Diamond Audio D580 User manual
D580D580

2
INTRODUCTION
Thank you for purchasing a Diamond Audio product for your
vehicle audio system. You have chosen Diamond Audio because
you deserve the best!
Diamond Audio products are designed and engineered to the
highest quality standards in the industry to create the ultimate
listening experience. For optimal performance of this product, it is
highly recommended that you have it installed by on authorized
Diamond Audio dealer.
Our authorized dealers have the necessary experience and
installation equipment to ensure that your Motors Sport DVR
will deliver maximum performance and explain all the details
pertaining to our warranty coverage as well.
If you decide to install the product by yourself, please thoroughly
read through this manual before getting it installed. This manual
will help familiarize yourself with this Motors Sport DVR
and guide you through the installation process and procedures.
Please contact your local authorized Diamond Audio dealer
if you have any questions regarding the instructions in this manual
or the products operational capabilities. If you require additional
assistance, please contact the Diamond Audio Technical
Support Department during business hours (PST) at 213-212-3187.
3
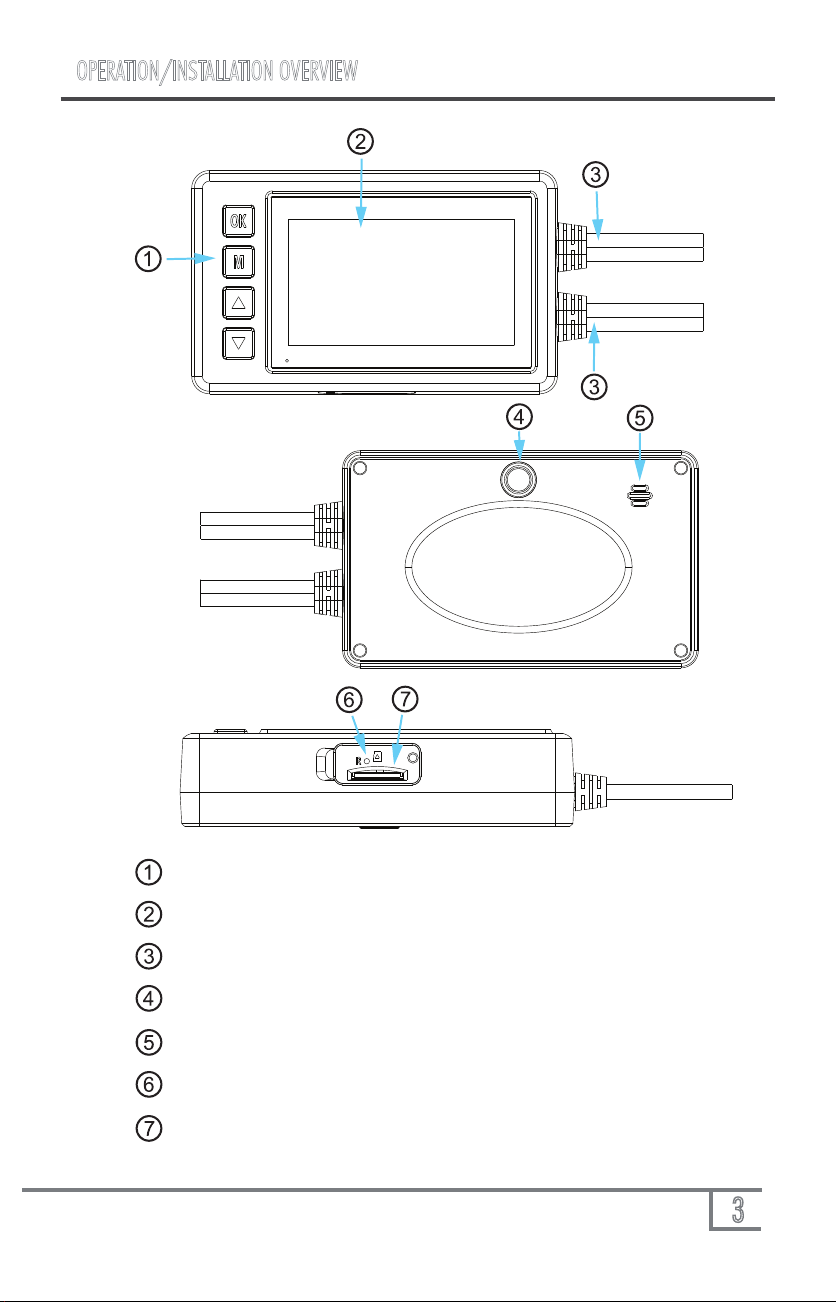
OPERATION/INSTALLATION OVERVIEW
Control Panel
Display
Connection Ports
Mounting Hole
Speaker
Reset Button
Micro SD Card Slot

4
INSTALLATION
Please install according to the specific motorcycle environment and connect
the power cable. The installation diagram is show as below:
1. Memory card (micro SD card or micro SDHC card) not included. Please
use the high-speed Micro SD card (over U1), with a capacity of 8GB to
128GB.
2. Insert memory card into card slot and press in with finger til it clicks in.
3. To remove the memory card, press in the card and let it slide out,
remove with fingers gently.
4. Micro SD Card must be formatted before use.
Turn on/off
1. Short press button for 1 second to turn on system.
2. Long press button for 3 seconds to turn off system.
Selection of Memory Card
A. Main Unit
B. Front and Rear
Cameras
C. Power Harness
(Red: Swith Power,
Yellow: Battery +,
Black: Ground or Battery)
D. Remote Control Panel
E. GPS Antenna
5
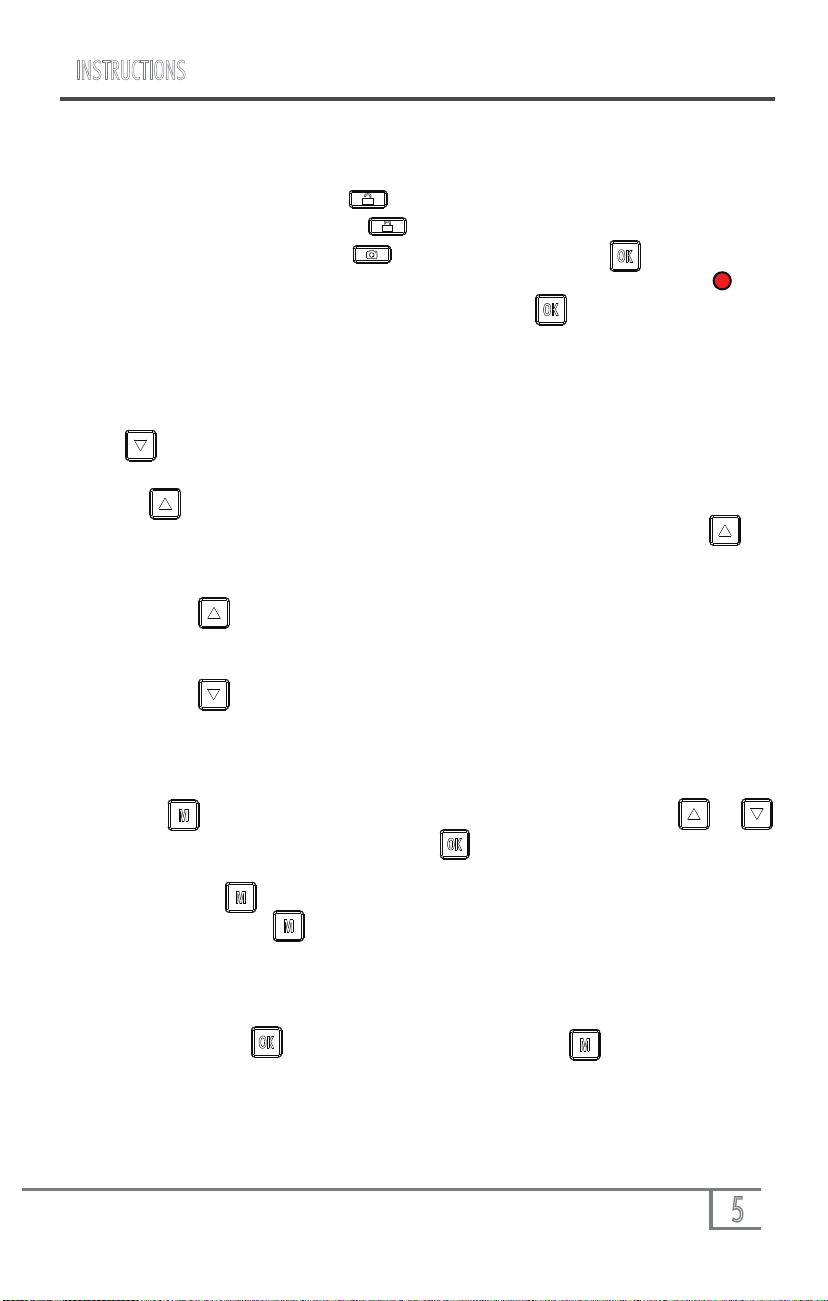
INSTRUCTIONS
• During recording, press the button on the remote control to lock the
current recording file. Press the button again to unlock the locked video
in the current recording. Press to take a photo. Press button to start
recording, and the upper left side of LCD would show a recording mark and
the red mark would flashes during recording. Press button again to stop
recording, and the recording mark would disappear accordingly.
Note: During recording, the red light of cable control would flash.
Press down button, to turn display off while recording. Press it
again to turn the screen back on.
• Press up key to turn off voice recording function. When the voice
recording is off, there will be no audio recorded in the video. Press the up
button again to turn voice recording back on.
• Long press up key for 3 seconds to switch the display picture of front
and rear cameras.
• Long press down key for 3 seconds to turn on the WIFI, press it again
for 3 seconds to turn off the WIFI.
Note:Due to the camera’s default setting, of automatically recording when
powered on, press to stop recording. Then press button to enter
the menu.
System Setting
Press the button for 3 seconds to enter viewing mode. Press or
to choose the “picture” or “video” press key to view.
Press menu key to return to the menu.
Then press menu key to return to the camera screen.
Viewing mode
Video mode

Connect to a Computer
6
OPERATION
1. Language setting, press the menu button
Enter the system setting menu, Press up key or down key to enter
"Language Selection", press button to select the language. Press to exit.
2. Time and time zone settings:
For first use, please first go to system menu and access to “clock setting” optio
to set the current date and time or connect the GPS module to automatically
synchronizes the time.
3. Other personalized settings can be done in the system menu.
Video mode: 1920x1080 FHD 30fps
Film cutting time: 3 minutes, 5 minutes, 10 minutes.
Voice recording: on/off
Explanatory note: record the sound simultaneously when the video is recorded.
When the voice recording is closed, it can ensure the video shot is silent.
Movie Mode
Key tone: on/off
Auto off: Never, 1 minute and 5 minutes
When set to 1 minute or 5 minutes the system will shut down automatically after no
motion for this duration of time.
Clock setting: Set the current date and time
Date Format: Set how you want the date to appear
Stamp: on/off
Note: the left bottom will display the set date and time when recording or taking a
picture.
Flicker frequency: 50Hz and 60 Hz
LCD Power Save: off, 1 minute or 3 minutes
Explanatory note: after the camera is not operated for X minutes, the camera will
turn off the LCD screen. Press any key to display LCD screen.
Power Save Mode: Black/Time
Note: when set to time display will show the date and time.
Protect Level: closed, high, middle and low.
Note: the vibration video is locked, the greater the grade, the higher the sensitivity.
Time Zone Select: select current time zone (GMT+/-)
System reset: confirm and cancel
Note: after the system is reset, the function of camera will return to default state.
Format SD card: confirm and cancel
Note: confirm to format SD card in the camera.
General Settings
Language
11
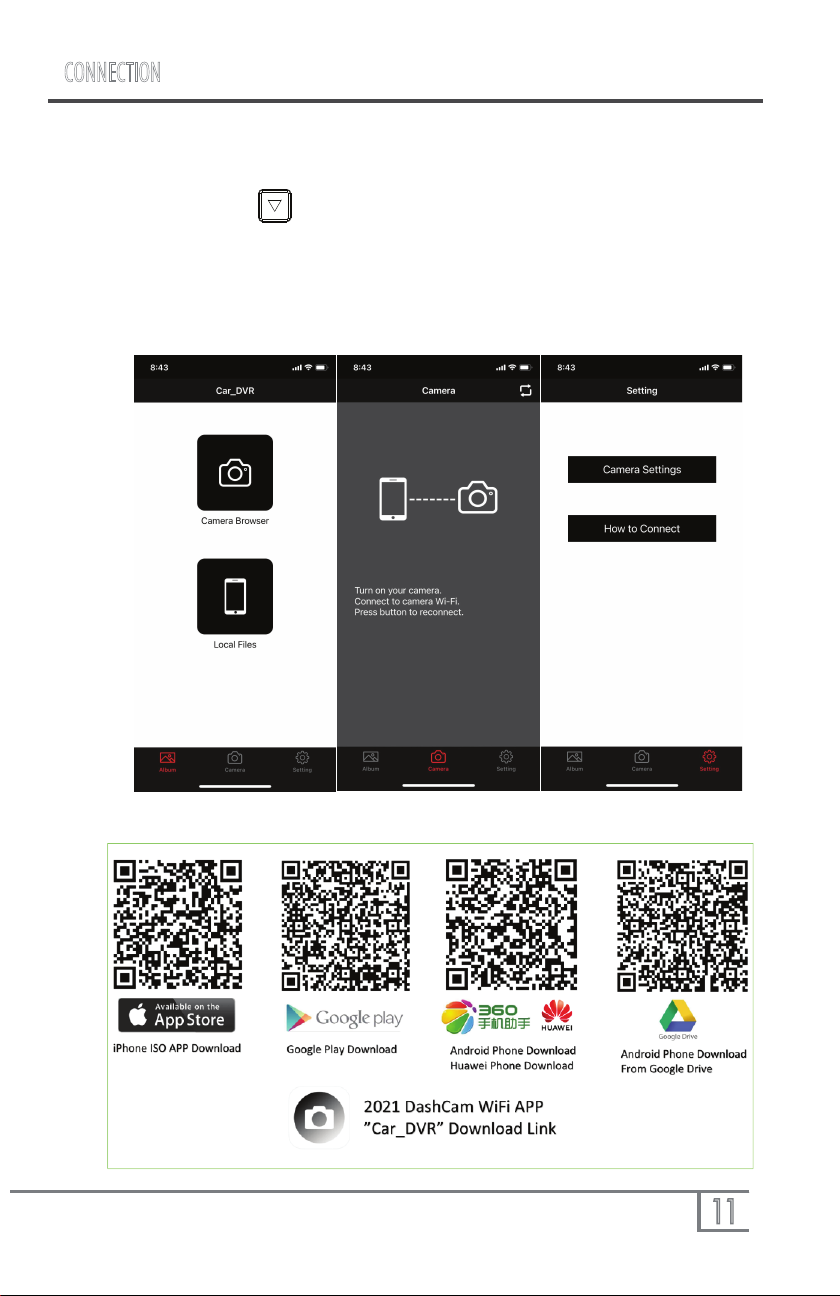
CONNECTION
Please use your mobile phone to connect the camera’s WIFI
(1)Long press down key for 3 seconds to turn on the WIFI;
Camera’s WIFI name: DA-D580-XXXX ;
Password: 1234567890
(2)After connecting the camera’s WIFI, users could set the camera’s
setting on APP---CAR_DVR
Connecting to WIFI
(3)Scan the below QR Code for download the APP:

Lens
Video
Video Format
1920*1080P 30fps /1280*720P 60fps
AVI
Technical Specifications
120 degrees A + level high resolution
Ultra Wide Angle lens
SD memory
card slot Micro SD Card (not included)
Microphone Built-in
USB interface USB2.0
Power Interface 5V 1A
Battery Built-in lithium battery
System
Requirements
Windows 2000/XP/Vista/Windows 7,
MAC OS x 10.3.6
Note: this product retained design and specifications changing right
without prior notice. If there is a different place please use the standard
with the real subject.
8
GPS
GPS Location and Application
Plug the GPS, the display would show the red GPS mark , when the GPS
locates successfully,the mark would turn to green and the time would
be synchronized automatically.
Video Player
1. Please download the player by below link:
Google :
https://drive.google.com/open?id=1Igs5EHaCsY5kkyYMKSmogYC6J5HtqrdA
MediaFire Share
http://www.mediafire.com/file/ca199784cl7xdsz/GVP_GPS_Player_
English.msi/file

9
SPECIFICATIONS
LCD
Front cam
Language
Video
Video Format
1080P-AHD
English (Default)
Spanish
Russian
Chinese
1080P 30fps
MOV
Technical Specifications
2.7” (16:9) TFT LCD
Mic/Speaker Built-in
Light Source
Frequency 50Hz/60Hz
GPS External
Power Supply 5V 2A
Rearcam 1080P-AHD
Battery Built-in Super capacitor.
Notes: the design and specification of the product are subject to
the change without notice. If there is any inconsistency, in kind shall
prevail.

10
NOTES

11
WARRANTY
THIS WARRANTY IS NOT TRANSFERABLE AND APPLIES ONLY TO THE ORIGINAL PURCHASER OF THIS PRODUCT
IN ITS ORIGINAL INSTALLATION. Original purchaser must reside in the United States and be able to provide proof of
purchase and installation with the sales receipt and completion of online registration from the authorized DAT retailer that
sold and installed the product.
Should a manufacturing defect occur during above said warranty period, DAT will replace or repair the defective product
with a product of the same or equivalent value and performance, at DAT’s discretion.
Damage or failure caused by any of the following is not covered under this warranty policy: negligence, improper use,
abuse, product modification, unauthorized repair attempts, accident, acts of God, misrepresentations by DAT retailers, and
improper/inadequate packaging during return shipping.
Warranty is void if serial numbers have been removed, altered or defaced.
In the event a DAT product should require service, you should visit the authorized DAT retailer you purchased the product
from and they can expedite your claim. All claims must fall into the guidelines listed above and be accompanied by a copy of
the original sales and installation receipt from that authorized DAT retailer.
Product returned for warranty service must be freight-prepaid, properly packaged and clearly marked with the Return
Authorization (RA) number issued by DAT. Any product returned to DAT that is improperly packaged, does not have a
RA number clearly marked on the package, or never received a RA number, may be refused upon delivery. DAT does not
assume responsibility for lost or misdirected product.
Repair or replacement under this warranty is the exclusive remedy of the consumer. DAT shall not be liable for any
incidental or consequential damages for breach of any expressed or implied warranty on this product. Some states do not
allow the exclusion or limitation of incidental or consequential damages, or allow limitations on how long an implied warranty
lasts, so the above limitations or exclusions may not apply to you. This warranty gives you specific legal rights and you may
also have other rights that may vary from state to state.
Customers outside the United States should contact their local sales office to obtain information on pricing, exchange unit
availability, instructions, service and warranty/non-warranty replacement or repair.
Diamond Audio Technologies
3761 S. Hill Street
LOS ANGELES,CA 90007
Tel: 213-261-4161
Fax: 213-947-4767
Web: diamondaudio.com
Service/Tech Support:
213-261-4161
Tech Support Email
Diamond Audio Technologies (DAT), a division of CV & DA Holdings Incorporated, warrants this product to be free from
defects in material and workmanship for a period of one (1) year from the original date of purchase, provided it was
purchased from an authorized DAT retailer within the United States. Product warranty period starts at the date of
purchase or one year past the manufacture date whichever is first. However, upon purchase and completion of the
on-line registration and installation by an authorized DAT dealer, warranty period will be extended to two (2) years.
This warranty extension offer will only be recognized upon completion of the on-line registration of your product within
thirty (30) days of the date of purchase.
HOW TO OBTAIN WARRANTY SERVICE

3761 S. Hill Street
Los Angeles, CA 90007
Table of contents
Other Diamond Audio Speakers manuals

Diamond Audio
Diamond Audio SXP65a User manual

Diamond Audio
Diamond Audio DES Series User manual

Diamond Audio
Diamond Audio D35 User manual

Diamond Audio
Diamond Audio DMD Series User manual

Diamond Audio
Diamond Audio H65A/S COMPONENT User manual

Diamond Audio
Diamond Audio MOTORSPORT Series User manual

Diamond Audio
Diamond Audio D663 User manual

Diamond Audio
Diamond Audio HEX Diamante Italia User manual

Diamond Audio
Diamond Audio MOTORSPORT Series User manual


