Dick Smith 373573 User manual

USER MANUAL
BLADELESS FAN WITH
AIR PURIFIER - WHITE
373573

2
Important Safeguards
When using electrical appliances, in
ĊģÙÝģīĊģÝÙįÔÝīòÝģôĦāĊîLjģÝȌÝĂÝÔīģôÔ
shock and/or injury, these basic
safety precautions should always be
followed:
For Your Safety
Read all instructions carefully, even if you are
familiar with the appliance.
• This product is intended for general domestic
use only.
• Do not use the product for any other purpose.
• This appliance is not intended for use by
persons (including children) with reduced
physical, sensory and mental capabilities, or
lack of experience and knowledge, unless they
have been given supervision or instruction
concerning use of the appliance by a person
responsible for their safety.
• Children should be supervised to ensure that
they do not play with the appliance.
ȕ ĊĆĊīĂݼŀÝīòÝĠģĊÙįÔīįĆ¼ljÝĆÙÝÙŁòôĂÝôī
is in use, especially when children are present.
• Always unplug the product from the electrical
outlet when it is not in use.
• Always operate the product on a flat,
level, steady, and stable surface to avoid it
overturning.
• Do not hang or wall-mount the product.
• Do not place the product in or near an open
window. Rain, snow, and other weather
elements may create an electrical hazard.
• Keep the power cord and product away from
heated surfaces.
• Always unplug the product from the electrical
outlet when cleaning it.
• Do not plug/unplug the product into/from the
electrical outlet with a wet hand.
• Never drop or insert objects into any opening
of the product.
ȕ ĊĆĊī¼ljÝąĠīīĊĊĠÝĆ¼ĆŇĠ¼ģīĊîīòÝąĊīĊģ
housing, as a risk of electrical shock may exist.
• Do not allow the power cord to hang (i.e., over
the edge of a table or counter) where it may
be tripped over or pulled.
• Do not operate product if the power cord is
cut, damaged, or if the wires are exposed.
• Do not immerse or expose the motor housing,
power cord, or plug to water or other liquids.
• Do not put any stress on the power cord where
it connects to the product, as the power cord
could fray and break.
• Only use the adaptor supplied with the
product.
• Do not operate the product if it has a damaged
power cord or plug, malfunctions, is dropped,
ĊģÙ¼ą¼ïÝÙȋ ĊĆĊī¼ljÝąĠīīĊÝņ¼ąôĆÝĊģ
ģÝĠ¼ôģīòôĦĠģĊÙįÔīŇĊįģĦÝĂîȋhį¼ĂôLjÝÙĦÝģŀôÔÝ
personnel should perform any servicing.
• This product is intended for indoor, non-
commercial, non-industrial, household use
only.
• Do not use outdoors.
• To disconnect the product, set main switch
to OFF then remove the plug from the
outlet. Do not pull on the power cord when
disconnecting.
• Ensure that the product is switched OFF and
unplug from the supply mains before cleaning
and maintenance.
• Do not move the product when it is in use.
• Do not run the power cord under carpeting or
cover the power cord with throw rugs, runners
or the like. Arrange the power cord away from
īģ¼LJôÔ¼ģݼĦ¼ĆÙŁòÝģÝôīŁôĂĂĆĊīÓÝīģôĠĠÝÙ
over.
• Do not use this product with a programmer,
timer or any other device that switches the
ĠģĊÙįÔīĊĆ¼įīĊą¼īôÔ¼ĂĂŇȌĦôĆÔݼLjģÝģôĦā
exists if the product is covered or positioned
incorrectly.
• Do not place any objects on/cover the air
inlet or outlet. Make sure that the ventilation
openings are free of dust, lint, hair or any other
obstacles that could impair the air flow in/out.

3
Warning
Do not place the appliance near any power board
or socket outlet.
If the supply power cord is damaged, the power
cord must be replaced by the manufacturer, its
ĦÝģŀôÔݼïÝĆīĊģĦôąôĂ¼ģĂŇĢį¼ĂôLjÝÙĠÝģĦĊĆĦôĆ
order to avoid a hazard.
This product has not been designed for any uses
ĊīòÝģīò¼ĆīòĊĦÝĦĠÝÔôLjÝÙôĆīòôĦÓĊĊāĂÝīȋ
Save These Instructions

4
Features of Your Bladeless Pedestal Fan
Display and
control panel
Atmosphere
night light
Air outlet
Aluminum support
Base
AC Adaptor
5
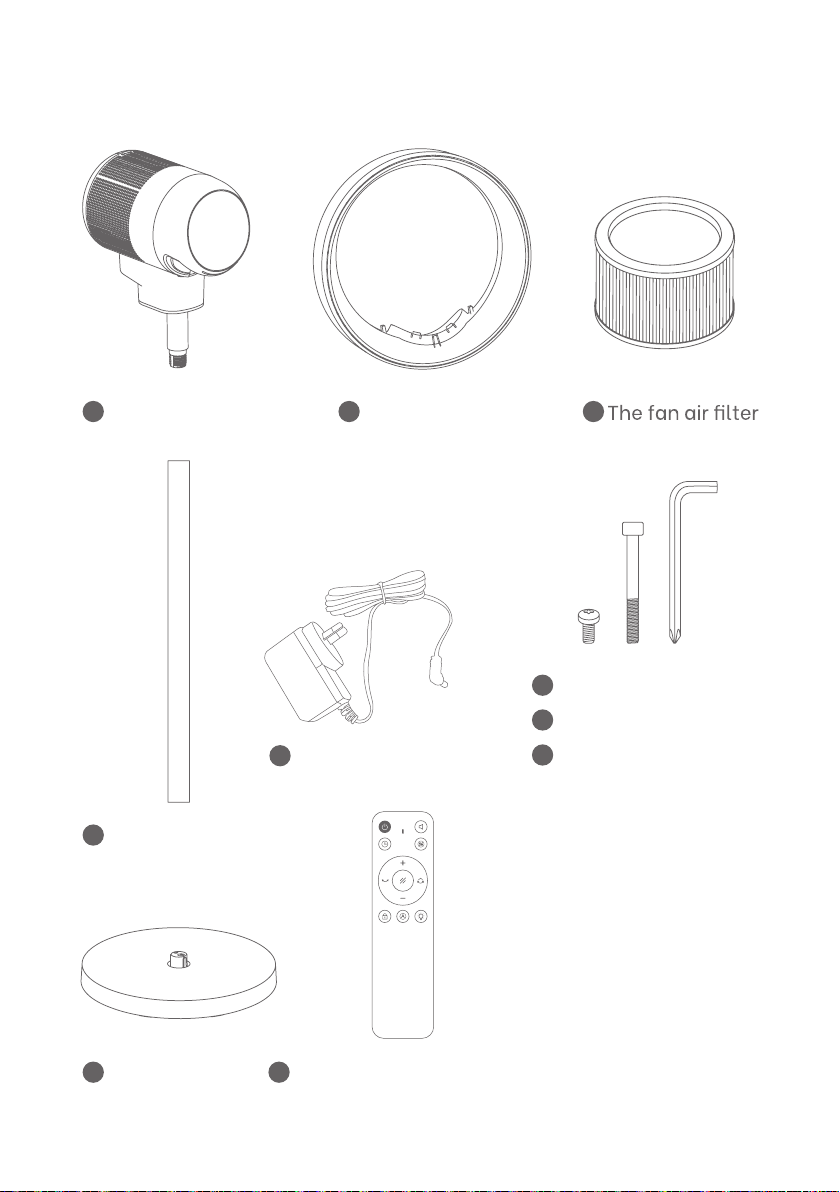
Product View
Main body of the fan
Fan air-outlet ring
Aluminum support
of the fan
Screw x 1
The fan base bolt x 1
Wrench x 1
The fan base
The fan remote control
AC Adaptor
6
6ÝljôĆïīĊGĆĊŁĊįģ
Bladeless Fan
Congratulations on the purchase of your
Bladeless Fan.
ÝîĊģÝLjģĦīįĦôĆïīòݼĠĠĂô¼ĆÔÝȌôīôĦąĊĦī
important that you read and follow the
instructions in this use and care booklet, even if
you feel you are quite familiar with this type of
appliance.
Ċįģ¼ljÝĆīôĊĆôĦÙģ¼ŁĆĠ¼ģīôÔįĂ¼ģĂŇīĊīòÝĦÝÔīôĊĆ
dealing with IMPORTANT SAFEGUARDS. Find a
place and keep this booklet handy for future
reference.
The appliance is designed to function quietly and
safely under normal circumstances.
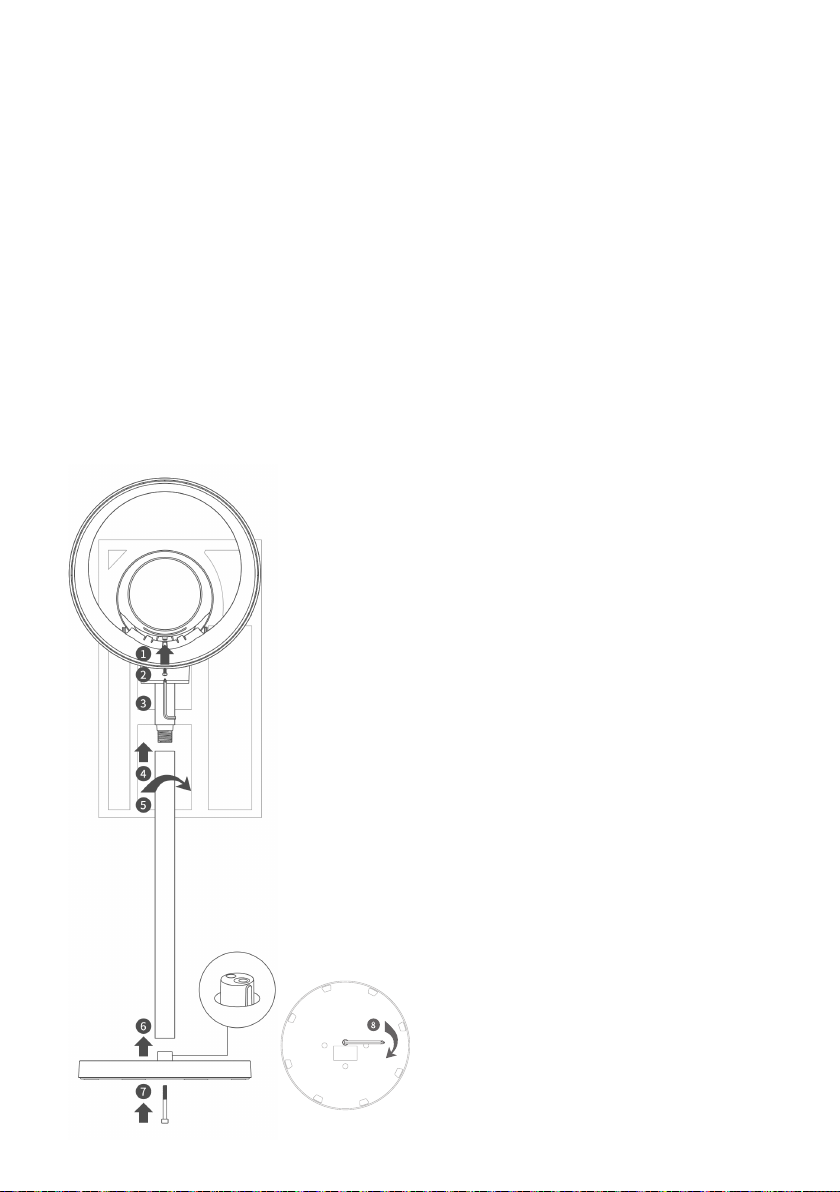
Assembly
1. Assembling the fan
First place the main body on the foam as shown.
Remove plastic packagings from the parts.
Step 1: Install the fan air-outlet ring
1: Install the air-outlet ring to the main body of
the fan;
2: Insert the fan air-outlet ring screw into the
òĊĂݼīīòÝÓĊljĊąĊîīòݼôģȥĊįīĂÝīģôĆïȎ
3: Use the wrench to clockwise tighten the fan
air-outlet ring screw.
Step 2: Install the pillar
4: Insert the aluminum support of the fan
ôĆīĊīòÝÓĊljĊąĊîīòÝą¼ôĆÓĊÙŇĊîīòÝî¼ĆȎ
5: Rotate the aluminum support clockwise until
ôīôĦĦÝÔįģÝĂŇ¼lj¼ÔòÝÙīĊīòÝÓĊljĊąĠ¼ģīĊî
the main body.
Step 3: Install the base
6: Install the aluminum support onto the fan
Ó¼ĦݼĦĦòĊŁĆôĆīòÝLjïįģÝȋK¼āÝĦįģÝīĊ
align the connecting part on the base with the
groove inside the aluminum support.
7: Insert the fan base bolt into the hole at the
ÓĊljĊąĊîīòÝÓ¼ĦÝȎ
8: Tighten the base bolt clockwise by the
wrench.
7
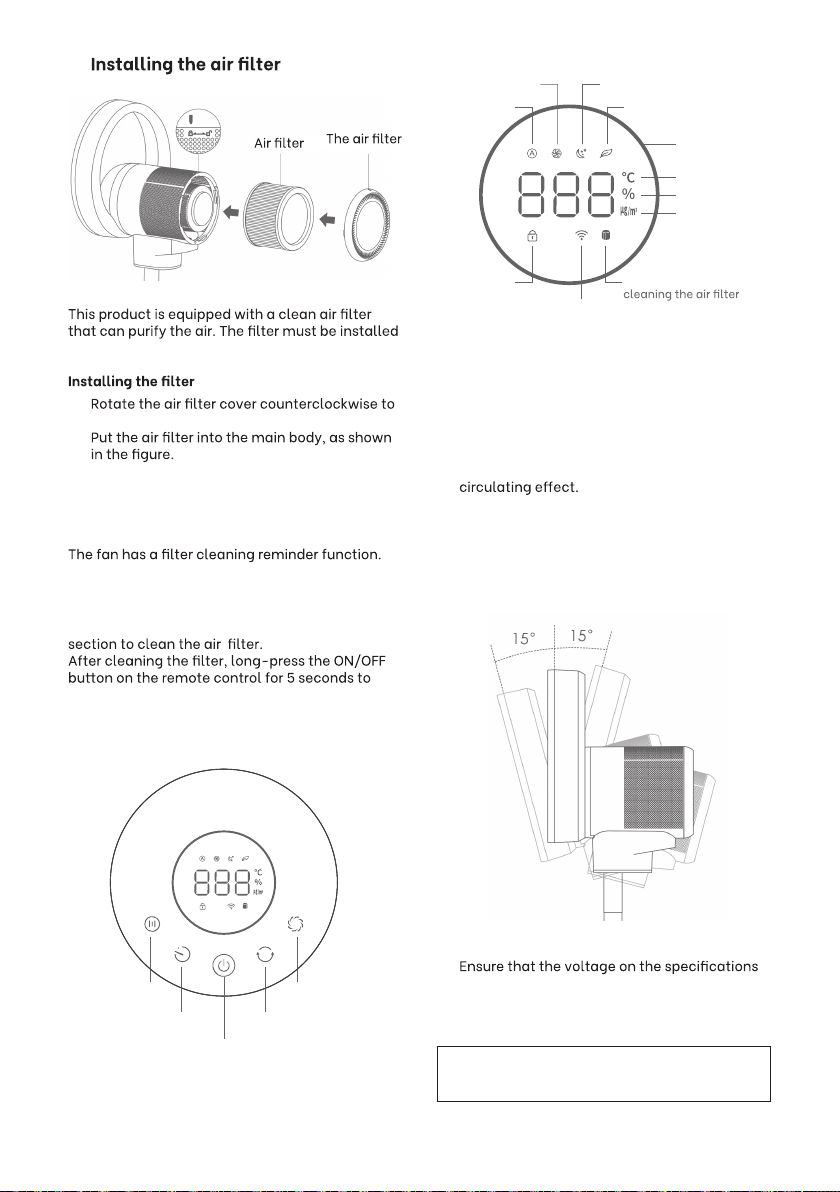
2.
cover
into the main body before use.
1. remove the cover.
2.
3. Put the cover back on and rotate it clockwise
to secure it.
Filter cleaning reminder
After 2100 hours of operation, the cleaning
indicator on the display will be on.
Please turn OFF the fan and follow the
instructions in the “Care and Maintenance”
accumulated from zero again.
Control Panel and Display
Swing
Air speed
Timer
Air mode
Power On/ OFF
Operation
1. When using the fan, make sure that it is on a
flat and stable surface. Damage may occur
if it is placed on an incline or decline. Do not
block the air inlet and outlet. Also make sure
that there is no obstacle within 30 cm in front
of the air outlet to avoid weakening of the air
2. Adjust the air supply direction
Gently press forward/backward on the top
part of the fan air-outlet ring. The ring can be
adjusted to supply the output air upward or
downward.
3. Insert the plug into a mains power outlet.
plate is the same as in your home. The fan
beeps once, indicating that it is connected to
the power supply and is in the standby mode.
NOTE: The fan makes a “beep” every
time when it is operated.
reset the reminder,and the running time will be
Automatic air
-speed mode
Strong air-
speed mode Sleep mode
Natural air-
speed mode
Unit of PM2.5
Child lock Reminder of
WIFI
Real time Air quality
color display
Unit of temperature
Unit of humidiry
8
4. Switch ON/OFF
When the fan is in standby mode, press the
mode at the default fan speed. When the fan
to turn it OFF.
5. Air Mode
four airflow styles. The indicator of the current
mode will light up.
Automatic mode : The fan automatically
adjusts the airflow speed according to the
real-time detected PM2.5 level.
PM2.5
The
numerical
0-35 36-70 71-120 121-
999
Airflow
speed 01 03 05 09
Color of
display green yellow orange red
Strong mode : The airflow speed is set to the
highest level.
Sleep mode : The airflow speed and noise are
reduced to the lowest level.
Natural mode : The airflow speed switches
between 3, 4, and 5 in turn.
Press again when the fan is in “Natural” mode will
6. Timer
A timer can be set to automatically turn OFF
the fan. The timer can be set up to 8 hours
with 1-hour intervals: 0Ŀ1Ŀ2...Ŀ8. You may
will be displayed. Each press will increase the
will be canceled.
7. Swing
oscillation angle. There are four angle options
which will be switched with each press : 30°,
60°, 90°, 120°. The current oscillation angle
oscillation.
8. Air Speed
speed levels from 1 to 9.
to enter the strong mode which keeps the
airflow speed at the highest level.
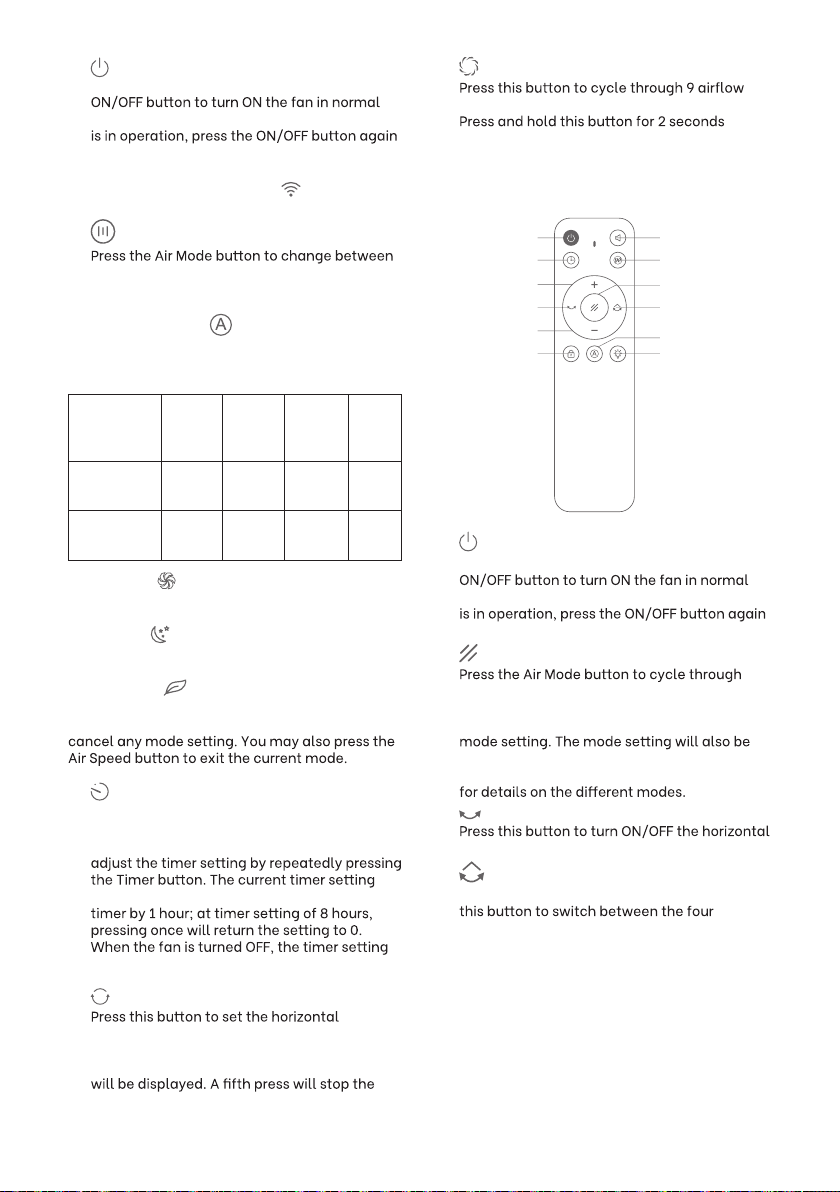
Remote control operation
Child lock
Air mode
Swing angle
Display ON/OFF
Swing ON/OFF
Power On/ OFF
Timer
Air speed+
Air speed -
Atmosphere
night light
Sound ON/OFF
Automatic mode
1. Power ON/OFF
When the fan is in standby mode, press the
mode at the default fan speed. When the fan
to turn it OFF.
2. Air mode
four airflow styles: “Automatic”, “Strong”,
“Sleep”, “Natural”. Press again when the
fan is in “Natural” mode will cancel any
cancelled if air speed is adjusted. Please refer
to the “Air mode” section under “Operation”
3. Swing ON/OFF
oscillation of the fan.
4. Swing angle
When the fan oscillation is turned ON, press
horizontal oscillation angle 30°, 60°, 90° and
120°. The current oscillation angle will be
displayed. Please note that there will be no
response if the fan oscillation is OFF.
Note: Hold this press for 5 seconds to enter the
WIFI connection state, and " " blinks.
9
5. Timer
fģÝĦĦīòôĦÓįljĊĆīĊ¼ÙĀįĦīīòÝīôąÝģĦÝljôĆï
with 1-hour intervals: 0Ŀ1Ŀ2...Ŀ8. You may
¼ÙĀįĦīīòÝīôąÝģĦÝljôĆïÓŇģÝĠݼīÝÙĂŇĠģÝĦĦôĆï
īòÝpôąÝģÓįljĊĆȋpòÝÔįģģÝĆīīôąÝģĦÝljôĆï
will be displayed. Each press will increase the
īôąÝģÓŇǐòĊįģȎ¼īīôąÝģĦÝljôĆïĊîǗòĊįģĦȌ
ĠģÝĦĦôĆïĊĆÔÝŁôĂĂģÝīįģĆīòÝĦÝljôĆïīĊǏȋ
òÝĆīòÝî¼ĆôĦīįģĆÝÙP55ȌīòÝīôąÝģĦÝljôĆï
will be canceled.
6. Air speed +/-
fģÝĦĦīòÝɈȘȥÓįljĊĆīĊôĆÔģݼĦÝȘÙÝÔģݼĦÝīòÝ
airflow speed. There are 9 speed levels.
7. Sound ON/OFF
fģÝĦĦīòôĦÓįljĊĆīĊīįģĆPLȘP55īòÝÓįljĊĆ
pressing beep sound.
8. Display ON/OFF
fģÝĦĦīòôĦÓįljĊĆīĊīįģĆPLȘP55īòÝÙôĦĠĂ¼Ň
screen light. When the screen light is OFF, only
īòÝfKǑȋǔĂÝŀÝĂ¼ĆÙfĊŁÝģPLȘP55ÓįljĊĆŁôĂĂ
be displayed.
9. Child lock
fģÝĦĦīòôĦÓįljĊĆīĊīįģĆPLȘP55īòÝÔòôĂÙ
ĂĊÔāȋòÝĆīòÝÔòôĂÙĂĊÔāôĦPLȌ¼ĂĂīòÝÓįljĊĆĦ
except the power ON/OFF and child lock
ÓįljĊĆÓÝÔĊąÝôĆŀ¼ĂôÙȋ
10. Automatic mode
fģÝĦĦīòôĦÓįljĊĆīĊīįģĆPLȘP55īòݼįīĊą¼īôÔ
mode. In this mode, the airflow speed will
be automatically adjusted according to the
real-time detected PM2.5 level. Please refer
to the “Air mode - Automatic” section under
“Operation” for details of the mode.
11. Atmosphere night light
fģÝĦĦīòôĦÓįljĊĆīĊīįģĆPLȘP55īòÝ
atmosphere night light.
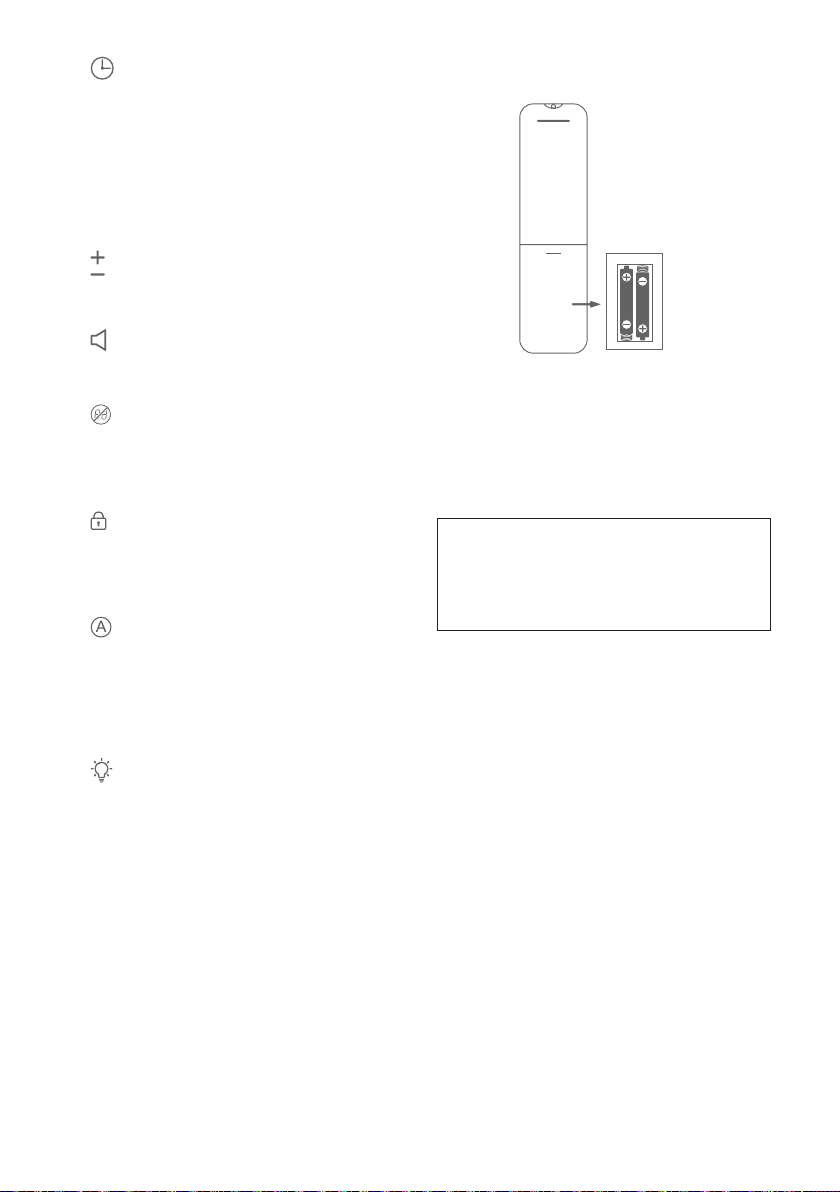
¼ljÝģŇôĆĦī¼ĂĂ¼īôĊĆĦȍ
PĠÝĆīòÝÓ¼ljÝģŇĦĊÔāÝī¼īīòÝÓ¼ÔāĊîīòÝģÝąĊīÝ
control.
;ĆĦÝģīīŁĊĆÝŁǐȋǔ¼Ăā¼ĂôĆÝÓ¼ljÝģôÝĦ¼ĂôïĆ
with polarity indicator markings (+/-) inside the
Ó¼ljÝģŇÔĊąĠ¼ģīąÝĆīȋ
lĂôÙÝÓ¼ÔāīòÝÓ¼ljÝģŇÔĊŀÝģȌą¼āôĆïĦįģÝīòÝ
locking tabs click into place.
LĊīÝȍK¼āÝĦįģÝīòÝÓ¼ljÝģôÝĦ¼ģÝ
installed correctly in the remote control
by aligning the +/- polarity marking
ôĆīòÝÓ¼ljÝģŇÔĊąĠ¼ģīąÝĆīŁôīòīòÝ
Ó¼ljÝģôÝĦȋ
WARNINGS:
ȕ GÝÝĠÓ¼ljÝģôÝĦĊįīĊîÔòôĂÙģÝĆȯĦģݼÔòȋ
ȕ tĦÝĊĆĂŇ¼Ăā¼ĂôĆÝÓ¼ljÝģôÝĦȋ ĊĆĊīįĦÝ
ģÝÔò¼ģïݼÓĂÝÓ¼ljÝģôÝĦȋ
ȕ ĊĆĊīįĦÝĊĂÙ¼ĆÙĆÝŁĊģÙôLJÝģÝĆīīŇĠÝĦ
ĊîÓ¼ljÝģôÝĦôĆÔĊąÓôĆ¼īôĊĆȋ ĊĆĊīįĦÝīòÝ
ģÝąĊīÝôîīòÝÓ¼ljÝģôÝĦò¼ŀÝĂݼāÝÙȋ
ȕ iÝąĊŀÝīòÝÓ¼ljÝģôÝĦôîīòÝŇ¼ģÝÙôĦÔò¼ģïÝÙ
or if the remote control is not being used for a
ĂĊĆïĠÝģôĊÙĊîīôąÝȋ ôĦĠĊĦÝĊîįĦÝÙÓ¼ljÝģôÝĦ
immediately.
ȕ ¼ljÝģŇąįĦīÓÝģÝÔŇÔĂÝÙĊģÙôĦĠĊĦÝÙĊî
ĠģĊĠÝģĂŇȋ ĊĆĊīÙôĦĠĊĦÝĊîÓ¼ljÝģŇôĆ¼LjģÝȌ
oven or near any flammable object as this
may cause an explosion. Do not dispose of
Ó¼ljÝģŇôĆģÝïįĂ¼ģīģ¼ĦòȌąįĆôÔôĠ¼ĂŁ¼ĦīÝ
ĦīģݼąĊģÓŇLjģݼĦÓ¼ljÝģŇą¼ŇĂݼāĊģ
explode.

10
Using the remote control to operate
the bladeless fan
1. For the best results, aim the remote control
directly at the fan’s display screen.
2. Do not put any objects between the remote
control and the appliance while operating the
appliance.
3. Operate the remote control within 5 meters
from the unit and within a range of 45 degree
towards the appliance.
Care and Maintenance
Before cleaning the fan, you must switch it OFF
ÓŇīòÝPLȘP55ÓįljĊĆ¼ĆÙÙôĦÔĊĆĆÝÔīôīîģĊąīòÝ
power outlet.
1. If there is oil dirt on the fan’s main body,
it must be cleaned up, so as not to cause
discoloration and damage to the main body.
2. To clean the exterior surfaces, simply wipe
them over with a soft damp cloth. Should it
be necessary, greasy marks may be removed
from the surfaces by using mild soap and a
cloth dampened in hot water. Avoid all other
types of harsh detergents, cleaners, solvents
that may contain chemicals, which could
damage parts of the product. Thoroughly dry
all parts before storage or further use.
3. Do not wash any part of the product directly
with water. Do not allow water or any kind of
liquid into the fan’s main body.
ĂݼĆôĆïīòݼôģLjĂīÝģ
pĊÔĂݼĆīòÝLjĂīÝģȌįĦݼŀ¼ÔįįąÔĂݼĆÝģŁôīò¼
ĦĊîīÓģįĦò¼lj¼ÔòąÝĆīȋpòÝÓģįĦòĦòĊįĂÙÓÝģįĆ
ïÝĆīĂŇ¼ÔģĊĦĦīòÝLjĂīÝģīĊĂĊĊĦÝĆ¼ĆŇÓįôĂīȥįĠ
stuck on it.
pòݼôģLjĂīÝģĦòĊįĂÙĆĊīÓÝŁ¼ĦòÝÙŁôīòŁ¼īÝģĊģ
any other liquid, since these may damage it.
Trouble Shooting
Problem Cause Solution
The fan can’t
be turned ON 1.The power
supply cable
is not plugged
in or doesn’t
connect well.
2.The main
body is
damaged.
1. Plug in
the power
supply cable
and ensure
that the
connection is
stable.
2. Send the
product to
¼Ģį¼ĂôLjÝÙ
agent or
similarly
Ģį¼ĂôLjÝÙ
persons for
repairing.
The fan can’t
be turned OFF 1. The main
body is
damaged.
1. Send the
product to
¼Ģį¼ĂôLjÝÙ
agent or
similarly
Ģį¼ĂôLjÝÙ
persons for
repairing.
The remote
control
doesn’t work
1.The
Ó¼ljÝģôÝĦ¼ģÝ
flat.
ǑȋpòÝÓ¼ljÝģŇ
orientation is
wrong.
3.The remote
control is not
pointed to the
fan’s display
screen.
1. Replace the
Ó¼ljÝģôÝĦȋ
2. Reinstall
īòÝÓ¼ljÝģôÝĦ
in the correct
direction.
3. Point
the remote
control at the
fan’s display
screen.
pÝÔòĆôÔ¼ĂlĠÝÔôLjÔ¼īôĊĆ
AC Adaptor Input voltage :................100-240V AC,
50/60Hz 1.2Amax
Output voltage: ....................................24V DC, 1.5A
Fan power:...........................................................35W
NOTE: As a result of continual
improvements, the design and
ĦĠÝÔôLjÔ¼īôĊĆĦĊîīòÝĠģĊÙįÔīŁôīòôĆą¼Ň
ÙôLJÝģĦĂôïòīĂŇīĊīòÝįĆôīôĂĂįĦīģ¼īÝÙĊĆ
the packaging.

Air Purifier Bladeless Fan
11
Operation Instructions
Connecting The Product To WiFi
This product can be controlled via smartphone
with Smart Life APP.
Note:
To connect the product to WiFi, please use WiFi
with a frequency of 2.4 GHz, does not work with
WiFi with a frequency of 5.0 GHz.
A. How To Set Up The APP
1. Connect your phone to 2.4 GHz WiFi then scan
the QR Code below, or search “Smart Life”in App
Store or Google Play to download and install the
APP.
B. Pairing Sequence
Method 1: Auto Pairing
ON/OFF
seconds until WiFi Indicator Light blinks.
2. Click “+” on the upper right corner of the APP
homepage,then click “Add Device”.
3. Before pairing, user must allow the App to
access your Bluetooth. Tap on “Turn on Bluetooth”
(if Bluetooth is already on, ignore this step).
4. Tap “Go To Set”
(if Bluetooth is already on, ignore this step).
5. Turn on Bluetooth
(if Bluetooth is already on, ignore this step)
6. APP will show “Searching for nearby devices…”.
7. APP will show “Discovering devices…”, click
“Add”.
8. Click “+” on the right of product name.
9. it is recommended to allow the APP to access
your location.Tap “Set Now” (if Location is already
on, ignore this step).
Air Purifier Bladeless Fan
Air Purifier Bladeless Fan
10. Tap “Allow While Using App”
(if Location is already on, ignore this step)
11. Select WiFi name and enter your WiFi password,
then click “Next”.
12. APP will show ”Being Added”, the product and
APP will automatically pair up.
13. When pairing is completed,APP will show “Added
successfully”. Click “Done” to return to homepage.

12
WARNING! WARNING!
access Bluetooth, the product cannot be paired.
(Note: Even if Bluetooth is turned on, it does not
mean the APP is allowed to access your Bluetooth.)
Note:
ȕpòÝĠģĊÙįÔīÔ¼ĆĊĆĂŇÓÝĠ¼ôģÝÙīĊĊĆݼÔÔĊįĆī¼ī
a time. If another user pairs their smartphone to the
product, the previous account will lose their control
of the product.
ȕtĦÝģŁòĊò¼Ħ¼ĂģݼÙŇÓÝÝĆĠ¼ôģÝÙÔ¼ĆĦò¼ģÝīòÝôģ
control rights with other users.
Note:
Sequence, if APP shows an exclamation mark icon,
it means pairing is unsuccessful. Please use method
2 below for pairing.
Air Purifier Bladeless Fan
Air Purifier Bladeless Fan
Method 2: Bluetooth Pairing
1. Click “+” on the upper right corner of the APP
homepage,then click “Add Device”.
2. In the “Add Manually ”
model that needs to be paired, and click the
product to pair.
3. Follow the instructions on the APP to pair.
4. Click “+” on the right of product name.
5. Select WiFi name and enter your WiFi password,
then click “Next”.
6. When pairing is completed,APP will show “Added
successfully”. Click “Done” to return to homepage.
access Bluetooth, the product cannot be paired.
(Note: Even if Bluetooth is turned on, it does not
mean the APP is allowed to access your Bluetooth.)
Controlling The Product With The APP
Auto Mode
Key
PM2.5
Concentration
pôąÝģ ôĦĠĂ¼Ň
Oscillation
Angle Display
Home Screen
Strong Mode
Key
Fan Speed
Level Display
Sleep
Mode Key
Natural
Mode Key
Filter Life
Display
Oscillation
Mood Light Key
Beep Key

13
OPERATING THROUGH AMAZON ALEXA @
ECHO DOT
The bladeless fan works seamlessly with Alexa to
give you hands-free voice control.
Step 1
Link the Smart Life account to Alexa. Run Alexa
App and connect your Echo dot. Go to the Home
menu. Tap “Skills” or “Skills & Games” in the
Home menu and search “Smart Life” in the search
window. Select “Smart Life” and tap “Enable” to
enable the Smart Life skil
Step 2
Select your country code, and enter your Smart
Life App Login and Password.Tap the Link Now
the prompt, “Alexa has been successfully linked
with Smart Life” pops up.
Step 3
Step 4
device in the Devices list.You can use your echo dot
through Alexa to control your Smart Lamp by voice
now.
When the accounts have been successfully linked,
you can use your smart products via control the
Amazon Alexa device by voice command, e.g .:
Hi Alexa, turn on the “device name” // Hello Alexa,
name”Hi Alexa, set the “device name” to 9 speeds //
Hello Alexa, set the “device name” to 9 Speeds
Hi Alexa, increase/decrease the “device name”
speed // Hello Alexa,increase / decrease the Speed
of the “device name”
NOTE: Device Name is the name assigned by the user.
For example, set the device name as a “fan”.
NOTE: Echo needs to discover your smart devices
before it controls them. You can say, “Alexa, discover
devices” to Alexa. Alexa will discover devices in about
20 seconds. You can now control your smart devices
through Echo.
Control your bladeless fan with via Amazon
Alexa
OPERATING THROUGH GOOGLE HOME
The bladeless fan works with the Google Assistant,
allowing you to control your device by using your
Google Home devices, your Android phone or iPhone,
or any other device with built-in Google Assistant
support. You will enjoy seamless, intuitive voice
control to this Smart Fan
Step 1
Open Google Home App by tapping the app icon on
your device. Tap “Sign up” and choose one Google
account that you already logged in on your mobile
14
Step 2
p¼ĠȬĦĦôĦī¼Ćīȋȭp¼ĠȬ9ĊąÝĊĆīģĊĂȋȭp¼ĠȬɈȭ¼ĆÙ
LjĆÙȬlą¼ģīHôîÝȭôĆīòÝĂôĦīȋ;ĆīòÝôĆĠįīŁôĆÙĊŁȌ
select your Smart Life account’s region type, and
ôĆĠįīŇĊįģ¼ÔÔĊįĆī¼ĆÙĠ¼ĦĦŁĊģÙȋpòÝĂôĆāī¼ÓŁôĂĂ
be highlighted.
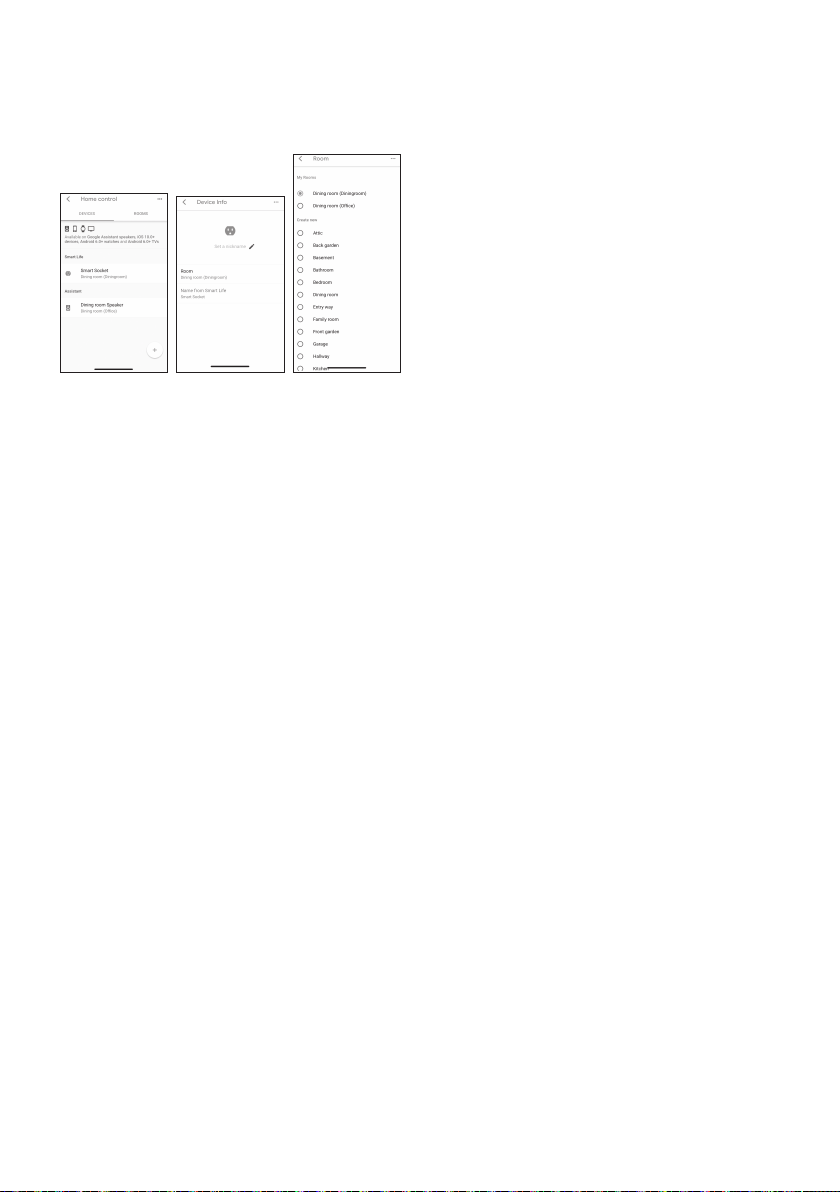
Step 3
p¼ĠȬHôĆāLĊŁȋȭîīÝģĂôĆāôĆïȌĦÝĂÝÔīīòÝiĊĊąȝÝņ
Living Room) where your Smart Fan is located. It
helps you identify the device when you want to cast
to it.
Step 4
Your devices will be listed on the Home Control
page, and now you can con-trol your Smart Fan
through Fan Home. You can now activate Smart
Lamp ON/OFF via voice instructions to Google
Home Device.
Now you can use your Google Home device to
control your products using voice commands, e.g.:
Hey Google, turn on the “device name” // Hey
Google, turn on the “device name”
9ÝŇ6ĊĊïĂÝȌīįģĆĊLJīòÝȬÙÝŀôÔÝĆ¼ąÝȭȘȘ9ÝŇ
6ĊĊïĂÝȌīįģĆĊLJīòÝȬÙÝŀôÔÝĆ¼ąÝȭ
Hey Google, set the “device name” to 9 speeds //
Hey Google, set the “device name” to 9 Speeds
Hey Google, increase/decrease the “device name”
speed // Hey Google,increase / decrease the speed
of the “device name”
LPp$ȍ ÝŀôÔÝL¼ąÝôĦīòÝĆ¼ąÝ¼ĦĦôïĆÝÙÓŇīòÝ
user. For example, set the device name as a “fan”.
Control your bladeless fan via Google Home
Table of contents
Popular Fan manuals by other brands


Lomanco
Lomanco Bath Pro BRV34KIT installation instructions

Craftmade
Craftmade San Lorenz SL52 Specifications

Marley
Marley Marley Reflex Marley Reflex RTM brochure

Alpine
Alpine SF-5006 Instructions for use

HiB
HiB Turbo Fixing instructions

Emerson
Emerson Northwind Contemporary Snugger CF805SAB01 owner's manual


