Dictaphone Dictamite II User manual

Contents
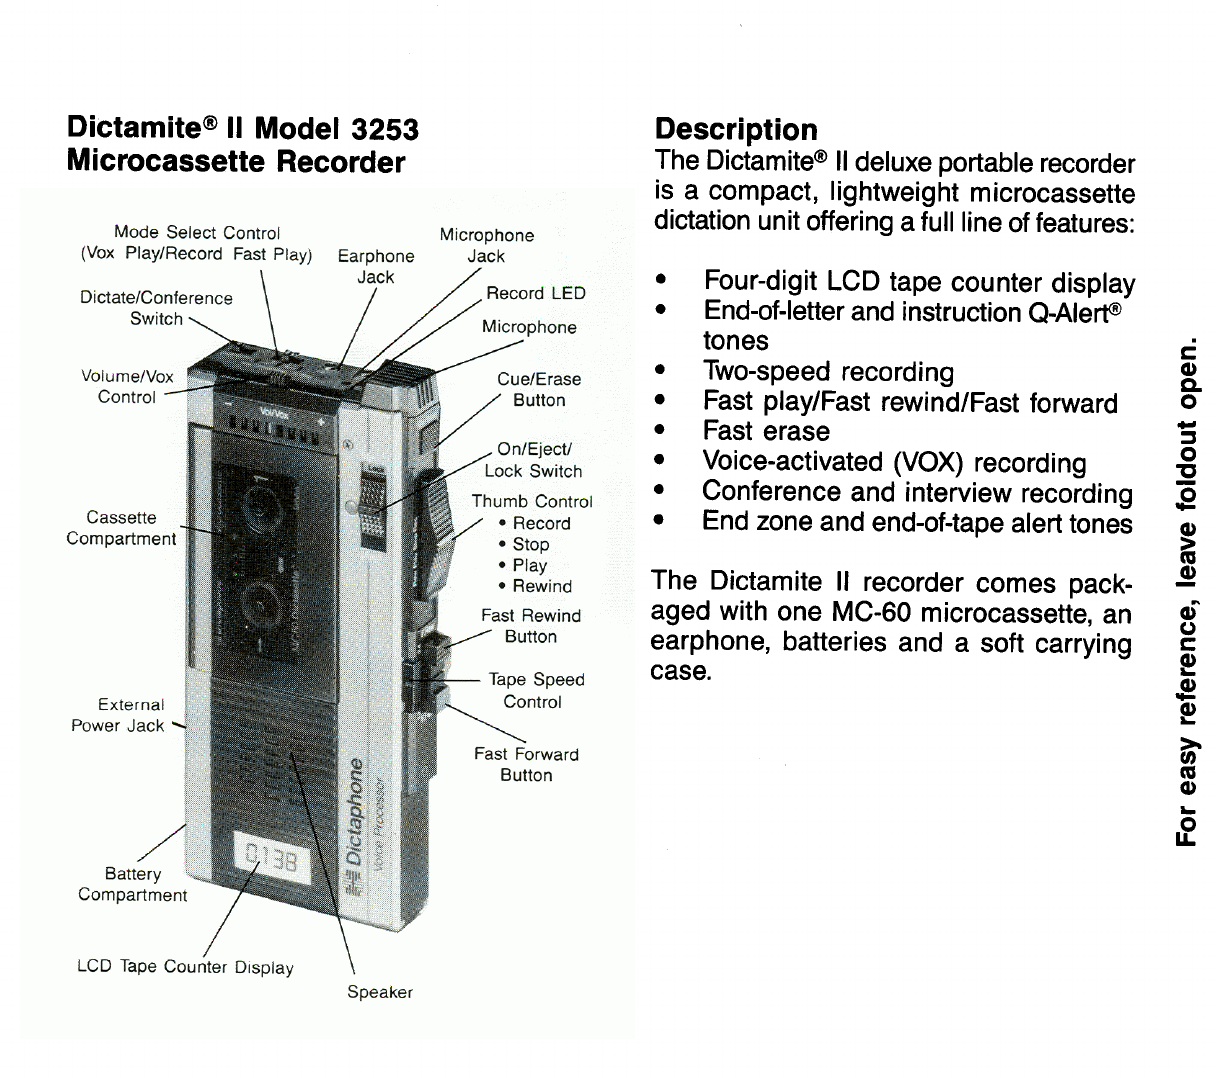
Description
........
Inside Front Cover
Inserting the Batteries
............
1
Inserting the Microcassette
........
1
Recording Dictation
..............
2
End-of-LetterCues
...............
3
Instruction Cues
.................
4
Cue Scanning
..................
5
Vox
Recording
..................
5
Tape Counter
...................
6
Review and Correction
...........
7
Ending Dictation
................
8
Conference Recording
............
9
Interview Recording
..............
9
Fast Erase
.....................
10
Erase Prevention
................
10
Convenience Features
............
11
Optional Accessories
.............
12
Specifications
...................
14
Notices
........................
14

0
Press
to
closethe cassettecompart-
ment door. (The EJECTswitchshould
be in Lock positionfor door
to
close
properly.)
Recording Dictation
To
record dictation:
Slidethe ONEJECTswitch
to
the
ON
position.
Placethe DlCT/CONF switch on top
panelof recorderinthe
DlCT
position
and the mode select control in the
PLAY/REC position.
Movethe thumb control on rightside
of unit
to
the RECORD position.
(The red indicator on the top panel
will lightwhen recordingbegins.
If
the
indicator does not light, replacethe
batteries or use an AC adapter.)
Holdthe unit
so
that the microphone
is approximately three inches from
your mouth and speak in a normal
voice.
2

To pause while dictating:
Slide the thumb control down to the
STOP position. The red LED
will
ex-
tinguish and tape motion will stop.
NOTE: For optimum recordingquality,the
2.4/1.2 tape speed control should be set
at 2.4. (Theslower 1.2 speed may beused
for lengthy recordings.)
End-of-Letter
Cues
The Q-Alert@indexingfeature permitsyou
to recordcuetonesto marktheendof let-
ters. These tones assist the transcrip-
tionist inlocatingand processingyour dic-
tation more efficiently.
To record a cue at the end of each letter:
With the thumb control in the
RECORDposition, briefly pressand
release the CUE/ERASE button. A
single tone is generated, and LTR
and the number of letter cues you
have recordedappear on the digital
display for
11/2
seconds.
3

Instruction Cues
The instruction cue feature permits you
to record special instructions to the
transcriptionist about priority work, at-
tachments, carboncopies, reminders, etc.
Such instructions can be previewed by
the transcriptionist before dictation is
transcribed.
With the thumb control in the
RECORDposition, briefly pressand
releasethe CUE/ERASE button
twice
inquicksuccession.Two toneswill be
generated and
INS
and the number
of instruction cues you have record-
ed appear on the digital display for
1%
seconds.
Record your instruction, then con-
tinue your dictation
in
the usual
manner.
NOTES:
Q-Alert indexingcan be usedat
2.4
cm/sec speed only.
A total of
15
recorded cues will be dis-
played. When additional cues are re-
corded, a plus
(+)
sign appears on the
display following the number of letter or
instruction cues already recorded.
4
Cue Scanning
The cue alert tones recorded at the end
of each letter andat the beginningof each
instruction can be located rapidly by
rewindingusingthethumbcontrol.Watch
thedisplayfor LTR and
INS
as well asthe
numberof thecue. Whencue information
displays, thetape pausesbriefly. Release
thethumb controlfor automatic playback
when the cue you want appears on the
display.
NOTE:
If
the cassette was recorded on
another recorder or was reinserted, the
cue indicator is a plus
(+)
sign.
VOX
Recording
Voice-activated (VOX) recording can be
used for either hand-held
or
hands-free
dictation.
To
use VOX recording:
Move the
DICTKONF
switch to the
CONF
position(if the recorderwill be
more than three inches away from
your mouth
.)
Movethe modeselectcontrolon the
top panel
to
the VOX setting.
5
Move the
VOL/VOX
slide control to
the right-typically above midpoint-
to adjust thesound levelat which the
tape starts moving.
Slide the thumb control to its
RECORD
position and begin
dictating.
Recording begins when you start
speaking. Tape movementcontinues
for several seconds after you stop
speaking but resumeswhen you con-
tinue. The digital display flashes
when tape is not moving.
Tape
Counter
Inserting a new cassette resets the
counter to
0000.
The counter counts up
while you are recordingand down when
you rewind.
NOTE:
When reviewingdictation, notethe
number on the tape counter prior to
rewinding. This will allow you to return
quickly to where you left off dictating.
6

Review and Correction
To review your dictation:
Slide the thumb control down and
hold
it
inthe REW (Rewind) position.
Tape rewindswith audiblefeedback.
Release the control for automatic
playback. (For private listening plug
the earphone into the EAR jack on
top panel.)
Adjust the volume by moving the
Volume control to the left or right.
For quick review with audible feedback:
Movethe modeselect controlon top
panel to F. Play position.
Rewindto desired point; releasethe
REW control for automatic fast
p
I
ayback
.
For fast forward or rewindwithout audible
feedback:
With the thumb control inStop posi-
tion, press and hold the F.Fwd (Fast
Forward) or F.Rew (Fast Rewind)
button.
7

Releasethe F.Fwdor F.Rew buttonto
stop tape motion.
To
edit dictation:
Locate portion of dictation that re-
quires editing.
Slide the thumb control up to
RECORD position and record over
unwanted material.
Ending Dictation
To
end dictation:
Movethethumb controlto the STOP
position and eject the cassette.
The unit will automatically be in the
Lock position after the cassette is
ejected.
(For the dictator’s convenience and for
transcribingefficiency, it is recommended
thecassetteberewoundona Dictaphone
transcriber.)
8
Conference Recording
The Dictamite
II
microcassette portable
recordercan also beusedto recordcon-
ferences, meetings, seminars, etc.
Move the DICT/CONF switch to
CONF position.
Slidethe ON/EJECTswitchto the
ON
position.
Movethethumbcontrolto RECORD.
Place the recorder in a central
location.
Slidethe 2.4/1.2 speedcontrolto the
1.2speed position
if
extended record-
ing time is desired.
Interview Recording
An optional remote microphone can be
used for interview recording
.
Plugthe remote microphoneintothe
MIC jack.
Move the DICT/CONF switch to
CONF position.
Slidethe ON/EJECTswitchto the ON
position.
9

Slide the thumb control' to the
RECORD
position.
Fast Erase
To
erase a cassette quickly:
Simultaneously hold down the
CUE/ERASEbuttonand
REW
thumb
control.
Movethumbcontrolto
STOP
position
when erase is complete.
Erase Prevention
To
prevent erasure or recording over
prerecorded material:
Remove the small plastic tab(s) on
thetop edgeof the microcassetteby
pushing inwardwith a hard, pointed
object such as a ballpoint pen. A
warning tone sounds
if
you attempt
to
record using a cassette with the
tabs removed.
(To
recordona micro-
cassette with the safety tabs re-
moved, cover hole with tape.)
10

Convenience Features
RecordIndicator-The red RECORD in-
dicator (LED) illuminateswhenthe unit is
inrecord mode.
If
batterypower istoo low
for reliable recording,the RECORDLED
will not lightwhen you attemptto record.
Low
BatteryIndicatorL‘BAT” appearson
the digital display when battery power is
low. Charge the optional battery pack,
replace alkaline batteries or plug in the
AC adapter.
NOTE: To retain cue information while
changingbatteries,movethethumbcon-
trol to STOP position;then quickly insert
new batteries as soon as “BAT” disap-
pears from the digital display.
To retaincue informationwhile changing
batteriesbefore“BAT” appears, movethe
thumb controlto STOP position.After ap-
proximatelyfive minutesthedigitaldisplay
will blank.Quickly insert newbatteriesas
soon as the display blanks.
End
Zone Warning Tone-When the
cassette has
2-3
minutesof availabletape
remaining, a warning tone is generated
at approximately 15-second intervals to
alert the dictator that end of tape is
approach
i
ng
.

En
d-o
f-Tape
Wa
rning
-T he record
e
r
generates a warning tone when the end
of tape isreachedduringany tape motion.
No-Cassette Safety Feature-A warning
tone sounds
if
you try to record without
a cassette.
Q-Alert Tones-When an end-of-lettercue
is recorded, the unit generates a single
tone. When an instruction cue is re-
corded, the unit generates two tones.
Automatic Lock-The EJECT switch
automatically returns to Lock position
after cassette is ejected to prevent ac-
cidental operation.
lnactivityTimeout-After
5
minutesof in-
activity, your Model 3253 will auto-
matically turn itself off.
Optional
Accessories
The following accessories are available
for the Dictamite
II,
Model 3253:
RemoteMicrophone-Microphone for
in-
terview recording.
Conference Microphone-Compact high-
sensitivity condenser microphone.
12
Telephone Record Adapter-permits
recording
of
telephong conversations.
MC-60 Microcassettes-Box
of
3
DictarasePMicrocassette
Bulk
Eraser-
Permits rapiderasure
of
microcassettes.
RechargeableBatteryPack-(PIN
878880)
A/C AdapterICharger-Permits unit to
operateonAC power and can beusedto
charge optional rechargeable battery
pack in the unit. Recharging batteries
overnight is recommended.
To use the optional AC adapter:
Insert the power cord into the exter-
nal power jack (DC
3V)
on the left
side
of
recorder.
Connect the plug to a proper wall
outlet:
120
V
60Hz
220
V
50Hz
240
V
50Hz
CAUTION: Use
of
other than the proper
adapter may apply impropervoltage and
may damage your portable dictation
equipment
.
NOTE:
Some accessories may not be
available in every country.
13

Specifications
Size: Height-45/8” (118 mm)
Width
-21/4”
(57 mm)
Depth
-
11A6’‘
(17 mm)
Weight:
5.5
oz. (156 gm)
Power Source:
2
size AAA alkaline bat-
teries, optional recharge-
able battery pack or AC
adapter
Media: MC-60 microcassette
Not
ices
FCC
Notice
Thisequipmentgenerates and usesradio
frequency energyand
if
not installedand
used properly, and in strict accordance
withthe manufacturer’sinstructions,may
cause interferenceto radioandtelevision
reception. It has been type tested and
foundto complywith the limitsfor aClass
B
computing device in accordance with
the specifications inSubpart
J
of Part 15
of FCC Rules, which aredesignedto pro-
vide reasonableprotectionagainst such
interference in a residential installation.
However, there is no guarantee that in-
terferencewill notoccur ina particularin-
stallation.
If
this equipment does cause
14
interferenceto radio
or
television recep-
tion, which can bedeterminedby turning
the equipmentoff and on, the user isen-
couragedto try to correct the interference
byoneor moreof the following measures:
reorient the receiving antenna.
0
relocatethe equipment with respect
to the receiver.
move the equipment away from the
receiver.
plug the equipment into a different
outlet
so
that equipmentand receiver
are on different branch circuits.
If
necessary,the user should consultthe
dealer
or
a Dictaphoneservicerepresen-
tative for additionalsuggestions. The user
may find helpful the following booklet
preparedbythe FederalCommunications
Commission: “How to Identify and
ResolveRadioTVInterferenceProblems.”
This booklet is available from the
U.S.
Government Printing
Off
ice, Washington,
D.C.
20402,
Stock
NO.
004-000-00345-4.
15

Table of contents
Other Dictaphone Microcassette Recorder manuals


 Service manual")


