Dictaphone Connexions User manual
1
Overview
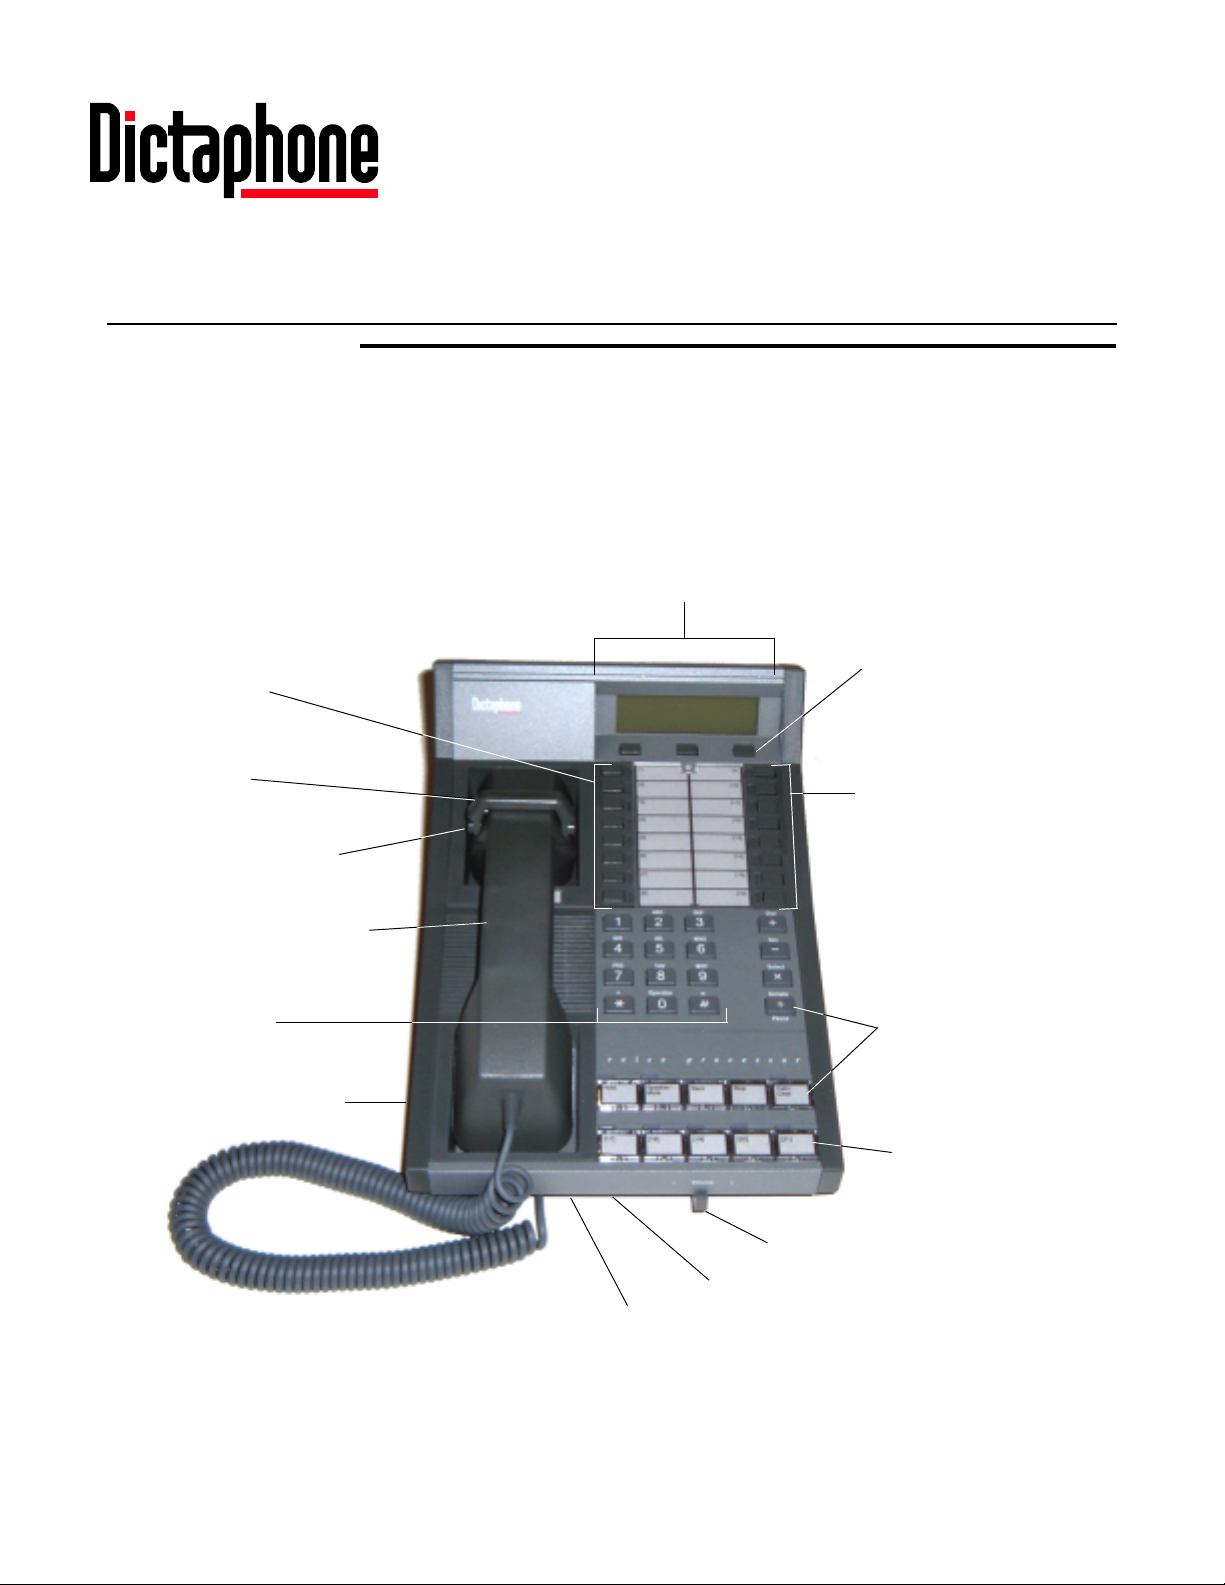
The Connexions Station (telephone), also known as a C-Phone, is an all-purpose piece
of equipment used with Dictaphone dictation/transcription systems. It can be used as a
telephone, a dictation station, or a transcription station.
FIGURE 1 Connexions Station (Top View)
Menu Keys
Screen Display
Quick Access Keys
(9 - 16)
Quick Access Keys
(1 - 8)
Keypad
Foot Control/
Hand Mic Jack
(on side)
Dictation Handset
Yoke
Record Button
Function Keys
Line Keys
(Quick Access
Keys 17 - 21)
Volume Control
Headset Jack (on front)
Ring Volume Control
(on bottom)
Connexions®Telephone Quick Reference
5/25/05
2 5/25/05 Connexions®Telephone Quick Reference
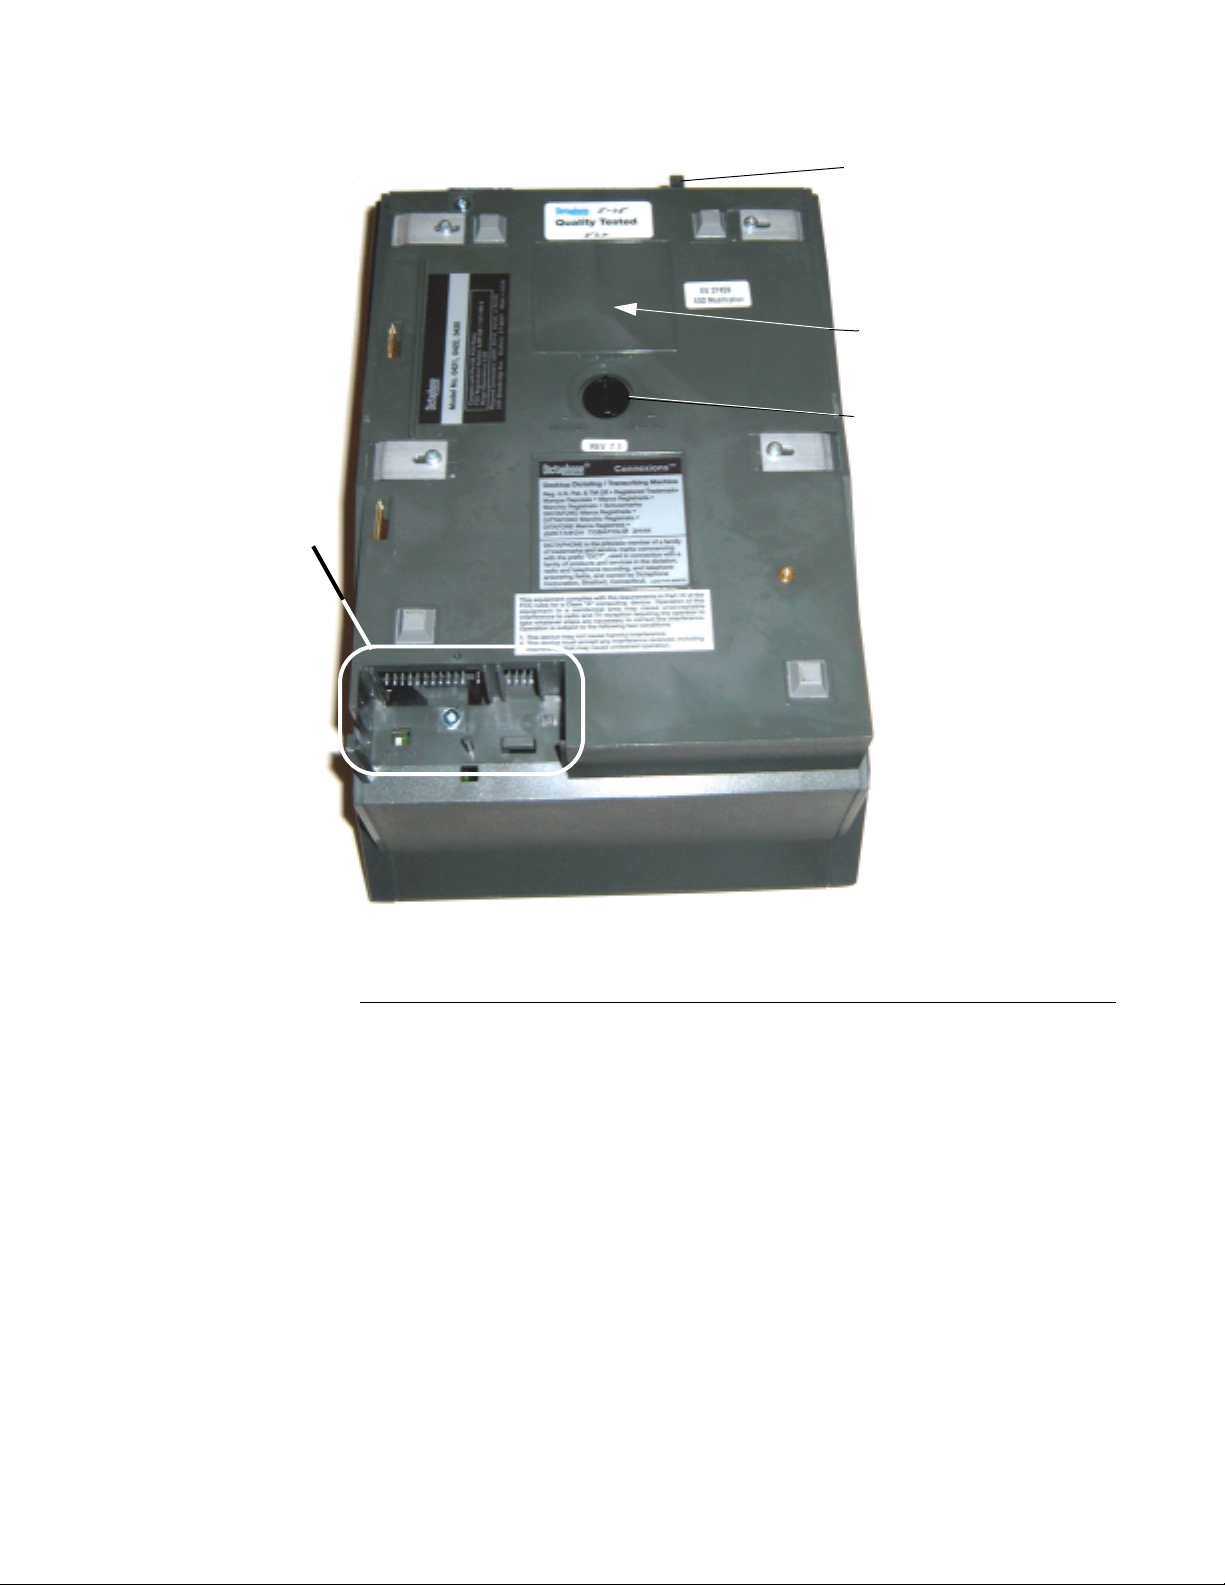
FIGURE 2 Connexions Station (Bottom View)
Glossary
Please review the following glossary of Connexions Station terminology. Becoming
familiar with the terminology will make setup and programming of the Connexions
Station much easier to understand.
Keypad - The Connexions telephone keypad is used the same way as any standard
telephone keypad is used for dialing telephone numbers. You can also use the keypad
in conjunction with other features of the telephone.
Volume Control
The Model and Serial
Numbers are found on
a plate in this area
Ringer Volume Control
Power Compartment
with Cover removed.
Refer to Figure 7.

Connexions®Telephone Quick Reference 5/25/05 3
FIGURE 3 Keypad and Function Keys
Function Keys - These keys are used in conjunction with other features of the
Connexions telephone. Operation of these keys is covered in sections dealing with the
specific features requiring their use.
Line Keys (Multi-Line Telephones) - The line keys correspond to your extension
number or numbers. The Connexions telephone comes standard as a single line
telephone. However, you have the option of adding up to seven additional extensions
or numbers. You can use the line keys to answer and place calls. An indicator
illuminates when the associated line is in use. When not used for telephone lines, these
keys can be used as additional quick access keys (#17 - 21).
FIGURE 4 Function Keys and Line Keys
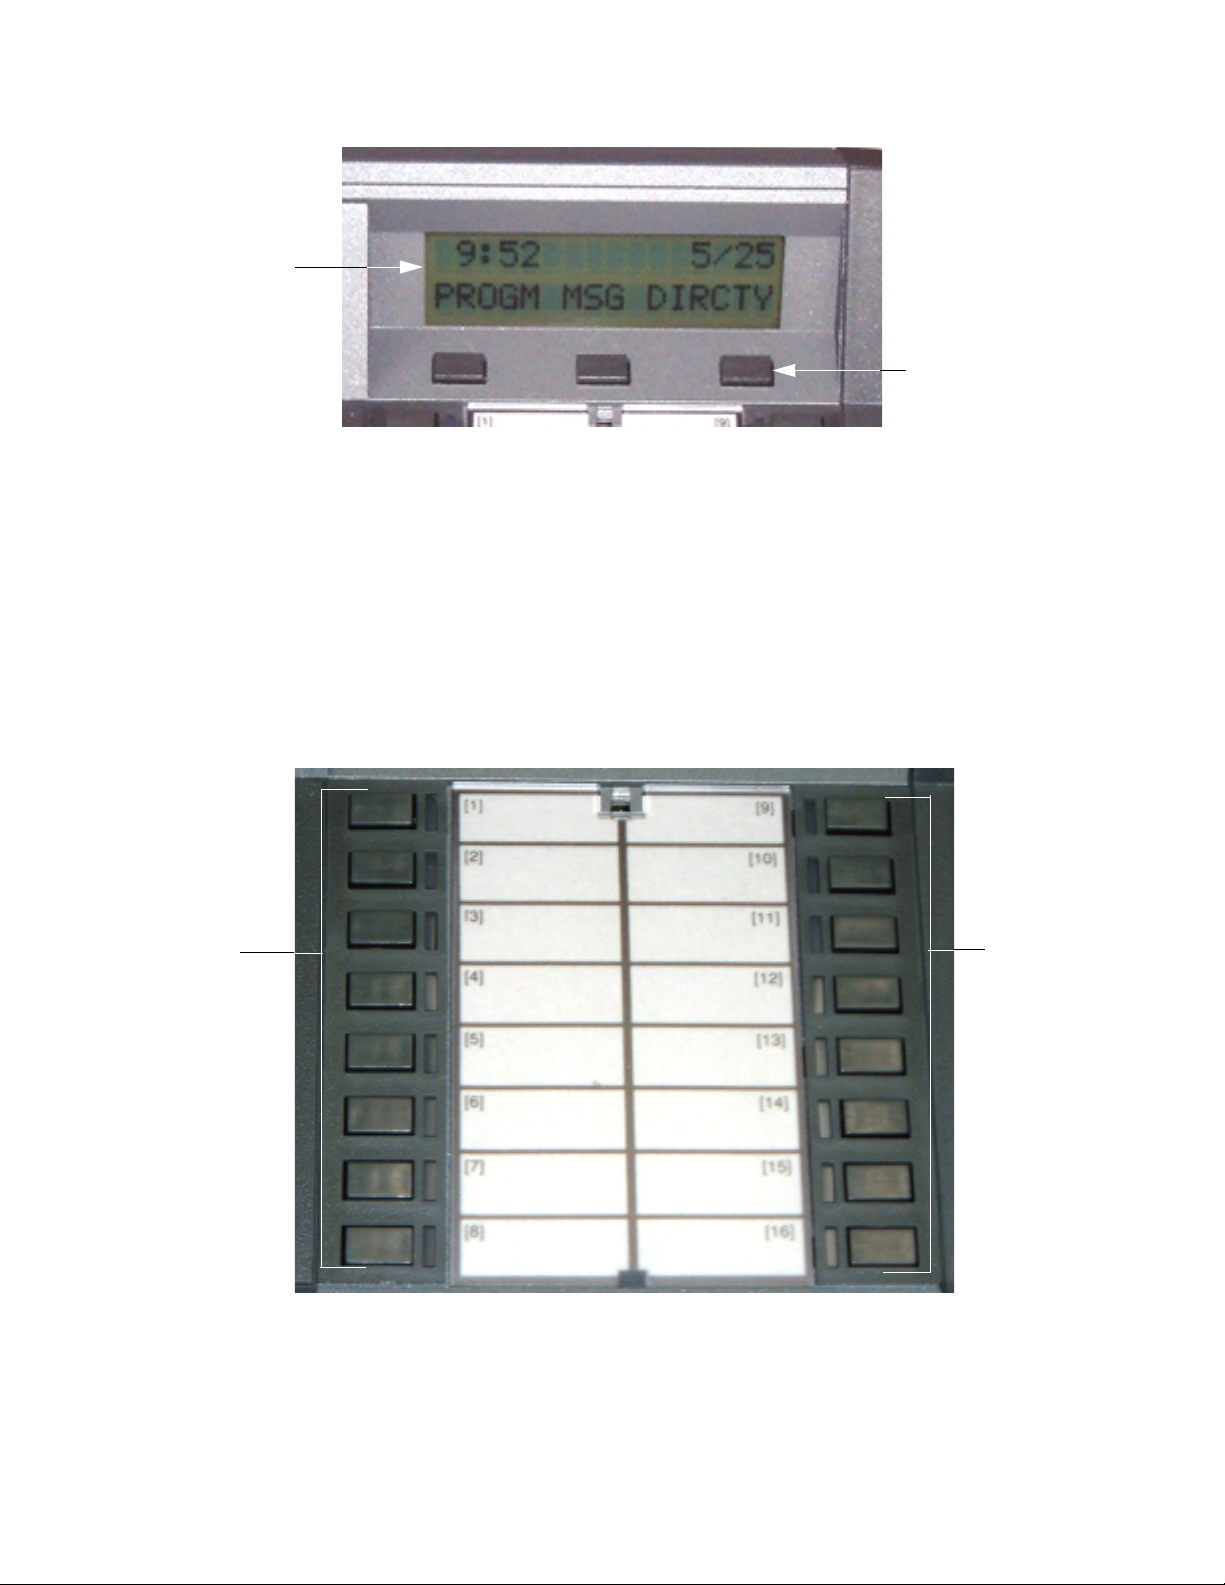
Screen Display - The 2-line display consists of up to 16 characters per line. When the
telephone unit is idle, the Main Menu displays the time and date on the top line and
feature prompts on the bottom line. When the telephone is in use, the date is replaced
with a call timer, showing the elapsed time of the current phone call. Information on
the display is feature dependant and will change accordingly.
Menu Keys - The menu keys are used to set up system features. The user responds to
prompts on the telephone screen display by pressing the associated menu key. A new
prompt is displayed each time one of the menu keys is pressed.
Function Keys
Keypad
Function Keys
Line Keys
(Quick Access Keys
17 - 21)
Calc/Clear Button
4 5/25/05 Connexions®Telephone Quick Reference
FIGURE 5 Screen Display and Menu Keys
Quick Access Program Keys - You can set up and label the 16 quick access program
keys so that, when pressed, they will perform specific functions. Programming these
keys with features you are most likely to use allows quick, single key access to any of
the features offered by the telephone or your PBX system. Typical features might be
speed dialing for frequently called numbers, storage of an access code for long
distance dialing, MCI, Sprint, call forwarding, automatic telephone answering,
automatic telephone recording, etc. Quick access keys 1 - 8 permit you to program an
additional eight functions or numbers by “burying” them under existing programmed
functions. These are quick access keys 22 - 29.
FIGURE 6 Quick Access Programs Keys
Buried Quick Access Keys - Normally you can program up to 16 functions or
numbers on quick access keys 1 - 16. You can “bury” additional functions or numbers
for keys 1 - 8 by using the Acc key. These are know as keys 22 - 29 (quick access keys
Menu Keys
Screen Display
Keys 9 - 16Keys 1 - 8
Buried Keys
22 - 29

Connexions®Telephone Quick Reference 5/25/05 5
17 -21 are the line keys). (It is not recommended that the Bill Timer feature code be
programmed into a “buried” key.)
Chained Quick Access Keys - The contents of one quick access key may be
“chained” as part of another quick access key. The contents of three keys (maximum)
can be chained together. “Buried” key contents may also be chained. (It is not
recommended that the Bill Timer feature code be programmed into a “buried” key.)
Volume Control - The volume control is used to lower or raise the volume of the
incoming call. To raise the volume, slide the control towards the + symbol. To lower
the volume, slide the control towards the - symbol.
Ring Volume - The ringer volume control located on the underside of the telephone
adjusts the ring volume. Turn the dial towards the + symbol to increase the ring
volume and towards the - symbol to decrease the ring volume.
Dictation Controls - Your telephone handset or hand microphone can be used to
record dictation on to an attached Connexions voice processing system recorder or to
a Dictaphone systems recorder.
Status Indicator Lights - Status indicator lights illuminate when the associated key is
activated, alerting you to the current status of the selected line or programmed
function.
Headset Jack – allows connection of a headset.
Power Compartment - Contains the Battery Backup switch and connections for the
power and telephone cables.
Electronic Lock - Prevents unauthorized use of the telephone. Dialing can be totally
disabled, or you can enter the number of digits (01-99), which will limit dialing to that
number of digits.
Dictation & Transcription Features
Dictation can be performed in the following ways:
!Using the Handset
!Using the Hand Microphone
!Using the OpticMic Hand Microphone/Bar Code Reader
!Using the Hands Free Gooseneck Microphone and Foot Control
Transcription can be performed in the following manner:
!Directly calling the system and playing the jobs back through a Connexions
phone using a foot control and headset
Initial Setup
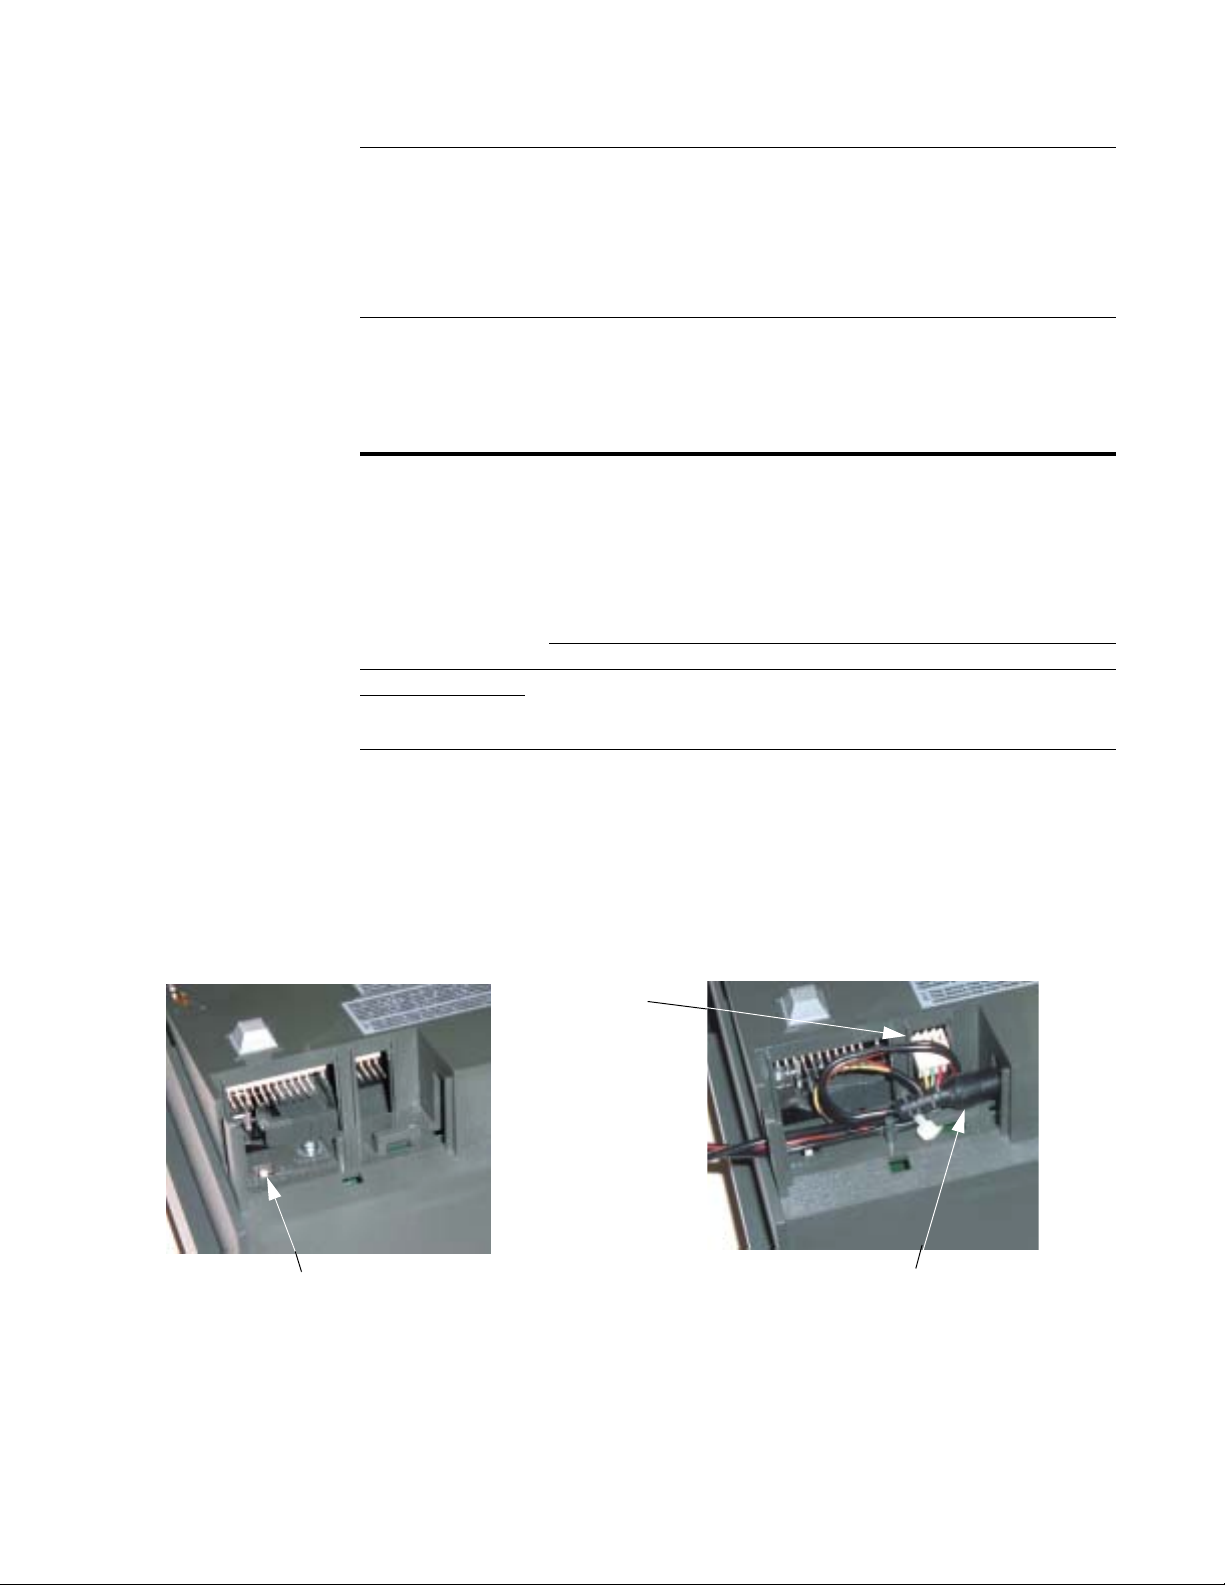
The Power Compartment cover needs to be removed to connect the power plug, the
telephone line, and to turn on the battery backup switch.
6 5/25/05 Connexions®Telephone Quick Reference
To remove the Power Compartment cover:
1. First turn the phone upside down
2. Slide the cover up, away from the body of the phone
To replace the cover:
Slide the cover down until it clicks into place, indicating that is firmly seated.
Connecting and Disconnecting the Station
Failure to follow these procedures may cause damage to your Connexions station.
Your Connexions station is an analog station and should only be connected to an
analog phone line. DO NOT PLUG THE CONNEXIONS STATION INTO A
DIGITAL PHONE LINE FOR RISK OF DAMAGING A CARD IN THE DIGITAL
PHONE SWITCH. Some digital phone switches have analog capabilities. If you are
not sure what type of phone line you have, contact your telecommunications person.
Connecting the Connexions Station
1. Make sure the power cube is NOT plugged into an electrical outlet.
2. Connect the power cord and telephone cord to the Connexions station by opening
the power compartment located in the upper-right corner on the back of the station.
FIGURE 7 Power Compartment
Battery Backup Switch
This must be ON to save
the programming
Telephone Cable
Plugged In
AC Adapter Cable
Plugged In

Connexions®Telephone Quick Reference 5/25/05 7
3. Verify that the battery backup switch, located in the power compartment, is set to
the ON position.
Important: If you leave the battery backup switch in the OFF position and power
is lost for 10 - 15 minutes, all programming will be LOST! The Connexions station
will have to be reprogrammed
4. Insert the Connexions station telephone cord into an analog telephone line jack.
5. Connect any accessory you are using (foot control, headset, OpticMic, etc.).
6. Plug the Connexions station’s power cord into an electrical outlet.
Disconnecting a Connexions Station
If you need to move and unplug the Connexions station, you must first unplug the
power cord, then unplug the telephone cord. The Connexions station will hold the
date/time as well as the quick access key programming for up to 48 hours if it is
unplugged.
Connecting or Disconnecting the cables improperly or in the wrong
order can cause damage to the station.
Programming
At the top of your Connexions station, you’ll see a two-line, three-option display
(refer to Figure 1). The top line displays the date and time and the bottom line displays
the three-option menu.
To execute a menu selection, press the gray key under the desired choice. These keys
are used while programming the station, as described in the following procedures:
!Set or Change the Date and Time
!Create or Change a Password
!Programming the Quick Access Keys
!Burying a Quick Access Key
!Chaining Quick Access Keys
!Revising the Contents of a Quick Access Key
Set or Change Date and Time
1. Press the menu key under PROGM.
2. Enter the Security (password) Code, if required.
3. Press the menu key under ID/TIME. You have the option to change the Security
Code.
IMPORTANT

8 5/25/05 Connexions®Telephone Quick Reference
4. Press the menu key under NO.
5. If you are given the option to revise the Author ID, press the menu key under NO.
6. The current time is displayed.
7. Press the menu key under YES.
8. Enter a four-digit time. Press the 2 for A (for a.m.) or 7 for P (for p.m.). The current
date is displayed.
9. Press the menu key under YES.
10. Enter a four-digit date.
11. The Main Menu is displayed with the new time and date.
Create or Change a Password (Security Code)
1. Press the menu key under PROGM.
2. If changing the security code, enter the current code (password). If creating a code
(password), go to next step.
3. Press the menu key under ID/TIME.
4. Press the menu key under YES.
5. Enter a 4-digit code (password).
Remove the Security Code
If you wish to remove a security code (password), enter 4 zeros at step 5 above.
Programming the Quick Access Keys
Setting up the Quick Access Keys
!A total of 16 digits is allowed per key.
!If you make a mistake while entering digits, simply press the BACK key to delete
the error.
!You must press the SELECT key after entering the contents of each key.
!Enter pauses as part of the dialing sequence by pressing the PAUSE (÷) key. (A
pause is the interval during which you wait for an outside line after dialing 9, for
example, or for a confirmation after entering a credit card code. Each pause will
cause the unit to wait approximately 3/4 of a second until you get a dial tone
before dialing the next digit. Several pauses in succession may be needed in
some situations.)

Connexions®Telephone Quick Reference 5/25/05 9
TABLE 1 Setting up Quick Access Keys
Label each Quick Access Key to indicate what has been programmed into each key.
Using your Quick Access Keys
Once you have setup a quick access key, simply press that key to activate the function.
Burying a Quick Access Key
An additional eight functions or numbers can be programmed by “Burying” them
within quick access keys 1 - 8, which already contain one programmed number.
To setup buried quick access keys 22 - 29 “under” keys 1 - 8, follow the steps in
Table 2
TABLE 2 Buried Quick Access Keys
Press: Display Prompt:
1. PROGM ENTER
SECURITY # _ _ _ _
2. Enter Security Code (if required, if not
the display at right is shown) PROGRAM
KEYS ID/TIME TEL
3. KEYS SELECT PROGM KEY
4. Any one of the keys labeled 1 through 21
(keys 17-21 can be used if not in use for
telephone lines)
ENTER NUMBER
5. Enter the desired number using the
telephone keypad or another quick
access key (if required)
The digits you are entering.
6. SELECT SELECT PROGM KEY
7. To setup another quick access key,
repeat the same procedure. To exit this
mode, press STOP.
The Main Menu will return to the
display.
Press: Display Prompt:
1. PROGM ENTER
SECURITY # _ _ _ _
2. Enter Security Code (if required, if not
the display at right is shown) PROGRAM
KEYS ID/TIME TEL
3. KEYS SELECT PROGM KEY
4. ACC (the – sign) followed by selected
quick access key (1-8) ENTER NUMBER
10 5/25/05 Connexions®Telephone Quick Reference
Note: LEDs do not illuminate when a buried quick access key is in use. Therefore, it is
recommended that the buried keys be used for Author IDs, long distance access codes
or telephone numbers, not for feature codes.
Using your Buried Quick Access Keys
Once you have setup a buried quick access key, simply press Acc followed by that key
(1 - 8) to activate the function.
Chaining Quick Access Keys
The contents of one quick access key may be chained as part of another quick access
key. The contents of three keys (maximum) can be chained together. "Buried" key
contents may also be chained.
Example: Let’s say Key [8] has been programmed with the telephone number of the
Enterprise Express Voice System (EXVoice access code), and you want to program
Key [2] so that all the dictator has to do is press [2] to call the system and
automatically login. When programming Key [2], first press Key [8], and then enter
the dictator’s ID number. The contents of Key [8] (EXVoice access code) has now
become part of Key [2].
Revising/Viewing the Contents of a Quick Access Key
Perform the following steps to revise the contents of a quick access key:
TABLE 3 Revising a Quick Access Key
5. Enter the desired number using the
telephone keypad or another quick
access key (if required)
The digits you are entering
6. SELECT SELECT PROGM KEY
7. STOP Main Menu
Press: Display Prompt:
Press: Display Prompt:
1. PROGM ENTER
SECURITY # _ _ _ _
2. Enter Security Code (if required, if not
the display at right is shown) PROGRAM
KEYS ID/TIME TEL
3. KEYS SELECT PROGM KEY
4. Press the Quick Access Key you wish to
revise Current contents are shown
REVISE? YES NO
5. YES ENTER NUMBER

Connexions®Telephone Quick Reference 5/25/05 11
These instructions can also be used to view the contents of a Quick Access key
without making any modifications. For instance, if one Connexions station looses it’s
programming, and was programmed the same as other stations, the programming of
another station’s Quick Access keys can be viewed in this way.
At the REVISE? prompt, press NO, and then STOP.
Deprogramming a Key and Leaving It Blank
At the “REVISE? YES/NO” prompt press YES. Do not enter a number in when
prompted, and then press SELECT to save the blank entry.
Feature Codes
!Feature codes are codes that can be programmed into quick access keys to
provide your telephone with additional features that may not be available
through the menu keys. Feature codes may also be used for single key access to
features available through the menu keys. Each feature code must be
programmed into a separate key.
!Program the desired feature codes into quick access keys in the same way you
program a telephone number, except substitute the following sequence for the
telephone number: [#] [*] 2, 3 or 4-digit code.
!When complete, press SELECT.
!Pressing a quick access key programmed with a feature code will cause that
feature to take effect automatically.
6. Enter the desired number of digits or
code The digits you are entering
7. SELECT SELECT PROGM KEY
8. STOP Main Menu
Press: Display Prompt:

12 5/25/05 Connexions®Telephone Quick Reference
TABLE 4 Common Feature Codes
Feature Code Feature Description
#*05[n] Electronic Lock
Prevents unauthorized use of the telephone. Dialing can be totally
disabled, or you can enter the number of digits (01-99), which will
limit dialing to that number of digits.
Example: enter #0504 to allow a maximum of four digits to be dialed
from your telephone.
To unlock a locked telephone, press the quick access key and enter
your Security ID (it is recommended that a security number be used
with the electronic lock feature).
#*06[n][n] Delayed Ring
Changes number of delayed rings programmed through the menu
keys to a new number. The new number of rings will display for two
seconds. With a multi-line telephone installed, each line can be
programmed with a different number of delayed rings. Key in #*06
followed by the desired number of rings to bypass (1-9) before
ringing is heard at your telephone. Then key in the line number
(1-8). Quick access key LED illuminated when function active.
#*11 Headset Answer
When a key is programmed with the # * 11 code and activated
before transcription begins, it allows a transcriptionist to answer the
telephonewithoutremovingtheheadset.Withthe handseton-hook,
press the SPEAKER/MUTE key to transfer the incoming call to the
headset. The telephone unit's microphone is located under the
volume control. To end a call, press the STOP key. To resume
transcribing, press the DICTATE and TRANS keys. Quick access
key LED illuminates when function active.
#*16 Timer
Permits you to keep track of the time spent on a particular activity.
Press the quick access key to start the Timer. Press again to stop.
Quick access key LED illuminates while function is active.
#*17 LED "in use" Light
This access code lets the light associated with the programmed key
stay lit.
#*18 Transcribe
This code turns on the transcribe display and activates the foot
control(left-FORWARD,center-PLAY,right-REWIND).Youcanalso
use this code with a bar code reader; however, the bar code digits
will not appear on the display. This code turns on all foot control and
keypad transcribe controls

Connexions®Telephone Quick Reference 5/25/05 13
For a complete list of Feature Codes, please refer to the Operator Manual.
Quick Access Key and Function Programming Examples
Now that you understand the mechanics of programming Quick Access Keys,
presented below are some examples of ways you may want to program your Quick
Access keys. These examples apply to an Enterprise Express Voice system, they may
vary if you are connected to a different system.
Programming Quick Access Keys for Automatic Access and Login to the EXVoice System
In this example, a dictator wants to have one Quick Access Key that will dial the
telephone number to access the EXVoice dictation system, and log the dictator into the
system. The access number for the EXVoice system (555-9876 in this example) will
be programmed into Quick Access Key [1]. The site ID is 5 and the dictator’s ID is
1234. These will be programmed into Quick Access Key [2] and the EXVoice access
number will be chained into this key.
A good way to find out what has to be programmed into the dictator’s Quick Access
Key is to manually dial into the EXVoice system and listen to the prompts.
Dial the access number (555-9876). When the system answers, you will hear a
welcome prompt:
“Hello. Welcome to the Enterprise Express Voice System. Enter your site ID,
followed by the pound key.”
Your response to this prompt would be to hit “5#” on the keypad.
“Enter your user ID, followed by the pound key.”
Your response to this prompt would be to hit “1234#” on the keypad.
Now to program all of this into Quick Access Keys, chain the EXVoice access
number, programmed into Quick Access Key [1], to the dictator’s site and user ID in
Quick Access Key [2].
#*1807 Bar Code Reader
This Quick Access code lets the display show all of the digits
enteredwith thebar codereader. Thedisplay willnot showother job
information.
#*19 Hands Free Dictate (Optional)
Enables Hands Free dictation using a foot control and telescoping
microphone. This feature code enables the foot control for dictation
use (left-PLAY, center-RECORD, right-REWIND). It is important to
activate this feature code prior to accessing an Enterprise Express
Voice system. Failure to do so will prevent the hands free dictator
from going into record mode.
Feature Code Feature Description

14 5/25/05 Connexions®Telephone Quick Reference
TABLE 5 Dictator One Key Access
Now, when Quick Access Key [2] is pressed, the EXVoice system will be dialed, and
the dictator will be logged in.
Alternately, if there is not a site prompt, then a site ID does not have to be
programmed into the Quick Access Key. In this case, just chain the EXVoice access
number to the Dictator User ID.
This process may be repeated for several Quick Access Keys if more that one dictator
uses a particular Connexions station.
Label Quick Access Keys programmed in this example with the dictator’s names.
Hands Free Dictation
In the case where a dictator uses a foot control and telescoping microphone to dictate,
Feature Code #*19 should be programmed into one of the Quick Access Keys. It
should not be programmed into a buried key. This code configures the foot control
tones for dictation. To activate hands free dictation, depress this key prior to accessing
the EXVoice system. This feature code toggles on and off, so it should be pressed only
once. To indicate that Hands Free Dictation is activated, chain #*19 to *#17 (LED “in
use” Light). That way, when the Hands Free key is depressed, the LED associated
with this key will stay lit to indicate that this feature is activated.
Label the key programmed with #*19 as “Hands Free Dictate.”
Press: Display Prompts:
1. PROGM ENTER
SECURITY # _ _ _ _
2. Enter Security Code (if required, if
not the display at right is shown) PROGRAM
KEYS ID/TIME TEL
3. KEYS SELECT PROGM KEY
4. Quick Access Key [1]. ENTER NUMBER
5. Enter the EXVoice access phone
number 5559876 (do not include
the dash)
ENTER NUMBER
5559876_
6. SELECT to store the contents in
Quick Access Key [1] SELECT PROGM KEY
7. Quick Access Key [2] ENTER NUMBER
8. Quick Access Key [1], and then 5#
Pause 1234# (you may need to
add more than one Pause)
ENTER NUMBER
[1]5#P1234#_
9. SELECT to store the contents in
Quick Access Key [2] SELECT PROGM KEY
10
.Continue to program other dictator
site/UserIDs in otherQuick Access
Keys or press STOP to exit
programming mode.
Main Menu

Connexions®Telephone Quick Reference 5/25/05 15
Viewing a Bar Code Label
Program a Quick Access Key with the Feature Code #*1807 in order to view the bar
code label digits in the Connexions Station display as the bar code is scanned.
The bar code reader functions properly whether or not the program key
is pressed. However, the digits of the label will display only if the Bar
Code Label key is depressed.
Transcribe
To active the foot control for transcription use, program the Feature Code #*18 into a
Quick Access Key. Then, chain the Transcriptionist user ID to this key so that the
transcriptionist will have to press only one key to activate the foot control and log into
the EXVoice system.
In this example, the Transcribe feature code is going to be programmed into Quick
Access Key [3], and the transcriptionist Site and User ID into [4]. The transcriber’s
site ID is 5 and the User ID is 54321.
TABLE 6 Transcribe
Press: Display Prompts:
1. PROGM ENTER
SECURITY # _ _ _ _
2. Enter Security Code (if required, if
not the display at right is shown) PROGRAM
KEYS ID/TIME TEL
3. KEYS SELECT PROGM KEY
4. Quick Access Key [3] (unused) ENTER NUMBER
5. Type #*18 to program Transcribe
into this key ENTER NUMBER
#*18_
6. SELECT SELECT PROGM KEY
7. Quick Access Key [4]. ENTER NUMBER
8. Quick Access Key [3], and then 5#
Pause 54321# ENTER NUMBER
[3]5#P54321#_
9. SELECT SELECT PROGM KEY
10. Continue to program other
transcriptionist’s user IDs in other
QuickAccessKeys orpressSTOP
to exit programming mode.
Main Menu

16 5/25/05 Connexions®Telephone Quick Reference
Programming Common Functions
There are several single digit commands that are commonly programmed in the Quick
Access Keys so that dictators and transcribers do not have to remember the actual
keypad command to use. Table 7 identifies the most commonly used commands that
are programmed into Quick Access Keys.
TABLE 7 Single Digit Commands
To verify the actual command used for a particular function, you may need to run the
EXVoice Explorer application and look at the actual keypad programming. In
EXVoice Explorer, go to Site | Keypads, and expand the user class (Dictation,
Transcription, etc.) and then right-click on the actual keypad and select Modify
Keypad. This will open up the window that displays what is programmed into each
level of the keypad.
To view the Normal Keypad, click the Normal tab. You will see a display similar to
Figure 8 if you are modifying the Dictator Default keypad:
Keypad
Command
What to
program into
Quick Access
Key
Function User Type
Sign off/Get Next 8 Used to sign off the current job and get next
job Transcriptionist
Speed + # Used to speed up dictation Transcriptionist
Speed - * Used to slow down dictation Transcriptionist
Disconnect 5 Used to disconnect user from system All C-phone users
Record 2 Used to get into Record mode Dictator
Ready/New 8 Used to complete one job and start next job Dictator
Place Bookmark 9 Places a bookmark in the dictation Dictator
Priority 6 Marks the job as high priority Dictator

Connexions®Telephone Quick Reference 5/25/05 17
FIGURE 8 Dictator Default Normal Keypad
Note the tones labeled A-D. These tones are referred to as “fourth column tones” and
are the DTMF tones that are emitted by peripheral devices like foot controls, handsets,
and hand microphones. These tones cannot be programmed into Quick Access Keys.
Turning Electronic Lock On or Off
To prevent unauthorized use of your telephone, you can lock it completely.
TABLE 8 Electronic Lock
You can also program Feature Code #*05 into a Quick Access key to implement the
Electronic Lock Feature. Refer to Feature Codes.
Press: Display Prompts:
1. PROGM ENTER
SECURITY # _ _ _ _
2. Enter Security Code (if required, if
not the display at right is shown) PROGRAM
KEYS ID/TIME TEL
3. TEL ELECTRONIC LOCK
ON OFF
4. ON (to turn on)
OFF (to turn off or leave off) DIGIT LIMIT 99 (default)
REVISE? YES NO
5. Press STOP Main Menu

18 5/25/05 Connexions®Telephone Quick Reference
Resetting the Telephone
A warm reboot can be accomplished by holding the # and the Calc/Clear buttons
(refer to Figure 4) simultaneously or just the Calc/Clear button for a minimum of
seven seconds. The display will clear. A warm reboot should be done if the
Connexions phone appears to be locked up.
OpticMic Hand Microphone/Bar Code Reader
!The OpticMic Hand Microphone has seven buttons (or keys) for dictation
control, 3 LEDs, and a built-in microphone and speaker for audio input/output.
The buttons control record, record/lock, rewind, play and stop.
!The OpticMic Hand Microphone also has a built-in optic bar code reader to
improve the speed and accuracy of data entry. The OpticMic supports the 3 of 9
bar code format.
!Refer to Figure 9, OpticMic Hand Microphone/Bar Code Reader.
FIGURE 9 OpticMic Hand Microphone/Bar Code Reader
Bar Code Reader Tip
Speaker
Imp Buttom
(Impression Cue)
FFwd Button
(Fast Forward)
Record Button
Rewind/Play Button
Mic Indicators
Microphone
(on the side)
End Button
(End Cue)
Lock Button
(Record Lock)
Stop Button

Connexions®Telephone Quick Reference 5/25/05 19
Troubleshooting Guide
Below are some common problems that can be encountered with the Connexions
Station. If the suggested action does not resolve the problem, go to the next section to
request depot repair.
No Display at the Station - Screen Blank
Turn station over and open the Power Compartment, check all of the connections. The
telephone cable should be securely connected to the 4-prong jack and the AC adapter
plug should be firmly seated into the power jack (refer to Figure 7).
Station Does not React to Program Key
Press the key under PROGM, and then press the key under KEYS. At the SELECT
PROGM KEY prompt in the display, press the key in question and check the
programming. If reprogramming is needed, follow the procedure of Revising/Viewing
the Contents of a Quick Access Key.
If You Press a Program Key and the Indicator Light Does Not Come On
Your station may be locked up. Press the Calc/Clear key until the display clears (hold
for at least 7 seconds).
If You Pick Up the Handset and the Telephone Line Seems Dead
a. Check the telephone jack.
b. Wiggle the handset cord at the handset end and at the station end. If the dial
tone returns, arrange for depot repair, refer to Requesting Depot Repair
Service.
c. If the line remains dead after all testing, have telecommunications check the
line to the station.
You Do Not Hear the Tone Generated when Pressing a Key on the Keypad
Arrange for depot repair, refer to Requesting Depot Repair Service.
System Access
If a programed key looses it programming, a programming sheet, left at the site by the
Dictaphone representative, will assist you to reprogram the station. If this is not
available, refer to Revising/Viewing the Contents of a Quick Access Key for
information on how to reprogram a Quick Access key.
Transcription
If the Foot Control Does Not Work.
Check the connection on side of the station; firmly press connection in slot. If this
does not resolve the problem, try a foot control that is known to be working. If the foot

20 5/25/05 Connexions®Telephone Quick Reference
control still does not work, arrange for depot repair, refer to Requesting Depot Repair
Service.
If the System Does Not React to Foot Control Commands.
Check the bottom of the foot control, and increase or decrease the tension setting.
If the Headset Does Not Work.
a. Check the connection to the station
b. Check the connection from the ear piece to the cable. Firmly push together.
c. Check the headset key (feature code). Is it illuminated for activation? If the
LED is Off, the audio goes through the speaker; if the LED is On, the audio
goes through the headset
d. Check the program key labeled for Headset and make sure that it is
programmed with the correct feature code.
Dictation Devices
Static in Handset
a. Pick up the handset. If the static increases while you are wiggling the cord for
the handset to the station, arrange for depot repair, refer to Requesting Depot
Repair Service.
b. If the static remains with telephone line or the number called, call the phone
company/vendor.
If the Hand Microphone is not working.
Check the connection on the side of the station. Firmly press connector in slot.
If Hand Mic records surrounding noise.
Check SPEAKER/MUTE light. It should be blinking. If not, press the Speaker/Mute
key once.
If the station with Bar Code Reader chirps during digit entry:
a. The bar code reader did not get a good read from the label. Swipe the label
with the reader again.
b. The entry is invalid or too long, enter the appropriate digits using the keypad
followed by the # key.
Pressing Hands Free Foot Control does not stop the playback.
An adjustment may be needed. Arrange for depot repair, refer to Requesting Depot
Repair Service.
Hands Free Key Intermittently Works When Logged on System
The Feature Code, #*19, may be chained or buried in the ID or login key(s).This
feature toggles on and off at each depression. Unchain or unbury this feature key and
leave this on regardless of system access mode to ensure proper Hands Free operation.
Table of contents


