DIEBOLD NIXDORF BEETLE/iSCAN EASY eXpress+ Quick setup guide
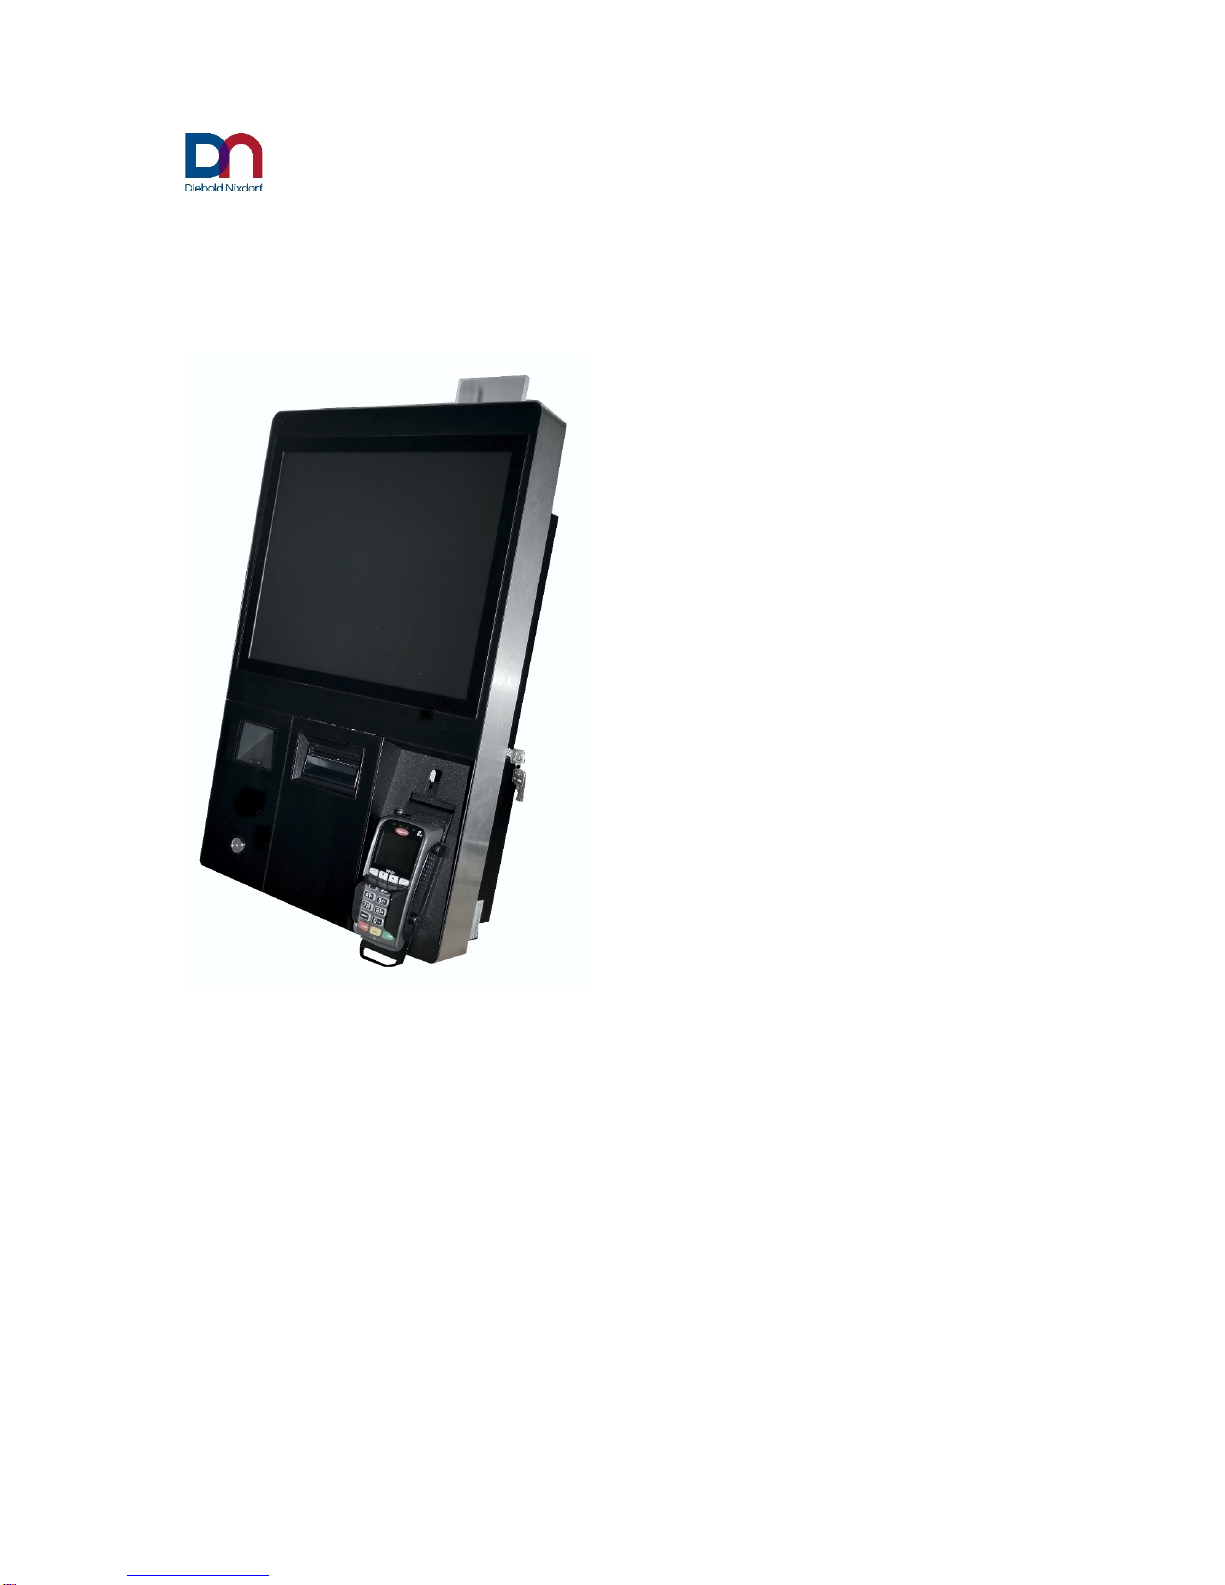
BEETLE /iSCAN EASY eXpress+
Self-Checkout System
Integration Guide (November 2018)

All of the product names mentioned in this document are registered trademarks.
Copyright © Diebold Nixdorf International GmbH, 2018
All rights, including rights to full or partial translation, reprinting and transmission or copying by any
means, are reserved.
Offenders are liable to payment o
f damages. All rights, including those granted by registration of a patent,
utility model or design, are reserved.

Contents
1Remarks ........................................................................................................................... 1
2Technical data................................................................................................................... 2
2.1 System......................................................................................................................................... 2
2.2 Environmental conditions........................................................................................................... 2
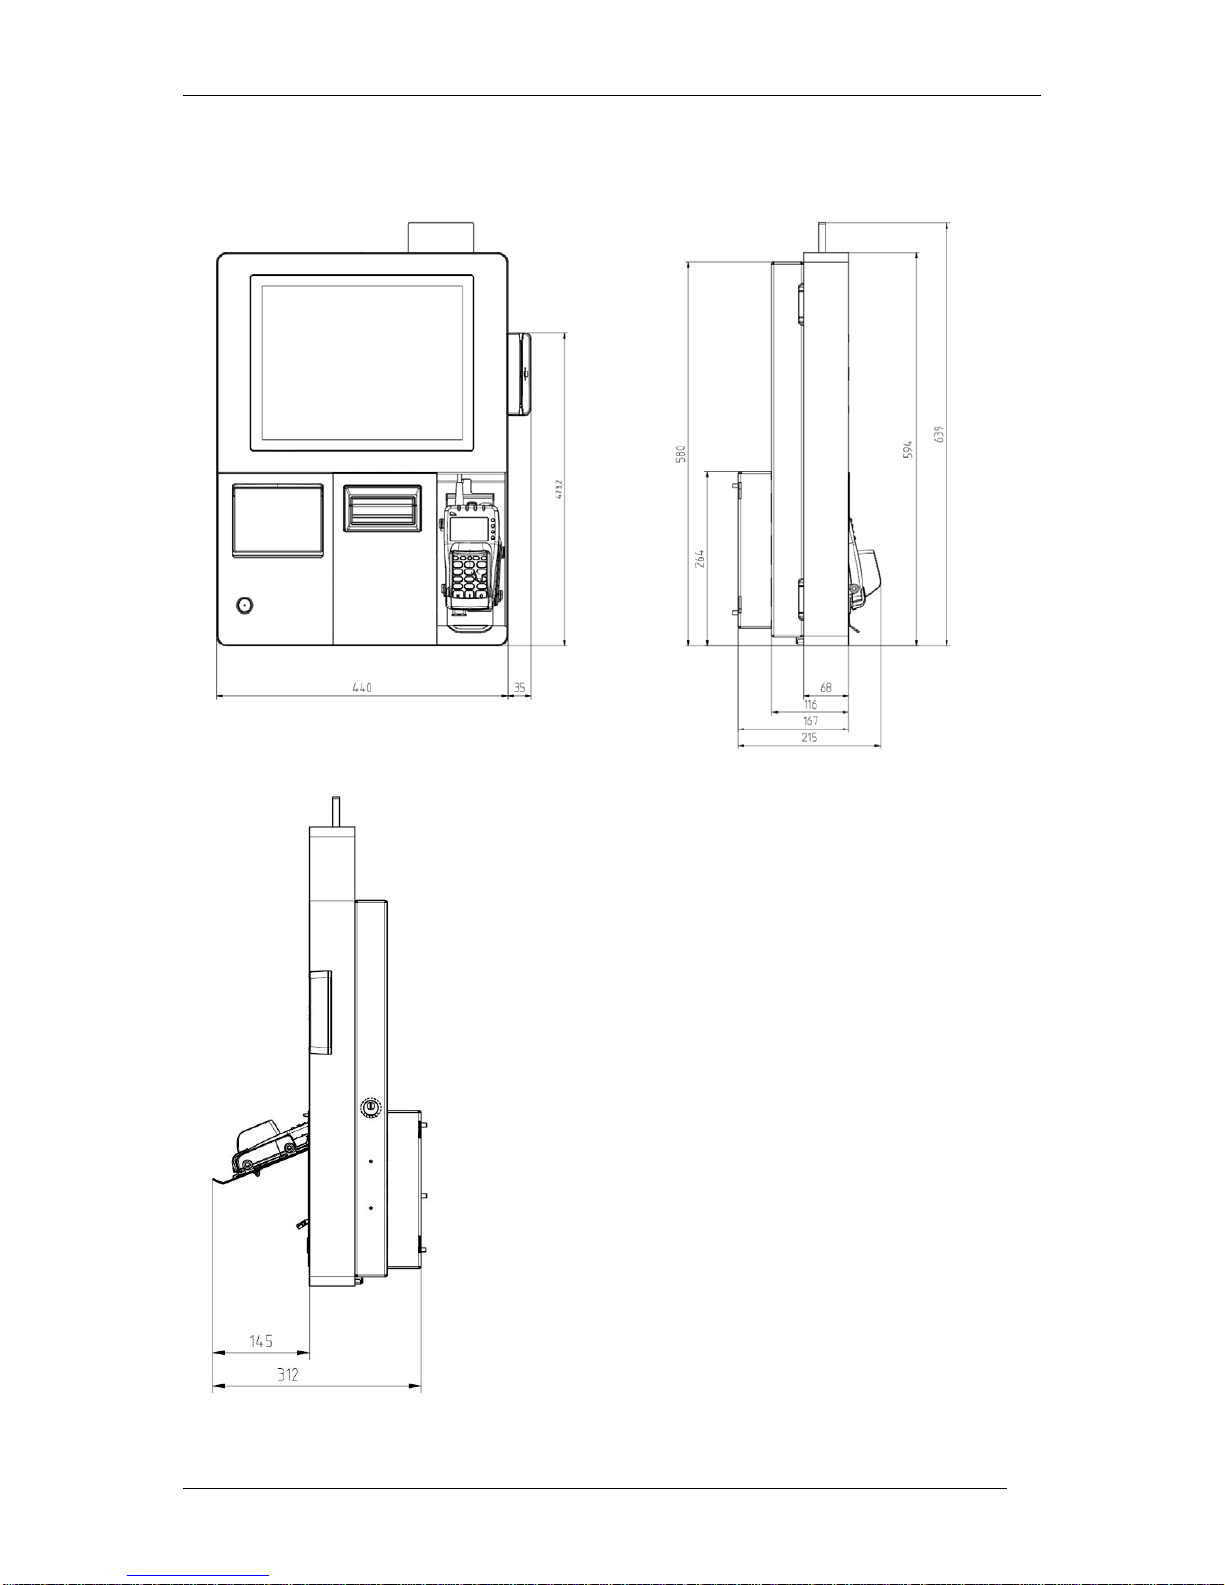
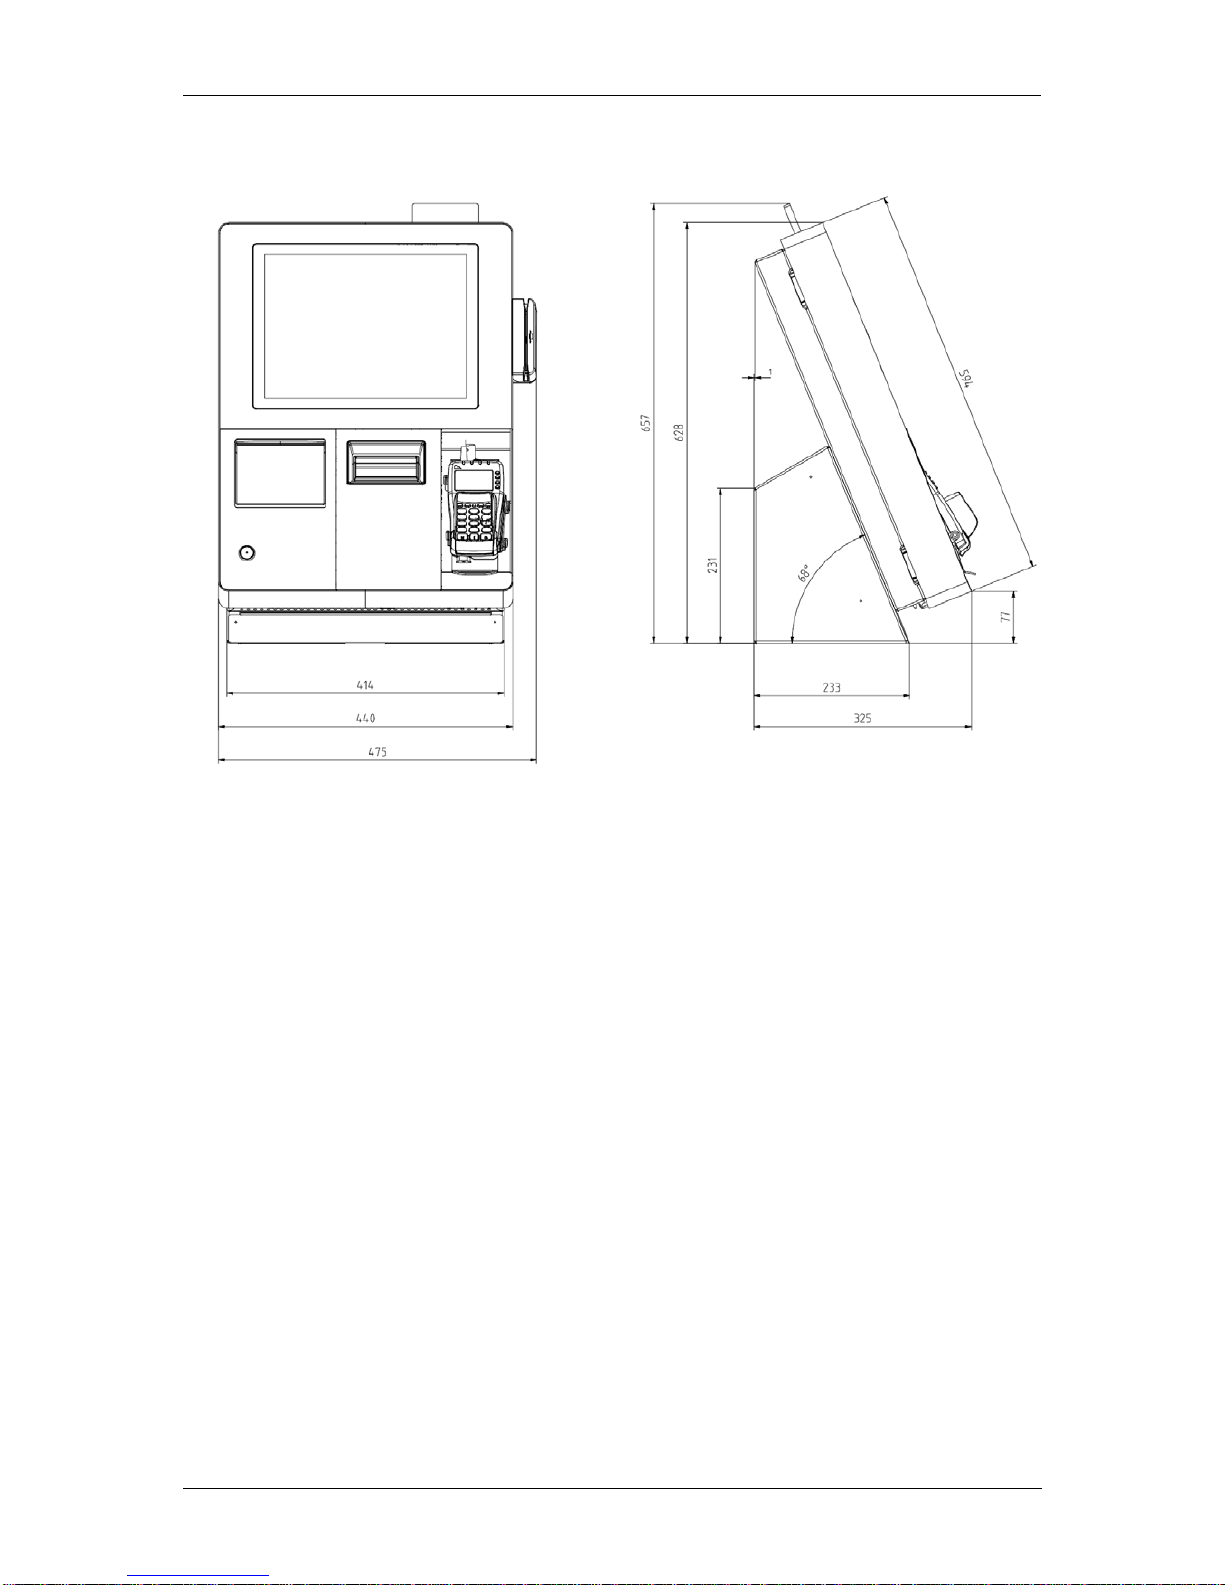
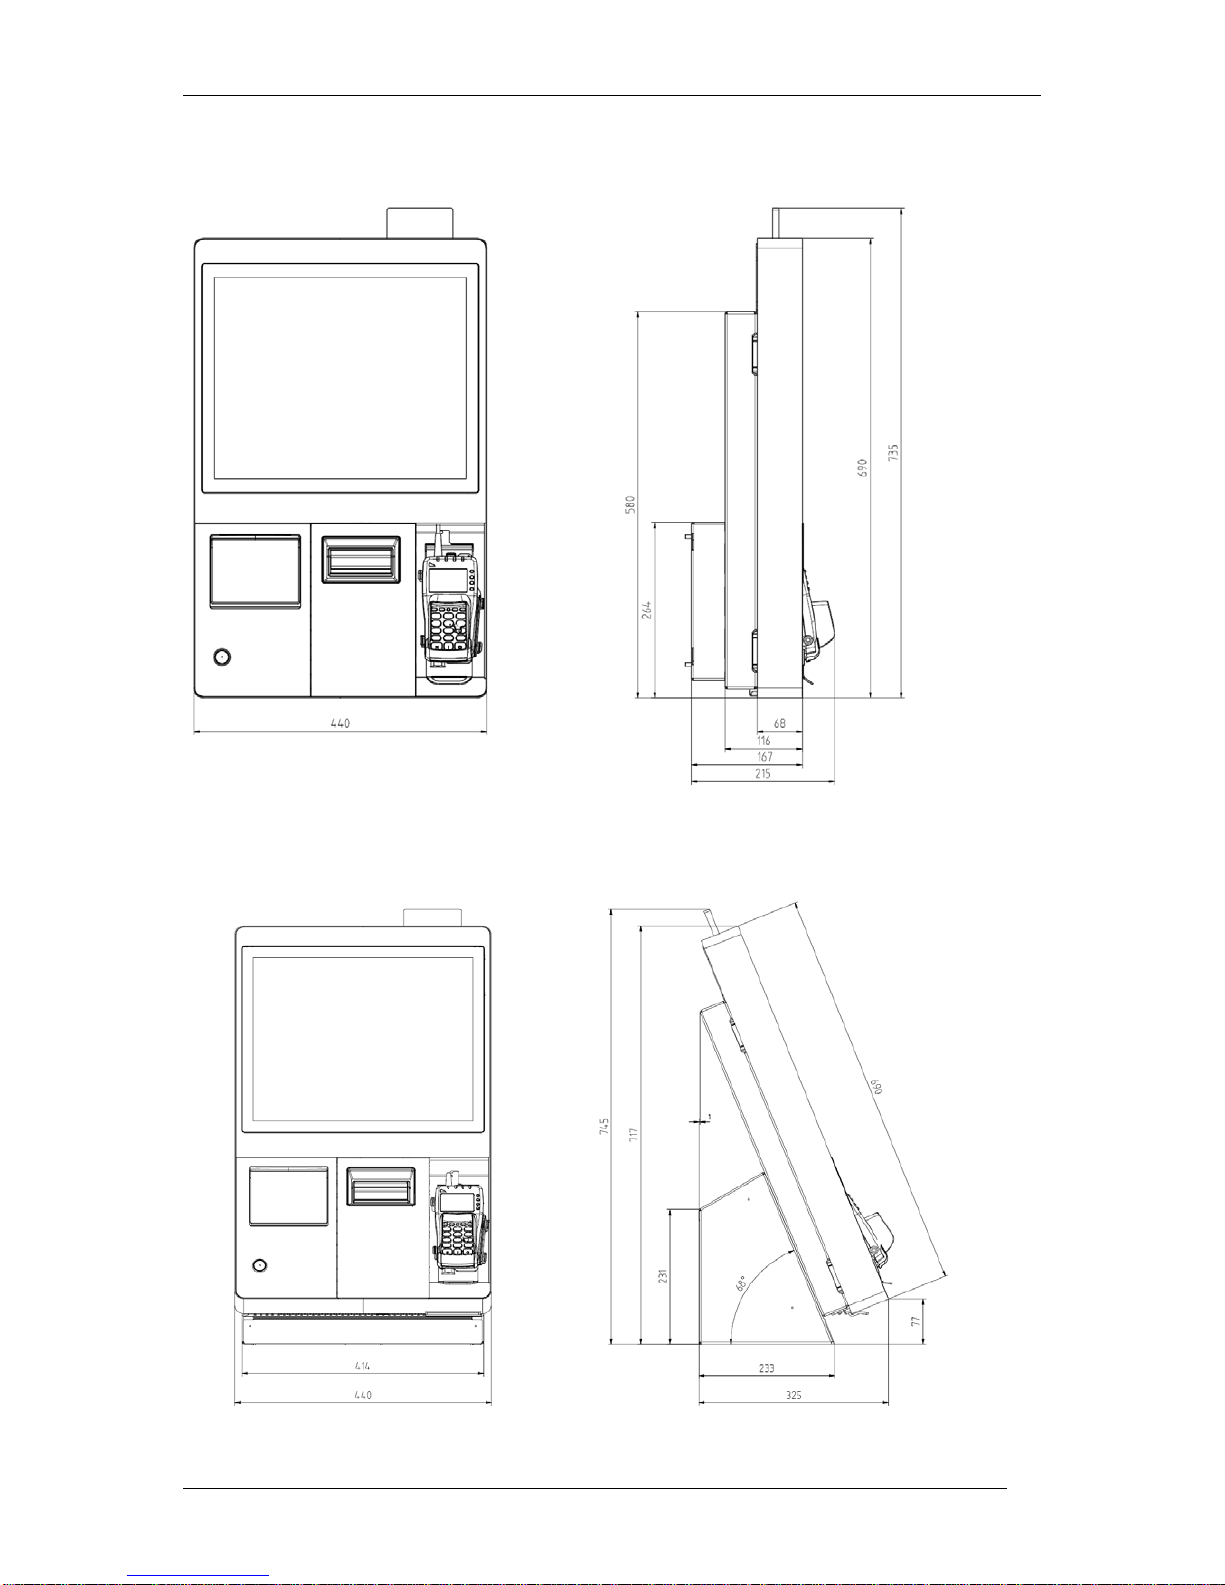
3Dimensions....................................................................................................................... 3
3.1 Rear of 15” and 19” version........................................................................................................ 3
3.2 15” version .................................................................................................................................. 4
3.3 15“ version with tabletop display ............................................................................................... 5
3.4 19” version .................................................................................................................................. 6
3.5 19“ version with tabletop display ............................................................................................... 6
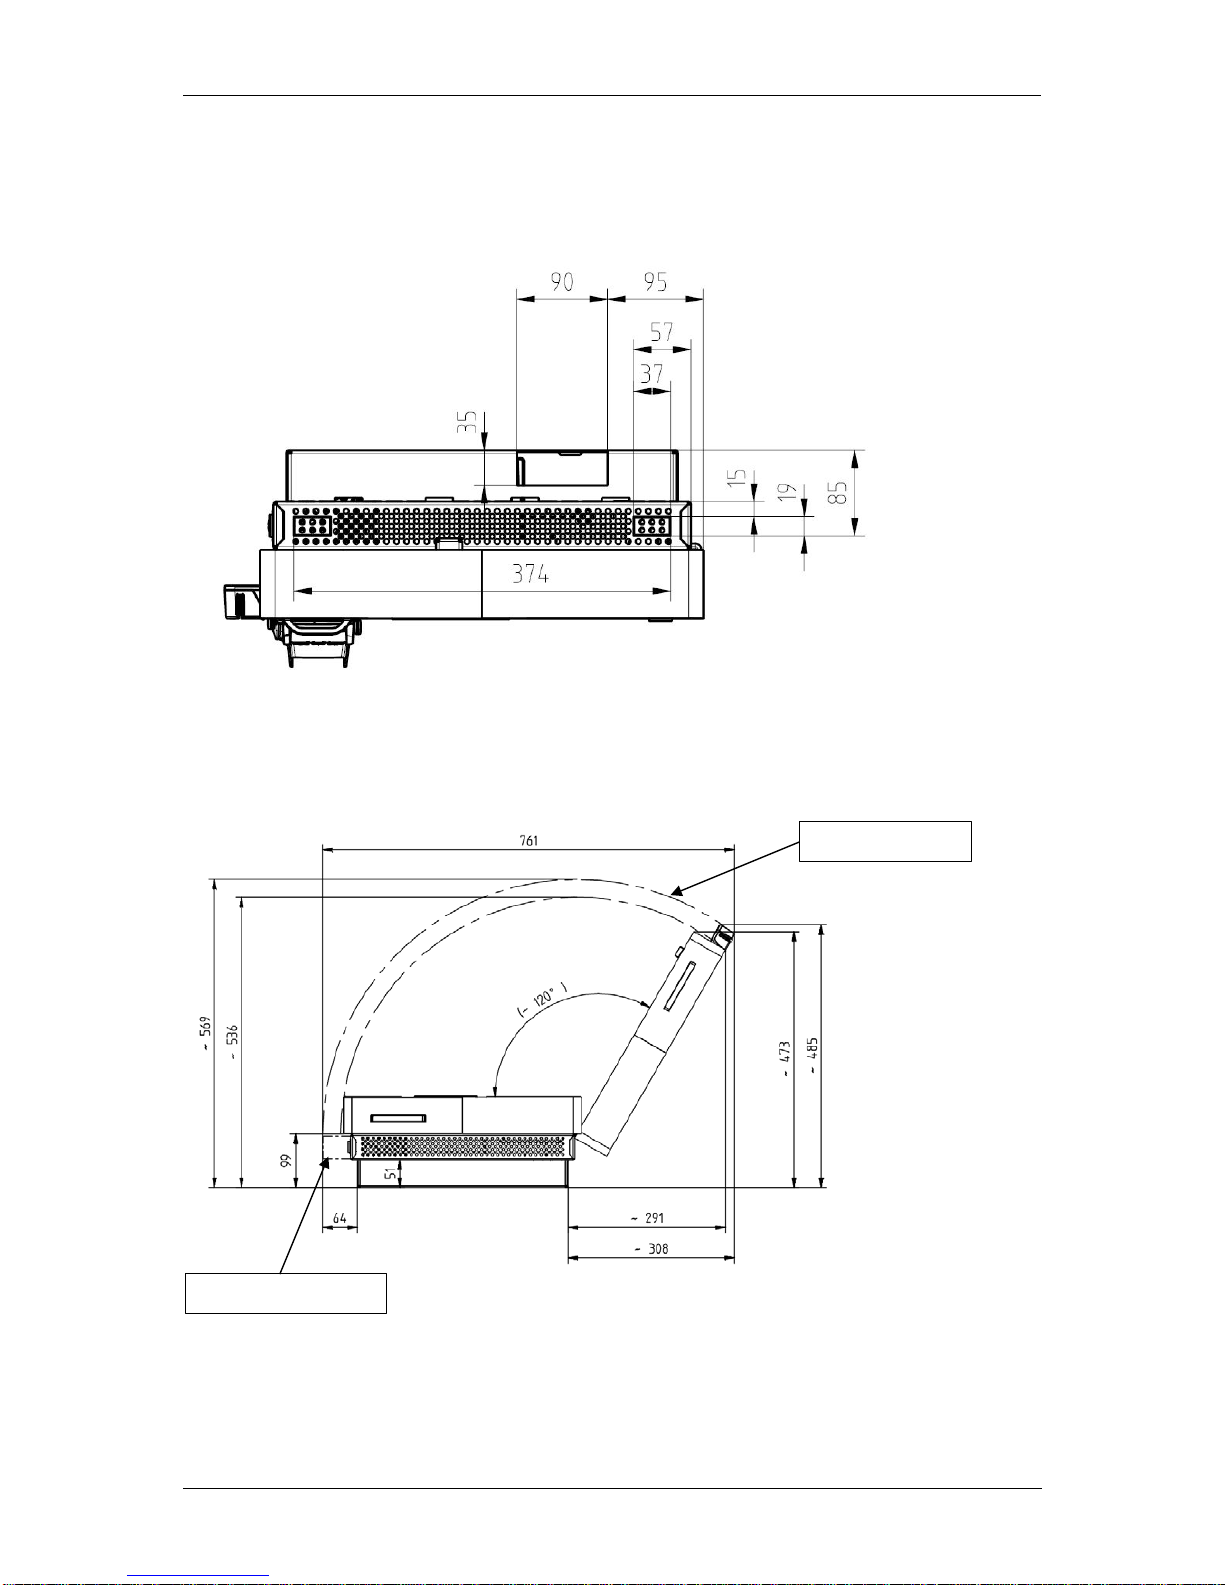
3.6 Openings on the underside......................................................................................................... 7
3.7 Device with open door................................................................................................................ 7
4Orientation and vertical mounting..................................................................................... 8
5Ventilating the system ...................................................................................................... 9
6Suspending the system.................................................................................................... 11
7Cabling external devices.................................................................................................. 12
8Mechanically adapting additional peripherals.................................................................. 13
9Pillar and wall mounting ................................................................................................. 14
9.1 Dimensions (in mm) .................................................................................................................. 14
9.1.1 Optional base plate................................................................................................................... 14
9.1.2 Pillar drill template.................................................................................................................... 14
9.1.3 Pillar mounting with 15” BEETLE /iScan EASY eXpress+ ........................................................... 15
9.1.4 Pillar mounting of 19” BEETLE /iScan EASY eXpress+ with optional basket shelf on both sides,
status indicator, coupon box and base plate ........................................................................................ 15
9.1.5 Pillar mounting of 19” BEETLE /iScan EASY eXpress+ and optional scale platform.................. 16
9.1.6 Wall mounting of 15” BEETLE /iScan EASY eXpress+................................................................ 16
9.1.7 Wall mounting of 19” BEETLE /iScan EASY eXpress+................................................................ 17
9.2 Installation instructions: Self-Checkout on pillar ...................................................................... 18
9.2.1 Self-Checkout with floor cabling ............................................................................................... 18
9.2.2 Self-Checkout with floor cabling and optional base plate ........................................................ 23
9.3 Self-Checkout with cabling “on the floor” ................................................................................ 24
9.4 Installing the basket shelf at front ............................................................................................ 24
9.5 Installing the basket shelf at side.............................................................................................. 26
9.6 Installing the security scale at front.......................................................................................... 26
9.7 Installing the security scale at side ........................................................................................... 29
9.8 Installing the coupon box.......................................................................................................... 31
9.9 Installing the signal indicator .................................................................................................... 33
9.10 Installing the coupon printer shelf............................................................................................ 36
9.11 Assembly instructions: Wall mounting ..................................................................................... 36
9.11.1 Requirements............................................................................................................................ 36
9.11.2 Hole pattern for wall mounting (dimensions in mm) ............................................................... 37
9.11.3 Installing the wall mount .......................................................................................................... 38
10 Block diagram ................................................................................................................. 40


BEETLE /iSCAN EASY eXpress+Integration Guide
1
1Remarks
You will find further important details in relation to installation in the Installation Guide for the
BEETLE /iSCAN Express+ on the Diebold Nixdorf website.
An angled power cable is required both for integration in the tabletop adapter and for wall
and pillar mounting.
Integration Guide BEETLE /iSCAN EASY eXpress+
2
2Technical data
2.1 System
Mains input voltage 100-240 VAC / 60-50Hz
Power consumption 1.4-0.7A
Typical output approx. 55W
Max. output approx. 87W
Standby output approx. 1.5W
Weight for 15” version 28 kg
Weight for 19” version 30 kg
2.2 Environmental conditions
Operation
Air temperature: 5 °C – 35 °C
Relative humidity: 5% r.h. (1 g/m 3 ) – 85% r.h. (25 g/m 3 )
Temperature fluctuation: 0.5 K/min (max. 7.5K/30 min)
Air pressure: 106 - 78 kPa
(78kPa corresponds to the air pressure for installation at approx. 2000m above sea level)
Installation environments with prolonged exposure to sunlight should be avoided.
Storage
Air temperature: 5 °C – 40 °C
Humidity: 5% r.h. (1g/m 3 ) – 85% r.h. (25 g/m 3 ) 0.5 K/min
Temperature fluctuation: 0.5 K/min (max. 7.5K/30min)
Transport
Air temperature: -25 °C – 60 °C
Humidity: 15% r.h. (1 g/m 3 ) – 98% r.h. (32 g/m 3 )
Temperature fluctuation: - 25 °C / 25 °C

BEETLE /iSCAN EASY eXpress+Integration Guide
3
3Dimensions
(all values in mm)
3.1 Rear of 15” and 19” version
Integration Guide BEETLE /iSCAN EASY eXpress+
4
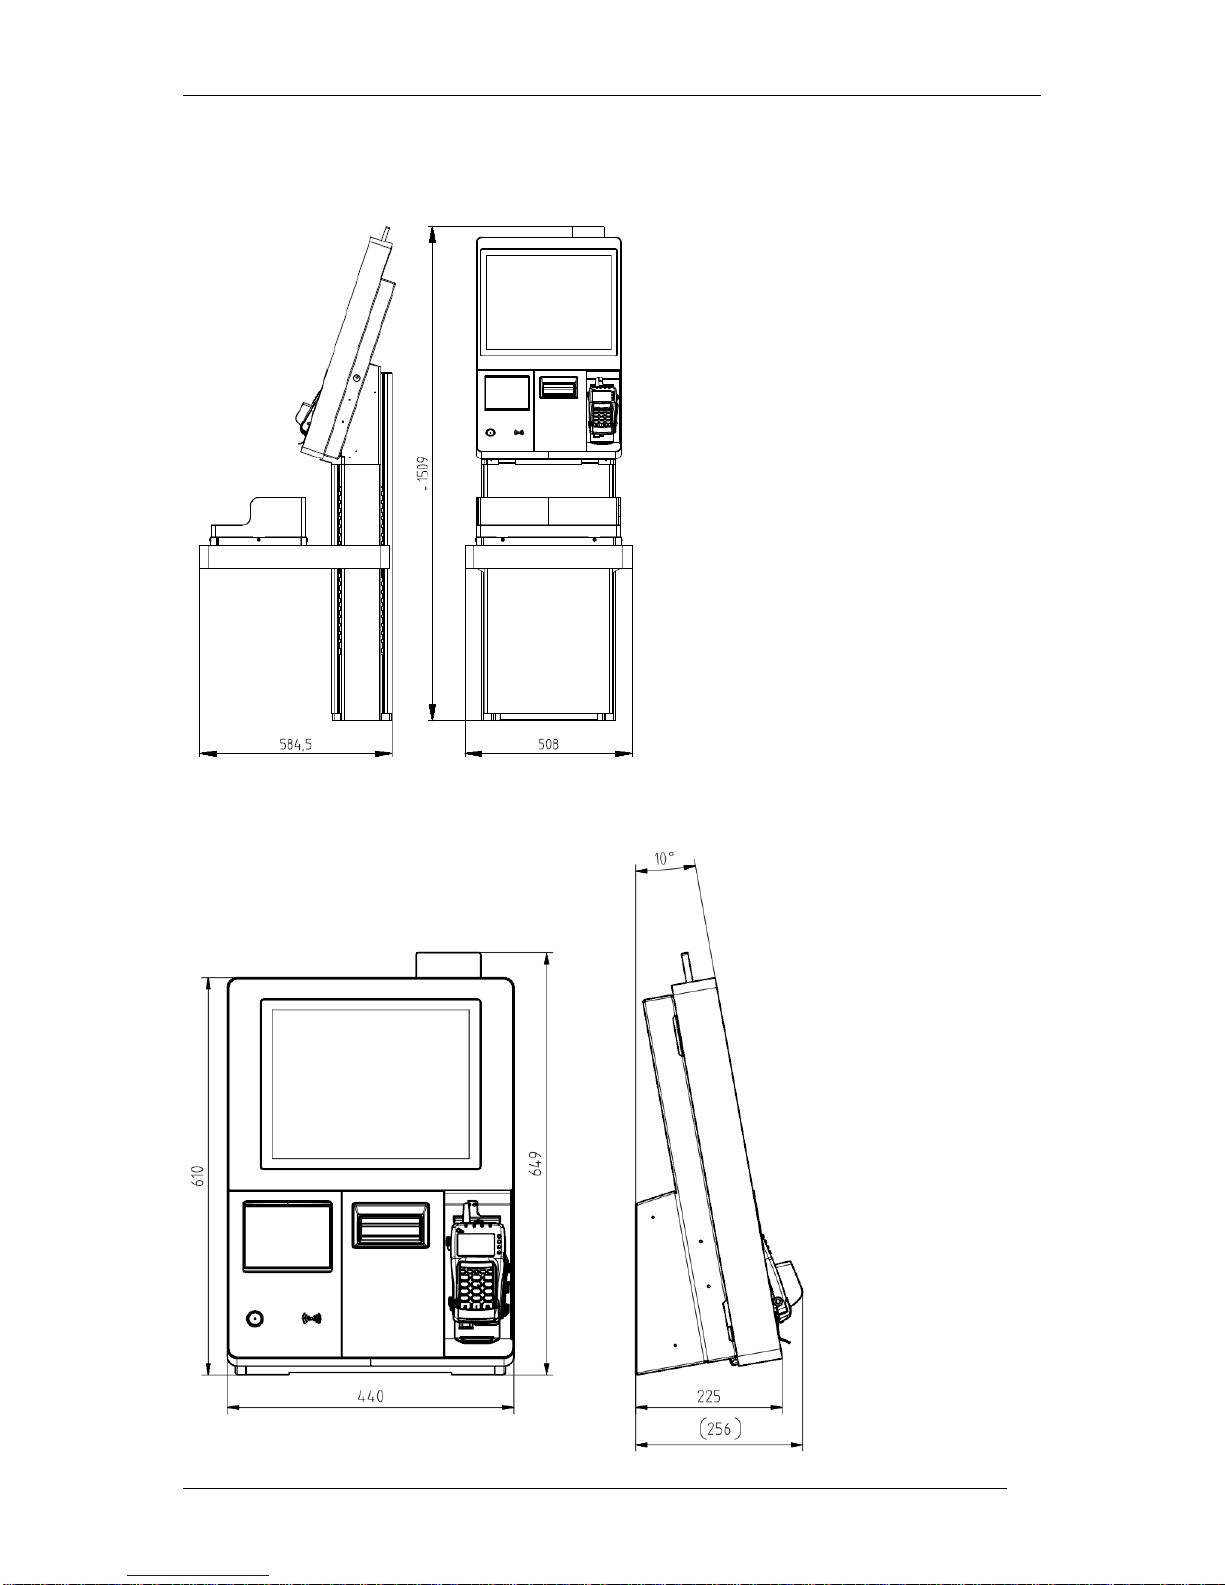
3.2 15” version
BEETLE /iSCAN EASY eXpress+Integration Guide
5
3.3 15“ version with tabletop display
Integration Guide BEETLE /iSCAN EASY eXpress+
6
3.4 19” version
3.5 19“ version with tabletop display
BEETLE /iSCAN EASY eXpress+Integration Guide
7
3.6 Openings on the underside
3.7 Device with open door
Service area
Grip area of lock
Integration Guide BEETLE /iSCAN EASY eXpress+
8
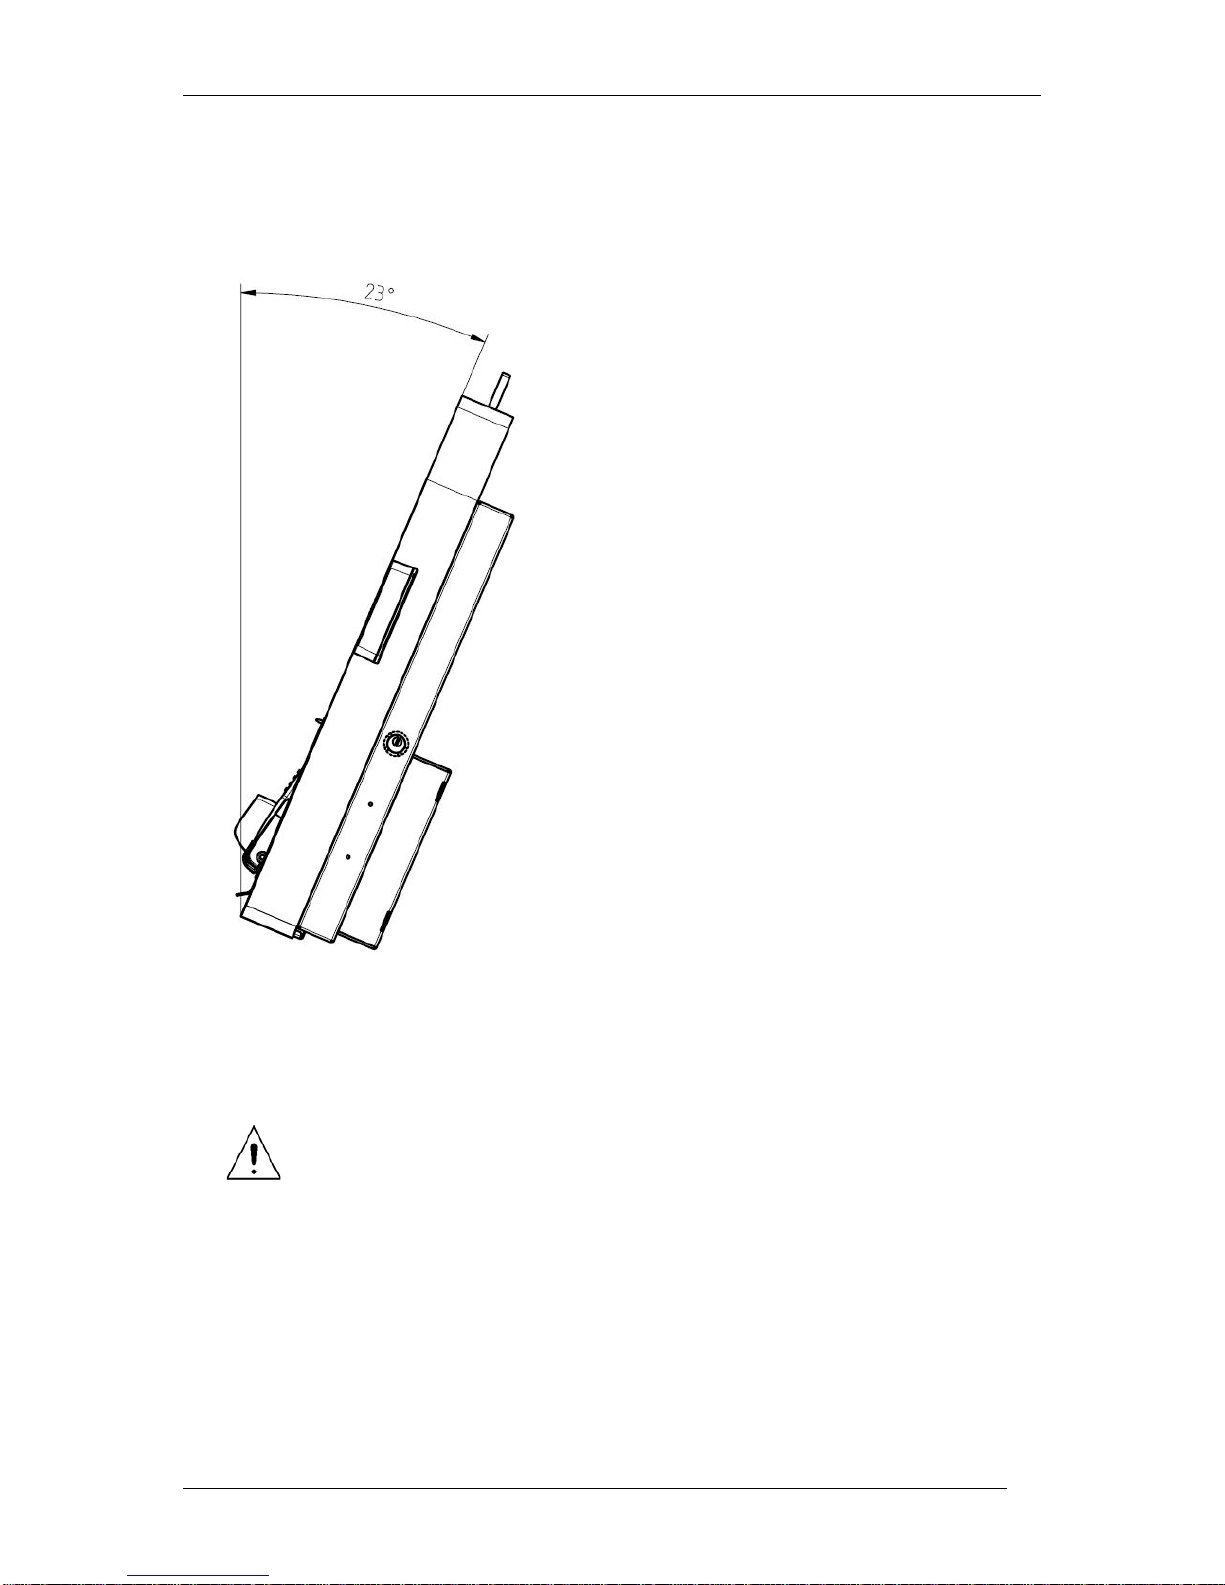
4Orientation and vertical mounting
The BEETLE /iSCAN EASY eXpress+may be installed vertically or tilted at an angle of up to 23° from
the vertical.
Danger owing to ingress of liquids!
In case of vertical assembly in a restaurant environment, a suitable mechanism must be
used to ensure that no beverages can be placed on the device.
Ingress of liquids can damage the device irreparably.
BEETLE /iSCAN EASY eXpress+Integration Guide
9
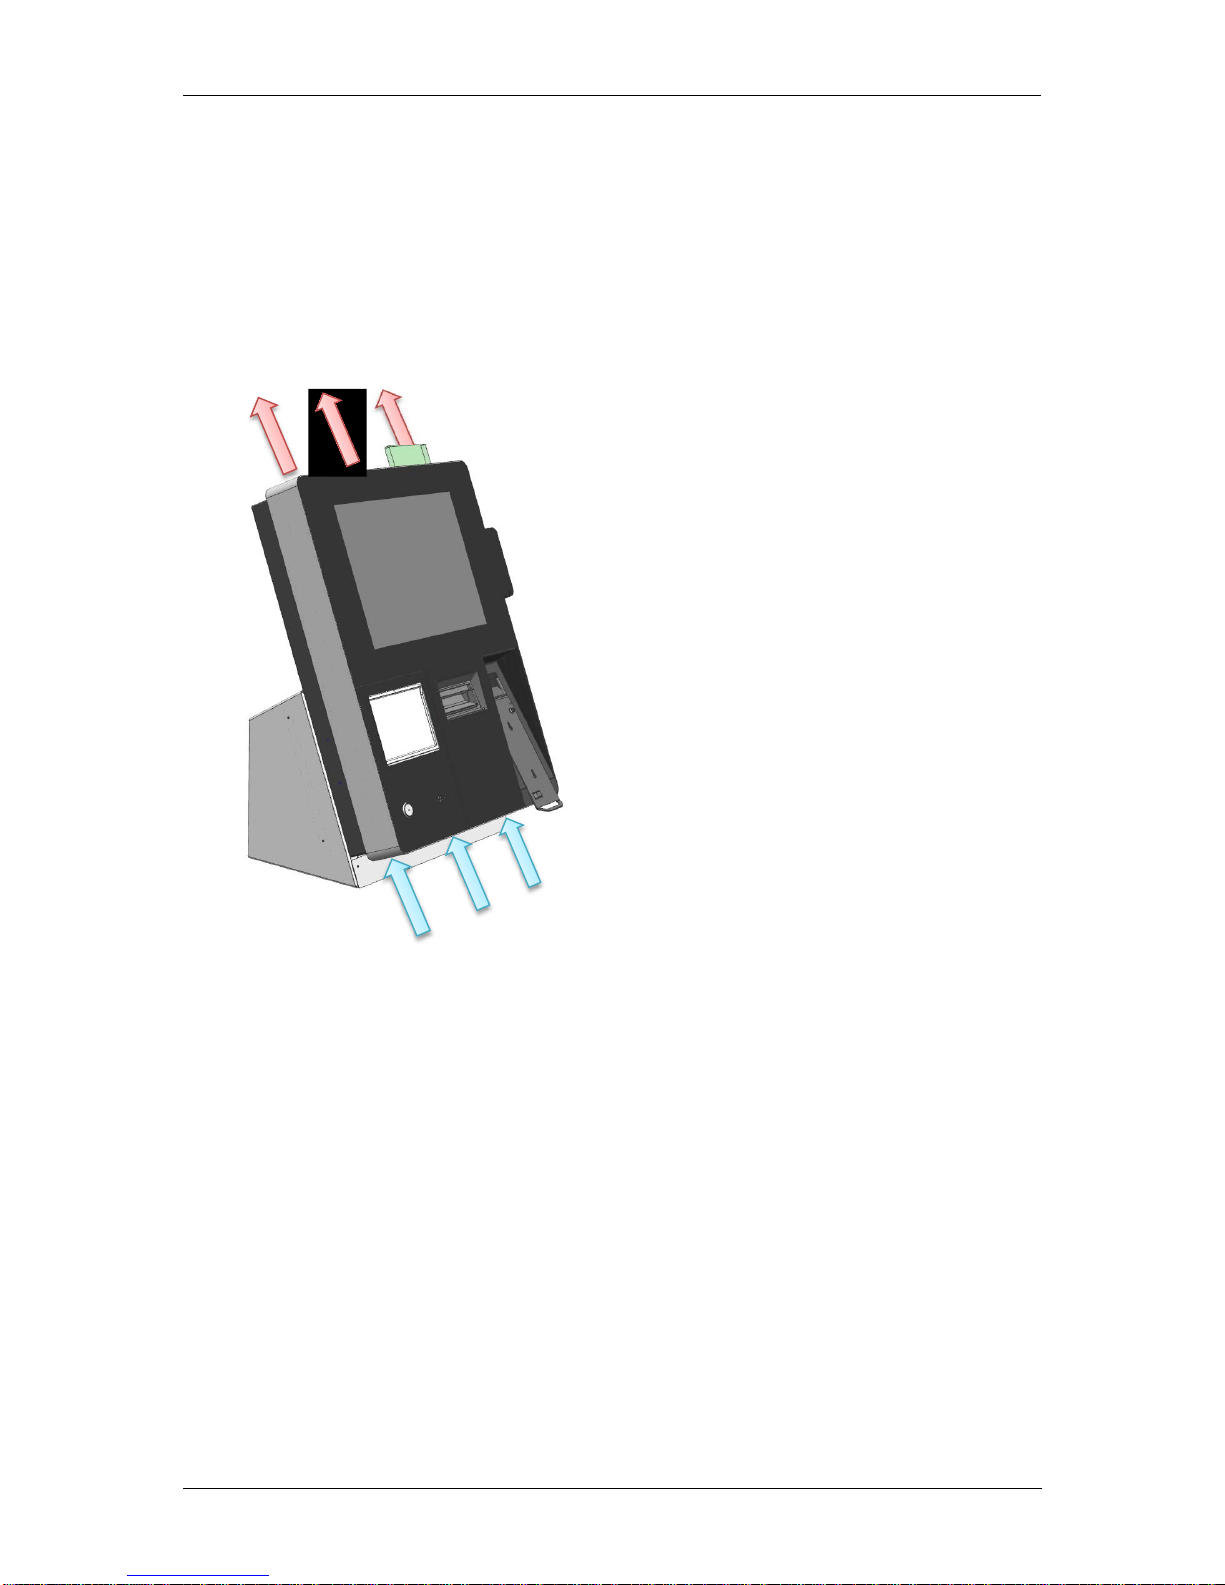
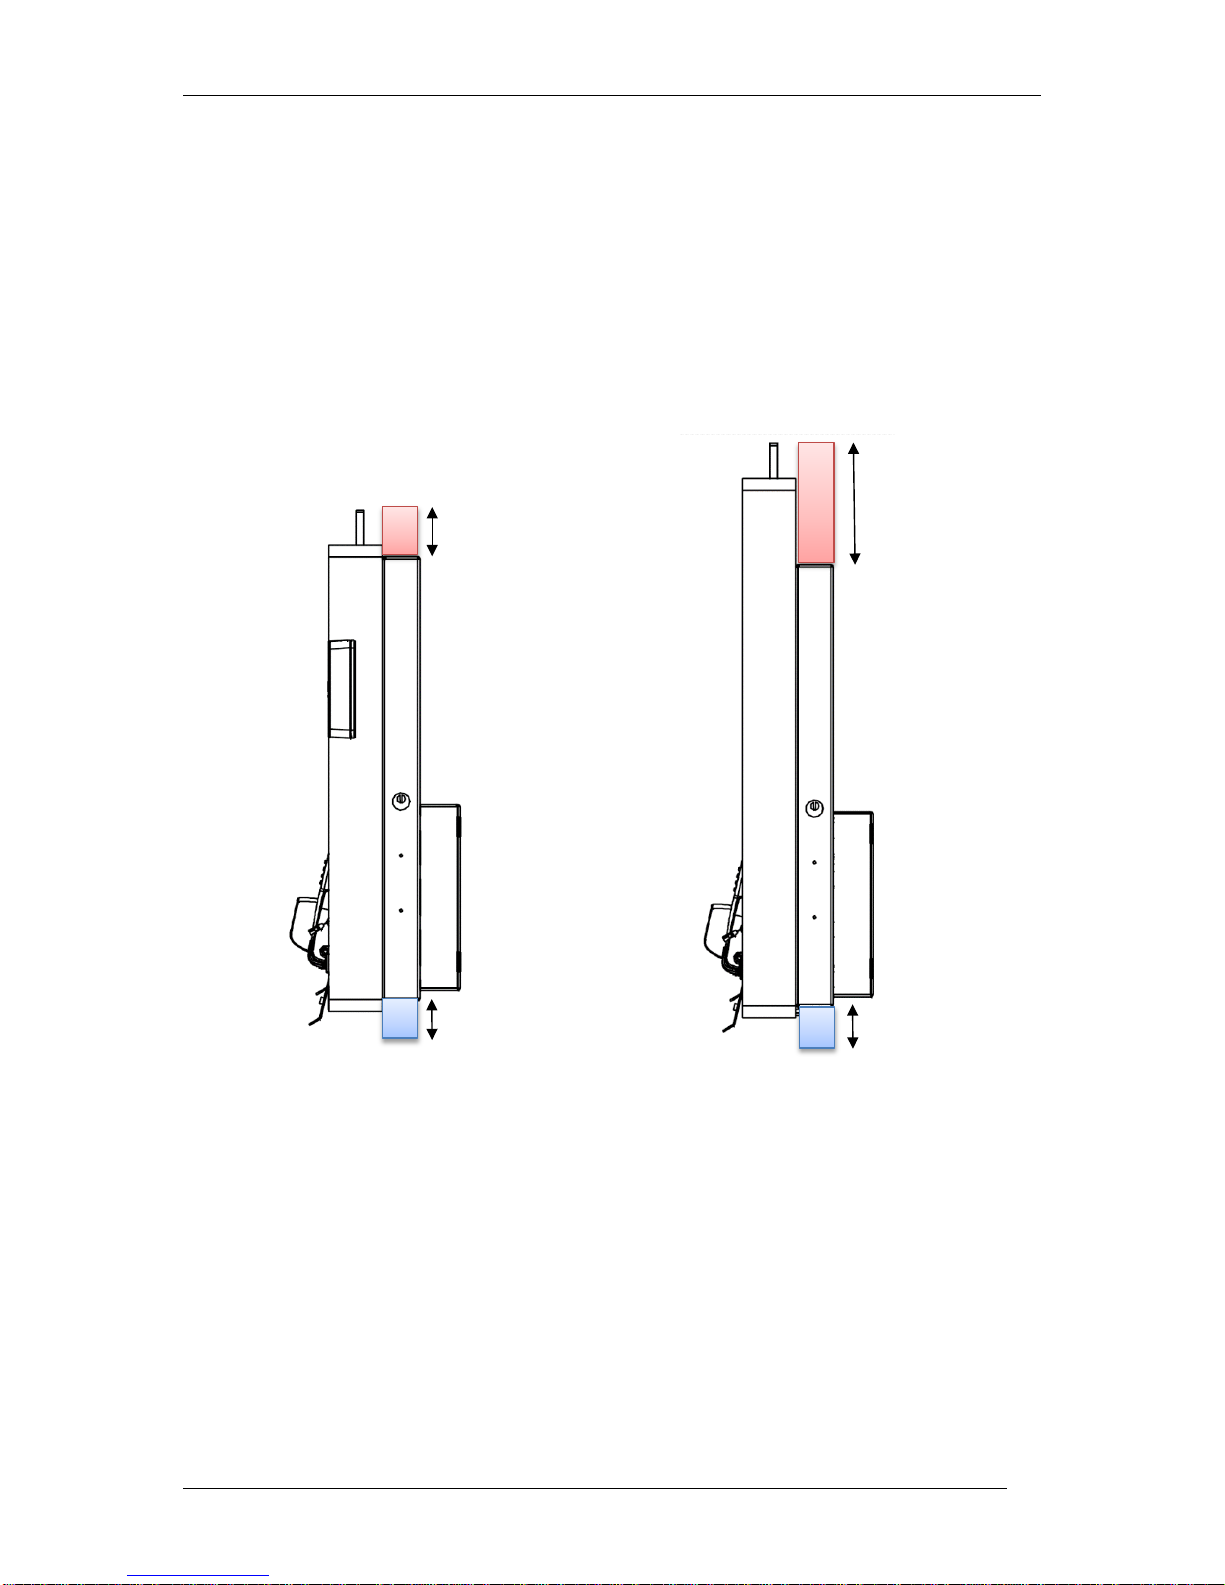
5Ventilating the system
Keep the device's ventilation openings uncovered to ensure adequate ventilation. This prevents the
temperature increasing excessively.
Even if you plan to integrate the device, make sure to maintain the minimum distances stated below
and ensure reliable ventilation and air extraction.
The direct ambient temperature of the system must not exceed 35 °C.
Integration Guide BEETLE /iSCAN EASY eXpress+
10
Observe the specified minimum distances to ensure proper ventilation.
Always keep the ventilation slots free of obstruction to ensure adequate air circulation and avoid
overheating.
15” version
19” version
50mm
60mm
50mm
150mm
BEETLE /iSCAN EASY eXpress+Integration Guide
11
6Suspending the system
4 positions for securing with screws with a diameter of 6mm
4 positions for se-
curing with hooks;
additional fixing
with screws is nec-
essary!
Integration Guide BEETLE /iSCAN EASY eXpress+
12
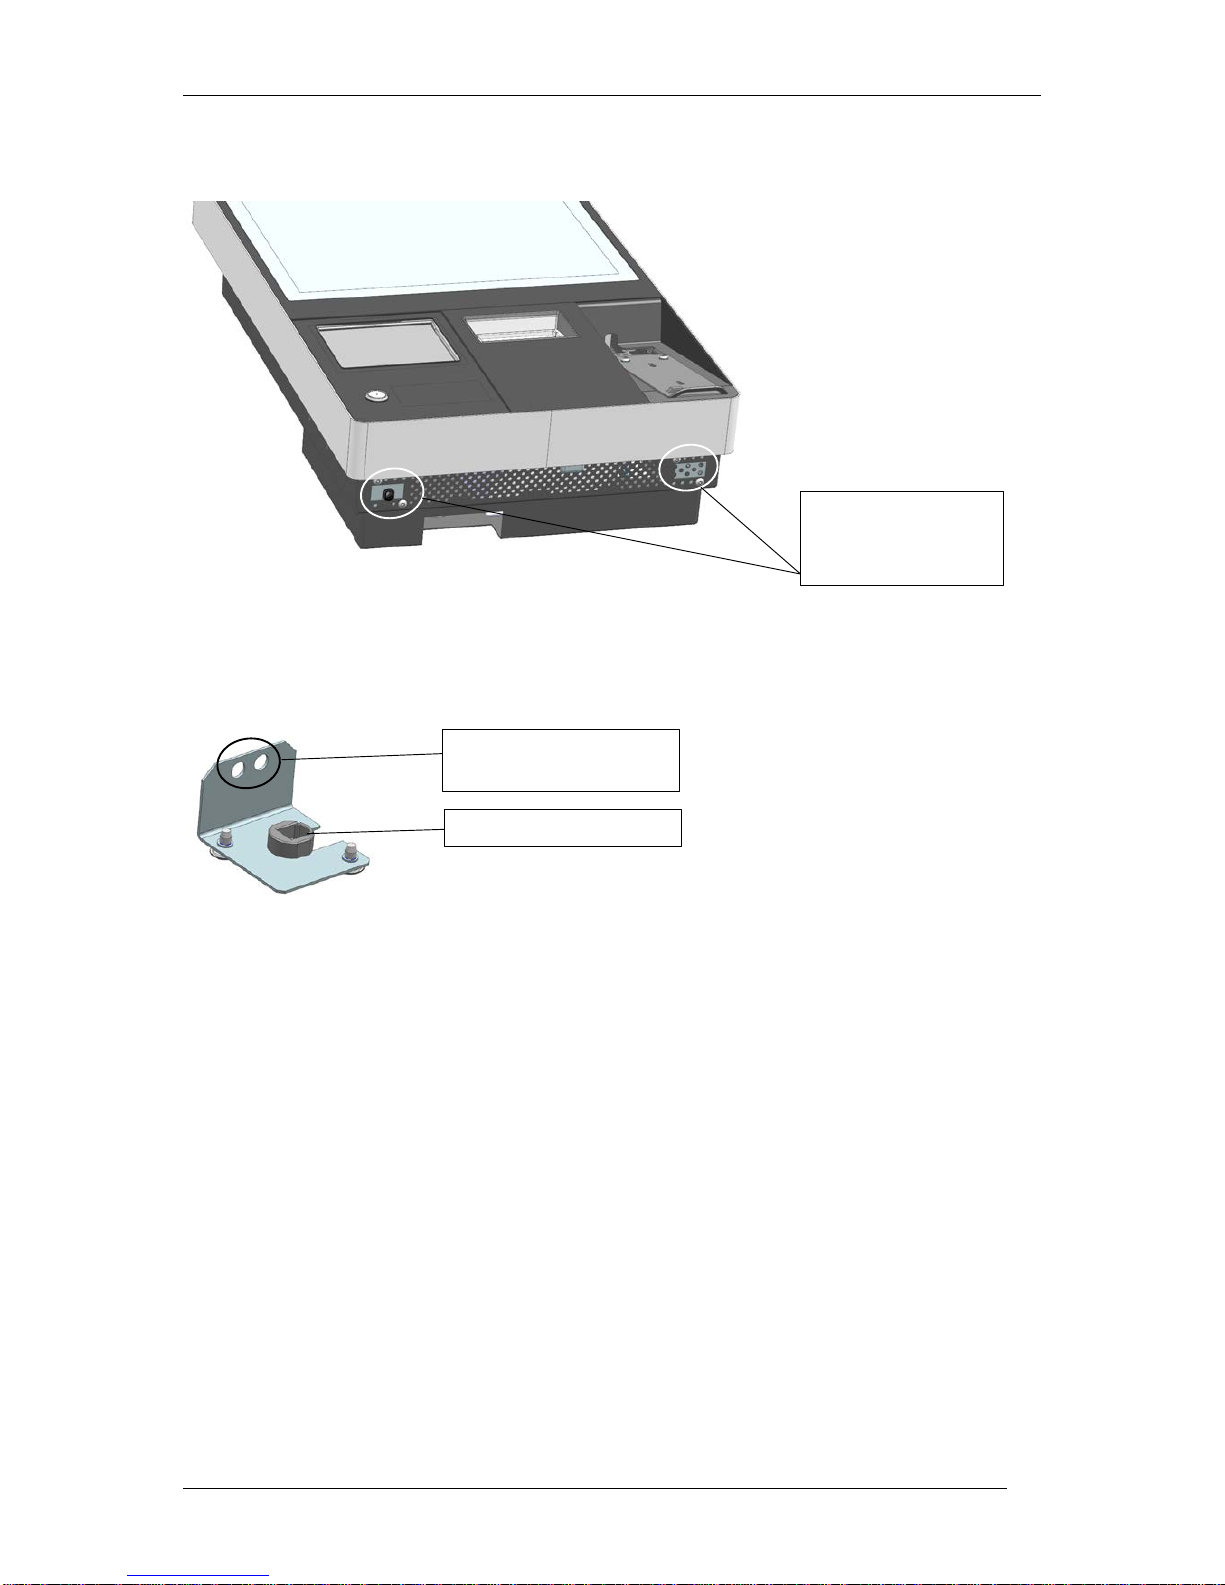
7Cabling external devices
There are openings on the underside of the device to the right and left, which are sealed by
covers.
One of the covers allows cable feed with edge protection. The covers are interchangeable.
Covers for cabling
external devices
Fixing of cables is possi-
ble (strain relief)
Cable feedthrough
BEETLE /iSCAN EASY eXpress+Integration Guide
13
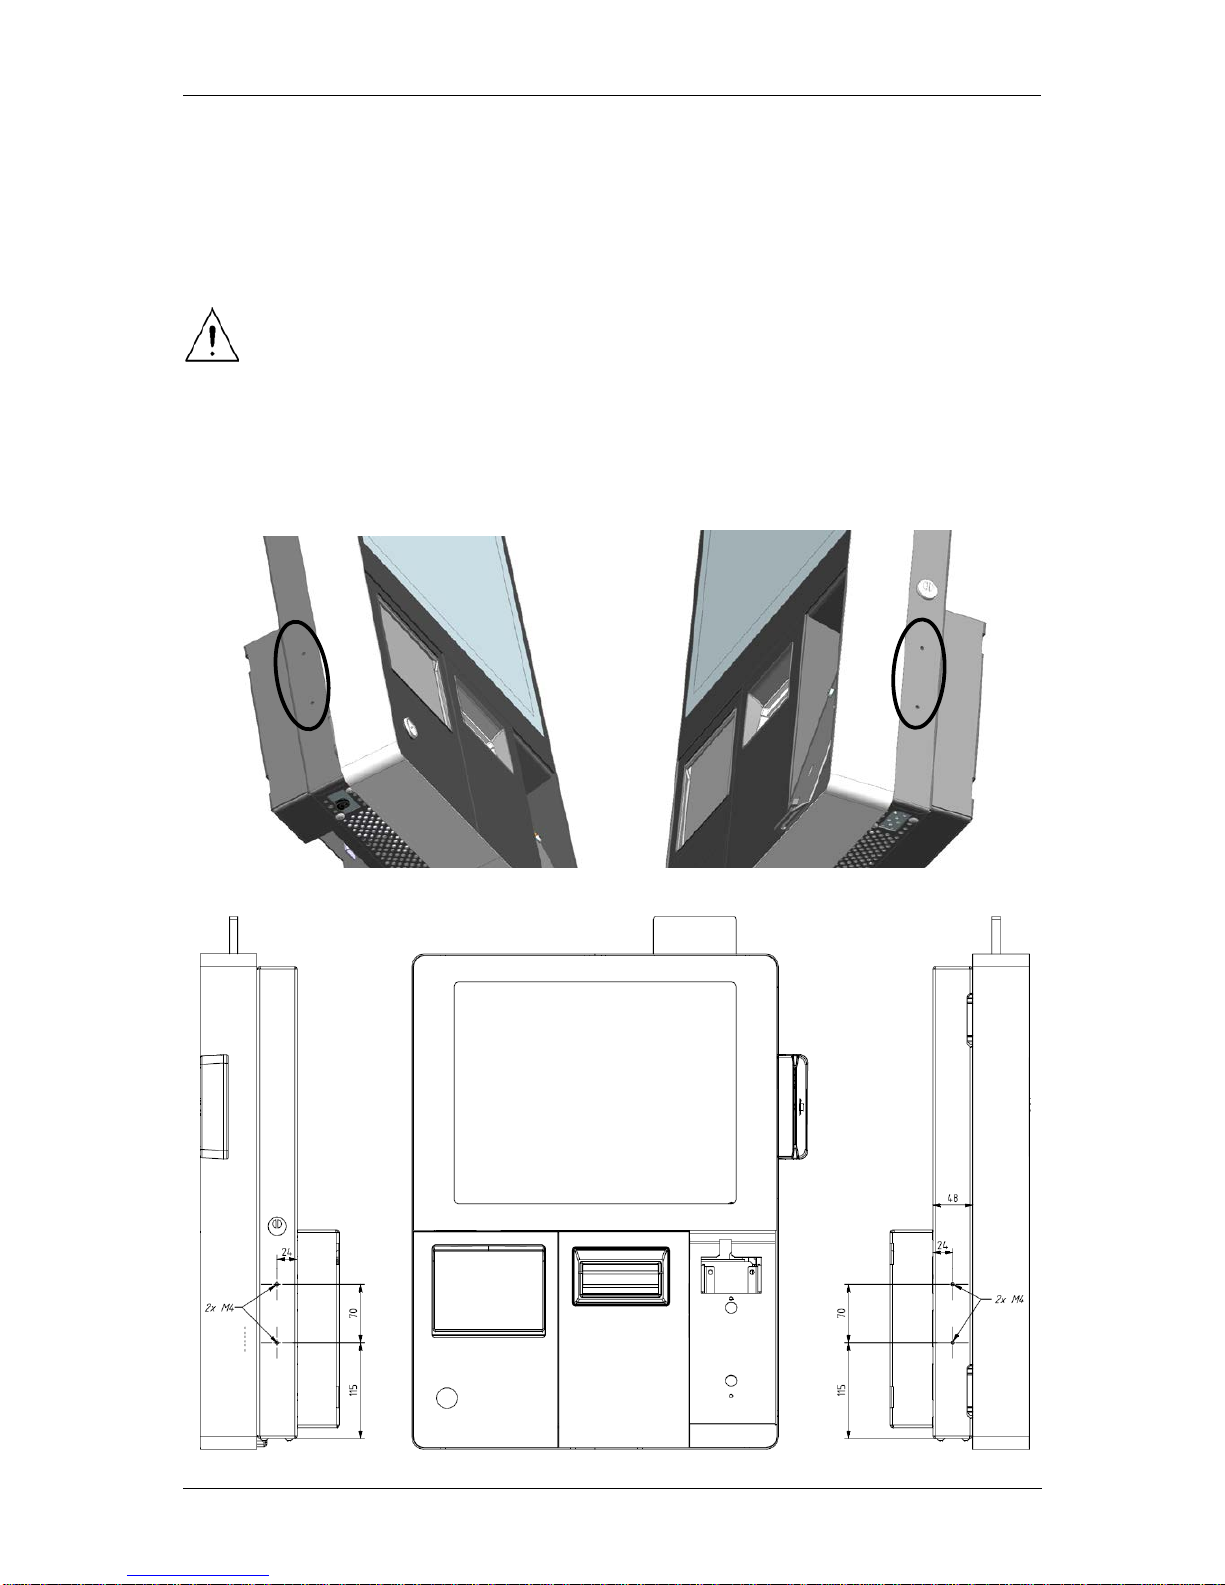
8Mechanically adapting additional peripherals
The housing of the BEETLE /iSCAN EASY eXpress+ includes two M4 screw threads on either side
of the body for attaching add-ons, such as brackets for handheld scanners, advertising media,
etc.
The M4 screw threads must not be used under any circumstances for mounting the
device on a wall.
Take care when fitting the add-ons that the opening of the door and access to the locking
system are not obstructed.
Integration Guide BEETLE /iSCAN EASY eXpress+
14
9Pillar and wall mounting
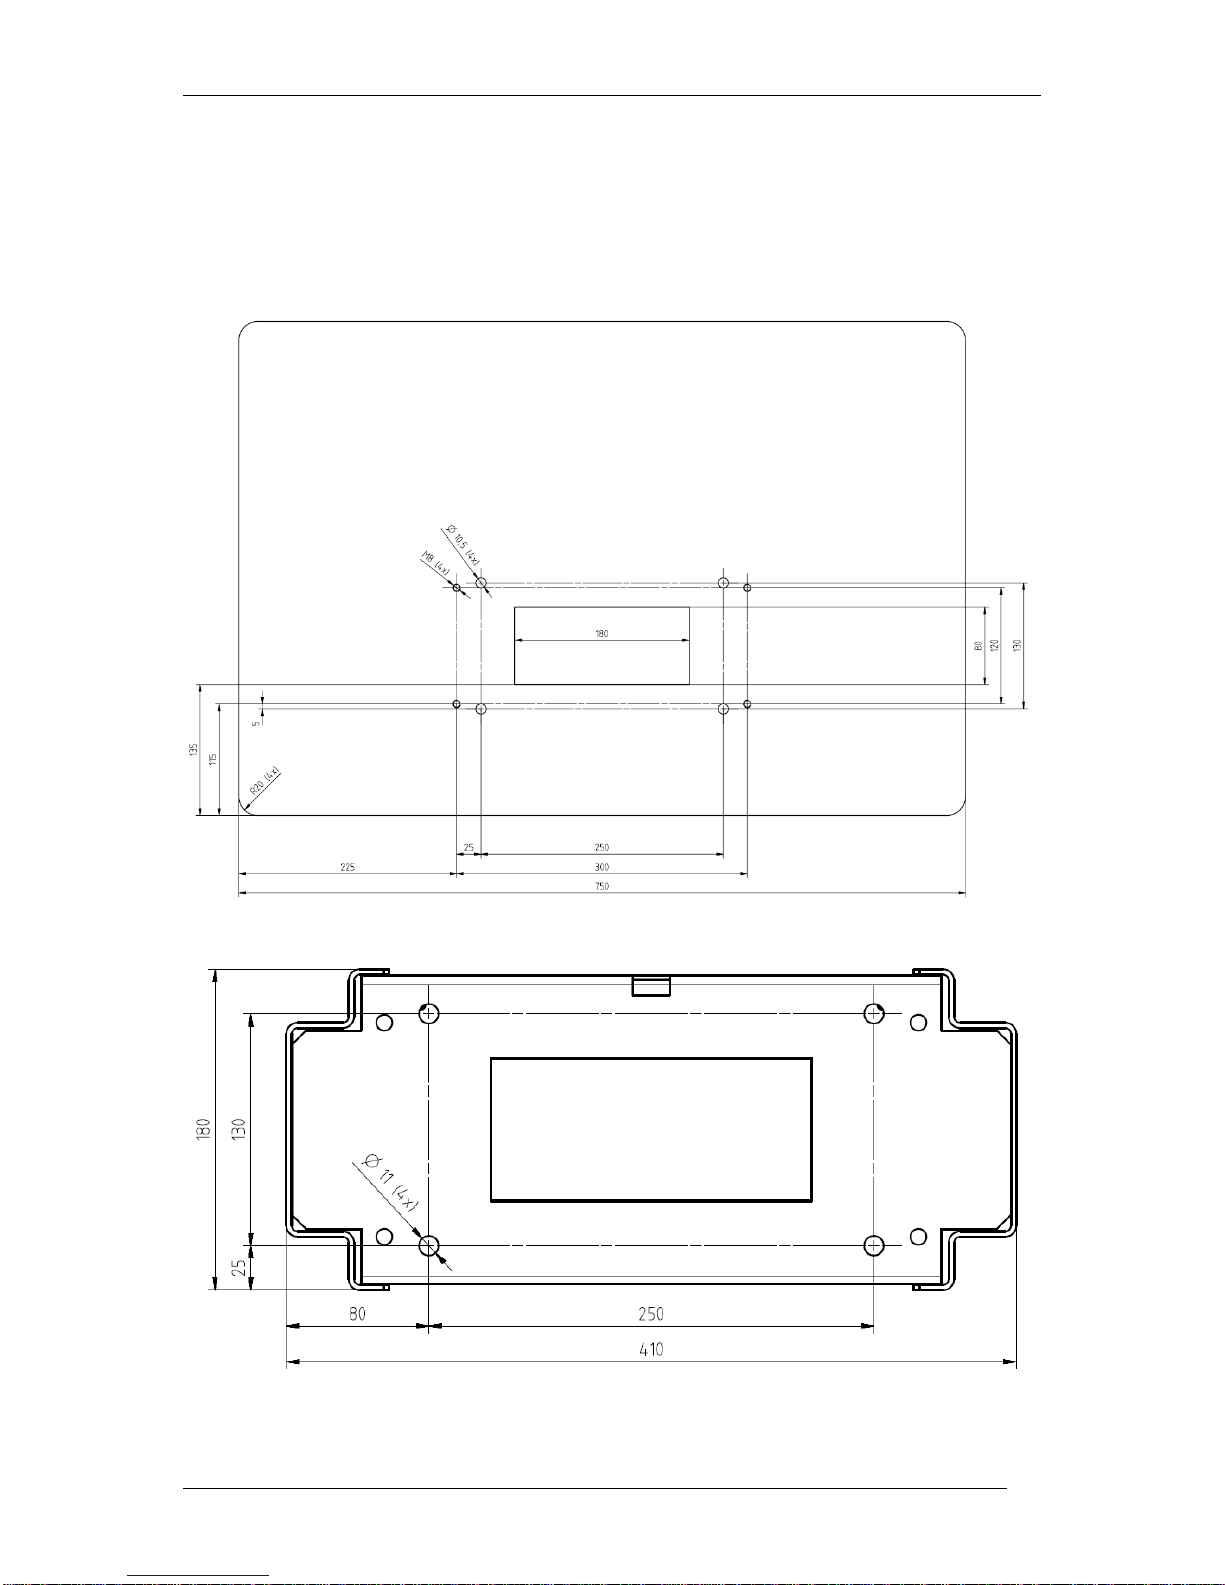
9.1 Dimensions (in mm)
9.1.1 Optional base plate
9.1.2 Pillar drill template

BEETLE /iSCAN EASY eXpress+Integration Guide
15
9.1.3 Pillar mounting with 15” BEETLE /iScan EASY eXpress+
9.1.4 Pillar mounting of 19” BEETLE /iScan EASY eXpress+ with optional
basket shelf on both sides, status indicator, coupon box and base
plate
Integration Guide BEETLE /iSCAN EASY eXpress+
16
9.1.5 Pillar mounting of 19” BEETLE /iScan EASY eXpress+ and optional
scale platform
9.1.6 Wall mounting of 15” BEETLE /iScan EASY eXpress+
Table of contents
Other DIEBOLD NIXDORF Cash Register manuals


