DigiSender Plug'n'Go DX2000-LCD User manual

ENGLISH (EN)
040609-1
DigiSender
Plug’n’Go™ LCD
MODEL: DX2000-LCD
Single Input ‘Plug Style’ Wireless AV Sender
®
IMPORTANT: ALWAYS KEEP THIS INSTRUCTION MANUAL FOR FUTURE REFERENCE
WICHTIG: HEBEN SIE DIESE BEDIENUNGSANLEITUNG ZU REFERENZZWECKEN AUF
IMPORTANT : VEUILLEZ CONSERVER CE MODE D’EMPLOI AFIN DE POUVOIR VOUS Y REPORTER SI BESOIN
BELANGRI K: GELIEVE DEZE INSTRUCTIEHANDLEIDING ALTI D TE BEWAREN VOOR LATER GEBRUIK
ENGLISH (EN)
DEUTSCH (DE)
FRANCAIS (FR)
NEDERLANDS (NL)
DX2000-LCD - DigiSender® Plug’n’Go™ LCD
Please read this instruction manual carefully prior to installationPage 02
Table of Contents
ENGLISH
Introduction 03
Step 1 - Unpack your Plug’n’Go™ LCD 04
Step 2 - Install the Transmitter 05
Step 3 - Install the Receiver 06
Step 4 - Using the Plug’n’Go™ LCD 07-08
Plug’n’Go™ LCD Advanced Function 08
Upgrades and Accessories 09
Troubleshooting 10-13
Picture Problems 10-11
Audio Problems 12
Problems Controlling Your Source Equipment 13
Technical Support 14
DEUTSCH
Einführung 15
Schritt 1 - Überprüfung des Packungsinhalts 16
Schritt 2 - Installieren Sie die Sendereinheit 17
Schritt 3 - Installieren Sie die Empfängereinheit 18
Schritt 4 - Gebrauch des Plug’n’Go™ LCD 19-20
Plug’n’Go™ LCD Erweiterte Funktionen 20
Erweiterungen und Zusatzgeräte 21
Problemlösung 22-25
Bildprobleme 22-23
Tonprobleme 24
Fernbedienungserweiterung 25
Technischer Support 26
FRANCAIS
Présentation 27
Étape 1 - Déballez votre Plug’n’Go™ LCD 28
Étape 2 - Installation du Emettuer 29
Étape 3 - Installation du Receptuer 30
Étape 4 - Utilisation du Plug’n’Go™ LCD 31-32
Plug’n’Go™ LCD Fonctions avancées 32
Mises à jour et accessoires 33
Depennage 34-37
Problémes d’image 34-35
Problémes de Son 36
Problémes de commande de l’équipment source 37
Assistance Techique 38
NEDERLANDS
Inleiding 39
Stap 1 - Uw Plug’n’Go™ LCD uitpakken 40
Stap 2 - Installeer de Zendapparaat 41
Stap 3 - Installeer het ntvangapparaat 42
Stap 4 - De Plug’n’Go™ LCD gebruiken 43-44
Plug’n’Go™ LCD Geavanceerde functies 44
Upgrades & Accessoires 45
Probleemoplossing 46-49
Beeldproblemen 46-47
Geluidsproblemen 48
Problemen bij het bedienen van de
bronapparatuur 49
Technische ondersteuning 50
Document of Conformity 51

Please read this instruction manual carefully prior to installation Page 03
DX2000-LCD - DigiSender® Plug’n’Go™ LCD
ENGLISH (EN)
Introduction
Congratulations on purchasing the DigiSender® Plug’n’Go™ LCD - Single Input ‘Plug Style’ Wireless
AV Sender. This product represents state of the art wireless audio and video technology at exceptional
value for money.
You can now enjoy DVD quality video and Hi-Fi stereo sound from your Satellite, Cable, Freeview, DVD
or VCR in another room in your home.
Bene it rom Compact and Discrete Transmitter and Receiver units, 4 Audio/Video Channels and
unsurpassed ease o use with the new DigiSender® Plug’n’Go™ LCD!

DX2000-LCD - DigiSender® Plug’n’Go™ LCD
Please read this instruction manual carefully prior to installationPage 04
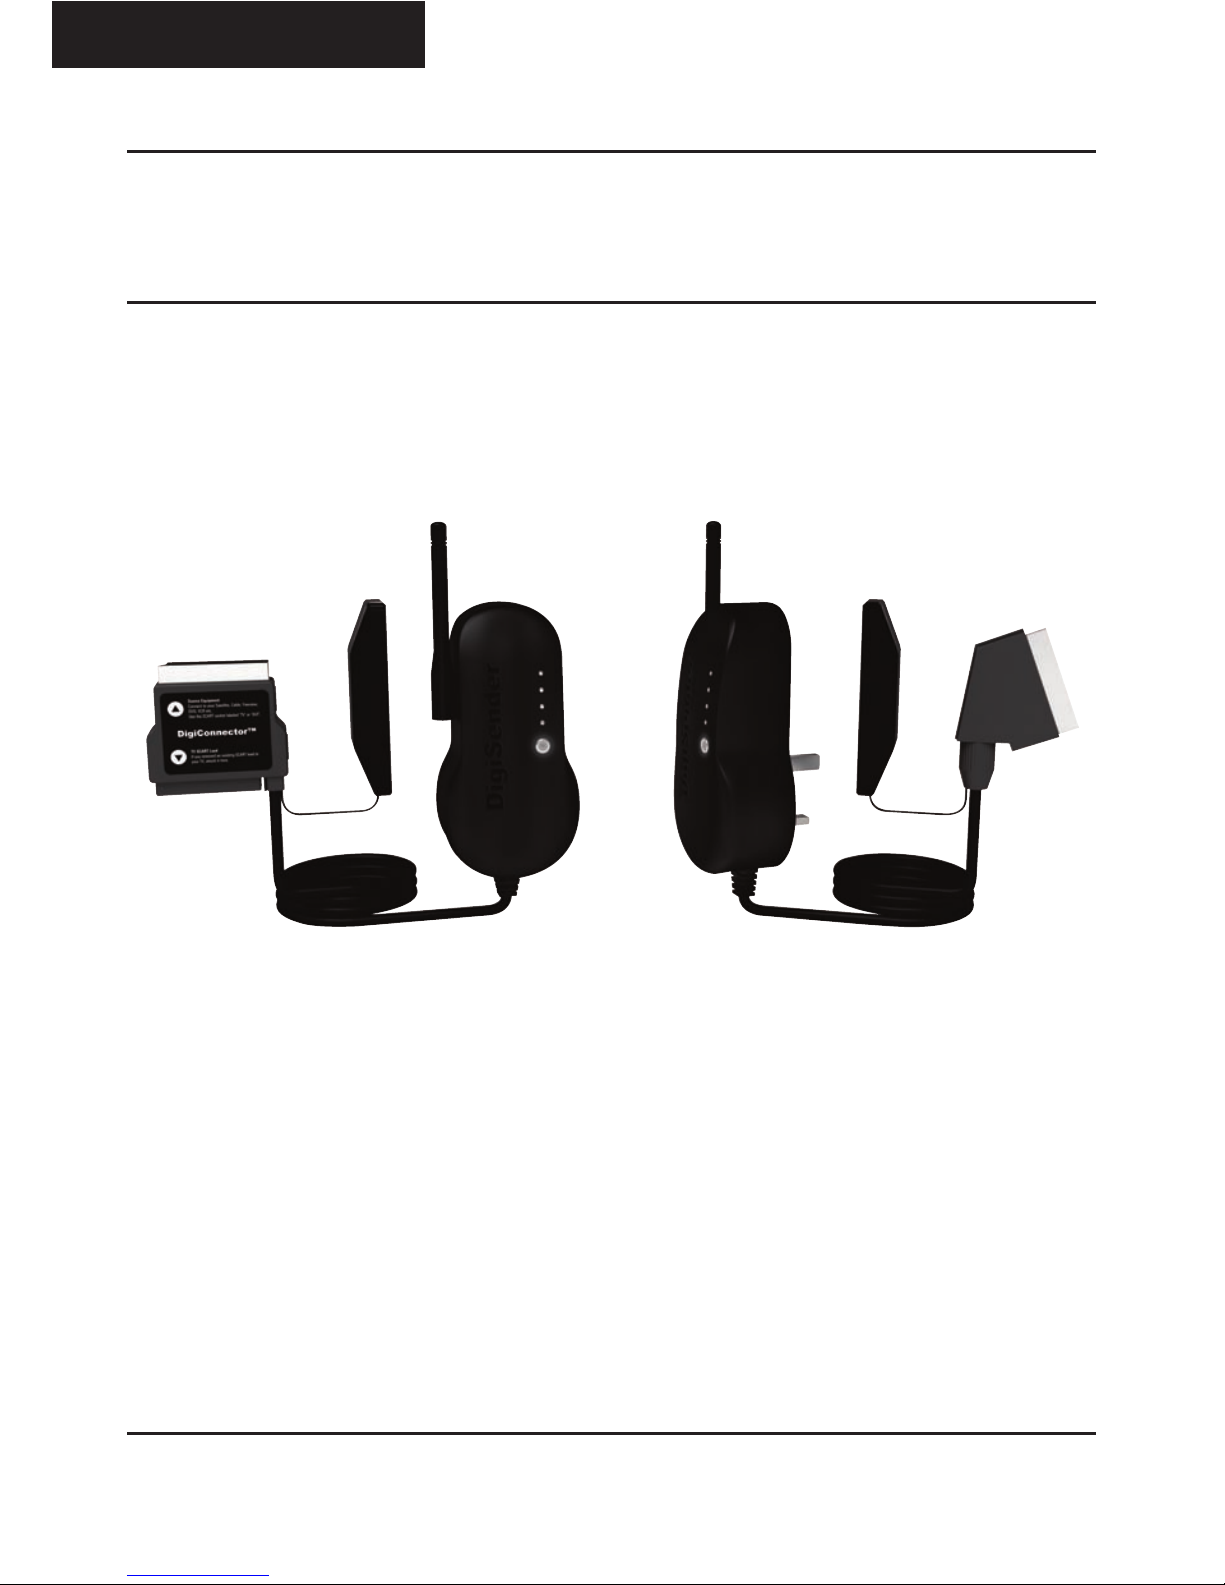
Step 1: Unpack Your DigiSender® Plug’n’Go™ LCD
ENGLISH (EN)
All DigiSender® orders are computer weight checked when packed. However, it is a good idea to check
all kit contents are present before proceeding with the installation.
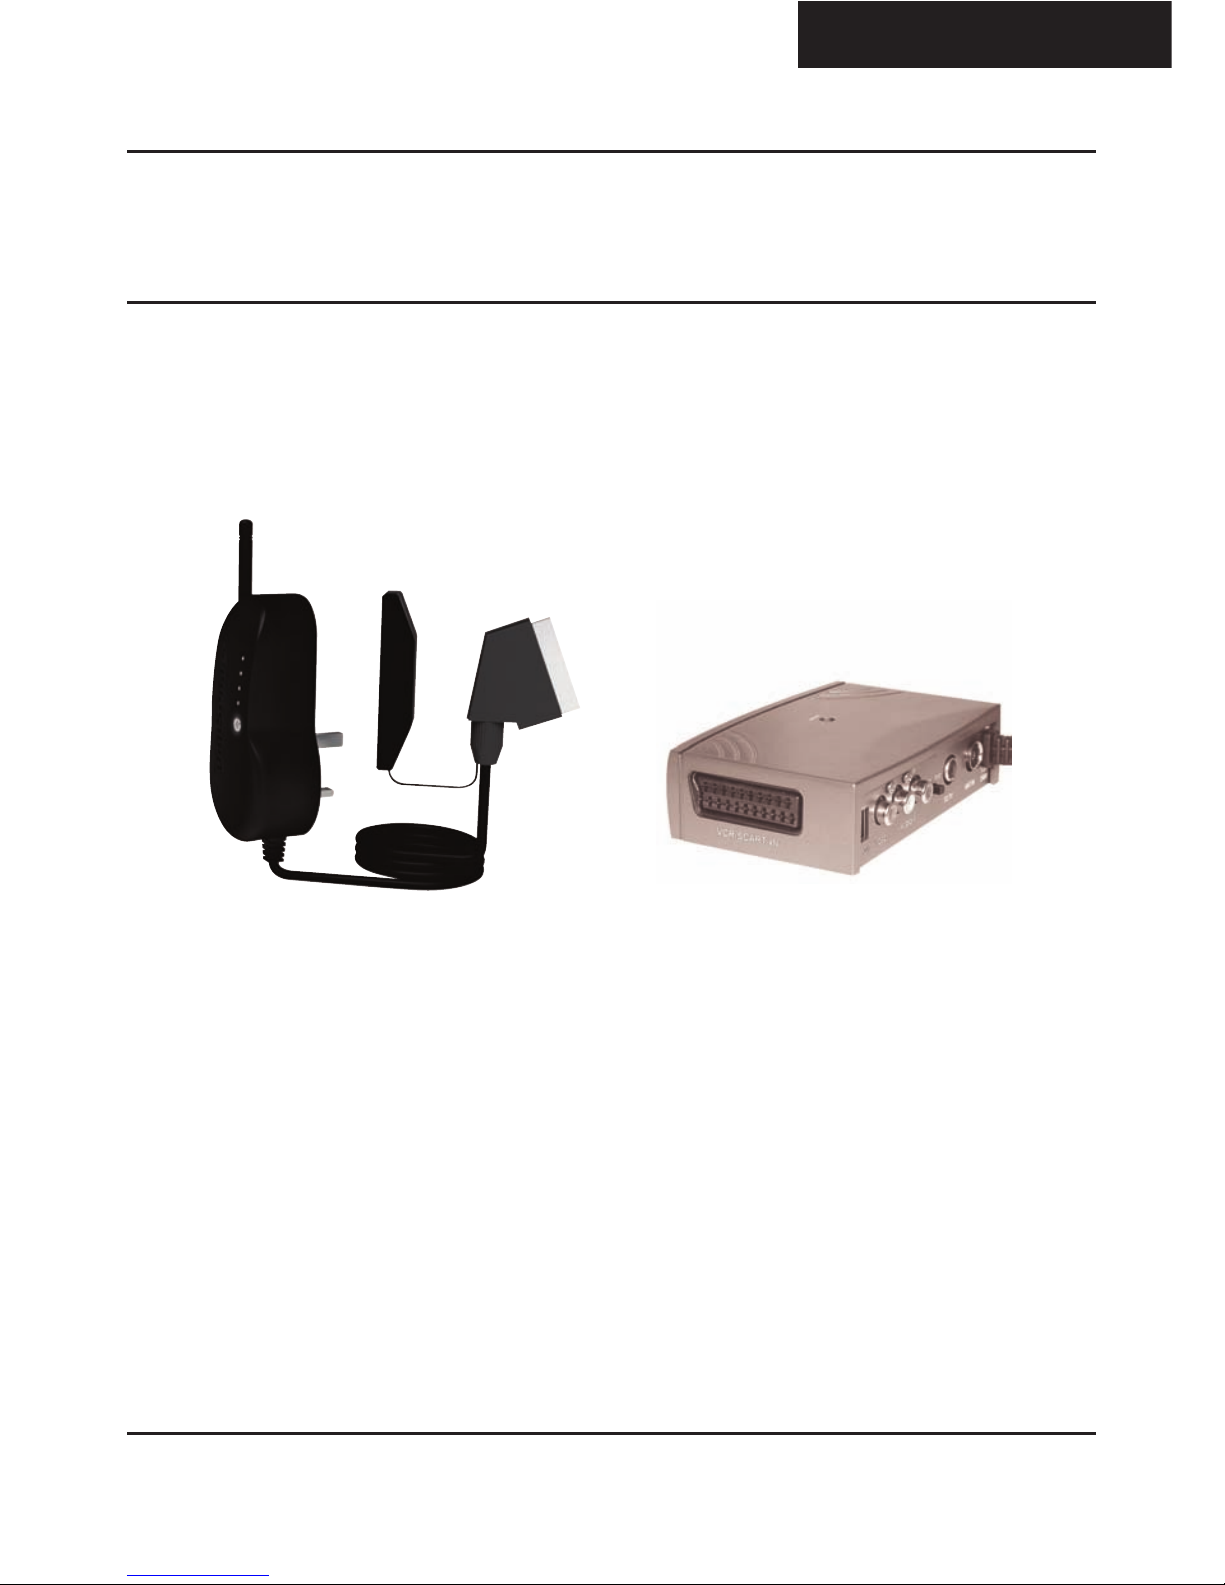
DX2000-LCD Transmitter
1. Transmitter Unit
2. Pre-Wired IR Emitter
3. DigiConnector™ SCART Input
DX2000-LCD Receiver
4. Receiver Unit
5. Pre-Wired IR Sensor
6. SCART Output
1.
2.
3.
4. 5.
6.

Please read this instruction manual carefully prior to installation Page 05
DX2000-LCD - DigiSender® Plug’n’Go™ LCD
Step 2: Install the Transmitter
ENGLISH (EN)
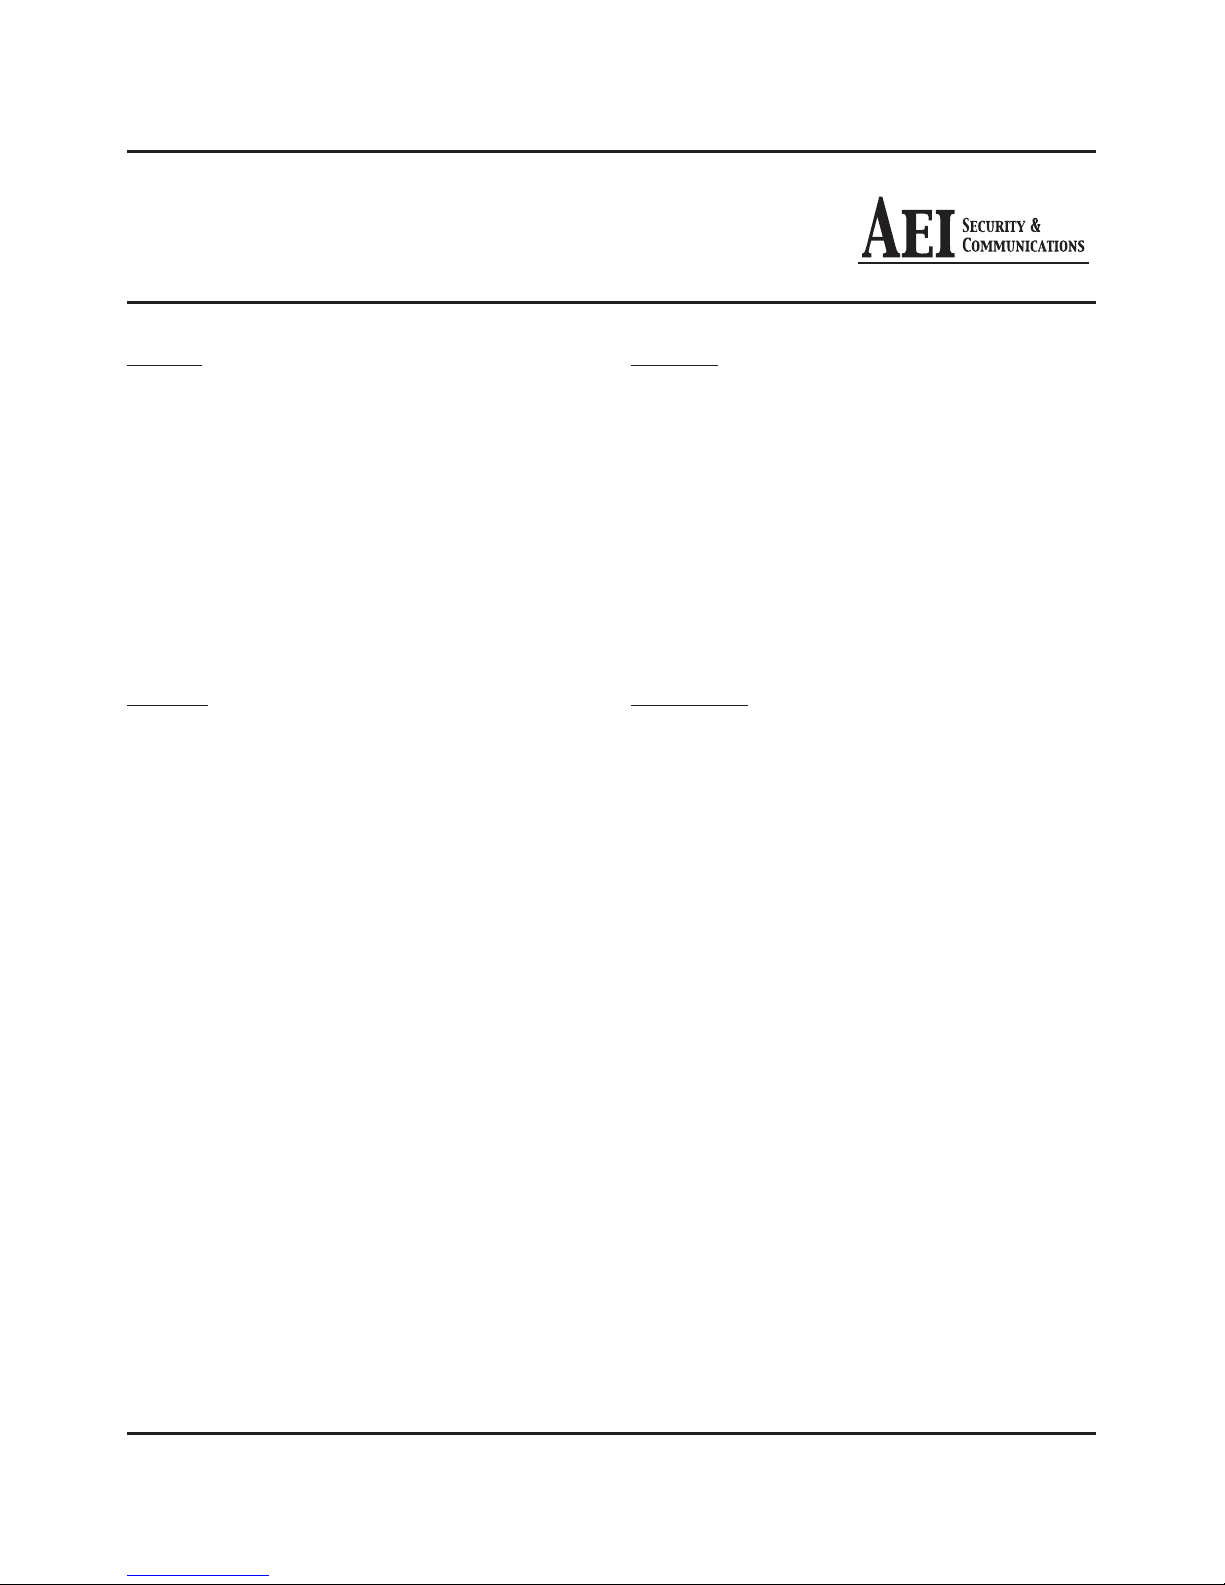
Connect the Transmitter into a Mains Extension
Lead. The positioning of the Transmitter can affect
the picture quality so being able to move it is an
advantage.
2.
Connect the DigiConnector™ to your Satellite,
Cable or Freeview box. Use the SCART socket la-
belled ‘TV’ or ‘OUT’. Connect any existing SCART
lead into the rear of the DigiConnector™.
1.
The DX2000-LCD Transmitter will send the audio and video from a connected source (your Satellite
receiver for example) to the DX2000-LCD Receiver, located in another room in your home.
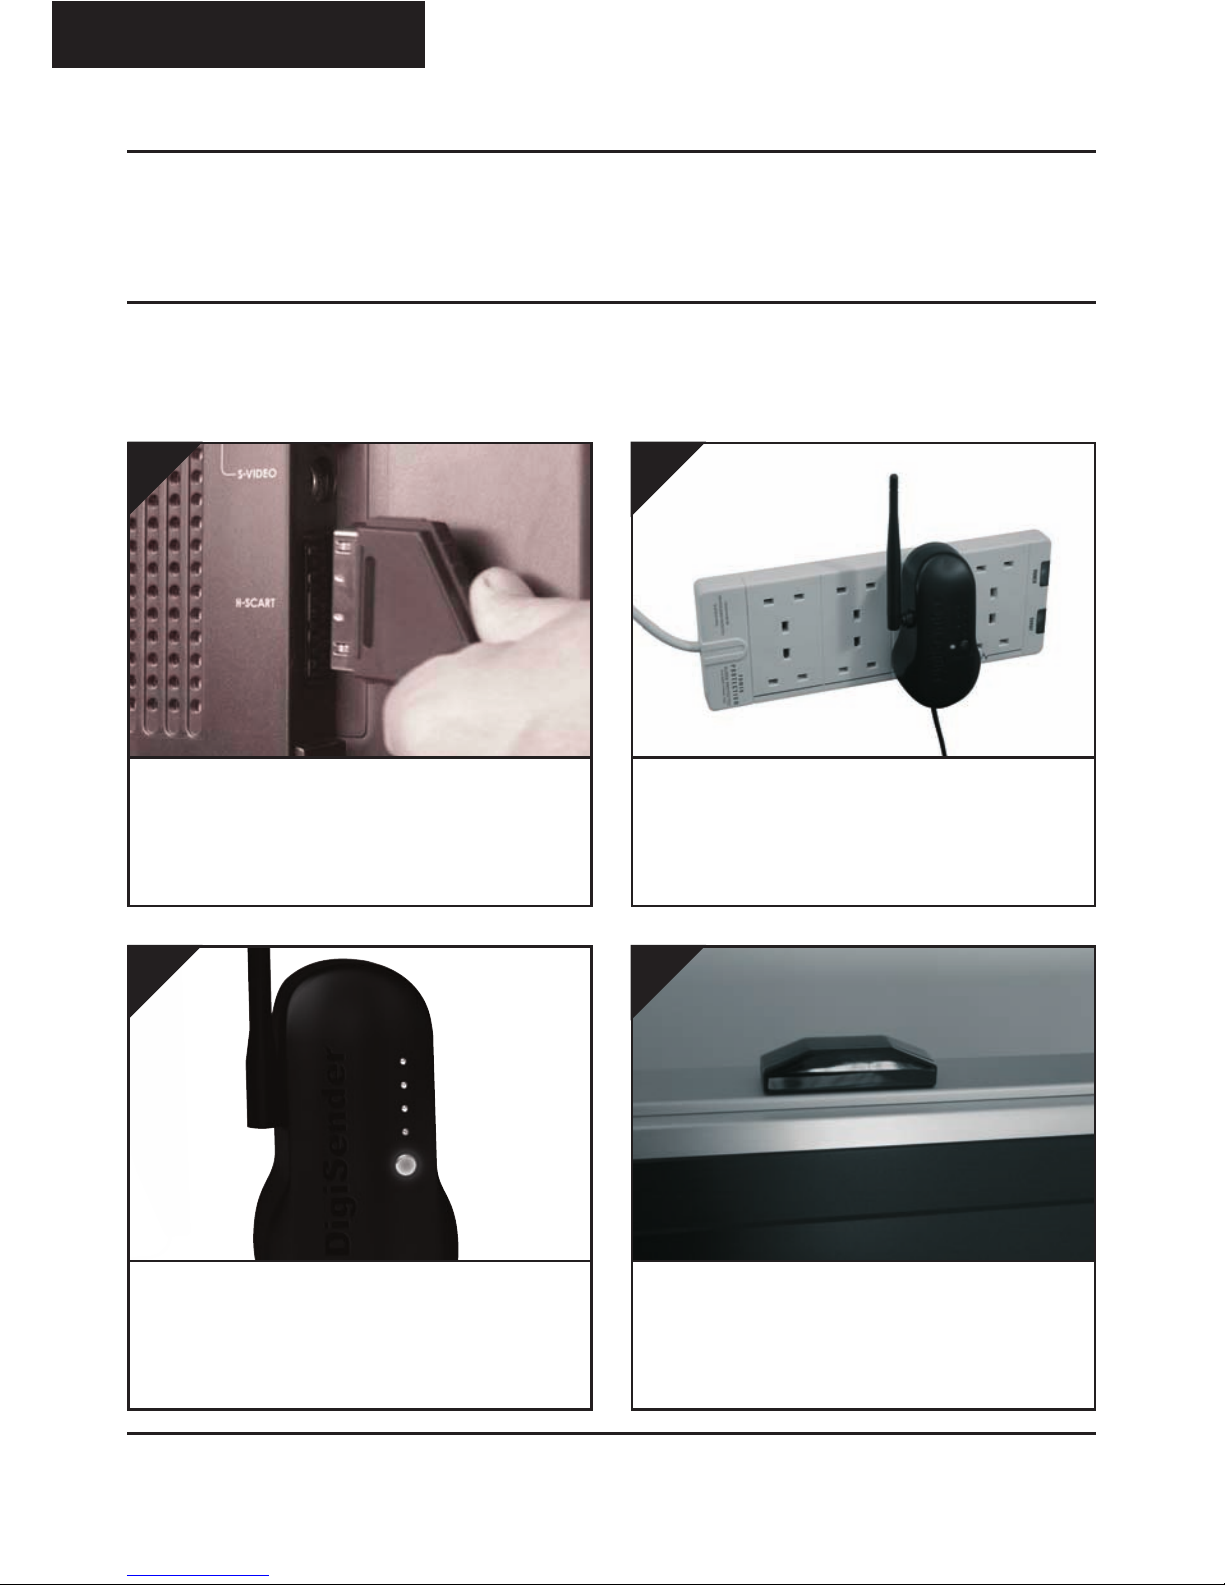
Press and hold the power button for 5 seconds to
turn the Transmitter on. Pressing the button again
cycles through the 4 available channels. Make sure
it is set to channel 1.
3.
Position the IR Emitter in front of your Satellite,
Cable or Freeview box with the lens facing the
equipment’s IR sensor.
4.
DX2000-LCD - DigiSender® Plug’n’Go™ LCD
Please read this instruction manual carefully prior to installationPage 06
Step 3: Install the Receiver
ENGLISH (EN)
Connect the Receiver into a Mains Extension
Lead. The positioning of the Receiver can affect
the picture quality so being able to move it is an
advantage.
2.
The DX2000-LCD Receiver will pick up the signals being sent by your DX2000-LCD Transmitter and out-
put them to a connected TV.
Press and hold the power button for 5 seconds to
turn the Receiver on. Pressing the button again
cycles through the 4 available channels. Make sure
it is set to channel 1.
3.
Locate a vacant SCART socket on the back of your
receiving TV and insert the DigiSender® SCART
cable.
1.
Position the IR Sensor on the top, side or bot-
tom of your receiving TV with the lens facing
out into the room.
4.
Please read this instruction manual carefully prior to installation Page 07
DX2000-LCD - DigiSender® Plug’n’Go™ LCD
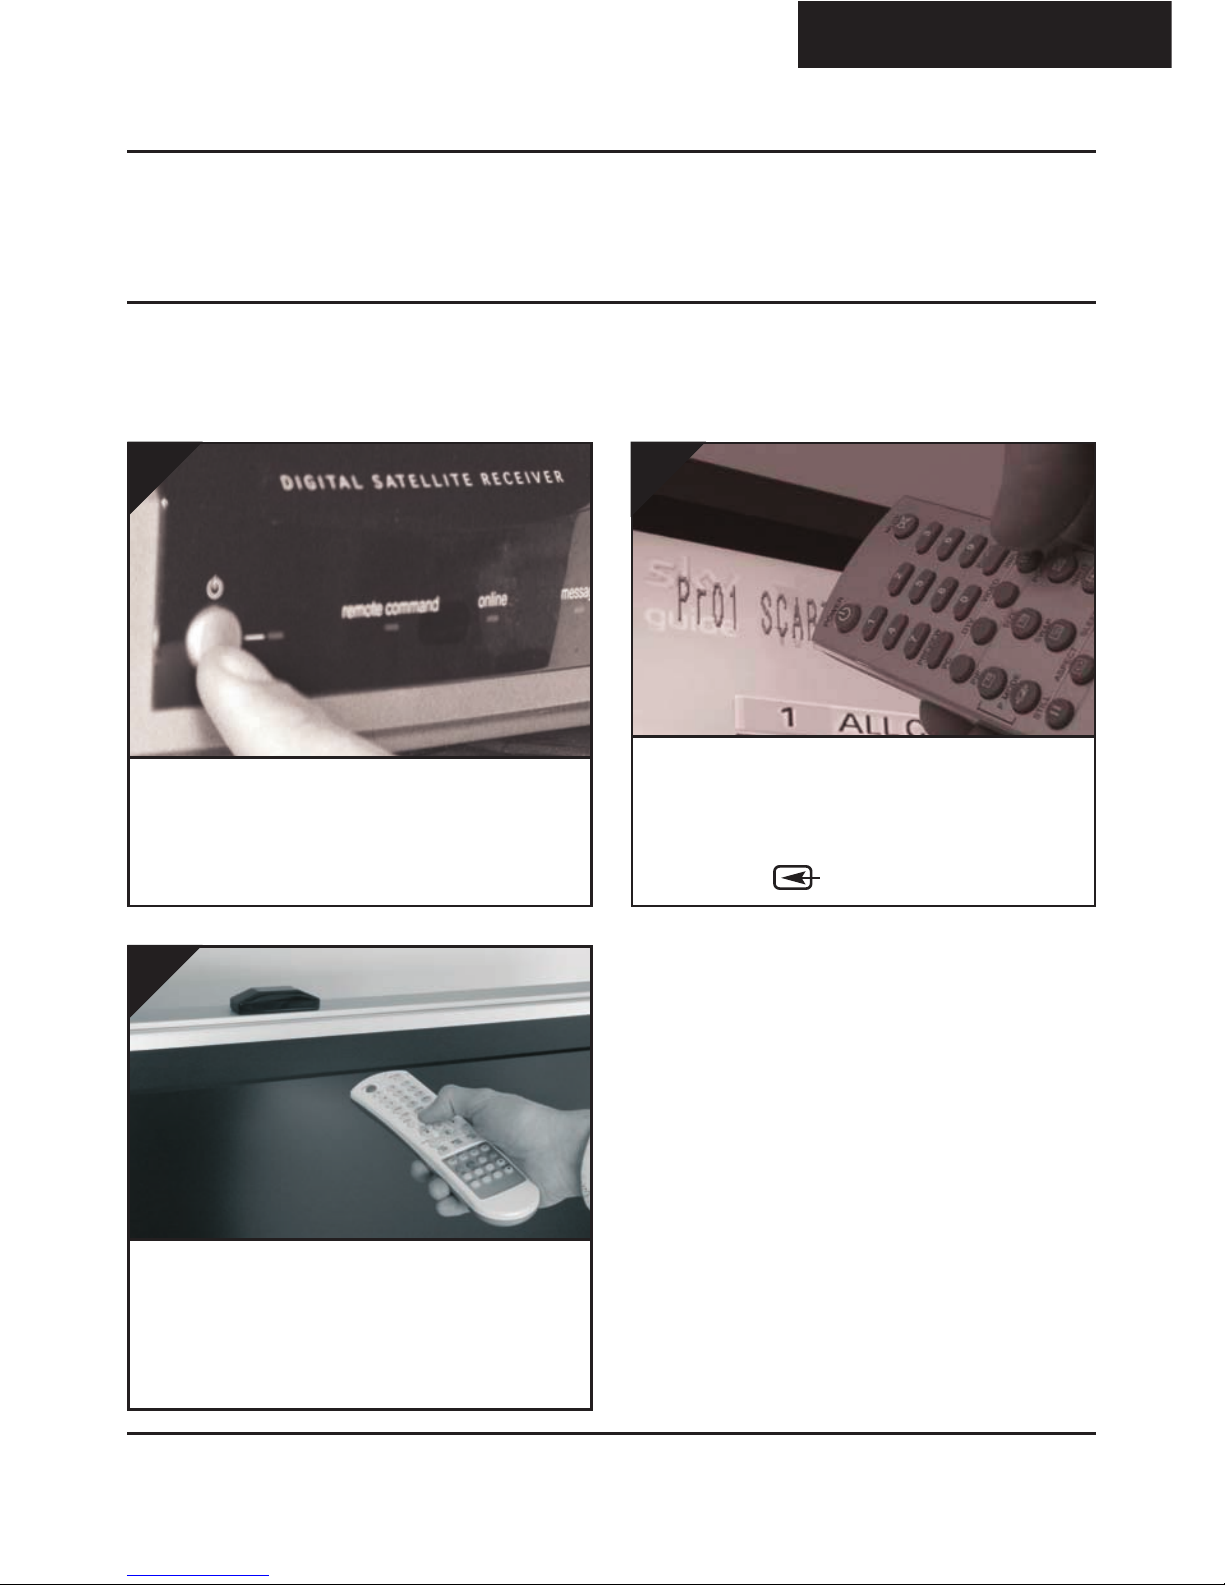
Step 4: Using the DigiSender® Plug’n’Go™ LCD
ENGLISH (EN)
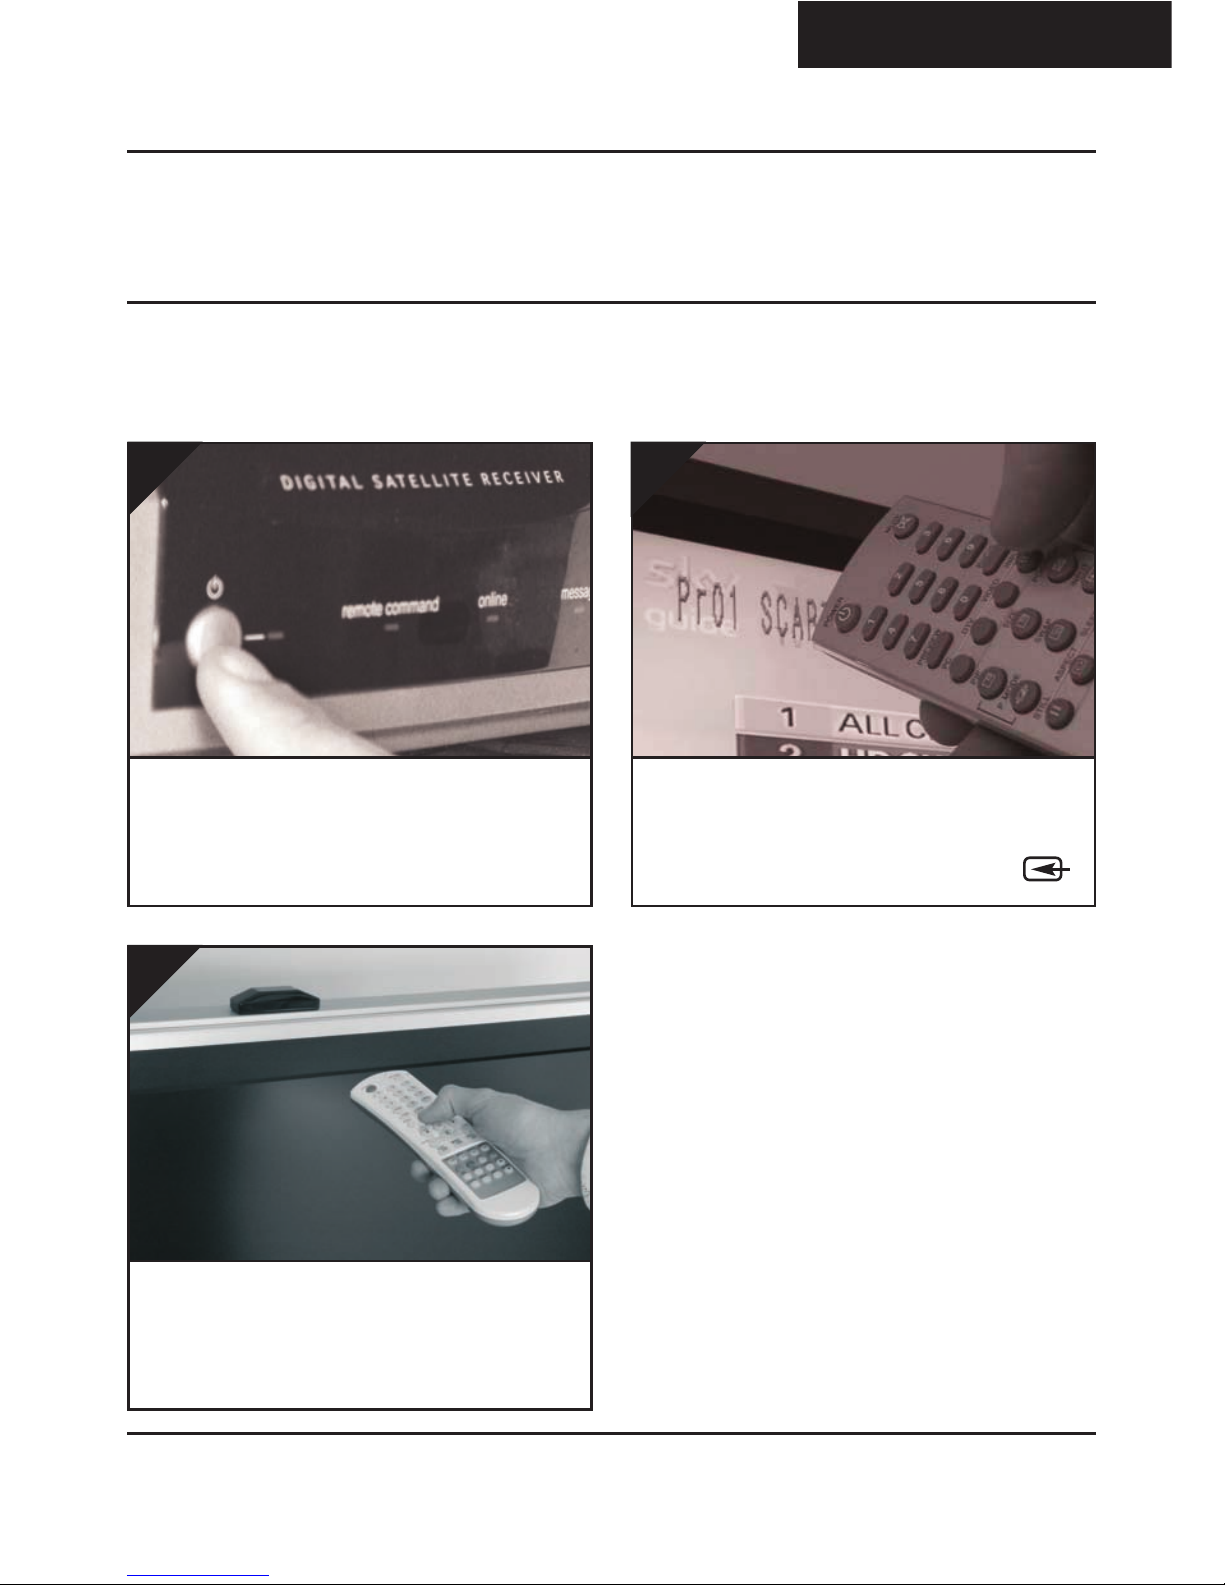
Switch on the source equipment (Satellite, Cable,
Freeview, DVD, VCR, etc.).
1.
n the receiving TV, select the SCART channel
assigned to the SCART socket that you plugged
the DX2000-LCD Receiver in to. This may be la-
belled as SCART, AUX, AV, VIDE , VCR or .
2.
When controlling your Satellite, Cable or Free-
view box, point the remote control at the IR Sen-
sor in the receiving location. Ensure you are using
the correct remote control for the source device.
3.

DX2000-LCD - DigiSender® Plug’n’Go™ LCD
Please read this instruction manual carefully prior to installationPage 08
Using the DigiSender® Plug’n’Go™ LCD
Advanced Functions
Changing the Audio/Video Channel
The DigiSender® Plug’n’Go™ LCD features 4 Audio/Video Channels. Each of these Audio/Video Chan-
nels slightly changes the frequency on which the DigiSender® Plug’n’Go™ LCD operates. Because
the Audio/Video Channel switch allows you to ‘fine tune’ the frequency on which your DigiSender®
Plug’n’Go™ LCD operates, it is possible to overcome most interference and reception troubles that may
occur.
To change the Audio/Video Channel on your DigiSender® Plug’n’Go™ LCD, simply press the button to
cycle through the 4 available channels.
For your DigiSender® Plug’n’Go™ LCD to unction correctly it is very important that the Audio/Video
Channel settings are the same on both the Transmitter and Receiver.
ENGLISH (EN)
Please read this instruction manual carefully prior to installation Page 09
DX2000-LCD - DigiSender® Plug’n’Go™ LCD
Upgrades & Accessories
ENGLISH (EN)
A itional Receiver - DX200RX
• Get your Satellite channels to additional
TV’s in your home!
• Add as many Receivers as you require to
your DigiSender® system
• Connect to any SCART enabled TV or use
with the MOD01PIS Aerial Converter
• Supplied with Power Supply Unit
• Requires existing DigiSender®
Plug’n’Go™ LCD Transmitter
Aerial Convertor - MOD01PIS
• Connect a DigiSender® Receiver to an
aerial socket on your TV
• Shares the power supply with your
DigiSender®
• Test Card signal for easy set up
• Compatible with every U television
• Adds the DigiSender® signal to your ex-
isting aerial signal
DX2000-LCD - DigiSender® Plug’n’Go™ LCD
Please read this instruction manual carefully prior to installationPage 10
ENGLISH (EN)
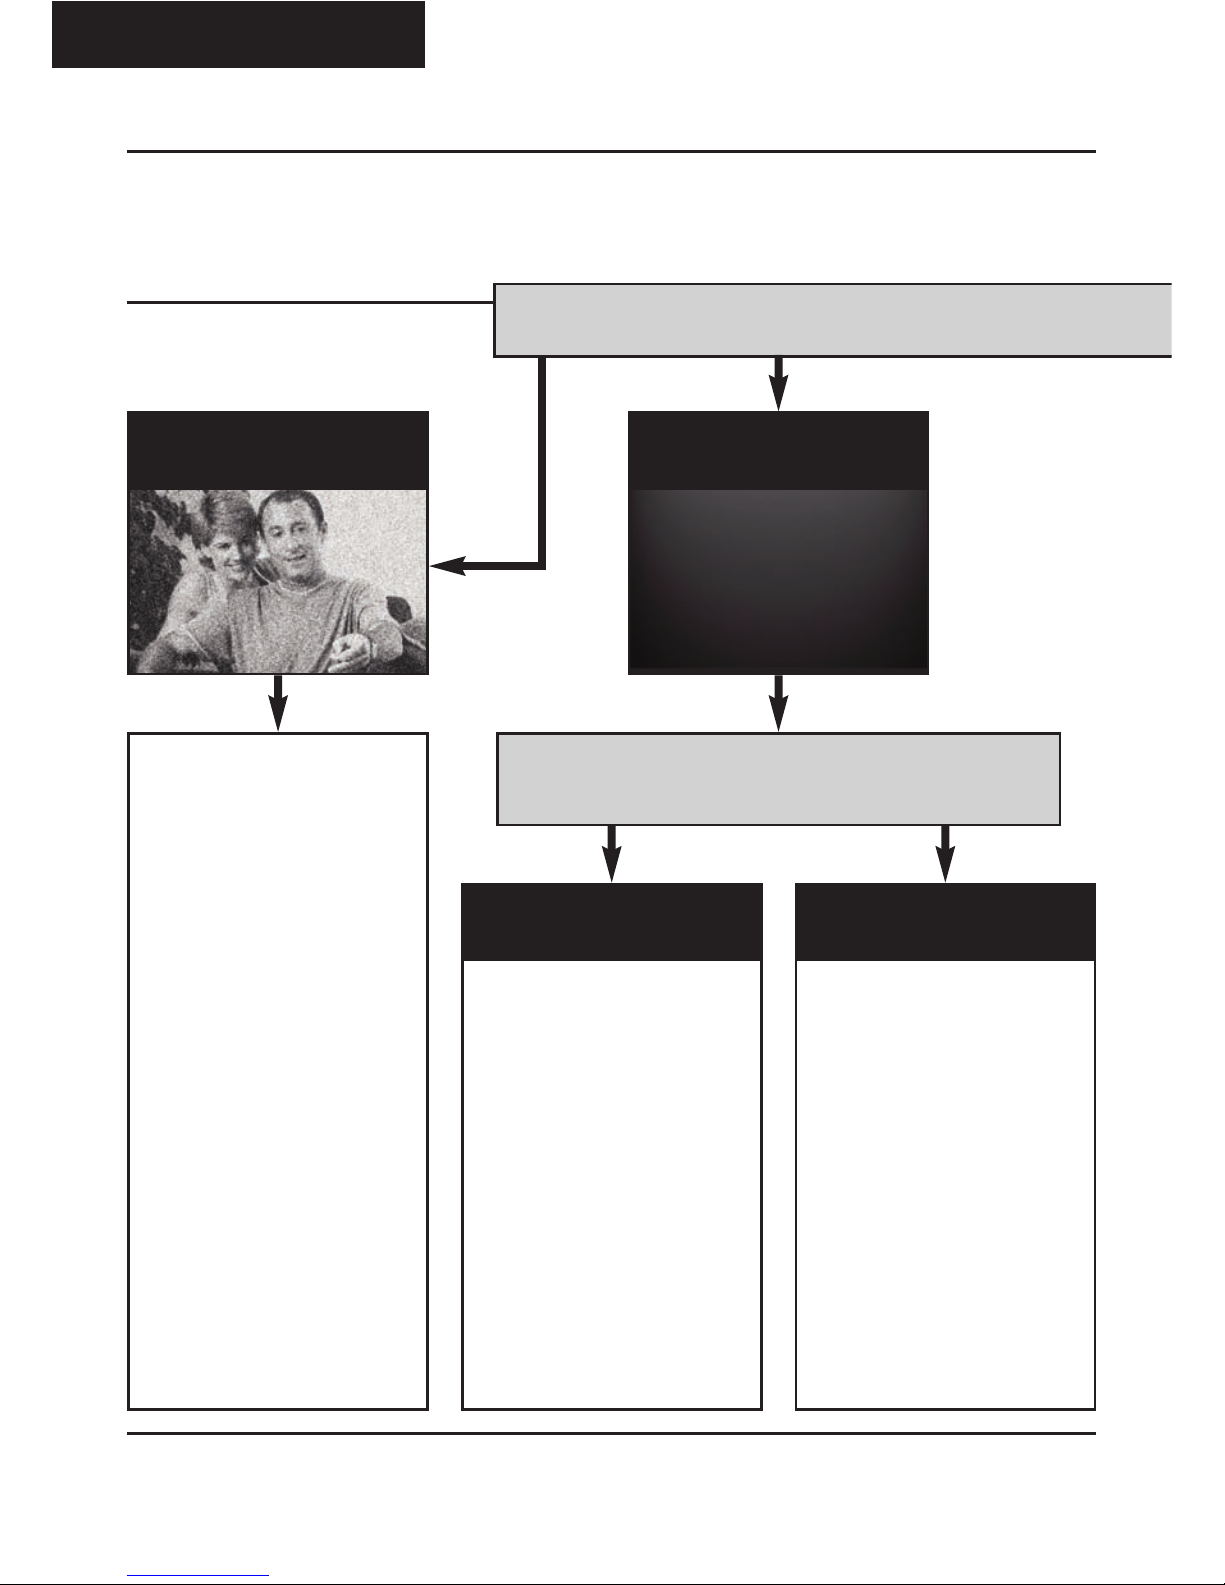
Troubleshooting
Picture Problems
Q: What o you see on your secon television?
The picture is present but
poor quality
I still see a Black Screen...
WRONG AV CHAN-
NEL SELECTED
1. Switch the Transmitter back
on.
2. Ensure the correct SCART
channel is selected on your sec-
ond television. Some televisions
feature multiple AV channels for
one or more SCART, phono and
S-Video inputs.
3. If available try another SCART
socket on the second television.
POOR RANGE
1. The picture & sound quality is
affected by the Transmitter and
Receiver’s location. Try position-
ing them in different locations.
The Transmitter and Receiver
should be connected to a mains
extension lead that can be
moved.
2. Try the other 3 available
Audio/Video channels ensuring
that the Audio/Video Channel
setting is the same on both the
Transmitter and Receiver.
3. Ensure the units are within the
usable range, normally this
would be 40m when passing
through 2 average internal walls.
Thicker or stone/granite walls
may lower the usable range of
this device.
RECEIV I N G B L A N K
SIGNAL
1. Switch the Transmitter on.
2. Ensure the Transmitter is con-
nected to your source device
(such as your Satellite, Cable,
Freeview, DVD or VCR).
3. Ensure that your source device
is switched on.
I now see a snowstorm or
blue screen...
I see a black or blank screen
Switch OFF your DigiSender® TRANSMITTER
What o you now see at the second TV?

Please read this instruction manual carefully prior to installation Page 11
DX2000-LCD - DigiSender® Plug’n’Go™ LCD
ENGLISH (EN)
I see a snowstorm effect or
plain blue screen
Switch OFF your DigiSender® RECEIVER.
Q: What o you now see at the second TV?
I see lines over the picture
NOT RECEIVING
SIGNAL
1. Switch the DigiSender® Re-
ceiver back on.
2. Ensure the DigiSender® Trans-
mitter is switched on.
3. Try the other 3 available
Audio/Video channels ensuring
that the Audio/Video Channel is
set the same on both the Trans-
mitter and Receiver.
I now see a Black screen
WRONG TV
CHANNEL SELECTED
This indicates that the correct
SCART Channel has N T been
selected on the second televi-
sion. Look for buttons on this tel-
evisions remote control which
could select the AV Channel such
as EXT, AV, VIDE , VCR, AUX,
Channel 0 AND .
I still see a snowstorm or
blue picture
INTERFERENCE
This indicates one or more elec-
trical devices are interfering with
the DigiSender®. Make sure the
Transmitter and Receiver are not
directly on top of other electrical
devices. Try all 4 Audio/Video
Channels on your DigiSender® as
one or more may still be avail-
able. Visit digisender.net or con-
tact our helpline for information
on configuring your equipment to
work together.
cont...

DX2000-LCD - DigiSender® Plug’n’Go™ LCD
Please read this instruction manual carefully prior to installationPage 12
ENGLISH (EN)
Troubleshooting
Audio Problems
Q: What seems to
be the problem
with the soun ?
I can see the picture but
can’t hear anything.
The sound is distorted.
There is a buzzing sound
present. It seems to get
worse during on-screen
menus or bright pictures.
1. Disconnect both the Transmitter
AND Receiver SCART cables. Recon-
nect the cables ensuring they are
pushed into the sockets firmly.
2. If you are using a home cinema
DVD player with surround sound,
please ensure the analogue audio
output on SCART is switched on.
Turn down the volume on your source
device (Satellite, Cable, Freeview,
DVD or VCR).
Change the Contrast A/B setting on
the Transmitter DigiConnector™ con-
nected to the offending equipment.
There is a hissing sound
and the volume must be
turned up high on the sec-
ond TV to hear anything.
1. Turn the output volume UP (if pos-
sible) on your source device (Satellite,
Cable, Freeview, DVD or VCR).
2. Ensure the Transmitter and Re-
ceiver are within the usable range
(40m avg).
3. Switch off your microwave oven if
present.
Please read this instruction manual carefully prior to installation Page 13
DX2000-LCD - DigiSender® Plug’n’Go™ LCD
ENGLISH (EN)
Troubleshooting
Problems Controlling the Source Equipment
If you have any difficulty operating your source equipment remote control in your second room
please follow the advice below below:
1. Ensure you are using the correct remote control in the second room. For instance, if you are
trying to control your Satellite Receiver you will need to use the Satellite remote control.
2. Ensure the IR Emitter is facing the IR Sensor on your source equipment.
3. Move the IR Emitter further away from the source equipment.
4. Move the DigiSender® Plug’n’Go™ LCD Transmitter AND Receiver further away from other
electrical devices.
5. Try operating your source remote control closer to the IR Sensor.
6. Replace the batteries in your source remote control.

DX2000-LCD - DigiSender® Plug’n’Go™ LCD
Please read this instruction manual carefully prior to installationPage 14
ENGLISH (EN)
Technical Support
AEI Security & Communications Ltd is dedicated to providing our customers with first class customer
care and technical support.
During busy periods we would suggest using the web option to obtain support.
1. On the web...
Free technical advice is available online 24/7 at our dedicated support web site:
www.aei.eu
2. By telephone...
We have a dedicated helpline, open Monday to Friday, 9AM - 5PM.
Please note that calls are charged at the local rate and your call may be recorded for training purposes.
UK Customers only:
0845 166 7940
Overseas Customers:
+44 (0) 1797 226123

Lesen Sie diese Instruktionen bitte sorgfältig durch, bevor Sie die Installation beginnen Page 15
DX2000-LCD - DigiSender® Plug’n’Go LCD
Einführung
Wir gratulieren Ihnen zum auf Ihres DigiSender® Plug’n’Go™ LCD - Ein Eingang “Plug Style” kabel-
loser AV-Sender. Dieses Gerät steht auf dem neuesten Stand der Technik für kabellose Audio- und
Video- Technologie. Mehr können Sie für Ihr Geld nicht bekommen.
Jetzt können Sie DVD Qualität, Video und HiFi Stereo Ton Ihres Sattelitenempfängers, abelfernsehers,
DVD- oder Videogerätes in jedem anderen Raum Ihrer Wohnung empfangen.
Vorteil der kompakten und unau älligen Sender- und Emp ängereinheiten, 4 Audio/ Video –
Kanäle und der unübertro enen ein achen Handhabung mit dem neuen
DigiSender® Plug’n’Go LCD!
DEUTSCH (DE)
DX2000-LCD - DigiSender® Plug’n’Go LCD
Lesen Sie diese Instruktionen bitte sorgfältig durch, bevor Sie die Installation beginnenPage 16
DEUTSCH (DE)
Schritt 1 - Überprüfung des Packungsinhalts
Alle Pakete werden von einem Computer bei der Verpackung auf Ihr Gewicht geprüft. Es ist jedoch
eine gute Idee zu überprüfen, ob alle angegebenen Teile vorhanden sind, bevor Sie mit der Installa-
tion fortfahren.
DX2000-LCD Sender
1. Sender
2. Vorverkabeltem IR Sender
3. DigiConnector™ SCART Eingabe
DX2000-LCD Empfänger
4. Empfänger
5. Vorverkabeltem IR Sensor
6. SCART Ausgabe
1.
2.
3.
4. 5.
6.

Lesen Sie diese Instruktionen bitte sorgfältig durch, bevor Sie die Installation beginnen Page 17
DX2000-LCD - DigiSender® Plug’n’Go LCD
DEUTSCH (DE)
Schritt 2 - Installieren Sie die Sendereinheit
Das Sender sollte möglichst an eine Steckdosen-
leiste angeschlossen werden. Da sich die Position
des Empfänger auf die Bildqualität auswirken
kann, ist es von Vorteil, wenn es beweglich ist.
2.
Schließen Sie den DigiConnector™ an Ihren
Satelliten- oder Kabelempfänger an. Verwenden
Sie die mit „TV“ beschriftete SCART-Buchse und
schließen Sie ein verfügbares SCART- abel an die
Buchse an der Rückseite des DigiConnector™ an.
1.
Der DX2000-LCD Sender überträgt das Audio- und Videosignal von zwei angeschlossenen Quellen (z.
B. Sattelitenempfänger und DVDplayer) zum DX2000-LCD Empfänger, den Sie in einem anderen Raum
Ihrer Wohnung aufstellen können.
Presse und hält den Kraftknopf für 5 Sekunden,
den Sender einzuschalten. Drücken fährt der
Knopf wieder Fahrrad durch die 4 verfügbaren
Kanäle. Vergewissert sich, dass es gesetzt wird, 1
zu leiten.
3.
Positionieren Sie den IR Sender vor dem Quell-
gerät, wobei die Linse auf den IR Sensor des
Geräten weisen muss.
4.

DX2000-LCD - DigiSender® Plug’n’Go LCD
Lesen Sie diese Instruktionen bitte sorgfältig durch, bevor Sie die Installation beginnenPage 18
DEUTSCH (DE)
Schritt 3 - Installieren Sie die Empfängereinheit
Das Empfänger sollte möglichst an eine Steck-
dosenleiste angeschlossen werden. Da sich die
Position des Empfänger auf die Bildqualität
auswirken kann, ist es von Vorteil, wenn es be-
weglich ist.
2.
Der DigiSender® Plug’n’Go™ LCD Empfänger fängt das Signal des Transmitters auf und leitet es an
ein Fernsehgerät weiter.
Presse und hält den Kraftknopf für 5 Sekunden,
den Empfänger einzuschalten. Drücken fährt der
Knopf wieder Fahrrad durch die 4 verfügbaren
Kanäle. Vergewissert sich, dass es gesetzt wird, 1
zu leiten.
3.
Schließen Sie den SCART-Stecker an den Zweit-
fernseher an.
1.
Positionieren Sie das vorverkabelte Infrarotsen-
sorgerät mit Hilfe des Klebepads auf der Seite,
oben oder unten an Ihrem zweiten TV mit der
Linse daraufgerichtet.
4.
Lesen Sie diese Instruktionen bitte sorgfältig durch, bevor Sie die Installation beginnen Page 19
DX2000-LCD - DigiSender® Plug’n’Go LCD
DEUTSCH (DE)
Schritt 4 - Gebrauch des DigiSender® Plug’n’Go™
LCD
Schalten Sie das Quellgerät, wie Ihren Satellit-
oder Kabelreceiver ein.
1.
Bei dem empfangenden Fernsehgerät wählen
Sie bitte den Scarteingang, an dem Sie den
DX2000-LCD Empfänger angeschlossen haben.
Das kann als SCART, AUX, VIDE , VCR angezeigt
werden, der
2.
Wenn Sie Ihr Satelliten- oder Kabelfernsehen um-
schalten wollen, richten Sie bitte Ihre Fernbedi-
enung auf den Sensor in der Empfangsrichtung
aus. Stellen Sie sicher, dass Sie die richtige
Fernbedienung für Ihr Gerät benutzen.
3.

DX2000-LCD - DigiSender® Plug’n’Go LCD
Lesen Sie diese Instruktionen bitte sorgfältig durch, bevor Sie die Installation beginnenPage 20
DEUTSCH (DE)
Gebrauch des DigiSender® Plug’n’Go™ LCD
Erweiterte Funktionen
Umschalten des Audio/Video - Kanals
Der DigiSender Plug’n’Go™ LCD bietet 4 Audio/ und Videokanäle. Jeder dieser anäle verändert ger-
ingfügig die Frequenz, auf der der DigiSender überträgt. Daher ist es möglich, Ihr Gerät exakt so
einzustellen, dass die meisten Interferenzen oder Empfangsprobleme ausgeschaltet werden können.
Um den Audi/ Video – anal ihres DigiSender Plug’n’Go LCD umzuschalten, drücken Sie einfach den
nopf, um die 4 zur Verfügung stehenden anäle durchzugehen.
Um eine korrekte Funktion Ihres DigiSender® Plug’n’Go™ LCD sicherzustellen, ist es wichtig, dass
der Audio/Videokanal an Sender UND Emp änger gleich gewählt ist.
Other manuals for Plug'n'Go DX2000-LCD
1
Table of contents
Languages:


