Digital Aquatics Lifeguard User manual

Lifeguard™ User Guide V2.0
WrittenforLifeguard™Firmware2.0
Updated4/11/2013

Lifeguard™UserGuideV2.0 - 1 -
Copyright © 2010-2013 Dynon Instruments, Inc., DBA Digital Aquatics. All rights reserved. No part of this
manual may be reproduced, copied, transmitted, disseminated or stored in any storage medium, for any
purpose without the express written permission of Digital Aquatics. Digital Aquatics hereby grants permission
to download a single copy of this manual and of any revision to this manual onto a hard drive or other electronic
storage medium to be viewed for personal use, provided that such electronic or printed copy of this manual or
revision must contain the complete text of this copyright notice and provided further that any unauthorized
commercial distribution of this manual or any revision hereto is strictly prohibited.
Information in this document is subject to change without notice. Digital Aquatics reserves the right to change
or improve its products and to make changes in the content without obligation to notify any person or
organization of such changes. Visit the Digital Aquatics website (www.DigitalAquatics.com) for current updates
and supplemental information concerning the use and operation of this and other Digital Aquatics products.

Lifeguard™UserGuideV2.0 - 2 -
Forward
Digital Aquatics thanks you for purchasing the Lifeguard™ monitoring system! This exciting system will protect
your aquarium and help you stay aware of the condition of your tank.
Digital Aquatics’ Lifeguard™ monitoring system protects your aquarium by monitoring the three parameters that
most often lead to tank crashes: temperature, pH and water level (via a switch input). Lifeguard™ is a super-easy-
to-use alternative for anyone who wants to protect their tank without using a controller. Lifeguard™ helps you
respond quickly to out-of-bounds tank conditions by sending you email alerts when temperature or pH crosses
user-definable thresholds, or when the switch input opens or closes.
Lifeguard™ features built-in network connectivity which will allow you to access the system remotely.
Lifeguard™ enables you to keep an eye on your tank while you are at work, on an errand, or on vacation.
Lifeguard™ can be used alone or as a backup to an aquarium controller such as a Digital Aquatics ReefKeeper™
system.
This guide will take you step by step through the installation and setup processes so you can get Lifeguard™
connected, configured and operating with your aquarium system. You can follow this manual like a book,
starting from the beginning and working your way to the end, or use it as a reference for help with specific
subjects. Either way, we hope this guide will help you get your Lifeguard™ system up and running in no time!

Lifeguard™UserGuideV2.0 - 3 -
Contents
Forward........................................................................................................................................................................................................... 2
About This Guide.........................................................................................................................................................................................5
Icon Definitions ......................................................................................................................................................................................5
System requirements ...........................................................................................................................................................................5
Disclaimers...............................................................................................................................................................................................6
Warnings...................................................................................................................................................................................................6
Chapter 1: Product Overview .................................................................................................................................................................7
Identify and inventory all of the included components...........................................................................................................7
Familiarize yourself with Lifeguard™ ..............................................................................................................................................7
Identifying the Accessories ................................................................................................................................................................8
Chapter 2: Installation...............................................................................................................................................................................9
The Lifeguard™ System........................................................................................................................................................................9
Connecting Your Lifeguard™ System .............................................................................................................................................9
Mounting Lifeguard™.........................................................................................................................................................................10
Locating Lifeguard™ ...........................................................................................................................................................................12
Mounting the Probes .........................................................................................................................................................................12
Connecting the Advanced Switch Cable.....................................................................................................................................12
Cable Routing .......................................................................................................................................................................................12
Connecting Lifeguard™ to your Router........................................................................................................................................13
Chapter 3: Powering up the Lifeguard™ system............................................................................................................................14
Applying Power....................................................................................................................................................................................14
Home Screen.........................................................................................................................................................................................14
Getting Around ....................................................................................................................................................................................15
Displaying Alarm Conditions...........................................................................................................................................................16
Resetting Lifeguard™..........................................................................................................................................................................16
Chapter 4: Initial Lifeguard™ Setup ....................................................................................................................................................17
Accessing the Lifeguard™ Web Server .........................................................................................................................................17
Setting up Lifeguard™ for the first time.......................................................................................................................................18
If You Forget Your Username or Password .................................................................................................................................20
Welcome to the Lifeguard™ Dashboard!.....................................................................................................................................20
Chapter 5: Calibrating the Probes........................................................................................................................................................21
Calibrating the Temperature Probe ..............................................................................................................................................22
Canceling Temperature Calibration..............................................................................................................................................24
If Temperature Calibration Fails .....................................................................................................................................................24
Calibrating the pH Probe ..................................................................................................................................................................24
The pH Calibration Wizard................................................................................................................................................................25
Canceling pH Calibration..................................................................................................................................................................28
If pH Calibration Fails .........................................................................................................................................................................28
Chapter 6: Setting Up Lifeguard™ for Your Aquarium..................................................................................................................29
Accessing the Settings Dialog.........................................................................................................................................................29
Changing your Username and Password (General Settings Menu) ...................................................................................30
Setting Time and Units (Time and Units Menu) ........................................................................................................................31
Setting Alarm Thresholds (Sensors Menu)..................................................................................................................................32
Setting up Email Alerts (Notifications Menu).............................................................................................................................33
Changing Network Settings (Network Menu)............................................................................................................................35
Chapter 7: Using Lifeguard™..................................................................................................................................................................37
Monitoring Temperature on the Lifeguard™ Dashboard.......................................................................................................37
Monitoring pH information on the Lifeguard™ Dashboard..................................................................................................38
Monitoring the Switch Input and the Date and Time .............................................................................................................39
Alarm (Critical) and Caution Conditions ......................................................................................................................................40
Using the Advanced Graphing Features......................................................................................................................................41

Lifeguard™UserGuideV2.0 - 4 -
The Short-term Graph........................................................................................................................................................................42
The Extended Graph...........................................................................................................................................................................43
Accessing Data Logs...........................................................................................................................................................................44
Downloading Data Logs....................................................................................................................................................................44
Clearing Data Logs..............................................................................................................................................................................46
Accessing Lifeguard™ from the Internet......................................................................................................................................46
Using Lifeguard™ without an Internet Connection .................................................................................................................47
Using Lifeguard™ as a Standalone Device...................................................................................................................................47
Updating Lifeguard™ Firmware......................................................................................................................................................47
Updating Firmware with a USB Drive ...........................................................................................................................................50
Getting Help..........................................................................................................................................................................................50
Chapter 8: Specifications ........................................................................................................................................................................51
Size and Weight ...................................................................................................................................................................................51
Networking............................................................................................................................................................................................51
Display.....................................................................................................................................................................................................51
Performance..........................................................................................................................................................................................51
Data Calculations and Graphing.....................................................................................................................................................51
Power.......................................................................................................................................................................................................51
Inputs.......................................................................................................................................................................................................51
Website Technology...........................................................................................................................................................................51
Chapter 9: Troubleshooting and Support.........................................................................................................................................52
Troubleshooting ..................................................................................................................................................................................52
Digital Aquatics Support...................................................................................................................................................................52
Appendix A: Troubleshooting...............................................................................................................................................................53
Frequently Asked Questions............................................................................................................................................................53
Appendix B: Accessing Lifeguard™ from the Internet...................................................................................................................55
Getting Started.....................................................................................................................................................................................55
Glossary of Terms.................................................................................................................................................................................55
Networks, Routers and Modems ....................................................................................................................................................56
Step 1: Connect Lifeguard™ to your Network............................................................................................................................57
Step 2: Set Up your Router for Internet Access to Lifeguard™ (Enable Port Forwarding)...........................................57
Step 3: Set up a Domain Name (optional)...................................................................................................................................58
Step 4: Access Lifeguard™ from the Internet..............................................................................................................................58
Example Router Configurations......................................................................................................................................................59

Lifeguard™
U
Abou
t
T
his guid
e
to be sim
p
configuri
n
Icon D
e
System
serGuideV2.0
t
This G
u
e
is intended t
o
p
le to setup a
n
g and using L
i
e
finitions
An exclama
to which at
t
A lowercas
e
informatio
n
A jagged ar
r
involves th
e
requirem
e
A
A
(
h
A
L
i
S
u
An Intern
e
email aler
t
u
ide
o
give you a st
n
d operate. Th
i
i
feguard.
t
ion point wit
h
t
ention should
e
“i” within a ci
r
n
in the literat
u
r
ow within an
e
e
possibility of
e
nts
n Ethernet ne
t
network rout
e
h
ighly recom
m
PC, laptop, ta
i
feguard) with
u
pported bro
w
Internet
Firefox 1
Google
C
Safari 5.
1
e
t connection i
s
t
s.
ep-by-step to
u
i
s guide is des
i
h
in an equilate
r
be given prior
r
cle is intende
d
u
re accompany
i
e
quilateral tri
a
electrical shoc
t
work with an
e
r with DHCP
m
ended)
blet or smart
p
a modern we
w
sers include
Explorer 9.0+
1.0+
C
hrome 19.0+
1
+
s
required in o
r
- 5 -
u
r of the Lifeg
i
gned to prov
i
r
al triangle is i
n
to the produc
t
d
to alert the u
s
i
ng the produ
c
a
ngle is intend
e
k.
active intern
e
(Dynamic Hos
p
hone (conne
c
b browser tha
r
der to sync th
e
uard monitori
i
de in-depth i
n
n
tended to ale
t
s usage.
s
er to the pres
e
c
t. This symbo
l
e
d to alert the
u
e
t connection,
s
t Configurati
o
c
ted to the sa
m
t supports HT
M
e
Lifeguard un
i
ng system. Li
f
n
formation ab
rt the user of
a
e
nce of import
l
is also used f
o
u
ser of a haza
r
o
n Protocol) e
n
m
e network a
s
M
L 5 function
a
i
ts time to the
i
f
eguard is des
out installing,
a
cautionary n
o
ant operating
o
r Notes.
r
dous warning
t
n
abled
s
a
lity.
i
nternet and u
s
igned
o
tice
t
hat
s
e

Lifeguard™UserGuideV2.0 - 6 -
Disclaimers
As with most electronic devices, contact with water will cause irreparable
damage to the Lifeguard Monitoring System and is not covered under
warranty.
Lifeguard carries a limited 2 year warranty against manufacturer defects.
All probes sold by Digital Aquatics have a limited 90 day warranty unless
otherwise stated. Some probes may be covered under warranty by the probe
manufacturer and not Digital Aquatics.
Warnings
Do not use non-standard or 3rd party power supplies with Lifeguard.
Do not apply power or voltage to the Advanced Switch Port.
Do not connect inappropriate or damaged devices or cables to Lifeguard’s
ports.
Do not connect devices or cables that are not designed to be connected to the
respective ports.
Do not connect a ReefKeeper™ bus cable to the Lifeguard temperature port.
Do not use phone cables or phone accessories with Lifeguard.
Do not connect Lifeguard to power through the USB port or Lifeguard may be
damaged. The USB port on Lifeguard is intended for updating the firmware on
the device using a flash drive. The USB port should never be connected to any
other type of device or connection.
Failure to heed these warnings may result in irreparable damage to the Lifeguard unit and is not covered by the
Warranty.
Although the Lifeguard system has been tested with a variety of devices to ensure compatibility,
whenever two measuring devices are placed together there is a slight possibility that the devices will
interact with each other’s readings. In the rare event that such interactions occur, a standard grounding
probe should be installed in the tank in which the Lifeguard system is installed.
Lifeguard™
U
Chap
t
Identif
y
Familia
Front Di
s
serGuideV2.0
t
er 1: P
r
y
and inve
n
1 x L
i
1 x
Te
1 x p
1 x 7
p
1 x 1
0
1 x P
o
1 x 5
'
1 x
Q
1 x 3
M
rize yours
e
s
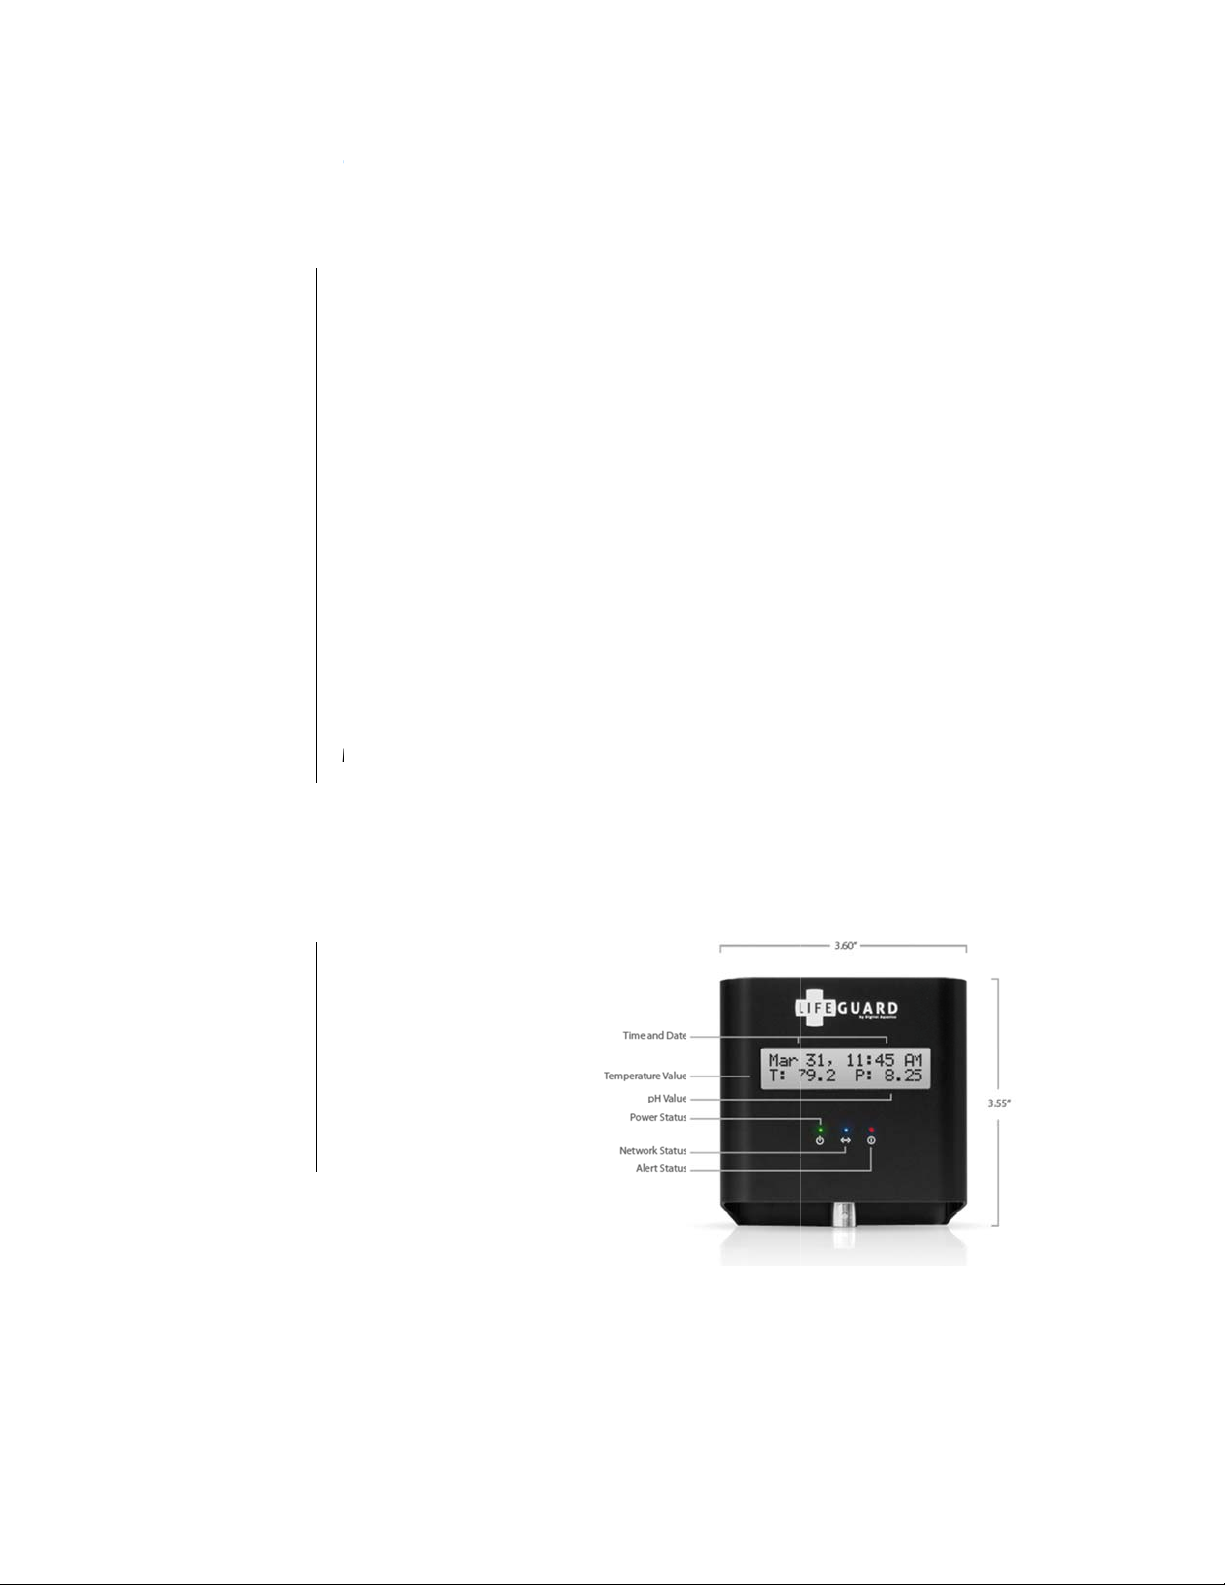
play
M
P
o
N
A
r
oduct
O
n
tory all o
f
i
feguard unit
e
mperature P
r
H Probe
p
H Calibratio
n
0
pH Calibrati
o
o
wer Adapter
'
Ethernet Cab
Q
uick Start Gui
d
M
Dual Lock L
e
lf with Li
f
M
ain Display
o
wer Status
etwork Statu
s
lert Status
O
vervie
w
f
the inclu
r
obe
n
Packet
o
n Packet
le
d
e
ow Profile™
M
f
eguard™
- 7 -
w
ded com
p
M
ounting Kit
p
onents
Lifeguard™
U
Top Pan
e
Bottom
P
Identif
y
T
he Lifeg
u
temperat
u
Te
serGuideV2.0
e
l
P
anel
T
A
Yo
u
Yo
u
y
ing the A
c
u
ard Monitori
n
u
re probe wit
h
Te
mperature Pr
o
Th
e
swi
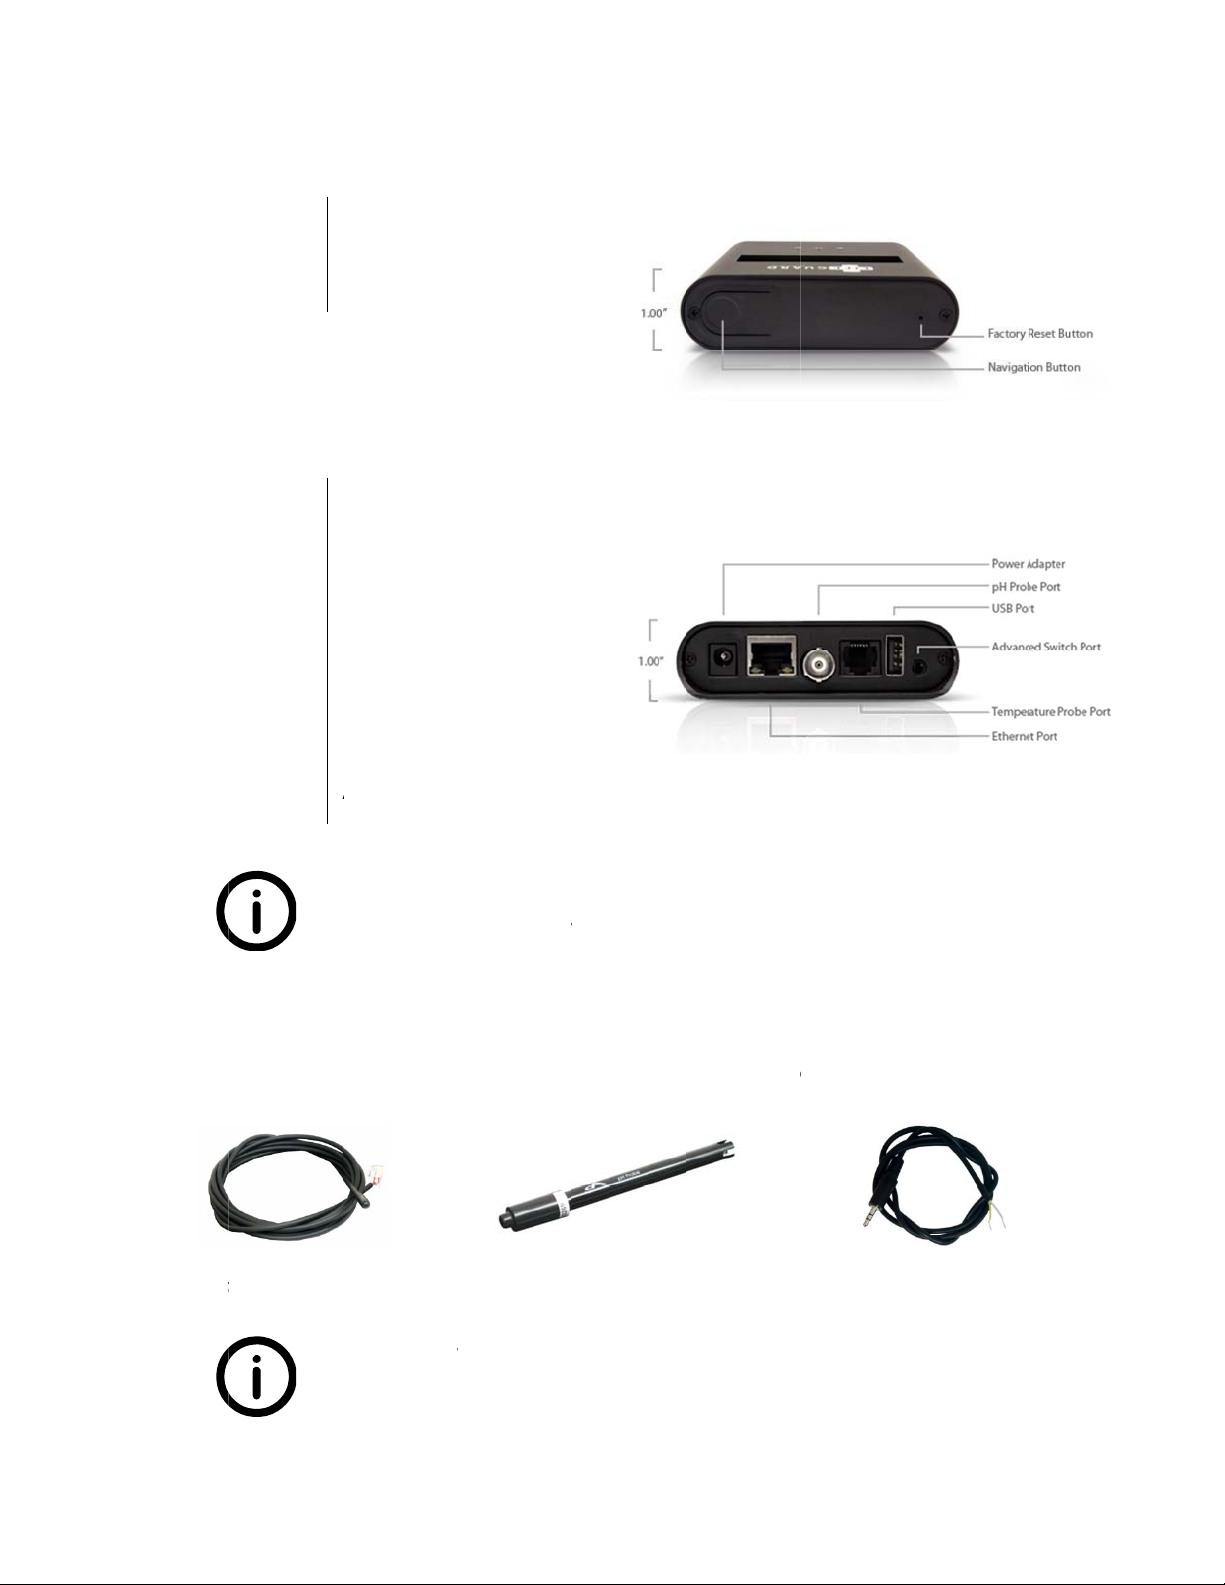
Navigation B
u
Reset Button
Power Adapt
e
Ethernet
pH Port
T
emperature
P
USB Port
A
dvanced Sw
i
u
will not lose
a
u
will not be a
b
c
cessories
n
g System incl
u
h
an RJ12 con
n
o
be
e
Advanced S
w
tches, leak de
t
u
tton
e
r Port
P
ort
i
tch Port
a
ny saved data
b
le to save ne
w
u
des two pro
b
n
ector. The pH
w
itch cable can
b
t
ectors, and ot
- 8 -
by turning of
f
w
graph data w
h
b
es. The tem
p
probe conne
c
pH Probe
b
e connected
m
her water leve
l
f
the power to
y
h
ile Lifeguard
i
p
erature prob
e
c
ts to Lifeguar
d
m
any differen
t
l sensors .
y
our Lifeguard
i
s powered off
.
e
consists of a
s
d with a meta
A
dvance
d
t
devices, inclu
d
!
.
s
tandard
l BNC connec
t
d
Switch Cable
d
ing float
t
or.
Lifeguard™
U
Chap
t
T
he Lif
e
A typical
L
Conne
c
The Lifeg
u
the Lifegu
Power Ad
a
serGuideV2.0
t
er 2: In
e
guard™ S
y
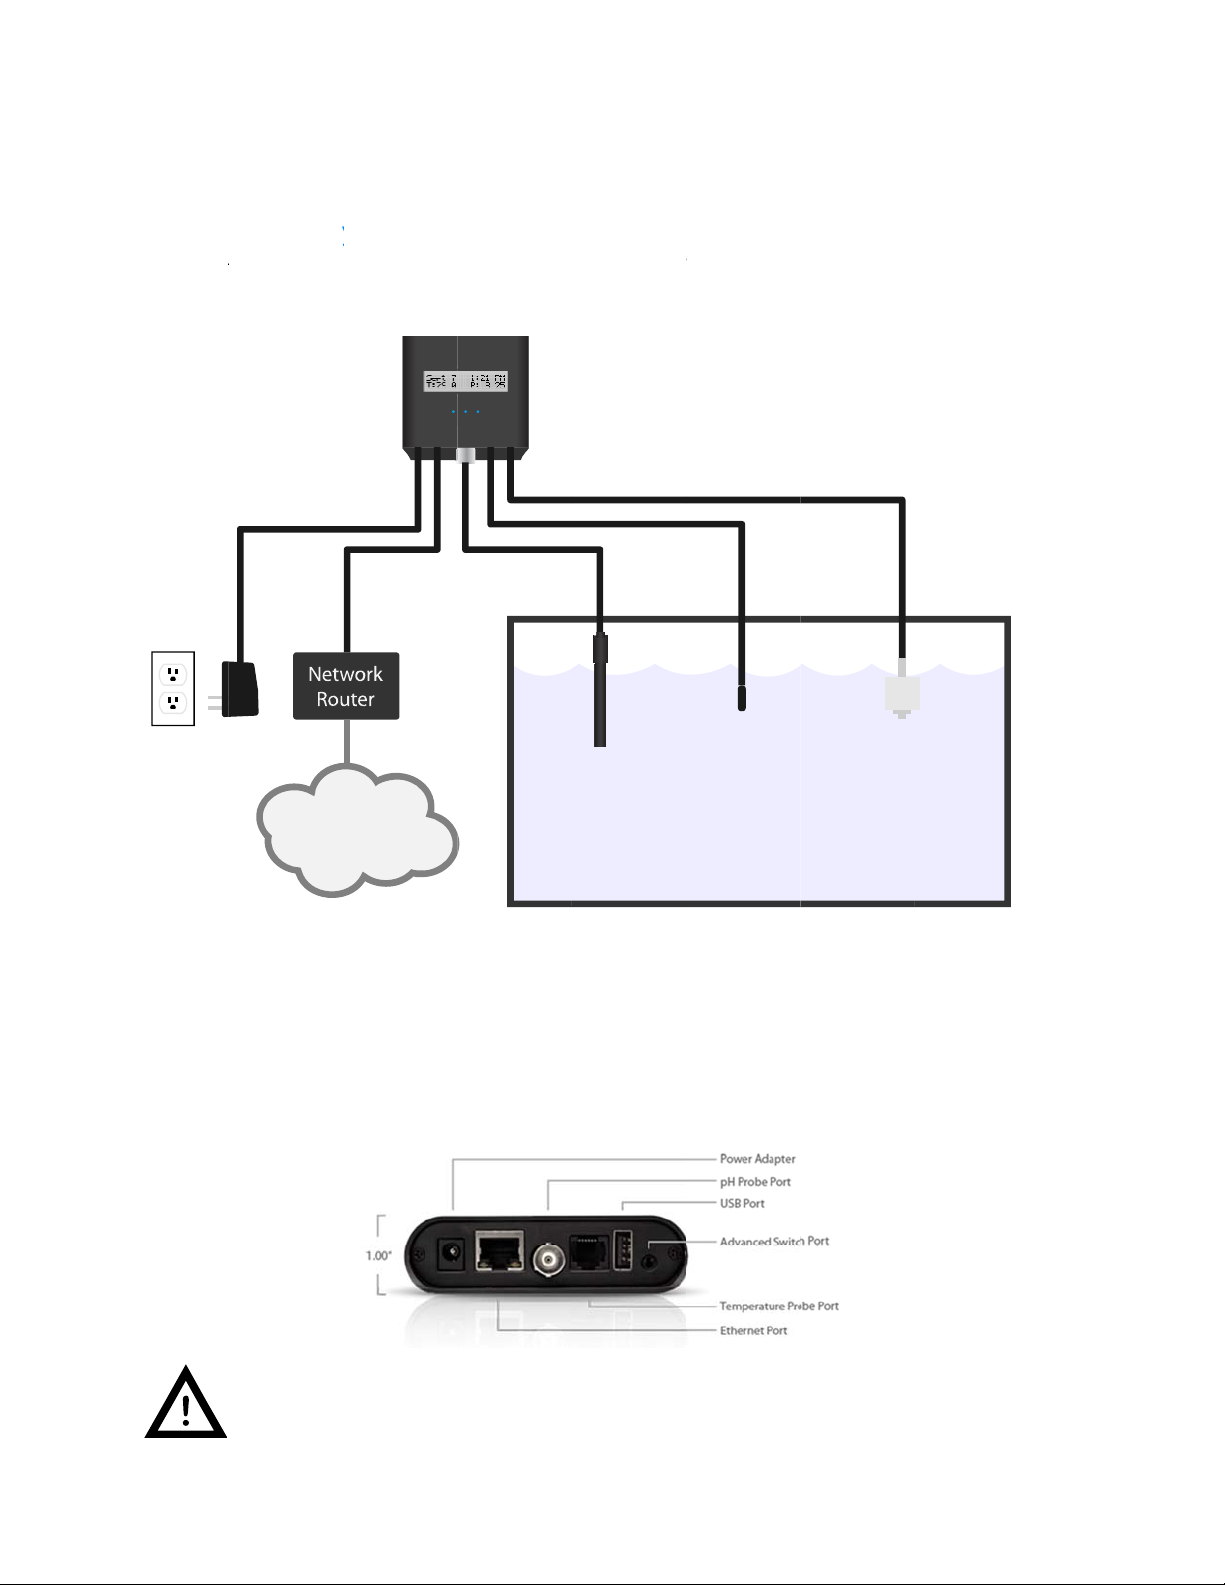
L
ifeguard mon
c
ting Your
u
ard monitori
n
ard unit:
a
pter
Int
e
Lifeguard’s
connect Lif
e
s
tallati
o
y
stem
itoring syste
m
Lifeg
Lifeguard
n
g system is c
o
e
rnet
USB port is int
e
e
guard to pow
e
o
n
m
installation i
s
uard monitori
n
™ System
o
nnected by p
p
e
nded for upd
a
e
r through the
- 9 -
s
shown in the
n
g system – typ
i
lugging each
s
Te
m
H Probe
a
ting Lifeguar
d
USB port or th
e
e
diagram bel
o
i
cal installatio
n
s
ystem cable i
m
perature Pr
o
Aquariu
m
d
’s firmware vi
e Lifeguard un
o
w:
n
nto to the ap
p
o
be Float S
w
m
a a USB memo
n
it may becom
e
p
ropriate port
w
itch
ry device. Do
n
e
damaged.
on
n
ot

Lifeguard™UserGuideV2.0 - 10 -
The Temperature Probe and the pH Probe should be mounted in an appropriate place in the aquarium (see
“Mounting the Probes” below). The bare-wire end of the Advanced Switch Cable can be connected to one or
more float switches or other switching devices (see “Connecting the Advanced Switch Cable” below). Use the
supplied Ethernet cable to connect Lifeguard to your network switch or router/modem (see “Connecting
Lifeguard to your Router” below).
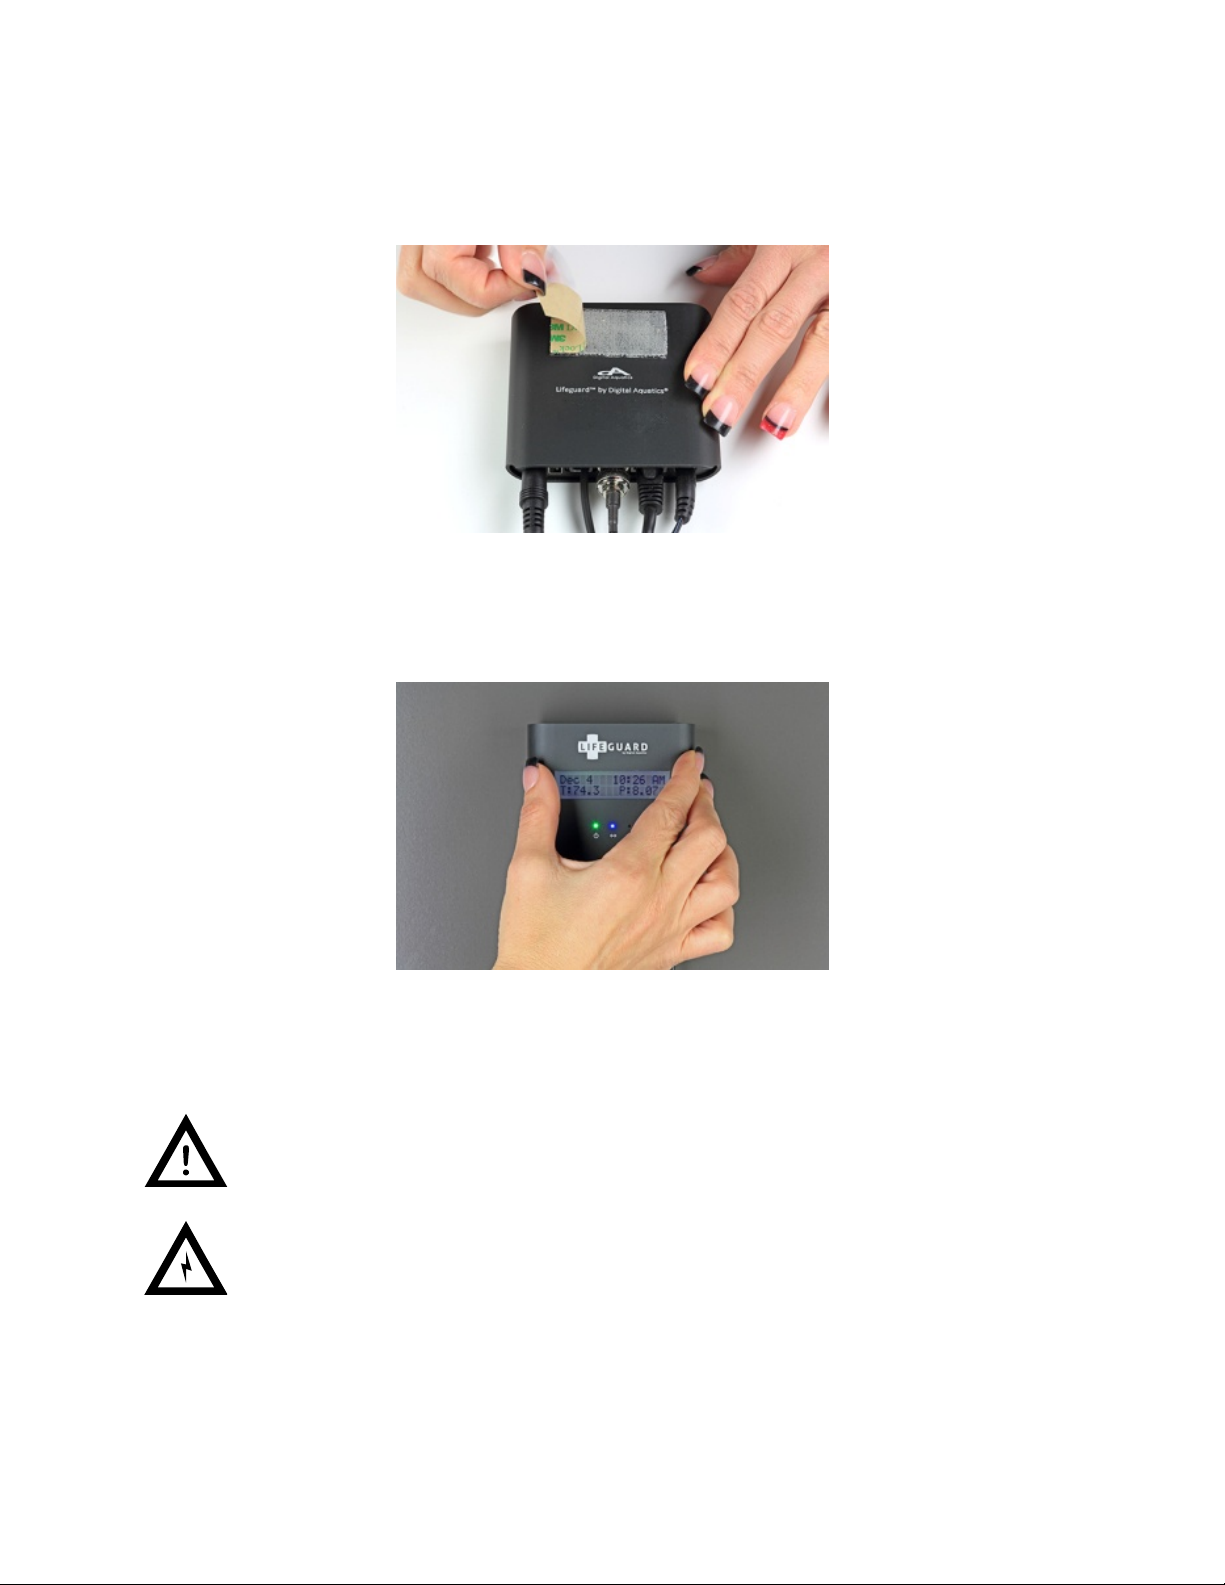
Mounting Lifeguard™
Included with the Lifeguard package is a Dual Lock™ mounting kit. This adhesive Dual Lock™ mounting kit can
be attached to the back of Lifeguard and most flat surfaces, as shown below. This allows you to pick up
Lifeguard when you want to access the unit directly.
Step 1
Peel off one side of the backing of the included Dual Lock™ mounting piece.
Step 2
Attach the piece of Dual Lock™ to the back of Lifeguard.
Lifeguard™UserGuideV2.0 - 11 -
Step 3
Peel off the remaining piece of backing from the Dual Lock™ that is attached to Lifeguard.
Step 4
Press the unit onto the surface that you would like your Lifeguard to be mounted on.
Digital Aquatics recommends mounting Lifeguard vertically. It is important that your electronic equipment
never be mounted on the ground or in the bottom of a cabinet where water can pool. Lifeguard is best
mounted as high above a level surface as conditions will allow.
Water damage is not covered by product warranties and is the leading cause of device failure. It is the
responsibility of the user to ensure safe installation practices are followed.
The Lifeguard power adapter should never be mounted on the floor or on any surface where water can
pool.
Lifeguard™UserGuideV2.0 - 12 -
Locating Lifeguard™
Digital Aquatics recommends installing Lifeguard in a location where it can be easily accessed for daily
operation.
Mounting the Probes
Probes should be mounted in your aquarium or sump tank where they are able to acquire reliable readings. For
example, placing a temperature probe next to a heater will skew the readings. The probes are fully submersible.
The pH probe must be kept moist. Be sure to leave the pH probe in its protective cap until you
are ready to calibrate and install it.
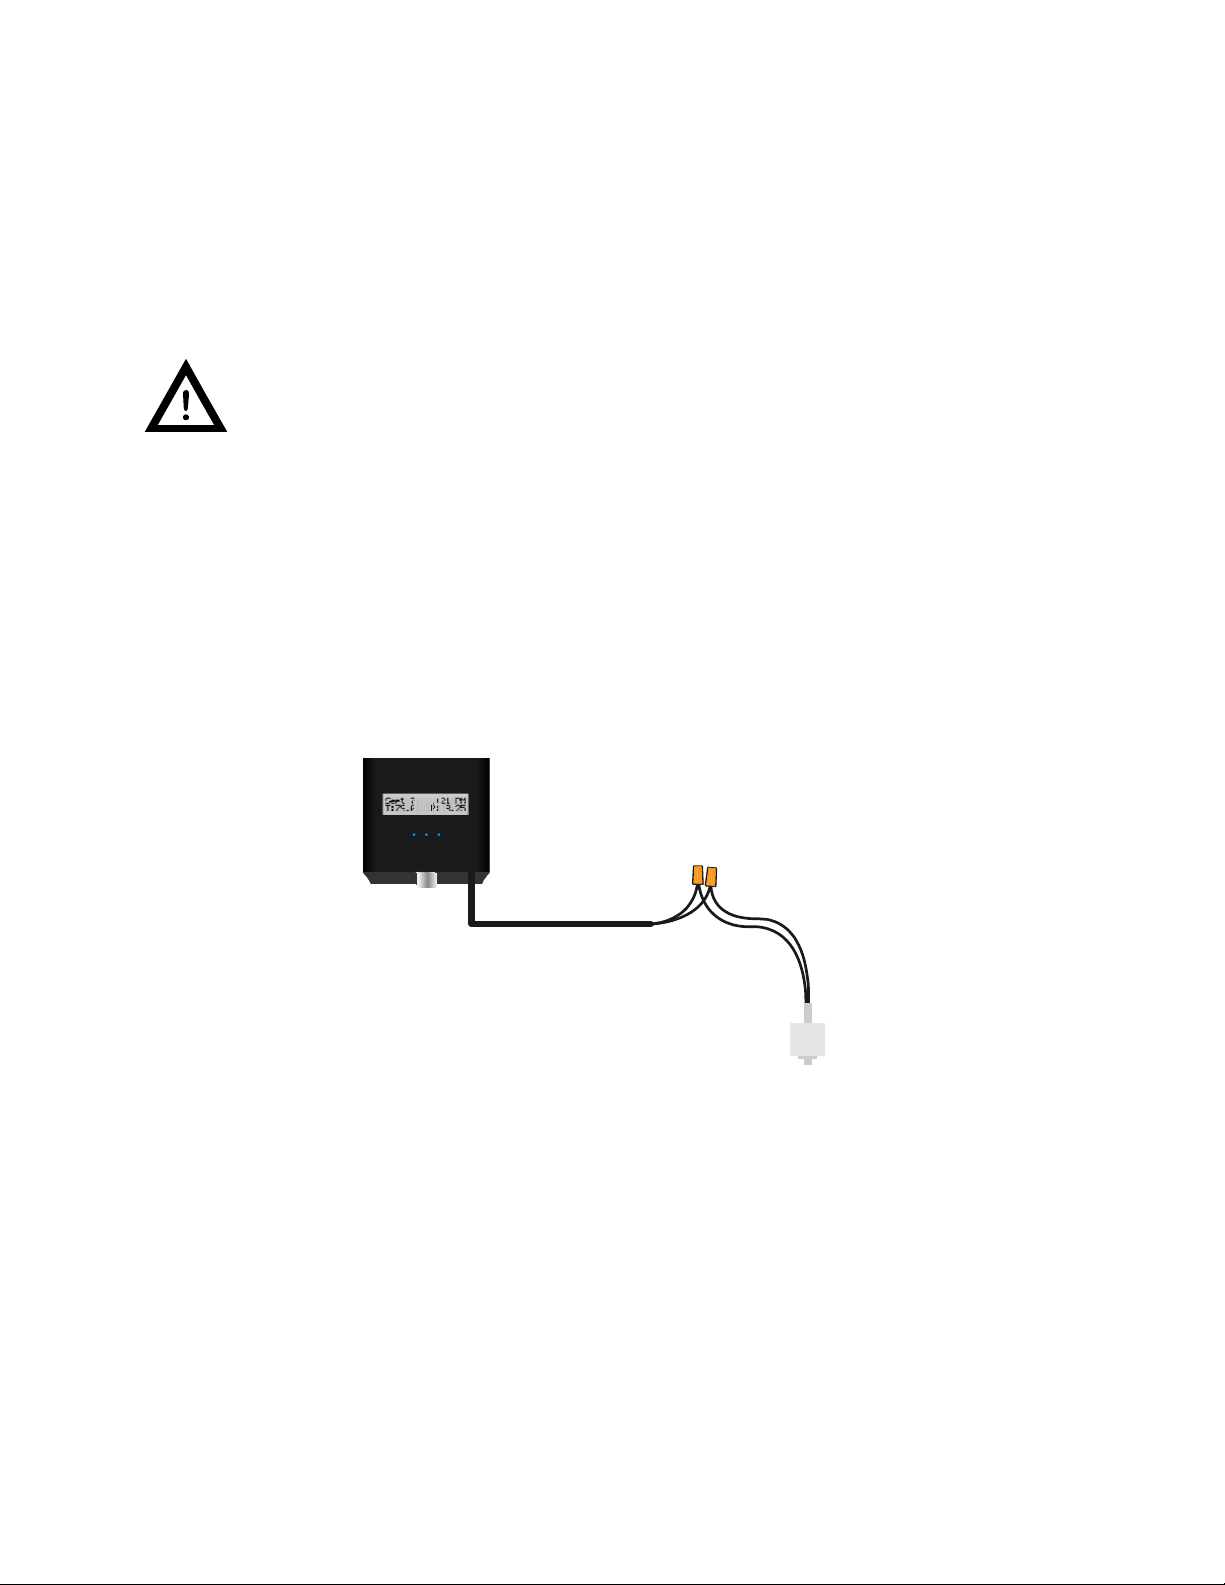
Connecting the Advanced Switch Cable
The Advanced Switch Cable can be connected to one or more float switches or other switching device. The bare
wires at the end of the Advanced Switch Cable can be connected to the wires on the switched device by
soldering the wires, installing a crimp connector, or attaching twist-on connectors. If the wires are soldered,
Digital Aquatics recommends using a lineman splice (see diagram) and wrapping each connection with
insulating electrical tape.
Crimp connectors and twist-on connectors typically do not require soldering and are commonly available at
most auto parts and home improvement stores. The bare wires on the Advances Switch Cable are #26 AWG and
the crimp or twist-on connectors should be sized accordingly.
Twist-on connector Diagram
Cable Routing
It is important to make sure cables are routed in a way that will keep them safe. Make sure that they cannot get
pinched or crimped. Damaging a cable can cause system wide failure! All cabling, probe wires, and power
cords should be installed with proper drip loops (see diagrams below). Drip loops will help prevent water from
getting in your devices and causing damage.
Float Switch
Twist-on Connectors
Switch Cable

Lifeguard™
U
Conne
c
Lifeguard
configure
d
serGuideV2.0
N
o
c
ting Lifeg
is designed t
o
d
, Lifeguard c
a
In order to
q
and turned
DHCP.
1Connect
t
Ethernet
2
Connect
t
open Eth
or mode
m
Lifeguard i
s
Adapter to
a
It may be n
e
network in
w
o
drip loop
uard™ to
y
o
connect dire
c
a
n be accesse
d
q
uickly and ea
s
on in your net
w
t
he provided
E
port on the b
o
t
he other end
e
rnet port on
y
m
.
s
not inherentl
y
a
llow Lifeguar
d
e
cessary to rec
o
w
hich Lifegua
r
y
our Rout
e
c
tly to your ne
d
by a standar
d
s
ily begin usin
g
w
ork router. S
e
E
thernet cabl
e
o
ttom of Lifeg
of the Ethern
e
y
our network
y
wireless. You
d
to communi
c
o
nfigure the n
e
r
d is connecte
d
- 13 -
e
r
twork switch
o
d
web browse
g
Lifeguard, pl
e
e
e your router
’
e
to the
uard.
e
t cable to an
switch, route
r
can connect L
i
c
ate wirelessly
w
e
twork setting
d
when setting
i
P
r
o
r router
/
mo
d
r from any de
v
e
ase make sur
e
’
s user guide f
o
1
r
i
feguard to a
W
w
ith your wire
s of third part
y
it up.
r
oper drip loop
d
em. Once co
n
v
ice with acce
s
e
that DHCP h
a
o
r instructions
1
W
ireless Bridge
e
less router.
y
networking e
n
nected and
s
s to your net
w
a
s been config
u
about turning
2
or Wireless G
a
quipment wit
h
w
ork.
u
red
on
a
ming
h
in the
Lifeguard™
U
Cha
p
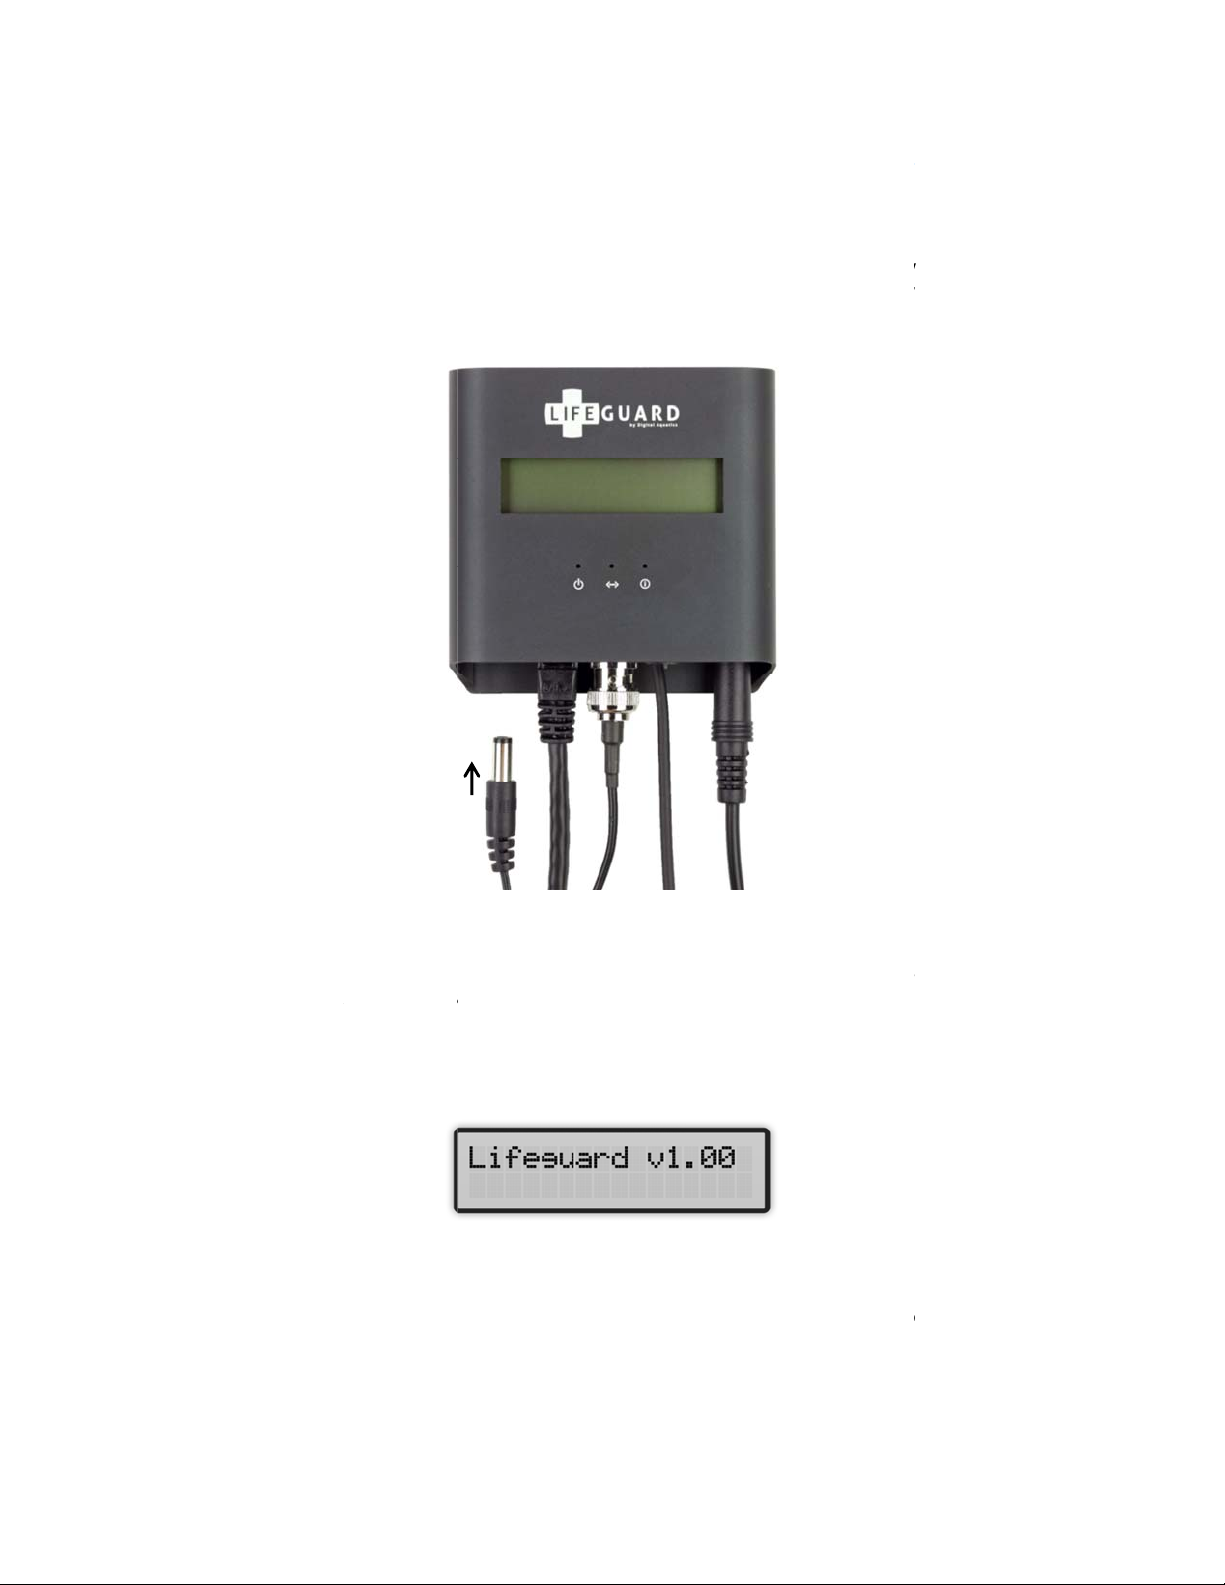
Applyi
n
The Lifeg
u
plugged i
n
Lifeguard
When po
w
network c
o
is applied.
T
he Lifeg
u
LCD displ
a
The Startu
Home
S
T
he Hom
e
to the mo
s
serGuideV2.0
p
ter 3:
n
g Power
u
ard unit does
n
to an AC po
w
a
s shown bel
o
w
er is applied
t
o
nnection is
p
The Networ
k
u
ard unit’s LC
D
a
y will briefly s
p screen will
b
S
creen
e
screen is the
s
t important i
n
Powe
r
not feature a
p
w
er outlet and
o
w.
t
o the Lifegua
r
p
resent, the bl
u
k
Status LED m
a
D
display (with
how a Startu
p
b
e displayed f
o
Lifeguard uni
t
n
formation in
y
r
ing u
p
p
ower switch.
then simply p
Connectin
g
r
d unit, the gr
e
u
e Network L
E
a
y flash.
backlight) sh
o
p
screen:
Exam
p
o
r a few secon
t
’s main displa
y
y
our Lifeguar
d
- 14 -
p
the L
To apply po
w
lug in the po
w
g
Lifeguard to
p
e
en Power Sta
E
D (center) sh
o
o
uld also illu
m
p
le Startup scre
e
ds, followed
b
y
screen. The
d
system.
ifegua
w
er, make sur
e
w
er adapter pl
u
p
owe
r
a
tus LED (left)
w
o
uld also illum
m
inate upon p
o
e
n
b
y the Home s
c
Home screen
rd™ s
y
e
that the po
w
u
g to the Po
w
w
ill illuminate
inate a few se
c
o
wer up. Afte
r
c
reen (descri
b
gives you qui
c
y
stem
w
er adapter is
w
er Adapter Po
. If an active
conds after p
o
r
a few secon
d
b
ed below).
c
k and easy a
c
rt on
o
wer
d
s the
c
cess

Lifeguard™
U
When the
formatted
hour cloc
k
The Hom
e
allows qui
Gettin
g
T
o naviga
t
Lifeguard
The Lifeg
u
Home
Current t
e
serGuideV2.0
Home screen
as the curren
t
k
using the A
M
The Date a
n
clock to ke
e
e
screen also d
i
c
k access to t
h
g
Around
t
e between sc
r
unit will scroll
u
ard unit featu
screen (main
d
Pressing th
e
screen (mai
n
e
mperature re
Curre
n
is displayed, t
h
t
month follo
w
M
and PM desi
g
n
d time are aut
o
e
p time in the e
i
splays the cu
r
h
e system’s pa
r
eens on the
L
to the next s
c
res just three
m
d
isplay)
e
navigation b
u
n
display).
ading
n
t date
Exam
p
h
e date and ti
m
w
ed by the cu
r
g
nators.
T
he t
i
o
matically det
e
vent that Life
g
r
rent tempera
t
rameters with
L
ifeguard unit,
c
reen in the or
d
m
ain screens:
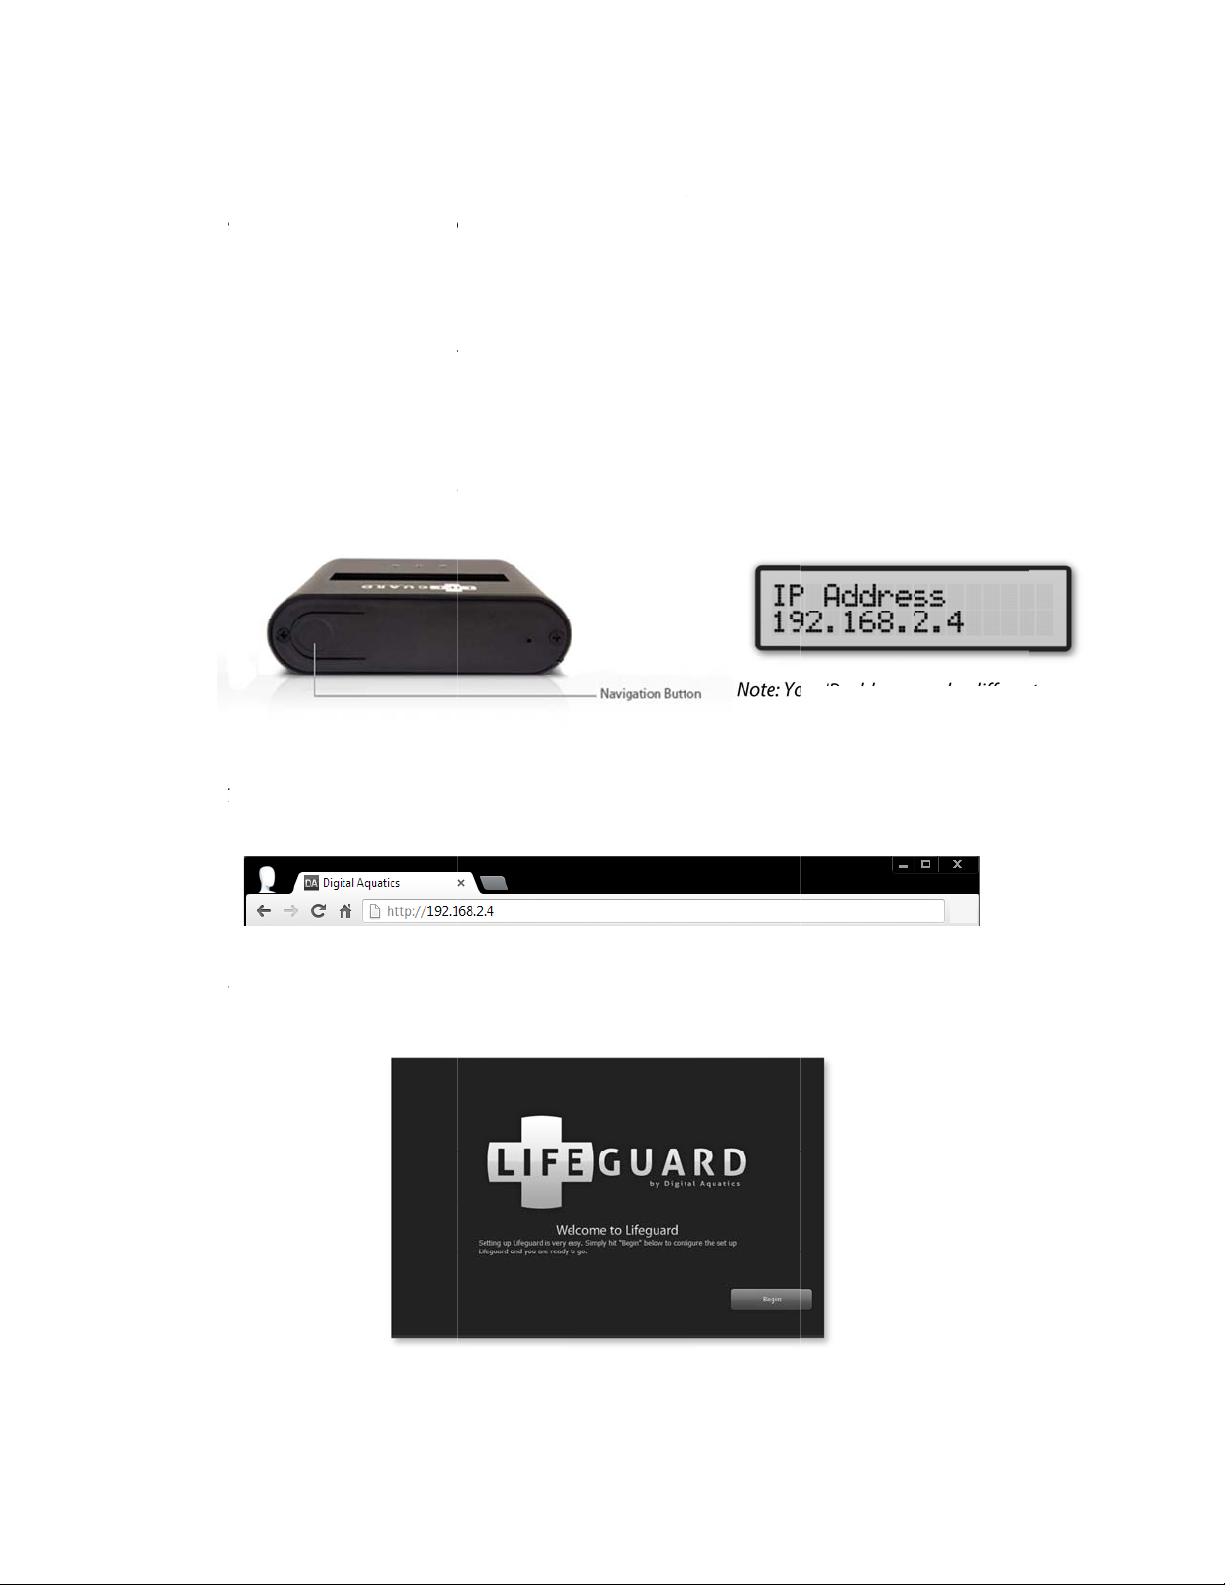
IP a
d
(Note: Your
I
u
tton on the s
c
- 15 -
p
le Home scree
m
e are displa
y
r
rent day of th
e
i
me format ca
n
e
cted by Lifeg
u
g
uard cannot c
o
t
ure and pH r
e
out having to
just press the
d
er described
d
dress screen
I
P address ma
y
c
reen displayin
e
n
y
ed in the top
e
month. The
n
also be set t
o
u
ard upon sta
r
o
nnect to the i
n
e
adings on th
e
navigate thr
o
Navigation b
u
below.
y
differ)
g the serial nu
half of the dis
time is forma
t
o
follow a 24
h
r
tup. Lifeguar
d
nternet.
e
bottom half
o
o
ugh complex
u
tton on the t
o
Inf
o
mber will loop
Current p
H
Current ti
m
play. The dat
e
t
ted based on
h
our clock.
d
has a real-ti
m
o
f the display.
menus.
o
p of the unit.
o
Screen
back to the H
o
H
reading
m
e
e
is
a 12
m
e
This
.
The
o
me

Lifeguard™
U
Displa
y
When an
a
illuminate
to the dis
p
When the
the three
p
the alarm
c
The alarm
present, L
i
Resetti
n
If you forg
T
o perfor
m
diameter
t
When the
Hold the r
e
Lifeguard
serGuideV2.0
y
ing Alarm
a
larm conditio
s
the red Aler
t
p
lay shown be
navigation b
u
p
rincipal scre
e
c
ondition scr
e
screen remai
n
i
feguard displ
a
n
g Lifegu
a
et your usern
a
m
the reset, pr
e
t
ool, as shown
Factory Reset
e
set button u
n
system has n
o
Resetting L
i
saved in Lif
e
Conditio
n
n occurs, Life
g
t
Status LED w
h
low:
u
tton is presse
d
e
ns (Home, IP
a
e
en becomes
a
n
s active as lo
n
a
ys the most r
e
a
rd™
a
me or passw
o
e
ss and hold
d
below:
button is pre
s
n
til the progr
e
o
w been reset.
i
feguard will cl
e
guard’s mem
o
n
s
g
uard displays
h
en an alarm
c
Exam
p
d
while the al
a
a
ddress and S
e
a
fourth scree
n
n
g as the alar
m
e
cent alarm c
o
o
rd you can re
d
own the rece
s
Resetting Lif
e
s
sed and held,
Exam
p
e
ss bar compl
e
ear Lifeguard’
s
o
ry will be lost
.
- 16 -
the conditio
n
c
ondition occ
u
p
le Alarm scre
e
a
rm condition
e
rial number)
a
n
in the Lifegu
a
m
condition is
p
o
ndition occu
r
set Lifeguard
t
s
sed Factory
R
e
guard with a
p
the Reset scr
e
p
le Reset scree
n
e
tes and the sc
s
measuremen
t
.
n
on Lifeguard
’
u
rs.
T
he alar
m
e
n
is being displ
a
a
s well as the
a
a
rd’s interfac
e
present. If m
o
r
rence on the
L
t
o its original
s
R
eset button
w
p
aperclip
e
en appears:
n
c
reen reverts t
o
t
data logs. A
n
’
s LCD display
.
m
condition sc
r
a
yed, Lifegua
r
a
larm conditi
o
e
.
o
re than one a
LCD display.
s
tate as shipp
e
w
ith a papercli
p
o
the Home s
c
n
y measureme
n
.
Lifeguard al
s
r
een will look
s
r
d will cycle th
o
n screen. In
e
larm conditio
n
e
d from the fa
p
or a small-
c
reen. Your
n
t data previo
u
s
o
s
imilar
rough
e
ffect,
n
is
ctory.
u
sly
Lifeguard™
U
Chap
t
If you are
s
familiariz
e
measure
m
Accessi
Lifeguard
measure
m
laptop, ta
b
Once Life
g
use this IP
Press the
N
You can e
n
screen.
Ex
Once you’
v
below):
serGuideV2.0
t
er 4: In
s
etting up Lif
e
e
yourself with
m
ent dashboar
ng the Lif
e
contains its o
w
m
ent data. Yo
u
b
let or smartp
h
g
uard is com
m
address to ac
c
N
avigation bu
t
n
ter the IP ad
d
Ex
ample: http:/
/
v
e entered th
e
itial Life
guard for the
Lifeguard’s w
e
d will display
t
e
guard™
W
w
n web serve
r
u
can access Li
f
h
one on your
m
unicating wit
h
c
ess Lifeguar
d
t
ton on top o
f
d
ress into the
U
/
192.168.2.4
e
IP address, L
i
guard™
f
irst time, we
s
e
b interface.
A
t
he system’s c
u
W
eb Serve
r
r
software tha
t
f
eguard’s we
b
network or vi
a
h
your router,
d
’s web server.
f
Lifeguard to
d
U
RL or addres
s
i
feguard’s we
b
- 17 -
Setup
s
uggest that y
A
fter the Lifeg
u
rrent readin
g
r
t
enables you
t
b
server as you
a
the Internet.
the router sh
o
d
isplay the cu
r
s
bar of your
w
b
server will di
y
ou read throu
uard system
h
g
s, graphing i
n
t
o set up the
L
u
would any w
e
o
uld assign an
r
rent IP addre
s
Note: Y
o
w
eb browser t
o
splay the Wel
c
gh each of th
e
h
as been confi
n
formation an
d
L
ifeguard syst
e
e
b site - via a
b
IP address to
s
s:
o
ur IP address
m
o
access the Li
c
ome screen i
n
e
sections bel
o
gured, Lifegu
a
d
trends.
e
m and access
b
rowser on a
P
Lifeguard. Yo
u
m
a
y
be differe
n
feguard Welc
o
n
your brows
e
o
w to
a
rd’s
P
C,
u
can
nt
o
me
e
r (see

Lifeguard™
U
Setting
The Lifeg
u
start.
Step 1
Read thro
u
Step 2
Enter you
r
maximum
quotes).
Y
‘Next’.
serGuideV2.0
up Lifegu
u
ard web serv
e
u
gh the terms
r
username an
of 32 alphan
u
Y
our usernam
e
Note: Be su
r
web server.
ard™ for t
h
e
r is designed
t
and conditio
n
d password.
Y
u
meric or pun
c
e
and passwor
d
r
e to keep you
r
h
e first ti
m
t
o guide you
t
n
s. Select wh
e
Y
our usernam
c
tuation char
a
d
are case-se
n
r
username an
d
- 18 -
m
e
t
hrough initial
e
ther you acce
e and passwo
r
a
cters (excepti
o
n
sitive. When
y
d
password inf
o
setup. Click
‘
pt the terms
a
rd must each
b
o
ns: no space
s
y
ou have com
o
rmation han
d
‘
Begin’ on the
a
nd then click
o
b
e a minimu
m
s
, single quot
e
pleted your e
n
d
y in order to l
o
Welcome scr
e
o
n ‘Next’.
m
of eight and
a
e
s or double
n
tries, click on
o
gin to the Lif
e
e
en to
a
e
guard

Lifeguard™
U
Step 3
Select yo
u
down list
o
format; ot
h
“Yes” for t
h
Step 4
Enter you
r
to display
you have
c
serGuideV2.0
r time zone a
n
o
f menu choic
h
erwise selec
t
h
e Daylight S
a
r
unit and nu
m
temperature i
c
ompleted yo
u
n
d your time a
es. Select the
the 24-hour f
o
a
vings setting.
m
erical format
n °C or °F. Pr
e
u
r selections,
p
nd date form
a
12-hour time
o
rmat. If dayl
When you h
a
preferences.
B
e
ss or click on
p
ress or click
o
- 19 -
a
t preferences
.
format if you
w
ight savings t
i
a
ve complete
d
B
y choosing t
e
each menu b
a
o
n ‘Next’.
. Press or clic
k
w
ant Lifeguar
d
i
me is current
l
d
your selectio
e
mperature u
n
a
r for a drop-d
k
on each me
n
d
to display t
h
l
y in effect in
y
ns, press or cli
n
its, you can c
o
own list of m
e
n
u bar for a dr
o
h
e time in “AM
y
our area, sele
c
ck on ‘Next’.
o
nfigure Lifeg
e
nu choices.
W
o
p-
/PM”
c
t
uard
W
hen
Other manuals for Lifeguard
1
Table of contents


