Digital Audio Corporation SSABR G2 User manual

Solid State Recorder
Generation 2
User's Manual
Software Revisions 1.1.0
DIGITAL AUDIO CORPORATION
A DRI COMPANY
"THE POWER TO HEAR –THE POWER TO CONVICT"


Solid State Recorder
Generation 2
User's Manual
Software Revisions 1.1.0
September 2005
Digital Audio Corporation
4018 Patriot Drive
One Park Center, Suite 300
Durham, NC 27703
Phone: 919 572 6767
Fax: 919 572 6786
Web: www.dacaudio.com
Copyright © 2005 by Digital Audio Corporation.
All rights reserved.

iv

v
TABLE OF CONTENTS
1 SSABR G2 Introduction........................................................................................ 1
1.1 Overview of the SSABR G2 System...............................................................................1
2 System Basics ........................................................................................................ 3
2.1 Power and Batteries.......................................................................................................4
2.1.1 Charging the Unit ..................................................................................................4
2.1.2 Displaying the Battery Charge ................................................................................4
2.1.3 SSABR G2 (-6,-12) Battery Technical Data.............................................................5
2.2 Record Modes ...............................................................................................................6
2.2.1 Normal Mode (non-Button Safeguard Mode)..........................................................6
2.2.2 Button Safeguard Mode..........................................................................................7
2.2.3 Using An External Harness ....................................................................................8
2.3 Playback Mode..............................................................................................................9
2.4 Local Erase ...................................................................................................................9
2.5 Track Management ..................................................................................................... 10
2.6 SSABR G2 Time/Message Display (LCD) .................................................................. 11
3 Software Installation............................................................................................ 13
3.1 SSABR G2 Software Installation ................................................................................. 13
3.2 Installing the Easy CD Creator Software...................................................................... 14
4 SSABR G2 Configuration and Download Utility................................................. 15
4.1 Configuration and Download Wizard.......................................................................... 15
4.2 Main Window............................................................................................................. 16
4.3 Options Window......................................................................................................... 18
4.4 Configuration Window................................................................................................ 21
4.4.1 Record Mode Tab ................................................................................................ 21
4.4.2 Scheduling Tab .................................................................................................... 23
4.4.3 Security Tab......................................................................................................... 25
4.4.4 File and Help Menus............................................................................................ 26
4.4.5 Setting the SSABR Time ...................................................................................... 26
4.5 Begin Download Window ........................................................................................... 27
5 Image File Player Utility ..................................................................................... 29
5.1 Main Window............................................................................................................. 29
5.2 Loop Control Window ................................................................................................ 31
5.3 Track List Window ..................................................................................................... 31
5.4 Track Information Window......................................................................................... 32
6 Wave File Creation Utility .................................................................................. 33
6.1 Main Window............................................................................................................. 33
6.2 Preferences Window.................................................................................................... 35
6.3 Create Wave Files Window ......................................................................................... 37
6.4 Wave File Creation Window ....................................................................................... 38
7 Creating Audio CD’s........................................................................................... 41
8 SSABR G2 External Microphone/Switch Harness .............................................. 43
8.1 Microphone, External Power, and Remote switch Connector Type .............................. 43
8.2 External Power and Remote Switch Connector............................................................ 43
8.2.1 External Power .................................................................................................... 43
8.2.2 Remote Control Switch ........................................................................................ 43
8.3 External Microphone Connector.................................................................................. 45

vi
8.3.1 Microphone Wiring ............................................................................................. 45
9 Specifications.......................................................................................................47
9.1 Analog Input/Output.................................................................................................. 47
9.2 Digital Processing ....................................................................................................... 47
9.3 Construction ............................................................................................................... 47

1
1 SSABR G2 INTRODUCTION
1.1 OVERVIEW OF THE SSABR G2 SYSTEM
Thank you for purchasing the SSABR G2 Solid State Recorder from Digital Audio Corporation. The
SSABR G2 has been specifically designed for law enforcement applications in which a concealable, high
quality recorder is required. The SSABR G2 is light and compact, making it easy to hide on an agent’s
body, in an automobile, in a wall or ceiling, or in virtually any other small space. It is housed in a rugged
aluminum case to withstand even the most difficult conditions in the field.
The SSABR G2 distinguishes itself from other digital flash recorders by providing up to 12 hours of lossless
compressed audio1. This gives the operator the highest possible recording quality and maximizes the
potential for after-the-fact electronic voice enhancement. The data reduction schemes employed in other
solid state recorders often eliminate or severely distort low-amplitude components of the recorded signal,
making voice enhancement difficult or impossible.
The SSABR G2 comes equipped with the following features:
•Two built-in, high quality microphones
•Liquid Crystal Display (LCD)
•REC/PLAY/STOP, FFWD, and REW buttons
•Three MicroTech style connectors for:
oLeft and right channel auto-sensing external microphone connections
oRemote record switch
•Five-pin Mini-B USB “On the go” connector
•Stereo headphone jack
•Internal Lithium-Ion battery operation
•Scheduled recording
•Up to 12 hours stereo record time (utilizing lossless compression), or 24 hours record time (using
lossy compression)1
•Multiple bandwidths
•Error correction
With the aid of the supplied configuration software running on a standard personal computer (PC), the
SSABR G2 unit can be precisely configured for any recording situation. Upon returning from the field, the
same configuration software is used to transfer evidence collected in the SSABR G2 unit to a recordable
compact disc (CD-R). The supplied playback software allows the downloaded evidence file to be played
back on any standard PC. The supplied Wave file creation software can be used to create WAV files of the
recorded tracks.
1Record times will vary significantly based on the SSABR G2 model, settings, and power sources.

2

3
Rewind
Button
(REW)
Fast Forward
Button
(FFWD)
Record/Play/Stop
Button
(REC/PLAY/STOP)
Figure 2-3: SSABR G2 Side View (Button Side)
Mini-B USB
Connector Headphone
Connector
Figure 2-2: SSABR G2 Bottom View
(USB Connector Side)
2 SYSTEM BASICS
Left Microphone
Right Microphone
6h.45
LR
L
EXT
IN
EXT
PWR
CTL
R
EXT
IN
USB PH
Right External
Microphone Connector
Time/Message
Display (LCD)
Left External
Microphone Connector
External Control Switch
and Power Connector
Mini-B USB
Connector Headphone
Connector
Figure 2-1: SSABR G2 Front View (LCD Side)
4
2.1 POWER AND BATTERIES
The SSABR G2 unit has a built-in rechargeable Lithium-Ion battery. Although there is no ON/OFF
switch, the unit will enter “sleep mode” when not recording, playing, or downloading its contents over the
USB. In the sleep mode, the unit will consume a minimal amount of power and can have a shelf life of
many months, possibly a year or more. However, it is recommended that the unit be fully charged before it
is used. The unit will still remember any schedule that has been programmed into the flash memory and the
real-time clock will continue to run (the SSABR G2 also contains a Lithium “coin” battery that powers the
clock –this battery can only be replaced by DAC).
The unit will only come out of sleep mode to record or play back audio. Once these operations are
complete, the unit will remain idle for a brief time (30 seconds) and then automatically shut down to the
sleep mode once again. While connected to a PC via a USB cable, the unit will be remotely powered and
charged via the USB Port.
2.1.1 Charging the Unit
To recharge the built-in Lithium-Ion battery, simply connect the SSABR G2 unit to a computer via the
USB port. This connection will begin automatically recharging the unit. Run the Configuration and
Download Utility and use its battery charge display to determine when the unit has been fully charged.
2.1.2 Displaying the Battery Charge
While the unit is charging via the USB cable, run the Configuration and Download Utility and use its
battery charge display to determine when the unit has been fully charged. While using the SSABR G2
unit while not in playback mode (see Section 2.3), you may display its remaining battery charge on the
LCD (Time/Message Display) by pressing the Fast Forward (FFWD) button. This feature will remain
available in all record modes. Table 2-1shows the meaning of the LCD displayed text.
Table 2-1: Battery Charge Remaining LCD Messages
LCD Message
Battery Charge
Remaining
(%)
bFUL 90-100
b_80 80-90
b_70 70-80
b_60 60-70
b_50 50-60
b_40 40-50
b_30 30-40
b_20 20-30
b_10 10-20
b LO 0-10
5
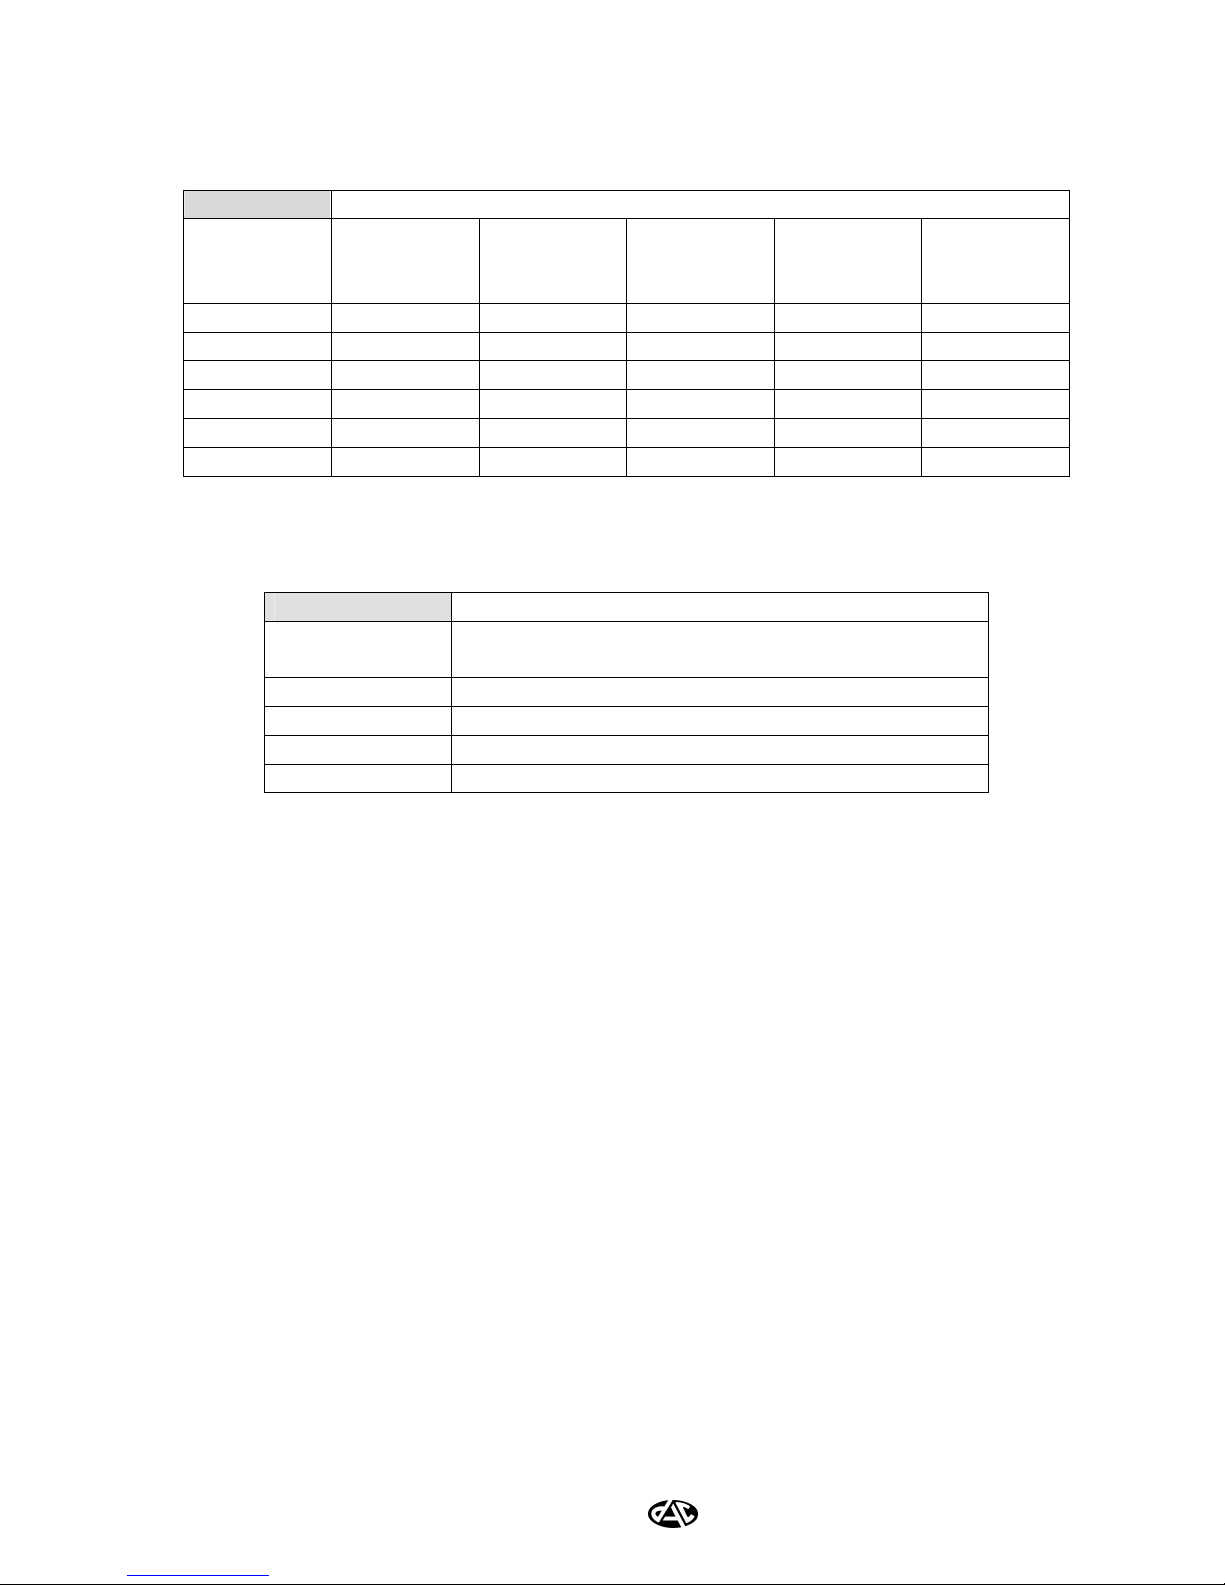
2.1.3 SSABR G2 (-6,-12) Battery Technical Data
Table 2: CPU Clock Speeds (MIPS) When Recording
Compression Type (Number of Channels)
Sample
Rate
DACPak
(Mono or
Stereo)
ADPCM
(Mono)
ADPCM
(Stereo)
PCM
(Mono)
PCM
(Stereo)
8000 20 20 20 20 20
11025 40 40 40 40 40
16000 40 40 40 40 40
22050 60 40 40 40 40
32000 60 40 40 40 40
44100 80 40 80 40 80
Table 3: Maximum Run Times Based on CPU Speed
Battery Type
CPU Clock
Speed (MIPS)
Ultralife 620mAh Li-Ion Rechargeable
(4.2V cell)
20 12.5 hours (measured)
40 12.5 hours (measured)
60 10.75 hours (measured)
80 9.75 hours (measured)
Charge Time for 620mAh Li-Ion Cell: approximately 1 hour charging from 20% to FULL gas gauge,
or 2 hours from completely flat to FULL gas gauge
Precharge Period: when battery completely flat, requires 15-20 minute precharge before unit will
power on, even when connected to PC via USB cable

6
2.2 RECORD MODES
The SSABR provides two basic record modes of operation1, Normal Mode and Button Safeguard Mode.
These modes are selected via the Security Tab within the Configuration Window of the Configuration and
Download Utility Software (see Section 4.4.3.)
The first mode is Normal Mode (Section 2.2.1). This mode provides the simplest way of operating the
SSABR unit. This mode is most useful when first learning how to use the SSABR unit and for non-critical
operations.
The second mode is Button Safeguard Mode (Section 2.2.1). This mode provides protection from
unintentional button presses as well as impedes the unauthorized termination of a recording when used by
an informant. This mode is very similar to the “button-lock” feature found on most cellular telephones.
Each record start and stop operation creates a new recorded track. A track is defined as the audio recorded
between each record/stop cycle. The SSABR allows recording up to 256 different tracks.
The SSABR has a built-in, automatic power-off feature. This feature powers the unit off only if it has
stopped recording or stopped playing back for a period of 30 seconds.
2.2.1 Normal Mode (non-Button Safeguard Mode)
To power on and begin recording:
In Normal Mode the SSABR unit will power on and begin recording under one of two circumstances:
1. The REC/PLAY/STOP button is pressed.
2. The on-board timer initiates a scheduled recording session (see Section 4.4.2).
In these cases, when the unit powers up2, the SSABR will first display its firmware version (for example,
“0140”) for a brief moment before displaying “RECD” followed by the remaining record time3. The
decimal display (“.”) will blink to signify that the unit is recording.
To stop a recording:
In Normal Mode the SSABR unit will stop recording under one of two circumstances:
1. The REC/PLAY/STOP button is pressed.
2. The on-board time terminates a scheduled recording session (see Section 4.4.2).
Once the recorder is stopped, any new attempt to begin recording again will result in a new track being
created. After stopping, the unit will display the remaining record time available2. (In the case of a
scheduled recording, the recorder will stop when the STOP button is pressed or when the end of the scheduled recording
session is reached.) After 30 seconds of being stopped, the SSABR will automatically power-off.
1When using an external wiring harness, the button modes affect how the external ON/OFF slide switch responds. See
Section 2.2.3 for more information.
2See Section 2.3 if the headphones are inserted.
3If the option to display the remaining record time is disabled, only the blinking dot will show (See Section 4.4.3 for more
information)

7
2.2.2 Button Safeguard Mode
REMINDER: Button Safeguard Mode must be selected via the Security Tab within the Configuration Window of
the Configuration and Download Utility (see Section 4.4.3.)
To power on and begin recording:
In Button Safeguard Mode the SSABR unit will power on1and begin recording under one of two
circumstances:
1. The on-board timer initiates a scheduled recording session (see Section 4.4.2).
2. The Safeguard key-sequence is pressed (see Table 2-4).
Table 2-4: Button Safeguard Key-Sequence
Step Action Time/Message Display
1Power-on the unit by pressing
and releasing the
REC/PLAY/STOP button.
The firmware version will be displayed
(for example, “0140”) for a brief moment
followed by the remaining record time
available2.
2Press and hold the REW button
for three seconds.
The phrase, “-go-”, will appear for 5
seconds indicating Button Safeguard has
been disabled.
3While continuing to hold the
REW button press the
REC/PLAY/STOP button
The phrase “RECD”3will appear,
followed by the remaining record time
available2.
4Release the buttons The remaining record time available2will
display, along with a blinking dot to
signify recording has begun.
Depressing any of the keys without first following the Safeguard key-sequence will cause the message “SAFE” to
be displayed on the LCD.
To stop a recording:
In Button Safeguard Mode the SSABR unit will stop recording under one of two circumstances:
1. The on-board timer terminates a scheduled recording session (See Section 4.4.2).
2. The Safeguard key-sequence is pressed (see Table 2-4).
Once the recorder is stopped, any new attempt to begin recording again will result in a new track being
created. After stopping, the unit will display the remaining record time available2. (In the case of a
scheduled recording, the recorder will stop when the Safeguard key-sequence is pressed or when the end of the scheduled
recording session is reached.) After 30 seconds of being stopped, the SSABR will automatically power-off.
1See Section 2.3 if the headphones are inserted
2If the option to display the remaining record time is disabled, only a blinking dot (“.”) will show (See Section 4.4.3 for
more information).
3If the unit is already recording, it will be stopped and “STOP” will appear on the LCD.

8
2.2.3 Using An External Harness
When using an external harness, the ON/OFF slide switch1is normally used to automatically power-on the
SSABR unit and start a recording. To prevent a recording from being accidentally started by depressing the
REC/PLAY/STOP button while a harness is attached, the REC/PLAY/STOP button must be held down
for at least two-seconds before a recording will start. This will occur in either Normal Mode or Button
Safeguard Mode. However, stopping the recording is different in each mode.
To stop a recording in Normal Mode2:
Slide the ON/OFF switch to the “OFF” position.
To stop a recording in Button Safeguard Mode2:
Step 1: Press and hold the REW button until “-go-” appears on the LCD.
Step 2: While continuing to hold the REW button, slide the ON/OFF switch to the “OFF” position.
If an external harness consists of a momentary (push-button) switch instead of a slide switch, it will operate
as an extension of the normal REC/PLAY/STOP button on the SSABR unit. Therefore, refer to the
Sections 2.2.1and 2.2.2 when using an external momentary switch. See Section 8 for detailed information
on construction and connection of external wiring harnesses.
1The ON/OFF slide switch on the external harness should be clearly marked to indicate when the switch is in the ON or
OFF position.
2Pressing the REC/PLAY/STOP button will not stop a recording as long as the ON/OFF slide switch is in the ON
position.

9
2.3 PLAYBACK MODE1
To place the unit in the playback mode, headphones must be inserted into the headphone jack.
To begin playing a track:
Press the REC/PLAY/STOP button.
or
If using a harness, slide the ON/OFF switch to the “ON” position.
The unit will begin playing the first track (track “1”) recorded on the unit.
To stop playing a track:
Press the REC/PLAY/STOP button.
or
If using a harness, slide the ON/OFF switch to the “OFF” position.
To listen to another track:
Step 1: Stop the playback (see above).
Step 2: Press the FFWD button to select a higher number track, or press the REW button to select a
lower number track.
The LCD will indicate the current track number. After 30 seconds of the playback being stopped, the
SSABR will automatically power-off.
2.4 LOCAL ERASE
The local erase feature is provided as a means of erasing the contents of the flash memory in the event
that the SSABR unit is compromised, or when the recorded contents of the SSABR are no longer
needed. It is suggested that if you fear the SSABR unit might fall into unwanted hands that you
disable the ability to play back the recorded audio locally (see Section 4.4.3). If the Configuration and
Download Utility has enabled the Local Erase feature (Section 4.4.3), it can be started in one of two
ways.
To start the Local Erase in Normal Mode:
Press and hold down all the SSABR buttons (REW, FFWD, REC/PLAY/STOP) for three seconds.
To start the Local Erase in Button Safeguard Mode:
Step 1: Press and hold the REW button until “-go-” appears on the LCD.
Step 2: While continuing to hold the REW button, press and hold the FFWD and
REC/PLAY/STOP buttons for three seconds2.
Once the erase begins, the SSABR LCD will display a series of rapidly decrementing numbers. These
numbers represent sections of recorded flash memory that are being erased. When the numbers
decrement to zero, the erase will be complete.
1Local playback may be disabled using the security features available in the Configuration and Download Utility (see
Section 4.4.3)
2The ON/OFF slide switch on the external harness is attached and in the ON position, only the FFWD button need be
depressed and held along with the REW button.

10
2.5 TRACK MANAGEMENT
As described previously, a track is defined as the audio recorded between a record/stop cycle. Appending
or concatenating current tracks is currently not supported by the SSABR unit. Each track, when
downloaded from the unit, will create a separate WAV file when the Wave File Creation Utility is used.
Each track will be time-stamped based on the local time or on Greenwich Mean Time (GMT) set by the
SSABR software upon configuration. The time set on the SSABR is based upon the time setting of the host
PC.
11
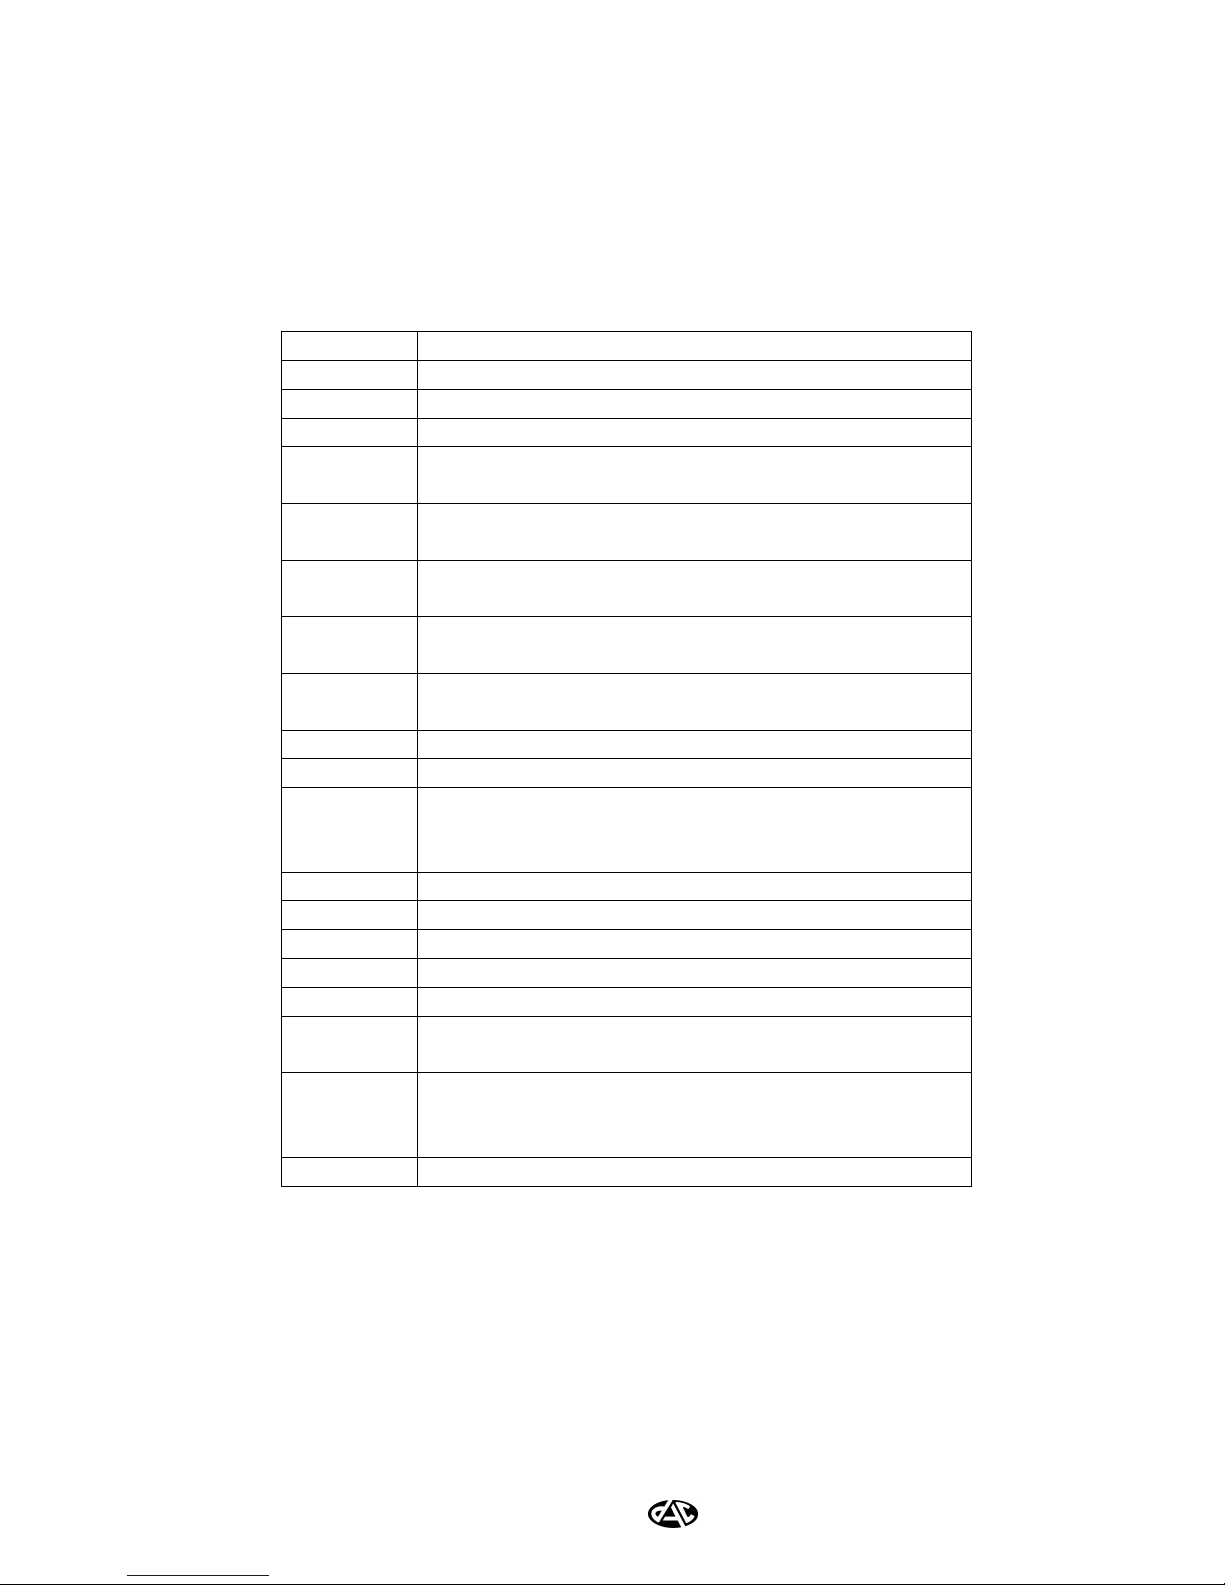
2.6 SSABR G2 TIME/MESSAGE DISPLAY (LCD)
The SSABR G2 Time/Message Display (LCD) provides information about the current status of the
unit. The table below gives a description of the messages shown on the four-character LCD.
Table 2-5: SSABR G2 LCD Message Descriptions
Display Description
STOP Record or local playback halted
PLAY Local playback started
RECD Record started
GO The SSABR G2 unit is in Safeguard Mode and
recording may now be started or stopped
SAFE The SSABR G2 unit is in Safeguard mode and an
incorrect button sequence was pressed
FULL Unable to record due to full flash, incomplete track
table, or recording being disabled
---- Attempted to playback when no valid tracks are
recorded
BAD Attempted to playback a track whose track table
information is incomplete
SCHD Scheduled recording started
USB Connected SSABR G2 to USB
NO
DATA
(alternating)
Flash is empty, no recorded tracks
SERR Internal software error (stack overflow)
BATT Low battery
ERAS Flash erase in progress
FORT Flash format in progress
DNLD Flash download in progress
NO Unable to playback audio locally because local
playback is disabled
0100 The firmware version is first displayed when the
unit is powered-up. This number will be different
for different firmware versions.
bFUL See Table 2-1for more information

12

13
3 SOFTWARE INSTALLATION
3.1 SSABR G2 SOFTWARE INSTALLATION
The SSABR G2 software requires Windows™ 98, Windows Me, Windows 2000, or Windows XP
operating system. The software can be installed on any PC that meets the following minimum hardware
requirements:
Minimum Recommended
Windows 98 Windows 2000 or XP
Internet Explorer 5.0 Internet Explorer 6.0
400 MHz Pentium II 1 GHz Pentium III
1 USB Port 2 USB Ports
4X CD-R Drive 32X CD-R Drive
32 Megabytes of RAM
512 Megabytes of RAM
10 Gigabyte Hard
Drive
60 Gigabyte Hard Drive
The software package consists of the SSABR G2 software developed by DAC. DO NOT ATTACH THE
SSABR G2 UNIT TO YOUR PERSONAL COMPUTER UNTIL YOU HAVE COMPLETED THE
INSTALLATION OF ALL SOFTWARE. To install the SSABR G2 software:
1. Close all other applications
2. Insert the SSABR G2 CD into your CD drive
3. Upon insertion, the setup program should start automatically. If not, go to the Start Menu and
select “Run…”, browse to the SSABR G2 CD and select “setup.exe”. Click OK.
Follow the instructions on the screen to complete the installation. Once the installation is complete and the
“Finish” button has been pressed, the “Readme” file will be displayed. Before following the installation
instructions given in the “Readme” file, remove the installation CD from the drive1. Next, attach the USB
cable to the SSABR G2 and then to the computer. You will see the letters “USb” displayed on the LCD of
the SSABR G2 once it has powered up. Follow the instructions detailed in the “Readme” file.
It is possible on some machines that the drivers will not load automatically. If the drivers are not found by
the automatic install option in the “Found New Hardware Wizard” you will have to tell the computer
where to find the drivers. The drivers are located in the folder where the software was installed under a
folder named “Drivers”. For example, the normal location will be, “C:\Program Files\Digital Audio
Corporation\SSABR G2\Drivers”.
If you have any questions or problems with the installation, please contact DAC for assistance.
1This removal of the CD will prevent a quirk in XP where it will attempt to search for the driver on the CD instead of
using the one that was installed with the software.

14
3.2 INSTALLING THE EASY CD CREATOR SOFTWARE
Many CD-R drives include Roxio™ Easy CD Creator software. This software includes a utility called
DirectCD. DirectCD allows the SSABR G2 software to write directly to a CD-R drive as if it were a
standard hard drive. If this software is not already included and installed on your machine it can be
purchased from Digital Audio Corporation.
Before installing Easy CD Creator go to the company’s web site (www.roxio.com) and check for the latest
upgrades and patches. To install Easy CD Creator, follow the instructions included with the product (and
any additional instructions listed on Roxio’s support web page). If you encounter any problems installing
Easy CD Creator, please contact DAC for assistance. Easy CD Creator is not required to run the SSABR
G2 software, but is required to allow copying of the SSABR G2 contents (image file) directly from the
SSABR G2 unit to the CD-R.
Table of contents


