Digital Blue Flaunt Necklace Cam User manual

When You've Got It, Flaunt It!
You can take pictures anywhere while still looking great!
This guide will provide basics on how to use your new camera.
You’ll be a photographer in no time.
User Guide
NEED ADDITIONAL HELP?
For additional product support visit out website at:
www.playdigitalblue.com and select Technical Support.
If you are still having problems with the product,
contact Customer Support at 888-800-0502.
If You've Got It, Flaunt It!If You've Got It, Flaunt It!
Necklace Cam
Check for other Flaunt products at: myflaunt.com TM

POWERING THE CAMERA
The camera needs an AAA alkaline battery before you can
begin taking pictures with it.
To install the battery:
First, remove the protective cover on the end of the camera. Slide the
battery compartment open and place the battery in with the (–) end
facing the viewfinder.
Press and hold the Mode button for few seconds to turn the camera
on. The camera will beep twice and will display the image counter.
To turn the camera off, press and hold the Mode button.
Protective Cap
Viewfinder
Mode
Battery Compartment
+_
Note: The camera will shut off automatically (60 sec)
to conserve battery when it is not being used.
The camera will beep once when it powers off.
2
The camera will automatically return to Capture Mode. If you
would like to use the self-timer again just repeat the previous steps.
Once the picture has been taken, the display screen will show the
total number of pictures on the camera.
CHANGING THE PICTURE QUALITY
The camera has two different settings for picture quality. The default
state for the camera is high quality. In High Quality mode the picture
will look nicer, but that means the camera will store less pictures.
In Low Quality mode, the camera can store more pictures, but they
will not look as crisp.
To change the picture quality
press and hold the Mode button
to turn the camera on.
Continue to press the Mode button
until you see the following screen.
Press the Snapshot button to change to low quality.
The Low Quality icon will now be steady on the screen.
Take pictures by following the steps in Take Pictures
with the Camera section.
Low Picture Quality
Note: If the camera powers off it will return to the default state- High Quality.
11
SETTING THE TIMER
The camera timer is a great way to make sure that memories
are saved forever with you in them! You can set the timer so
you can be in snapshots with your friends.
Press and hold the Mode button to turn the camera on.
Press the Mode button until you see the screen below.
The Self-Timer icon will flash in the upper right corner
indicating that you are in Self-Timer Mode.
Position the camera on something stable and look through the
Viewfinder and focus on the image you want to capture.
If you are trying to take a photo that you are going to be in, be
sure to frame the snapshot so there is room for you in the picture.
Press the Snapshot button to activate the timer.
The camera will beep to indicate the timer has been triggered.
Once you have started the timer, you have about 15 seconds
before the picture is taken.
The beep will get more frequent and the camera display will count
from 1 to 10. The picture is taken when the counter reaches 10
and you hear a several quick beeps.
Timer Icon
10
INSTALL THE PHOTO
EDITING SOFTWARE
Install the photo editing software for the ultimate fun with your
photos. If the application does not start on its own, double-click
the CD-ROM\DVD drive that contains the software.
Follow the instructions on the screen.
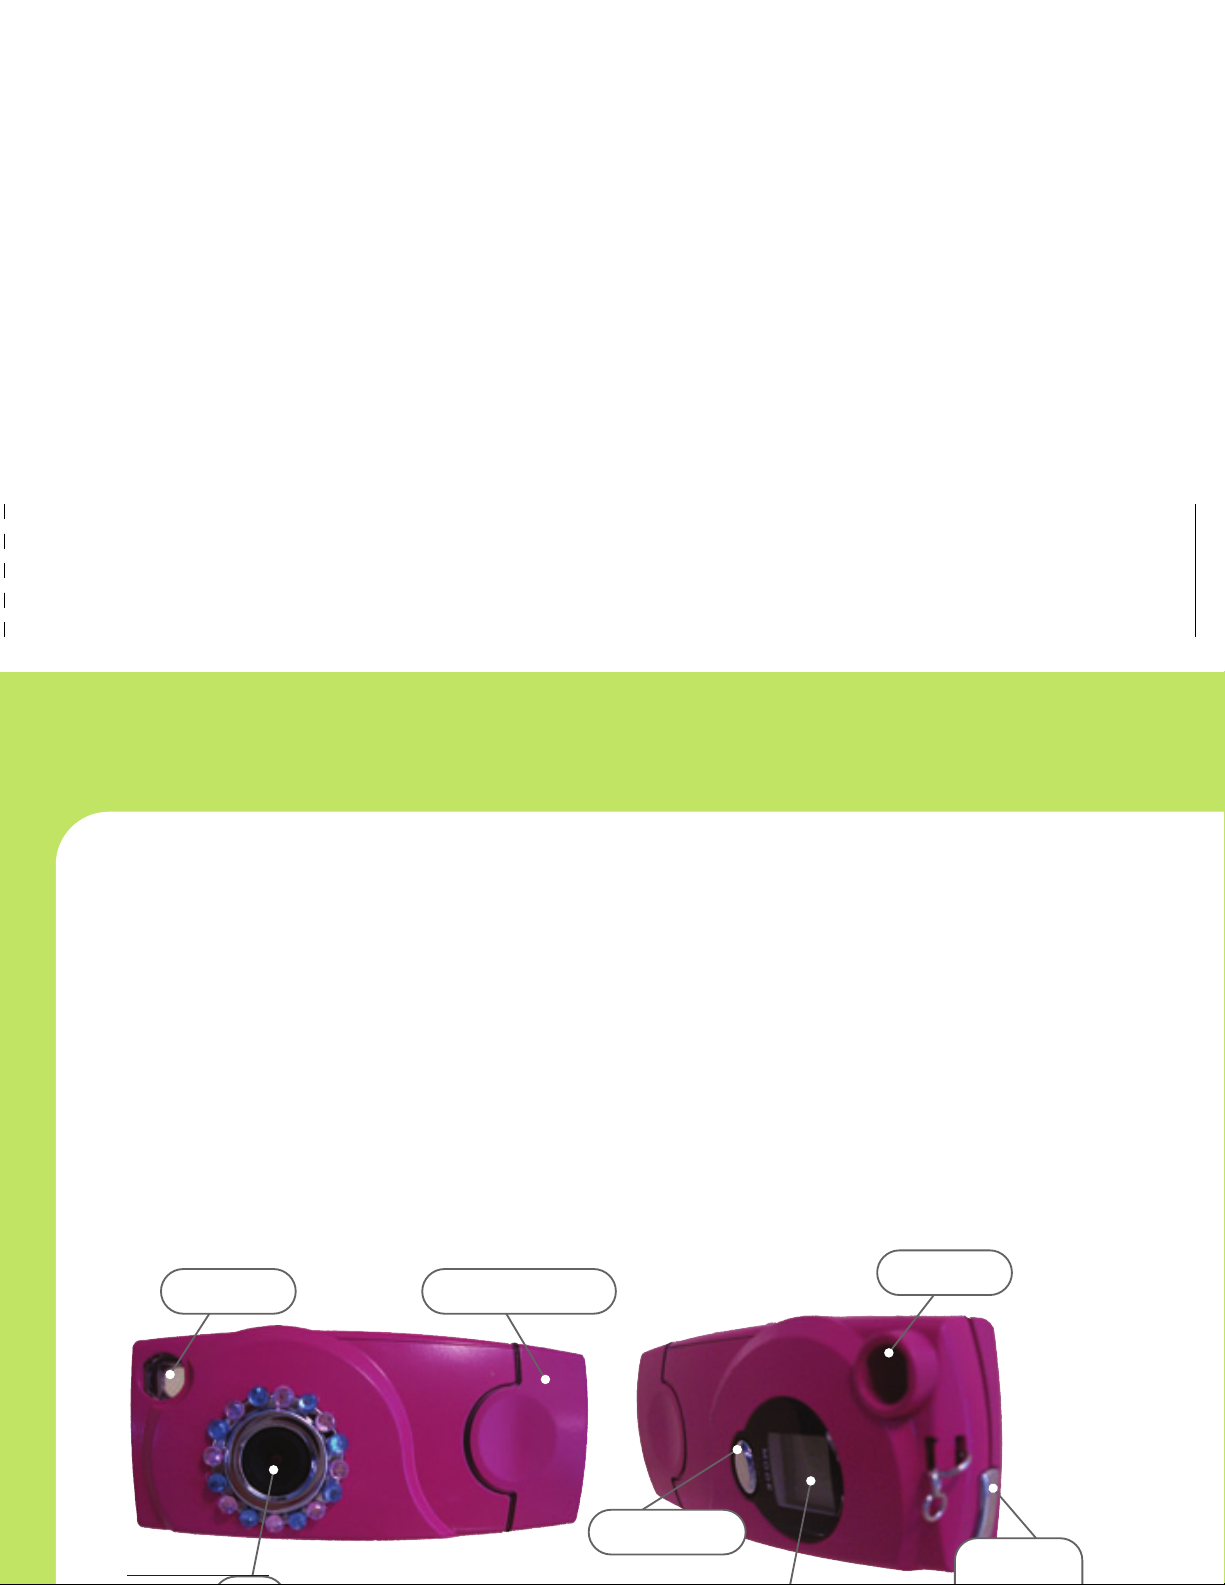
Camera Controls
Viewfinder: Use the viewfinder to frame your pictures.
Lens: The optical piece that is responsible for capturing pictures.
Protective Cover: This protects the USB port by snapping onto
the end of the camera.
Snapshot: Press the snapshot button to take a picture.
Mode Button: Press the mode button to turn the camera on and
select different mode options.
Display Screen: Allows you to view items on the selection menu.
Protective CoverViewfinder
Lens
Snapshot
Button
Viewfinder
Mode Button
Display Screen
3
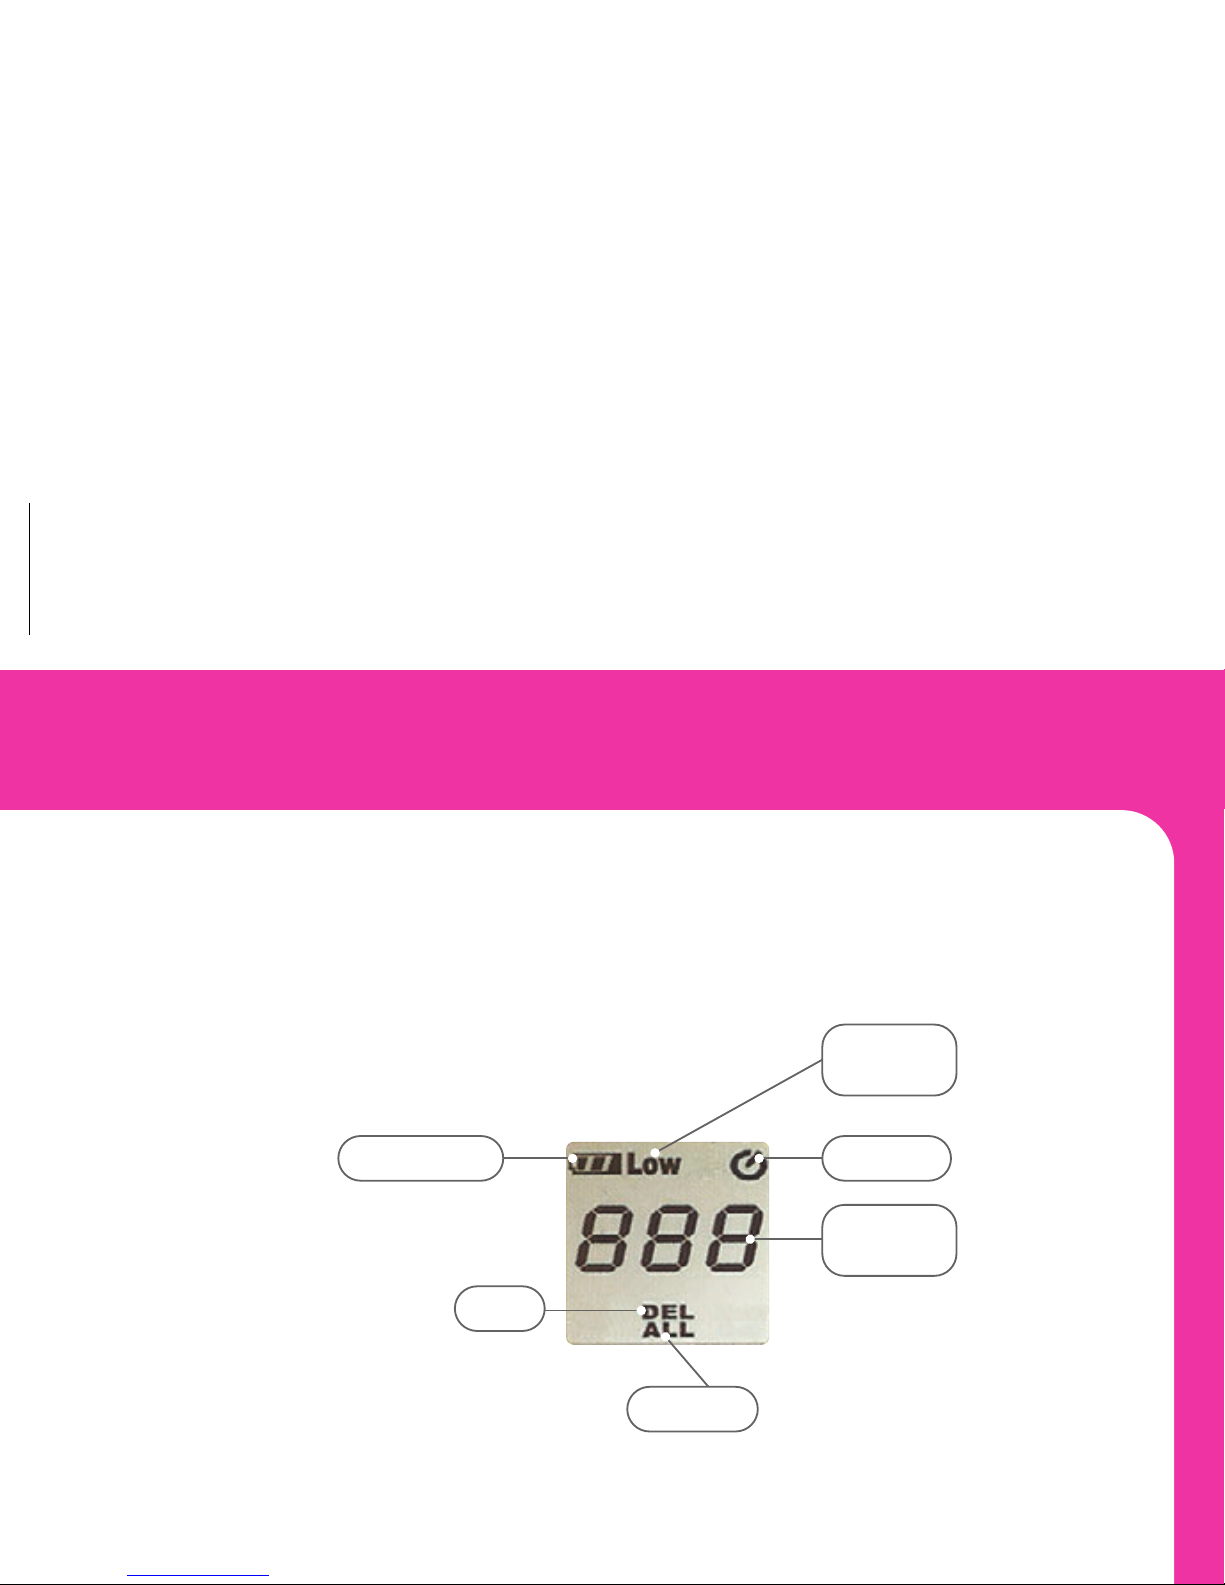
Using the Camera Display Screen
The camera display screen provides
you with information about all the functions
of the camera. To view the current mode,
refer to the display screen:
Battery Status: The battery status will always appear on the
screen. The battery is full when the icon looks like the picture above.
As the bars disappear, the battery power is decreasing.
Self-Timer: This icon appears when self-timer has been set.
Number of Pictures: Displays the number of pictures currently
stored on camera.
Resolution: Displays when the picture quality is set to low. If the
camera is set to high resolution nothing will display on screen.
Delete: This icon displays when you are deleting the last picture
taken on the camera.
Delete All: This icon displays when you are deleting all the
pictures on the camera.
Number
of Pictures
Resolution
Mode
Delete
Self-TimerBattery Status
Delete all
4
To delete all pictures on the camera follow the steps above,
but press the Mode button until you select the Del All icon.
If there are any pictures you would like to keep, make sure you
download them first. Press the Snapshot button to delete
all the photos on the camera.
Deleting Pictures from the Computer
Connect the camera to the PC using the supplied
USB docking station.
View the removable storage device folder on My Computer.
Double-click the DCIM folder to review the snapshots
you would like to delete.
Select the photos you would like to delete.
Right-click the photo(s) you would like to delete and select
Delete from the menu.
Delete All
Note: It is easier to view your pictures in thumbnail view.
9

DELETING PICTURES
The great thing about a digital camera is deleting pictures
that you don’t like! You can delete the last picture you took
or you can delete all the photos on the camera. You can delete
pictures from the camera or while the camera is connected
to the computer.
Deleting Pictures from the Camera
To delete the last picture you took press and hold the
Mode button to turn the camera on.
Continue to press the Mode button until you see the
following screen. The Del icon will flash on the bottom.
To delete only one picture make sure you have selected the
Del icon and not the Del All icon.
Press the Snapshot button to delete the last picture you took.
You will notice that the counter on the camera decreases.
Delete
8
How to Hold the Camera
To get best results, shoot pictures by holding the camera
in this position.
Take Pictures with the Camera
Press and hold the Mode button to turn
the camera on.
The camera should default to Capture
Mode and the screen should look like
the following. The only icons on the
display should be the Battery Status
icon and the image counter.
Look through the Viewfinder and aim at the subject
you want to capture.
Press the Snapshot button to take the picture. The camera will
beep twice while you are taking the picture. Keep the camera
still until you hear the second beep end.
The display screen will show the number of pictures stored on the camera.
5

DOWNLOAD
YOUR PICTURES
After you have taken your pictures you’ll need
to download them to the computer.
Connect the camera to the PC using the
supplied USB docking station.
If this is the first time the camera is
connected, wait until Windows detects
the hardware and follow the prompts
to install the hardware.
Open My Computer and then open the new removable storage
device. Double click on the DCIM Folder to view your pictures.
Select all the photos you would like to save and copy them
to a folder on your computer.
For example, you may want to save your photos to your
My Pictures Folder:
\My Documents\My Pictures
PHOTOGRAPHY TIPS
These general tips will help you improve the quality of the
photos you shoot. Because this is a digital camera, it’s easy
to experiment and try different techniques. If you don’t like the
results, you can delete the pictures and try again.
There are many factors that contribute
to good photography:
- Take lots of pictures to increase your chance of capturing just
the right shot. Afterward, you can go back and delete the
pictures you don't want.
- Make sure that the source of light is behind or to the side of the
camera, rather than in front of the camera. The person taking
pictures should not be looking into a light source.
- When taking a picture, hold the camera as steady as
possible to prevent blurry photos. Try resting your elbows
on something stable.
- If you are taking a picture of a person, try to get direct eye
contact with the person to create a more engaging picture.
- Using a plain background will put more emphasis on the
subject of your picture. When taking a picture make sure to
notice what is in the background of your photo.
- Try using a different angle to capture an ordinary object to
make the picture more interesting.
67

DELETING PICTURES
The great thing about a digital camera is deleting pictures
that you don’t like! You can delete the last picture you took
or you can delete all the photos on the camera. You can delete
pictures from the camera or while the camera is connected
to the computer.
Deleting Pictures from the Camera
To delete the last picture you took press and hold the
Mode button to turn the camera on.
Continue to press the Mode button until you see the
following screen. The Del icon will flash on the bottom.
To delete only one picture make sure you have selected the
Del icon and not the Del All icon.
Press the Snapshot button to delete the last picture you took.
You will notice that the counter on the camera decreases.
Delete
8
How to Hold the Camera
To get best results, shoot pictures by holding the camera
in this position.
Take Pictures with the Camera
Press and hold the Mode button to turn
the camera on.
The camera should default to Capture
Mode and the screen should look like
the following. The only icons on the
display should be the Battery Status
icon and the image counter.
Look through the Viewfinder and aim at the subject
you want to capture.
Press the Snapshot button to take the picture. The camera will
beep twice while you are taking the picture. Keep the camera
still until you hear the second beep end.
The display screen will show the number of pictures stored on the camera.
5

Using the Camera Display Screen
The camera display screen provides
you with information about all the functions
of the camera. To view the current mode,
refer to the display screen:
Battery Status: The battery status will always appear on the
screen. The battery is full when the icon looks like the picture above.
As the bars disappear, the battery power is decreasing.
Self-Timer: This icon appears when self-timer has been set.
Number of Pictures: Displays the number of pictures currently
stored on camera.
Resolution: Displays when the picture quality is set to low. If the
camera is set to high resolution nothing will display on screen.
Delete: This icon displays when you are deleting the last picture
taken on the camera.
Delete All: This icon displays when you are deleting all the
pictures on the camera.
Number
of Pictures
Resolution
Mode
Delete
Self-TimerBattery Status
Delete all
4
To delete all pictures on the camera follow the steps above,
but press the Mode button until you select the Del All icon.
If there are any pictures you would like to keep, make sure you
download them first. Press the Snapshot button to delete
all the photos on the camera.
Deleting Pictures from the Computer
Connect the camera to the PC using the supplied
USB docking station.
View the removable storage device folder on My Computer.
Double-click the DCIM folder to review the snapshots
you would like to delete.
Select the photos you would like to delete.
Right-click the photo(s) you would like to delete and select
Delete from the menu.
Delete All
Note: It is easier to view your pictures in thumbnail view.
9
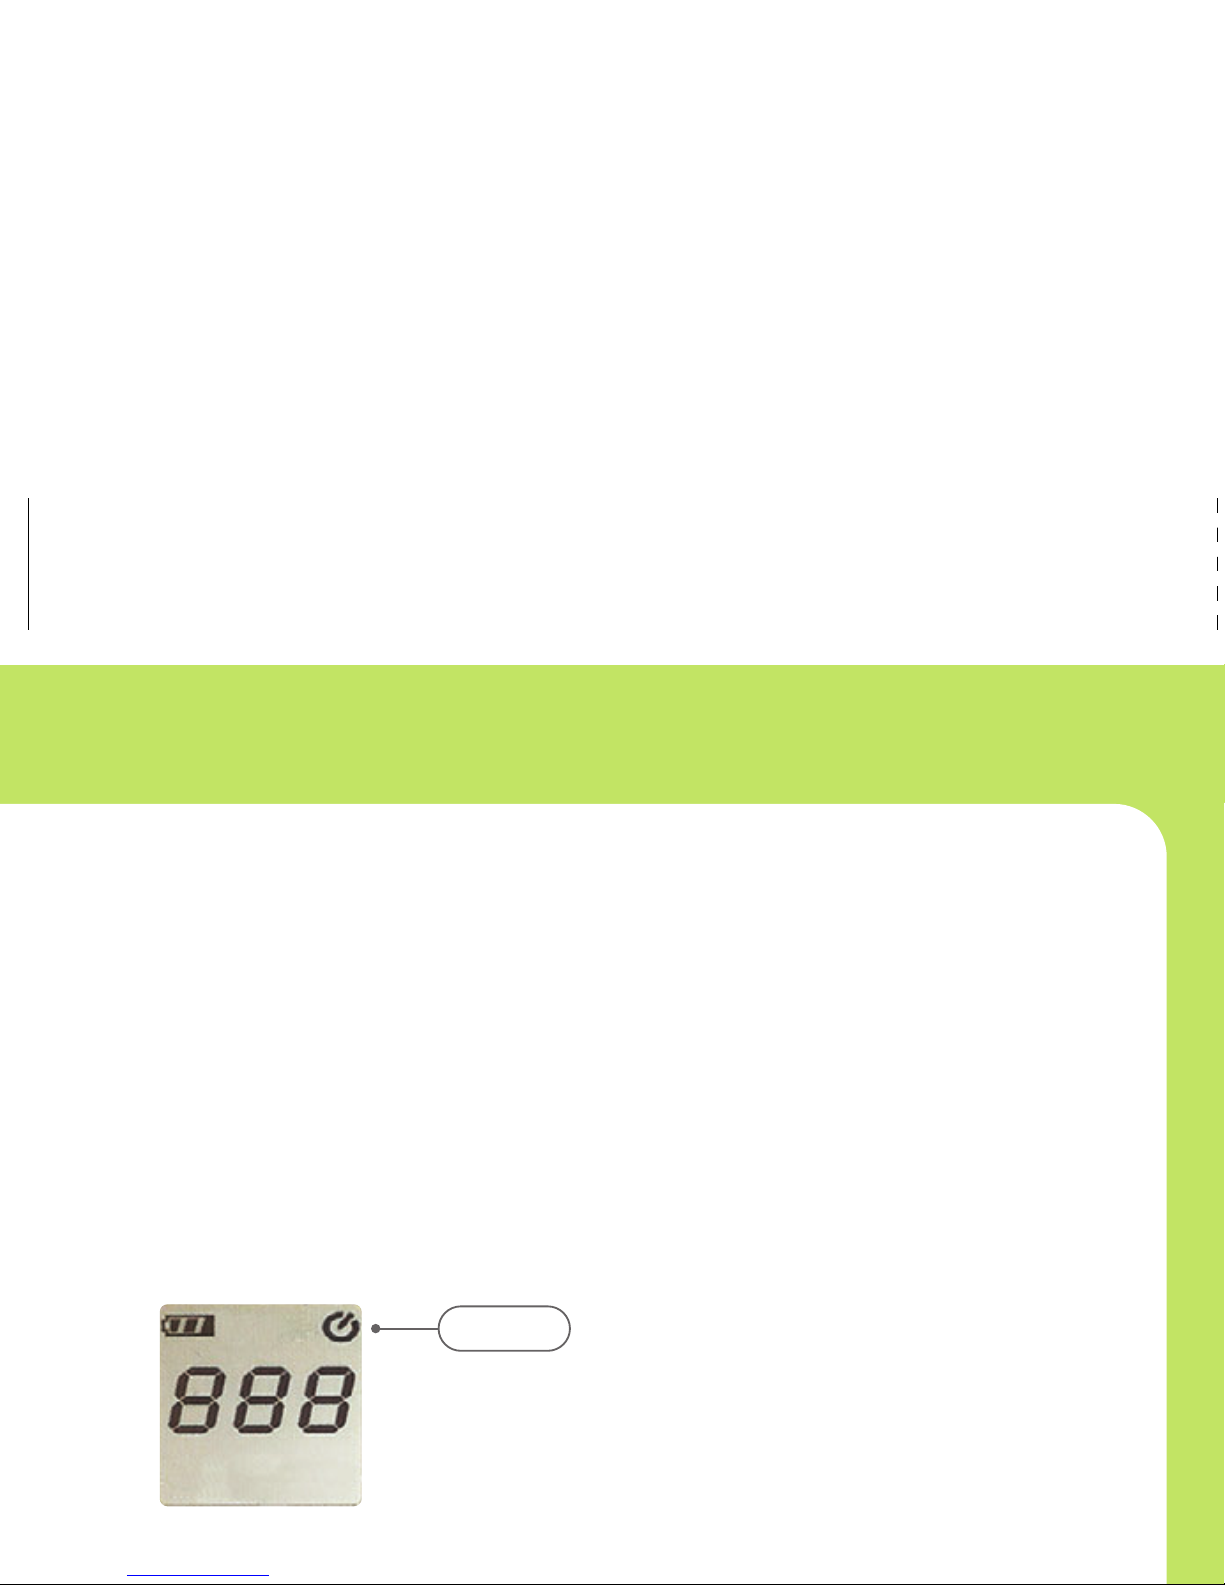
SETTING THE TIMER
The camera timer is a great way to make sure that memories
are saved forever with you in them! You can set the timer so
you can be in snapshots with your friends.
Press and hold the Mode button to turn the camera on.
Press the Mode button until you see the screen below.
The Self-Timer icon will flash in the upper right corner
indicating that you are in Self-Timer Mode.
Position the camera on something stable and look through the
Viewfinder and focus on the image you want to capture.
If you are trying to take a photo that you are going to be in, be
sure to frame the snapshot so there is room for you in the picture.
Press the Snapshot button to activate the timer.
The camera will beep to indicate the timer has been triggered.
Once you have started the timer, you have about 15 seconds
before the picture is taken.
The beep will get more frequent and the camera display will count
from 1 to 10. The picture is taken when the counter reaches 10
and you hear a several quick beeps.
Timer Icon
10
INSTALL THE PHOTO
EDITING SOFTWARE
Install the photo editing software for the ultimate fun with your
photos. If the application does not start on its own, double-click
the CD-ROM\DVD drive that contains the software.
Follow the instructions on the screen.
Camera Controls
Viewfinder: Use the viewfinder to frame your pictures.
Lens: The optical piece that is responsible for capturing pictures.
Protective Cover: This protects the USB port by snapping onto
the end of the camera.
Snapshot: Press the snapshot button to take a picture.
Mode Button: Press the mode button to turn the camera on and
select different mode options.
Display Screen: Allows you to view items on the selection menu.
Protective CoverViewfinder
Lens
Snapshot
Button
Viewfinder
Mode Button
Display Screen
3
POWERING THE CAMERA
The camera needs an AAA alkaline battery before you can
begin taking pictures with it.
To install the battery:
First, remove the protective cover on the end of the camera. Slide the
battery compartment open and place the battery in with the (–) end
facing the viewfinder.
Press and hold the Mode button for few seconds to turn the camera
on. The camera will beep twice and will display the image counter.
To turn the camera off, press and hold the Mode button.
Protective Cap
Viewfinder
Mode
Battery Compartment
+_
Note: The camera will shut off automatically (60 sec)
to conserve battery when it is not being used.
The camera will beep once when it powers off.
2
The camera will automatically return to Capture Mode. If you
would like to use the self-timer again just repeat the previous steps.
Once the picture has been taken, the display screen will show the
total number of pictures on the camera.
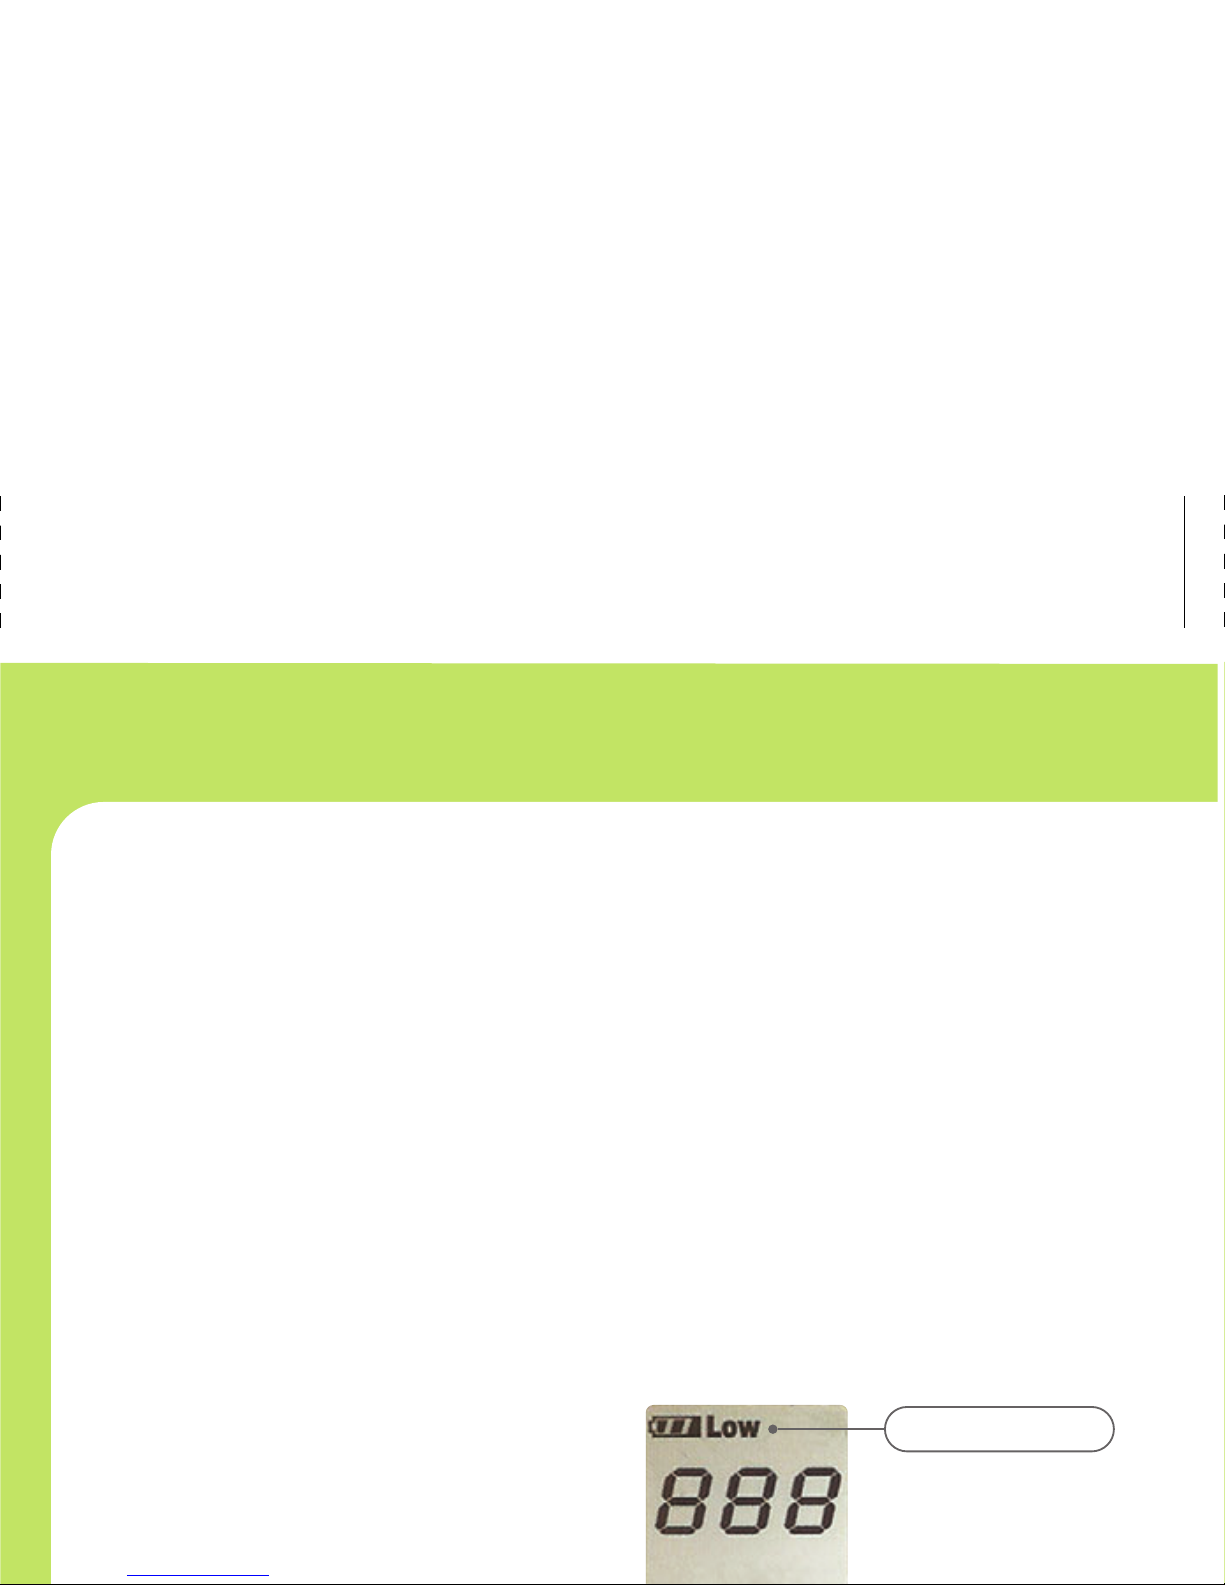
CHANGING THE PICTURE QUALITY
The camera has two different settings for picture quality. The default
state for the camera is high quality. In High Quality mode the picture
will look nicer, but that means the camera will store less pictures.
In Low Quality mode, the camera can store more pictures, but they
will not look as crisp.
To change the picture quality
press and hold the Mode button
to turn the camera on.
Continue to press the Mode button
until you see the following screen.
Press the Snapshot button to change to low quality.
The Low Quality icon will now be steady on the screen.
Take pictures by following the steps in Take Pictures
with the Camera section.
Low Picture Quality
Note: If the camera powers off it will return to the default state- High Quality.
11

When You've Got It, Flaunt It!
You can take pictures anywhere while still looking great!
This guide will provide basics on how to use your new camera.
You’ll be a photographer in no time.
User Guide
NEED ADDITIONAL HELP?
For additional product support visit out website at:
www.playdigitalblue.com and select Technical Support.
If you are still having problems with the product,
contact Customer Support at 888-800-0502.
If You've Got It, Flaunt It!If You've Got It, Flaunt It!
Necklace Cam
Check for other Flaunt products at: myflaunt.com TM
Table of contents
Other Digital Blue Digital Camera manuals

Digital Blue
Digital Blue SNAP Carabiner User manual

Digital Blue
Digital Blue Disney Pix Micro User manual

Digital Blue
Digital Blue SNAP 1.3MP User manual

Digital Blue
Digital Blue Disney Pix Micro User manual

Digital Blue
Digital Blue Disney Pix Frame User manual

Digital Blue
Digital Blue SNAP 5MP User manual

Digital Blue
Digital Blue Tony Hawk User manual

Digital Blue
Digital Blue Disney Pix Micro User manual

Digital Blue
Digital Blue LEGO User manual

Digital Blue
Digital Blue Disney Pix Jr User manual


