DIGITAL YACHT 4GConnect Quick guide

4GConnect
3G/4G ROUTER

User Manual for 4GConnect V1.00
TEL + 44 1179 554474 www.digitalyacht.co.uk sales@digitalyacht.co.uk
1. Introduction
Congratulations on the purchase of your 4GConnect 3G/4G Router. This unit is designed for permanent installation on
board a sail or motor boat. The 4GConnect comprises of the following parts;
•1x internal Wi-Fi antenna
•2x internal LTE antennas
•4GConnect Router/Modem unit
•User Manual
Before operating 4GConnect you should familiarise yourself with this User Manual and the manuals for
any other equipment you wish to connect to it.
2. Before you start
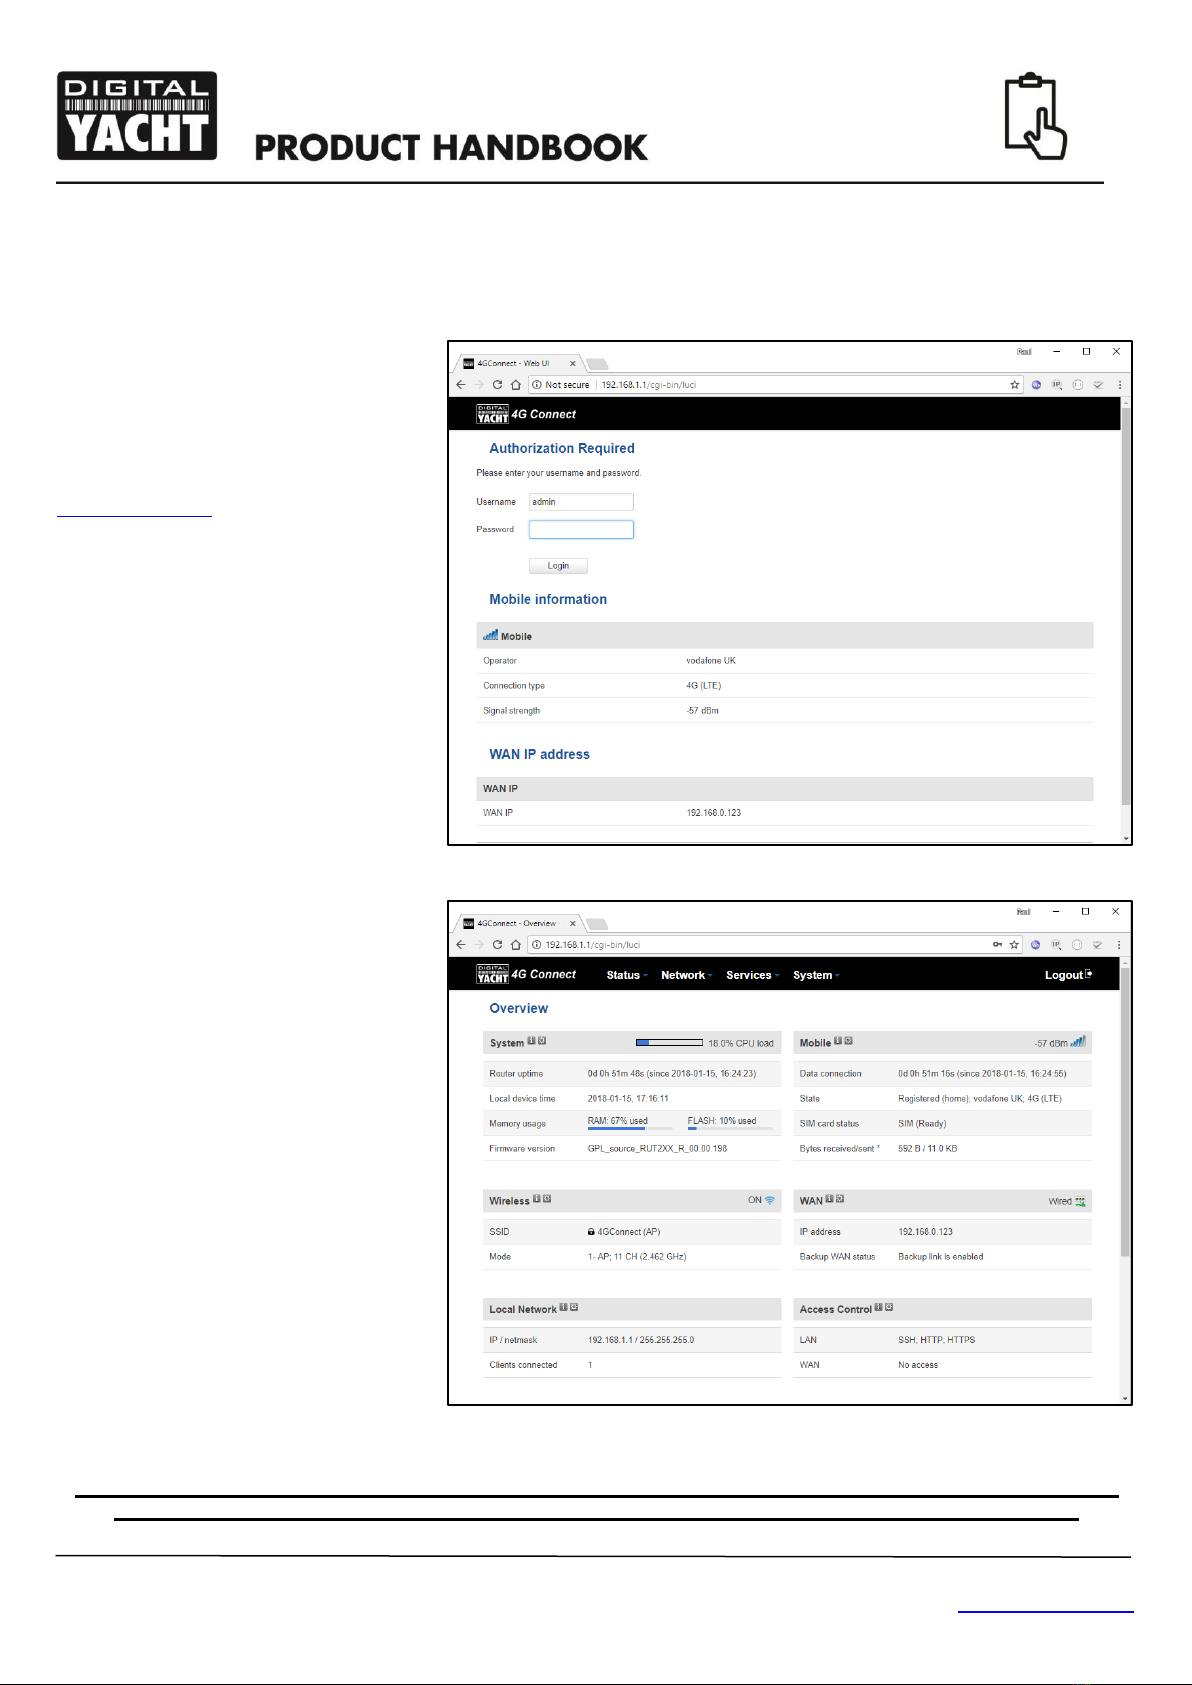
The 4GConnect is configured and controlled via its built-in web interface. In order to access this, you will need a wireless
device such as a PC/Mac, Tablet or Smart Phone running a modern web browser such as Chrome, Safari, Edge or
Firefox. No special drivers or software are required to make the 4GConnect work.
Do not plug in the 4GConnect to the Ethernet port of your computer whilst the 4GConnect is powered up
and always ensure that the 4GConnect antennas are connected before powering up the 4GConnect.
3. Installation
The 4GConnect is designed to be mounted below deck. When deciding on the best location, the biggest factor will be
3G/4G reception. Use your mobile phone to test various locations inside the boat to see where the best reception is
found, usually close to a port hole, hatch or window.
On fibre-glass (GRP) hulled vessels, it should be possible to find a location that gives good reception but if this is not the
case or you have a wooden, carbon fibre or steel hulled vessel, then you should consider purchasing the 4GConnect Pro
antenna kit which allows you to mount the 3G/4G antennas externally and provides the best possible reception/range.
Mounting location is always a compromise on boats and 3G/4G reception will have to be weighed against other
conditions such as; space, visibility of the unit, Wi-Fi reception and cable runs. With the supplied 5dB Wi-Fi antenna,
wireless network connection to the 4GConnect should not be a problem on most pleasure boats but we recommend
mounting it centrally on the boat or as close to the area where mobile devices will be used.
The power cable can be easily extended, as can the LAN/WAN Ethernet cables.
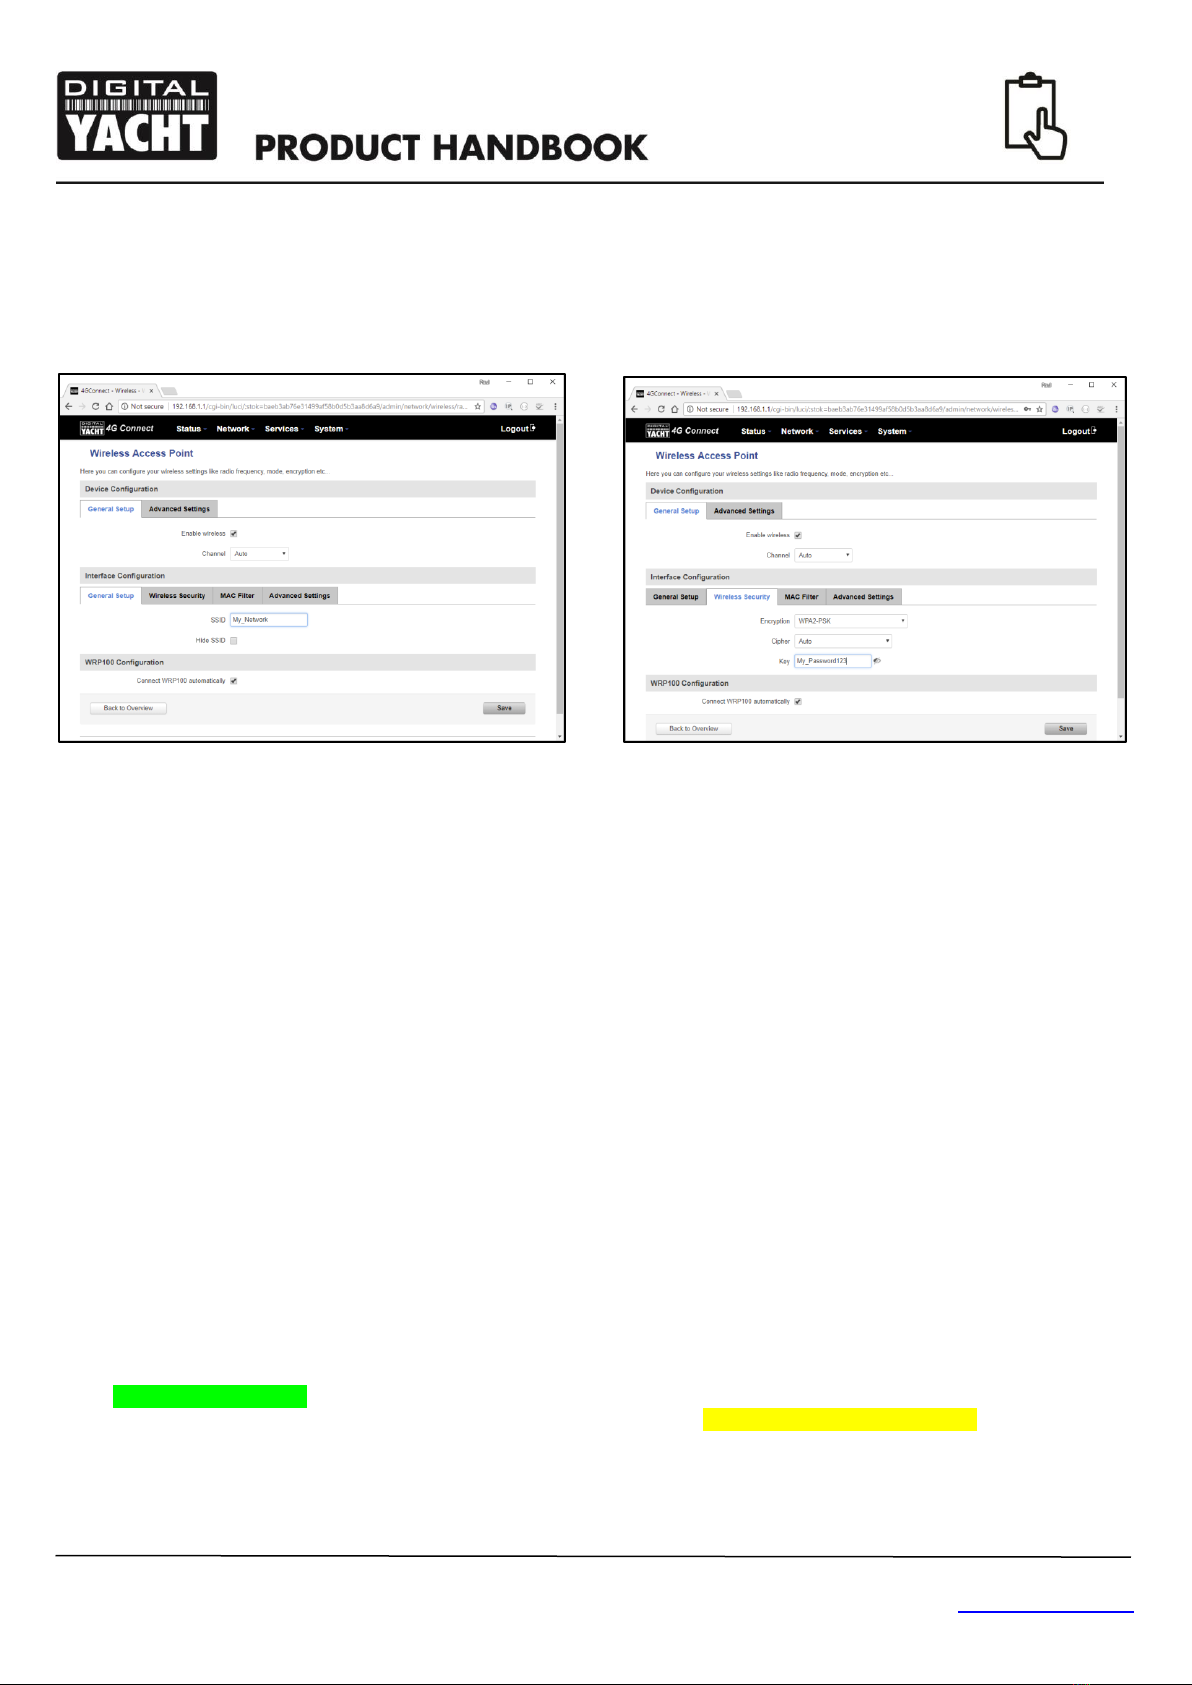
The default settings of the 4GConnect have been chosen for optimum performance and we do not
recommend users make any changes to them, except to change the default wireless network name (SSID)
and wireless password.
3.1 Mounting the 4GConnect
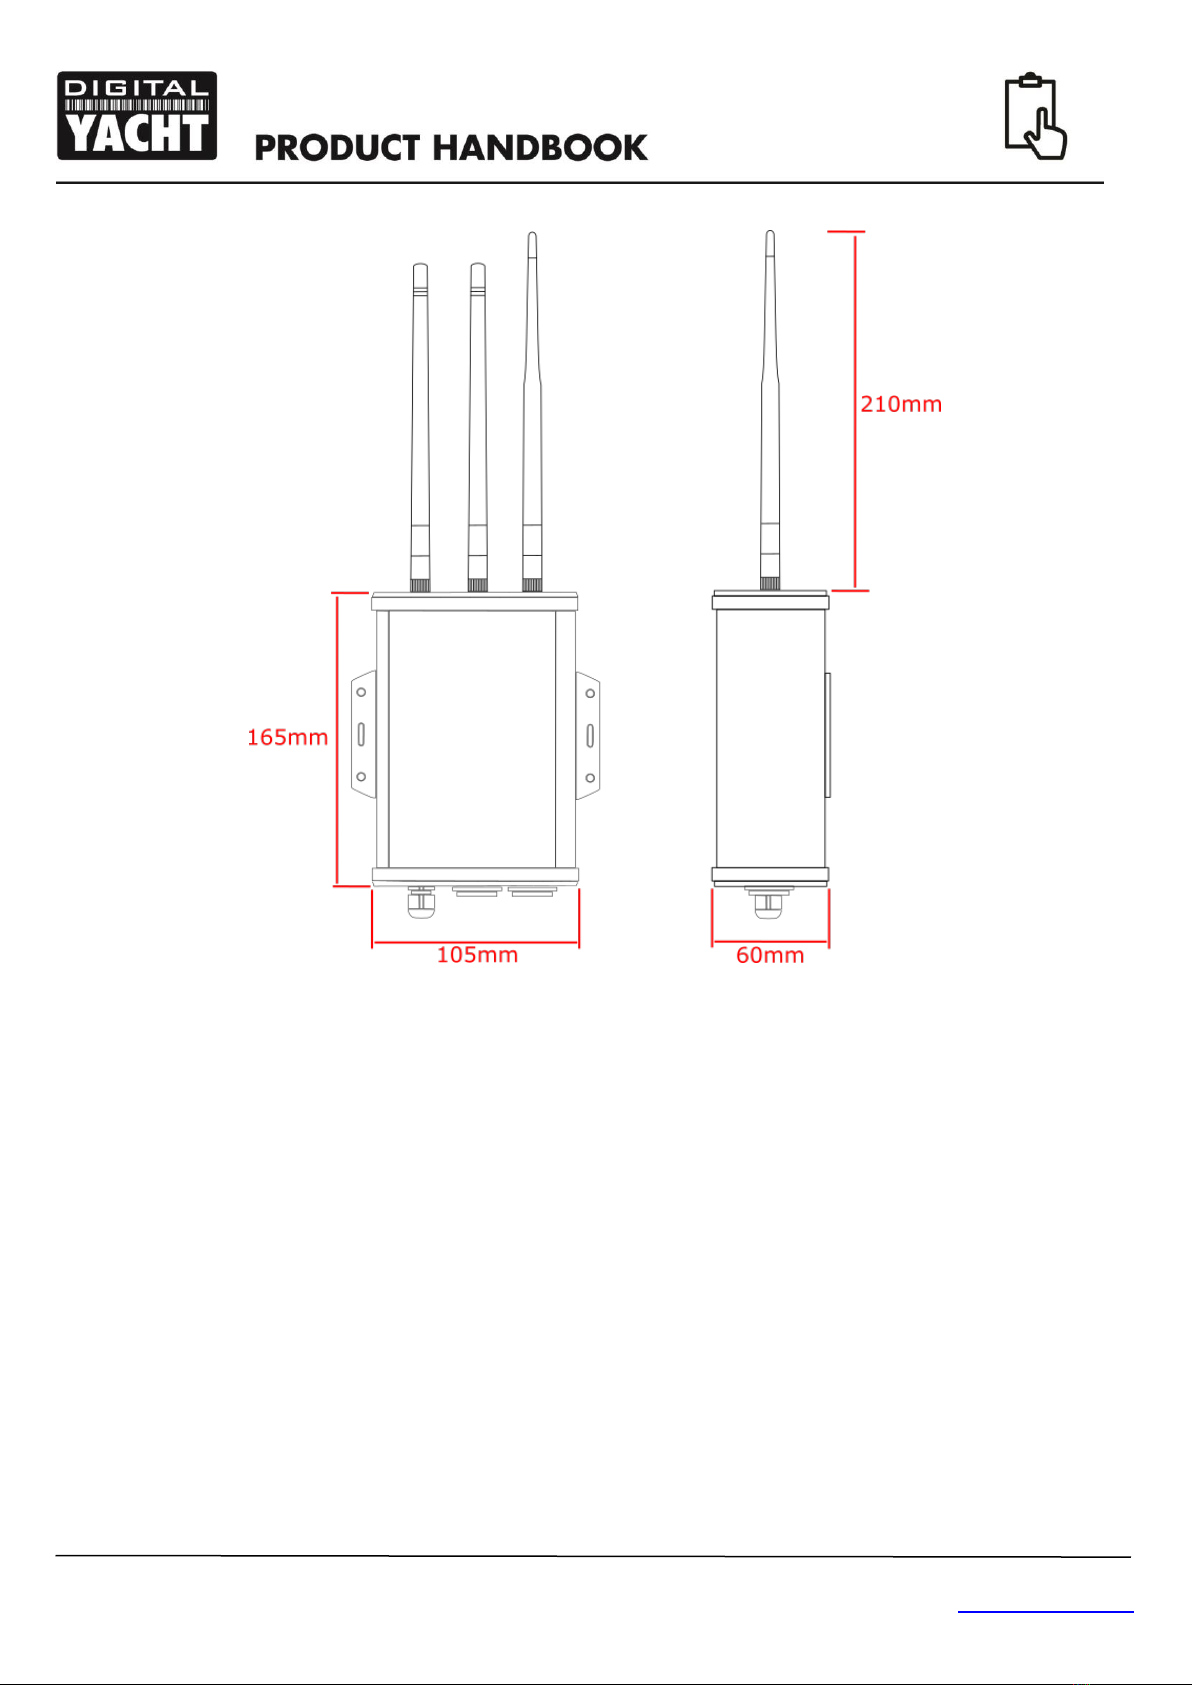
The 4GConnect should be mounted in position using M4 screws or other fixings appropriate to the mounting location. It
can be mounted in any orientation, as the antennas can be rotated and bent for best reception, although we recommend
mounting the 4Gconnect vertically with the antennas pointing upwards, to avoid stress on the cables and to ensure any
moisture/condensation falls away from the connectors.
On the next page (Fig.1) is a dimensioned drawing of the 4GConnect. When rotating the antennas, always rotate them
clockwise to avoid loosening them. They each have a small threaded SMA connector and are removable, for fitting the
4GConnect Pro antenna kit.

User Manual for 4GConnect V1.00
TEL + 44 1179 554474 www.digitalyacht.co.uk sales@digitalyacht.co.uk
Dimensioned Drawing
Figure 1
3.2 Power Requirements
The unit is designed to work on vessels with a 12V or 24V DC system (9-30V DC Input voltage). It should be wired to a 1
Amp fused or circuit breaker protected circuit and if connected to a higher amperage circuit, then a 1A in-line fuse should
be used to protect the 4GConnect wiring.
The 4GConnect has a two-core power cable with a Red (+) and Black (-) wire. Be very careful to ensure that the correct
supply voltage polarity is connected to the 4GConnect, as reverse polarity will damage the unit.
Once the 4GConnect is correctly wired to the vessel’s 12v/24v DC system, do not apply power to the unit but continue
with the installation steps below.
3.3 Network Connections
The 3GConnect has two RJ45 Ethernet connectors; a LAN and WAN.
If you wish to connect additional wired devices to the 4GConnect’s local area network (LAN) such as a Smart TV, fixed
mount computer, VOIP Phone, etc. then using a conventional network cable connect the device to the LAN socket of the
4GConnect. If you wish to connect multiple wired devices, then you will need a standard network switch. The 4GConnect
provides IP addresses automatically (via DHCP) to any wired devices that are connected to its LAN socket.

User Manual for 4GConnect V1.00
TEL + 44 1179 554474 www.digitalyacht.co.uk sales@digitalyacht.co.uk
If you wish to connect an Ethernet based long range wireless adaptor, such as the Digital Yacht WL510, so that you can
access wireless hotspots in bars, marinas, etc. then connect the adaptor using a normal network cable to the
4GConnect’s WAN socket. The 4GConnect expects to receive an IP address automatically from the long-range wireless
adaptor.
The 4GConnect will always try and access the internet first, via its wired WAN socket. If no internet connection exists on
the wired WAN socket, then it will “fall back” and use the 3G/4G mobile network.
3.4 Inserting a 3G/4G data SIM card
To connect to the internet via a 3G/4G mobile connection, the 4GConnect must have a 3G/4G data SIM inserted which is
registered to a valid mobile operator account. Any mobile operator’s data SIM card can be used if it is a Standard SIM (15
x 25mm) size.
To insert the SIM, it is necessary to unscrew the four screws of the 4GConnect’s “connectors” end cap plus the top two
screws of the “antennas” end cap, as shown in Fig.2…
Figure 2
With the six screws removed gently lever the “connectors” end cap away from the aluminium housing and then let it drop
down slightly, enough so that the top aluminium panel (one with the product label on) can be gently slid out as shown in
Fig.3.
With the top aluminium panel removed, you can now access the 3G/4G router module. To make it easier for you, we have
not insterted the SIM holder and it is attached to the power cable with a twist tie as shown in Fig.4. Simply remove the
twist tie, insert your SIM card into the SIM holder and then carefully insert the SIM holder in to the router module as
shown in Fig.5.

User Manual for 4GConnect V1.00
TEL + 44 1179 554474 www.digitalyacht.co.uk sales@digitalyacht.co.uk
Figure 3 Figure 4
Figure 5 Figure 6
If too much force or too little care is taken, it is physically possible for the SIM holder to be pushed in to the space below
the holder, so care should be taken to ensure the SIM holder locates correctly in the two grey runners at the top of the
SIM slot as shown in Fig.6.
Once the SIM is correctly inserted, you should re-assemble the 4GConnect, check that all power and Ethernet
connections are correctly made and then apply power for the first time.
There are no external LED indicators as most 4Gconnects will spend their time hidden behind a bulkhead or inside a
locker, but after power is applied the “4GConnect” wireless network (SSID) should appear within 50-60 seconds.
If after 60 seconds, you scan for wireless networks and cannot see “4GConnect” contact Digital Yacht support by email
support@digitalyacht.co.uk

User Manual for 4GConnect V1.00
TEL + 44 1179 554474 www.digitalyacht.co.uk sales@digitalyacht.co.uk
4. Configuration
Assuming that your wireless device can see the “4GConnect” network, connect to it using the default wireless password,
which is…
4GConnect
Once connected, your device should
automatically get an IP address, via
DHCP, in the 192.168.1.xxx range. You
should now be able to type
http://192.168.1.1 in to the address bar
and of your browser and see the
4GConnect login page appear.
The Login Page gives you the key
status information about your mobile
3G/4G network connection It also tells
you if you have a valid WAN IP address,
which indicates that you are connected
to the internet.
In the example shown in Fig.7, the
4GConnect’s WAN socket is wired to an
office network which is providing the
internet connection.
On a boat, this would be one of our long
range WL510 wireless adaptors
connected to a marina hostpost or
another type of internet connection.
Now login to the 4GConnect by entering
the default login password which is:-
4GConnect
Once logged in you will be taken to the
main Overview Page as shown in Fig.8.
This page provides a “Dashboard”
showing the status of the 4GConnect’s
network connections and settings. From
this page, you can access the main
menu bar along the top of the page
which will take you to various status,
configuration, tools and services menus.
The default 4GConnect settings have
been carefully chosen to work well in
most situations/installations, commonly
found on pleasure boats.
Digital Yacht strongly recommend that you do not change any settings except those specifically mentioned in
this manual and we cannot support or warranty repair any 4GConnect that fails due to wrong settings
Figure 7
Figure 8

User Manual for 4GConnect V1.00
TEL + 44 1179 554474 www.digitalyacht.co.uk sales@digitalyacht.co.uk
The key settings that all customers must set are…
1) The APN connection settings for the 3G/4G Mobile network of the Data SIM they are using with 4GConnect –
these must be set to enable the mobile braodband connection
2) The Wireless Network settings (SSID and Password) which secure and control how you wirelessly connect to the
4GConnect
We do not generally recommend changing the Admin password of the router, as this can be difficult to reset when
forgotten. Also, this can only be used by someone wirelessly connected to the 4GConnect, so make sure your wireless
security is good and that you trust the people you allow to connect to the network and there should be no need to change
the default Admin password.
If you do decide to change the Admin password, make sure you record the new password somewhere you can easily
refer to in the future, as resetting this involves opening the 4GConnect box.
4.1 Changing the APN Settings
Every data SIM network provider has different Access Point Name (APN) settings that allow the 4GConnect to register
and connect to the mobile data network. These settings can usually be found online (Google “APN settings for
Vodaphone”) or requested from the network provider. In the following example, we are using the recommended
Vodaphone settings, but you will need to enter the correct details for the SIM network provider you are using.
To enter the APN settings, login to the 4GConnect web interface and click on the Network>Mobile menu options. You
should see the page in Fig.9.
Figure 9
Enter the APN settings for your network provider which generally are the APN name plus the username and password.
Once you have changed the settings, scroll to the bottom of the page and click the “SAVE” button. The 4GConnect will
apply the changes and reboot, so after 20-30 seconds just refresh the page and you will need to login again.
To check that the 3G/4G mobile connection is working, make sure the wired WAN connection is disconnected (if you have
one), and click on the Status>Network>WAN menu options. You should see the page in Fig.10.

User Manual for 4GConnect V1.00
TEL + 44 1179 554474 www.digitalyacht.co.uk sales@digitalyacht.co.uk
Figure 10
If everything is OK, you should see valid IP addresses and the green Backup WAN [Mobile] IN USE indicator.
4.2 Changing the Wireless Network Settings
It is very important that you “lock down” your wireless network, with your own network name (SSID) and wireless
password. This ensures that only people that you give the network information to can connect and stops other less trust
worthy individuals from connecting to your network and using your internet connection.
To change the default wireless network name and
password of your 4GConnect, login to the web interface
and click on the Network>Wireless menu options, which
will take you to the page shown in Fig.11.
Click the “EDIT” button and you will be taken to the page
shown in Fig.12 where you can change the Network
Name (SSID) on the General Setup tab and the
Password on the Wireless Security tab (Fig.13).
When choosing network names, it is best to avoid
spaces and special characters (such as apostrophies) in
the SSID or password, otherwise some wireless devices
will not connect properly. Instead of using a space, use
the underscore character, i.e. for “My Network” use
“My_Network”.
Figure 11

User Manual for 4GConnect V1.00
TEL + 44 1179 554474 www.digitalyacht.co.uk sales@digitalyacht.co.uk
The best password encryption to use is “WPA2 PSK” and try to use a strong password with at least one capital letter and
a mix of numbers and letters.
Make sure to record the details of your password somewhere secure but easy for you to access, as resetting a wireless
password requires a wired connection to the 4GConnect which is not always easy or practical.
Figure 12 Figure 13
Once the Network Name and Password have been entered click the “SAVE” button and the 4GConnect will apply the new
settings and reboot. Due to the network name change, your wireless device will be dis-connected, so wait for the new
wireless network name to appear in your Wi-Fi scan list (50-60 secs) and connect to it using the new password.
Those are all the settings you need to change and you can now proceed to the Normal Operation section.
5. Normal Operation
The 4GConnect will always create its own wireless network within 50-60 seconds of being powered up and any wireless
device should be able to scan for wireless networks, select the 4GConnect and connect if you have given them your
wireless password.
Assuming you are within 3G/4G coverage, then any device connected to the 4GConnect wireless network, or wired to the
LAN socket should be able to access the internet, if you have a registered SIM card and have not used up your 3G/4G
data limit.
If you are using the 4GConnect with one or our WL510 long range Wi-Fi adaptors or another 3rd Party internet access
device connected to the 4GConnect WAN socket, then this connection will take priority if it has a good internet
connection. The 4GConnect is constantly monitoring the wired WAN connection and if it detects no internet, it will
automatically “fall back” to its own mobile 3G/4G connection.
You can monitor the WAN status by clicking on the Status>Network>WAN menu options and you will be taken to the
page shown in Fig.14.
In the example in Fig.14, the 4GConnect is connected to the internet by the wired WAN connection, as shown by the
green WAN: [Wired] IN USE indicator and the 3G/4G Mobile connection is ready to provide the backup WAN connection if
anything should happen to the wired connection, as shown by the yellow Backup WAN: [Mobile] READY indicator.

User Manual for 4GConnect V1.00
TEL + 44 1179 554474 www.digitalyacht.co.uk sales@digitalyacht.co.uk
Figure 14
4GConnect is designed to be as automatic as possible and once you have used it for a while, you will quickly become
confident in its operation and there should be very few times when it is necessary to login to the web interface. However,
it is probably a good idea to bookmark the http://192.168.1.1 web address in your browser.

User Manual for 4GConnect V1.00
TEL + 44 1179 554474 www.digitalyacht.co.uk sales@digitalyacht.co.uk
Addendum for 4GConnect Pro Systems
The 4GConnect Pro system comprises of the following parts;
•1x internal Wi-Fi antenna
•2x internal LTE antennas
•4GConnect Router/Modem unit
•2x high gain external LTE antennas
•2x antenna mounts
•2x 7m LMR200 Cable Assemblies
•User Manual
Items in Bold are the additional parts to a normal 4GConnect system.
The 4GConnect Pro system is intended for non-GRP
hulled vessels, where below deck reception is difficult or
for boat owners that simply want the best possible
reception range.
Installation and siting of the external LTE antennas is
very important for maximum range, so take your time in
working out the best location for these two antennas.
The 7m LMR200 cables should not be extended and it is better to move the 4GConnect Router/Modem unit closer to the
antennas than extend the cables. The high frequency 3G/4G signals will be attenuated by 0.3dB per each additional
meter of cable, so if you must have a longer coax cable run, contact Digital Yacht about swapping these cables for thicker
LMR400 cables.
The two LTE antennas should ideally be mounted at least 40cm apart (1 wavelength) to maximise the positive effect of
the MIMO technology that the 4GConnect uses. It should be noted that there are no significant additional gains to be
made in making the antennas even further apart.
Avoid the antennas being blocked by other metal objects and do not place them close to other high-power transmitting
antennas like VHF, HF or SSB antennas. To avoid the LTE transmissions affecting other devices; GPS, TV, etc. try to
mount them at least 1m away from other antennas.
The external LTE antennas have a 1.25” Pipe Thread and are supplied with two mounts. These mounts, designed for
securing to a horizontal platform, are fine for most installations, but should you wish to use another type of mount such as
those designed for VHF/GPS antennas, then you will need a 1” x 14TPI to 1.25” Pipe Thread adaptor, which are available
from Digital Yacht.
Once a suitable location has been found for the two
external LTE antennas, secure the base mounts, attach
the N-Type connectors to the base of each antenna and
then route the LMR200 cables through to the
Router/Modem unit.
Remove the two internal LTE antennas from the
Router/Modem unit and screw on the SMA connectors
from the LMR200 antenna cables –it does not matter
which LTE antenna goes to which LTE connector and it
is not possible to screw these SMA connectors to the RP
SMA connector that the Wi-Fi antenna has.
Antenna installation is now complete.
Table of contents