Digitron D110 User manual

ELECTRONIC CASH REGISTER
D110
USER MANUAL

2USER MANUAL D110

D110 USER MANUAL 3
TABLE OF CONTENTS
1. ECR CONFIGURATION....................................................................................6
1.1. Display..............................................................................................................7
1.2. Keyboard...........................................................................................................7
1.3. Printer ...............................................................................................................7
1.4. Power supply ....................................................................................................8
1.5. Switching the ECR on and off ..........................................................................8
2. PREPARATION FOR WORK AND SAFETY REQUIREMENTS ..................9
2.1. ECR installation and prevention.......................................................................9
2.2. Placing the paper roll........................................................................................9
3. TERMINOLOGY..............................................................................................10
3.1. Operation modes.............................................................................................10
3.2. Digital certificates...........................................................................................10
3.3. Programming ..................................................................................................10
3.4. Parameters.......................................................................................................10
3.5. Passwords and operators.................................................................................11
3.6. PLU and PLU groups......................................................................................11
3.7. Printed documents ..........................................................................................11
4. MODE SELECTION AND PASSWORD ENTERING....................................12
5. PROGRAMMING.............................................................................................13
5.1. General principles...........................................................................................13
5.2. Operations on parameters in Programming mode ..........................................13
5.2.1. Entering a parameter number.......................................................................13
5.2.2. Entering an item number..............................................................................14
5.2.3. Entering a field number ...............................................................................14
5.2.4. Printing of programmed parameters ............................................................14
5.2.5. Changing a field value.................................................................................14
5.2.6. Data saving ..................................................................................................16
5.2.7. Editing a character field...............................................................................16
5.2.8. Using a barcode scanner for saving a barcode.............................................17
5.2.9. Exit...............................................................................................................17
5.3. Programming mode (4)...................................................................................17
5.3.1. Parameters....................................................................................................17
5.3.2. Changing the tax rates..................................................................................27
5.3.3. Changing the exchange rate.........................................................................27
5.3.4. Changing the date and the time....................................................................27
6. REGISTRATION MODE..................................................................................28
6.1. Date and time display .....................................................................................29

4USER MANUAL D110
6.2. Registration.....................................................................................................29
6.2.1. Registration of a PLU and a PLU group......................................................29
6.2.2. Registration in departments .........................................................................29
6.2.3. Registration of quantity ...............................................................................30
6.2.4. Repeated registration of a PLU/PLU group.................................................30
6.2.5. Repeated registration of a department sale ..................................................30
6.3. Displaying and printing the subtotal...............................................................30
6.4. Discounts and mark-ups..................................................................................30
6.4.1. Percentage discounts and mark-ups.............................................................31
6.4.2. Value discounts and mark-ups.....................................................................31
6.5. Correction of a wrong registration..................................................................32
6.6. Void all ...........................................................................................................33
6.7. Payment and receipt closure ...........................................................................33
6.8. Data interchange with the Tax administration CIS.........................................35
6.9. Refund.............................................................................................................36
6.10. Printing a receipt copy ..................................................................................37
6.11. Received on account and paid-out amounts..................................................38
7. REPORTS..........................................................................................................39
7.1. Reports of PLU and PLU groups....................................................................39
7.1.1. Report of one PLU/ PLU group...................................................................39
7.1.2. Report of all PLU and PLU groups .............................................................40
7.2. Reports of PLUs in stock................................................................................41
7.2.1. Report of one PLU in stock .........................................................................41
7.2.2. Report of all PLUs in stock..........................................................................41
7.3. Department reports .........................................................................................41
7.3.1. Report of one department ............................................................................41
7.3.2. Report of all departments.............................................................................42
7.4. Commodity groups reports .............................................................................43
7.4.1. Report of one commodity group..................................................................43
7.4.2. Report of all commodity groups ..................................................................43
7.5. Tax groups report............................................................................................44
7.6. Sales report .....................................................................................................45
7.7. Operators report..............................................................................................45
7.7.1. Report of one operator.................................................................................45
7.7.2. Report of all operators .................................................................................46
7.8. Daily report.....................................................................................................47
7.9. Periodic report ................................................................................................50
7.10. Electronic journal review..............................................................................51
8. ELECTRONIC JOURNAL PRINTOUTS ........................................................52
8.1. EJ printout by a daily Z report number...........................................................52
8.2. EJ printouts by a receipt number ....................................................................52
8.3. EJ printouts by dates.......................................................................................52
9. MESSAGES, DISPLAYED IN CASES OF ERRORS AND OVERFLOWS .54

D110 USER MANUAL 5
ELECTRONIC CASH REGISTER D110
•Universal – suitable to be used in all kinds of shops
•13-digit 7-segment LCD display with a backlight (option – a customer display)
•Thermal printer (Seiko Instruments Inc.):
-easy paper loading
-printing rate – max. 60 mm/sec;
-thermal paper, one-layer, width - 57 mm, external diameter – max. 42 mm;
-characters per line – 32.
•Keyboard:
-12 digit keys;
-13 functional keys.
•Interfaces - USB, two RS232
•Memory card (2 GB) - Secure Digital Specification Standard (V2.0)
•Communication module – Wi-Fi or GPRS
•External adapter (9V, 4 A), input 220V(-15%,+10%), 50Hz
•Battery supply (option) – built-in rechargeable battery: (7.4V, 1800 mАh)
•Lithium battery supporting the real time clock.
•Dimensions (mm) – 192 x 86 х58 (196 x 86 x 61 with a customer display)
•Weight (kg) ~ 0,370
•Operating temperature interval: -15° to 45° С

6USER MANUAL D110
Functional characteristics:
•PLU database
•PLU barcodes and available quantities support
•Weight barcodes support – programmable identifier, zone type and length.
•8 departments
•10 operators in Registration mode and 4 passwords for the other four modes (X
reports, Z reports, Programming, Service mode)
•4 VAT groups and a Consumption tax
•8 commodity groups with programmable names
•10 units of measure with programmable names
•3 types of payment – CASH and 2 payments with programmable names
•Programmable receipt header – 8 lines
•Programmable receipt footer – 2 lines
•Graphic logo printing – 384 x 144 pixels
•Discounts and mark-ups - percentage and value
•Registration of received on account and paid out amounts
•Registration of refunds
•Reports:
-PLU/PLU groups report;
-available quantities;
-commodity groups report;
-departments report;
-tax groups report;
-operators report;
-sales report;
-daily report;
-periodic report.
•Printing of data, stored in the electronic journal
•Communication protocol between the ECR and a PC - supported
•Built-in tests
1. ECR CONFIGURATION
D110 USER MANUAL 7
1.1. Display
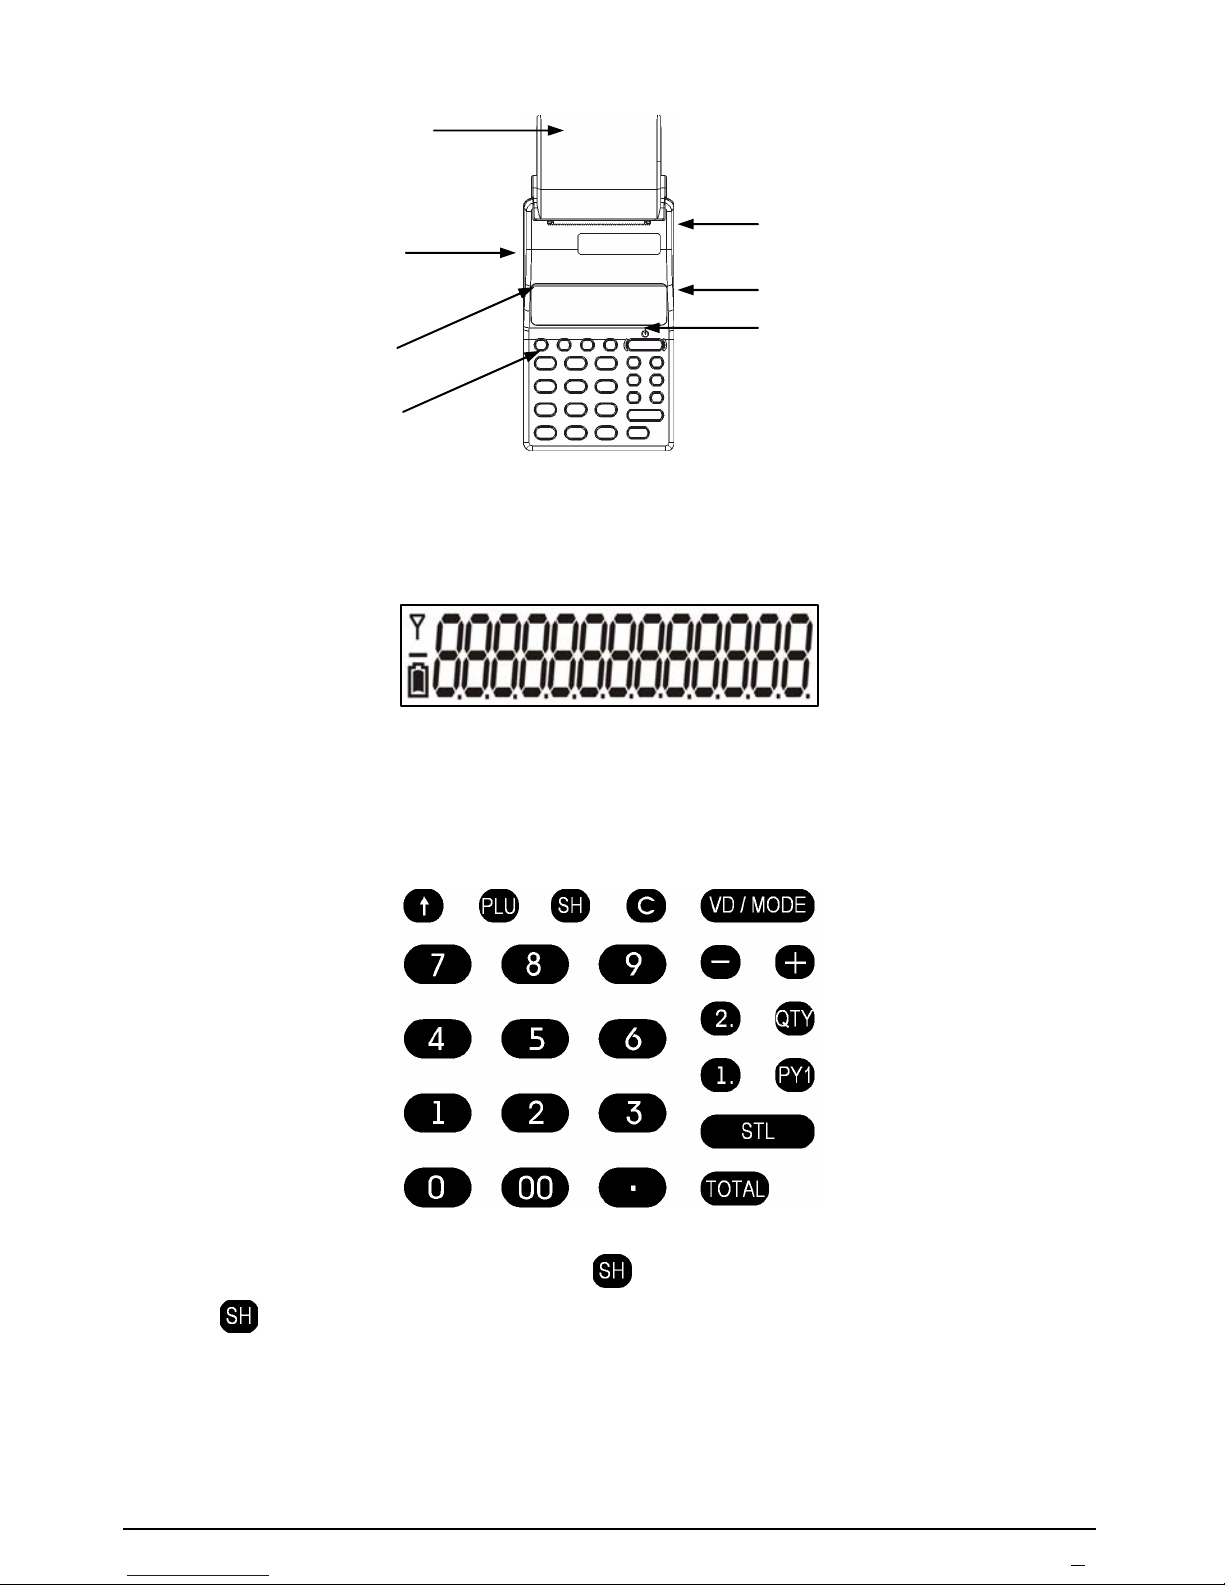
The ECR configuration includes one 13-digit 7-segments LCD display with a
backlight. A customer display is an option.
1.2. Keyboard
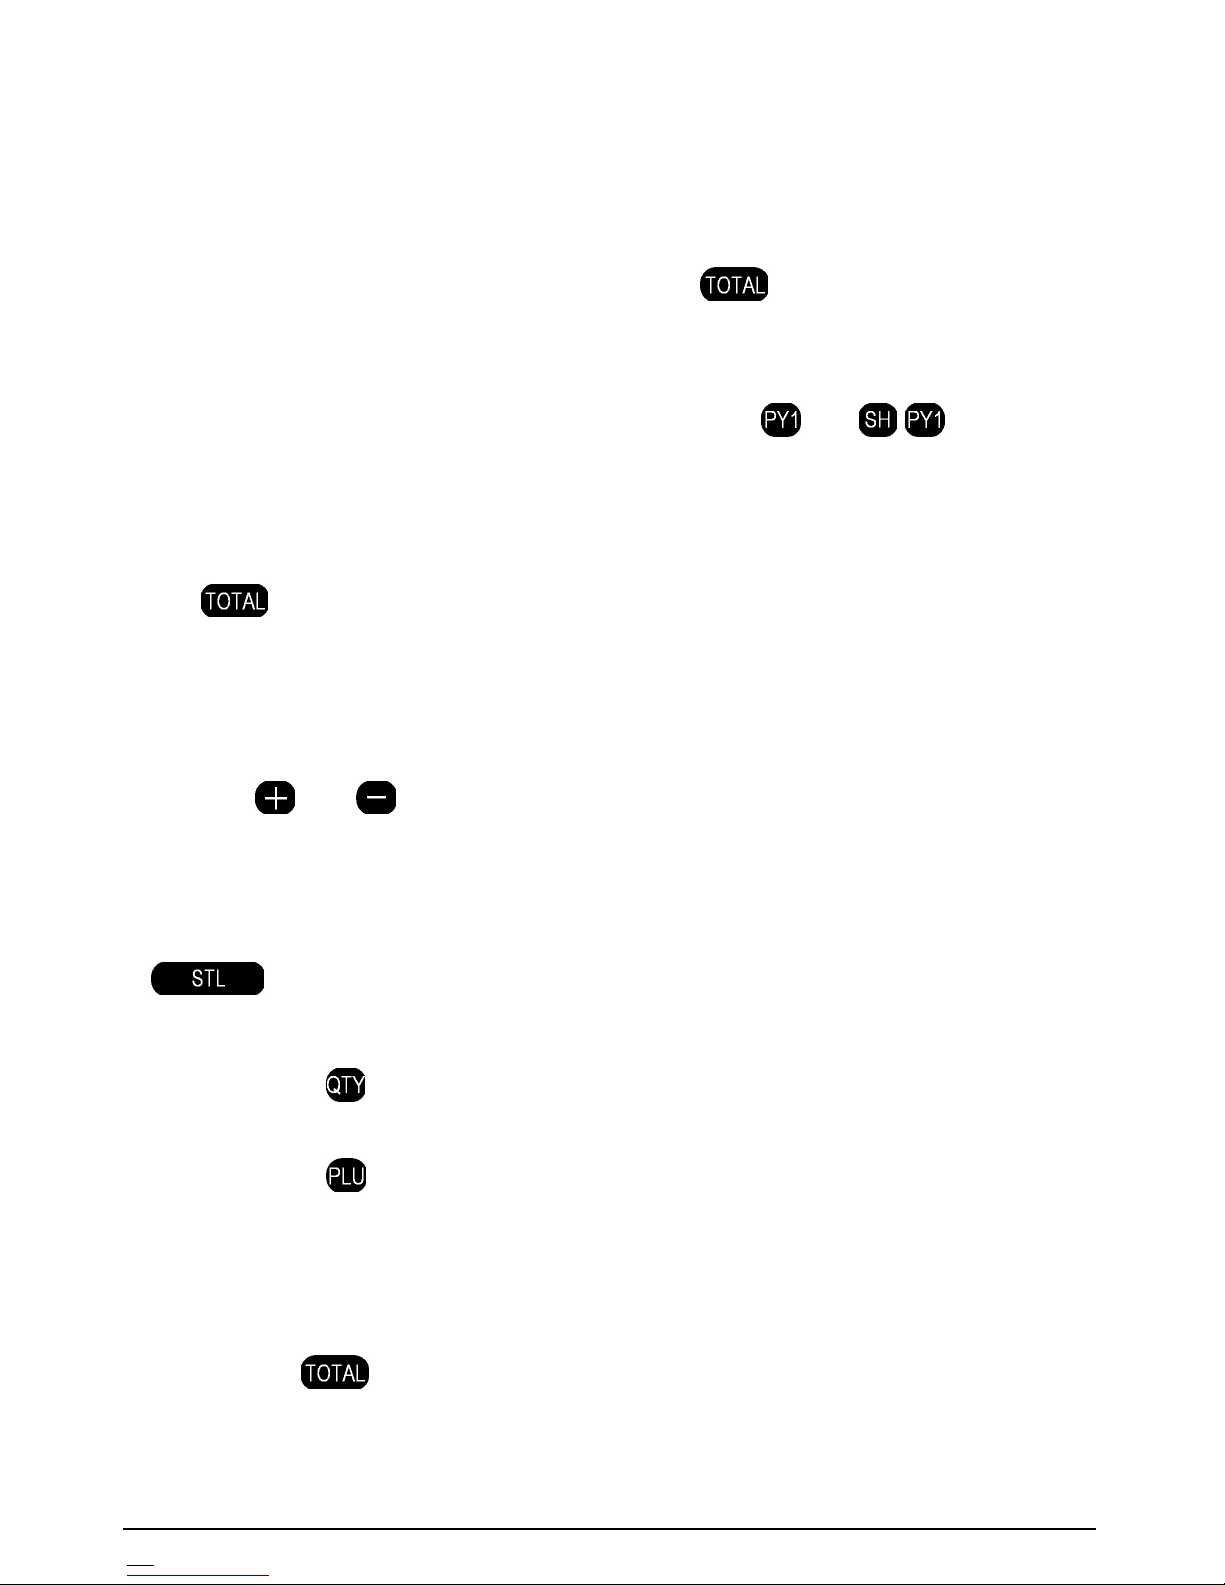
The keyboard includes 25 keys – 12 digit and 13 functional. The designation and
position of the keys is the following:
Note: Key combinations, using the key , are performed in the following way:
the key is pressed first (a segment is lit up in the leftmost display position –
above the battery icon), then another key is pressed.
1.3. Printer
The thermal printing mechanism prints 32 characters per line. The thermal paper
Paper
compartment
USB port
Keyboard
Connector for the
external adapter
Display
RS232 port
ON/OFF button

8USER MANUAL D110
roll is 57 mm wide and up to 42 mm in diameter.
1.4. Power supply
The ECR is connected to the electric network (220V, 50 Hz) through its external
adapter.
Option: A built-in rechargeable battery (7.4V, 1800 mАh).
If a rechargeable battery is included, the ECR is power supplied by the battery. It
guarantees approximately 60 hours in operation mode and printing of
approximately 40000 lines when it is fully charged. There is a special icon on the
lower left corner of the display, which shows the battery charge status. If the
battery sign is empty, the battery must be recharged. When the ECR is plugged in
through its external adapter, the process of charging is indicated by the blinking
battery icon. When recharging is completed, the battery icon stops blinking and
the icon is black inside.
ATTENTION!
To avoid battery damage, the rechargeable battery should not be left
discharged, even if the ECR is not used. Battery recharging must be
performed at least once a month for a period of 8 hours, through connecting
the original external adapter to the ECR and plugging in a 220V AC socket.
Only original batteries and adapters, specified by the ECR producer, must
be used with the ECR. A risk of explosion exists, if an incorrect type is used
to replace the original battery!
1.5. Switching the ECR on and off
The ECR is switched on and off, using the key . It must be pressed
and held down, until the corresponding message:
- 0n rdY - or - 0FF rdY - is displayed.

D110 USER MANUAL 9
2. PREPARATION FOR WORK AND SAFETY REQUIREMENTS
2.1. ECR installation and prevention
When the ECR is delivered and unpacked, it must be examined for eventual
mechanical damages, for the integrity of the seal and the product completeness.
The ECR must be protected from direct sun light, heat sources, strong electro-
magnetic fields, high humidity, liquids and dust. The paper roll compartment and
the adjacent area should be regularly cleaned with a slightly damp cloth. The ECR
should be protected from mechanical damages.
During printing and for some time after printing, the printing head is very hot and
should not be touched.
If some damage or malfunction of the ECR is detected, the ECR operations must
be stopped, the ECR must be switched off and unplugged and a service technician
must be called. Only authorized service technicians are permitted to repair the
ECR.
Safety regulations, recycling regulations, electrical safety rules etc. must be
strictly observed with regard to the ECR.
2.2. Placing the paper roll
Before starting operations with the ECR, the operator has to check the available
paper roll in the ECR and place a new one, if necessary. The ECR has the
advantage of easy paper loading. The cover of the paper compartment must be
opened and the new paper roll must be placed. The paper tape must be pulled to
come above the cutting edge and the cover of the paper compartment must be
closed.
The key is used for paper feeding. When a paper roll is used up, the printer
operation is blocked. The ECR displays the corresponding error message: PEnd.
Pressing any key is necessary after placing a new paper roll.

10 USER MANUAL D110
3. TERMINOLOGY
3.1. Operation modes
The ECR provides the following operation modes:
-Registration (1)
-Хreports (2)
-Z reports (3)
-Programming (4)
-Service mode (5)
The access to each of the modes is enabled through entering the corresponding
password.
3.2. Digital certificates
Each taxpayer, who will use an ECR to register sales, has to obtain digital
certificates according to the Fiscal law and the requirements of the Tax
administration in Croatia.
The digital certificates have to be uploaded in the ECR and the taxpayer personal
identification number OIB has to be entered in the ECR memory too. These
procedures, as well as configuring the ECR communication module for sending
data to the Tax administration CIS, are performed in the ECR Service mode by an
authorized service specialist.
3.3. Programming
This is a process of entering or changing the ECR parameters (names and prices
of goods, tax rates, passwords, operators’ names etc.).
3.4. Parameters
Most of the ECR parameters are organized in items and fields. The items are used
for numbering of similar characteristics, for instance each article (PLU) is a
different item in the PLU parameter. The fields are used for saving the different
characteristics of one item, for instance the fields of an article are its name, price,
tax group, available quantity etc.

D110 USER MANUAL 11
3.5. Passwords and operators
The different ECR operation modes are accessed through entering a password,
corresponding to each mode. 4 different passwords can be programmed (in
parameter 11), corresponding to the modes: X reports, Z reports, Programming
mode and Service mode. Operation of 10 operators is possible in Registration
mode. Their names, passwords and ID number (OIB) are programmable
(parameter 1). The operator passwords have to be different.
3.6. PLU and PLU groups
Each item of the PLU parameter is used for programming of one PLU or PLU
group. The difference between a PLU and a PLU group is the following: free
prices (entered at the moment of the sale) are enabled only for a PLU group.
The number of PLUs and PLU groups depends on parameter 3, which determines
the structure of the PLU database. Parameter 3 specifies the usage of bar codes
and available quantities. When the user sets these options in the appropriate way,
the actual PLU number is calculated and can be printed through .
3.7. Printed documents
Before the ECR activation, the ECR operates in Training mode. All receipts and
reports include the message “TRAINING RECEIPT”(TRENING RAČUN).
Note: Even after the ECR activation (performed in the Service mode), there
is a possibility for training mode usage. An option in parameter 10, field 1 is
used to enable the training mode in this case.
After the ECR activation, all the receipt and reports include the taxpayer OIB.
If a graphic logo is uploaded in the ECR memory, it is printed at the beginning of
the receipts and reports.
A header message is printed in all receipts and reports. The header is
programmable and includes up to 8 text lines for the owner’s data: trade name,
address etc.
The ECR provides the possibility for printing of a footer message (up to 2 lines)
in the receipts and reports.
All receipts and reports include the date and time of printing, the current receipt
number and the ECR identification number (Tv.Br.).

12 USER MANUAL D110
4. MODE SELECTION AND PASSWORD ENTERING
When the ECR is switched on, the display shows: 1______. The leftmost
position displays the mode and a password entering is expected. The following
keys are accessible in that state:
Used for going through the mode numbers. The modes are
numerated, as follows:
1– Registration
2– X reports
3– Z reports
4– Programming
5– Service mode
Digit keys Used for password entering. An underscore appears with each
newly entered digit.
Ignores the last entered digit and removes one underscore.
Ends the password entering. If the password is correct, the
selected mode is entered. If the password is wrong, the ECR
beeps and a new password entering is expected

D110 USER MANUAL 13
5. PROGRAMMING
5.1. General principles
ECR programming provides defining the values of a number of parameters, most
of which are organized in items and fields. Field values can be changed, examined
and printed. Changing a value is done through:
-selection of a parameter, item and field numbers;
-entering a new value;
-saving the new value.
There are DIGITAL and CHARACTER fields, depending on the data, saved in
them. In both cases data is entered through the digit keys, but ASCII codes of the
characters have to be entered when programming character fields.
Besides the numbered parameters, the ECR provides changing the tax rates,
entering the date and time and changing the currency exchange rate.
Note: With a view to keeping the ECR accounting, a parameter programming is
enabled only if the related Z reports are completed. In case of necessity, the
corresponding message is printed, for instance: “DAILY REPORT !!!”(DNEVNI
IZVJEŠТАJ!!!), “OPERATORS REPORT!!!”, “PLU REPORT !!!“. Err 33 is
displayed when a report of one PLU is needed.
5.2. Operations on parameters in Programming mode
5.2.1. Entering a parameter number
The main menu in Programming mode (mode 4) is the menu “Parameters” – a
parameter number is displayed at the leftmost position. When the Programming
mode is entered, the number of the first parameter is displayed. Reaching a
definite parameter number in “Parameters” menu is done through the keys
and , which provide the possibility for cyclic going through the consecutive
parameter numbers in ascending and descending direction respectively.
Selecting a parameter is done through the key when the parameter number
is displayed at the leftmost position. When a parameter is selected, a submenu is
entered. The numbers of the first field and first item are displayed next to the
parameter number, for instance 2.1.1. (Parameter 2, field 1, item 1).
14 USER MANUAL D110
5.2.2. Entering an item number
It concerns parameters, including more than one item. There are three methods of
reaching a definite item number:
-in the main menu – when the chosen parameter number is displayed – through
entering the item number and pressing the key . This is the way to enter
the submenu ”parameter item and field” - the number of the first field and the
entered item number are displayed;
-in the submenu ”parameter item and field” the keys and , provide the
possibility for cyclic going through the consecutive item numbers in ascending
and descending direction respectively;
-in the submenu ”parameter item and field” - the item number is entered and the
key is pressed.
5.2.3. Entering a field number
It concerns items, including more than one field. There are two methods of
reaching a definite field number in the submenu ”parameter item and field”:
-the keys and provide the possibility for cyclic going through the
consecutive field numbers in an item, in ascending and descending direction
respectively;
-direct entering the field number through the digit keys and pressing the key
.
5.2.4. Printing of programmed parameters
Pressing the key prints the corresponding parameter 2, 3, 4, 5, 8, 9, 15 or 16
in the “parameters” menu and the submenu “parameter item and field”.
Pressing the key prints an item, whose number is displayed in a submenu
“parameter item and field”. This possibility concerns parameters 1, 2 and 4.
5.2.5. Changing a field value
When the necessary field number is reached in the submenu “parameter item and
field”, the key is necessary to be pressed first for selecting and entering into
the field. If the item has not been programmed, the message “rEC ---” is
displayed for a few seconds.
Data entering in a digital field

D110 USER MANUAL 15
When a digital field is selected, the item number is displayed on the left, followed
by the contents of the field. If the display positions are not enough, only the
content is displayed.
The new content is entered using the digit keys. In case of an error, the key
has to be pressed so many times as necessary – each pressing clears one digit
from the right to the left. If the key is pressed and hold down, all the entered
digits are cleared.
Data entering in a character field
When a character field is selected, the item number is displayed on the left,
followed by the number of the first character and the ASCII code of the character.
The ASCII codes of the characters are entered, using the digit keys. If an ASCII
code includes a leading zero, it is obligatory to be entered. An automatic
transition to the next character is done when 3 digits are entered (the displayed
character number increases by 1).
Pressing the key , when a character field is entered, prints the current text.
Pressing the key combination when a character field is entered
prints a table of the ASCII codes. A character code can be calculated through
adding the column number to the number printed at the end of the row, where the
character is printed.
ATTENTION! Pressing the key in a character field clears its contents and
performs positioning for entering the first character in the field.

16 USER MANUAL D110
Character codes:
Space - 032
! – 033
“ – 034
# – 035
$ – 036
% –037
& – 038
‘– 039
( – 040
) – 041
* – 042
+ – 043
, – 044
- – 045
. – 046
/ – 047
0 – 048
1 – 049
2 – 050
3 – 051
4 – 052
5 – 053
6 – 054
7 – 055
8 – 056
9 – 057
: – 058
; – 059
< – 060
= – 061
> – 062
? – 063
@ – 064
A – 065
B – 066
C – 067
D– 068
E – 069
F – 070
G – 071
H – 072
I – 073
J – 074
K – 075
L – 076
M – 077
N– 078
O – 079
P – 080
Q – 081
R – 082
S – 083
T – 084
U – 085
V – 086
W – 087
X– 088
Y – 089
Z – 090
[– 091
\ – 092
] – 093
^ – 094
_ – 095
` – 096
a – 097
b – 098
c – 099
d – 100
e – 101
f – 102
g – 103
h – 104
i – 105
j – 106
k – 107
l – 108
m – 109
n – 110
o – 111
p – 112
q – 113
r – 114
s – 115
t – 116
u – 117
v – 118
w – 119
x – 120
y – 121
z – 122
{ – 123
| – 124
}– 125
~ – 126
Š – 138
Ž – 142
š – 154
ž – 158
Ć– 198
Č– 200
Đ– 208
ć– 230
č– 232
đ– 240
5.2.6. Data saving
Pressing the key or confirms and saves the newly entered data.
The difference in the usage of these two keys is the following: after saving with
the ECR returns to the submenu “parameter field and item” and the next
field number is displayed (the first field follows the last one); after saving with
the ECR keeps displaying the contents of the field – the key
is pressed to exit the field.
The ECR beeps to show an error if an inadmissible value is attempted to be
entered and saved.
5.2.7. Editing a character field
When a character field is selected, the keys and are used to reach the
number of the character, that has to be changed. The correct code is entered. If
there are other wrong characters in the same field (text), and are used
again to reach a wrong code. When all necessary codes are entered correctly, the
change is confirmed and saved through or .

D110 USER MANUAL 17
5.2.8. Using a barcode scanner for saving a barcode
Barcode support is enabled through an option in parameter 3.
When parameter 2, field 6 (corresponds to a barcode) and the necessary item
number are displayed in the submenu “parameter field and item”, the key is
pressed first to select the field for entering the barcode.
If the selected item has not been programmed, “rEC ---“ is displayed for a
while. The barcode has to be scanned, using the barcode scanner, connected to the
ECR. If the reading is correct “YE5” is displayed. The correctness of the
programmed barcode can be checked by printing the item through .
Barcode digits can be entered manually and in this case pressing the key is
used to save the barcode.
5.2.9. Exit
The key is used for moving one level up in the Programming mode
menus, as well as for exiting the mode.
5.3. Programming mode (4)
5.3.1. Parameters
Parameter 1: Operators
This parameter includes 10 items – one item for each operator (cashier)
Note: The operator OIB is obligatory to be entered in order that the operator can
issue sales receipts. If the operator OIB is missing and a receipt is started, VOID
ALL operation is automatically performed when payment is attempted.
Field
No
Description Contents Notes
1 Operator name Up to 28 characters Default names – OPERATER
2 Operator password Up to 6 digits Default password of operator 1
– 0.
3
Operator personal
identification
number (OIB)
11 digits Default contents of the field:---

18 USER MANUAL D110
Parameter 2: PLU and PLU groups
The number of items depends on parameter 3.
Note: The general options in Parameter 3 must be programmed before PLU/PLU
groups programming (when parameter 3 is changed the whole PLU database is
erased).
Field
No
Description Contents Notes
1
Tax link or
department
link
From 101 to 108 - a link to a
department from 1 to 8
From 001 to 008- a direct link to a
tax group:
001 - A , 002 - B, 003 - C, 004 - D,
005 - A and consumption tax,
006 - B and consumption tax,
007 - C and consumption tax,
008 - D and consumption tax
101 by default (link to DP 1).
If a department link is
specified, the tax of
the department is
applied to the PLU
2 Name Up to 28 characters
3 Price Up to 99999999999.99
4
Options
- commodity
group link;
- PLU or PLU
group
- integer or
fractional
quantities
- last sale in a
receipt
XXXX – PLU options – 4 digits
1 – automatic receipt
closure
0 - integer quantities,
1 - fractional quantities;
0 - PLU
1 - PLU group (enabled
“free” prices)
commodity group link –
from 1 to 8
1010 by default
When the option “PLU
group” is set, free
price registration is
enabled for the item.
5 A link to a unit
of measure
From 1 to 10
1by default (this unit of measure is
blank and is not printed)
The unit name is in the
corresponding item of
parameter 9
6 Barcode Up to 13 digits It depends on an

D110 USER MANUAL 19
Note: If some value is programmed in field 9 (Max. amount), it is considered a
limit, which should not be exceeded by the product of multiplying the quantity
and the price of any sale, attached to this PLU.
Example: Programming a PLU- number 75, name -COCA-COLA; price 10.00;
This PLU is linked to department 2 and to commodity group 3; integer quantity.
Operations Display
4 _ _____
Enter the password (if programmed) and press .
Parameter 1 is displayed. 10
Press to reach
the next parameter number 20
75 goes directly to item 75, field 1of parameter 2 2.1.75 0
Press to select the first field for programming.
If the item is not programmed yet, a message for an empty
record is displayed for a few seconds. rEC - - -
Then the previous (if programmed) or the default value
of the field is displayed 75.101 0
101 shows a link to department 1
option in parameter 3.
It can be entered
manually or using a
barcode scanner
7
Quantity in
stock
(available
quantity)
Up to 999999.999 (fractional
quantity)
Up to 999999999 (integer qty)
0by default (the quantity is not
supported and checked)
It depends on an
option in field 4
It depends on an
option in parameter 3.
8 Quantity
addition
The programmed value is added to
the value in field 7
It depends on an
option in parameter 3.
9 Max. amount Up to 99999999999.99 0.00 by default - no
limit

20 USER MANUAL D110
102 - enters the new value and goes to the next
field (PLU name)
department 2
department link 2.2.75 0
Press to select the field 2 for programming. 01.000 0
01 shows the number of the letter in the text, the other
3 digits show the ASCII code of this letter
Enter the following codes without any separators
067 079 067 065 045 067 079 076 065
The letter number increases with each code entering 10.000 0
Press and the programmed name COCA-COLA is printed.
Press to save the name and to move to the next field. 2.3.75 0
Press to select the field for programming.
The previous price (if programmed) or the default value 0.00
is displayed 75.0.00 0.00
10 enters the new price 10.00 and goes to the
next field (options) 2.4.75 0
Press to select the field for programming.
The previous options (if programmed) or the default 1010
are displayed. 75.1010 0
3000 enters the new options and goes to the next field
this is not a single transaction 2.5.75 0
integer quantities
a PLU (free prices are disabled)
commodity group 3
Press to print the current item.
Press to go up to parameter 2.
Press to exit the programming mode.
Table of contents
Other Digitron Cash Register manuals


