DigiVac 2L760 User manual

INSTRUCTION MANUAL
DIGIVACTM Model 2L760
Digital Vacuum Gauge
YOU MUST READ THIS MANUAL BEFORE USE
Readings from 1 –760 Torr
1-1013 mbar
NOTE: The DigiVac Model 2L760 has been discontinued. However, we are able to service, calibrate and/or repair
existing Models in the market at this time. If you require a replacement gauge, we recommend the StrataVac
775i see web page here that has added features and benefits compared to this model.
The DIGIVACTM Company
1020 Campus Drive
Morganville NJ 07751
www.DIGIVAC.com
(732) 765-0900
(732) 765-1800 FAX

DIGIVAC 2L760 Instruction Manual Page 2
CONTENTS
1.0 Description and Principle of Operation.
2.0 Construction.
3.0 Unpacking and Inspection.
4.0 Installation.
5.0 Operation.
6.0 Servicing and Calibration.
7.0 Notes on Calibration.
8.0 Understanding Microns, Torr, and Absolute Pressure.
9.0 Accessories and Modifications.
10.0 Terms & Conditions.

DIGIVAC 2L760 Instruction Manual Page 3
1.0 DESCRIPTION AND PRINCIPLE OF OPERATION.
The Model DIGIVAC 2L760 senses vacuum (absolute pressure) using a precision integrated strain gauge
transducer. The transducer has a thin silicon diaphragm with an array of resistors. One side is evacuated, while
the other is exposed to the pressure to be measured. Changes in the sensed pressure cause the relative values of
the resistors to change. This result is an output voltage which is linearized, temperature compensated, scaled
and amplified. The voltage is displayed on the DIGIVAC 760 as 0 to 760 Torr or 0 to 1013 mbar.
The instrument features large, bright LEDs visible from a distance with a hard, vinyl clad metal enclosure. The
straight forward design yields a low power instrument, that is simple to build and simple to operate. The model
2L760 can be ordered with optional control relays, analog output, and RS232 output, to simplify integration with
existing process controllers or computers. In addition, this device can be Ethernet enabled, to allow monitoring
via a web browser with our free ReAct browser software. The user can access your instrument from across the
hall, or across the world. All instruments leave our factory tested and calibrated under real vacuum against a
NIST standard.
2.0 CONSTRUCTION.
The controller consists of the indicating and controlling instrument, the configured sensor, the sensor cable, the
output interfaces and an univeral AC power adapter.
The instrument is housed in a rugged free-standing vinyl clad metal enclosure. It can be placed on a level surface
for easy viewing from across the room. The gauge tube houses the sensor circuitry and terminates in an octal
connector. On this model, the connector wiring terminates at the instrument with a 9 pin DSub connection.
Regulating circuitry in the 2L760 provides constant current for gauge tube excitation, and thus compensates for
resistance in the probe leads.
3.0 UNPACKING AND INSPECTION.
After the instrument is received, it should be carefully unpacked and inspected for damage during shipment and
for completeness. In the event of a loss during shipment, a claim should immediately be made to the common
carrier or the postal service, as applicable. The DIGIVAC warranty pertains only to the instrument, and does not
cover losses in shipping. Each 2L760 should come with:
oUser Manual (this document)
oDisplay controller (beige box with red lens)
oPower supply (universal adapter with US plug)
oConfigured Sensors
oRS232 (optional)
oRS232 Port
o5’ RS232 Cable (phono to Female DB9)
oEthernet (optional, includes RS232)
oEthernet Port
oNull modem RS232 converter
o2’ Ethernet Cable
oNull Modem Ethernet Cable
oConfiguration CD
4.0 INSTALLATION.

DIGIVAC 2L760 Instruction Manual Page 4
The instrument should be located in a clean, dry environment for best results. The gauge tube cable should be
identified by wire tags or markings specific to your environment.
Sensors perform best when installed in a thread-down orientation in a clean, dry vacuum system. While
threading the gauge tube into the manifold, the gauge tube cable should be disconnected to avoid damage. In
this way, twisting of the cable and the octal socket on the tube is avoided. Care should be exercised to install the
tubes in a dry part of the system. The gauge tube should be protected against oil and other contaminants by
installing it in such a way to protect it. A good practice is to mount the gauge tube in the most vertically distant
place from oil and other contaminants as applicable. The gauge tube should be mounted in the most stable
pressure region of the vessel to be measured. For example, it would be better to install the gauge tube on a tank
rather than on the pipe that is directly connected to a vacuum pump. In the event of contamination, see section
6.0 for gauge tube cleaning instructions.
The RS232 connection can be made to a PLC or computer via a male DB9 cable connection to the female jack on
the DIGIVAC. The DIGIVAC acts as a DCE, so a straight serial connection is appropriate.
Please use the supplied 5V AC adapter with your instrument. This adapter provides clean short protected power
to protect and insure accuracy of the internal circuitry.
5.0 OPERATION.
After installation, the DIGIVAC is ready for operation. The unit will normally provide accurate readings
immediately.
Make all connections to sensors, and relay outputs with the power disconnected. NEVER DISCONNECT SENSOR
OR OUTPUT WIRES WHILE UNIT IS POWERED UP.
In cases where the system has contaminants, as is often the case with metalizing and coating equipment, it is
often effective to isolate the gauge tube with a solenoid or manual valve during periods when contamination is
most active.
The user can purchase additional options:
•RS232 –The instrument puts out a standard RS232 serial stream with settings 9600, 8, N, and 1. The
unit transmits but does not receive, and displays the current vacuum indication in the current units.
•Analog out –This output reads from 0 to 5 Volts from a pressure of 1 Torr to 760 Torr.
•Relay Control outputs
Units configured with controls will have two set point SPDT relays adjustable with a potentiometer.
Operation:

DIGIVAC 2L760 Instruction Manual Page 5
1. Relay 1 will be activated when the set point falls below the configured set point, and will remain active
until the vacuum level (pressure) rises above set point. This will be indicated by a relay “click” and also a
hash mark in the upper left corner.
2. Relay 2 will act in the same way.
Configuration:
1. Remove front panel with Phillips head screw driver
2. Set the vacuum level for set point 1 by shorting the left most and center pin with the jumper provided,
then set the left most potentiometer to the desired vacuum level.
3. Follow the same procedure for setting set point 2, shorting the center pin and the right pin, then
adjusting the potentiometer on the right
4. Replace the jumper on the center pin and close up unit.
Rear View of 2L760:
SP1 SP2
Normally Open
Normally Open
Normally Closed
Normally Closed
Common
Common
If you purchased the Wireless or Ethernet option, please refer to the model 200 Ethernet Addendum for initial
setup. Your 2L760 should be set by default with the IP address 192.168.0.200. Surf over to http://192.168.0.200
(or whatever your IP address was set to) and say “yes” to security screens authorizing a DIGIVAC applet to run in
your browser. You should see a screen that looks like:

DIGIVAC 2L760 Instruction Manual Page 6
Feel free to connect to the IP address:10001 with HyperTerminal, putty or your favorite communication tool to
communicate directly with the device.
To use the 2L760 web
terminal capability, highlight Display ►Terminal
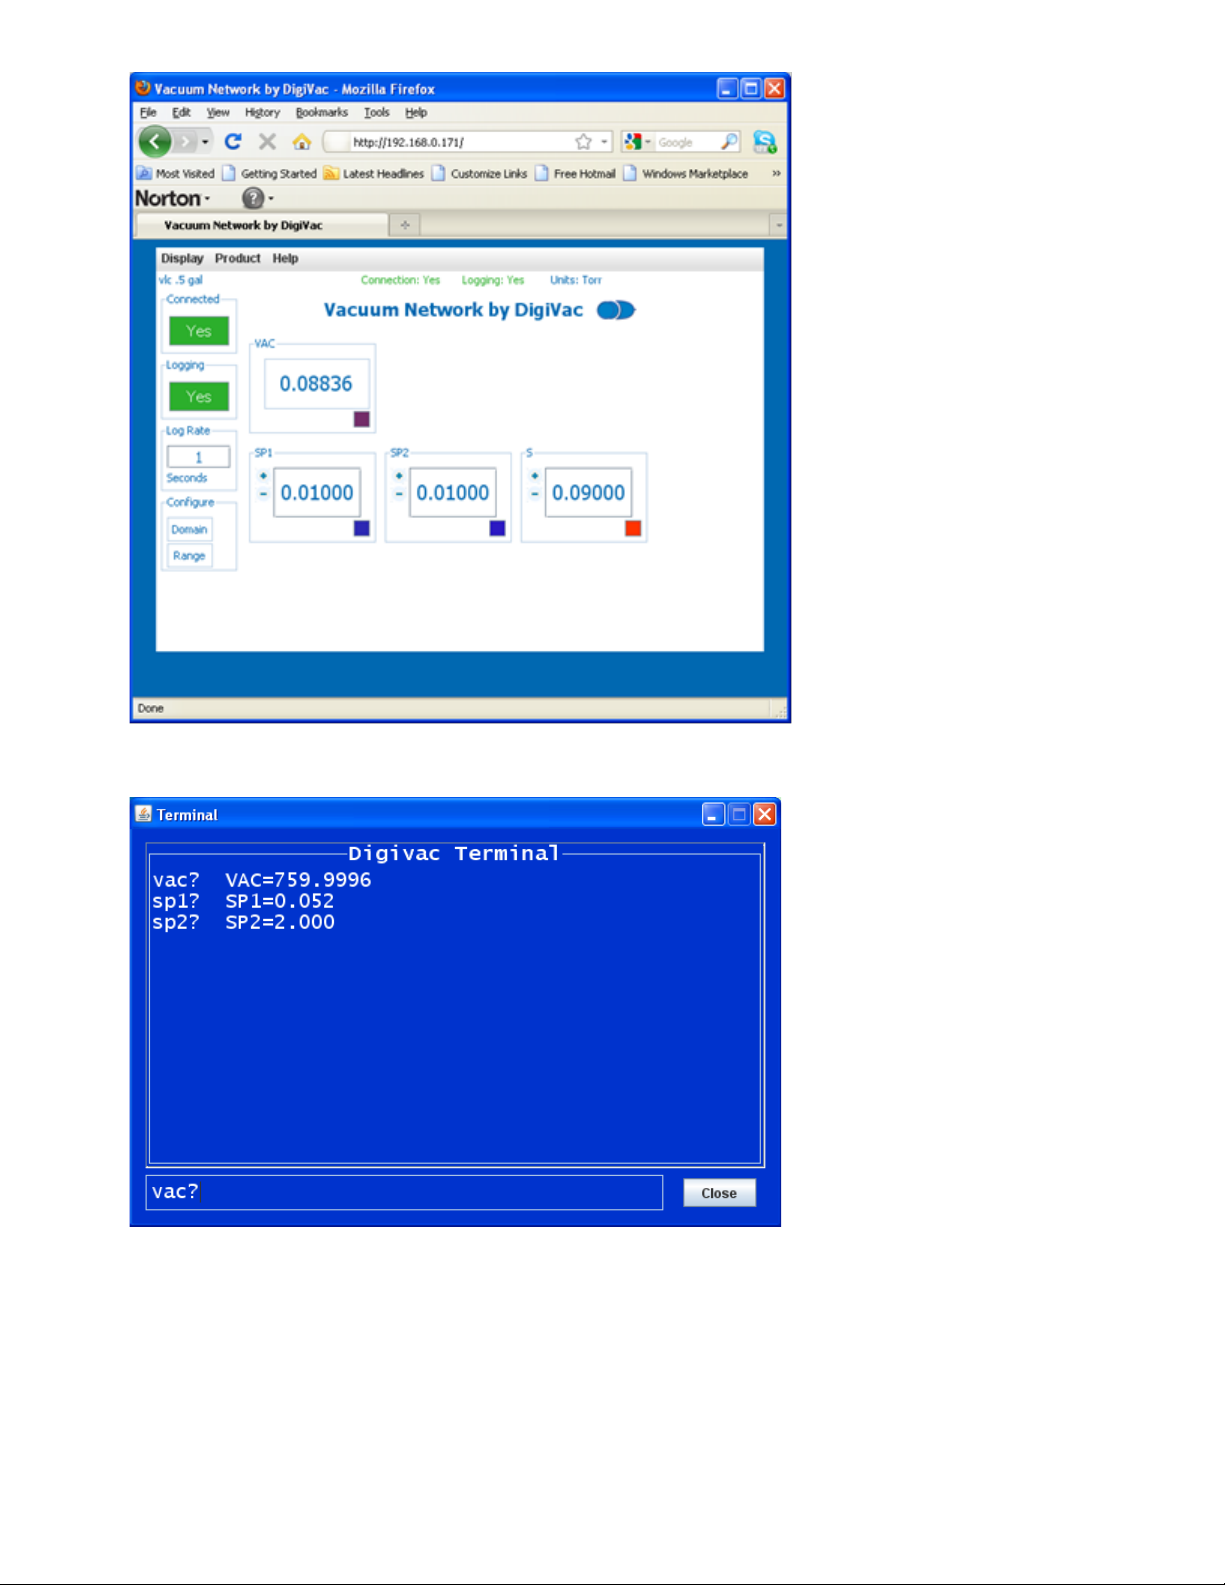
DIGIVAC 2L760 Instruction Manual Page 7
The terminal window popup will display, the usercan execute all the commands in:
Press return or enter to submit the query or change the set point. Note that while the web terminal is open, the
main 2L760 screen will not update. If at any time the web terminal or the main 2L760 applet window becomes
unresponsive, close the.

DIGIVAC 2L760 Instruction Manual Page 8
6.0 SERVICING - GAUGE TUBE CLEANING.
In some cases, a gauge tube may become contaminated with oil or other foreign matter. Once contamination
occurs, the sensor needs to be replaced. Please send the controller back to DIGIVAC for mating gauge tube
replacement.
6.1 FACTORY REPAIR AND CALIBRATION.
The vacuum gauge assembly is designed to provide years of trouble-free service, and the liberal internal use of
plug-in components makes it easily repairable. Field servicing of the unit is not recommended. The accuracy of
calibration is dependent on the quality of the gauge tube, accuracy of calibration is difficult to achieve in a field
setting. Each DIGIVAC vacuum gauge controller is calibrated to the particular vacuum gauge sensor that is
shipped with the unit.
In the event the user must recalibrate the instrument, the following procedures are suggested.
A. Before re-calibrating the instrument, it should be ascertained that the instrument is in fact incorrect. In
many cases, the problem will be with a tube that is contaminateded, or a system that is operating
improperly. It is recommended that a spare tube be kept on hand and stored in a clean, dry place. Then,
in cases of suspect readings, the tube should be changed before proceeding further.
B. Calibration instructions:
1. Put gauge on a manifold with a standard such as a capacitance manometer, and set manifold
pressure to 750 Torr or 1000 mbar
2. Adjust “ATM” potentiometer to 750 Torr (for Torr units) (or 1000 mbar) (matching standard)
3. Set manifold to 5 Torr and adjust “vac” potentiometer so it reads 5 Torr +/- 0.2 Torr. (for mbar
installations, set at 6.4 mbar +/- 0.2 mbar)
7.0 NOTES ON CALIBRATION.
The DIGIVAC is calibrated in nitrogen. This device can measure any clean dry gas and retain calibration.
Note that isolated transducers like capacitance manometers are independent of gas type or moisture content.
8.0 UNDERSTANDING TORR.
The 2L760 and many similar instruments are calibrated in microns or "millitorr." Microns are not really a measure
of vacuum at all, but rather of absolute pressure. It will be recalled that the pressure of the atmosphere is
14.696 or approximately 14.7 pounds per square inch at sea level. This pressure is due to the weight of all of the
air in the earth's atmosphere above any particular square inch. This 14.696 psi is equivalent to the pressure
produced by a mercury column of approximately 29.92 inches high or .76 meters (about 3/4 of a yard) or 760
millimeters of mercury. Atmospheric pressure varies greatly with altitude. It decreases approximately 1 inch of
mercury per thousand feet of altitude. It also varies widely with local weather conditions. (Variations of one half
inch in a single day are common.) The word vacuum means pressure lower than atmospheric or "suction," but,
in describing negative pressure, the atmosphere is only a satisfactory reference if we are dealing with values of
vacuum down to about 27 inches of mercury. Below that, it is much more useful to talk in terms of absolute
pressure, starting from absolute zero. The 2L760 and all similar instruments measure negative pressure below
27” of mercury.
One TORR, a commonly used unit, is an absolute pressure of one millimeter of mercury. A millitorr is equal to
one thousandth of a TORR. A MICRON is the same as a millitorr.

DIGIVAC 2L760 Instruction Manual Page 9
9.0 ACCESSORIES AND MODIFICATIONS.
The following are offered as accessory equipment or field-installed modifications.
Padded shoulder strap Case with Velcro closure- For instruments that will be used in the field, particularly in
cryogenic applications, a padded shoulder strap case is available.
COMPATIBILITY WITH OTHER GAUGE TUBES.
On special order, DIGIVAC Instruments can be provided to use with most other vacuum gauge tubes. AC and DC
excitation are available. Gauges have been provided for Hastings, Varian, Thermionics, Veeco, VRC, and
Fredericks gauge tubes.

DIGIVAC 2L760 Instruction Manual Page 10
10.0 TERMS AND CONDITIONS
.
TERMS OF USE, LIMITED WARRANTY & LIABILITY WAIVER
THE DIGIVAC COMPANY (“DIGIVAC”) offers all of its products with the following terms and conditions and notices
as follows. By accepting and/or using a DIGIVAC product, you hereby acknowledge and agree to the following
terms and conditions, and acceptance of these terms and conditions are a condition precedent to any
purchase/sale agreement between you and DIGIVAC.
EXCLUSIVE OBLIGATION: The DIGIVAC product you are purchasing has been designed for a specific use within a
set of suitable operating conditions, as set forth in its User Manual, or as indicated otherwise by DIGIVAC. Any use
of the DIGIVAC Product for any purpose or under any conditions, other than those specified, shall render any
limited warranty void, and shall expressly invalidate any liability of DIGIVAC for damages as a result of such misuse.
USER LIMITATION: You may not modify, copy, distribute, transmit, display, perform, reproduce, publish, license,
create derivative works from, transfer, or sell, any information, software, products or services obtained from or
created by DIGIVAC to any third party, without the express written consent of DIGIVAC to do otherwise. Any
violation of this provision shall give rise to an indemnification of DIGIVAC by you, for any third party claims arising
out of such violation. THIRTY (30) DAY LIMITED WARRANTY: All DIGIVAC products are warranted against any
manufactured defect for a period of thirty (30) days from date of purchase, unless such product is a custom-work
for you and not a standard DIGIVAC product. Any product qualifying as a custom-work shall not be warranted
against any defects for any purpose, and your acceptance of such custom-work shall relieve DIGIVAC of any liability
for any purpose. WITH THE EXCEPTION OF THE LIMITED WARRRANTY ABOVE, YOU AGREE ANY DIGIVAC PRODUCT
IS PROVIDED AS IS, EXCLUSIVE OF ANY WARRANTY, INCLUDING, WITHOUT LIMITATION, ANY IMPLIED WARRANTY
OF MERCHANTABILITY, FITNESS FOR A PARTICULAR PURPOSE, NON-INFRINGEMENT, OR ANY OTHER WARRANTY,
EXPRESSED OR IMPLIED. LIMITATION OF LIABILITY: You agree and acknowledge, DIGIVAC shall have no liability to
you whatsoever for any direct, indirect, punitive, incidental, special consequential damages arising out of or
connected with the use or misuse of its products. In particular, given the nature of DIGIVAC products, you agree
and acknowledge, under no circumstances whatsoever shall DIGIVAC be liable to you for any consequential
damages for damage to any non-DIGIVAC product or service, arising from the failure, use or misuse of a DIGIVAC
product, including, but not limited to, any vacuum system, engine, vehicle, factory, or the like. In the event, a
court of law with proper jurisdiction finds DIGIVAC liable to you for any purpose, you agree and acknowledge
DIGIVAC’s maximum liability shall not exceed the purchase price of one unit of product giving rise to such liability,
or $250.00, whichever is greater. ENTIRE OBLIGATION: These terms and conditions express the entire obligation
of DIGIVAC with respect to its products. If any part of these terms and conditions are deemed void, invalid,
unenforceable or illegal, including, but not limited to, the warranty disclaimers, liability disclaimers and liability
limitations set forth above, then the unenforceable clause or sentence may be disregarded with the remainder of
these terms and conditions valid and enforced. In the event the unenforceable clause or sentence leaves a void in
these terms and conditions, a provision closely matching the intent of the unenforceable provision should be
deemed inherent within these terms and conditions, slightly modified to render such provision valid and
enforceable. GENERAL: These terms and conditions are governed by the laws of the State of New Jersey, USA. You
hereby consent to the exclusive jurisdiction and venue of the Courts of New Jersey, in all disputes arising out of or
relating to the use of this product. Use of this product is unauthorized in any jurisdiction that does not give effect
to all provisions of these terms and conditions. MODIFICATION OF TERMS AND CONDITIONS: DIGIVAC reserves
the right to change the terms, conditions, and notices under which their products are offered.
Table of contents
Other DigiVac Vacuum Cleaner manuals


