ATTENTION NEW DIRT DEVIL® CLEANER OWNERS!
BEFORE RETURNING YOUR CLEANER TO THE RETAILER, PLEASE CALL 1-800-448-2343 AND ASK FOR TECHNICAL
SERVICE. MOST ISSUES RELATED TO CLEANERS ARE APPLICATION OR INSTALLATION AND OUR FRIENDLY SERVICE
TECHNICIANS WILL TYPICALLY BE ABLE TO HAVE YOUR CLEANER UP AND RUNNING IN MINUTES.
Congratulations on the purchase of your new Dirt Devil® Automatic Pool Vacuum. This
is an easy and simple way to clean and maintain your pool during the pool season.
Pool Recommendations
Dirt Devil®Above Ground Vacuums (D1000 & D2000) are recommended for use in pools with at least six (6) inches of pool cove height. If it is
less than 6” it could affect the cleaners’ operation.
Dirt Devil®Above Ground Vacuums require a certain amount of “vacuum” or “suction” to operate. This vacuum is created by the pump which
comes with the pool. Some pumps are not capable of providing enough vacuum and will not allow the cleaner to operate properly. In many
cases, soft-sided pools come with entry level pump and filter systems that are not capable of operating the Dirt Devil®cleaner. Consult your
dealer on the performance of your pump/cleaner combination.
To register your Dirt Devil® pool vacuum with GLI Pool Products, please go to
www.glipoolproducts.com
For assembly or installation questions, please visit our website to view our new
Dirt Devil® Instructional Videos.
GLI Pool Products • 215 Sinter Court Youngstown, OH 44510 • www.glipoolproducts.com
Dirt Devil® is a registered trademark of Royal Appliance and is being used under licence with Royal Appliance Mfg. Co.
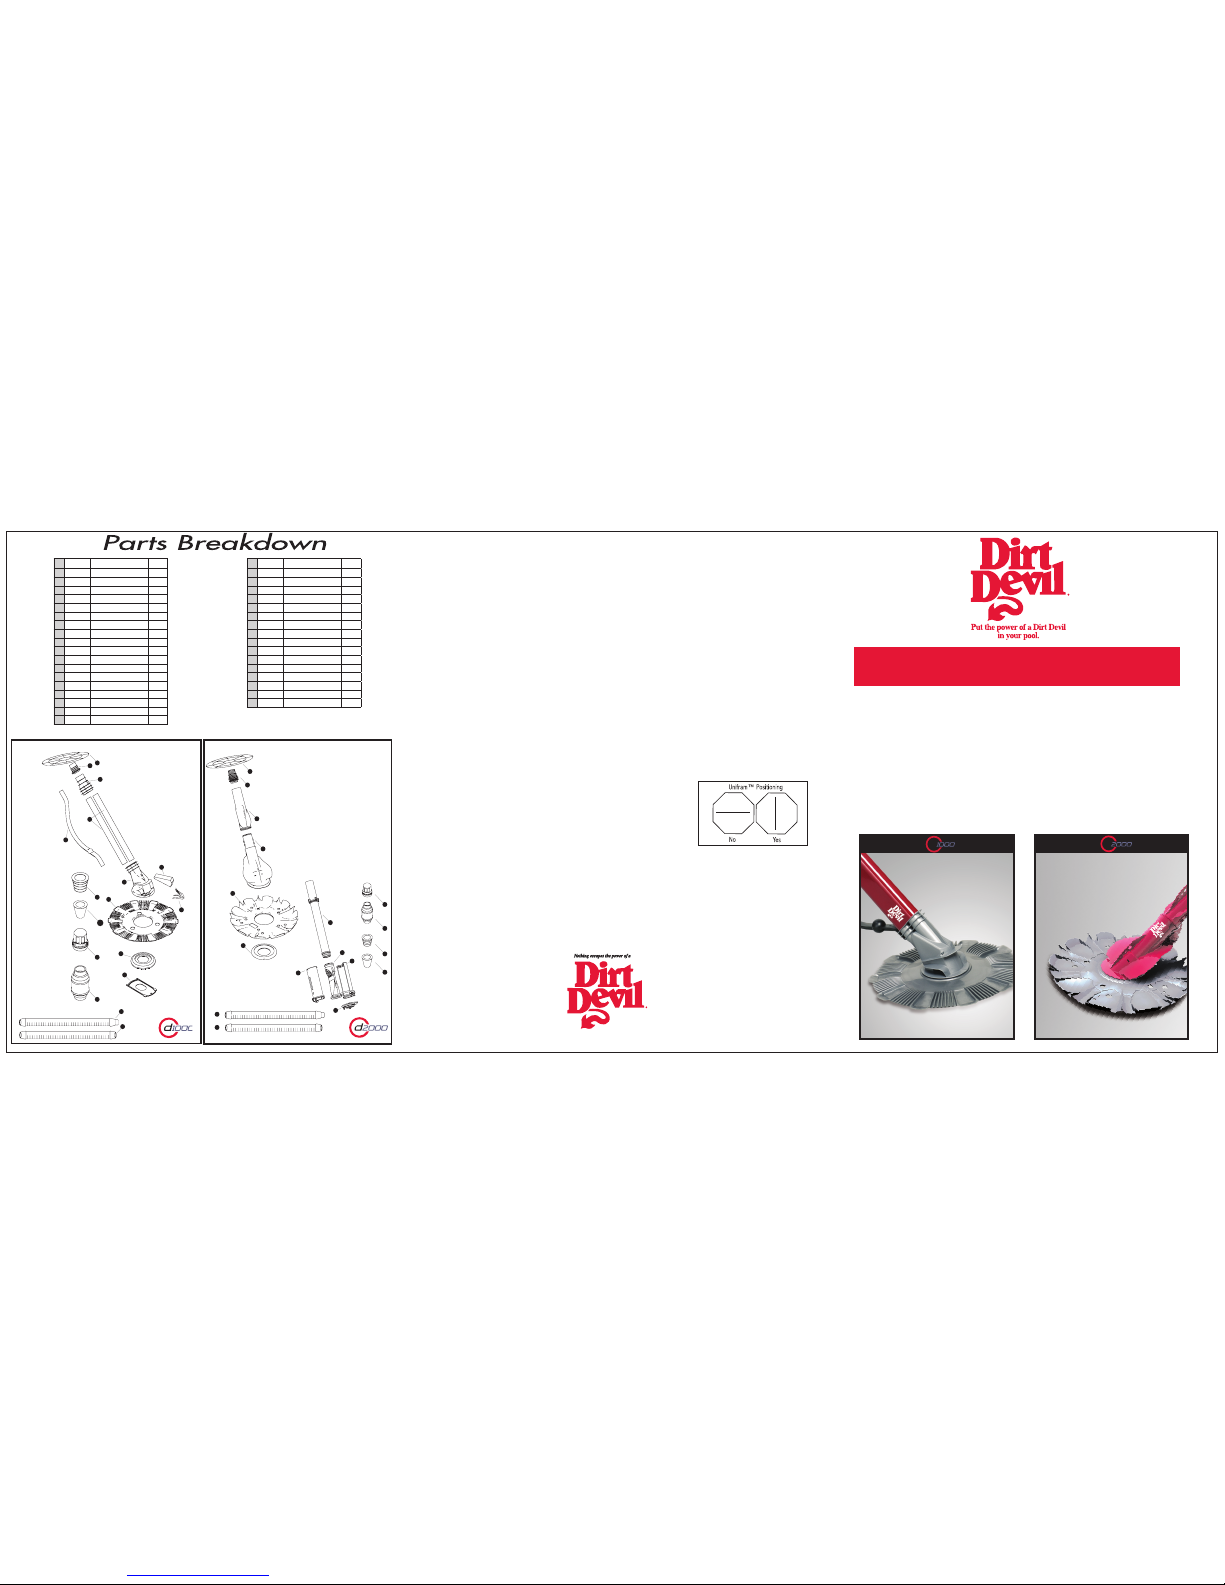
Part No. Description Qty
1 46001051R Connector, Swivel w/bearing 1
2 - Housing Tube, Upper 1
3 - Inner Tube 2
4 - Housing Tube, Lower 1
5 46001092R Bumper Guard w/ Weight 1
6 46001066R Cover Inlet 1
7 46001060R Large Disc, Ribbed/Solid 1
8 46001080R Foot Pad 1
9 46001070R By-Pass Valve 1
10 46001090R Hose Cone, Ribbed 1
11 46001085R Inlet Flow Control 1
12 46001065R Flapper w/Spring 1
13 46001067R Spring Flapper 1
14 46001050R Hose, Male-Female 12
15 46001055R Hose, Female-Female 1
16 - Cover, Internal Tube 1
17 4001095R Ladder Guard 1
18 46001091R Hose Cone, Small 1
Part No. Description Qty
1 46001051R Connector, Swivel w/bearing 1
2 - Housing Tube, Upper 1
3 - Inner Tube 1
4 46001062R Large Disc, Finned 1
5 46001080R Food Pad 1
6 46001053R Cleaner Throat Inlet 1
7 46001064R Cassette w/Unfram 1
8 46001064R Unifram 1
9 46001052R Internal Tube 1
10 46001085R Inlet FlowControl 1
11 46001070R By-pass Valve 1
12 46001090R Hose Cone, Ribbed 1
13 46001067R Hose Cone, Small 1
15 46001055R Ladder Guard 1
16 46001050R Hose, Male-Female 12
17 4001095R Hose, Female-Female 1
1
2
3
5
4
12
13
9
14
15
7
8
6
10
11
17
18
1
2
3
5
4
12
13
9
14
15
7
8
6
10
11
17
18
4. Important for Vinyl Pool Owners. Vinyl liners are subject to deterioration or damage due to age, the effects of chemicals,
corrosion or failure of the supporting walls: as well as improper installation. Before installing your Dirt Devil®pool vacuum, inspect
the interior of your pool carefully. If your vinyl liner is brittle or has stones, roots, wrinkles, metal corrosion in contact with the
underside of the liner, or has damage to the base material or supporting walls, do not install the Dirt Devil pool vacuum before
having a qualified pool professional perform the necessary repairs or modifications. GLI will not be responsible for the liner
damage caused by a cleaner out of warranty or one that has been used in a pool having an aged or deteriorated liner. You are
responsible for liner damage if you use the Dirt Devil®Pool Vacuum under these conditions.
5. Though we include the ladder guard as a convenience, we do recommend that the ladder be removed from the pool
when the cleaner is in operation.
6. If the cleaner stops moving, it is typically a blockage in the flapper or Unifram™ area. These parts are located inside the
main body of the cleaner and easily cleaned.
a. Step 1: Turn pump OFF.
b. Step 2: Remove the cleaner from pool, turn over, and inspect the flapper or Unifram™. The
flapper should move freely and their should be no obvious stones, twigs or other debris
clogging this area.
c. If you see debris and can’t remove it with your fingers, remove the base plate (plate where
the debris goes when vacuuming). Using a small flat headed screwdriver, push on one of
the two tabs located on the side of the base plate. Release the plate and remove the flapper
or Unifram™ and clean out.
d. Then replace the flapper or Unifram™, snap base plate back into place and put cleaner back
into the pool.
e. Turn pump ON.
Note: Unifram™ must be installed with opening in a vertical position.
Also, check your skimmer and pump baskets, if they are full, the cleaner may not be getting
full vacuum. Empty them per manufacturer’s instructions.


