Discount Car Stereo BT45-JAG User manual
Courtesy of: DiscountCarStereo.com
Serving the internet community since 1995
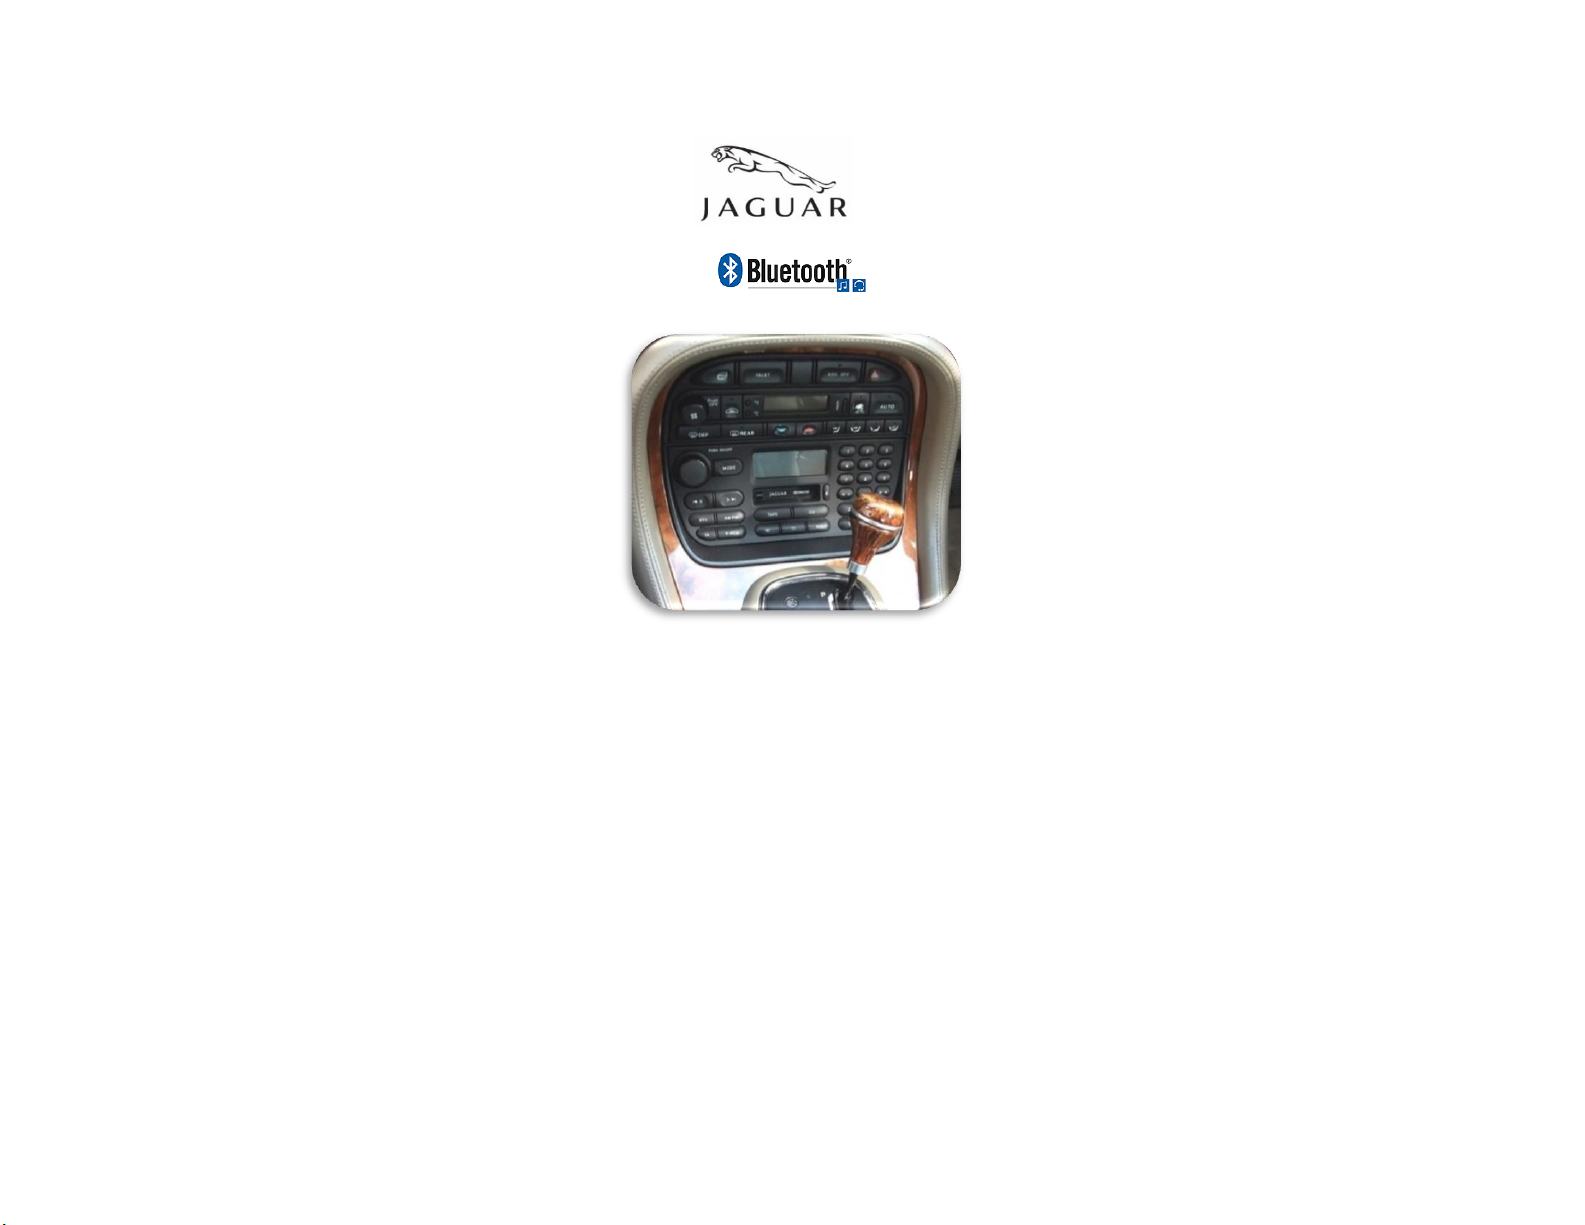
BT45-JAG
QUICK START BLUETOOTH INSTALLATION GUIDE FOR SELECT JAGUAR XK AND XJ WITH CD CHANGER
1998-03 XJ (X308) and 1997*-06 XK (X100)
Created December 21, 2015
Revised: June 17, 2021

PRODUCT SAFETY & DISCLAIMER
READ ALL INSTRUCTIONS CAREFULLY BEFORE INSTALLING, FAILURE TO DO SO MAY CAUSE
PERSONAL INJURY OR DAMAGE TO PRODUCT AND/OR PROPERTY
•This installation guide is provided as a GENERAL installation guide, some vehicles vary and
may require additional steps. We do not accept responsibility for third party labor charges
or modifications. Exercise due-diligence when installing this product.
•We do not accept any responsibility for vehicle damage or personal injury resulting from
the installation of this product.
•Careless installation and operation can result in equipment damage.
Introduction:
Safety comes first when you’re on the road, so having an intuitive and easy to
use Bluetooth kit is essential to reducing driver distraction. The BT45-JAG kit is
compatible with virtually all Bluetooth phones, and sounds great whether you are
using it for mobile conversations or music streaming. The system will mute
upon initiating or receiving a call and announces callers phone number on car
speaker. The wireless remote control conveniently installed on dashboard is
used to launch Voice Recognition application (Siri, Google Now, Assistant etc.),
initiate phone calls launch applications, track selection and more. Thanks to the
BT45-JAG Kit users keep the radio and car they love while enjoying Bluetooth
features only available on newer cars.
The BT45-JAG requires a working CD changer (which remains connected
but will no longer play) and factory phone plug (under center armrest)
See Frequently Asked questions at the end of this guide
Notes:
- Vehicle must have a phone plug beneath armrest
- Required CD changer remains connected but will no longer play.
Audio Adapter Installation:
1. Remove carpet trim piece surrounding audio rack (See Fig. 1). If
vehicle does not have Navigation, use empty slot to access changer
connecting plug, however vehicles with Navigation or convertibles, may
require lowering audio rack (See Fig. 1) by removing (4) 8mm and
leaning rack forward to reveal wiring.
Fig. 1
2. Locate CD changer short (6 inch) pigtail cable (it’s the only cable on
changer). This cable connects CD changer to radio (Standard audio
systems) or to amplifier (Premium audio system).
This is the cable required to complete install (See Fig. 1A)
Fig. 1A
plug/connector location
3. Remove cable from holding tab and disconnect CD changer by gently
pulling apart (Do not wiggle or twist)
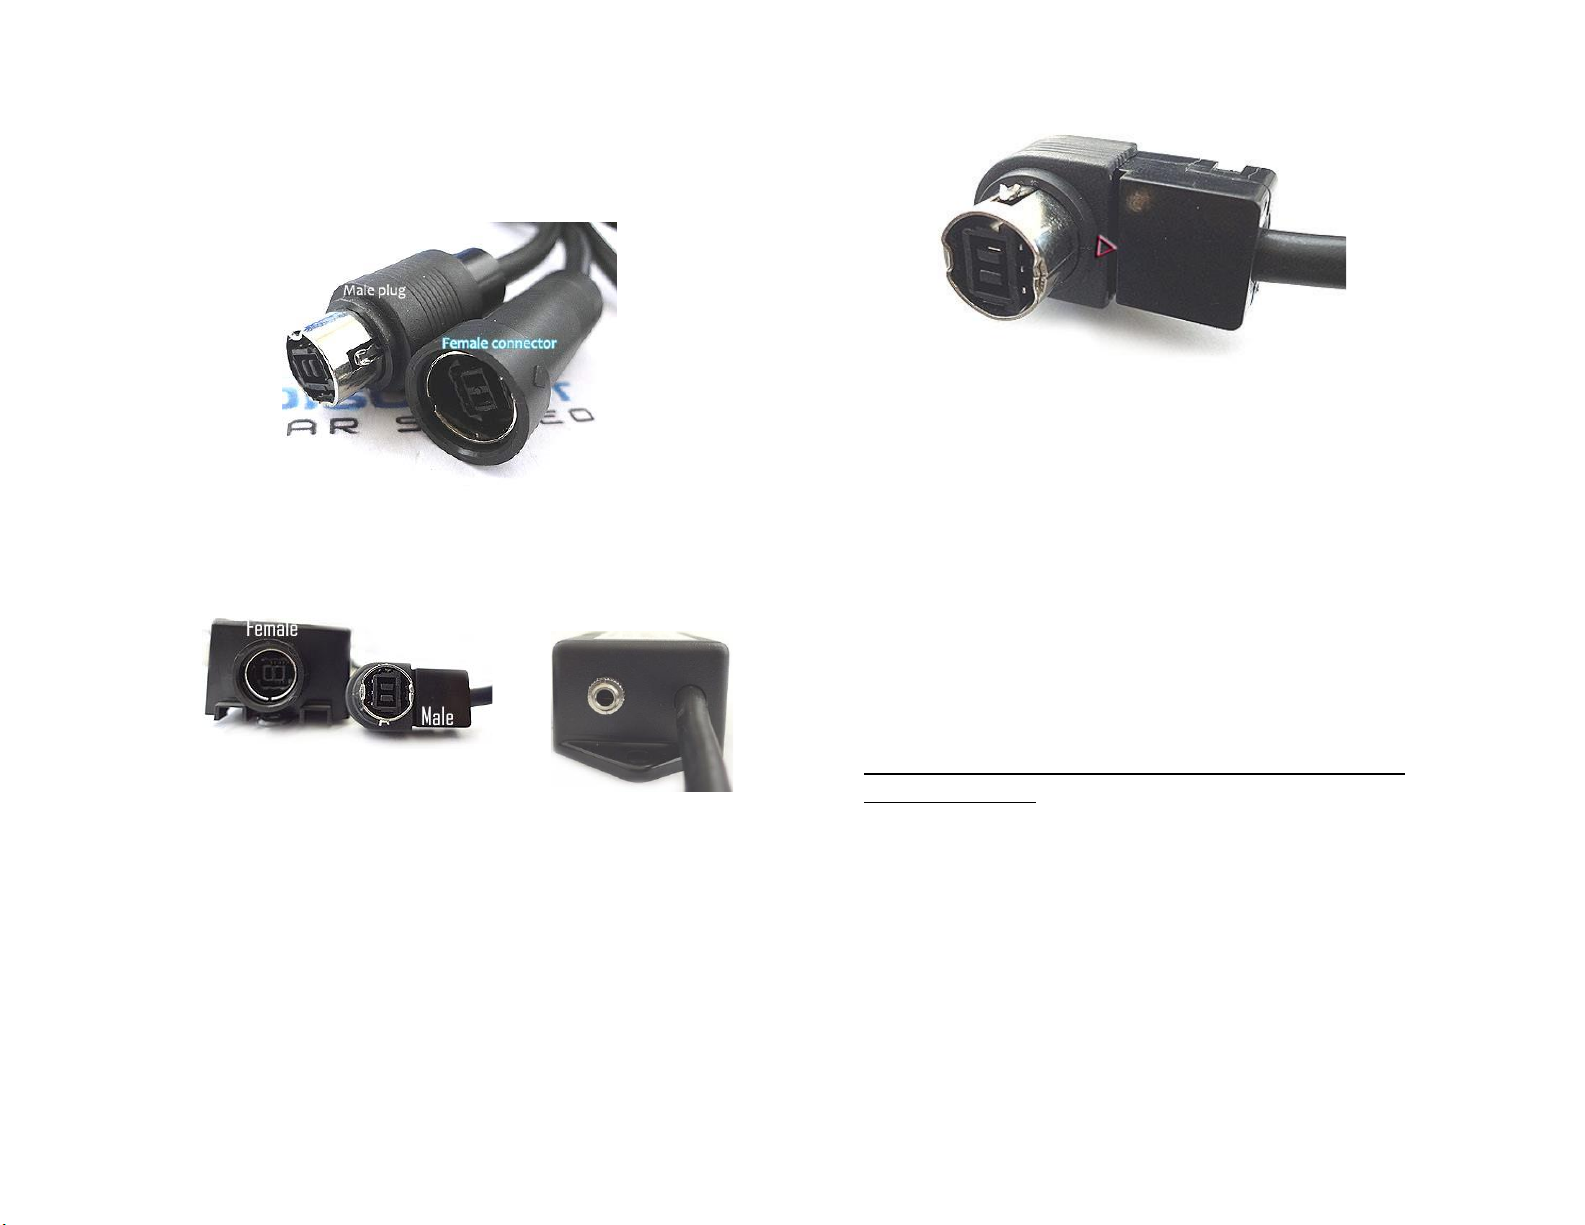
4. Once disconnected, cables should resemble Fig. 2. Female connector
(right) –leads to cd changer, male plug (left) –leads to amplifier
(premium audio system) or radio (standard audio system)
Fig. 2
5. Connect factory male plug to audio adapter female connector by
aligning triangle markers (avoid twisting)
Fig. 3
Audio Adapter
Fig. 3A
6. Connecting audio adapter right angle male plug to CD changer female
connector (See Fig. 2).
Note: Audio adapter right angle male plug (See Fig. 3b) does not have
an alignment marker. To connect, simply align imaginary triangle
marker seen in Fig. 3b to marker on factory female connector (See
Fig. 2)
Fig. 3b
7. Return cables to holding tab
8. Connect supplied 3.5mm audio cable (See Fig. 4) to audio adapter
3.5mm jack (See Fig. 3A)
9. Proceed to next step (routing audio cable).
Noteworthy:
They are multiple Ai-Net type plugs/connectors at the audio rack and more
so in vehicles with premium sound (e.g., Amplifier, Navigation etc.). In
premium audio systems, audio adapter (See Fig. 3) connects between CD
changer and amplifier and in standard systems; between CD changer and
radio.
To minimize connecting errors, locate single black cable emerging
from CD auto changer --- seen in Fig. 2 (right). This is the cable with
which you will be working. Connecting audio adapter to something other
than CD auto changer plug will result in volume issues, missing power to
radio etc.

Installing (routing) audio cable (X308)
1. Use pry tool or similar to open gap between window pillar and rear
deck as seen in Fig. 5. From trunk, fish audio cable jack (See Fig. 4)
through and into vehicle cabin. (See Fig. 6)
20 ft. audio cable
Fig. 4
Fig. 5
Fig. 6
2. Pull excess cable and begin to tuck under seat backrest and cushion as you
work towards center glove box (armrest) as seen in Fig. 7, Fig. 8 and Fig.
9
Fig. 7
Fig. 8
Fig. 9
3. Continue to use pry tool or fingers to fish wire under center glove box and
into storage bin.
4. To remove storage bin: Open center glove box and remove 2 Philips head
screws from latch cover and two more from hinge then remove single
screw on retainer bracket.
5. Lift to remove storage bin and set aside.
6. Locate audio plug fed through in step 3 and gently pull excess cable.
Note: The aforementioned steps apply to Jaguar XJ (X308). Jaguar XK (X100) –
Convertibles require additional steps not part of this guide.
Module wiring diagram
Connecting diagram
1. Connect audio cable 3.5mm plug (from trunk) to module “AUX1”jack (See
Fig. 11)
Note: After initial install, use “AUX2”if engine noise is present during
playback.
Fig. 11
Module
Microphone Installation:
Note: If vehicle has factory mic in overhead console (See Fig. 12) you may use it
instead of mic included with kit. To use factory mic, simply connect 3.5mm plug
from installation (See Fig. 15) to module “MIC” input jack (See Fig. 11).
Fig. 12
factory microphone
To install included microphone (See Fig. 13) simply clip to visor or headliner and
carefully route 3.5mm plug down side pillar, under dash and into center
armrest. Connect 3.5mm plug to module “MIC” Input jack
Fig. 13
microphone
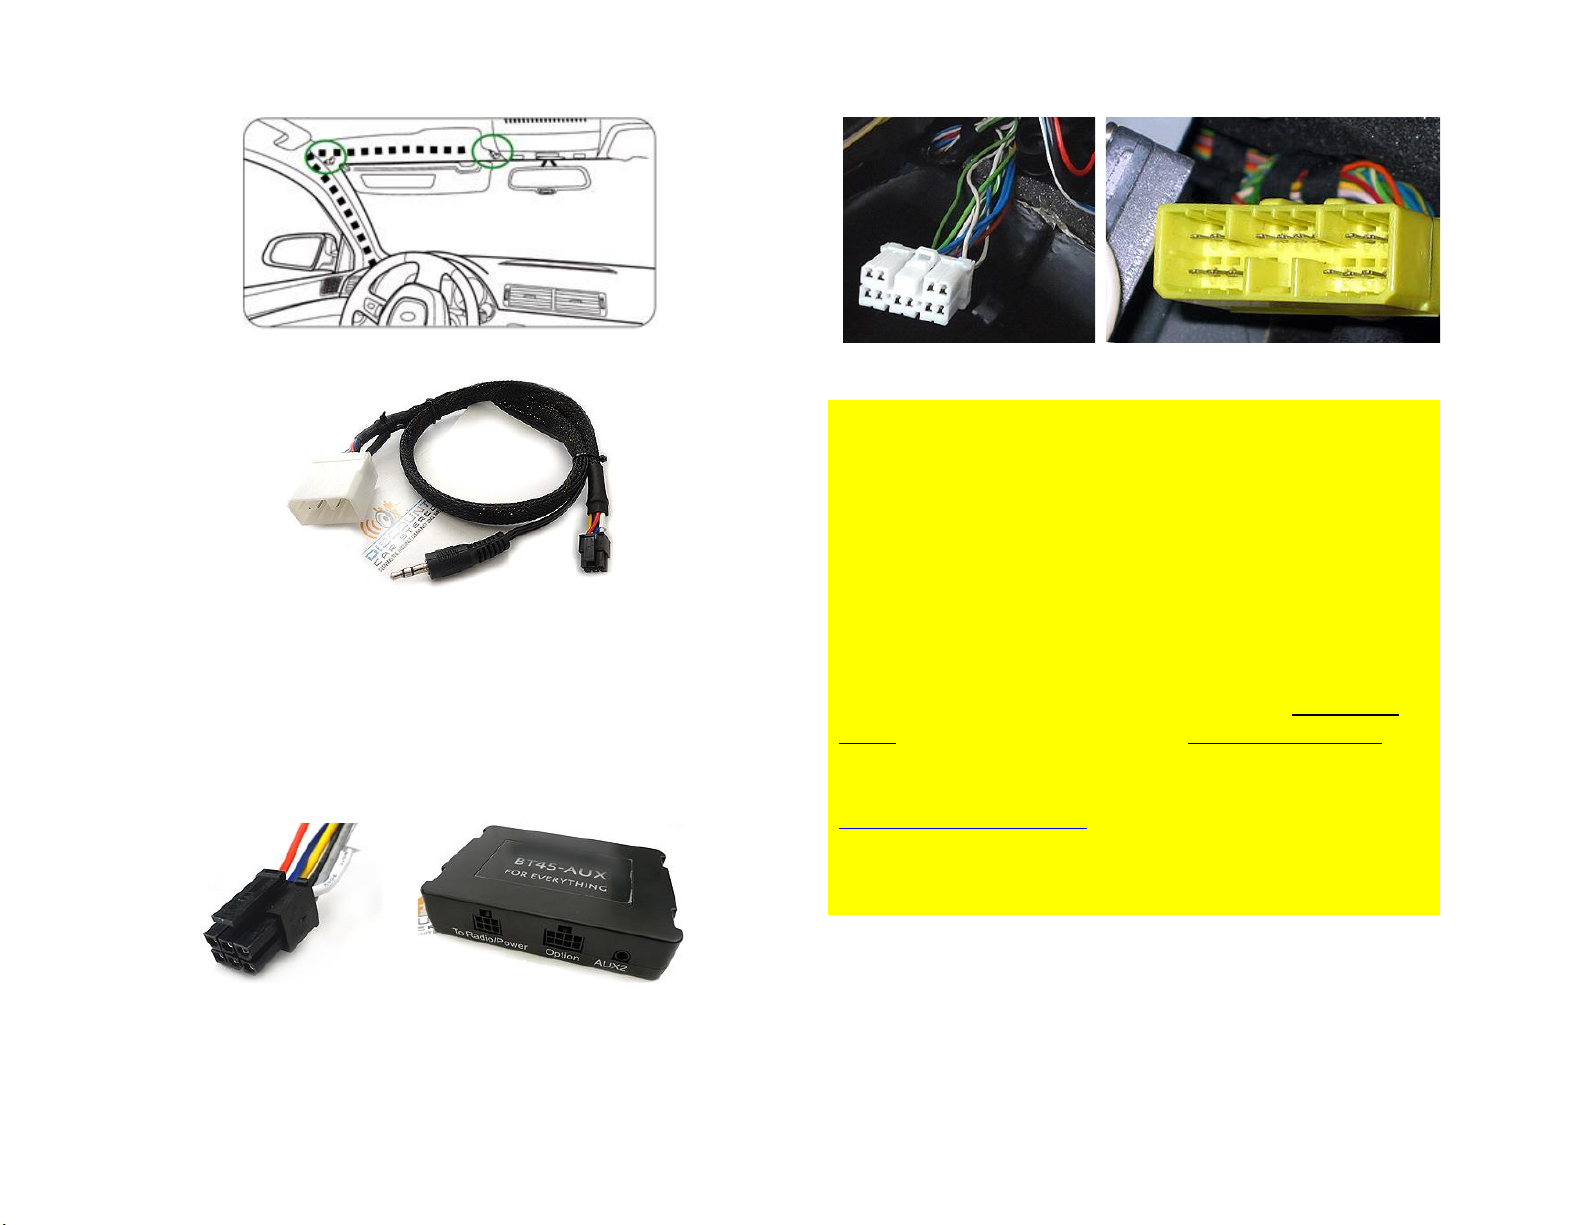
Fig. 14
Fig. 15
installation harness
(with 10-pin male connector)
3. Connect 6-pin plug from installation harness (See Fig. 16) to “Radio/Power”
input on module (See Fig. 17)
Fig. 16
Fig. 17
4. Connect installation harness 10, 14 or 18-pin plug/connector to factory 10, 14
or 18-pin phone plug/connector beneath armrest (See Fig. 18/19)
Fig. 18
(10-pin Female plug)
Fig. 19
(18-pin Male connector)
WARNING!! Prior to ordering, it is vital to check factory phone
plug/connector in your vehicle. Here are some possibilities:
1998-03 XJ (X308) and 1997*-99 XK (X100) may have a 14-pin male
connector (See Fig. 19), a 10-pin male connector OR 10-pin female plug
as seen in Fig. 18.
(Plug or connector with holes=female, Plug or connector with pins=
MALE)
2000-02 XK (X100) usually have 14-pin male connectors
2003-06 XK (X100) usually have 18-pin male connectors.
When ordering select plug/connector gender and pin count found in your
vehicle. We include matching plug/connector based on your selection. If
incorrect selection is made, the harness you receive will not work. Please
check your vehicle first and if in doubt, email picture of plug/connector to
2000 XK (X100) with no previous factory phone kit may require additional
wiring in trunk to activate phone plug in storage bin.
5. Secure module inside the center armrest

Bluetooth Pairing and Connection
This is a one-time process that will not have to be repeated. After initial pairing,
the BT45-JAG will automatically reconnect with paired phone upon entering
vehicle.
1. Turn vehicle ignition “ON”.
2. Turn radio “ON” and press “CD” button to enter CD/Bluetooth mode
3. Go to smartphone Bluetooth menu settings, and search (scan) for
available devices.
4. Select BT45 and click “Connect or Pair”
5. “Connected” is heard on car speakers
Pairing a second device (multi-point)
1. Turn vehicle ignition “OFF”.
2. Disable Bluetooth on fist phone (already paired)
3. Turn vehicle ignition “ON”
4. Turn radio “ON” and press “CD” button enter CD/Bluetooth mode
5. Enable Bluetooth on second phone and search (scan) for available
devices
6. Select BT45 and click “Connect”
7. Once paired, “Connected” is heard on car speakers
8. Turn ignition “OFF”
9. Enable Bluetooth on First phone
10. Turn ignition back “ON”
11. Turn radio “ON” and press “CD” button to enter CD/Bluetooth mode
12. Both phones will automatically connect. You should hear “Connected,
connected” confirming both devices have been successfully connected
Wireless Remote Control
1. Twist remote control bottom cap to open
2. Remove battery’s protective clear film
3. Close cap
4. Use enclosed double-side tape and place remote control at a location
that is most convenient for you. Avoid placing the remote control over
or around airbags or in direct sunlight.
Fig. 20
Wireless remote control
Wireless Remote Battery
The LED on remote control will blink 10 times indicating the battery is low. To
replace battery a 3V CR2032 is required:
1. Turn vehicles ignition to “OFF”
2. Twist remote control bottom cap and remove battery (observe
polarity)
3. Turn vehicles ignition to “ON”, press “CD” button on radio and within 60
seconds install new battery
4. Listen for long beep on car speakers at the same time the remote LED
will turn solid blue followed by 10 flashes
5. If remote LED does not flash 10 time, repeat steps 2 -5

Remote Control Operation
Enable/Disable Voice Prompt +Caller
Announcement
1. Stop all active calls and or media streaming
2. Press and hold button (2 sec) on remote control to enable feature:
you will hear “Voice Enabled”
3. Press button on remote control to disable feature: You will hear
“Voice Disabled”
Media Streaming Operation
If 2 phones have been paired, music streaming is possible from either one:
1. Set the radio to “CD/Bluetooth” mode
2. Launch preferred music app
3. Use wireless remote control to adjust volume, change tracks etc.
4. To switch between phones, simply pause first phone and press play on
second and vice versa
Answering and ending calls.
1. Set radio to “CD/Bluetooth” mode (if not already)
2. To answer call, press the button on remote control or answer
directly on phone*
3. To reject call or end, press the button on remote control
4. Phone call audio can be adjusted by remote control, on phone, radio
volume or steering wheel control buttons (if equipped)
*if you answered call directly from phone, phone audio will go through
phone. You must select BT45 from phone screen to redirect call to car
speakers.
Placing Calls
1. Tap the button on remote control to initiate voice command or
simply make call directly from phone
2. Press ◀button on remote control to end call
The environment inside a moving vehicle tends to be noisier. This will affect how
accurately the phone’s voice recognition picks up your voice prompts.
Notes:
1. If playback is distorted, adjust volume on Bluetooth device.
2. Voice command compatible with Apple (Siri), Android (Google Now),
Blackberry (Assistant)
If successful go ahead and reinstall audio rack etc.

Feature Comparison:
The following chart should aid in selecting the right kit based on features,
vehicles requirements etc.
Feature
JAG-HF
JAGCD-HF
BT45-JAG
CD Changer Retention
X
✓
X
Additional Audio input (aux)
✓
✓*
X
USB Charging Port
✓
✓
X
Mute Audio System
X
X
✓
Separate Microphone
X
X
✓
Requires CD Changer
✓
✓
✓
Voice Activation
✓
✓
✓
Requires factory phone Plug
X
X
✓
Plug-n-play installation
X
X
✓
*Aux input instead of CD Changer
Frequent asked questions
1. Why is it important to check factory phone plug? Can it be installed
without it?
Jaguar vehicles are equipped with 4 phone plugs/connectors and users are
required to check which applies their particular vehicle (same model/year
may have different plug). This information allows us to include matching
plug/connector. If phone plug has been cut you may still install this kit, but
required to make additional wiring not part of this guide.
2. Can the BT45-JAG be installed without removing radio?
The BT45-JAG does not require radio removal.
3. Which model/year Jaguars will the BT45-JAG work and where do I
connect the AUX adapter?
1998-03 XJ (X308) (To CD changer plug in trunk/hatch)
1997*-06 XK (X100) (To CD changer plug in trunk/hatch)
4. Will the stereo mute when I receive or initiate call?
YES.When call is initiated or received, radio will mute and “PHONE” is
displayed on radio screen.
5. Will callers name/number display on radio screen?
NO. Phone number announced on car speakers.
6. Will I be able to use both music and navigation apps at the same time?
YES.When streaming and navigating; music will mute during guidance and
return to previous state when guidance ends. If a call is made or received,
both navigation guidance and streaming are muted until call has ended.
7. This kit includes a mini-USB port; can it be used for charging?
NO. Unfortunately, the mini-USB port is to upgrade module software.
8. After installing and testing the system everything works, but there is
engine “whine”.
What can I do to fix this?
Ensure volume on audio device is between 90-100% and increase
volume on module using the VOL + on remote control
Check grounds
make sure all connections are snug
switch audio jack to “AUX2” on Bluetooth module
Install noise filter

9. Will I be able to use overhead microphone in my vehicle instead of
microphone included in this kit?
YES.If kit include option to use factory mic, simply connect 3.5mm plug
from installation harness (See Fig. 15) to module “MIC” input.
10. Where is the factory phone plug/connector?
Factory phone plug/connectors are bellow center armrest. ROW and NAS
vehicles may have different plugs; so, we can’t be certain which plug size
or gender apply to your vehicle. Please verify plug/connector size and
gender prior to ordering so that it can be added to your kit. In addition,
2000 XK without factory phone will require additional wiring in trunk so to
activate phone plug under storage bin.
11. I realize the CD changer is required for this kit to work, but will I be
able to play CD’s?
NO. Purchase our A2DIY-JAG98 , JAGCD-HF etc. to retain use of the
changer.
*1997 XK (X100) with Ai-NET connectors only (8-pin DIN connectors do not apply)
Disclaimer
• This product has no affiliation with Jaguar or Apple
• There are no warranties expressed or implied by installing this product
• We’re not liable for misuse of this product.
Email [email protected]
© 1995-Jun-21 Discount Car Stereo, Inc. All rights reserved. Information in this document is subject to
change without notice. Other products and companies referred to herein are trademarks or registered
trademarks of their respective companies or mark holders.
Other manuals for BT45-JAG
1
This manual suits for next models
2
Table of contents
Other Discount Car Stereo Receiver manuals


Popular Receiver manuals by other brands


Ekckom
Ekckom XC8602JE manual

Russound
Russound CAM66T 1 instruction manual

Silca
Silca Air4 Home Translation of the original instructions

Linear
Linear Multi-Code 2031 installation instructions

Kenwood
Kenwood Sovereign Entre Connection guide

GALAXIS SHOWTECHNIK
GALAXIS SHOWTECHNIK PYROTEC PFE Profi Midi 1 Output user manual


