dispomed Highdent intro+ User manual

by par Dispomed
MANUAL
RECEPTION + OPERATION + MAINTENANCE
www.dispomed.com

805-0260-250
2
by par Dispomed
TABLE
OF CONTENTS.
260-250R3
HighdentTM is a trademark of Dispomed Ltd.
User Responsibility ................................................................................... 3
Standard and optional Features .................................................................. 4
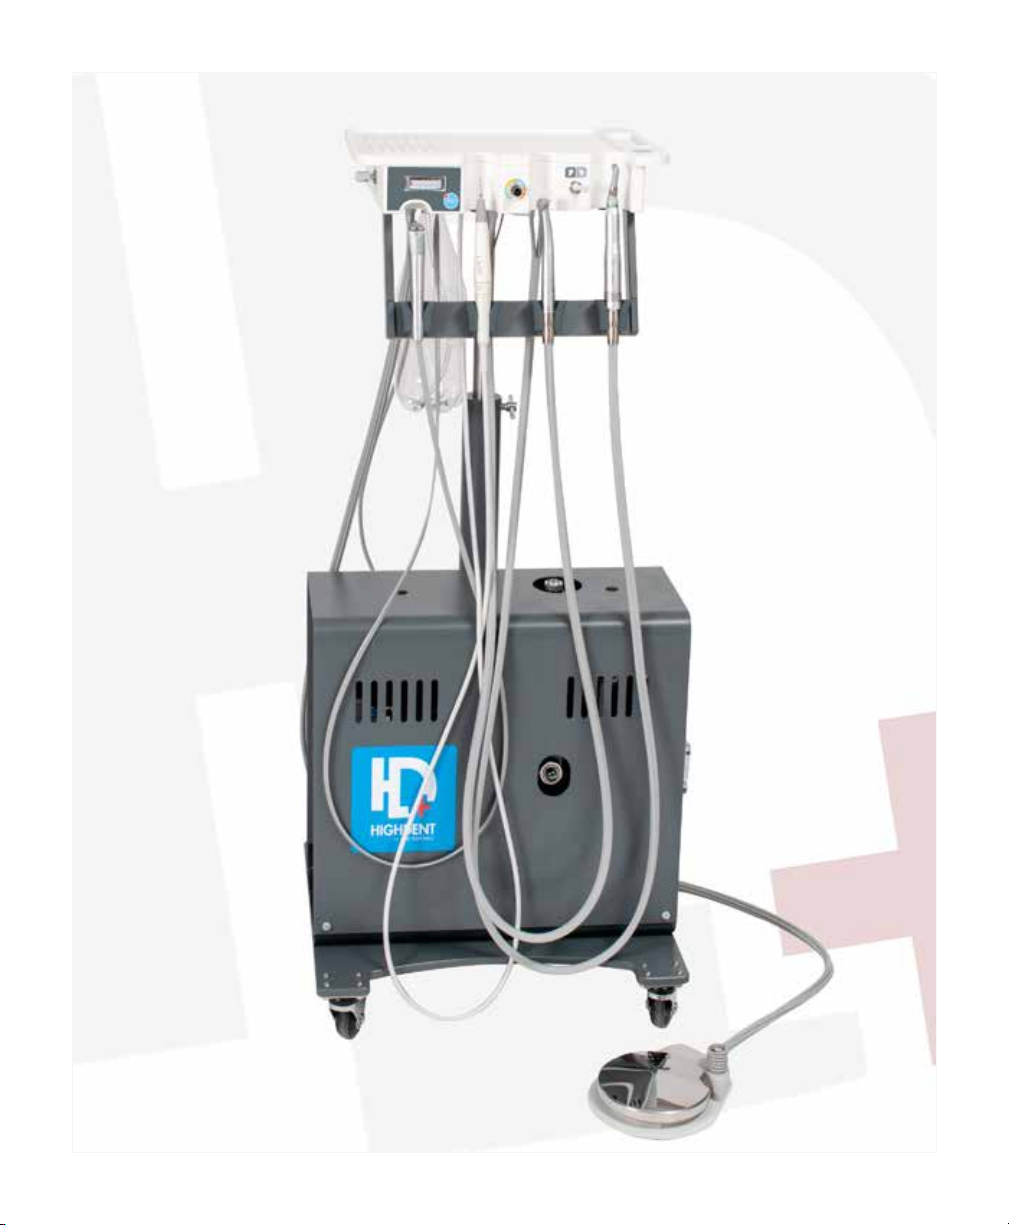
The HighdentIntro™dental delivery unit......................................................... 5
Receiving, Assembly and Start-up............................................................ 6 -11
Handpieces Adjustments ......................................................................... 12
Assembled View.................................................................................... 13
Controls Details........................................................................................14-15
Units head .................................................... 14
Compressor .................................................. 15
Daily Verications Procedures.....................................................................16-17
Annual Maintenance .............................................................................. 18
Kruuse – Intro........................................................................................ 19
Warranty ............................................................................................. 20

805-0260-250 3
by par Dispomed
USER
RESPONSIBILITY.
Read this manual before operating the equipment. Pay special attention to
all Warnings and Cautions.
This product will perform in conformity with the description contained in this
operating manual when assembled, operated, maintained and repaired in
accordance with the instructions provided. This product must be checked
periodically. A defective product should not be used. Parts that are broken,
missing, plainly worn, distorted or contaminated should be replaced
immediately. Should such repair or replacement become necessary, Dispomed
recommends that a telephone or written request for service be made to the
nearest Dispomed regional service center. This product, or any of its parts
should not be repaired other than in accordance with written instructions
provided by Dispomed and by Dispomed trained personnel. The product
must not be altered without the prior written approval of Dispomed. The user
of this product shall have the sole responsibility for any malfunction which
results from improper use, faulty maintenance, improper repair, damage, or
alteration by anyone other than a qualified Dispomed technician.
Caution: This device is intended for use by veterinarians who are thoroughly
familiar with the use of such products. Do not attempt to use this product if you
have not previously been trained on the use of dental units.

805-0260-250
4
by par Dispomed
THE HIGHDENT INTRO™
DENTAL DELIVERY UNIT.
Standard features include:
• Air/water syringe
• 1 water bottle
• Handpiece guard
• Instrument platter
Product dimensions:
• Length: 43.2 cm (17”)
• Width: 52.1 cm (20.5”)
• Min. height: 79 cm (31”)
• Max. height: 101 cm (40.5”)
• Weight: 44.9 kg (99 lb)
Specifications 120V:
• Amps: 7 A
• Power source: 110–120V AC
Optional features:
• Grey + colors options
• Quiet compressor, 40dB, means less noise pollution with compressor oil
• High speed handpieces with handpiece oil and 15 carbides
• Low speed handpieces with handpiece oil, Prophy cup and prophy paste
• Wall-mount

805-0260-250
6
by par Dispomed
RECEIVING, ASSEMBLY AND START-UP
INSTRUCTIONS.
Your Highdent dental unit requires some assembly before being used.
Receiving
To keep the possibility of damage during shipment to a minimum, the KRUUSE
unit requires some assembly. All accessories are included in a bag and or
small box within the shipping crate.
Instructions
Upon receipt and unpacking, inspect both the shipping container and all
of the enclosed components for signs of damage which may have occurred
during transit.
Check your materials list to ensure that all the necessary components are included.
Caution: To avoid injury while removing the unit from the box always have
another person assist you.
805-0260-250 7
by par Dispomed
RECEIVING, ASSEMBLY AND START-UP
INSTRUCTIONS.
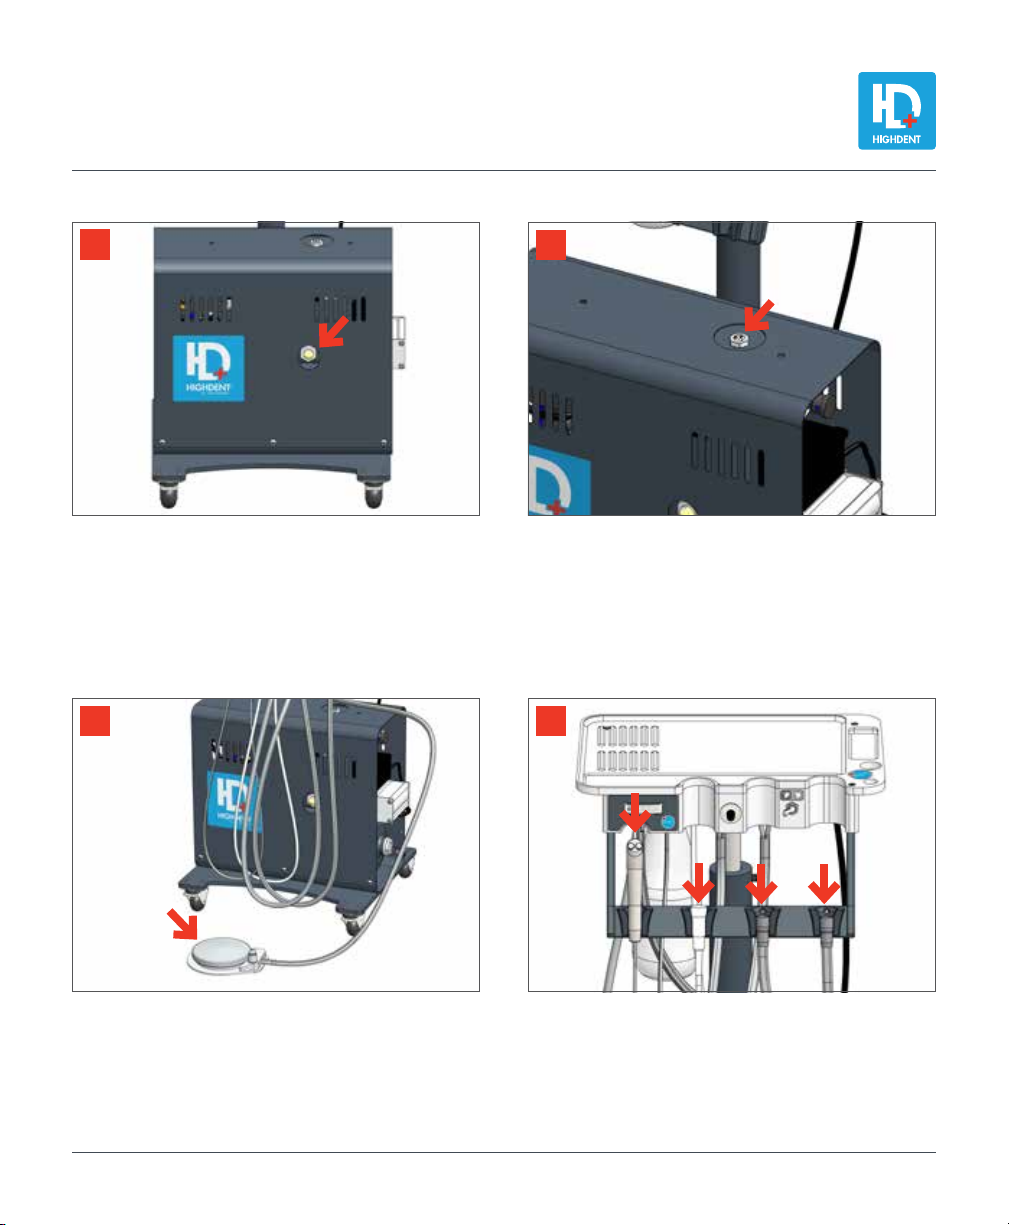
1
Check the compressor oil level through the sight
glass at the front of the compressor.
4
Install handpiece tubes to holders starting from the
right and following the order in which they are con-
nected to the bottom of the unit.
3
Carefully open accessories bag and place pedal
on floor.
2
If the oil level is less than half, remove the sticker and
fill the reservoir slowly by pouring a small quantity
of oil at a time. Wait 5 minutes and check the level.
Don’t forget to reinstall the sticker.
Do not ll more than half.
Use only compressor oil to ll.
805-0260-250
8
by par Dispomed
RECEIVING, ASSEMBLY AND START-UP
INSTRUCTIONS.
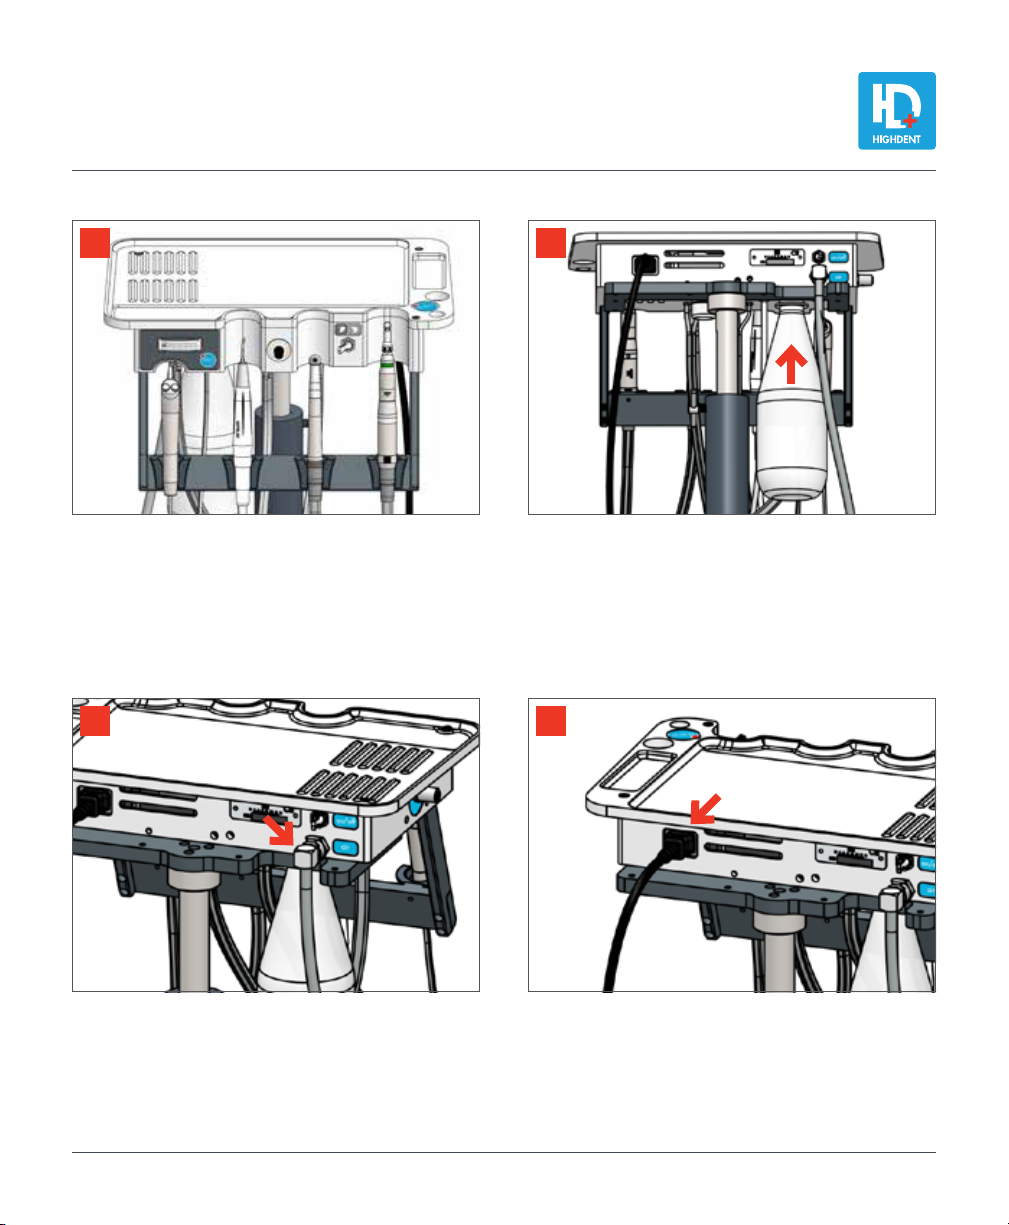
1
2
3
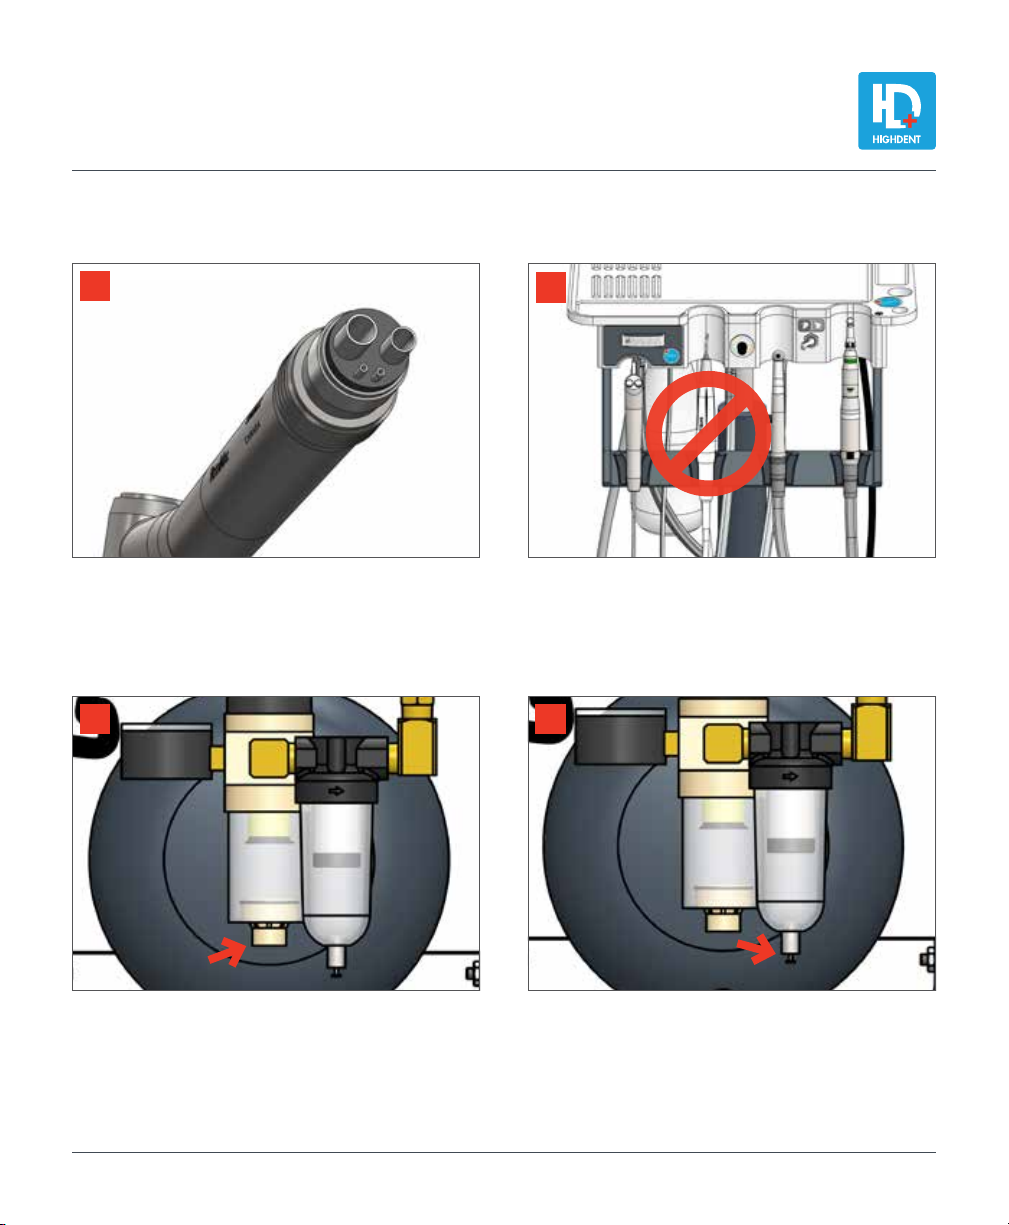
Install handpieces:
1: Low speed hanpiece
2: High speed handpiece
3: Piezo
(Caution: Never run handpiece without tip or bur)
6
Connect air pressure line to air connector behind
head assembly.
7 8
Connect power line on the back of head assembly
to the terminal strip on compressor.
5
Fill water bottle with distilled water and install under
head of unit by inserting drive tube and screwing
bottle into place.

805-0260-250 9
by par Dispomed
RECEIVING, ASSEMBLY AND START-UP
INSTRUCTIONS.
10
Turn compressor on. (On units equipped with oil
compressor the switch is near the pressure gauge at
the back of the compressor).
11
The gauge should indicate between 80 psi (5.5
bar) and 120 psi (8.3 bar) once compressor has
stopped.
If using another air source check for supply pressure
of approximately 80 psi (5.5 bar) at source.
12
Connect the other end of the power line from the
head assembly. Connect power cord from bottom of
terminal strip to appropriate electrical outlet.
9

805-0260-250
10
by par Dispomed
RECEIVING, ASSEMBLY AND START-UP
INSTRUCTIONS.
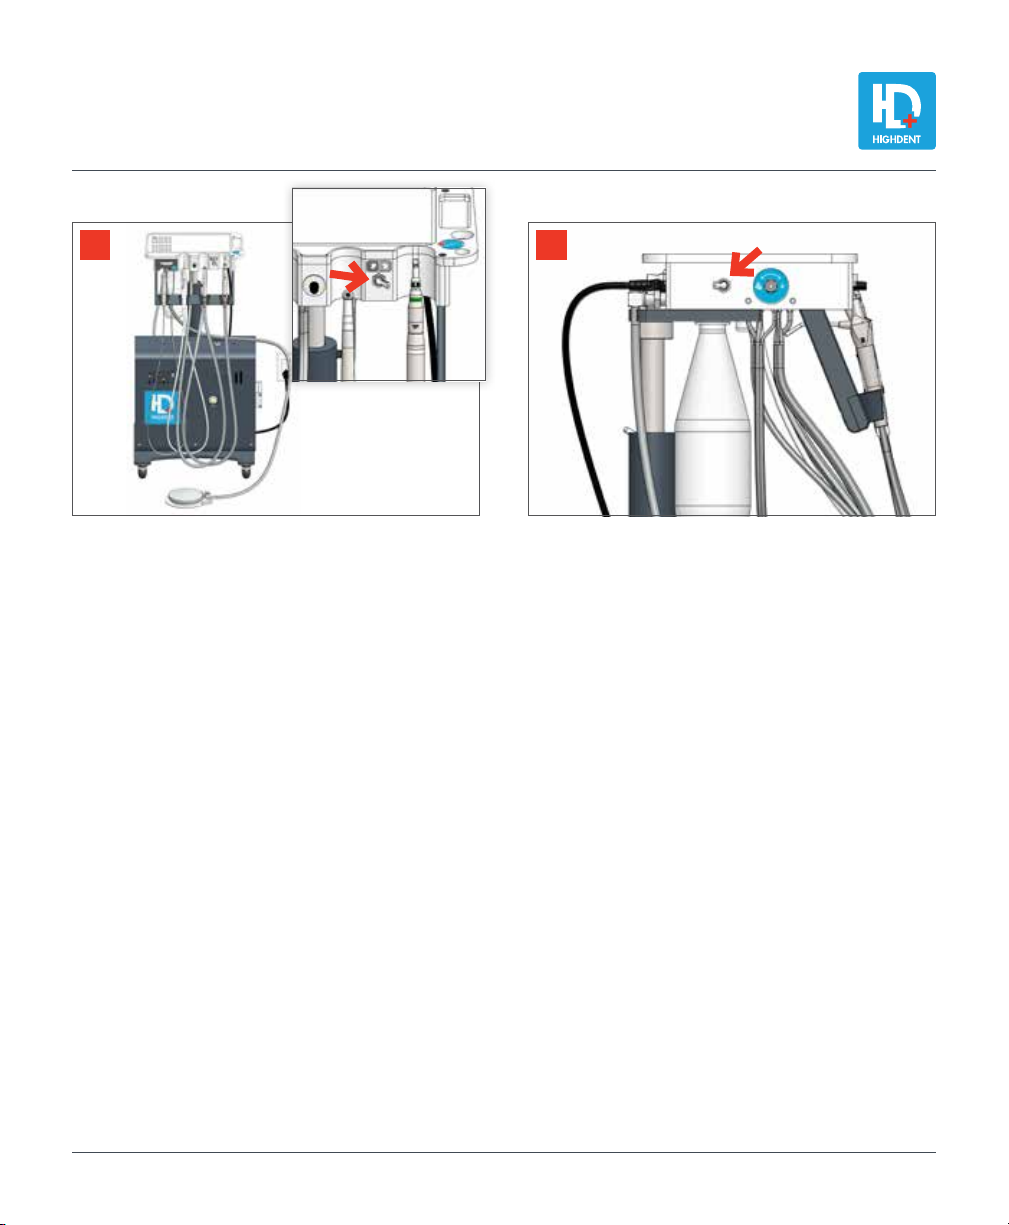
13
Turn water valve on.
15
1.
Remove high speed handpiece from holder.
2.Position the handpiece selector to high speed.
3.Depress pedal.
1. Remove Piezo from holder.
2.Depress smaller footswitch.
3.Adjust power according to tip being used.
16
2
2
1
1
14
Test syringe by pressing air button then water button
then both simultaneously for mist.
1. To sterilizee the tip pull it out of the syringe.
1
3
3
805-0260-250 11
by par Dispomed
RECEIVING, ASSEMBLY AND START-UP
INSTRUCTIONS.
1. Remove low speed handpiece from holder.
2.Position the handpiece selector to low speed.
3.Depress pedal.
2
1
3
17 18
Use the indicated switch to activate the water*on
the low speed handpiece.
*
The water on the low speed handpiece is optionnal.

805-0260-250
12
by par Dispomed
HANDPIECES
ADJUSTMENTS.
Adjust handpieces pressure according to the
manufacturers specifications.
1. High speed handpiece pressure adjustment
2. Low speed handpiece pressure adjustment
2
1
805-0260-250 13
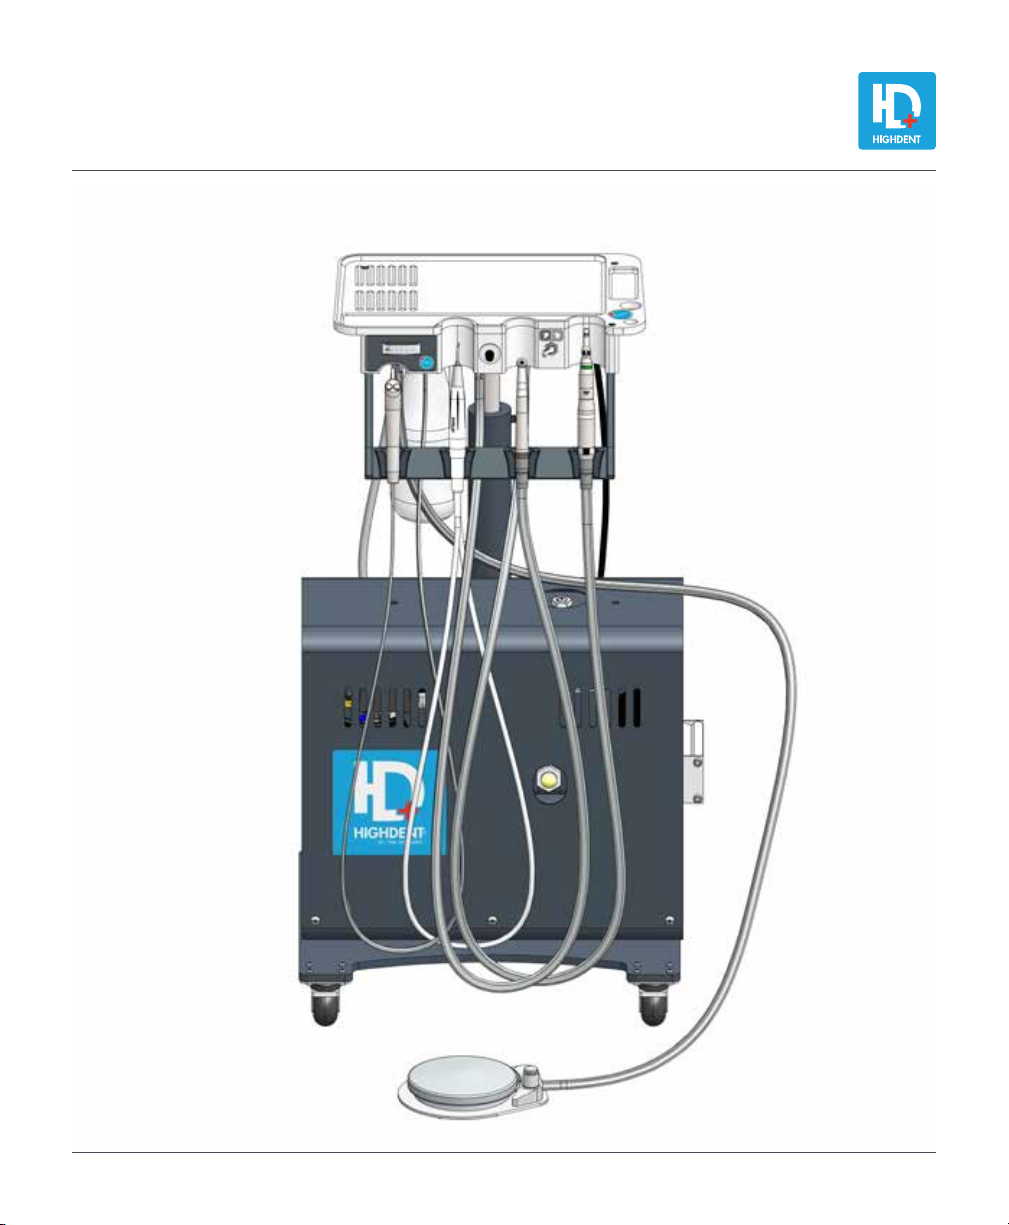
by par Dispomed
ASSEMBLED
VIEW.

805-0260-250
14
by par Dispomed
UNIT
CONTROLS DETAILS.
1. Handpiece pressure gauge
2. Piezo power adjustment
3. Handpiece selection
4. Air / water syringe
5. Piezo scaler (For detailed
instruction on the piezo handpiece
refer to the operation manual
supplied with the piezo)
6. High speed handpiece
7. Low speed handpiece
1. High speed handpiece water
adjustment
1. Water on/off
1
1
1
23
4 5 6 7
805-0260-250 15
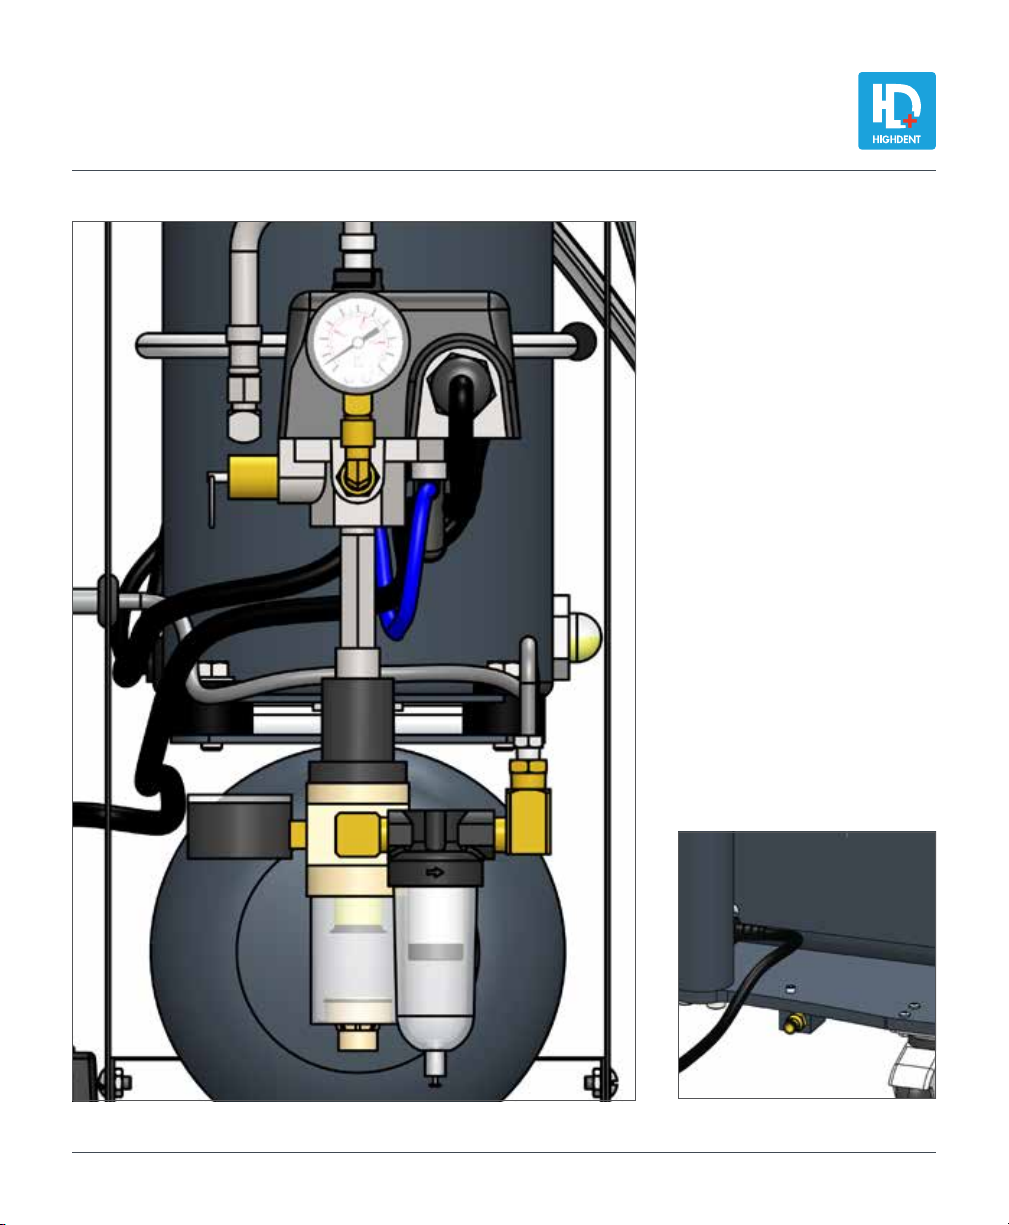
by par Dispomed
COMPRESSOR
CONTROLS DETAILS.
1. Auto/off
2. Regulator adjustment
3. Moisture trap
4. Oil filter
5. Compressor drain
6. Compressor pressure gauge
7. Over pressure valve
8. Delivery pressure gauge
(80 psi / 5.5bar)
1
2
34
6
8
7
5
805-0260-250
16
by par Dispomed
DAILY
MAINTENANCE PROCEDURE.
A properly maintained machine reduces air consumption and extends the life time of the unit.
Prerequisites: Air supply : 5.5 bar (75 to 85 P.S.I) – Electrical : 230 vac.
Lubricate your handpieces as per your manufacturers
specifications.
Empty the humidity filter by opening the drain at the
bottom.
Use a cloth to avoid getting wet.
3
Empty the oil filter by pushing the valve at the bottom.
Use a cloth to avoid getting wet.
4
2
1
Never lubricate the Piezo.
805-0260-250 17
by par Dispomed
DAILY
MAINTENANCE PROCEDURE.
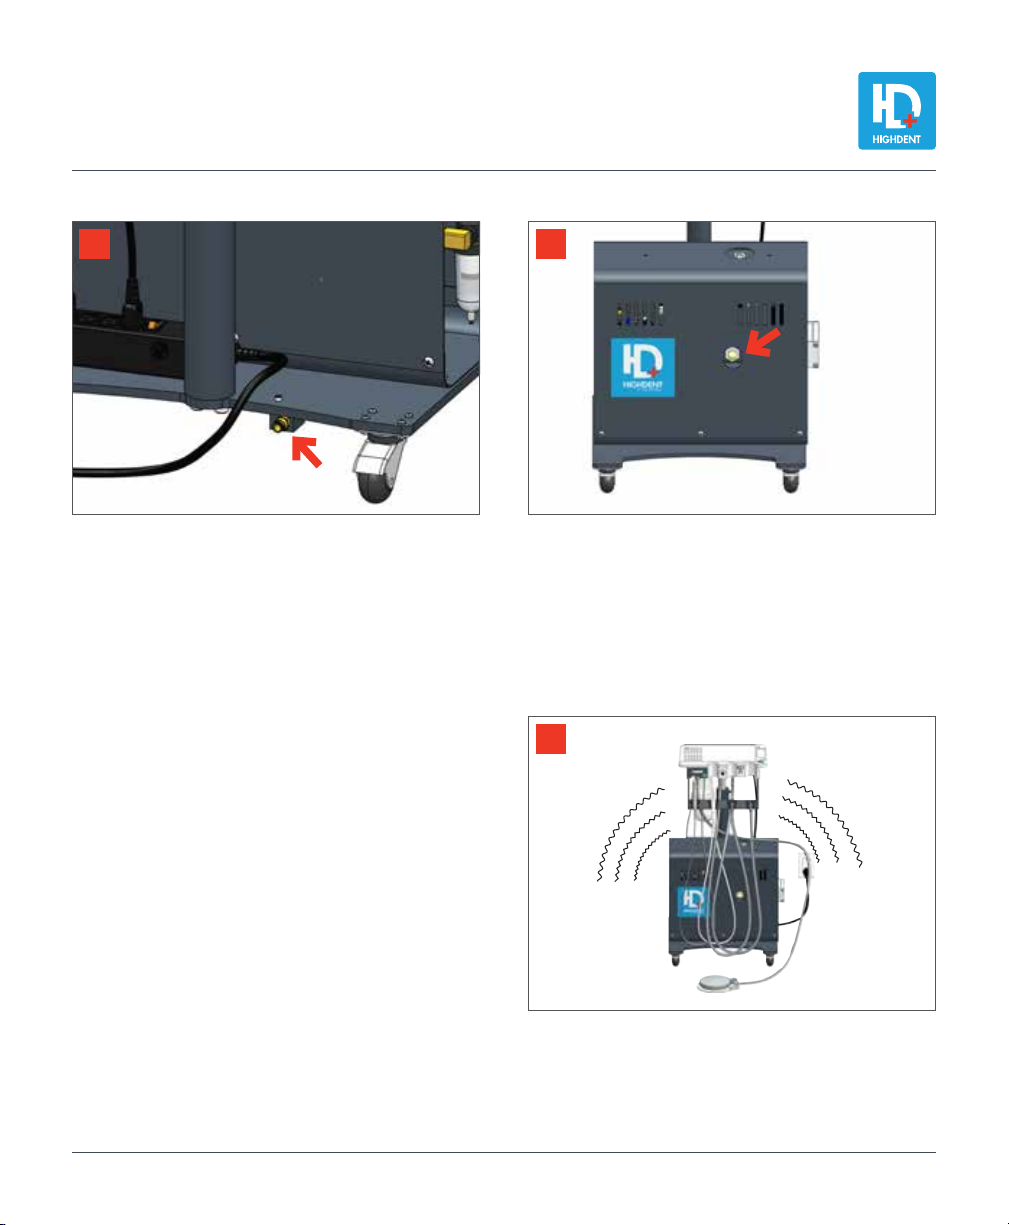
7
Listen for unusual compressor start-ups. If the
compressor starts occasionally when not being used
it is a sign that there is a leak in the system. If this
situation is frequent contact the manufacturer for
assistance.
5 6
If the oil level is less than half, Fill the reservoir slow-
ly by pouring a small quantity of oil at a time. Wait
5 minutes and check the level.
Do not fill more than half.
Use only compressor oil to fill.
Unplug your compressor at the end of the day and drain
all pressure by loosening the hand tight nut*below
air reservoir. This will also eliminate condensation and
prolong the life of the reservoir.
DON’T FORGET to tighten the hand tight nut before
starting your day.
*Don’t unscrew completely to prevent the parts falling.
805-0260-250
18
by par Dispomed
ANNUAL
MAINTENANCE.
An annual preventive maintenance is recommended. The maintenance consists of replacing all filter
elements, changing the oil in the compressor, checking for leaks, resetting pressures and complete
performance analysis.
Contact your Highdent supplier for further details.
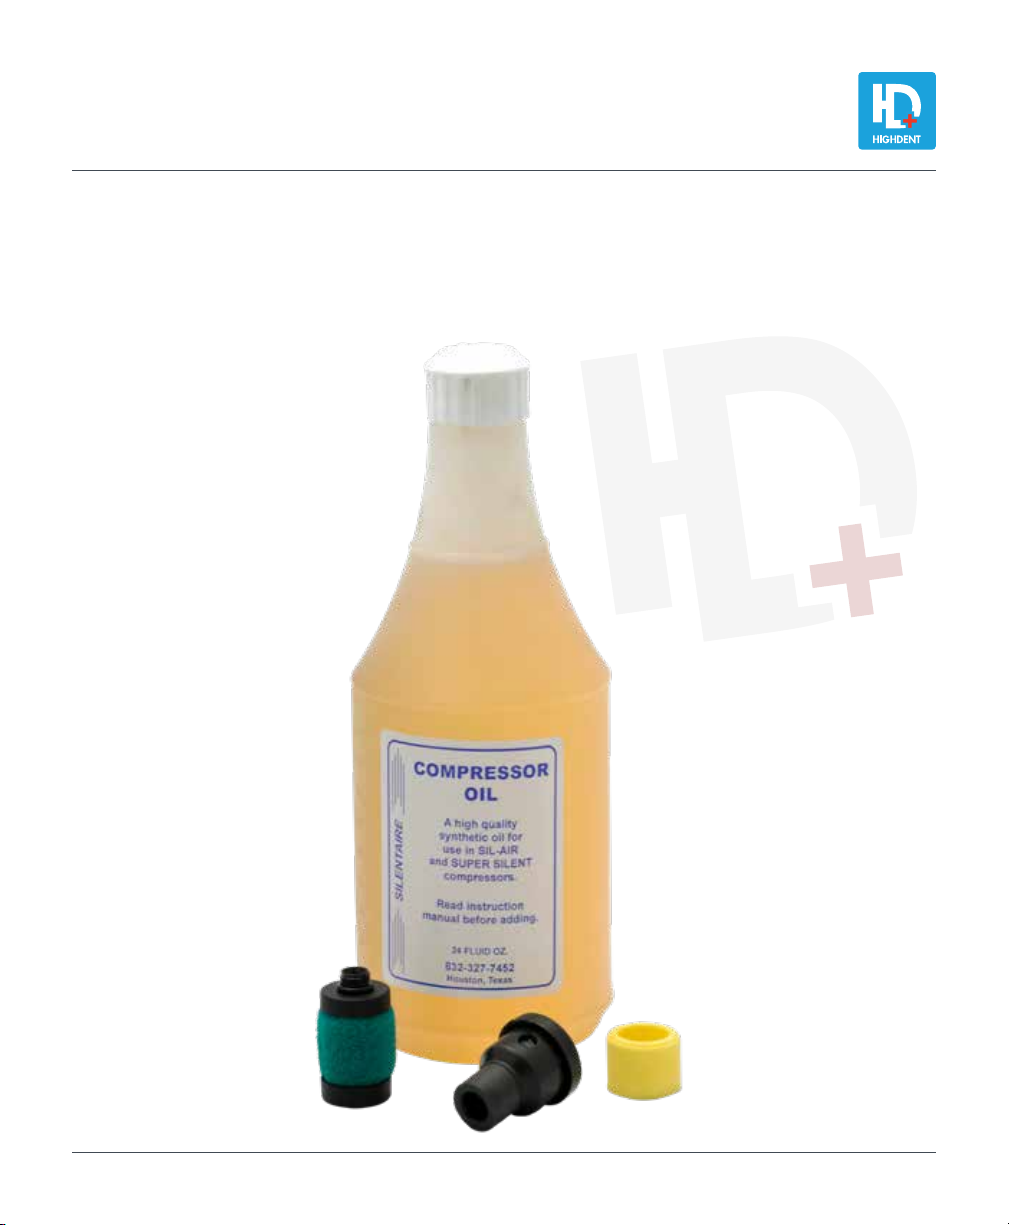
Maintenance kit
• Humidity filter - 260-C01642
• Air filter - 26 0 - C 0 011
• oil filter - 260-C0164N7
• Compressor oil - 260-15280

805-0260-250 19
by par Dispomed
DISPOMED
WARRANTY.
Dispomed Ltd. guarantees that Highdent dental
units are free from manufacturing defects for a
period of five (5) years and handpieces for a
period of one (1) year from the date of delivery
to the customer, provided that they are used
according to instructions and that the prescribed
maintenance and service are performed.
Dispomed Ltd. shall not be liable for any
damage, injury or loss arising out of the use
of the product, whether as a result of a defect
in the product or otherwise, if, prior to such
damage, injury or loss, the product was:
• Damaged, misused or misapplied;
• Repaired, altered or modified by a person
other than Dispomed Ltd. or a Dispomed
approved service technician;
• Not installed in strict compliance with
applicable codes and ordinances.
Dispomed Ltd. only guarantees that plastic,
rubber and disposable items parts and items
shall be free from defects at the date of delivery
to the customer.
Any product which proves to be defective in
workmanship or material will, at Dispomed’s
discretion, either be repaired or replaced.
Dispomed Ltd. is not responsible for deterioration,
wear or abuse. This warranty shall be void for
any product on which the serial number has
been altered, defaced or removed.
Freight charges to ship replacement or repaired
merchandise to customer will be paid by the
customer. Loaner units may be available if your
unit requires repairs.
Service & information center
Dispomed Ltd. is proud to offer its customers an
on-line or telephone service to answer questions
or concerns regarding its products.
Contact us at:
T: 1 800 363-1746
T: 450 759-9395
F: 450 759-8181
Email: info@dispomed.com
Website: www.dispomed.com

745, Nazaire-Laurin, Joliette (Qc) Canada J6E 0L6
T: 1 800 363-1746
T: 1 450 759-9395
F: 1 450 759-8181
Site internet : www.dispomed.com
Twitter : twitter.com/dispomed_fr
Facebook : www.facebook.com/dispomed
DISPOMED
CONTACT INFORMATION
Printed in Canada
Table of contents


