DJ Swivel BDE User manual

USER MANUAL

GETTING STARTED
INSTALLATION
To install BDE, simply run the installer and follow the instrucons on screen. When using BDE for the rst me, an
acvaon dialog will appear. Enter the individual Serial code you received in your conrmaon email. If you have
lost your conrmaon email, you can re-request one at our support page at: www.djswivel.com/products/support
In most cases, your host DAW will recognize the plugin automacally. In some cases you will need to direct your
DAW to search for VST3 les. BDE does not support the VST2 plugin format.
LOGIC PRO
Choose an empty insert slot on one of your audio tracks, instrument tracks or buses and select BDE from the pop
up menu. You will nd BDE in the audio units subfolder > DJ Swivel > BDE.
ABLETON LIVE
In session view, select the track you would like to place BDE on, for example by clicking the track name. At the le
top of Ableton Live’s interface, click on the plugin device browser icon (third icon from the top). From the plugins
list, double-click DJ Swivel > BDE or drag it onto a track.
PRO TOOLS
Choose an empty insert slot on one of your audio tracks, instrument tracks or buses and select DJ Swivel > BDE
from the pop up menu.
CUBASE
Choose an empty insert slot, for example in the mixer, and select DJ Swivel > BDE from the menu that appears.
TABLE OF CONTENTS
| GETTING STARTED ............................................................................................................................................................................................... 3
• Installaon
• Trial Mode
• Acvang BDE
• Oine Acvaon
• Deacvang BDE
| PLUGIN OVERVIEW.............................................................................................................................................................................................. 6
| MAIN CONTROLS ................................................................................................................................................................................................. 7
• Input
• Output
• Auto
• Detect
• Distoron Type
• Drive
• Range
• Speed
• Speed On / O
• M/S On / O
• M/S Slider
• Meters
• Value Display
• Mix
• Compressor
• Comp Pre/Post
• Down Sample
• Bit Crush
• FX Band
• Color
• Filters
• Presets
• Sengs
| USING BDE ............................................................................................................................................................................................................10
• Distoron Styles
| SUPPORT...............................................................................................................................................................................................................12
• Reporng a bug
3
2

TRIAL MODE
BDE comes with a complimentary 14 day free trial.
Once the evaluaon period has expired, you will be
required to purchase a license from
www.djswivel.com/products/bde in order to connue
using the plugin.
The plugin will indicate how many days are le on your
free trial each me you open the plugin.
To enter Trial Mode, simply click the Try buon in the
dialog window that appears when you open BDE for the
rst me.
ACTIVATING BDE
Aer you have purchased BDE you will immediately
receive an email containing your personal serial code.
This serial code will unlock BDE from Trial Mode*.
1. Open up BDE in your DAW. If this is your
rst me opening BDE, you will see a prompt
displayed requesng you to enter the serial code
we’ve emailed you. Your serial code in a unique 28
digit alphanumeric string of text.
2. Copy the serial code from the email you have
received and paste it into the text eld. Make sure
that you’re copying the enre serial code.
3. Click Enter. If successful, you will see a
prompt indicang your product was registered
successfully.
*If you’ve been using BDE in Trial Mode and would like
to register a recently purchased license, click the gear
icon in the presets menu and click the Acvate buon
to enter the acvaon menu. From here you can follow
the same steps as above to acvate your product.
DEACTIVATING BDE
Deacvang a license can come in handy if you need
to authorize the plugin on a new computer and need
to free up an authorizaon. To deacvate your license
click Deacvate in the le corner of the sengs
menu.
The License can then be transferred back to your DJ
Swivel User Account and moved onto a new computer
by simply re-entering your serial code in the acvaon
window when opening the plugin on a new computer.
OFFLINE ACTIVATION
For oine acvaon, simply enter your serial code
with Wi-Fi disabled and click “Acvate” to generate the
oine dialog window in BDE. Once displayed, please
save your computer ID le (comp-id.xml) which uniquely
idenes your machine by clicking “Save” and then
follow the instrucons on the page generated in your
browser.
If the link is not automacally generated please go to
www.djswivel.com/products/support/acvaon
Upload the computer ID le into the page generated in
your browser and then download the response le back
onto your computer. To acvate BDE oine simply load
the acvaon response le into the plugin by clicking
“UNLOCK” and your license will be acvated.
4 5
GETTING STARTED (CONTINUED)

PLUGIN OVERVIEW
1. Input – This is a simple input gain slider which is
used to set the opmal volume of signal entering
the distoron algorithm.
2. Output – This slider controls the output volume
of your signal.
3. Auto – The Auto buon links the input and
output gain sliders allowing for easy level
matching. Raise the volume of the input, and the
output will lower by an equal amount, and vice
versa.
4. Detect – Detect funcons as an audio analysis
tool to set the opmal level of signal entering
the distoron algorithm. To use, click Detect and
begin playback of your audio signal you wish to
process with BDE. For best results, playback at
the loudest poron of the audio signal you wish
to process. You will noce the Detect buon
will pulse, signifying the plugin is analyzing the
volume of your signal. You will also noce the
Auto buon engage during this process. Aer a
few seconds click the Detect buon once again
and you will noce the input and output sliders
adjust posions to ensure you are processing your
distoron at the opmal level, without impacng
the apparent level of your signal. This is the rst
step that should be done before using BDE.
5. Distoron Type – This dropdown menu allows
you to select between dierent distoron types,
each oering a dierent sonic characterisc,
some more aggressive, and some more subtle.
6. Drive – This knob is your distoron gain. It will
push the amount of signal hing the distoron
threshold thereby increasing the amount of
distoron present in your audio signal. It is best
to use the earlier menoned detect feature rst
before processing distoron on your audio signal.
7. Range – Range is an innovave feature in BDE,
and allows the user to process distoron while
maintaining the maximum dynamics of the audio
signal. The dynamics of all signal above the
Range dB value are maintained. The volume of
any poron of signal below the dB value would
raise in volume in conjuncon with the value of
the Drive knob. What this means is, if you lower
the Range value to -96dB, in eect you can apply
distoron to something as quiet as a reverb tail,
while sll maintaining the relave volume of
that signal. This is perfect for things like drum
loops which may want a distoron tone, without
augmenng the dynamics of the signal.
MAIN CONTROLS
1 2
23
22
11
10
19
20
9
13
14
17 18
15
16
12 12
7 8
3 4
5
21
6
76

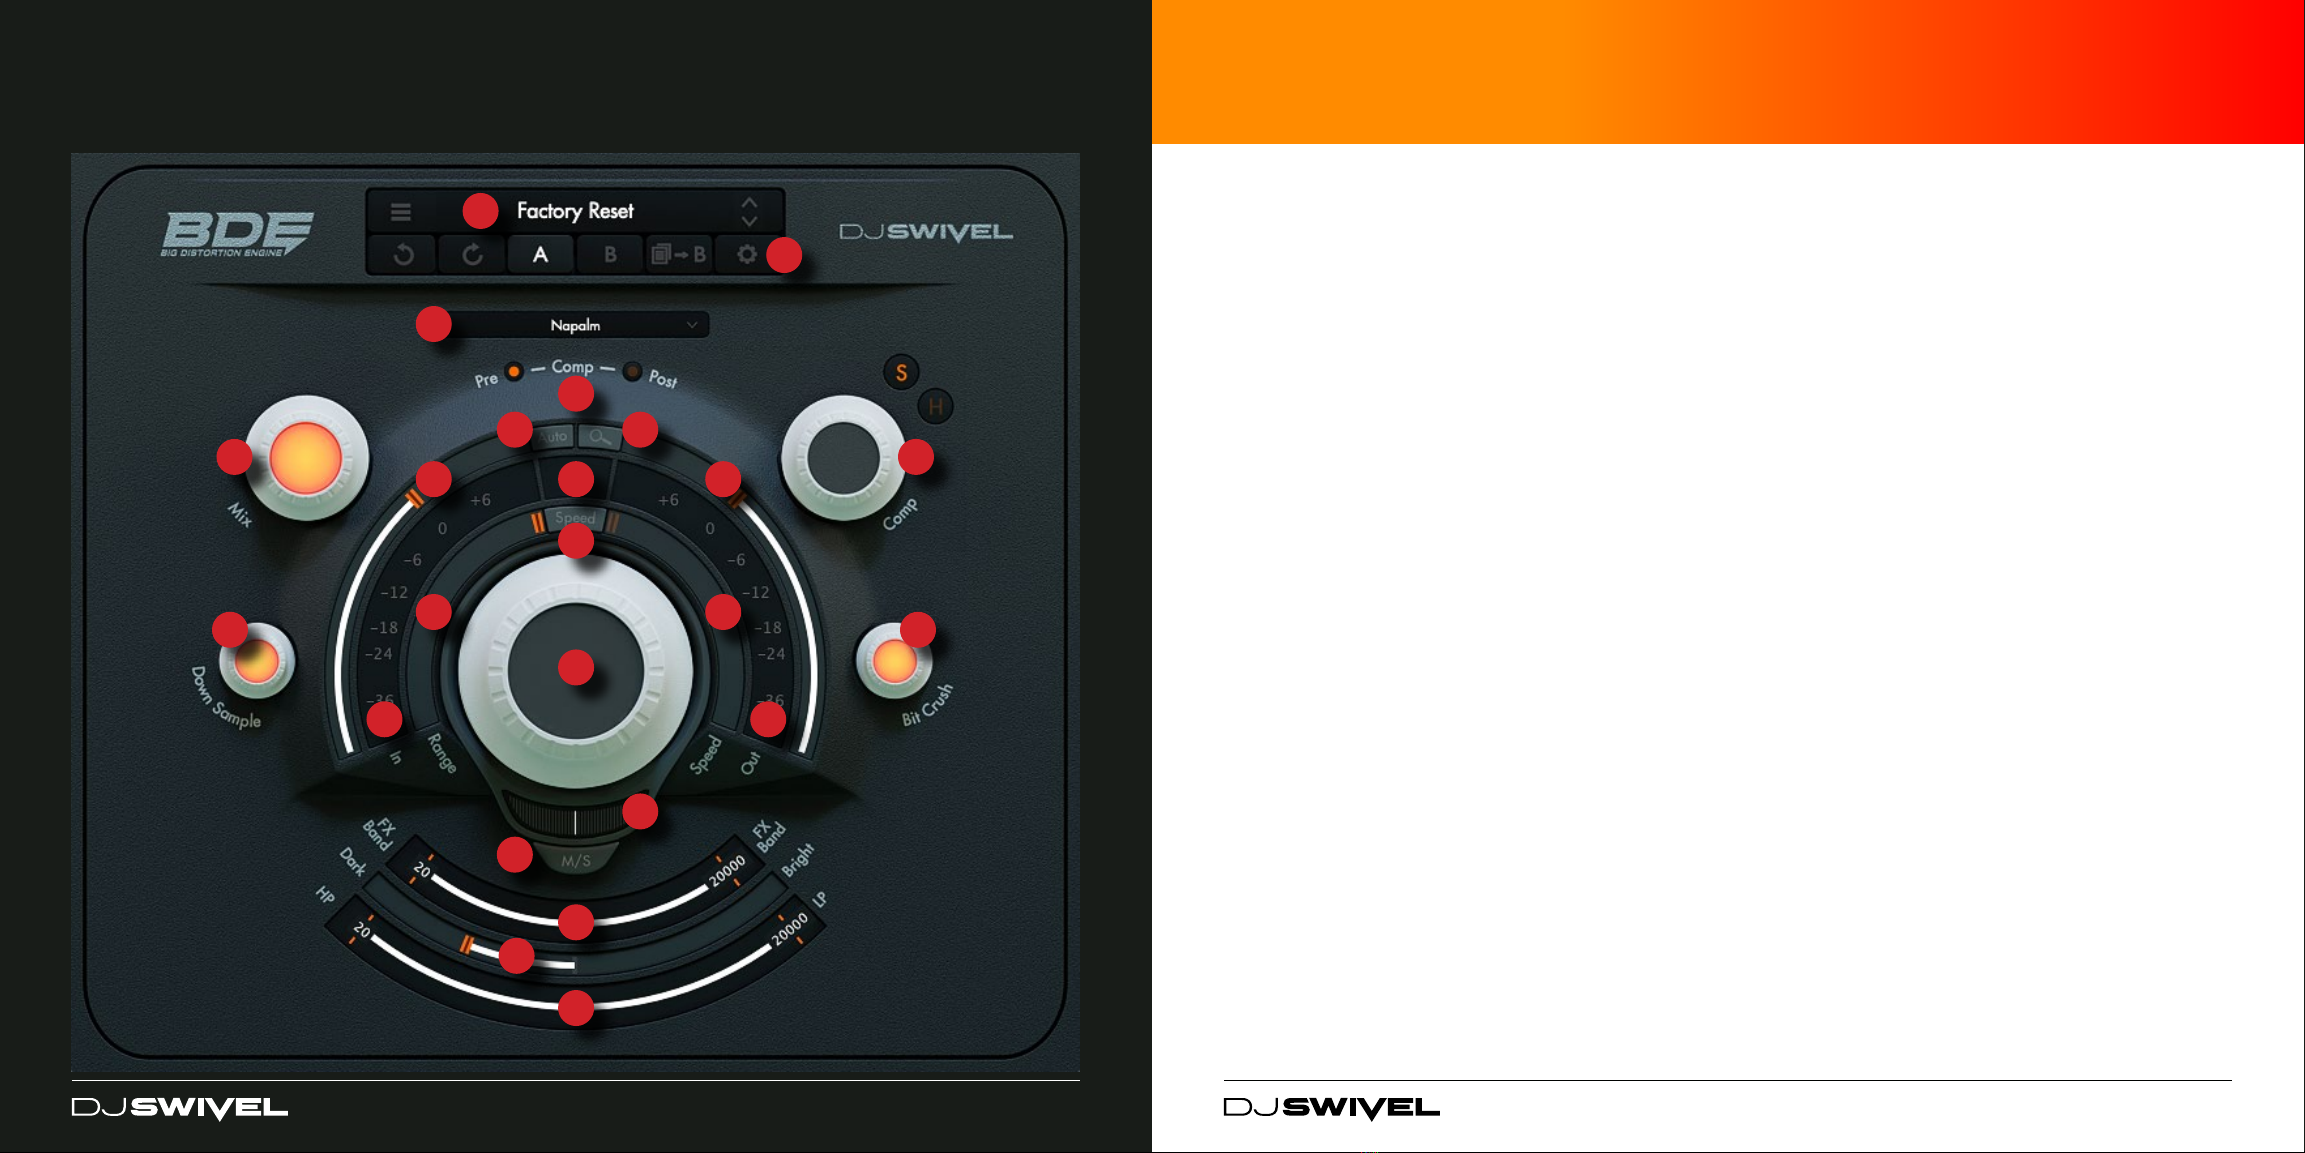
8. Speed – This slider adjusts the me in which
the distoron dynamics react to level changes
in the signal. This creates a wonderful sounding
pumping eect, primarily on very dynamic signal
such as drums. This can in some cases create an
undesired sound depending on the characteriscs
of the audio you’re processing.
9. Speed On / O – This buon allows you to toggle
the Speed funcon on or o. It should be noted,
by turning the Speed buon on, the plugin latency
will raise by roughly 100ms. If looking to record
through BDE, Speed should always be turned o.
For the DAW to adjust correctly to the change in
latency, please stop playback and recording while
switching the Speed funcon on or o.
10. M/S On / O – When o, the M/S toggle switch
directs BDE to process distoron classically, in
either a stereo or mono fashion. When M/S is
turned on, BDE will process the mid and sides
of the signal. When engaged, you will noce the
input meter changes with the le side displaying
the Mid poron of the signal, and the right side of
the meter displaying the side poron of the signal.
11. M/S Slider – Adjust which poron of the signal
BDE is processing. When centered, both Mid
and Side are processed equally. When the slider
is moved to the center, the Mid poron of signal
is processed. When moved to the sides, the side
signal is processed.
12. Meters – These are standard Input and Output
meters. The white poron of the meter display
represents the volume of the signal, while the
blue poron of the input meter represents which
poron of the signal is being aected by the
distoron algorithm.
13. Value Display – The Value display window
is a universal window displaying the value of
most parameters throughout the plugin. When
you hover over an adjustable parameter, you’ll
noce the seng is displayed. When adjusng a
parameter the value will connue to be displayed
unl the mouse is no longer hovering over the
parameter.
14. Mix – The mix knob introduces more dry signal as
the value is lowered from the default at 100%
MAIN CONTROLS (CONTINUED)
15. Compressor – The compressor has a xed
threshold, and the Comp knob acts as a mix value
between wet and dry signal. The compressor also
has two sengs, so (S) and hard (H).
16. Comp Pre/Post – Adjust where in the signal chain
the compressor sits. When Pre is selected, the
audio signal will rst pass through the compressor
before hing the distoron. When set to post,
the compressor will eect the signal aer the
distoron.
17. Down Sample – This knob allows you to lower
the sample rate of the signal exing BDE.
18. Bit Crush - This knob allows you to lower the bit
rate of the signal exing BDE.
19. FX Band – The FX Band slider allows the user
to choose which poron of the signal is being
processed by the distoron algorithm. Everything
in between the low and high crossovers will be
processed by the Drive knob, and everything
outside of those frequency bands will exit the
distoron path as a clean signal. For best use of
the FX Band, please rst adjust your input level
correctly by either using the detect funcon or
using the the input slider manually.
20. Color – This Color slider is a gentle so slope EQ,
allowing you to darken or brighten the signal. This
process occurs post-distoron.
21. Filters – The lter slider oers a high pass (HP)
and low pass (LP) lter, giving the user some
addional control over the sonic characteriscs of
the signal exing the distoron path.
22. Presets – The Preset menu oers all of the typical
funcons one would expect from a preset menu.
The sandwich menu allows you to save or recall
presets. The second row of buons are as follows:
Undo, Redo, A/B audion, Copy A to B (or vice
versa), and sengs.
23. Sengs – This seng buon will open up the
acvaon window, and also displays useful
informaon like version number, and quick links
to support, manual or other products sold by DJ
Swivel.
8 9

BDE is an innovave distoron plugin featuring an industry rst, dynamic preservaon control (range). This allows
the signal exing BDE to maintain the exact same dynamic range as the signal entering the plugin.
The rst thing that should be done when opening BDE is to run signal through the Detect funcon. This will allow
the plugin to set the opmal gain level to maximize the distoron range. From here, experiment with the various
distoron styles and the drive knob.
Double clicking on any parameter will set it back to its default state.
Both Shi and Command (Mac) or Shit and Control (Windows) enable ne tune funcons. If you click one of those
keys and drag any parameter, you’ll be able to more nely dial in a seng, and if you hold both keys, you’ll get even
more precise adjustment.
USING BDE
DISTORTION STYLES
NUKE
Beware the fallout. Duck and cover. Heavy symmetric saturaon curve which dynamically steepens when
increasing drive.
NAPALM
Burns the esh o your recordings. Heavy asymmetric saturaon curve which dynamically steepens when
increasing drive.
MORTAR
Blows to pieces even low volume signals. Gain li increases signal exponenally with drive which then hits the
ceiling, distorng every fragment of your audio signal.
GRENADE
Like Mortar but with a higher threshold for destrucon. Grenade is a level dependent exponenal saturaon curve.
MOLOTOV
Burns nicely on impact. So symmetric saturaon, with enough drive to com-bust up your sounds.
CHERRY BOMB
Sweet destrucon, if desired. So asymmetric saturaon, that sounds great on synths.
10 11

If you need help or quesons please visit the support page at our website. www.djswivel.com/products/support
For sales related quesons and technical support, you may also contact the DJ Swivel support team directly at
REPORTING A BUG
If you’ve encountered a bug using BDE, rst make sure you’re using the latest version of the plugin, which you can
nd in your DJ Swivel user account by logging in at www.djswivel.com/products/my-account
You can check the version of BDE you’re using by clicking the sengs icon in the main plugin interface. If the bug
is sll present in the latest version, please send us an email at [email protected] including your system details
(operang system & version, host soware and version) and as much technical informaon as possible so we can
easily reproduce any issues.
SUPPORT
12
Table of contents
Other DJ Swivel Dj Equipment manuals