DLS DLS POWER CAPS User manual

Operating features:
The Power Capacitor is an energy storage capacitor. It is designed
to supplement audio amplifiers power supply during high current
demand. The overall bass response of your audio system will be
enhanced with the using of this device due to it´s ability to store a
large amount of current and discharge it in a short period of time.
Combined with a good car battery and powerful DC-wiring will make
you experience a new dimension in the bass sound.
Another significant feature of the Power Cap is it´s ability to filter
noise induced in the system by the amplifiers power supply or
from the car alternator which could cause objectionable noise to be
induced into the audio system. We recommend using a capacitor of
1 Farad for each 500 Watts amplifier power. You can never have too
much capacitance in an audio system.
Installation:
The Power Cap should be mounted as close to the amplifier as pos-
sible and keep the wires short to reduce voltage drop in the cable.
Use the two mounting brackets to fix the capacitor near the amplifier.
The Power Cap may be mounted in any position. Care should be
taken to ensure the venting plug on capacitors top is unobstructed
at all time. The plug is a pressure relief valve when the polarity be-
comes reversed. If reversed voltage is applied to the capacitor, fluid
will leak through this vent plug and rendering the capacitor useless.
Wiring:
Use the same cable area to the capacitor as to the amplifier. The Po-
wer Cap should be fused at the battery, don´t place any fuse between
the Power Cap and the amplifier. Mount the fuse as in the drawing
below. Use the same cable area for the ground wire. The capacitor
should be connected in parallel with the positive feed to the amplifier.
If you have a model with the power block included on the top of the
capacitor, use this for connecting.
Technical Assistance
For technical assistance ask the shop where the product was sold or
the distributor in your country. You can also send an e-mail to info@
dls.se
Warranty service
This product is covered by warranty, depending on the conditions
in the country where it is sold. If it is returned for service, please
include the original dated receipt (or a copy) with the product.
Thank you for buying a high performance DLS Power
Cap capacitor. To avoid possible injury and damage to
your audio system, please first read this manual carefully
before you start to install the Cap. We recommend you to
keep the manual and all original accessories, including
the charge / discharge light bulb, in the packing box for
possible future use.
DLS POWER CAPS
OWNERS MANUAL
DLS Svenska AB 2009-05-04
DLS Svenska AB Phone: +46 31 84 00 60
P.O. Box 13029 Fax: +46 31 84 40 21
Sweden www.dls.se
More facts:
Capacitance 1 Farad 1 Farad with DVM
Both models have a power block installed
Max voltage 20 DCV 20 DCV
Tolerance +-10% +50% +-10% +50%
Max. temp. 95 C 95 C
Size 77 x 243 mm 77 x 243 mm
Art.no. 10-49510 10-49511
Charging the capacitor:
Before connecting the capacitor in the system it must be
charged slowly. The charging process is accomplished by
connecting the attached light bulb in series between the bat-
terys positive pole and the capacitors positive terminal (see
the photo below). Connect the negative terminal to ground.
At first the bulb glows, but after 60 seconds the lamp stops to
glow. Now the capacitor is fully charged.
The capacitor can be damaged if it´s not charged with a lamp
the first time it´s used. If you have lost the original lamp you
can charge/recharge the capacitor with the use of a 12 volt,
1-2 Watt vehicle lamp.
NOTE! Never connect +12 Volt to the capacitor without
charging it, this will destroy the capacitor.
Discharging the capacitor:
The capacitor must be discharged when it is removed from
the system. Simply place the same buld that was used in
the charging process across the terminals of the capacitor to
eliminate the stored power. the capacitor will be fully dischar-
ged when the bulb stops to glow, and can be stored away.
+ 12 V
ground -
Safety Considerations:
- To prevent injury and damage to the product, please read
and follow the instructions in this manual.
- If you feel unsure about installing the system yourself,
have it installed by a qualified DLS installer.
- Observe polarity during installation to eliminate the pos-
sibility of damaging the capacitor, the battery, or other as-
sociated equipment.
Capacitor with power block w/o DVM:
Capacitor with DVM power block on top:
Charging with the
bulb in series with
the + terminal.
Don’t hold the bulb
with your fingers, it
becomes hot.
Charging time: 60
seconds
Discharging with the
bulb in parallel with
the + and - termi-
nals.Don’t hold the
bulb with your fing-
ers, it becomes hot.
Fuse
Amplifier
Battery
+
+-
-
To amplifier
remote
A small wire must be
connected between the
amplifier remote and the
remote terminal on the ca-
pacitor. This is for starting
the LED display.
+
_
Fuse
Amplifier
Battery
+
+-
-
+
_

Funktion
En Power Cap kondensator fungerar som en energireserv där förstär-
karen kan hämta extra ström vid stora effektuttag, t.ex. vid kraftiga at-
tacker i basen. Basåtergivningen i ett ljudsystem är beroende på om
förstärkaren får all den ström som krävs i alla ögonblick, annars blir
basljudet trött och ansträngt och kommer att sakna den riktiga ”snär-
ten”. En DLS Power Cap ger snabbt förstärkaren den extra ström som
erfordras. Att dessutom kombinera med ett bra batteri och kraftiga
strömkablar gör att du kommer att uppleva en helt ny dimension i
basljudet.
En annan fördel med en Power Cap är att den fungerar som en filter-
kondensator som hjälper till att effektivt filtrera bort störningar som
genereras i förstärkarens nätdel eller från bilens generator.
Vi rekommenderar en kondensator på 1 Farad för varje 500 Watts
förstärkareffekt. Du kan aldrig ha för stor kondensator.
Installation
Kondensatorn skall monteras så nära förstärkaren/slutsteget som
möjligt. Håll kablarna så korta som möjligt. Använd de båda byg-
larna för att fästa kondensatorn.
Kondensatorn kan monteras stående eller liggande. Se till att
ventilen på kondensatorns ovansida inte kan påverkas. Detta är en
tryckventil som öppnar om kondensatorn kopplas in med felaktig
polaritet. Om den kopplas med fel polaritet öppnas ventilen och det
kommer ut kondensatorvätska från ventilen, dessutom blir konden-
satorn obrukbar.
Kabeldragning:
Använd samma kabelarea till kondensatorn som till förstärkaren.
Använd ingen säkringshållare mellan kondensator och förstärkare.
Säkring skall i stället monteras nära batteriet enligt skissen nedan så
att den avsäkrar båda förstärkare och kondensator. Använd samma
kabelarea även till jordanslutningen med kortast möjliga kabel. Kon-
densatorn kopplas alltså parallellt med plusmatningen till förstärkaren
så nära denna som möjligt. Har du köpt en kondensator med inbyggt
powerblock används detta för inkoppling.
Teknisk hjälp
Behöver du teknisk hjälp så vänd dej i första hand till den butik som
sålt produkten. Du kan även kontakta DLS på telefon 031-84 00 60,
Garantiservice
DLS lämnar ett års garanti mot material och fabrikationsfel. Vid re-
klamation skall kopia av kvitto eller annat köpbevis bifogas repara-
tionen.
Tack för att du köpt en DLS Power Cap kondensator.
Det är viktigt att du läser denna bruksanvisning före
installationen, den innehåller viktig information. Felaktigt
förfarande vid inkopplingen kan förstöra kondensatorn. Vi
rekommenderar att du sparar förpackningen med bruksan-
visningen, sexkantnycklarna och lampan som medföljer,
de kan behövas i framtiden.
DLS POWER CAPS
BRUKSANVISNING
DLS Svenska AB 2009-05-04
DLS Svenska AB Tel: 031- 84 00 60
Box 13029 Fax: 031- 84 40 21
www.dls.se
Mer fakta:
Kapacitans 1 Farad 1 Farad med DVM
Båda modellerna har monterat power block
Max spänning 20 DCV 20 DCV
Tolerans -10% +50% -10% +50%
Max. temp. 95 C 95 C
Storlek 77 x 243 mm 75 x 243 mm
Art.nr. 10-49510 10-49511
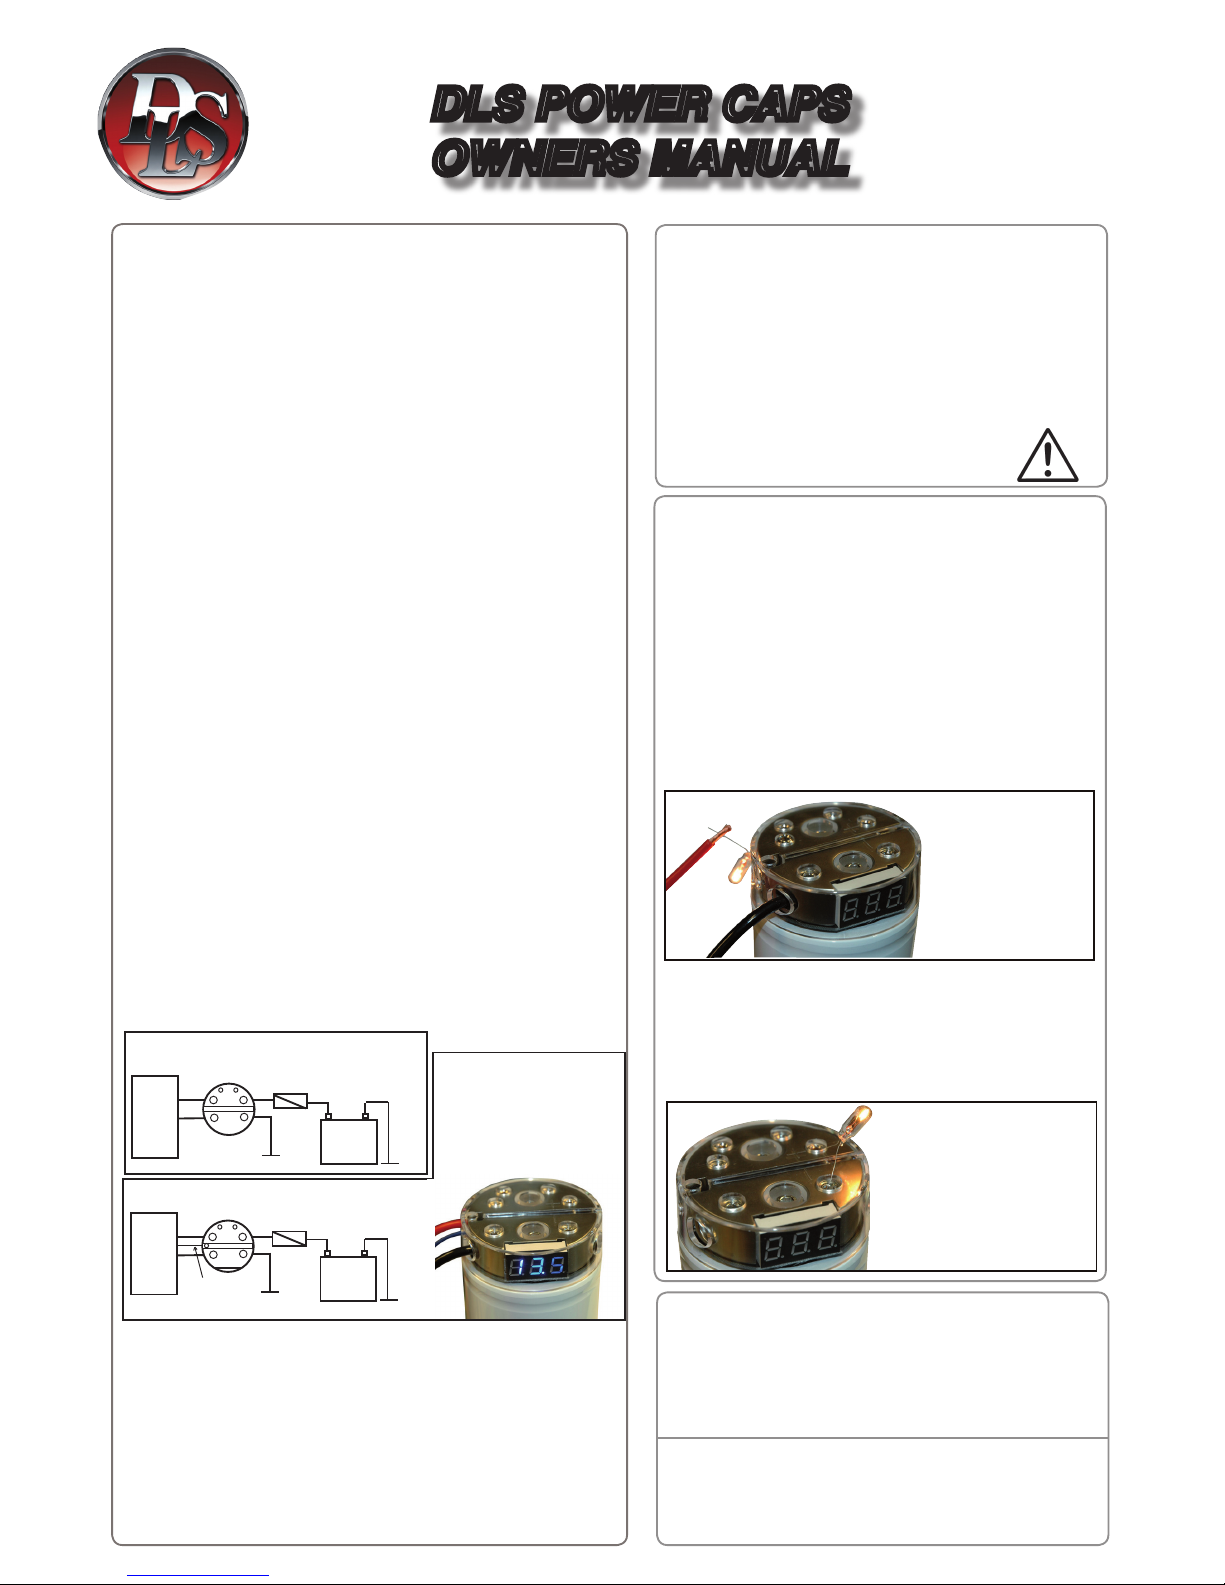
Uppladdning av kondensatorn:
Innan kondensatorn kopplas in i systemet skall den laddas
upp långsamt. Detta sker med hjälp av den bipackade glöd-
lampan. Denna kopplas i serie med pluskabeln från batteriet
enligt bilden nedan. Minuspolen på kondensatorn måste ock-
så vara kopplad till jord. Uppladdningen tar ca 60 sekunder.
Kondensatorn kan skadas om den inte laddas upp med en
lampa före inkoppling första gången. Först lyser lampan med
starkt sken för att sedan avta. När lampan slocknat är konden-
satorn laddad och då kan pluskabeln kopplas in permanent.
Om du tappat bort den medföljande lampan så kan du an-
vända en 12 Volt, 1-2 Watts glödlampa för bil.
OBS! Om du kopplar in 12 volt direkt, utan att först laddat
upp kondensatorn, så förstörs den!
Urladdning av kondensatorn:
Om kondensatorn kopplas ur systemet för att inte användas
igen på ett tag, skall den laddas ur. Urladdning görs med
samma lampa som användes vid uppladdning. Koppla lam-
pan direkt mellan plus- och minuspolen på kondensatorn och
ha den kvar tills den slocknat.
+ 12 V
jord -
Tänk på säkerheten:
- För att undvika skada på person eller produkt, läs
först igenom bruksanvisningen noggrant innan du
påbörjar installationen.
- Om du känner dig det minsta osäker hur du gör så
överlåt installationen till en kvalificerad installatör.
- Var noga med att du kopplar in med rätt polartitet.
Vid felaktig inkoppling kan du skada
kondensatorn, batteriet, eller annan
elektrisk utrustning i fordonet.
Laddas med lampan
i serie med kabeln till
+ terminalen.
Håll inte i lampan,
den blir varm!
Laddtid: 60 sekun-
der.
Laddas ur genom att
koppla lampan mel-
lan + och - anslut-
ningarna. Håll inte
i lampan, den blir
varm!
Kondensator med power block utan DVM:
Kondensator med DVM power block:
Säkring
Förstärkare
Batteri
+
+-
-
Till förstärka-
rens remote
+
_
En tunn kabel måste anslu-
tas mellan kondensatorns
lilla uttag och förstärkarens
remoteingång. Detta för att
LED-displayen ska tändas
när förstärkaren startar..
Säkring
Förstärkare
Batteri
+
+-
-
+
_
Table of contents
Languages: