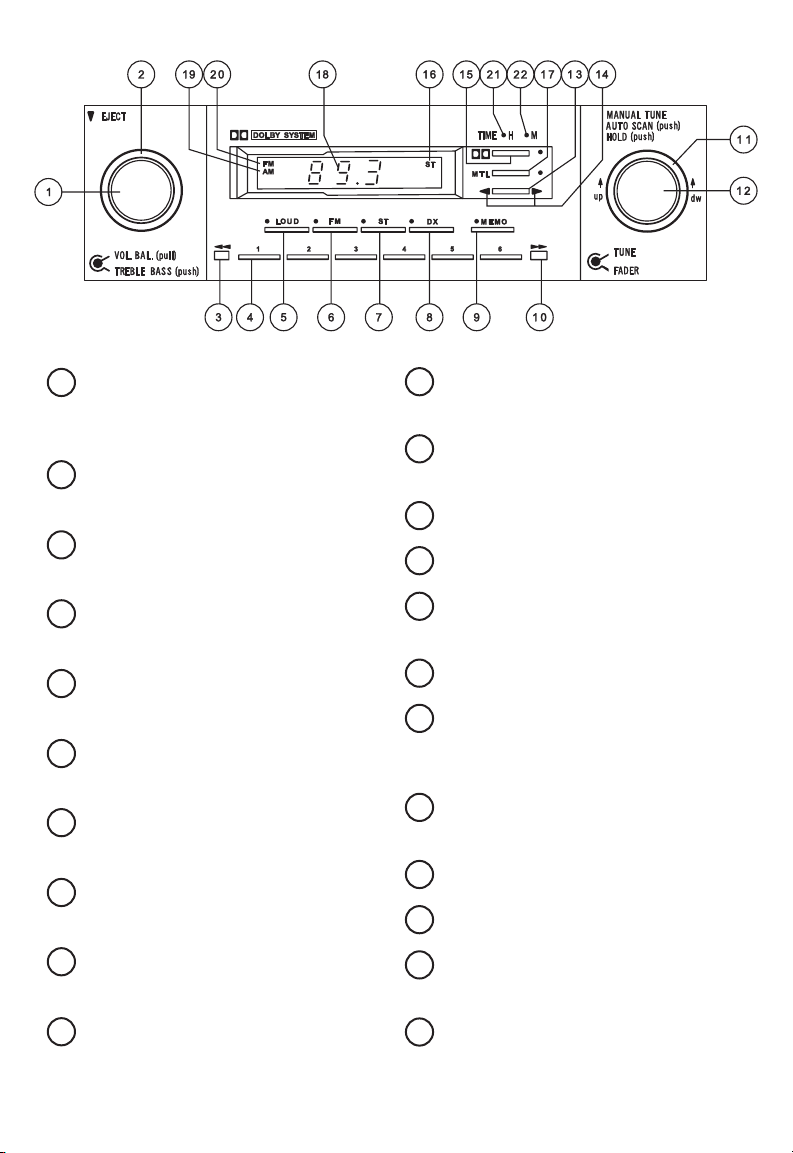
DMC CRAIG User manual

AM/FM - STEREO RECEIVER
& CASSETTE PLAYER
OPERATING INSTRUCTIONS
1982/1983 DELOREAN
© 2021 Copyright DeLorean Motor Company. The stylized DMC and DeLorean logos are registered
trademarks of the DeLorean Motor Company. Availability, pricing and specications subject to change.
DeLorean Motor Company, 15023 Eddie Drive, Humble, TX 77396, USA REV. 0421-A
DELOREAN M
OTOR COMPANY

2
DMC Workshop Manual
Reproduction of original
factory documentation
for dealership service
personnel.
Part Number P3113096
DMC Service Bulletins
Reproductions of original
factory documentation
as written for dealership
service personnel.
Part Number P2107010
DMC Parts
Identication Manual
Updated reproduction
of original factory
documentation.
Part Number P1105010
Full Color Wiring
Diagram
Most complete & accurate
wiring diagram ever created
for the DeLorean automobile.
Part Number P6100330
DeLorean Key Blank
Fits all ignitions, cubby
boxes, original locking gas
caps and door locks for
VIN’s ending in 4200 & up.
Part Number 109100
DMC License Plate
A reproduction of the
original design used
in publicity photos by
the original DMC.
Part Number A7101002
Oil, Air and Fuel Filters
Includes sealing washers where required to do the job
right! All pieces sold separately or as a convenient kit.
Oil Filter with sealing washer������������������ Part Number 102114B
Air Filter ��������������������������������������������������������Part Number 102575
Fuel Filter w/sealing washers & pad����������Part Number 100523
Three Filter Kit (Oil, Air & Fuel) ��������������� Part Number K102575
DeLorean Stainless Steel Car Care Kit
Modern formulations of original stainless shampoo,
stainless cleaner/sealer and leather/vinyl conditioner.
Car Care Kit�����������������������������������������������Part Number A4000100
Stainless Shampoo (16 oz)�����������������������Part Number A4000121
Stainless Cleaner/Sealer (16 oz) �������������Part Number A4000111
Leather/Vinyl Conditioner (16 oz) ����������Part Number A4000131
Blending Pad (each) ���������������������������������Part Number A4000151
Blending Pad Handle �������������������������������Part Number A4000152
SS-Glow Polish ������������������������������������������Part Number A4000162
Wheel Cleaning Brush �����������������������������Part Number A4000153

3
POWER ON/OFF, VOLUME
CONTROL, (PULL) BALANCE &
(PUSH) CASSETTE EJECT
TREBLE & (PUSH)
BASS CONTROL
FAST-FORWARD/REWIND
PUSHBUTTON
STATION PRESET
PUSHBUTTONS (6AM & 6FM)
LOUDNESS PUSHBUTTON
& INDICATOR
AM/FM PUSHBUTTON
& INDICATOR
STEREO/MONO
PUSHBUTTON & INDICATOR
LOCAL/DISTANT
PUSHBUTTON & INDICATOR
MEMORY ENTER
PUSHBUTTON & INDICATOR
FAST-FORWARD/REWIND
PUSHBUTTON
FADER CONTROL
(FRONT - REAR SPEAKERS)
TUNING CONTROL &
(PUSH) STATION SCAN
TAPE REVERSE PUSHBUTTON
TAPE RUN INDICATORS
DOLBY NOISE REDUCTION
PUSHBUTTON & INDICATOR
STEREO INDICATOR (RED)
TAPE EQUALIZATION
PUSHBUTTON (METAL TAPES)
& INDICATOR
FREQUENCY DISPLAY
& CASSETTE DOOR
FM INDICATOR (GREEN)
AM INDICATOR (ORANGE)
CLOCK-HOUR SET CONTROL
(ON VERSION 2 ONLY)
CLOCK-MINUTE SET CONTROL
(ON VERSION 2 ONLY)
22
21
20
19
18
17
12
11
16
15
14
13
10
9
8
4
3
2
1
5
6
7

4
SUMMARY OF OPERATION
RADIO RECEIVER OPERATION
1. Rotate the VOLUME control clockwise to turn on
power.
2. Select the AM or FM band desired. Push the FM but-
ton to illuminate the FM indicator placing the unit in
the FM mode. Press the pushbutton again to return
to the AM mode.
3. While observing the frequency display, rotate the
TUNING control in either direction to select the de-
sired station.
4. For stereo reception, press the ST (Stereo) push-
button to illuminate the stereo indicator placing the
unit in the stereo mode.
5. Adjust the VOLUME, TREBLE, BASS, BALANCE, and
FADER controls as desired.
TO PLAY A TAPE
1. Rotate the VOLUME control clockwise to turn on
power.
2. Push the cassette (tape edge to the right, desired
side up) into the cassette compartment. The tape will
then be automatically drawn into the deck for play.
3. Adjust the VOLUME, TREBLE, BASS, BALANCE, and
FADER controls as desired.
4. To eject tape, depress VOLUME control knob.
OPERATION AND DESCRIPTION
The VOLUME, TREBLE, BASS, BALANCE, and FADER con-
trols and the LOUD (loudness) pushbutton are used to
operate both the radio and the tape player. The TUN-

5
ING control, and the ST (Stereo) FM, DX (Distant), MEMO
(Memory) and PRESET pushbuttons are used to operate
the radio only.
The DOLBY, MTL (metal), REVERSE, EJECT, and and
(Fast Forward/Rewind) pushbuttons are used to operate
the tape player only.
Rotate the VOLUME control clockwise to turn on pow-
er and to increase the sound to a comfortable listening
level. The BALANCE control is controlled by the same
knob and may be pulled lightly outwards and rotated ei-
ther clockwise or counterclockwise to adjust the rela tive
loudness of the left and right side set of speakers. The
TREBLE control may be rotated to increase or decrease
the treble frequencies. The BASS control is the same
knob and may be depressed and rotated to increase or
decrease the base frequencies. The FADER control may
be rotated to adjust the relative loudness of the front
and rear pair of speakers.
DIGITAL DISPLAY
Whenever the radio is turned on, the digital readout
will show the precise radio frequency that was selected
when the radio was last turned o.
The display will indicate either the AM or FM mode in
use. When in the FM mode, the letters “FM” will appear
in green at the upper left hand corner of the display. In
the AM mode the letters “AM” will appear in orange at
the lower left hand corner of the display. When the unit
is in the FM mode and the ST pushbutton is pressed, the
letters “ST” will appear in red at the upper right hand
corner of the display if the station is broadcasting in stereo.

6
FOR RADIO RECEPTION
Turn on the radio, following the instructions given in the
summary of operation. Note that the radio will not op-
erate while a cassette is playing. To receive FM broad-
casts, press the FM pushbutton. The FM mode will be
indicated by the illumination of the FM indicator at the
upper left hand corner of the pushbutton and by the
FM indicator on the display. To receive FM Stereo broad-
casts in stereo, the ST pushbutton must be pressed to
illuminate both the ST indicator at the upper left hand
corner of the pushbutton and the ST indicator on the
display. The radio should normally be operated in the
DX mode and should only be switched to Local in areas
where signal strengths are very high, i.e., near station
transmitters or where excessive interference is noted.
To change the unit from the local to the distant mode,
press the DX pushbutton. The DX mode will be indicat-
ed by the illumination of the DX indicator at the upper
left hand corner of the pushbutton. The sensitivity of the
radio is increased in the DX mode, enabling it to receive
weak FM signals.
In some cases, the received signal may not be strong
enough to provide noise-free stereo listening, or some
adjacent channel interference may be heard while lis-
tening to a stereo program. If this occurs, press the ST
pushbutton to extinguish the ST indicators and re turn
the unit to the monophonic mode (a common signal is
provided for both the left and right channels) and re-
ception should be noticeably improved. The radio may
be returned to the stereo mode whenever listening con-
ditions permit.

7
To receive AM broadcasts, the FM pushbutton should be
pressed to extinguish both FM indicators and illuminate
the AM indicator at the lower left hand corner of the dis-
play.
CHANNEL SELECTION
The TUNING knob is a stepped control. Each “click” of
the knob to the right advances the station frequency up-
ward. Each click of the knob to the left decreases the
station frequency.
You may also automatically scan upwards across either
the AM or FM band by momentarily depressing the TUN-
ING knob. When this is done, the unit’s scanning circuit
is activated and the radio will tune upwards to the next
strongest receivable station. It will then pause at this sta-
tion for approximately ve seconds and pro ceed to the
next station on the band. THE UNIT WILL CONTINUE TO
SCAN THE ENTIRE BAND UNTIL YOU AGAIN PRESS THE
TUNING KNOB. The unit will then remain on the station
which you have selected.
When the unit is scanning stations, it is important to note
the position of the DX pushbutton. Because the sensitiv-
ity of the unit is increased in the DX mode (DX indicator
illuminated), more stations will be received during scan-
ning. If you wish to scan only strong local stations, press
the DX pushbutton to extinguish the indicator.

8
PRESET PUSHBUTTONS
The six preset pushbuttons may be used to recall your
six favorite AM and six favorite FM stations. To preset
stations on AM, rst place the unit in the AM reception
mode. Next tune the radio to your favorite AM station.
Once the station has been selected, press the MEMO
pushbutton and the indicator at the upper left hand
corner of the button will illuminate. Within ve seconds,
press the preset pushbutton of your choice, and the
MEMO indicator will go out. (If a preset pushbutton is
not pressed, the MEMO indicator will go out after six
sec onds.) Whenever that preset pushbutton is pressed,
the station you have assigned to it will be recalled. Re-
peat this procedure to preset other AM stations to the
other ve pushbuttons.
The procedure is the same to preset stations in the FM
mode and stations on either reception band may be re-
assigned at any time and in any order you wish.
NOTE: In the event the vehicle’s battery is disconnected
or battery voltage is interrupted, all preset pushbutton
selections will be cleared from the receiver’s memory
thus requiring resetting.
LOUDNESS PUSHBUTTON
The LOUD pushbutton has been provided for both radio
reception and cassette play. Because the ear becomes
less sensitive to low bass and high treble frequencies at
low volume, these sounds seem to become lost. Press
the LOUD pushbutton to illuminate the indicator at the
upper left hand corner of the button and the normal
balance of these frequencies will be restored.

9
FOR TAPE PLAYBACK
Play the tape, following the general directions given in
the Summary of Operation.
The cassette will immediately begin playing, and the
side being played will be indicated by the illumination
of one of the green Tape Direction indicators located at
either end of the REVERSE pushbutton. When the end of
the tape is reached it will automatically reverse to play
the other side. Tape programs may also be switched at
any time by momentarily depressing the REVERSE push-
button.
A desired tape selection may be more quickly located by
running the tape in either direction at high speed. When
the tape indicator (green) is illuminated, depressing
the (Fast-Forward/Rewind) pushbutton will cause the
tape to run fast-forward and depressing the push-
button will cause the tape to rewind. When the other
side of the tape is played and the tape run indi cator
is illuminated, the functions of these pushbuttons are
reversed. During either fast-forward or rewind, the tape
may be returned to the play mode by partially depress-
ing the opposite (released) pushbutton. When the unit is
allowed to remain in the fast-forward or rewind mode,
the unit will automatically return the tape to the play
mode at the end of the tape. At the completion of the re-
wind, the tape will replay the same side of the cassette.
At the completion of fast forward, the tape will begin to
play the opposite side of the tape.
To eject the cassette, depress the VOLUME control. The
cassette will also automatically eject whenever the pow-
er is turned o.

10
DOLBY PUSHBUTTON
The Dolby indicator should be illuminated whenever Dol-
byized cassettes are played. Press the Dolby push button
to turn the Dolby mode on or o. The Dolby Noise Re-
duction circuit properly decodes Dolbyized cassettes for
reduced background noise and wider dynamic range.
Turn the Dolby system o when playing non- Dolbyized
cassettes.
MTL PUSHBUTTON
The MTL pushbutton sets the proper equalization for
either regular ferric oxide tapes or special CrO2, ferri-
chrome, metal, or other tapes requiring 70 microsecond
equalization; turn it o for regular tapes (120 micro-
second equalization).
TO SHUT OFF ALL POWER
Rotate the VOLUME control counter-clockwise to turn
o all power.
CLOCK
To reset the clock, press the button on the left side of
the clock for hours, and the button on the right side of
the clock for minutes. If the electrical current has been
interrupted, the display will ash, indicating a resetting
is required.
Brightness of display is automatically reduced when ex-
terior lighting switch is turned on.

11
PARTS
CRAIG RADIO
FACEPLATE (FREQ)
Part Number 109244A
POWER ANTENNA
MOTOR & MAST
Part Number 110971
CRAIG RADIO
FACEPLATE
Part Number 109244

Texas
15023 Eddie Drive
Humble, TX 77396
800/USA-DMC1 • 281-441-2537
DeLorean.com
Midwest
990 Lutter Drive
Crystal Lake, IL 60014
877/DMC-MIDW • 815-459-6439
DMCMidwest.com
California
7402 Prince Drive
Huntington Beach, CA 92647
714-842-0040
DMCCalifornia.com
Florida
11144 Satellite Boulevard
Orlando, FL 32837
888/81DMC12 • 407-203-2300
DMCFlorida.com
© 2021 Copyright DeLorean Motor Company. The stylized DMC and DeLorean logos are registered trademarks of
the DeLorean Motor Company. Availability, pricing and specications subject to change.
DELOREAN M
OTOR COMPANY
Table of contents
Other DMC Car Receiver manuals