Die Taste Komfort-/Absenk-Temperatur ( ) dient zur einfachen Umschaltung zwischen diesen beiden Tem-
peraturen. Werkseitig liegen diese bei 21,0 °C (Komfort-Temperatur) und 17,0 °C (Absenk-Temperatur). Sie
können wie folgt angepasst werden:
• Halten Sie die Komfort-/Absenktaste ( ) für mind. 3 Sekunden gedrückt.
• Im Display erscheinen das Sonnensymbol ( ) und die aktuell hinterlegte Komfort-Temperatur.
• Verändern Sie die Temperatur mit dem Stellrad und bestätigen Sie durch kurzes Drücken des Stellrads.
• Im Display erscheinen das Mondsymbol ( ) und die Absenk-Temperatur.
• Verändern Sie die Temperatur mit dem Stellrad und bestätigen Sie durch kurzes Drücken des Stellrads.
Danach wechselt der Heizkörperthermostat in den Auto-Modus.
Auch im Auto-Modus kann die Temperatur jederzeit geändert werden. Diese bleibt dann bis zum nächsten
Schaltzeitpunkt des Programms erhalten.
Die Bedienung des Gerätes kann gesperrt werden.
• Zur Aktivierung/Deaktivierung der Bediensperre, drücken Sie gleichzeitig
kurz die Tasten Mode-/Menu und .
• Nach erfolgreicher Aktivierung erscheint „LOC“ im Display.
• Zur Deaktivierung der Bediensperre, drücken Sie erneut beide Tasten.
Ist die Heizung im Sommer abgeschaltet, können die Batterien geschont werden, indem das Ventil vollständig
geöffnet wird. Der Verkalkungsschutz wird weiter durchgeführt.
Zum Aktivieren der Heizpause gehen Sie wie folgt vor:
• Drehen Sie das Stellrad im manuellen Betrieb (Manu) so lange nach rechts,
bis im Display „On“ erscheint.
• Zum Beenden verlassen Sie den manuellen Betrieb (Manu) oder drehen Sie das Stellrad nach links.
Wenn ein Raum nicht geheizt werden soll, kann das Ventil geschlossen werden.
• Drehen Sie das Stellrad im manuellen Betrieb (Manu) so lange nach links,
bis im Display „OFF“ erscheint.
Nur bei Frostgefahr wird das Ventil geöffnet. Der Verkalkungsschutz wird weiter durchgeführt.
• Zum Beenden verlassen Sie den manuellen Betrieb (Manu) oder drehen Sie
das Stellrad nach rechts.
Sie können die aktuelle Position des Ventils abfragen. Dazu gehen Sie wie folgt vor:
• Drücken Sie die Mode-/Menu-Taste mind. 3 Sekunden.
• Wählen Sie mit dem Stellrad den Menüpunkt „PoS“ aus.
• Bestätigen Sie die Auswahl durch kurzes Drücken des Stellrads.
• Das Display zeigt die aktuelle Position des Stellantriebs in Prozent an.
Für den Heizkörperthermostat kann eine automatische Umschaltung zwischen Sommer- und Winterzeit akti-
viert bzw. deaktiviert werden. Werkseitig ist die Umschaltung aktiviert.
• Drücken Sie die Mode-/Menu-Taste mind. 3 Sekunden.
• Wählen Sie mit dem Stellrad den Menüpunkt „dSt“ aus.
• Bestätigen Sie die Auswahl durch kurzes Drücken des Stellrads.
• Wählen Sie mit dem Stellrad die Funktion „on“ (automatische Umschaltung aktiviert) oder „oFF“ (auto-
matische Umschaltung deaktiviert) aus.
• Bestätigen Sie Ihre Auswahl durch kurzes Drücken des Stellrads.
Der Heizkörperthermostat erkennt bei einer stark absinkenden Temperatur, dass ein Raum gelüftet wird. Um
Heizkosten zu sparen, wird die Temperatur für 15Minuten heruntergeregelt. Währenddessen wird im Display
das Fenster-auf-Symbol ( ) angezeigt.
• Drücken Sie die Mode-/Menu-Taste mind. 3 Sekunden.
• Wählen Sie mit dem Stellrad den Menüpunkt „AEr“ und bestätigen Sie durch
kurzes Drücken des Stellrads.
• Stellen Sie die Temperatur und die Zeit mit dem Stellrad ein.
Mit der Zeitauswahl „0“ lässt sich die Funktion deaktivieren.
Da die Temperatur am Heizkörper gemessen wird, kann es an einer anderen Stelle im Raum kälter oder wärmer
sein. Um dies anzugleichen, kann ein Temperatur-Offset von ±3,5 °C eingestellt werden. Werden z. B. 18,0 °C
anstatt eingestellter 20,0 °C im Raum erreicht, ist ein Offset von -2.0 °C einzustellen.
• Drücken Sie die Mode-/Menu-Taste mind. 3 Sekunden.
• Wählen Sie mit dem Stellrad den Menüpunkt „toF“ aus und bestätigen Sie durch kurzes Drücken des
Stellrads.
• Stellen Sie mit dem Stellrad die gewünschte Offset-Temperatur ein.
• Bestätigen Sie durch kurzes Drücken des Stellrads.
Die Werkseinstellungen des Heizkörperthermostaten können manuell wiederhergestellt werden. Dabei gehen
alle vorgenommenen Einstellungen verloren.
• Halten Sie die Mode-/Menu-Taste mind. 3 Sekunden gedrückt.
• Wählen Sie mit dem Stellrad den Menüpunkt „rES“ aus und bestätigen Sie
durch kurzes Drücken des Stellrads.
• Anschließend erscheint „CnF“ im Display.
• Bestätigen Sie durch kurzes Drücken des Stellrads, um die Werkseinstellungen
wiederherzustellen. Das Gerät führt einen Neustart durch.
Fehlercode Problem Behebung
Batteriesymbol ( ) Batterieleistung zu gering Batterien austauschen
F1 Ventilantrieb schwergängig Installation prüfen,Heizungsventil überprüfen
F2 Stellbereich zu groß Befestigung des Heizkörperthermostaten überprüfen
F3 Stellbereich zu klein Heizungsventil überprüfen
Zum Schutz vor Ventilverkalkung führt der Heizkörperthermostat jeden Samstag um 12:00 Uhr eine
Entkalkungsfahrt durch. Dabei erscheint „CAL“ im Display.
Reinigen Sie das Gerät mit einem trockenen Leinentuch, das bei starken Verschmutzungen
leicht angefeuchtet sein kann. Verwenden Sie zur Reinigung keine lösemittelhaltigen Reinigungsmit-
tel. Achten Sie darauf, dass keine Feuchtigkeit in das Geräteinnere gelangt.
Kurzbezeichnung: ......................................................................................................................... DNT000016
Produktbezeichnung:....................................................................................................................ThermoTune
Versorgungsspannung: ...............................................................................2x 1,5 V LR6/Mignon/AA-Batterie
Stromaufnahme:......................................................................................................................... 100 mA max.
Batterielebensdauer: .................................................................................................................. 4 Jahre (typ.)
Schutzart:................................................................................................................................................. IP20
Verschmutzungsgrad:.................................................................................................................................... 2
Umgebungstemperatur:..................................................................................................................0 bis 50 °C
Oberflächentemperatur: ............................................................................................... 90 °C (am Heizkörper)
LCD:............................................................................................................................................ 73 Segmente
Display-Abmessungen (L x B):.......................................................................................................27 x 15 mm
Anschluss: .................................................................................................................................M30 x 1,5 mm
Wirkungsweise: .......................................................................................................................................Typ 1
Linearer Hub: ....................................................................................................................................... 4,3 mm
Software-Klasse:................................................................................................................................Klasse A
Konstruktion des Regel- und Steuergerätes (RS): .........................Unabhängig montiertes elektronisches RS
Abmessungen (B x H x T):......................................................................................................54 x 72 x 76 mm
Gewicht:.........................................................................................................................150 g (inkl. Batterien)
Technische Änderungen sind vorbehalten.
Hiermit erklärt die dnt Innovation GmbH, Maiburger Straße 29, 26789 Leer, Deutschland, dass sich das Gerät
„DNT000016“
in Übereinstimmung mit den grundlegenden Anforderungen und den übrigen einschlägigen Bestimmungen
der Europäischen Union befindet. Die Konformitätserklärung kann unter folgender Adresse gefunden werden:
www.dnt.de
Das CE-Zeichen ist ein Freiverkehrszeichen, das sich ausschließlich an die Behörden wendet und
keine Zusicherung von Eigenschaften beinhaltet.
Lesen Sie diese Anleitung vollständig und sorgfältig durch, bevor Sie das Gerät in Betrieb nehmen. Beachten
Sie insbesondere die Sicherheitshinweise und Handlungsanweisungen. Bewahren Sie die Anleitung zum spä-
teren Nachschlagen auf. Wenn Sie das Gerät anderen Personen zur Nutzung überlassen, übergeben Sie bitte
auch diese Bedienungsanleitung.
Benutzte Symbole:
Achtung! Hier wird auf eine Gefahr hingewiesen.
Hinweis: Dieser Abschnitt enthält zusätzliche wichtige Informationen.
1x Heizkörperthermostat ThermoTune, 1x Montagering, 1x Adapterset Danfoss (RA,RAV und RAVL),
2x 1,5 V Mignon/LR6/AA-Batterie, Bedienungsanleitung (Deutsch/Englisch)
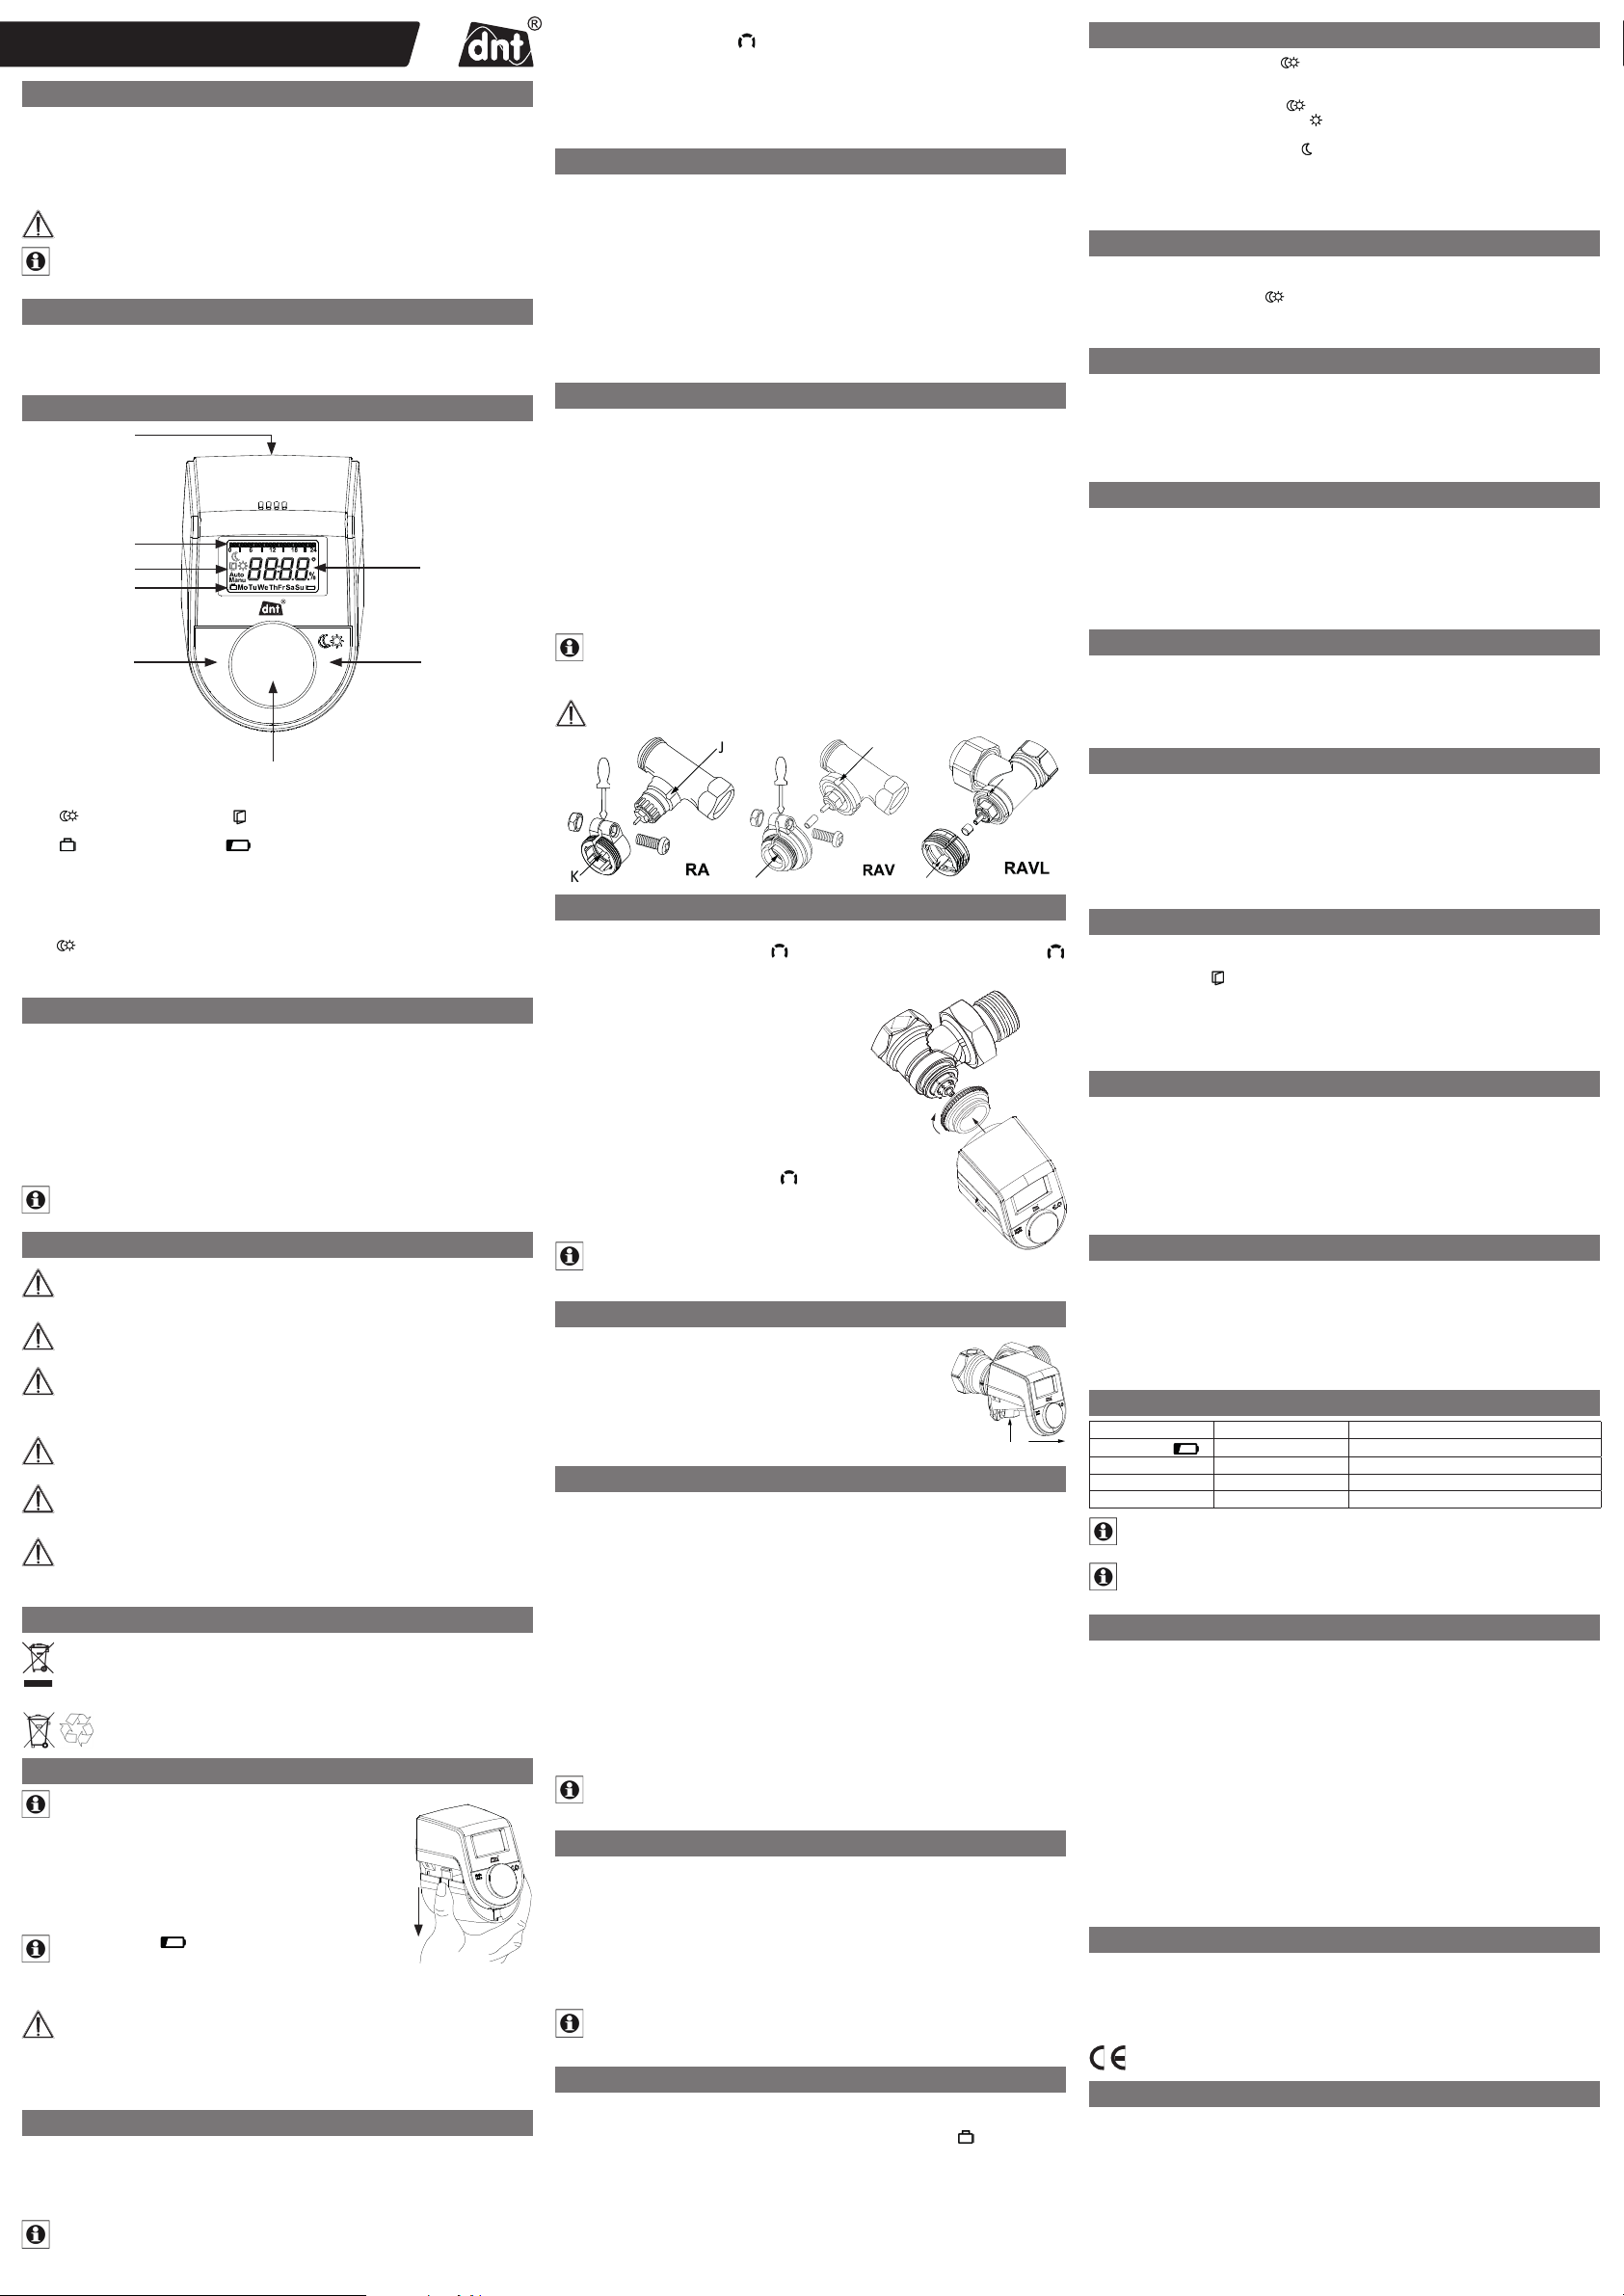
AKlickverschluss für die Montage am Heizungsventil
BEingestellte Schaltzeiträume im Wochenprogramm
C( ) Absenk-/Komfort-Temperatur, ( ) Fenster-auf-Funktion,
(Manu) Manueller Betrieb, (Auto) Automatikbetrieb
D( ) Urlaubsfunktion, Wochentag, ( ) Batterie-leer-Symbol
EMode-/Menu-Taste: Wechsel zwischen Automatikbetrieb, manuellem Betrieb und
Urlaubsfunktion (Taste kurz drücken); Öffnen des Konfigurationsmenüs
(Taste mind. 3 Sekunden drücken)
FStellrad: Einstellungen vornehmen, z. B. Temperatur (Drehen des Stellrads),
Aktivierung der Boost-Funktion und Bestätigen bzw. Speichern von Einstellungen im Menü
(kurzes Drücken des Stellrads)
G-Taste: Umschalten zwischen Absenk-/Komfort-Temperatur
HTemperaturanzeige, Zeit-/Datumsanzeige, Menüpunkte, Funktionen
Mit dem Heizkörperthermostat ThermoTune wird die Raumtemperatur zeitgesteuert reguliert. Durch vorpro-
grammierte oder individuelle Heiz- und Absenkphasen kann die gewünschte Temperatur komfortabel einge-
stellt werden. Der Heizkörperthermostat passt auf alle gängigen Heizkörperventile und ist durch das Aufklicken
am Ventil einfach und ohne Eingriff in das Heizungssystem zu montieren.
Betreiben Sie das Gerät nur in Innenräumen und setzen Sie es keinem Einfluss von Feuchtigkeit, Staub, Vib-
rationen, ständiger Sonnen- oder anderer Wärmeeinstrahlung, übermäßiger Kälte und keinen mechanischen
Belastungen aus.
Jeder andere Einsatz als der in dieser Bedienungsanleitung beschriebene ist nicht bestimmungsgemäß und
führt zu Garantie- und Haftungsausschluss. Dies gilt auch für Umbauten und Veränderungen. Das Gerät ist
ausschließlich für den privaten Gebrauch gedacht.
Das Gerät ist nur für den Einsatz in wohnungsähnlichen Umgebungen geeignet.
Das Gerät ist kein Spielzeug; erlauben Sie Kindern nicht damit zu spielen. Lassen Sie Verpa-
ckungsmaterial nicht achtlos liegen, dies kann für Kinder zu einem gefährlichen Spielzeug
werden.
Öffnen Sie das Gerät nicht, es enthält keine durch den Anwender zu wartenden Teile. Im
Fehlerfall lassen Sie das Gerät durch eine Fachkraft prüfen.
Bei Sach- oder Personenschäden, die durch unsachgemäße Handhabung oder Nichtbeach-
ten der Sicherheitshinweise verursacht werden, übernehmen wir keine Haftung. In solchen
Fällen erlischt jeder Gewährleistungsanspruch! Für Folgeschäden übernehmen wir keine
Haftung!
Aus Sicherheits- und Zulassungsgründen (CE) ist das eigenmächtige Umbauen und/oder
Verändern des Produkts nicht gestattet.
Das Gerät ist nur für die Regelung von durch Wärmeträger erhitzten Heizkörpern (Radiato-
ren, Konvektoren, Heizleisten) geeignet. Eine anderweitige Verwendung, z. B. an Kühlanla-
gen, Fußbodenheizungen etc., ist nicht zulässig und kann zu schweren Schäden führen.
Bei erkennbaren Schäden am vorhandenen Thermostat, am Ventil oder an den Heizungsroh-
ren konsultieren Sie bitte eine Fachkraft.
Gerät nicht im Hausmüll entsorgen!
Elektronische Geräte sind entsprechend der Richtlinie über Elektro- und Elektronik-Altgeräte über
die örtlichen Sammelstellen für Elektronik-Altgeräte zu entsorgen! Vor der Entsorgung des Geräts
eingesetzte Batterien entnehmen.
Verbrauchte Batterien gehören nicht in den Hausmüll!
Entsorgen Sie diese in Ihrer örtlichen Batteriesammelstelle!
Im Auslieferungszustand sind die Batterien bereits eingelegt.
Entfernen Sie einfach den Isolierstreifen, um das Gerät zu aktvieren.
Um die Batterien zu wechseln, gehen Sie wie folgt vor:
• Drücken Sie den Batteriefachdeckel an den Einkerbungen auf beiden Seiten
mit den Fingern ein und ziehen Sie ihn nach unten ab.
• Legen Sie 2 neue Batterien vom Typ LR6/Mignon/AA
polungsrichtig in das Batteriefach ein.
• Setzen Sie den Batteriefachdeckel wieder auf und rasten Sie ihn ein.
Das Batteriesymbol ( ) im Display weist darauf hin, dass die Batterien
auszutauschen sind. Nach Entnahme der leeren Batterien sollte bis zum Ein-
legen der neuen Batterien ca. 1Minute gewartet werden.
Ein Betrieb mit Akkus ist nicht möglich.
Vorsicht! Explosionsgefahr bei unsachgemäßem Austausch der Batterien. Ersatz nur durch densel-
ben oder einen gleichwertigen Typ. Batterien dürfen niemals aufgeladen werden. Batterien nicht ins
Feuer werfen. Batterien nicht übermäßiger Wärme aussetzen. Batterien nicht kurzschließen. Es be-
steht Explosionsgefahr!
Ausgelaufene oder beschädigte Batterien können bei Berührung mit der Haut Verätzungen verursa-
chen, benutzen Sie deshalb in diesem Fall geeignete Schutzhandschuhe.
Nach dem Einlegen der Batterien, werden nach Anzeige der Firmware-Versionsnummer und kurzem Motorlauf
(„InS“) automatisch Datum und Uhrzeit abgefragt.
• Stellen Sie Jahr, Monat, Tag, Stunde und Minute durch Drehen des Stellrads (F)
ein und bestätigen Sie durch kurzes Drücken des Stellrads.
Datum und Uhrzeit können Sie auch später im Menü unter „dAt“ einstellen.
Während der Eingabe von Datum und Uhrzeit fährt der Motor den Steuerstift zurück.
• Die Anzeige „InS“ mit drehendem „ “ weist darauf hin, dass der Motor noch zurückfährt.
Sobald der Heizkörperthermostat am Ventil montiert werden kann, steht nur „InS“ im Display.
• Das Wochenprogramm und das Datum können vor der Montage angepasst werden.
Drücken Sie dazu die Mode-/Menu-Taste, während in der Anzeige „InS“ steht.
Mehr Details finden Sie ab Kapitel „13. Wochenprogramm einstellen“.
• Nach abgeschlossener Programmierung steht erneut „InS“ im Display und die Montage
kann erfolgen.
Die Montage des Heizkörperthermostats ist einfach und kann ohne Ablassen von Heizungswasser oder Eingriff
in das Heizungssystem erfolgen. Spezialwerkzeug oder ein Abschalten der Heizung sind nicht erforderlich.
Der Klickverschluss des Heizkörperthermostats ist universell einsetzbar und mit dem Montagering VA80 pas-
send für alle gängigen Ventile mit dem Gewindemaß M30 x 1,5 mm.
Durch die im Lieferumfang enthaltenen Adapter ist das Gerät auf Heizkörperventile vom Typ Danfoss RA, RAV
und RAVL montierbar.
• Drehen Sie den vorhandenen Thermostatkopf auf den Maximalwert (gegen den Uhrzeigersinn). Der Ther-
mostatkopf drückt jetzt nicht mehr auf die Ventilspindel und kann so leichter demontiert werden.
• Entfernen Sie den Thermostatkopf.
• Setzen Sie bei Bedarf einen der beiliegenden Adapter auf.
Anschließend erfolgt eine Adaptierfahrt (s. Kapitel „11. Montage und Adaptierfahrt“).
Zur Montage auf Ventile von Danfoss können die beiliegenden Adapter (RA, RAV und RAVL) verwendet wer-
den. Die Zuordnung des passenden Adapterrings zum entsprechenden Ventil entnehmen Sie bitte den nach-
folgenden Abbildungen.
Die Adapter RA und RAV werden Zugunsten eines besseren Sitzes mit Vorspannung produziert. Bei Montage
verwenden Sie ggf. einen Schraubendreher und biegen diese im Bereich der Schraube leicht auf. Nach dem
Aufrasten auf den Ventilkörper befestigen Sie die Adapter bitte mit der beiliegenden Schraube und Mutter.
Auf Ventile vom Typ RAV ist vor der Montage die lange Stößelverlängerung (I) auf den Ventilstift aufzusetzen.
Der Adapter RAVL muss nicht verschraubt werden. Setzen Sie vor der Montage die kurze Stößelverlängerung
(I) auf den Ventilstift auf. Sie können die mit dem Adapter verbundene Stößelverlängerung einfach vom Ad-
apter abbrechen.
Die Ventilkörper von Danfoss weisen umlaufend längliche Einkerbungen (J) auf, die auch einen bes-
seren Sitz des Adapters nach dem Aufrasten gewährleisten. Achten Sie bei der Montage bitte darauf,
dass die Zapfen im Inneren des Adapters (K) eine deckungsgleiche Position zu den Einkerbungen (J)
am Ventil haben. Rasten Sie den Adapter vollständig auf.
Achten Sie bei der Montage darauf, sich nicht die Finger zwischen den Adapterhälften einzuklemmen!
I
J
I
Nach dem Einlegen der Batterien fährt der Motor zunächst zurück, währenddessen wird das Datum ab-
gefragt, „InS“ und das Aktivitätssymbol ( ) angezeigt. Sobald „InS“ ohne Aktivitätssymbol ( )
im Display steht, kann der Heizkörperthermostat montiert werden. Danach wird zur Anpassung ans Ventil eine
Adaptierfahrt („AdA“) durchgeführt.
(1)
(2)
L
• Schrauben Sie den beiliegenden Montagering (L) auf das Ventil
des Heizkörpers (1).
• Setzen Sie den Heizkörperthermostat mit dem Klickverschluss
gerade auf den Montagering (2) auf. Achten Sie darauf, dass
die Verrastung des Klickverschlusses vollständig einrastet.
Zur Feinjustierung des Heizkörperthermostats drehen Sie den
Thermostat mit dem Montagering.
• Drücken Sie kurz auf das Stellrad, wenn im Display „InS“
steht.
Der Heizkörperthermostat führt eine Adaptierfahrt durch.
Dabei werden „AdA“ und das Aktivitätssymbol ( ) im
Display angezeigt, währenddessen ist keine Bedienung möglich.
Die Adaptierfahrt kann durch kurzes Drücken des Stellrads abge-
brochen werden.
Wurde die Adaptierfahrt vor der Montage eingeleitet, drücken
Sie kurz auf das Stellrad und der Motor fährt zurück zur Position „InS“. Wird eine Fehlermeldung
(F1, F2, F3) angezeigt, fährt der Motor ebenfalls zurück zur Position „InS“.
(1)
Um den Heizkörperthermostat vom Heizungsventil zu lösen gehen Sie wie folgt vor:
• Öffnen Sie das Batteriefach, indem Sie den Batteriefachdeckel an den Einker-
bungen auf beiden Seiten mit den Fingern eindrücken und nach unten abzie-
hen (s. Kapitel 7. „Batterien wechseln“).
• Drücken Sie die Entriegelungstaste (mit dem Schlosssymbol) ein (1).
Die Verrastung am Klickverschluss öffnet sich und der Heizkörperthermostat löst
sich vom Ventil (2).
Im Wochenprogramm lassen sich für jeden Wochentag separat bis zu 6 Heizphasen (13 Schaltzeitpunkte) ein-
stellen. Die Programmierung erfolgt für die ausgewählten Tage, wobei für einen Zeitraum von 00:00 bis 23:59
Uhr Temperaturen hinterlegt werden können.
• Drücken Sie die Mode-/Menu-Taste mind. 3 Sekunden. Im Display erscheint „Pro“.
Bestätigen Sie durch kurzes Drücken des Stellrads.
• Im Display erscheint „dAy“. Mit dem Stellrad sind einzelne Wochentage, alle Werktage,
das Wochenende oder die gesamte Woche auswählbar.
• Bestätigen Sie durch kurzes Drücken des Stellrads.
• Der erste Schaltzeitpunkt wird angezeigt (0:00), dieser kann nicht verändert werden.
Die Heizzeiten werden zudem als Balken angezeigt.
• Bestätigen Sie durch kurzes Drücken des Stellrads.
• Danach können Sie die Temperatur einstellen, die ab 0:00 gewünscht ist.
• Bestätigen Sie durch kurzes Drücken des Stellrads.
• Der nächste Schaltzeitpunkt wird angezeigt. Diesen können Sie individuell anpassen.
• Stellen Sie anschließend die Temperatur ein, die ab der gewünschten Uhrzeit vorherrschen soll.
• Diesen Vorgang können Sie wiederholen, bis die weiteren gewünschten Temperaturen für den Zeitraum
von 0:00 bis 23:59 Uhr hinterlegt sind.
• Sind alle 13 Schaltzeitpunkte belegt, wird 23:59 Uhr als Endzeitpunkt zum Bestätigen angezeigt.
Im Auto-Modus kann die Temperatur jederzeit auch über das Stellrad verändert werden. Die geän-
derte Temperatur bleibt dann bis zum nächsten Schaltzeitpunkt erhalten. Danach ist das eingestellte
Wochenprogramm wieder aktiv.
Bei Aktivierung der Boost-Funktion wird das Heizungsventil für 5 Minuten auf 80 % geöffnet. Die Erwärmung
eines Raumes dauert zwar länger als 5 Minuten, die vom Heizkörper abgegebene Wärme kann dennoch so-
fort wahrgenommen werden. Kommen Sie z. B. früher nach Hause und möchten es schnell warm haben, hilft
Ihnen die Boost-Funktion.
• Drücken Sie kurz das Stellrad zum Aktivieren der Boost-Funktion.
• Die verbleibende Funktionsdauer wird im Sekundentakt heruntergezählt („b300“ bis „b000“).
• Nach Ablauf dieser 5 Minuten wechselt der Heizkörperthermostat in den vorher aktiven Modus (Auto/
Manu) mit der vorher eingestellten Temperatur.
• Die Funktion lässt sich jederzeit vorzeitig durch Betätigen des Stellrads deaktivieren.
Die Boost-Funktion hat keinen unmittelbaren Effekt, wenn der Heizkörper verdeckt ist.
Die Fenster-auf-Funktion ist während der Boost-Funktion deaktiviert.
Die Urlaubsfunktion kann genutzt werden, wenn für einen bestimmten Zeitraum eine feste Temperatur gehal-
ten werden soll (z. B. während eines Urlaubs oder einer Party).
• Drücken Sie die Mode-/Menu-Taste so oft kurz, bis im Display das Koffersymbol ( ) erscheint.
• Stellen Sie über das Stellrad die Uhrzeit ein, bis zu der die Temperatur gehalten werden soll und bestäti-
gen Sie durch kurzes Drücken des Stellrads.
• Stellen Sie danach mit dem Stellrad das Datum ein und bestätigen Sie durch kurzes Drücken des Stell-
rads.
• Stellen Sie mit dem Stellrad die Temperatur ein und bestätigen Sie durch kurzes Drücken des Stellrads.
Die Anzeige blinkt zur Bestätigung zweimal kurz auf.
Die eingestellte Temperatur bleibt bis zum vorgegebenen Zeitpunkt bestehen. Danach wechselt der Heizkör-
perthermostat in den Auto-Modus.
Heizkörperthermostat ThermoTune
Artikelnummer: DNT000016 Bedienungsanleitung
1. Hinweise zu dieser Anleitung
9. Demontage des vorhandenen Thermostats
10. Adapter für Danfoss-Ventile
2. Lieferumfang
3. Bedienung und Display
Mode
Menu
A
C
D
B
E
F
G
H
4. Funktion und bestimmungsgemäßer Einsatz
5. Sicherheitshinweise
6. Entsorgungshinweise
7. Batterie wechseln
11. Montage und Adaptierfahrt
12. Demontage
13. Wochenprogramm einstellen
14. Boost-Funktion
16. Komfort- und Absenk-Temperatur
17. Kindersicherung/Bediensperre
18. Heizpause aktivieren (Batterieschonung)
19. Frostschutzbetrieb einstellen
20. Anzeige der Ventilposition
21. Umschalten Sommer-/Winterzeit
22. Fenster-auf-Funktion
23. Offset-Temperatur
24. Werkseinstellungen wiederherstellen
25. Fehlerbehebung und Wartung
26. Technische Eigenschaften
27. Konformitätserklärung
28. Kontakt
1. Ausgabe Deutsch 8/2022 – Dokumentation © 2022 dnt Innovation GmbH
Alle Rechte vorbehalten. Ohne schriftliche Zustimmung des Herausgebers darf diese Bedienungsanleitung auch nicht auszugsweise
in irgendeiner Form reproduziert oder vervielfältigt werden. Es ist möglich, dass die vorliegende Bedienungsanleitung noch druck-
technische Mängel oder Druckfehler aufweist. Die Angaben in dieser Bedienungsanleitung werden jedoch regelmäßig überprüft und
Korrekturen in der nächsten Ausgabe vorgenommen. Für Fehler technischer oder drucktechnischer Art und ihre Folgen übernehmen
wir keine Haftung.Alle Warenzeichen und Schutzrechte werden anerkannt.Änderungen im Sinne des technischen Fortschritts können
ohne Vorankündigung vorgenommen werden. DNT000016-8/2022,Version 1.01
Importeur: dnt Innovation GmbH
Maiburger Straße 29 · 26789 Leer · Germany · www.dnt.de
8. Datum und Uhrzeit einstellen
15. Urlaubsfunktion einstellen
(Rückseite)
Sie haben Fragen zum Produkt oder zur Bedienung? Unser Technischer Kundendienst erteilt Ihnen gerne um-
fassende und qualifizierte Auskünfte: E-Mail: support@dnt.de


