DOF EDGE Installation guide

2
Table of Contents
Note 3
11
7
5
13
8
4
12
7
6
14 - 18
9 - 10
Software Installation
Plates
Calibration
Check the Contents
After Installation
Connect the Scanner
Mouse Motion
Scanner Parts
Select Language
System Requirement
Icons
19 - 30Basic Scan Sequence
31Our Ofce Locations

3
Note (Remarque lors d’une installation)
Safety Precautions (Remarque pour sécurité)
• Avoid setting up the scanner in an environment where there is a direct
exposure to a sunlight. The strong light can interfere with the projection light from
the scanner and in turn can affect the scan performance.
(Lors d’une installation du produit, évitez le rayon direct. Si le projecteur est
exposé sur le rayon direct, la qualité de produit du data de balayage baisse.)
• Once you turn on the scanner, the scanner needs about 10 seconds to boot up.
Please run the ScanApp SW after the scanner nishes booting.
(Après l’alimentation élecrique au produit, on a besoin d’un temps de préchauffage
du scanner environ 10 secondes. Le programme de balayage fonctionne
après avoir ni le préchauffage.)
• Do not use USB WiFi adapters along with the Edge scanner. In order to obtain
the maximum performance, Edge uses the full USB bandwidth. Using USB WiFi
adapters may result in scan failures.
(Il ne faut pas utiliser à la fois le scanner et l’équipement d’USB sans l an
d’obtenir le meilleur data de balayage. Lorsqu’on utilise le scanner ey
l’équipement d’USB sans l ainsi que la carte de LANsans l d’USB etc,
il peut se produire une erreur du balayage.)
• It is good practice to perform Scanner Calibration everyday but it is not mandatory.
Do calibrate the scanner at least once a week or right after the scanner had been
moved to another place.
(On recommande d’exécuter une seule fois pas an le travail en coopération.Aussi,
au moment d’avoir déplacé le scanner, on doit exécuter le travail en coopération.)
• Hazardous Direct Light – Keep
eyes away from the direct light while
in operation.
(Interdit de regarder directement le
rayon du projecteur émis pendant le
fonctionnement du balayage.
Le rayon émis du projecteur pourrait
nuire aux yeux.)
4
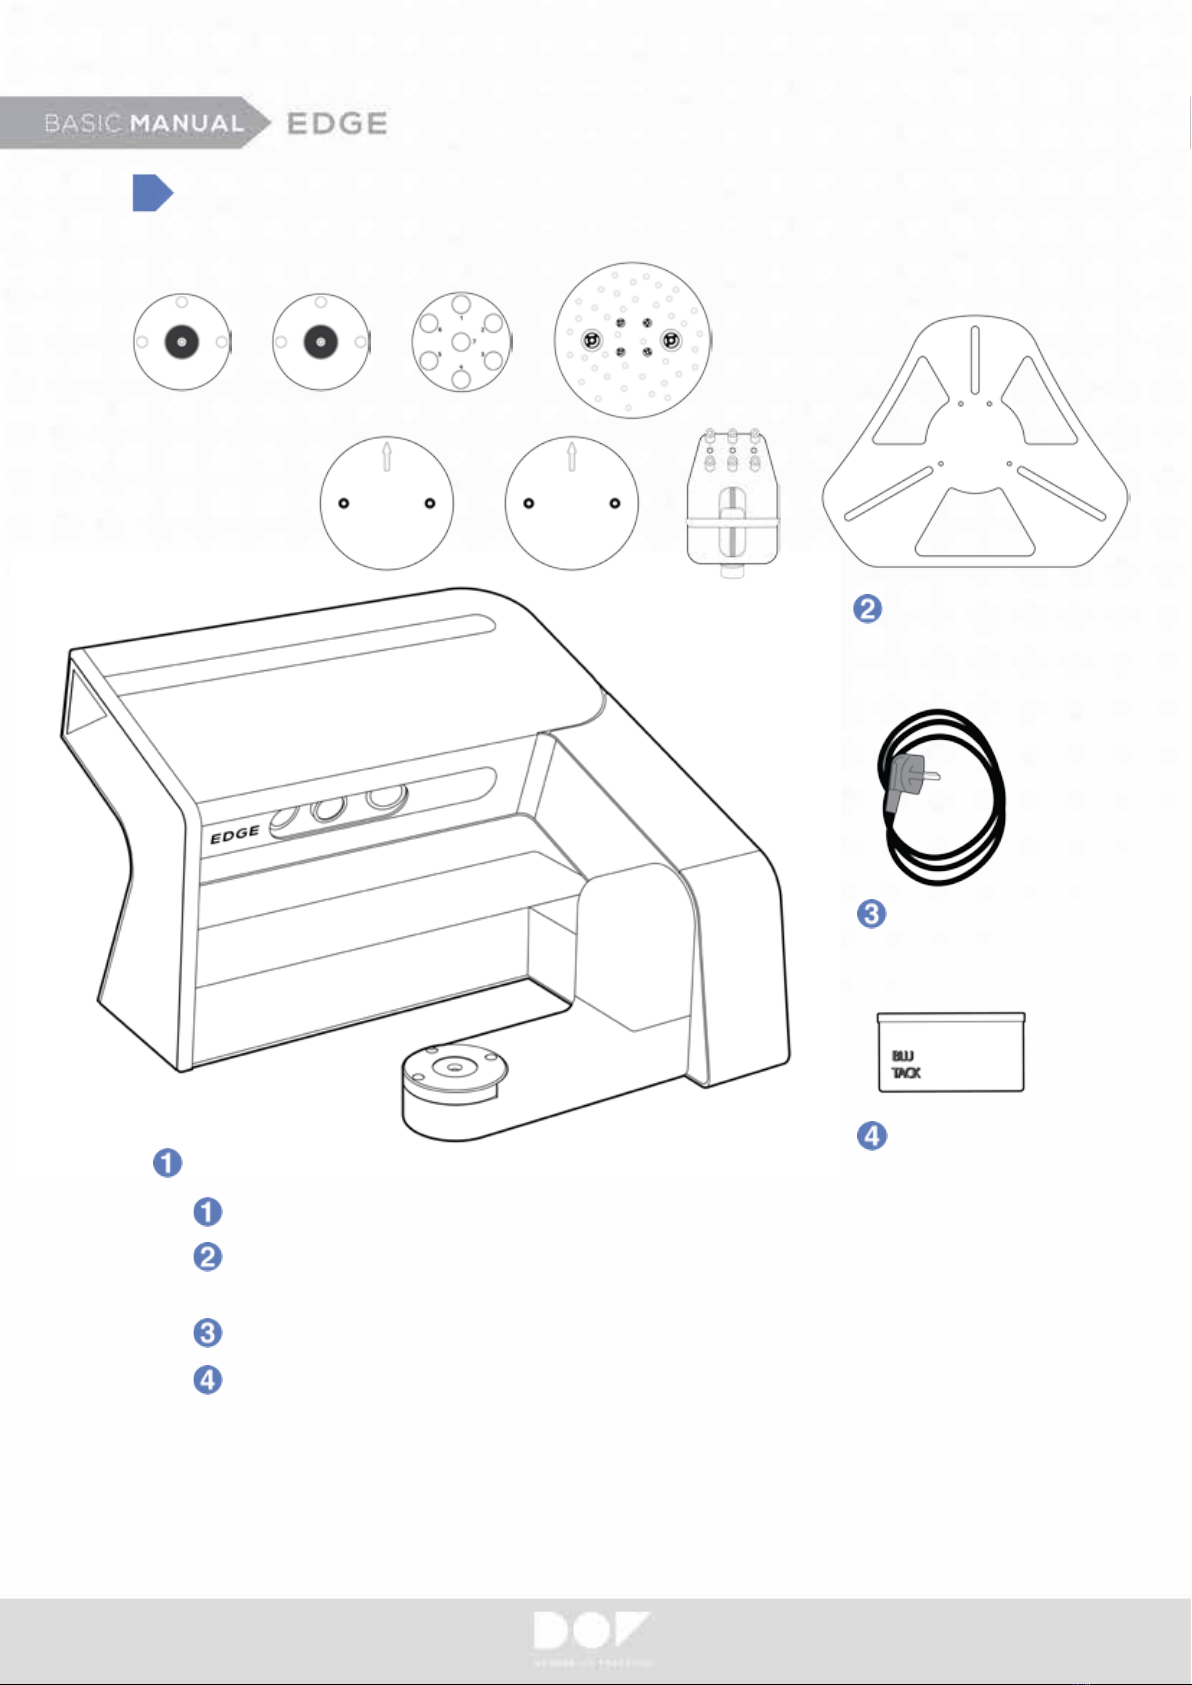
Check the Contents
Cables & Gender
Edge 3D Scanner
Accessory
Plates - Base Plates (2qty), Multi-Die Plate (1qty), Calibration Plate (1qty),
Gum Plates (2qty), Zig Block Plate (1qty), Articulator Plate (1qty)
Cables & Gender - Power Cable (1qty)
Accessory – Blue Tack (1qty)
Optional Plate - Transfer Plate A, Transfer Plate S, Transfer Plate B,
Impression Plate & Scan Targets (5 pieces)
*
Edge 3D Scanner
Plates

5
Scanner Parts
Projector CameraCamera
USB Cable Power ConnectorSwitch
6
Plates
Basic Plates
Optional Plate
Base Plate
Multi-Die Plate
Zig Block Plate
Impression Plate & Scan Targets
Calibration Plate
Gum Plate
Articulator Plate
Transfer Plate A
for Artex
Transfer Plate B
for Bio-Art
Transfer Plate S
for KaVo and SAM
* Place Transfer Plates on top of a Base Plate on the scanning platform.
All-in-One Plate

7
Connect the Scanner
Make sure your scanner power is off. Connect your power cable.
Connect the USB cable to one of your USB 3.0 ports.
Do not use USB WiFi adapters.
System Requirement
• Operating System - Windows 7, 8.1, 10 (64-Bit)
• RAM - 16GB
• Graphic Card - Recommend higher than 2GB (NVIDIA GeForce GT750Ti)
• HDD / SSD – 500GB or Higher / 128GB or Higher
• CPU - Intel 4th generation CPU i5 / i7-4790, Intel 6th generation CPU i5/ i7-6700
Do not use AMD CPU. (Ne pas utiliser AMD CPU.)
• Chipset – Z97, H97, X99, Q170, Z(H)170, H110
Do not use ASRock mainboard. (Ne pas utiliser la carte mère de ASRock.)
• USB Ports - USB 3.0
* Assembled PC and DOF scanner might not be compatible and note that DOF Inc. have no responsibility for any
problem caused by unknown pc. You are highly recommended using HP800G2 desk top PC provided by DOF.
(En cas de PC monté, il peut se produire un problème au niveau de la compatibilité et DOF ne prend pas tel
problème en charge. On recommande d’utiliser HP 800 G2 Desktop PC offert par le siège social de DOF.)
8
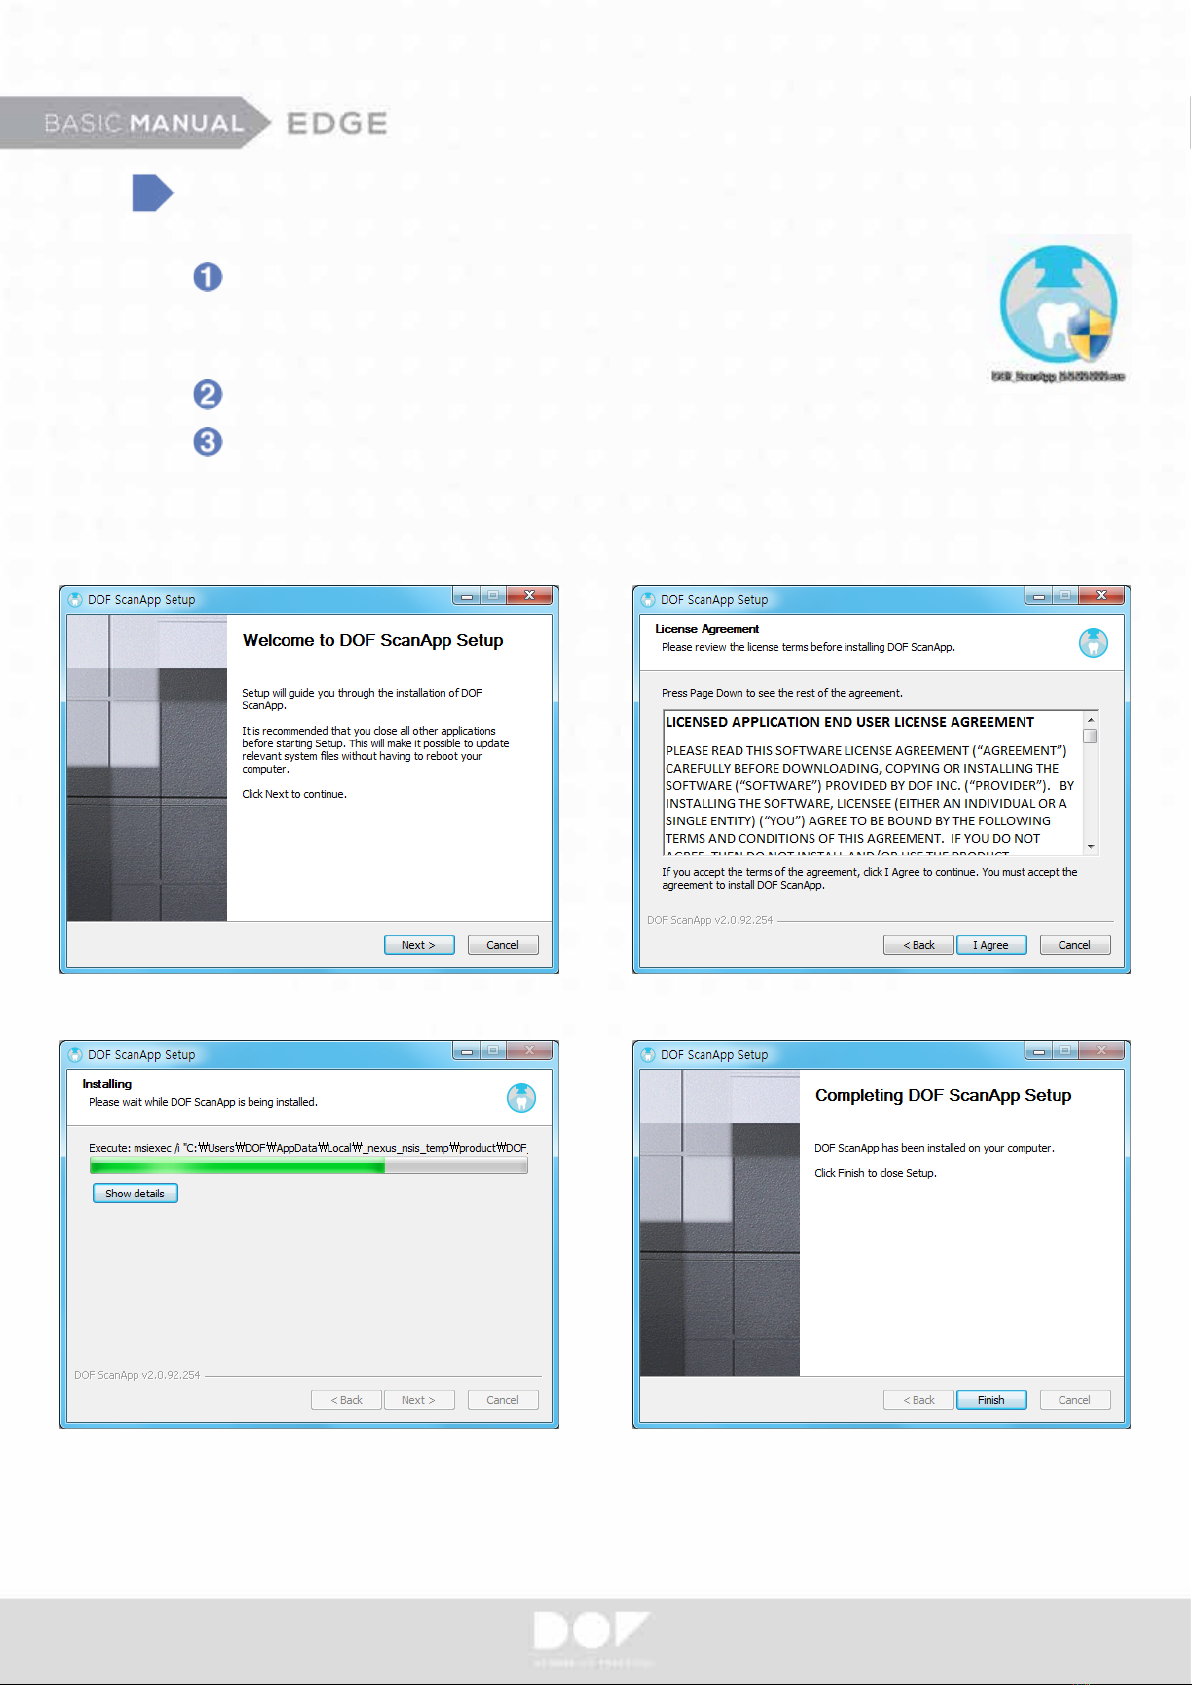
Software Installation
Run the ScanApp SW locating at DOF USB from the accessory box
or download the latest ScanApp SW from the link you have obtained
from your dealer/reseller.
Install the software.
Follow the wizard to successfully install the ScanApp SW.
* Restarting the PC after installation is recommended.
* Updating Window OS is recommended before installation.
9
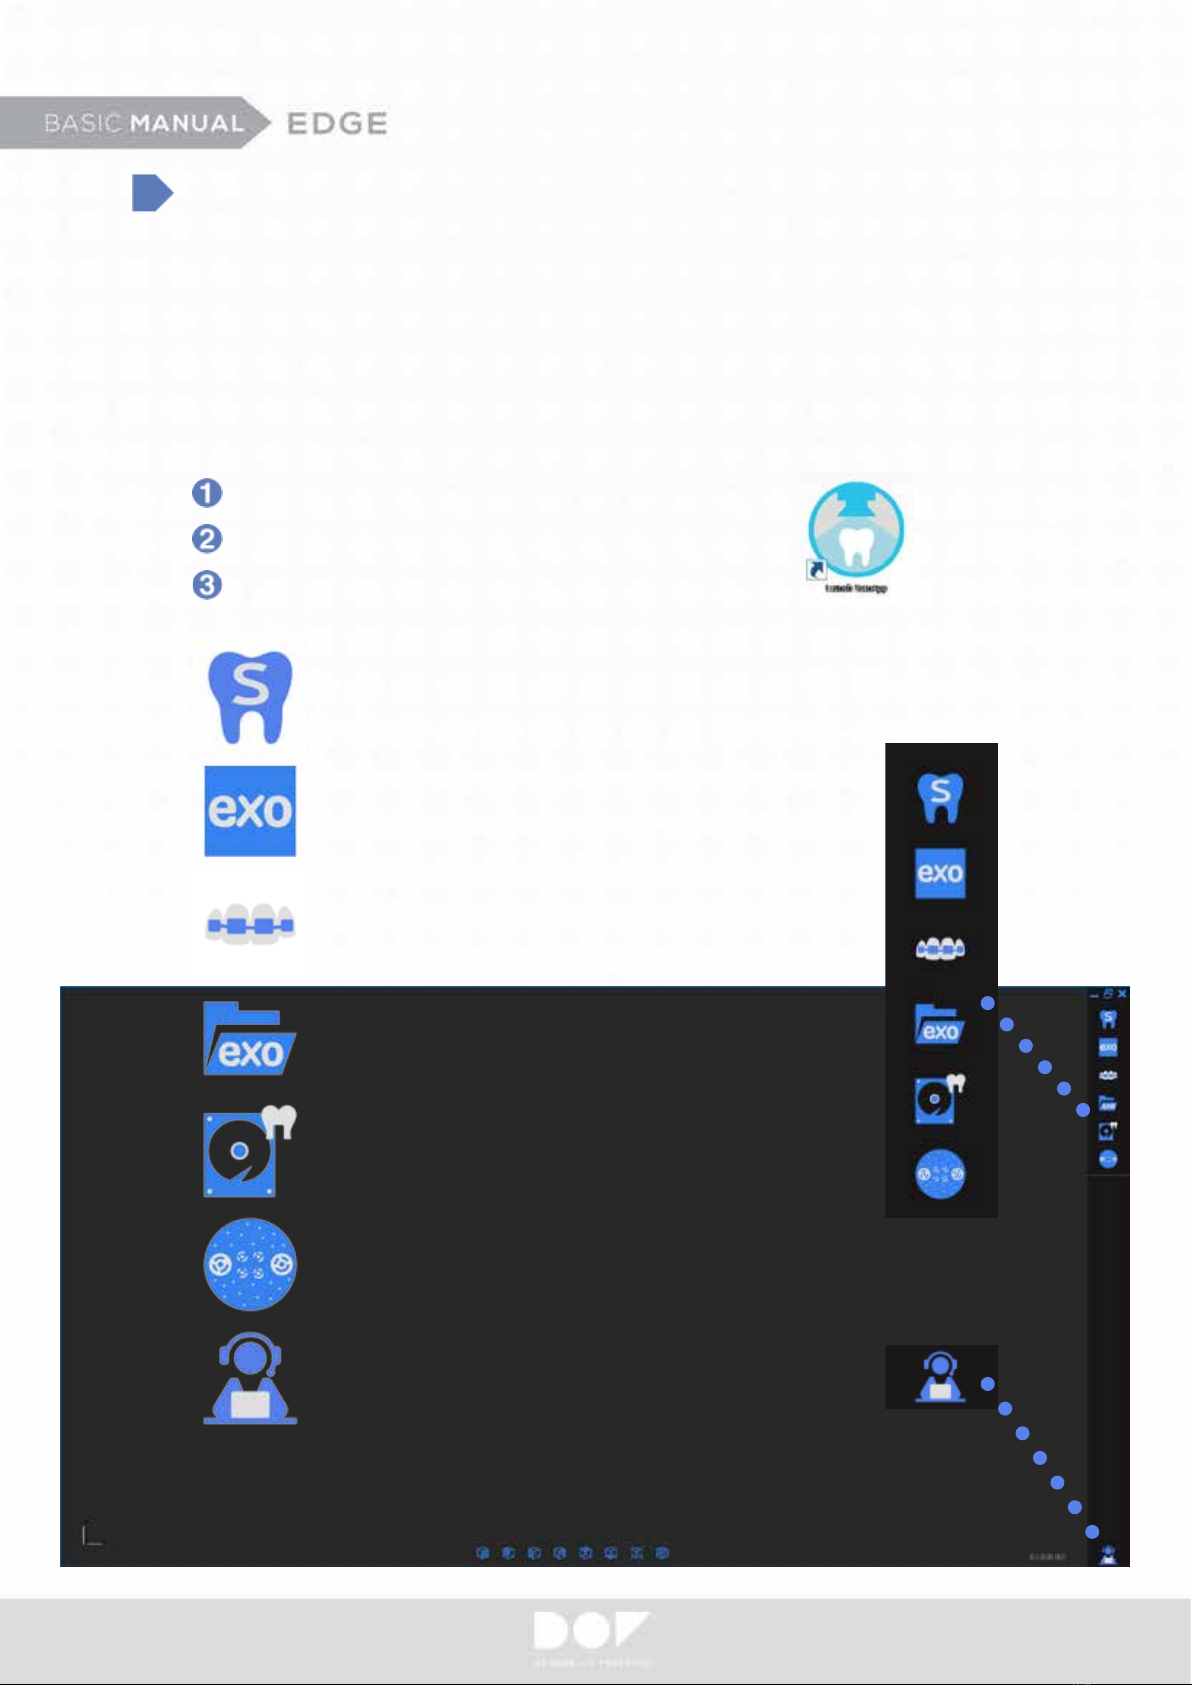
After Installation
Check if both of the software is installed properly.
Run the ScanApp for the rst time.
Press exocad icon.
Once you have both applications installed on your PC, you need to make
a connection (integration) between ScanApp and exocad.
ScanApp and exocad are two separate applications. ScanApp is responsible
to control and perform scan operations while exocad is responsible to design
the digital restorations.
Opens DOF Start.
Directs straight to Orthodontic Scan.
Prompts dental DB selection.
Helps to choose desired dental CAD platform.
Project Backup File Manager - helps to retrieve
scanned data.
Calibrates.
Teamviewer shortcut.
10
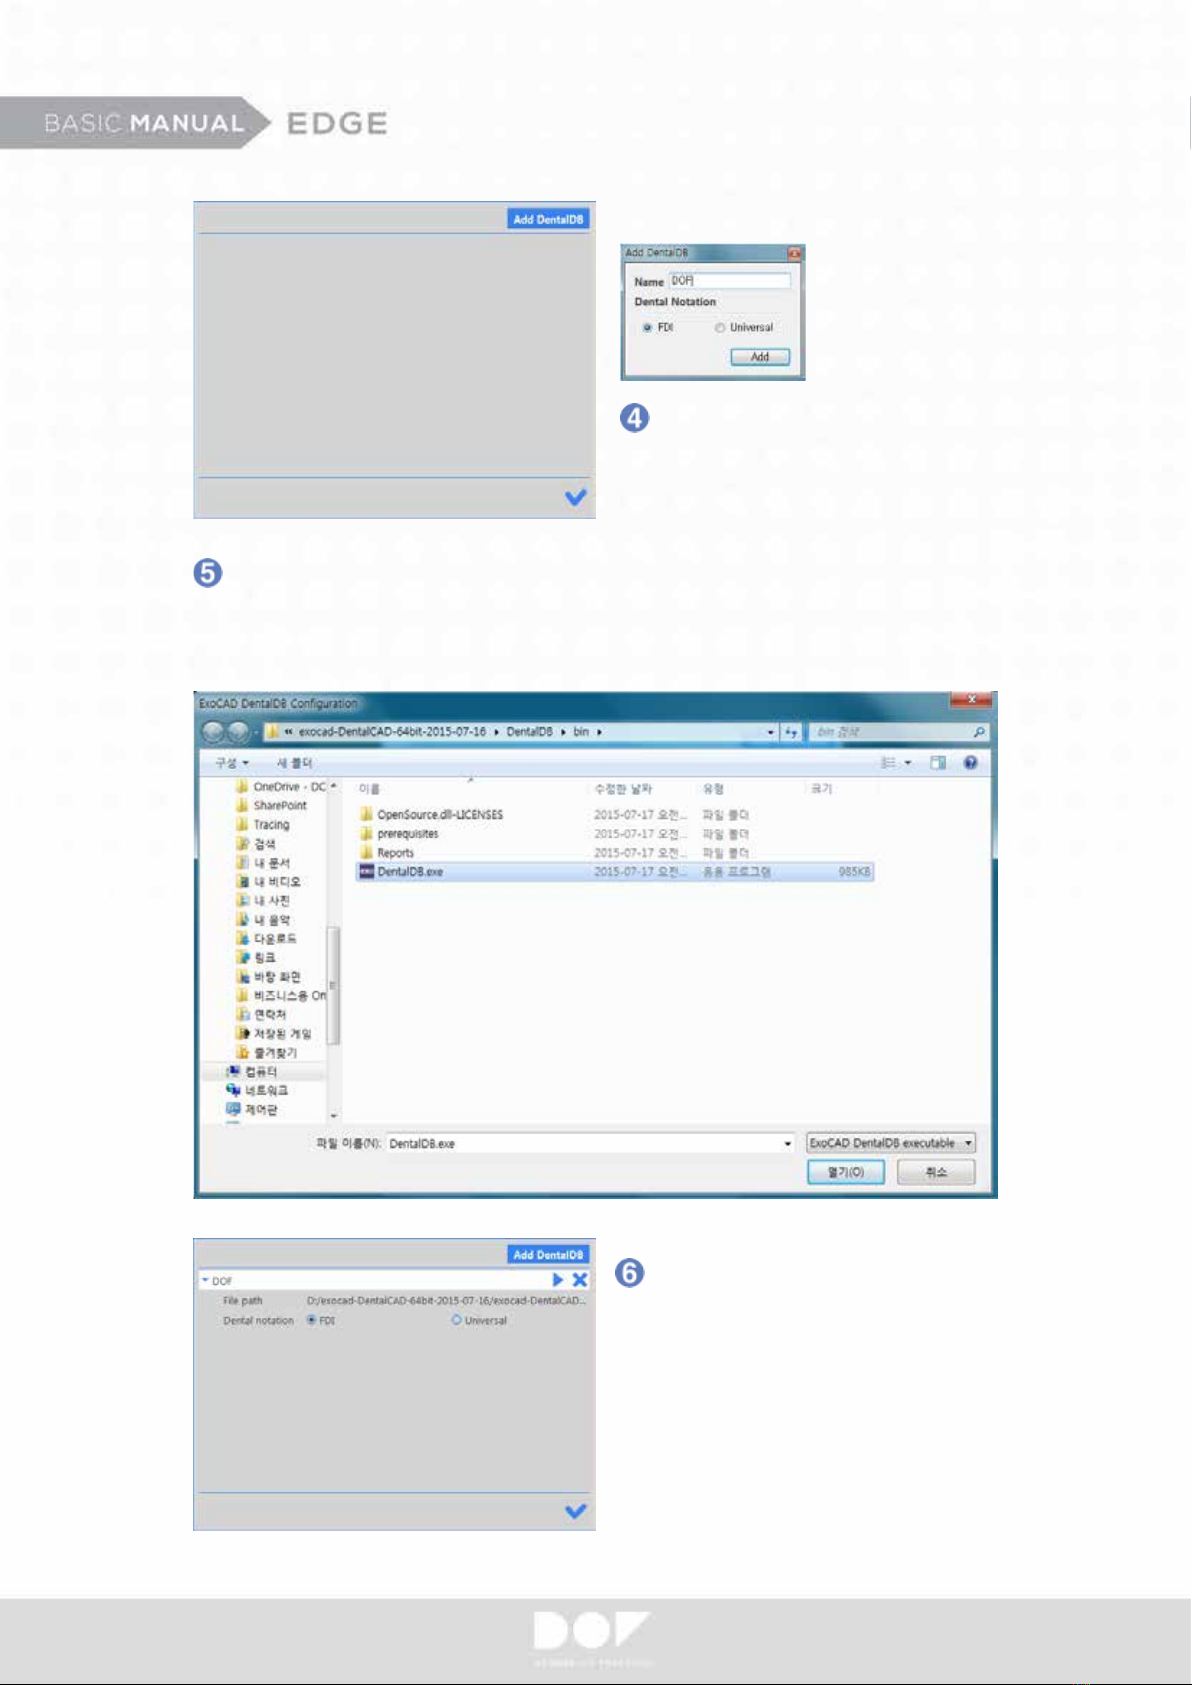
You will be asked to specify the exocad DentalDB.exe is located.
DentalDB.exe is usually located under the exocad-DentalCAD-versionnumber/
DentalDB/bin/ folder.
You can choose notation system.
(Notation or Universal)
After DentalDB is added, press run.
Table of contents


