Dolby Laboratories 7" Wide Touch Screen User manual

Operating Manual
7” Wide Touch Screen
EXACT Double-Din In-Dash Motorized TFT Monitor/DVD /AM/FM

- 1 -
TABLE OF CONTENTS
Safety Information ….…………………………………………………………………….2
Features …………………………………………………………………………………...3
Accessories………………………………………………………………………………..4
Unit Installation………… ………………………………………………………………….5
Unit Removal …………… ………………………………………………………………….7
Wire Connection …………………………………………………………………………...8
Front Panel …………………………………………………………………………………9
Rear Panel ……………………………………………………………………………..12
Remote Control …………………………………………………………………………13
Touch Screen Operations. ….... ..............................................................................17
Touch Screen Calibrate ………………………………………………………………17
Main Menu ……………………………………………………………………………..18
Radio Operations ………………………………………………..……………............19
DVD Operations ………………………………………………………….……………22
USB Operations ………………………………………………….…………………….24
SD CARD Operations …………………………………………….…………………….24
iPod Operations ……………………………………………………….………………25
AV IN 1 Operations …………………………………………………..………………….27
AV IN 2 Operations …………………………………………………..………………….28
NAVI Operations…………………………………………………….…………….……..29
System Setup ………………………………………………………………………….33
DVD Setup Menu…………………………………………………………………....…...37
Trouble Shooting……………………………………………………………………..…...42
Specifications ………………………………………………………………….…......44
Disc Notes ………………………………………………………………………………..45

- 2 -
SAFETY INFORMATION
Please read the manual carefully before operating this unit and keep it for
future reference.
CAUTION: This unit is a class 1 laser product. To prevent direct exposure to the
laser system, do not open the unit. The laser beam may hurt your eyes.
If the unit requires adjustments, contact an authorized service centre.
USE THIS PRODUCT SAFELY
Be sure you fully understand the following safety information:
When driving
Keep the unit at an appropriate sound level. Driving with the sound at a level
preventing you from hearing sounds outside and around the car may cause an
accident.
When cleaning
Do not expose the product to water or excessive moisture. This could cause short
circuit, fire or other severe damage.
When parked
Parking in direct sunlight can result in very high temperature levels inside your car.
Let the interior and unit cool down before switching the unit on.
NOTE:
Do not use and store the player in dusty, hot or humid environment.
FUSE REPLACEMENT – WARNING!
Never replace any fuse with one of a higher value than the fuse supplied
with your unit. Using a higher current rated fuse may cause damage to
your unit and/or electrical wiring.

- 3 -
FEATURES
- Fully Motorized 4 Position Drop Screen With Last Angle Memory
- (Optional) Navigation Black Box Module With Navteq Maps Of North America
- Electronic Touch Screen Functions Include DVD, Radio, USB, & MP-3/4
- DVD/DVD-RW/CD/CD-R/CD-RW/MP-3/MP-4/Divx
- All Functions Are Displayed On Screen Via OSD (Fourteen Languages)
- 30-Second Electronic Anti-shock Mechanism
- Accessory iPod Input Connection (Cable Not Included)
- USB Mini Input For MP-3 Music, Divx, Xvid & MP-4 Movies
- SD Card Slot For MP-3 Music Or MP-4 Movies (Memory Not Included)
- Front Panel A/V Input For Audio/Video MP-3/MP-4 Players
- IR Repeater Function For External Remote Eye
- Antenna Trigger Wire
- Amplifier Trigger Wire
- Brake Screen Safety Trigger
- AM/FM With 30 Pre-sets (18/FM – 12/AM)
- Auto Store Pre-set Scan
- 4-Channel High Power 50 x 4 Channels (Mosfet Power)
- Dual RCA Outputs (Front & Rear)
- Sub Woofer Selectable Frequency Outputs (80, 120, 160Hz)
- Variable Sub Woofer Volume Control
- 1-Auxiliary Video Input For Back-up Camera
- 1-RCA Video Output
- LO/DX And Stereo Mono Selector Switch
- Electronic (Bass, Treble, Volume, Balance, Fader)
- Pre-set EQ Functions (Rock, Pop, Classic Jazz, User)
- Digital Clock
- DVD, PAL/NTSC Selectable
- USA/Europe Frequency Stepping
- Resolution: 1440 x 234
- Panel Brightness: 350NIT
- ISO/ Double DIN
- Full Function Remote Control
- Last Position DVD Memory
- Improved Graphic User Interface
NOTE:
This user's manual is only for reference.
Modifying rights are reserved.
Specifications are subject to change without notice.

- 4 -
ACCESSORIES
Bolt Steel Bar x 1 M5X5 Screws x 8
Connecter Wire x 1 Remote Control x 1 Keys x 2
Operational Manual x 1 Mounting Sleeve x 1 USB Cable x 1
iPod Cable x 1
(option) Trim Bezel x 1 Air Vent Cover x 1
3
1
2
4
5
6
7
8
9
10 11 12
13

- 5 -
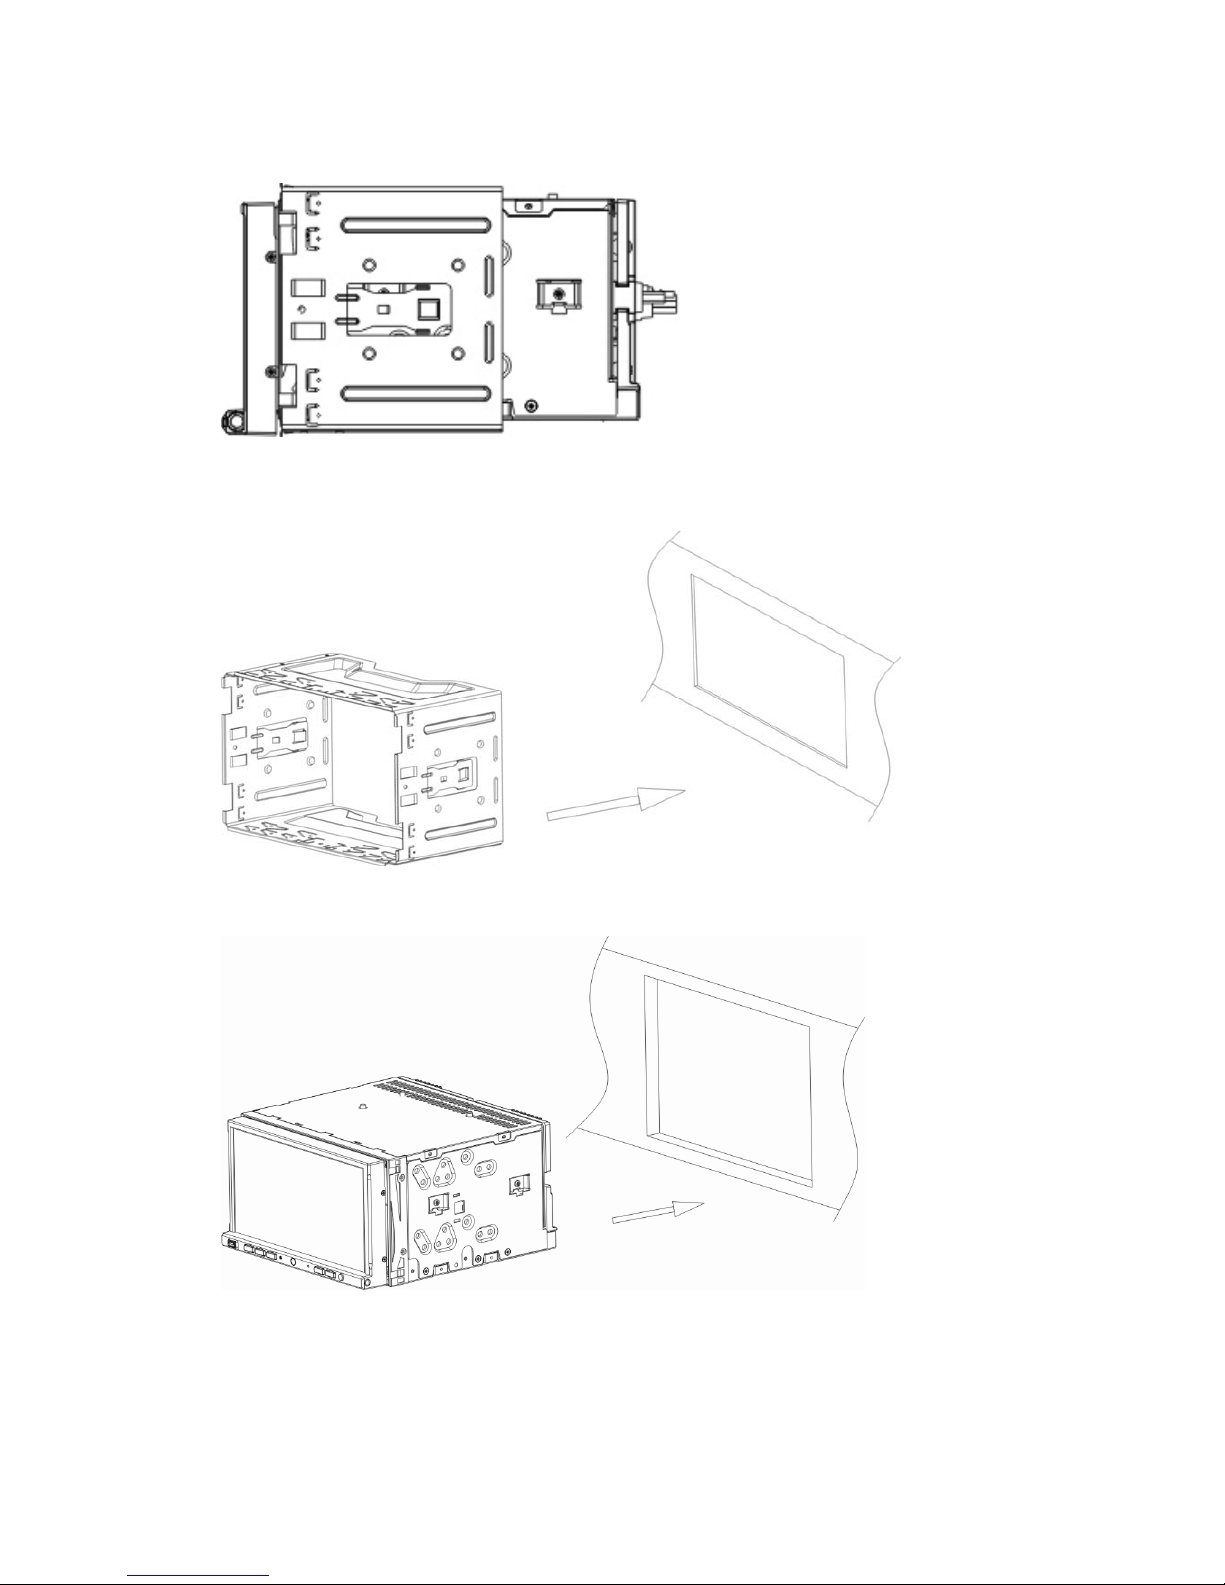
UNIT INSTALLATION
1, connect the power cable with unit.
2, press the [P.ANGLE] button to slide down the front panel.
3, turn over the unit, loose the screws.
- 6 -
4, press the [P.ANGLE] button to close the front panel.
5, install the Mounting sleeve into the dashboard.
6, install the unit into the mounting sleeve.
NOTE:
Screws are useful to protection during shipment.
- 7 -
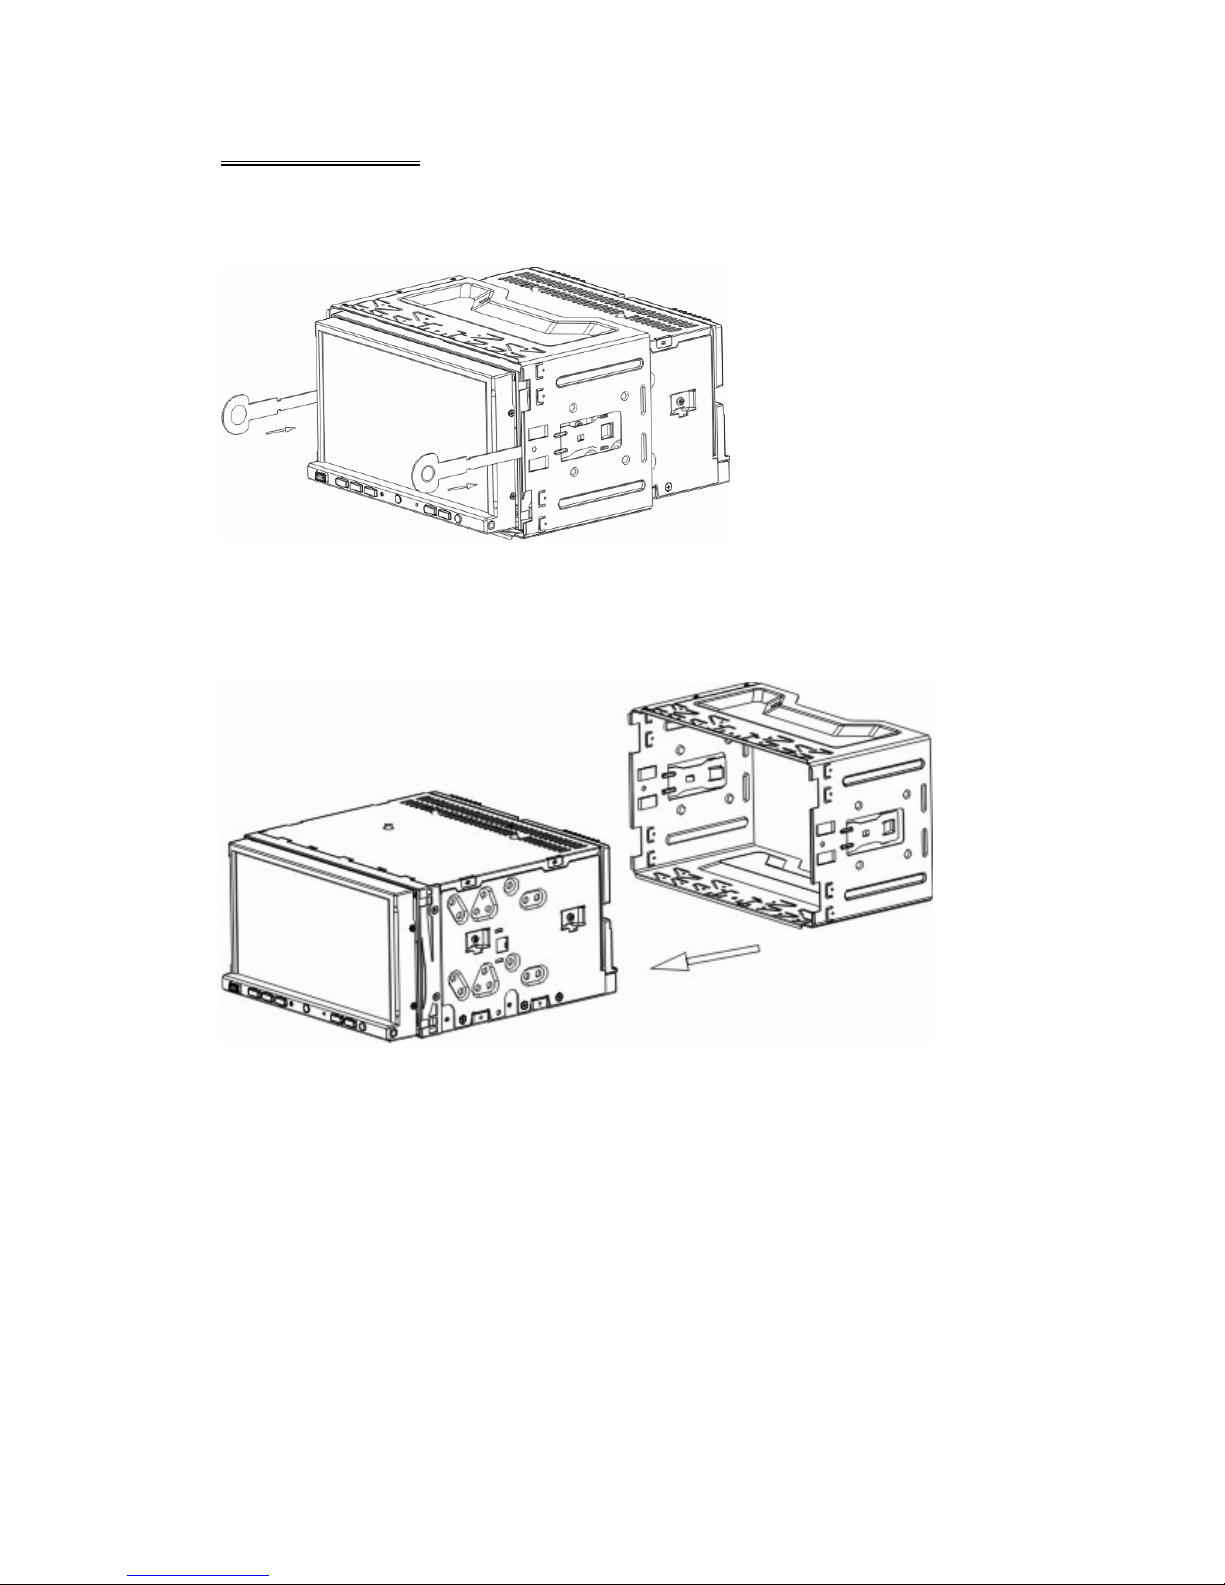
UNIT REMOVAL
Insert the keys supplied with the unit on both sides (as illustrated) as this will
release the internal locks so you can slide the unit out.
- 8 -
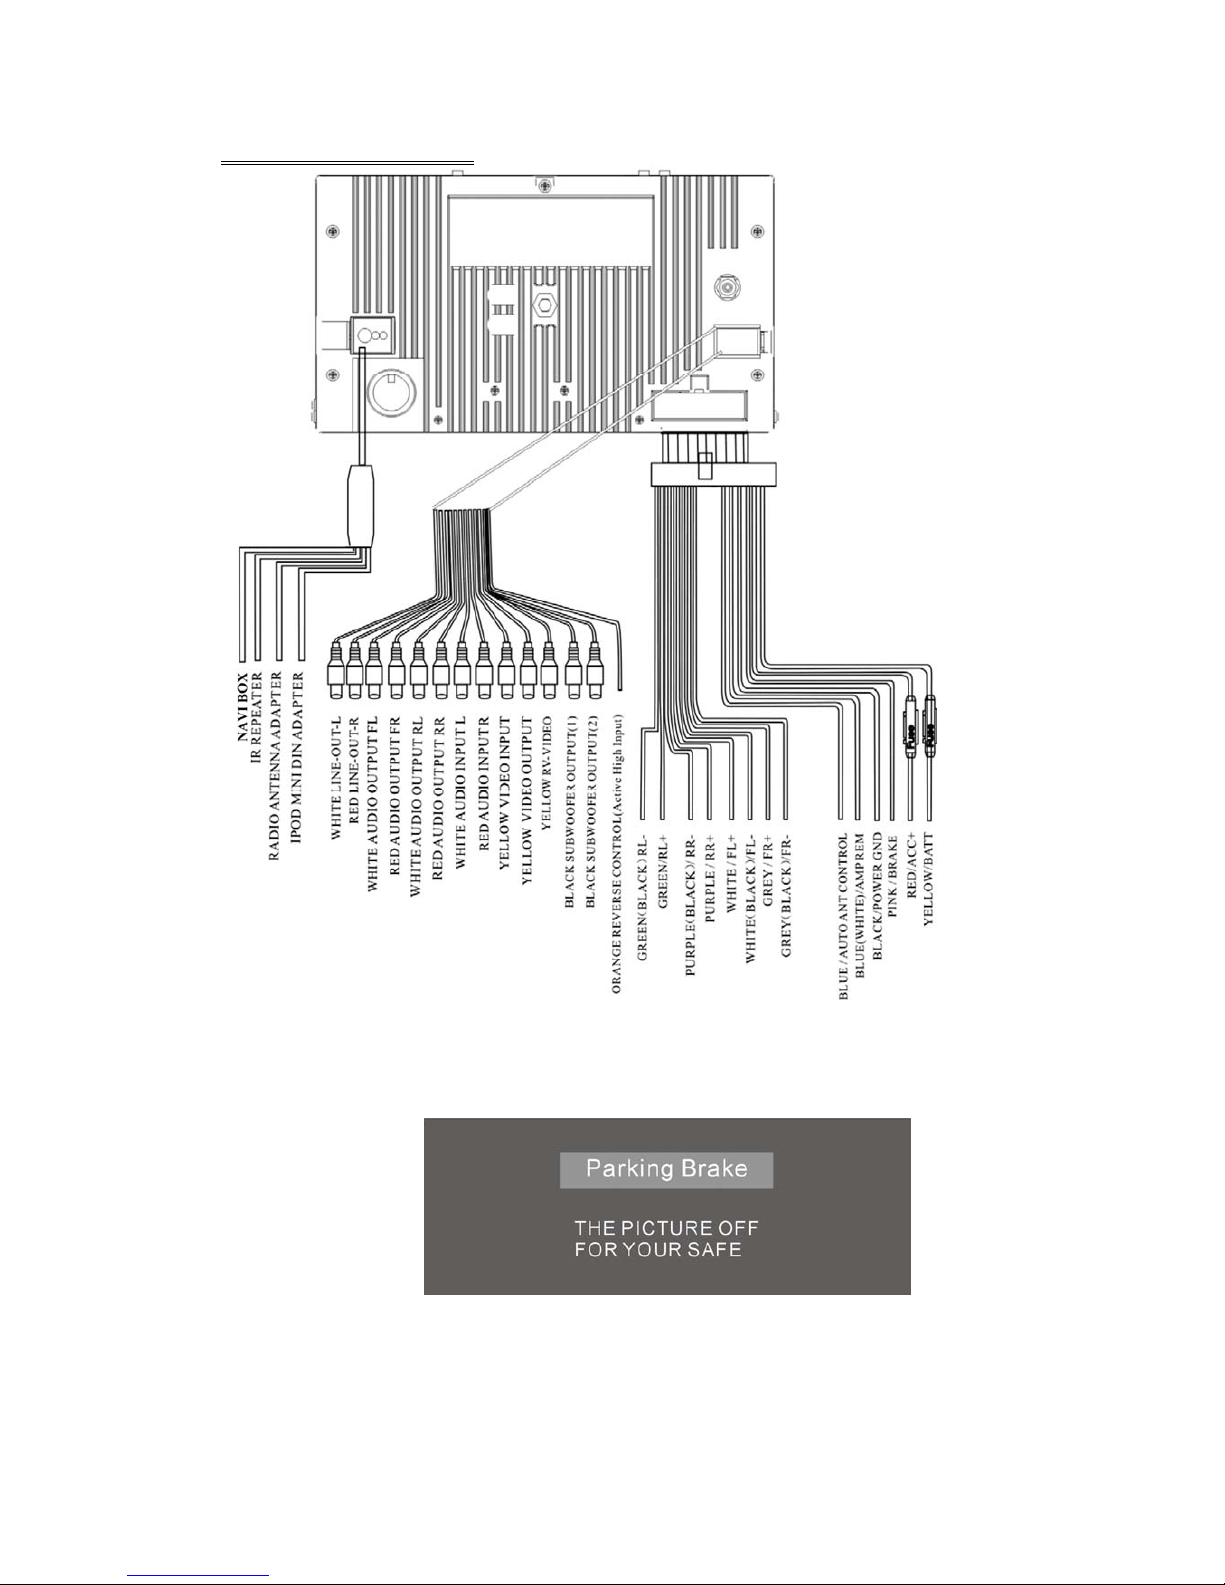
WIRE CONNECTION
NOTE:
Brake Control
It is necessary to connect the Brake Control wire to the Hand-brake switch of the car.
While driving, the TFT monitor will display the alarm picture (see as follows) in order
to ensure the safety.
Under the Rear View Mode, the Brake Control function is no effective.
Auto Antenna Control
Connect the auto antenna control wire AUTO_ANT (see Wiring Diagram); the
antenna will lift when the unit startup; it will descend when the unit turnoff.
- 9 -
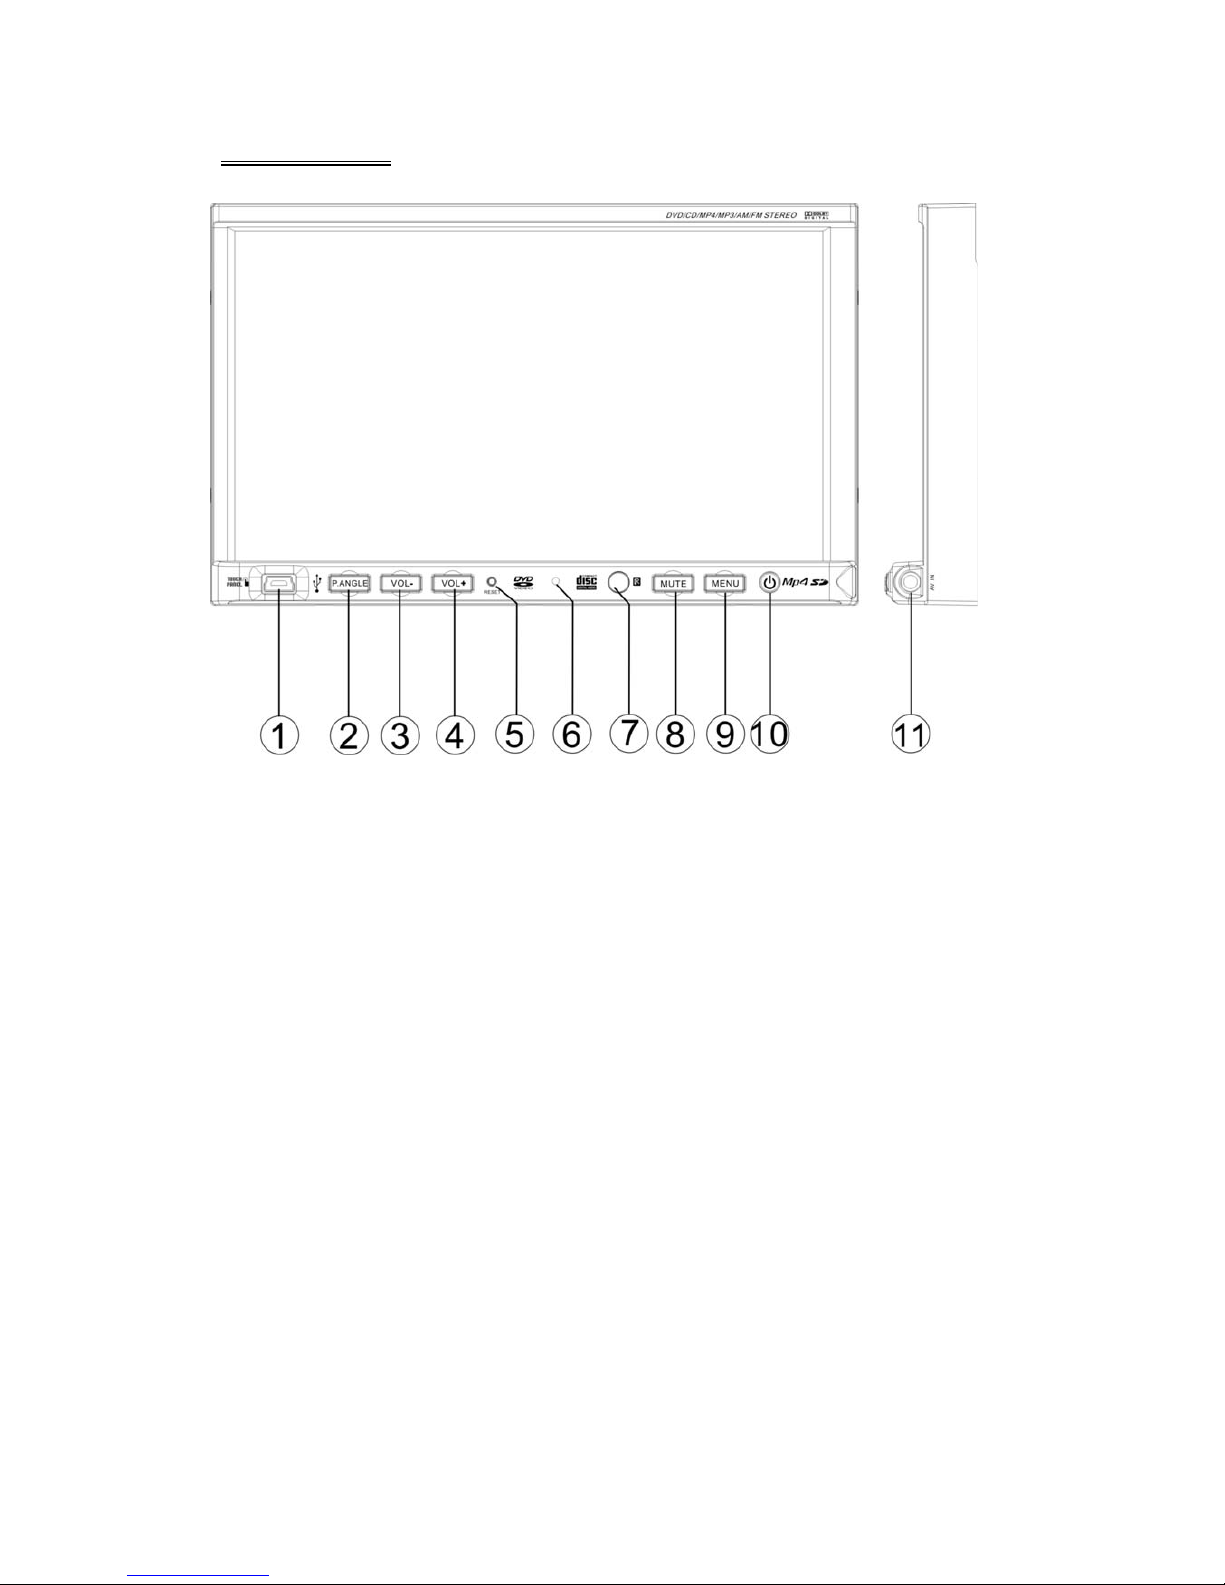
FRONT PANE
1. MINI USB 5. RESET 9. MENU / NAVI
2. P. A N G L E 6. MIC 10. POWER / SOURCE
3. VOLUME - 7. REMOTE 11. AV IN 2
4. VOLUME + 8. MUTE
NOTE:
MIC is not effective for this unit, it is a common panel for Bluetooth function models.
Table of contents


