Domain DM-DV5662NVU User manual

INSTRUCTION MANUAL
DM-DV5662NVU
DVD/VCD/CD/MP3/MP4/RMVB/USB/SD PLAYER
with built in BLUETOOTH/GPS
and FM/AM TUNER

1
Safety Precautions
Never expose this unit, amplifier,
and speakers to moisture or water to
prevent electric sparks or re.
Please don't change the fuse on
the power cord without professional
guidance, using improper fuse may
cause damage to this unit or even cause
re.
Please contact your nearest dealer
if one of the following symptoms is
experienced:
(a). Water or other objects enters the
unit.
(b). There is smoke.
(c). Peculiar smell.
Only connect the unit to a 12-volt power
supply with negative grounding.
MUTE
OK
MUTE
OK
Never install this unit where the
operation & condition for safe driving is
impaired.
Never use the video display function
in the front when driving to prevent the
violation of laws & regulations and also
to reduce the risk of traffic accident
except for using rear view video
camera.
MUTE
OK
MUTE
OK
MUTE
OK
MUTE
OK
Thank you for purchasing this product.
Please read through these operating
instructions so you will know how to
operate your model properly. After
you’ve nished reading the instructions,
keep this manual in a safe place for
future reference.
To ensure safe driving, please adjust
the volume to a safe and comfortable
level in case of emergency situations.

2
1. Never disassemble or adjust the unit without any professional guidance.
For details, please consult any professional car shop / dealer for inquiry.
2. If the front panel or TFT monitor is dirty, please use a clean silicone cloth and neutral detergent
to wipe off the spot. Using a rough cloth and non-neutral detergent such as alcohol for cleaning
may result in scratching or decoloration to the monitor.
3. If any abnormal behavior of the unit is found, please refer to trouble shooting guide of this
manual. If no relevant information is found, please press the [RESET] key on the front panel to
resume factory default.
4. If you have parked the car in hot or cold weather for a long time, please wait until the
temperature in the car becomes normal before operating the unit.
5. Using the car heater in low temperature environment may result in moisture inside the unit, DO
NOT use the unit in this situation. Eject the disc and wipe off the moisture on the disc. If the unit
still doesn't work after a few hours, please contact the service center.
6. Do not impact the LCD monitor which could cause damage.
7. To prevent damage to the screen, avoid touching it with sharp objects.
8. To provide a clear demonstration and an alternative for easy understanding to the operation of
this unit, graphic illustrations are used.
However, some illustrations are different from the actual images displayed on the screen.
9. Operate the unit correctly according to this manual to prevent unnecessary problem. The
guarantee won't be valid if the problem is caused by inappropriate operation.
Safety Precautions
Note:
The items listed outside of the frame are the commercial products generally sold.
Expanding Systems

3
Contents
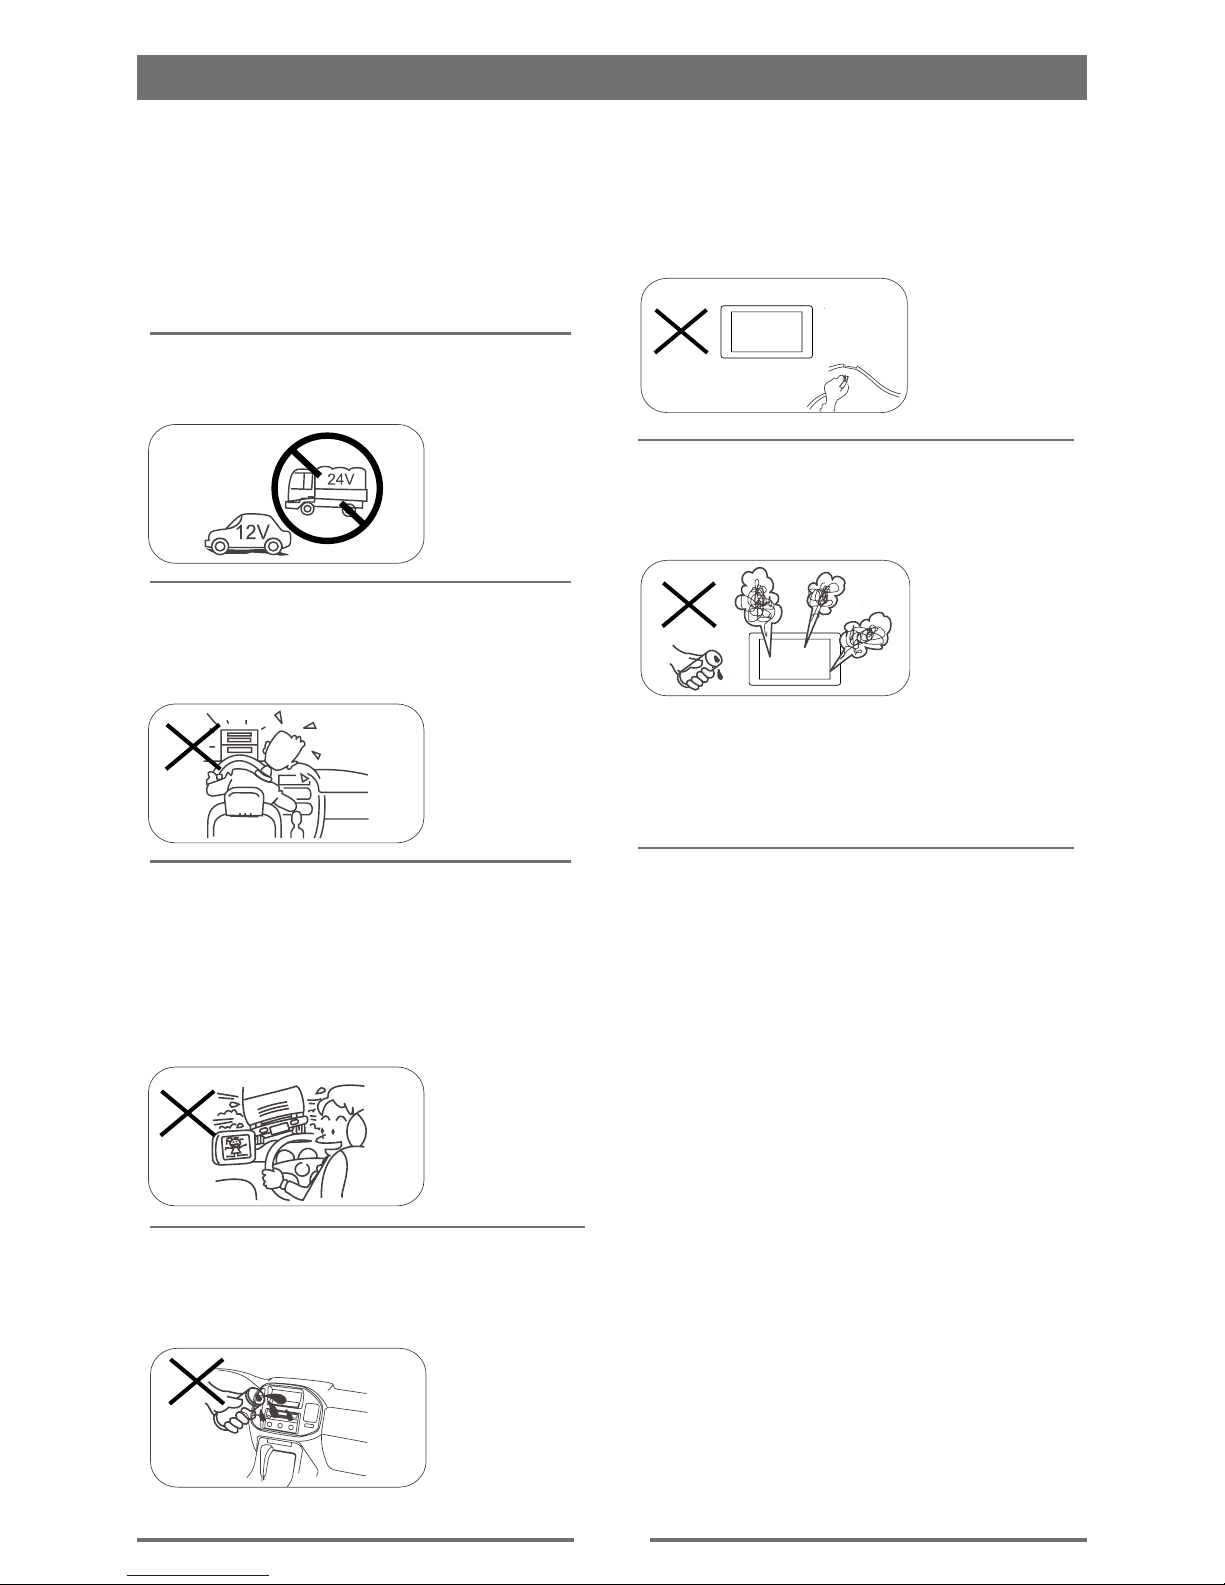
Safety Precautions ...................................1
Contents....................................................3
Before Using .............................................4
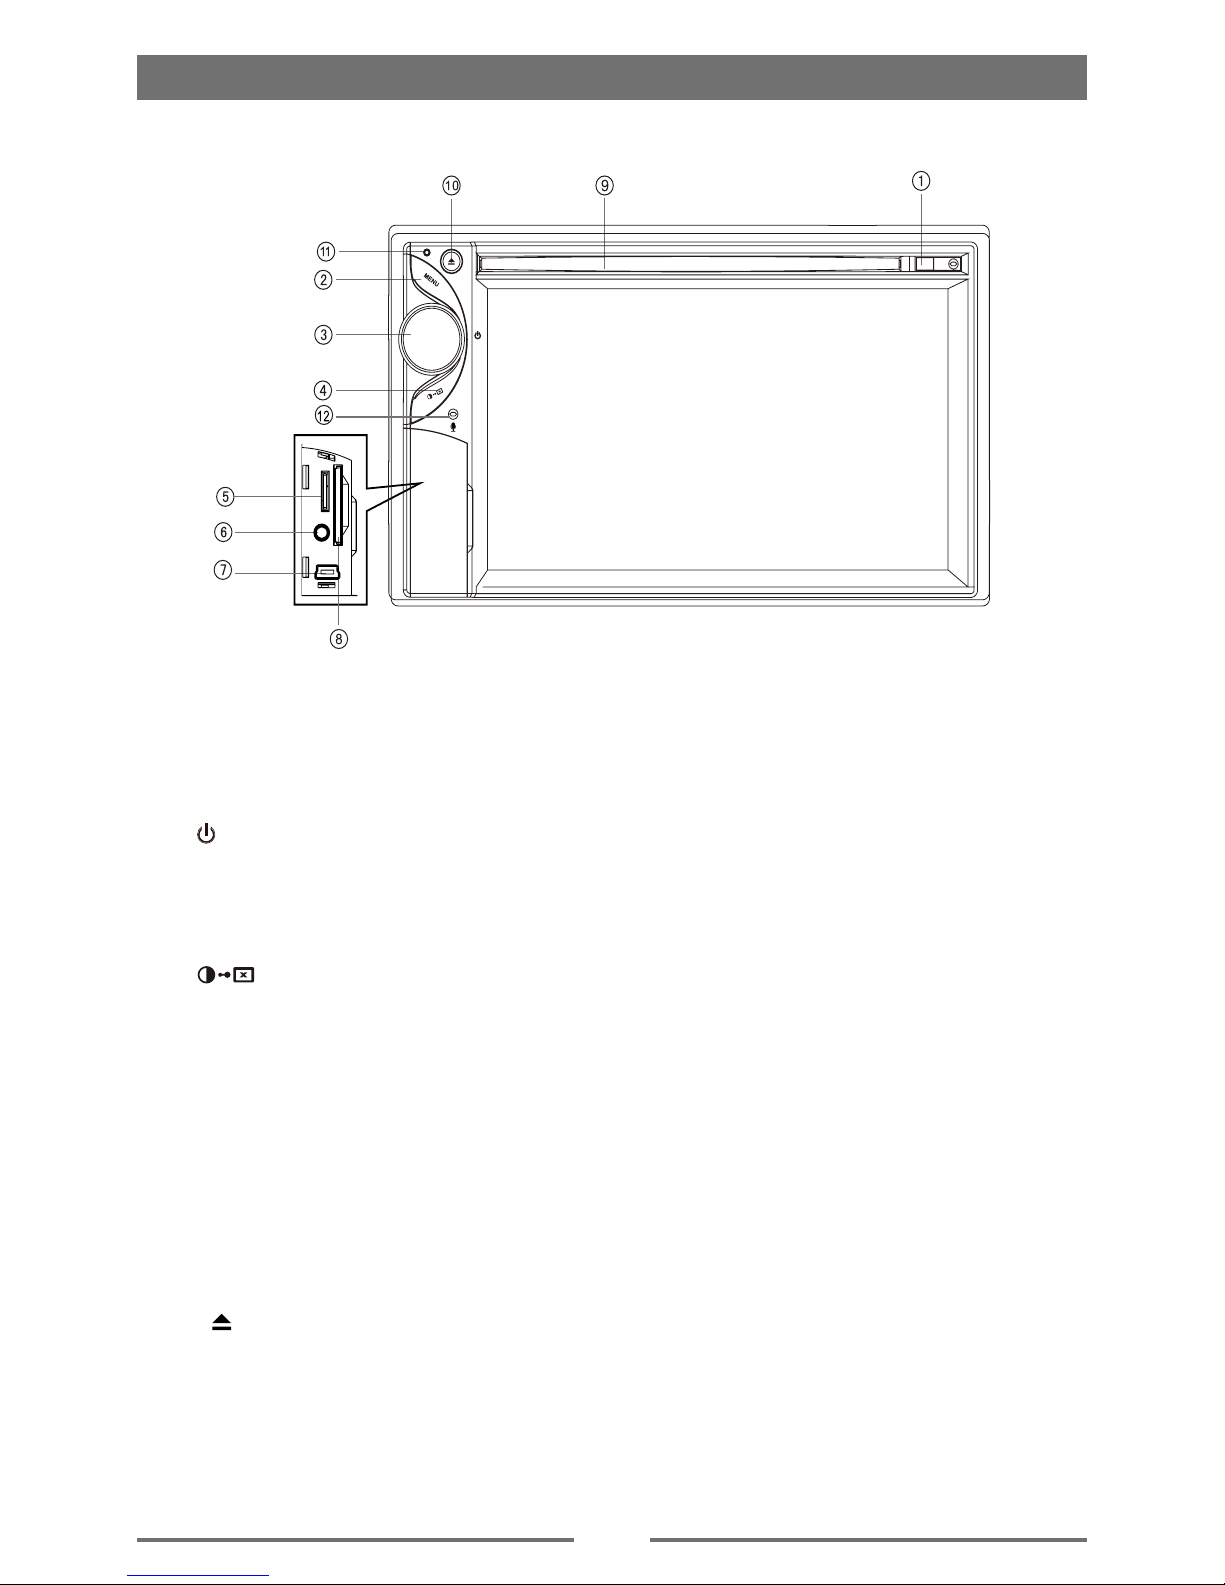
Front Panel .............................................4
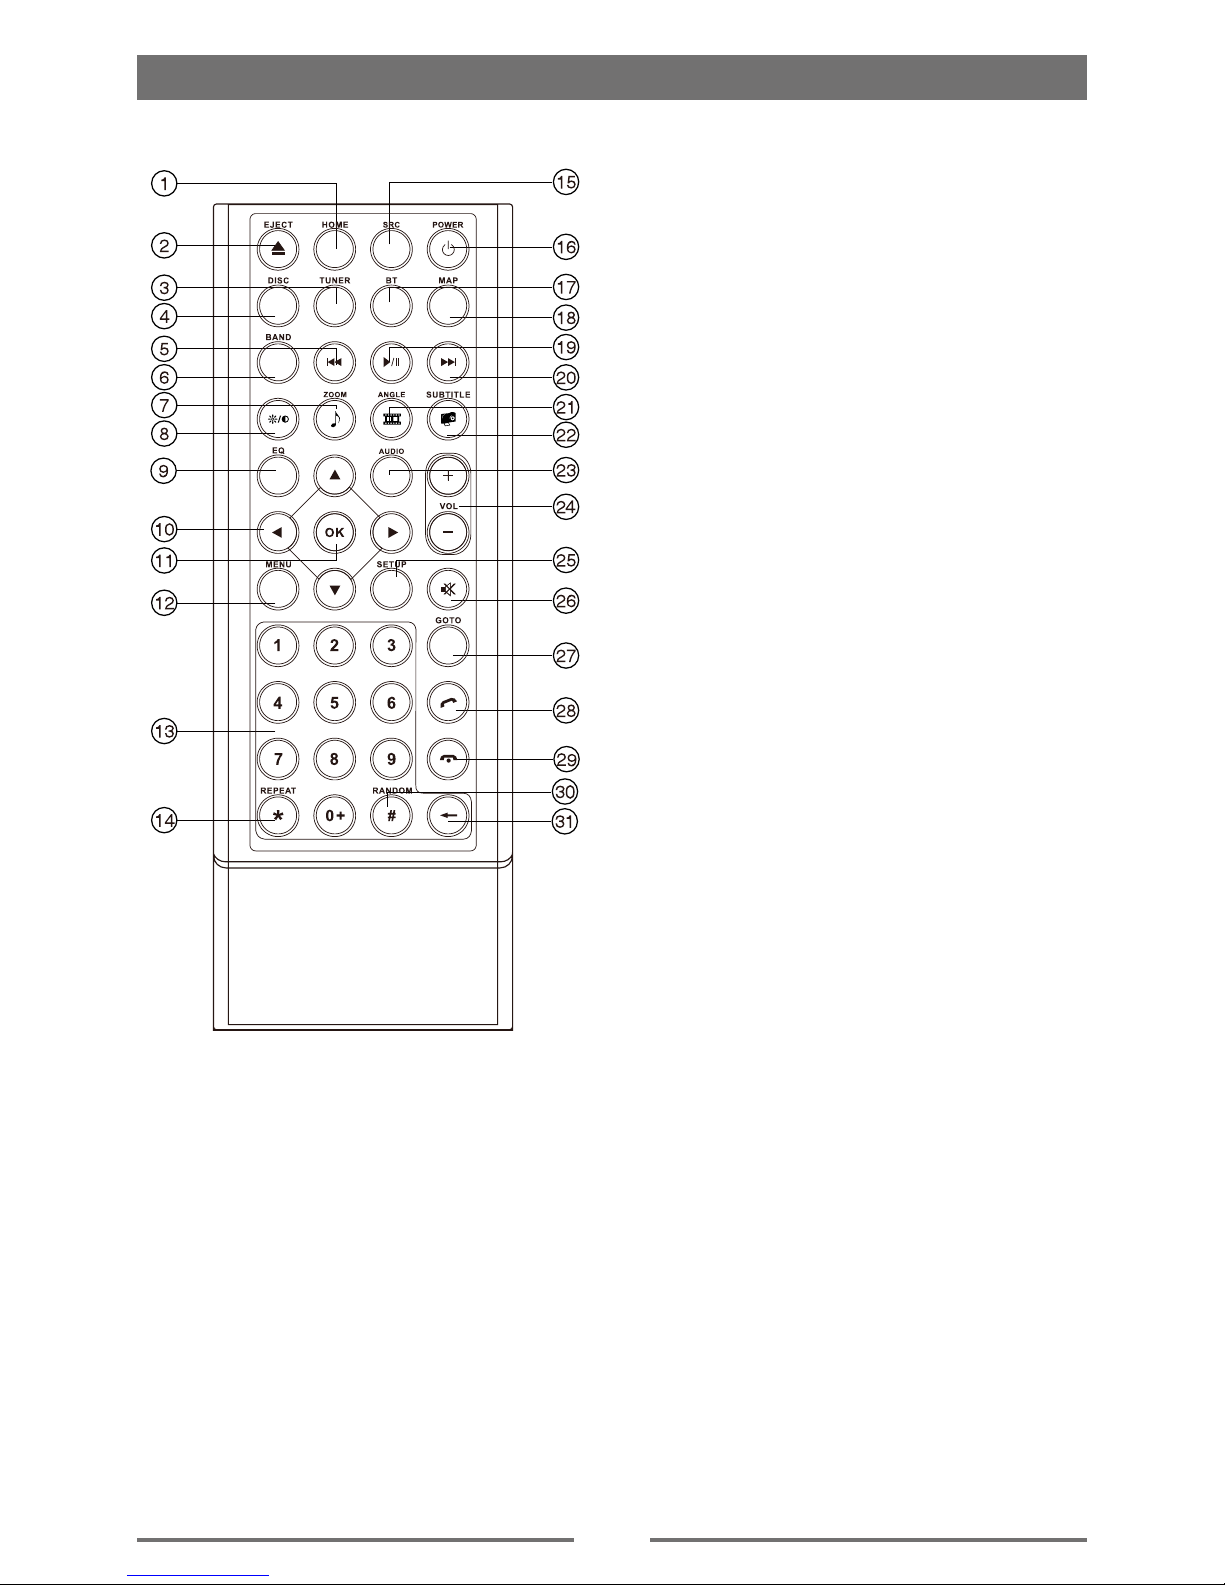
Remote Control.......................................5
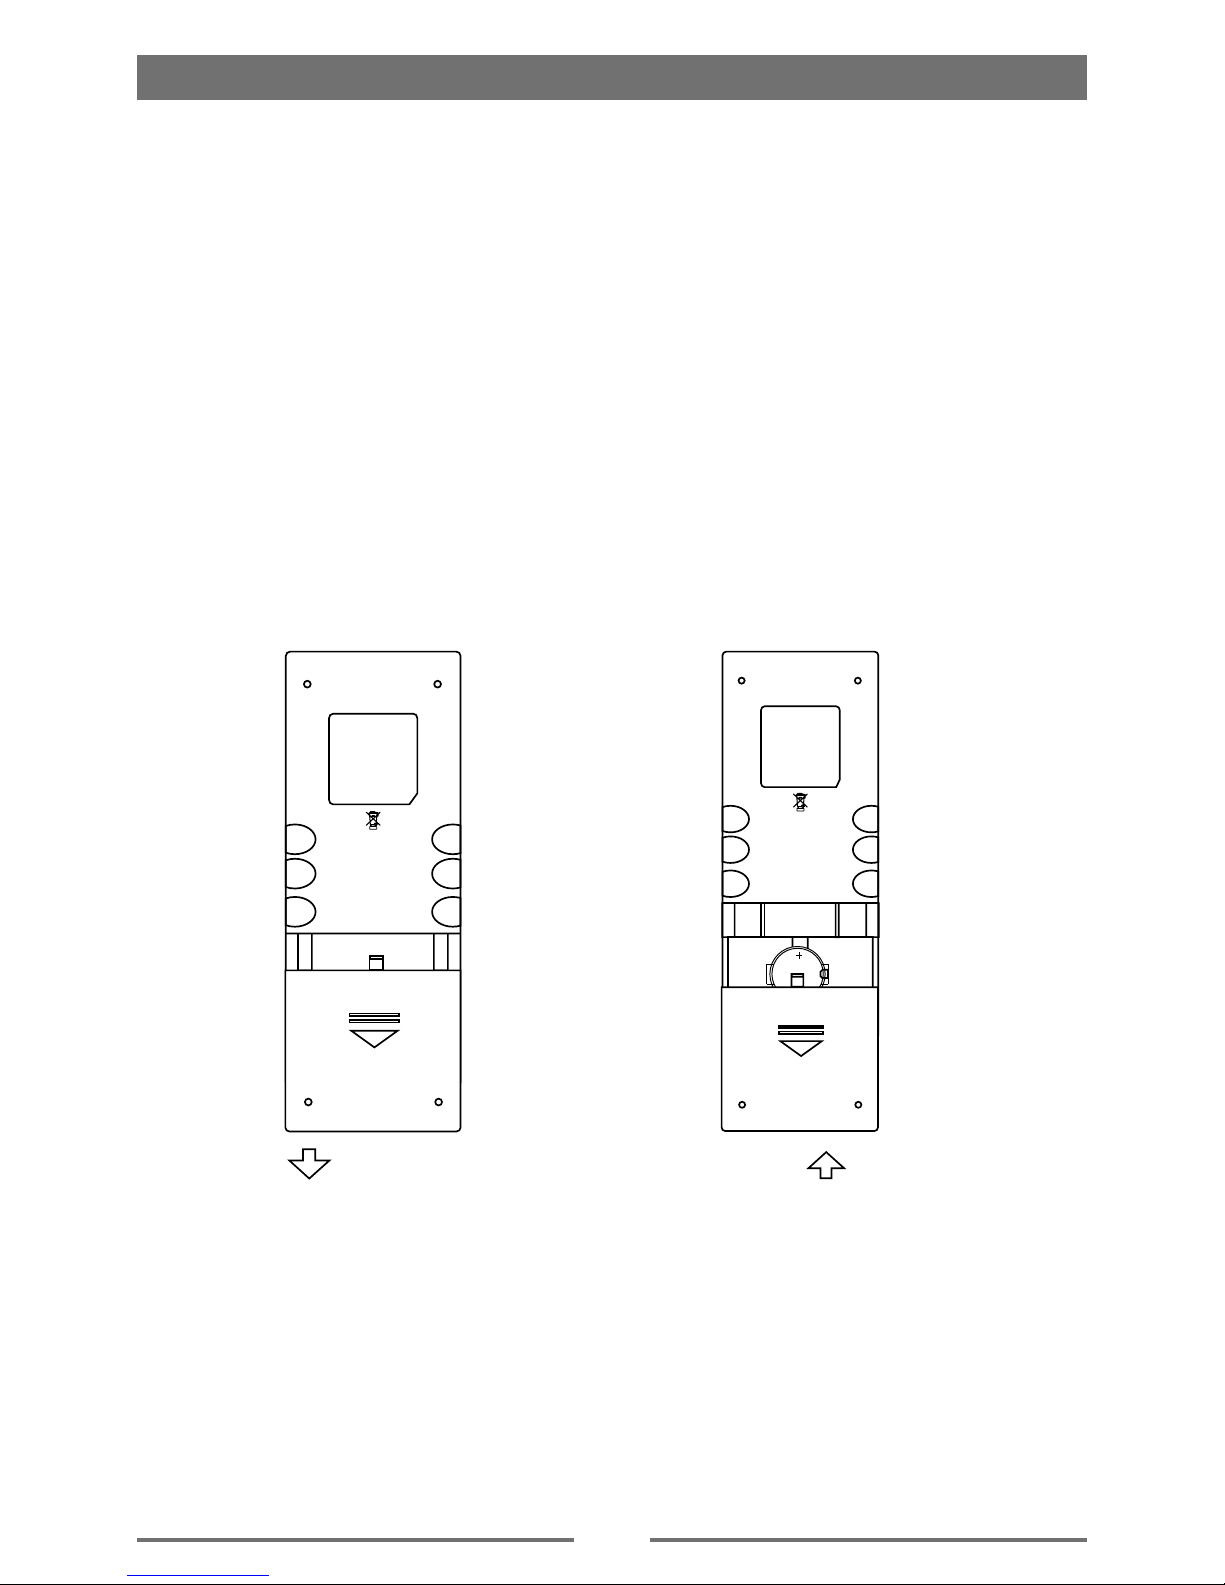
Notes on Remote Control Usage ............6
Basic Operations......................................7
Parking Brake Inhibit...............................7
Mute ........................................................7
Power On / Off ........................................7
Audible Beep Conrmation .....................7
Playing Source Selection ........................7
Volume Adjustment.................................7
EQ Menu.................................................7
Basic Operations......................................8
Select Preset Equalizer ..........................8
Adjust EQ Parameters ............................8
Adjust FAD BAL ......................................8
Set Date /Time ........................................9
Set Date ..................................................9
Set Clock Mode ......................................9
Set Time .................................................9
Radio Mode .............................................10
Radio Display........................................10
Select Radio as Playing Source ...........10
Select One Radio Band ........................10
Tune......................................................10
Preset Station .......................................11
Local Seeking .......................................11
EQ Selection .........................................11
Playback Mode........................................12
Load a Disc ...........................................12
Eject a Disc ...........................................12
Touch Screen Controls .........................12
Controlling Playback .............................12
Connect a USB Device .........................12
Remove a USB Device .........................12
Insert a SD Card ...................................12
Remove a SD Card...............................12
Play/Pause............................................12
Previous/Next .......................................13
Search for a Folder ...............................13
Repeat ..................................................13
Repeat A-B ...........................................14
Shufe (Random) Play..........................14
Select Audio Mode................................14
Select Subtitle Language ......................14
Video Setup ..........................................14
Playback Information ............................15
Direct Track Entry .................................15
Rotate Pictures .....................................15
Zoom.....................................................15
Bluetooth Mode ......................................16
Pair the Bluetooth-enabled Devices .....16
Disconnect Bluetooth Device ................16
Make a Call ...........................................16
Receive a Call.......................................17
Adjust Bluetooth Settings......................17
Settings ...................................................18
Display System .....................................18
Adjust General Settings ........................18
Calibration.............................................18
Adjust Video Settings............................18
Adjust sound settings............................19
Adjust Time Settings .............................19
Adjust Language Settings .....................19
Adjust Bluetooth Settings......................19
Adjust DVD Rating ................................20
Adjust Volume Settings.........................20
Other Modes............................................21
Listen to Other Devices ........................21
Reset ....................................................21
Replace a Fuse.....................................21
GPS ......................................................21
Specications .........................................22
Troubleshooting .....................................24
Installation...............................................25
Wire Connections...................................27

4
Front Panel
Before Using
Notice:
The graphic in this manual is for reference only, and may be different from the actual unit.
Reference to actual unit is suggested.
1. Remote sensor
2. [ MENU ]Button
Press to switch between the main menu and current source.
3. [ ] Knob
Rotate to adjust the volume.
Press momentarily to activate the MUTE function. Press again to resume normal
listening.
Press to turn the unit ON. Press and hold to turn the unit OFF.
4. [ ] Button
Adjust screen brightness (press)
Black screen (long press)
5. Map card slot
The MicroSD card slot is used for the Navigation Map, not for music or other les.
This may be used for rmware updates if required.
6. AUX IN
7. USB connector
Connect a USB device for playback of music/video/picture les.
8. SD card slot
Insert a SD card for playback of music/video les.
9. Disc slot
10. [ ] Button
Press to Eject the disc
11. Reset
Press to reset system settings to factory default (except password and parental
lock settings).
12. Microphone

5
Before Using
Remote Control
1. Return to the home menu
2. Eject the disc
3. Access to tuner source
4. Access to disc source
5. - Search an available radio station by
decreasing tuning frequency
- Select the previous chapter/track for
playback
6. Select radio band
7. - Zoom in (Picture menu of CD/USB/SD)
- Access to music list (Audio menu of
music playing)
8. Adjust screen settings
9. Open EQ menu
10. Menu cursor
11. Enter
12. - Open route menu (DVD)
- Turns on/off PBC (VCD)
13. Digit area
14. Repeat playback
15. Change to next source
16. Power on/off
17. Access to Bluetooth source
18. Access to navigation source
19. Pause playback/Start playback
20. - Search an available radio station by
increasing tuning frequency
- Select the next chapter/track for
playback
21. - Playback disc in different angle for a
scene (DVD)
- Rotate (photo playing)
- Access to video list
22. - Language selection for subtitle (DVD)
- Access to photo list
23. Change the audio language for disc
playback (DVD)
24. Increase/Decrease volume
25. Access to settings source
26. Mute On/Off Audio Output
27. Activate direct access mode
28. Dial/Receive a call
29. Hang up
30. Play all chapter/tracks in random order
31. - Press to clear the number one by one
- Hold to clear all the numbers

6
Notes on Remote Control Usage
1. Aim the remote control at the remote sensor on the unit.
2. Replace the battery from the remote control or insert a battery insulator if the battery has not
been used for a month or longer.
3. DO NOT store the remote control in direct sunlight or in high temperature environment, or it
may not function properly.
4. The battery can work for 6 months under normal condition. If the remote control won’t work,
please change the battery.
5. Use“button shaped” lithium battery“CR2025”(3V) only.
6. DO NOT recharge, disassemble, heat or expose the battery in fire.
7. Insert the battery in proper direction according to the ( + ) and ( - ) poles.
8. Store the battery in a place where children cannot reach to avoid the risk of accident.
Uninstall Battery
Slide out the battery compartment tray
at the bottom on the back of the remote
control.
Install Battery
Use button-shaped lithium battery
CR2025 (3V)” only. Insert the battery
to the battery tray with proper direction
according to the (+) and (-) poles.
Before Using
PULL OUTPUSH IN

7
Parking Brake Inhibit
• When the “BRAKE” cable is connected to the brake switch, the display on the TFT monitor will
display video only when the vehicle is applied.
• Parking brake function is overridden when the video source is set to REVERSE.
• When the parking brake inhibit is active, the front monitor displays “Warning!!! It is illegal to view
video while driving or operating a motor vehicle. Set parking brake to view video.”, preventing
the driver from watching content while driving. Rear video screens are not affected.
Mute
Press [ ] knob to mute the volume from the unit. Press again to restore the volume.
Adjusting the volume or using any of the audio setup features cancels the mute function.
Power On / Off
Press the [ ]knob on the unit to turn the unit on. The buttons on the front of the unit light up for
a moment and the current mode status appears in the LCD.
Press and hold the [ ]knob to power off the unit.
Audible Beep Conrmation
An audible beep tone conrms each function selection. The Beep tone can be disabled through
the Setup menu.
1 1
2 3 4
Basic Operations
Playing Source Selection
Press the [ MENU ] button on the front panel to change between
available playing sources. The playing mode is displayed on the
screen.
1. or :Touch this page button to view the first or second
page of on-screen buttons
2. Function icons
3. Date
4. Settings: Touch to access system settings menu.
5. EQ: Touch to access Equalizer level settings menu.
Volume Adjustment
To increase or decrease the volume level, rotate the []knob on
the front panel. The volume ranges from “0” to “50”. The LCD or
TFT screen displays the volume level for 3 seconds.
EQ Menu
The Audio Control feature allows you to easily adjust your audio
system to meet the acoustical characteristics of your vehicle, which
vary depending on the type of vehicle and its measurements.
Proper setting of the Fader and Balance boosts the effects of the
cabin equalizer.
5

8
Select Preset Equalizer
1. Enter the EQ setup mode
Touch the [ ] icon in the user interface and the EQ setup
interface will display on the screen.
2. Select EQ mode
Touch the desired EQ selection: [ User ] / [ Flat ] / [ Classic ]
/ [ Rock ] / [ Jazz ] / [ Techno ] / [ Pop ], and the EQ mode will
change.
Adjust EQ Parameters
To adjust EQ parameters, touch and drag the parameters adjustment
bar.
[ User ]: Set the desired audio effect.
[ Reset ]: Cancel the equalizer function settings.
[ Loud: On/Off ]: When listening to music at low volumes, this
featurewill selectively boost certain bass and treble
frequencies.
Adjust FAD BAL
You can adjust front/back/left/right balance of the speaker and the
subwoofer volume to get balanced listening effect according to the
surroundings and your interest.
1. Enter the EQ setup mode
Touch the [ ] icon in the user interface and the EQ setup
interface will display on the screen.
2. Adjust subwoofer volume
Touch [ ] / [ ] to adjust subwoofer volume from -12 to +12.
3. Adjust fade / balance value
Touch [ ] / [ ] / [ ] / [ ] to adjust fade / balance value
from -20 to +20.
[ ]: Front speaker
[ ]: Rear speaker
[ ]: Left speaker
[ ]: Right speaker
Notes:
1. The parameters of the EQ modes has been preset and you can
not change them besides ‘User’.
2. The EQ mode will change to ‘User’ automatically when you adjust
the frequency value under the modes besides ‘User’.
3. The value of Sub is independent of EQ mode and can be adjusted
separately.
Basic Operations

9
Basic Operations
Set Date /Time
1. Touch [ Setting ].
2. Touch [ Clock ].
The date/time setup menu is displayed.
Set Date
1. Touch [ Date ].
2. Touch the date information on the screen .
A submenu is displayed.
3. Touch [ ] or [ ] to set year, month and day.
Set Clock Mode
1. Touch [Clock mode].
2. Touch [12Hr] or [24Hr] to switch clock mode.
Set Time
1. Touch [ Clock ].
2. Touch the time on the screen, a submenu is displayed.
3. Touch [ ] or [ ] to set hour and minute.
Tip:
When date/time is set, touch [ Save ] to conrm or [ Cancel ] to exit.

10
Radio Mode
Select Radio as Playing Source
Open the Source Menu and then touch [Radio].
Select One Radio Band
Touch the [ ] icon on the user interface to select one radio band among FM1, FM2, FM3, AM1
and AM2.
Tune
Auto Tuning
Touch and hold [ ] / [ ] icon on the user interface more than 1 second to seek a higher / lower
station.
To stop searching, repeat the operation above or press other keys having radio functions.
Note:
When a station is received, searching stops and the station is played.
Manual Tuning
Method 1:
During manual tuning, the frequency will be changed in steps.
Touch the [ ] / [ ] icon on the user interface to tune in a higher / lower station.
Method 2:
1. Touch the numeric keypad icon [ ]. Numeric keyboard is
displayed, touch number to input frequency.
2. Touch [ ] to delete the input number step by step.
3. Touch [ OK ] to enter.
Radio Display
13 14 1512
1
3
2
87 9 10 11
4
5
6
1. Touch to view the SOURCE MENU.
2. To view all the stored stations
3. Preset stations list of current band
4. Clock
5. Current station frequency
6. Current radio band
7. Touch to view more buttons
8. Tune backward(short press)
Seek backward(long press, then short press briey)
9. Search stations automatically
10. Tune forward(short press)
Seek forward(long press, then short press briey)
11. Touch to change band
12. Save the desired radio station
13. Touch to receive Local or Distant stations
14. Enter frequency directly
15. Touch to access Equalizer settings menu

11
Radio Mode
Preset Station
The unit has 5 bands, such as FM1, FM2, FM3, AM1, AM2, and
each band can store 6 stations; hence the unit can store 30
stations in total.
Search Stations Automatically
Touch [ ] to search station and store 6 strongest stations in
current band automatically.
Manual Store
1. Tune to a station.
2. Touch [ ].
3. Touch one of the channels P1 to P6 to save the select band.
Tune to a Preset Station
1. Touch [ ].
2. Select a band.
3. Touch one of the preset channels (P1 to P6) on the screen.
Local Seeking
Touch the [ ] icon and choose the Radio Local or Distance.
When the [ ] icon turns bright, only stations with a strong
signal strength will be detected . Default is “Distance”.
EQ Selection
Press the [ ] icon to enter the EQ setup menu.

12
Load a Disc
You can play video, audio or images stored on the following discs:
• DVD Video, DVD-R, DVD-RW
• VCD
• Audio CD, CD-R, CD-RW
Note:
Ensure that the disc contains playable content.
Eject a Disc
Press the [ ] key on the front panel to eject the disc. When the
disc is ejected, the unit switches to the previous source.
Touch Screen Controls
The touch key areas for DVD playback are outlined below:
A: Return to the main menu
B: Play the video and display playback information
C: Display onscreen control menu
D: Time display
Controlling Playback
To access the on-screen controls, touch the screen except upper
left corner, and touch again to cancel display. Touch [ ] to
view all function icons.
Connect a USB Device
1. Open the USB door.
2. Insert the USB device into the USB slot.
Play starts automatically.
Remove a USB Device
1. Select other source on the main menu.
2. Remove the USB device.
Insert a SD Card
1. Open SD card cover.
2. Insert the SD card into the SD card slot.
Play starts automatically.
Remove a SD Card
1. Select other source on the main menu.
2. Press the card until you hear a click sound.
3. Remove the SD card.
Play/Pause
1. Once a disc, USB or SD card is inserted, play starts
automatically.
For DVD movie, if a menu appears, press [ ] to start play.
Playback Mode
B
C
A

13
2. To pause, touch [ ].
To resume play, touch [ ].
3. Skip to previous / next track / chapter, press [ ] / [ ] key.
Previous/Next
Touch [ ] / [ ] key on the screen to skip to previous / next track
/ chapter.
Search for a Folder
For Video Files
1. Touch [ ] to display all available video folders.
2. Touch a folder, then select the desired le.
3. Touch the le again to start play.
For Audio Files
1. Touch [ ] to display all available audio folders.
2. Touch a folder, then select the desired le.
3. Touch the le again to start play.
For Picture Files
1. Touch [ ] to display all available picture folders
2. Touch a folder, then select the desired le.
3. Touch the le again to start play.
For Folder Control
1. Touch [ ] to display all available folders
2. Touch a folder, then select the desired le.
3. Touch the le again to start play.
Repeat
For DVD/VCD movie disc:
1. Touch bottom half of the screen to display menu on the screen, if
necessary.
2. Touch [ ] to display the 2nd menu.
3. Touch [ ] repeatedly to select:
DVD
[ ] Repeat chapter: Play the current chapter repeatedly.
[ ] Repeat title: Play all chapters in the title repeatedly.
[ ] Repeat all: Play all in the disc repeatedly.
[ ] Repeat off: Cancel repeat play.
VCD
[ 1 ] Repeat single: Play the current single repeatedly.
[ ] Repeat all: Play all in the disc repeatedly.
[ ] Repeat off: cancel repeat play.
Playback Mode

14
For CD/MP3 les:
1. Touch anywhere except the upper left corner to display menu on the screen, if necessary.
2. Touch [ ] repeatedly:
[ ] Repeat all: Play all tracks repeatedly.
[ ] Repeat folder: Play all in the current folder.
[ ] Repeat single: Play the current single repeatedly.
[ ] Repeat off: Cancel repeat play.
Repeat A-B
You can repeat a specic of video le (repeat A-B).
1. Touch the screen to display control menu, if necessary.
2. Touch [ ] to display the 2nd menu, if necessary.
3. Touch [ A-B ] repeatedly to mark:
Repeat A-: the start of the section to repeat.
Repeat A-B: the end of the section to repeat.
The selected section plays repeatedly.
4. To exit A-B repeat mode, touch A-B until [Repeat A-B off] displayed.
Shufe (Random) Play
You can play audio tracks/les in random order.
1. Touch the screen to display control menu, if necessary.
2. Touch [ ] to display the 2nd menu, if necessary.
3. Touch [ ] on the screen repeatedly to turn random play on or off.
Select Audio Mode
When you play VCDs, you can select an audio mode (R/L/Stereo).
1. During play, touch bottom half of the screen to display menu on the screen, if necessary.
2. Touch [ ] to display the 2nd menu.
Touch [ ] repeatedly until the audio mode is selected.
Select Subtitle Language
For DVD discs that contain two or more subtitle languages.
1. During play, touch the screen to display menu on the screen, if necessary.
2. Touch [ ] to display the 2nd menu.
3. Touch [ ] repeatedly to select a language.
The selected language is displayed.
Video Setup
Touch [ ] to access video setup mode, touch [ ] or [ ]
to set the desired effect.
You may set the brightness, contrast, saturation, and hue of the
video output from 1 to 20.
Playback Mode

15
Playback Information
Touch the screen when playing back DVD and VCD discs and the
playback information will be displayed on the top area of the TFT.
For DVD
1. Disc type.
2. DVD Title information. “01/08” indicates that
this DVD has 8 titles and the title playing
back now is the first title.
3. DVD Chapter information. “005/012” indicates
that current title has 12 chapters and the
chapter playing back now is the fifth chapter.
For VCD
1. Disc type.
2. VCD Track information. “01/08” indicates that
this VCD has 8 tracks and the track playing
back now is the first title.
Elapsed Time
1. Elapsed time of the current track.
2. Total time of the current track.
Direct Track Entry
To select a track directly, touch the [ ] icon on screen control to
displaythe direct entry menu. Enter the desired track using the on-
screen number pad. Press [ OK ] to the selected track.
Rotate Pictures
1. When you view pictures, touch the screen to display menu on
the screen, if necessary.
2. Touch [ ] to display the 2nd menu.
3. Touch [ ] repeatedly to rotate the picture.
Zoom
You can zoom in pictures for a close view.
1. When you view pictures, touch the screen to display menu on
the screen, if necessary.
2. Touch [ ] to display the 2nd menu.
3. Touch [ ] repeatedly to zoom in the picture.
Playback Mode
12
00:01:20 00:30:17
12 3
DVD T:01/08 C:005/012 00:44
12
VCD Track:01/08 00:44

16
You can make or receive phone calls with Bluetooth-enabled phones
through the unit. You can also listen to music from a Bluetooth-
enabled device.
Pair the Bluetooth-enabled Devices
To connect your Bluetooth device to the unit, you need to pair the
device to the unit. Pairing needs only to be done once. You can pair
up to five devices. You also can search for Bluetooth devices by
mobile phone.
1. Turn on the Bluetooth function on the mobile phone.
2. Touch [ ] to search for Bluetooth device with the unit.
3. Select the Bluetooth device ID in the pairing list.
4. Enter default password “0000”.
Tip:
• The operational range between this unit and a Bluetooth device is
approximately 5 meters .
• Before you connect a Bluetooth device to this unit, familiarize
yourself with the Bluetooth capabilities of the device.
• Compatibility with all Bluetooth device is not guaranteed.
• Any obstacle between this unit and a Bluetooth device can
reduce the operational range.
• Keep this unit away from any other electronic device that may
cause interference.
Disconnect Bluetooth Device
To disconnect one device, touch [ ] .
Tip
• The device will also be disconnected when the device is moved
beyond the operational range.
• If you want to reconnect the device to the unit, place it within the
operational range.
• Ifyoudonotwanttoreconnectthedevicetotheunitautomatically,
touch [ ], then set [ Auto connect ] to [ Off ].
For details, see the “Adjust Bluetooth Settings” section.
Make a Call
1. Select Bluetooth function in the home menu.
2. Pair the phone with the unit.
3. Search for phone number from the following list:
[Phone Book]
[Call Log]
[Missed calls]
[Received calls]
[Dialed calls]
Or touch the number pad directly, then touch [ ] to dial.
Bluetooth Mode

17
Receive a Call
By default, all incoming calls are received automaticaly.
1. If there is an incoming call, the screen will appear “Incoming”.
2. You may touch the screen to select [ Hang up ] or [ Answer ].
Speak into the Bluetooth microphone.
∙ Touch[ ] to hang up the call.
∙ Touch[ ] to mute the microphone
∙ Touch[ ] to transfer the call to your mobile phone.
∙ Touch[ ] to show the key pad.
Tip
• You can select to receive calls manually by set [Auto answer] to
[Off] status.
Adjust Bluetooth Settings
1. In Bluetooth menu,touch [ ].
The option menu is displayed.
2. Touch on the selected option to change the setting.
∙ [Bluetooth]: To turn on or off “Bluetooth” function.
∙ [Auto connect]: To turn on or off “Auto connect” function.
∙ [Auto answer]: To turn on or off “Auto answer” function.
∙ [Pairing code]: To set paring code.
∙ [Phone sync]: To synchronize phone book, touch [ OK ] on the
sub-menu popped out.
Phonebook sync may take several minutes to load on initial setup.
Tip
• You can also adjust Bluetooth settings in the “Settings” menu.
Music Mode
A2DP
A2DP is short for Advanced Audio Distribution Profile. The mobile
phones supporting this function can transmit stereo audio, whereas
the ones not supporting this function can transmit mono audio only.
AVRCP
AVRCP is short for Audio/Video Remote Control Profile. The mobile
phones supporting this function can control the playback of a
Bluetooth audio player.
In the mode of the music player working, if you want to make a
phone call, you can press the number keys on the mobile phone.
At the same time the music player will stop. The TFT screen will
display “Calling”, after the call received, the voice will be transferred
to the unit. When the call ends, the screen will display music playing
menu.
If there is an incoming phone call, the music player will stop, and the
screen will display “Incoming”. When the call ends, the screen will
display music playing menu.
Bluetooth Mode

18
Display System
1. Touch the upper left corner to display main menu.
2. Touch [ Setting ].
The settings menu is displayed.
3. Touch the upper left corner of the screen to exit.
Adjust General Settings
1. Touch [ General ], if necessary.
2. Touch to highlight an option.
3. Touch the option to adjust it.
General settings Options Description
Radio region USA/China/Japan/Europe/Europe
(LW)/OIRT Select one that matches your location.
Sensitivity Local Select Local to receive only stations with extremely
strong signal.
Distance
Blackout Off/10s/20s Set the screensaver.
Dimmer mode Night/Dark/Normal/Bright Adjust the display brightness.
Beep On Turn on the beep sound. Each time you press a button,
the unit beeps.
Off Turn off the beep sound.
Key Color Red/Blue Select the background color of keys.
Calibration Start Calibrate the touch screen.
GPS path setup Touch to enter GPS path setup.
4. Touch the upper left corner of the screen to exit.
Calibration
When the touch operation is not sensitive or valid, you should
calibrate the touch screen through calibration setting function.
Adjust the response positions of the touch panel as followings:
1. Press the [ Calibration ] option on the setup menu to enter.
2. Touch [ Start ] to enter.
3. Press and hold the center of [ + ] for 2 seconds, the [ +] will
move automatically.
4. Aim at center of [ + ], follow the path as shown of the gure, after steps from 1 to 5, the system
will exit calibrating automatically.
Adjust Video Settings
1. Touch [Video].
2. Touch the option to select:
Video settings Options Description
Parking On Disable video
Off Enable video
3. Touch the upper left corner of the screen to exit.
When in Park “On” mode, the screen will display “WARNING” [if you play the video disc]. The
above warning screen will prevent the driver watching images.
Settings

19
Adjust Time Settings
1. Touch [ Clock ].
2. Touch an option repeatedly to select:
Time settings Options Description
Date Year/Month/Day Touch [ ] or [ ] to set year, month and day.
Clock mode 12Hr/24Hr Touch [12Hr] or [24Hr] to switch clock mode.
Clock Hour/Minute/AM/
PM
Touch [ ] or [ ] to set hour and minute.
Touch [ ] or [ ] to set AM/PM (only for 12Hr).
3. Touch the upper left corner of the screen to exit.
Adjust sound settings
1. Touch [Sound].
2. Touch an option to select:
Sound settings Options Description
Sub woofer On Turn on the subwoofer.
Off Turn off the subwoofer
Sub woofer lter
80Hz
Select subwoofer lter criteria.120Hz
160Hz
3. Touch the upper left corner of the screen to exit.
Adjust Language Settings
1. Touch [Language].
2. Touch an option repeatedly to select.
Language settings Description
OSD Select on-screen display language.
Disc audio Select DVD audio language. Options available are depend on DVD disc.
Disc subtitle Select DVD subtitle language. Options available are depend on DVD disc.
Disc menu Select DVD menu language. Options available are depend on DVD disc.
3. Touch the upper left corner of the screen to exit.
Adjust Bluetooth Settings
1. Touch [Bluetooth].
2. Touch an option repeatedly to select.
Bluetooth settings Options Description
Bluetooth On Turn on the Bluetooth function.
Off Turn off the Bluetooth function.
Auto connect On If the pre-paired device is within the effective range, the unit re-connects
to pre-paired device automatically.
Off Need to re-connect manually.
Auto answer On Answer paired phone call automatically.
Off Answer phone call manually.
Pairing code Set the password for pairing the unit with other Bluetooth device.
3. Touch the upper left corner of the screen to exit.
Settings
Table of contents