manuals.online logo
Brands
  1. Home
  2. •
  3. Brands
  4. •
  5. DOMINION PRECAST
  6. •
  7. Indoor Furnishing
  8. •
  9. DOMINION PRECAST 100 User manual

DOMINION PRECAST 100 User manual

Parts List for Product #100 – 4 Seat Round Patio Table
(1) Table top 40” diameter x 2 ¼” thick -- 255 pounds
(4) Curved seats 40” x 10 ¼” x 2” thick --80 pounds each
(2) Legs 60” x 28 ¼”H x 6” thick -- 300 pounds
each
(10) 7 inch x 3/8” bolts
(10) 3/8” nuts
(40) 1 and ½ inch fender washers (THIN) For use on seats and top
(40) 1 and ½ inch fender washers (THIN) For use on metal brackets
(20) Rubber washers
(20) 1 ¼ inch x 3/8” bolts
(1) Table bracket
(8) Seat brackets
Tools Required:
(2) people Approximately 1 hour per table
(1) Pallet jack Optional
(1) 2 wheeled hand cart Minimum weight capacity of 300 pounds
(1) 9/16 wrench
(1) 9/16 ratchet wrench
(1) portable drill with 9/15 socket Optional
(1) Work gloves Optional
(1) Broom handle
**** Highly recommended to apply a fresh coat of sealer,
before each winter. ****
Installation Instructions for Round 4 Seat and
3 Seat Round Patio Tables
** Note: Handle ALL concrete parts carefully. **
(Bumping pieces together will cause chips and cracks.)
Step
1
First, determine the area where your table(s) are going to be installed. Each table is 67
inches in diameter. We recommend that you place tables no closer than 100 inches on
center.
Step
2
Using a two wheeled moving dolly, move the bottom leg (leg with a rectangle notch on the
top) into position. Do not leave legs sitting upright unattended in case they should tip over
causing damage or injury!)
Next position a top leg (leg with a rectangle notch on the bottom) at the end of the bottom
leg. Now install 2 seat brackets on each end of the leg using the 7” x 3/8” bolts nuts and 4
fender washers per bolt. Just tighten finger tight for now. Now carefully lift the top leg
over the bottom leg and into the notch on the bottom leg. (When lowering do not allow it
to jam and don’t force it down.)
Step
3
Install the large table top plate. (Keep rotating until the 2 holes line up with the holes in
the legs. Insert 2 of the 7” bolts thru the holes in the legs. Use one of the fender washers
on the steel bracket side and 2 or 3 on the concrete side. Now using a broom handle, line
up the umbrella holes in the legs, then tighten the 7” bolts until the washers bend slightly.
Step
4
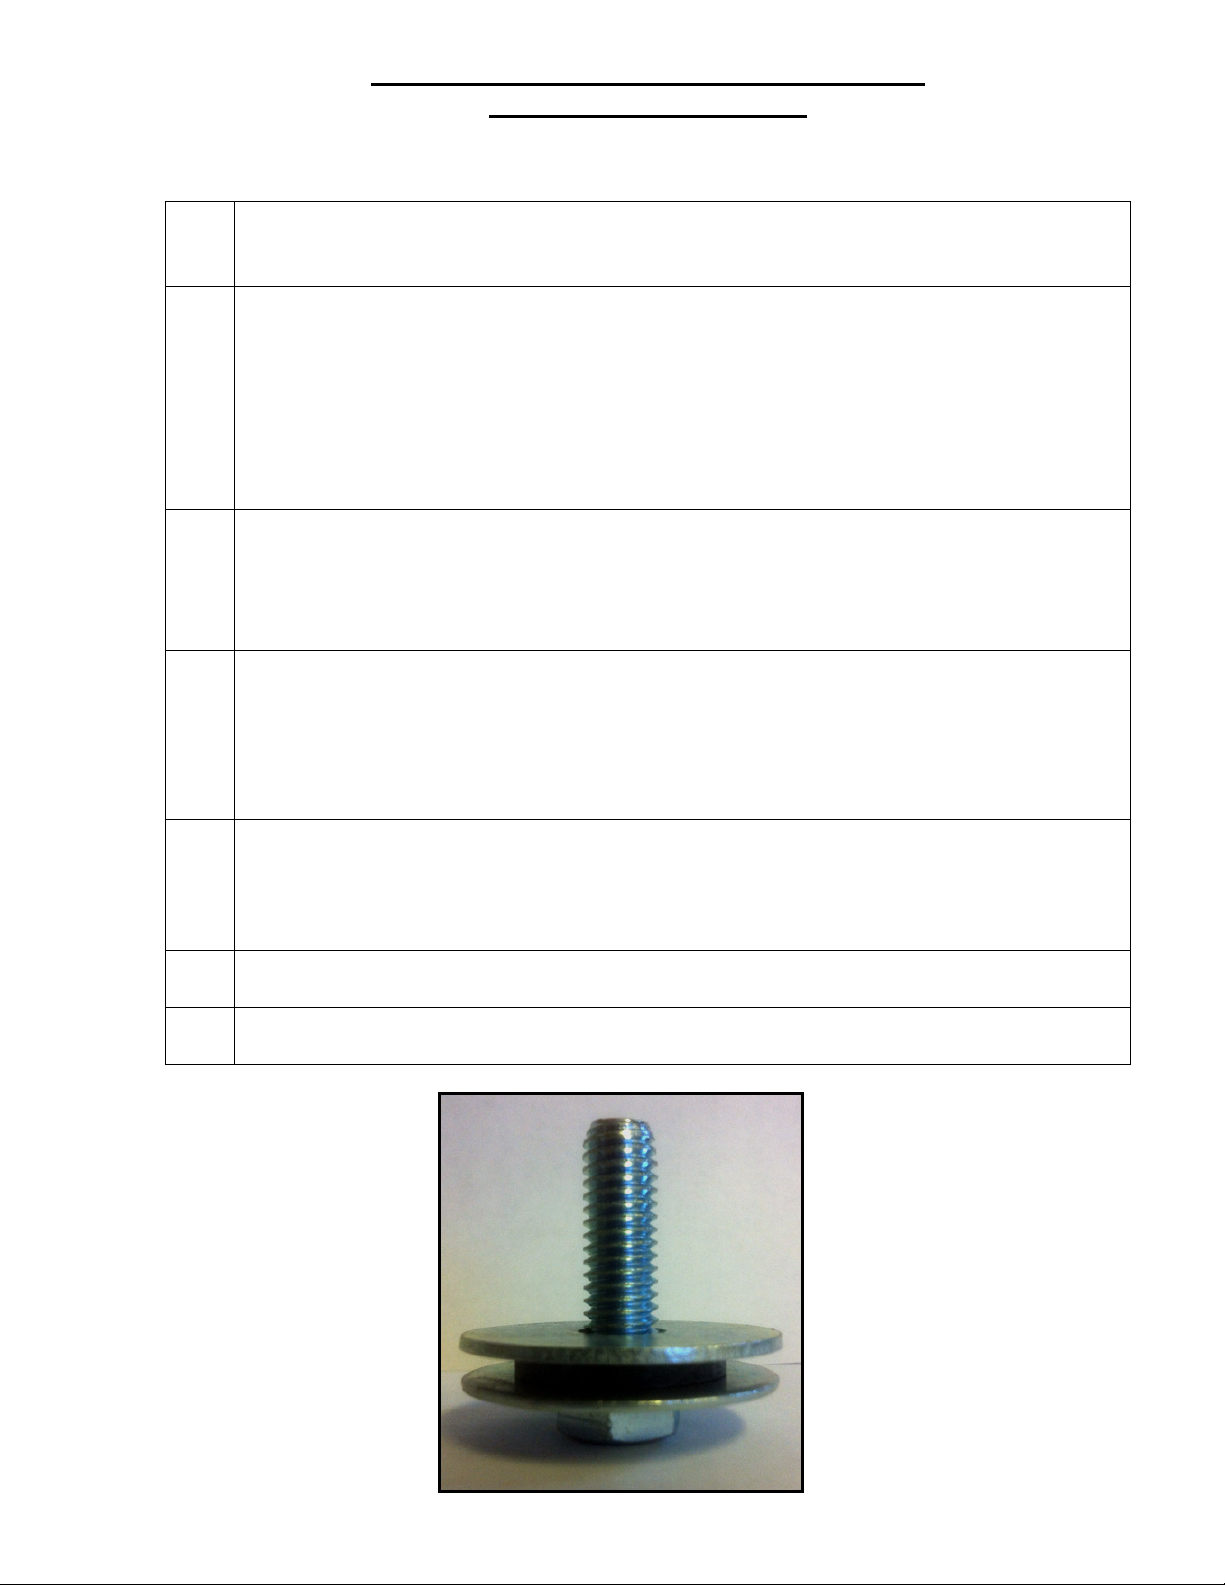
Now place the table top on the steel plate, slowly and carefully rotate the top until you line
up one of the 4 inserts in the bottom of the table top with one of the holes in the steel plate.
Then install one 1” x ¼” x 3/8” bolts with one rubber washer “sandwiched” between 2
fender washers (SEE DIAGRAM BELOW). Adjust the table top until the other 3 holes
line up and insert and install remaining 1” x ¼” x 3/8” bolts and fender washers. ( Do
NOT over tighten the bolts. ¼ turn past snug.)
Step
5
Next install the seats one at a time, using 4 of the 1 ¼” x 3/8” bolts per seat. Each of the 4
bolts should have a rubber washer sandwiched between 2 fender washers.
(SEE DIAGRAM BELOW).
Tighten these bolts carefully, until the rubber washer is slightly compressed.
Step
6
Be sure all the legs are touching the ground and not hung up or on uneven ground. If the
site is uneven use shims to make the legs level.
Step
7
Now level the seats and tighten the 7” bolts very tight, until the washers bend slightly.

Popular Indoor Furnishing manuals by other brands

Pinnacle PRO Series quick start guide

Pinnacle

Pinnacle PRO Series quick start guide

Germania Aktenschrank 0660 Assembly instructions

Germania

Germania Aktenschrank 0660 Assembly instructions

Vox V412BK owner's manual

Vox

Vox V412BK owner's manual

The Container Store 10054253 Assembly instructions

The Container Store

The Container Store 10054253 Assembly instructions

Kring BVNL2602 Assembling Instruction

Kring

Kring BVNL2602 Assembling Instruction

RH LUCE Assembly/installation instructions

RH

RH LUCE Assembly/installation instructions

Office Star Products AVENUE-SIX REF1818 quick start guide

Office Star Products

Office Star Products AVENUE-SIX REF1818 quick start guide

Tribesigns JW0473 Assembly instructions

Tribesigns

Tribesigns JW0473 Assembly instructions

CB2 BUNKER II Assembly instructions

CB2

CB2 BUNKER II Assembly instructions

Costway HW63758 user manual

Costway

Costway HW63758 user manual

DIVERSIFIED SPACES WALL BENCH II MA6 Series Assembly instructions

DIVERSIFIED SPACES

DIVERSIFIED SPACES WALL BENCH II MA6 Series Assembly instructions

Finori LW2T/137 Assembly instructions

Finori

Finori LW2T/137 Assembly instructions

Bouclair 9403335 Assembly instructions

Bouclair

Bouclair 9403335 Assembly instructions

Venjakob 6342 Assembly instructions

Venjakob

Venjakob 6342 Assembly instructions

Linon 141011BRN01U quick start guide

Linon

Linon 141011BRN01U quick start guide

Spectrum 37135 Assembly instructions

Spectrum

Spectrum 37135 Assembly instructions

HJH office CARLOW Assembly instructions

HJH office

HJH office CARLOW Assembly instructions

Seville Classics ULTRADURABLE SHE24365B manual

Seville Classics

Seville Classics ULTRADURABLE SHE24365B manual

manuals.online logo
manuals.online logoBrands
  • About & Mission
  • Contact us
  • Privacy Policy
  • Terms and Conditions

Copyright 2025 Manuals.Online. All Rights Reserved.