Dominox DHX 604 4G XS S E User manual
DHX 604 4G XS S E
DHX 604 3G 1E XS S E
DHX 705 4G TC XS F E
DHX 905 4G TC XS F E
DHX 905 4G TC XS F C
DHX 604 4G XS F E
DHX 604 3G 1E XS F E
ANKASTRE OCAKLAR
KULLANIM KILAVUZU
DHG 604 4G BK F C
DHG 604 3G 1E BK F C
DHG 705 4G TC BK F C
DHG 705 4G TC WH F C
DHG 905 4G TC BK F C
DHG 604 4G BK S C
DHG 604 4G BK S E
DHG 604 4G WH S C
DHG 604 4G WH S E
DHG 302 2G BK F C
DHG 301 1G BK F C

DHG 302 2G BK F C DHG 301 1G BK F C
DHX 604 4G XS F E DHX 604 3G 1E XS F E
DHG 604 4G BK F C DHG 604 3G 1E BK F C DHG 604 4G BK S C
DHG 604 4G BK S E
DHG 604 4G WH S C
DHG 604 4G WH S E
DHX 604 4G XS S E
P1
DHX 604 3G 1E XS S E
P2

DHX 705 4G TC XS F E
DHX 905 4G TC XS F E
DHX 905 4G TC XS F C
DHG 705 4G TC BK F C
DHG 705 4G TC WH F C
DHG 905 4G TC BK F C

30- GLASS- CAM
45mm
95mm
50mm
102,5mm
60mm
110mm
45mm
95mm 100mm
50mm
110mm
60mm
30- INOX
60- GLASS- CAM 60- INOX
Kurulum / Şek.1

490 mm
60mm
190mm
50mm
130mmm
45mm
130mm
95mm
45mm
95mm
50mm
110mm
60mm
70- GLASS- CAM 70- INOX
90- GLASS- CAM 90- INOX
Kurulum / Şek.2
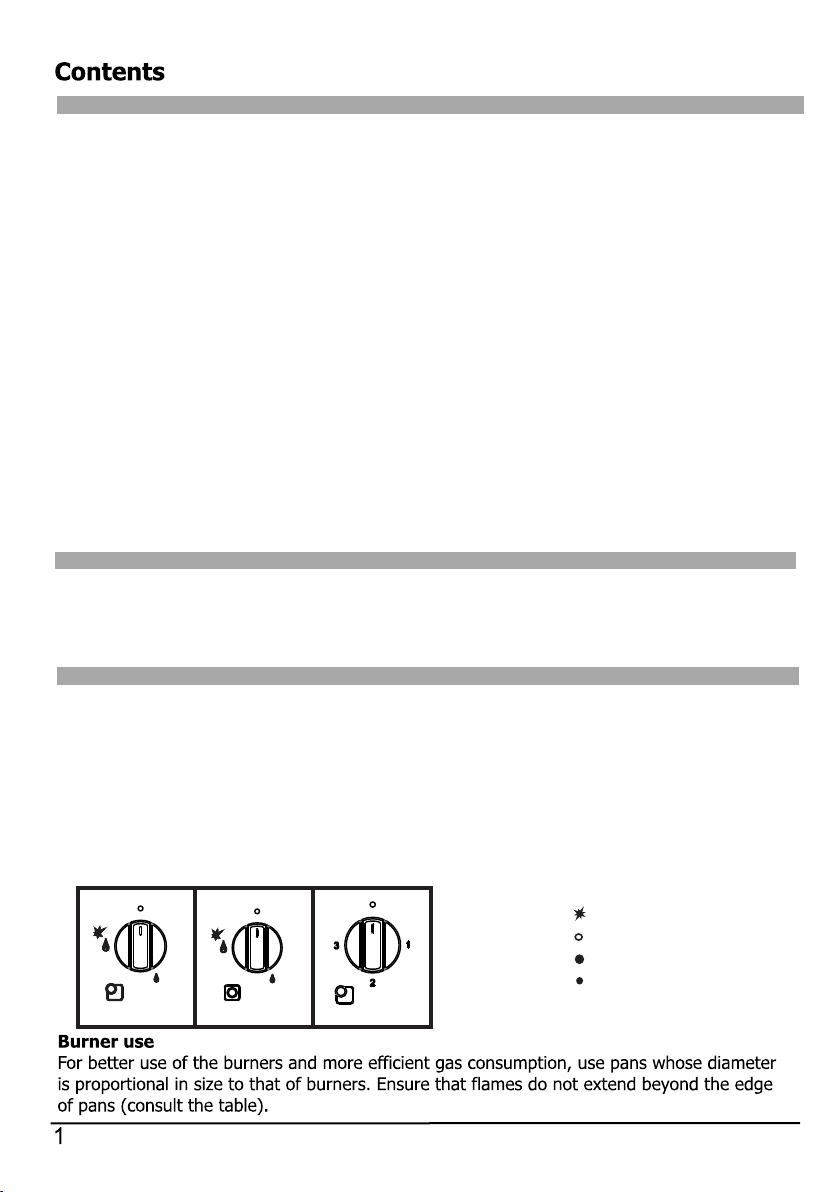
Firing position : Igniter
Circle : tap closed
Large flame : maximum gas delivery
Small flame : minimum gas delivery
Igniting the burners
The control knobs on these models incorporate both ignition and burner safety device.
To ignite the burners, proced as follows.
1.Turn the chosen control knob.
2.Keep the knob pressed down for 3 or 4 seconds in order to allow the sparks to ignite
the gas as it exits through the flame-spreader crown. and to allow the thermocouple
to heat up.
3. After 3 or 4 seconds, release the knob and turn it anti-clockwise to adjust The flame to
the desired setting. If the flame goes out, repeaat the operation from step1.
Thank you choosing a Dominox Product. Before using the appliance, please read the
warnings and instructions in this manual. This will make it easier to operate and also prolong
its servise life. Kep this booklet for futher reference.
Introduction..........................................................................................................................1
Use........................................................................................................................................1
Utilization of Hot plate.........................................................................................................2
........................................................3
Wok pan adaptor..................................................................................................................4
Usage of grills and recommendations...............................................................................4
Hob care and maintenance.................................................................................................6
After-sales service...............................................................................................................6
Safety warnings...................................................................................................................7
General instructions............................................................................................................7
Positioning...........................................................................................................................9
Installation Information on the Unit...................................................................................9
Connection to the gas supply...........................................................................................10
Electrical Connection.........................................................................................................11
Gas Connection..................................................................................................................12
Adjustment of Hob Per Gas Types...................................................................................13
Technical Data....................................................................................................................14
Flame Failure Device (FFD).................................................................................................3
Reasons of crashing glass and damaging on glass.
Introdution
Use

Auxiliary
Semi-rapid
Rapid
Wok Burner
Hot plate
From 12 16
From 14 20
From 18 24
From 22 26
From 14 18
Brulor
Before use of electrical plate the plate should be elevated to the maximum level and rest it for
5 minutes without putting any container thereon. It is Ok if any smell or smoke will rise from
the plate. Such effects shall disappear after starting normal use.
After such first use do not operate the electrical plate without any container thereon.
Use the containers with the bottoms being thick and suitable for the plate size. Never use
smaller sole containers.
Pay attention that no liquid and wet containers will be placed on the plate.
Avoid any contact of any vinegar, salt, lemon juice etc. with the plate.
Do not use any spatula and similar sharp objects in cleaning of joints between the glass and
metal surfaces or aluminum parts on the hob.
Utilization of Hob Plate
Power control switch3+1
Electrical plate is managed with a switch with which you may select proper power
for the food you will cook
Turning on the Plate:
Usage
Warning
Bring the control switch to the proper position by turning it to right or left by the cooking type,
food quantity and using below scheme. The red warning light will be on when the switch is
set to any value other than off position
To close the plate:
Bring the control switch to 0 position. The warning light will go off.
1 Low Heating
2 Medium Quick heating and cooking
3 High Frying
Power control switch3+1
The positions recommended are only for guiding purposes. The power should be increased
be increased at the following situations.
-in the event of cooking by using plenty of liquid.
-in big portions
-With cooking under the lidless containers.
2
Table of recommended pans
Suggestions
If the surface of the plates worn a few drops of oil or maintenance products available in the
market may be used.
It is recommended to set maximum level at the beginning of cooking process and to use
intervals and burning levels as per the caharateristic and quantity of the foods to be cooked
*You may use pans suitable for hotplate.
*There may be fire risk when you use pans that dont suitable for hotplate.
*You may not allow pouring any liquıds on hotplate.
*Use smooth based pans which cover all the surface of hotplate.
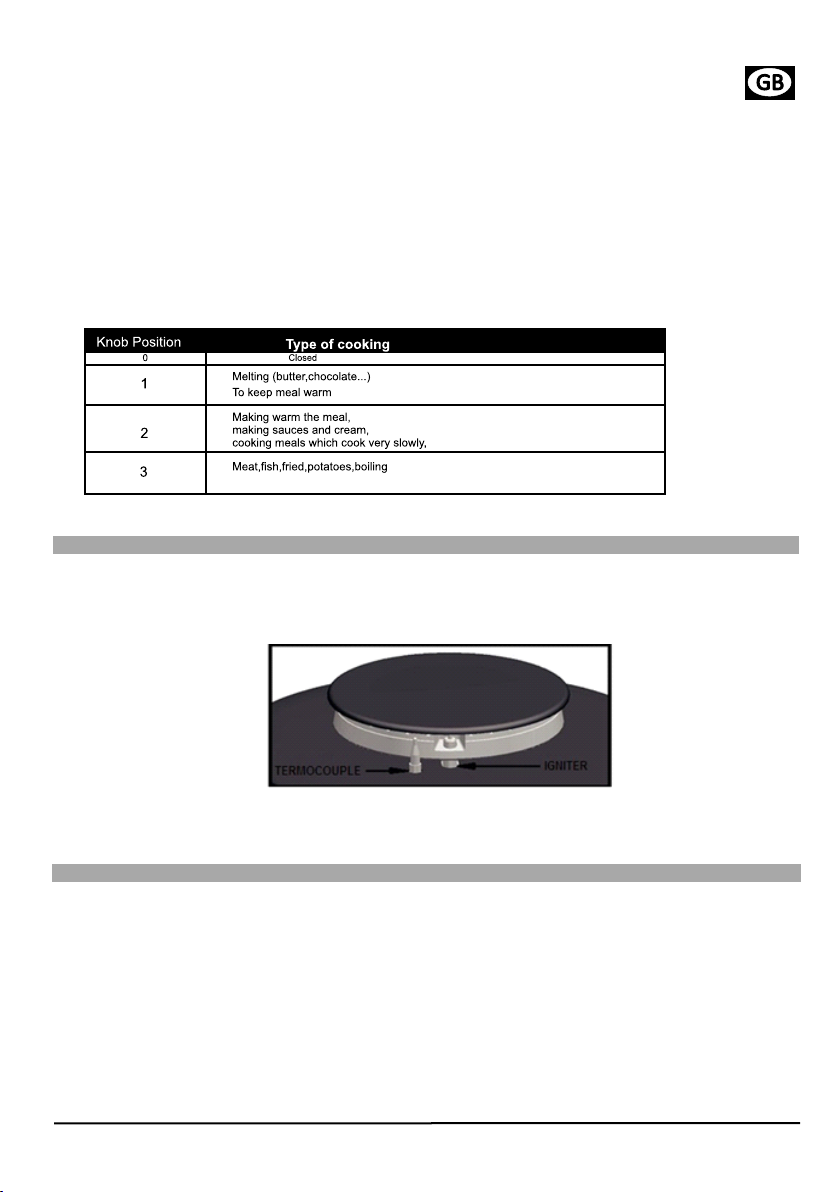
Flame Failure Device (FFD)
All burners on your hob are eguiqped with flame failure device system against flame
extinguishing risk (water flow, wind etc.)When the flame died down while the burner swtich
is open cuch system will provide cutting of the gas supplied to the burner. If the burning of
the burner will be cut due to safety, repeat the burning operation by switching the burner
switch to off position.
3
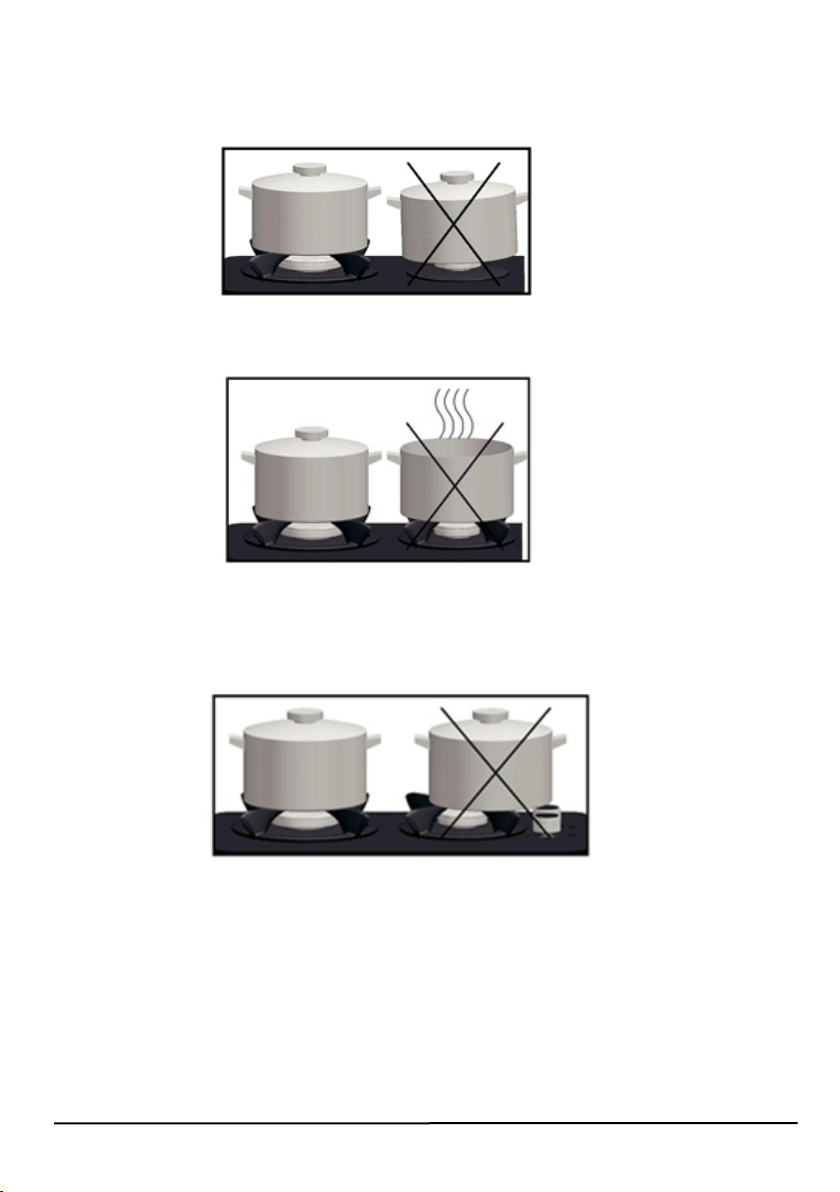
Reasons of crashing glass and damaging on glass
-Deep strikes and deep scratches because of any reasons
-Creating deep strikes on glass edges while taking pot from hob
-Pouring cold liquids which sugary or alcaline on hot glass surface
-Blowing fire to back on glasses because of some reasons (If burner caps cannot place
to slots correctly, it can causes this problem.)
-Pots should be used according to dimension informations in user manual.
(If a bigger pot can used on hobs, it reflects too much heat to glass surface because of
bigger surfaces of pot. )
- Pots which have holes like a sifter should not be used on glass hobs. Falling drops from
holes causes shock effects on glasses.
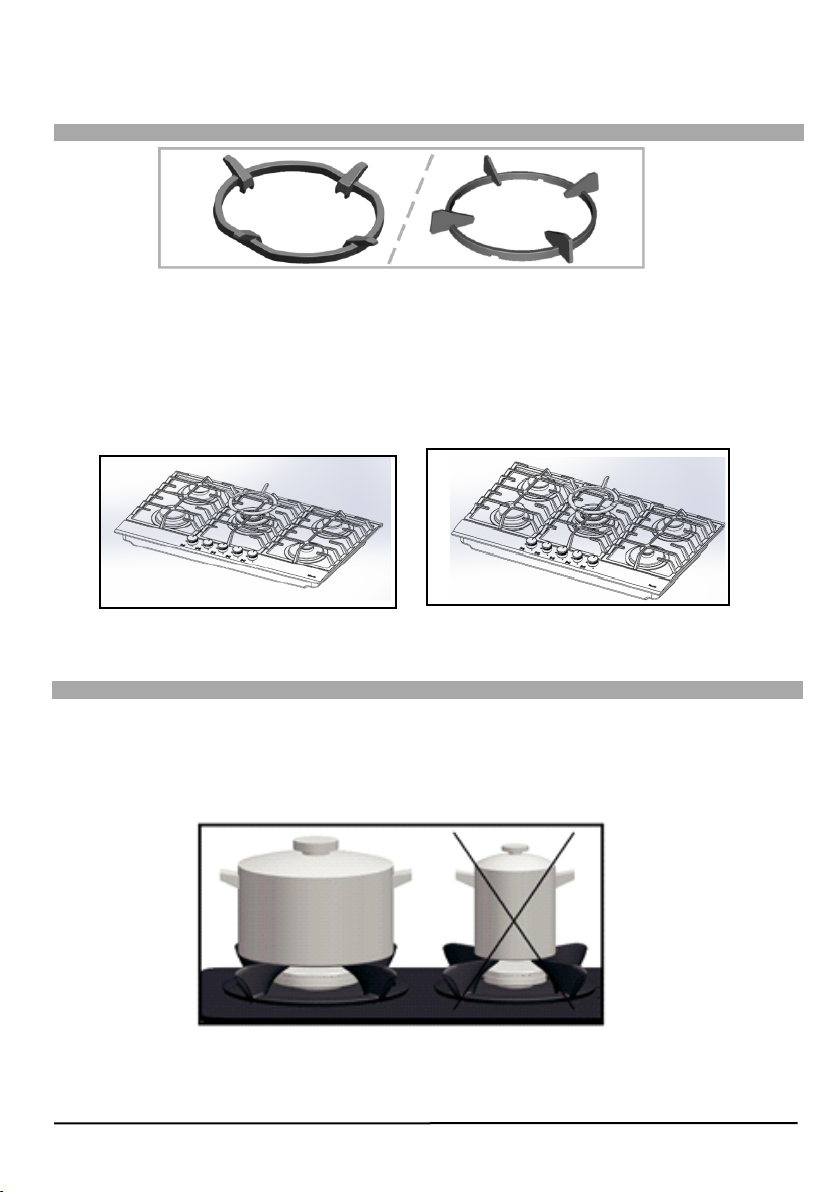
Wok pan adaptor
Triple 3.8 kW burner on 70 cm and 90 cm products, can be used as wok burner at the
same time. While using wok pan on these wok burners, wok tool has to be used. If not
used; manufacturer company is not responsible for overturning of pans and these kind
of material and spiritual accidents.
You can supply wok tool from Franke/Dominox authorizated services and stores.
Usage of grills and recommendations
*The pan grills on the hob are designed for safe use of the hob. Please make sure that the
grills are placed properly and plastic legs fit well.
·*Do not use pans with the deformed soles which may cause instability on the grills.
4
5
*Place the cooking pan on the burner evenly. The containers placed on the burner
inappropriately may be tipped. Do not place the large containers at the side of the switch
switches may be damaged. Do not place the pans on the grills hardly
*Pay attention that the burner place will not have any impact. And do not place heavy objects
on the grill.
*Do not heat the pans as empty. The pan sole may be deformed. The heat on the sole may
damage the hob's top plate surface.
*The cold liquids should not be thrown on the glass surface or burners when the surface is hot.
*Do not place sharp objects on the hob.
*Do not use pans transferring the excessive heat to the bottom surface directly.
*Do not cook with pans without lid or semi closed pans to avoid energy loss.
This manual suits for next models
17
Table of contents
Languages:
Other Dominox Cooktop manuals

Popular Cooktop manuals by other brands

Fisher & Paykel
Fisher & Paykel CE302CBX2 manual

Whirlpool
Whirlpool GJC3634RB00 parts list

Whirlpool
Whirlpool ACH7324/BLV Use, care and installation guide

Frigidaire
Frigidaire Professional FPDF4085KF Important safety instructions

Bonnet
Bonnet OPTIMUM 700 Technical instructions

Jenn-Air
Jenn-Air JGCP430 installation instructions

Bompani
Bompani BO374AA/E User instructions

Kleenmaid
Kleenmaid cooking GCTK9011 Instructions for use and warranty details

Waldorf
Waldorf RN8603E-B Technical data sheet

Whirlpool
Whirlpool SMP658CNEIXL quick guide

Electrolux
Electrolux E36IC80ISS - 36" Induction Cooktop Wiring diagram

Wolf
Wolf CI243C/B Use and care guide


