Dong Gu Co i-Creo User manual

Model : i-Creo
Espresso Coffee Machine

Table of Contents
1
1. Table of Contents.........................................................................................1
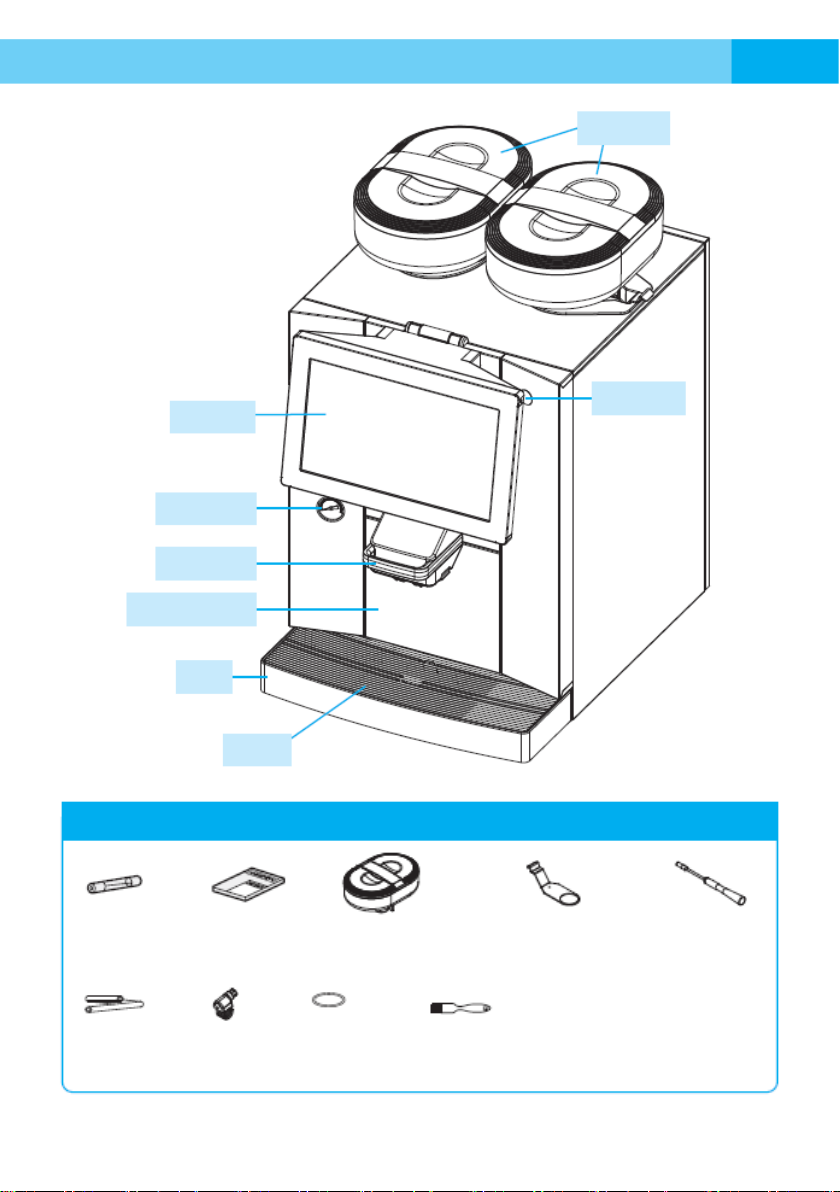
2. Components & Accessories...........................................................................2
3. Safety Precautions .......................................................................................3
4. Installation and Operation
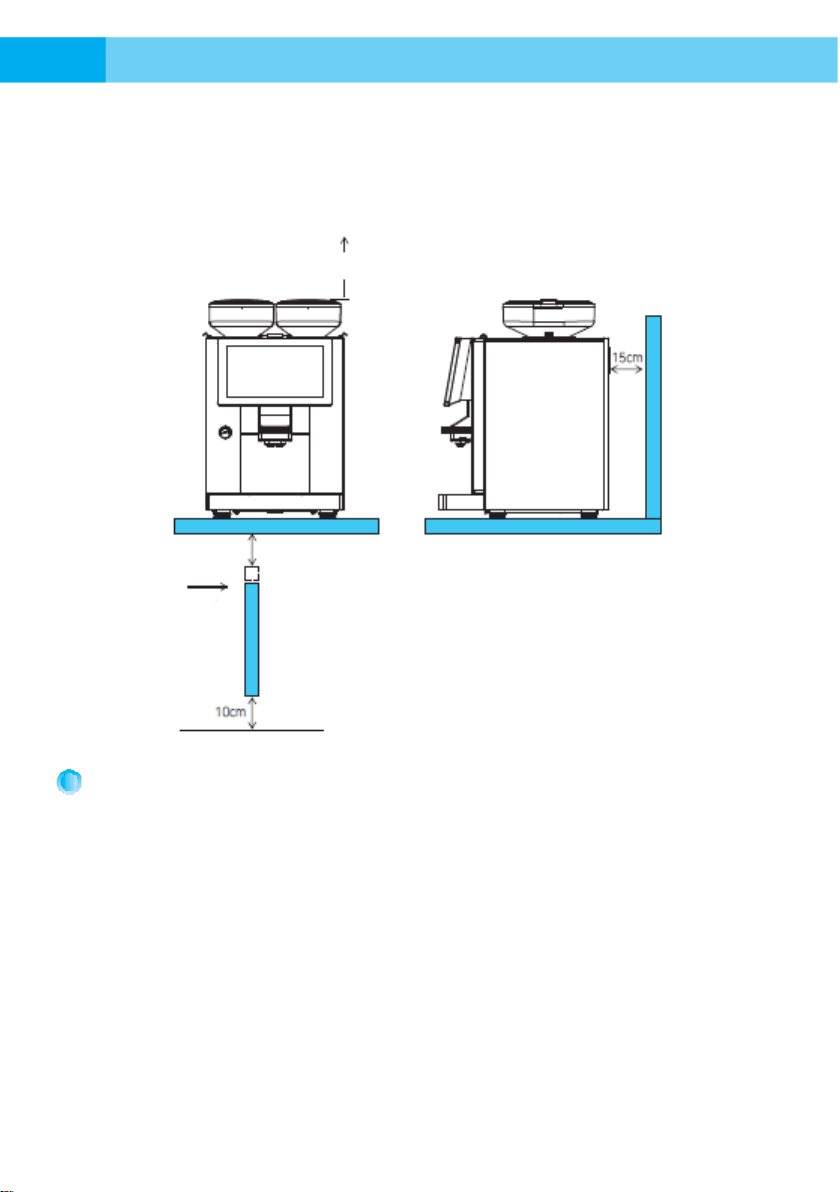
4-1. Installation Conditions...............................................................................5
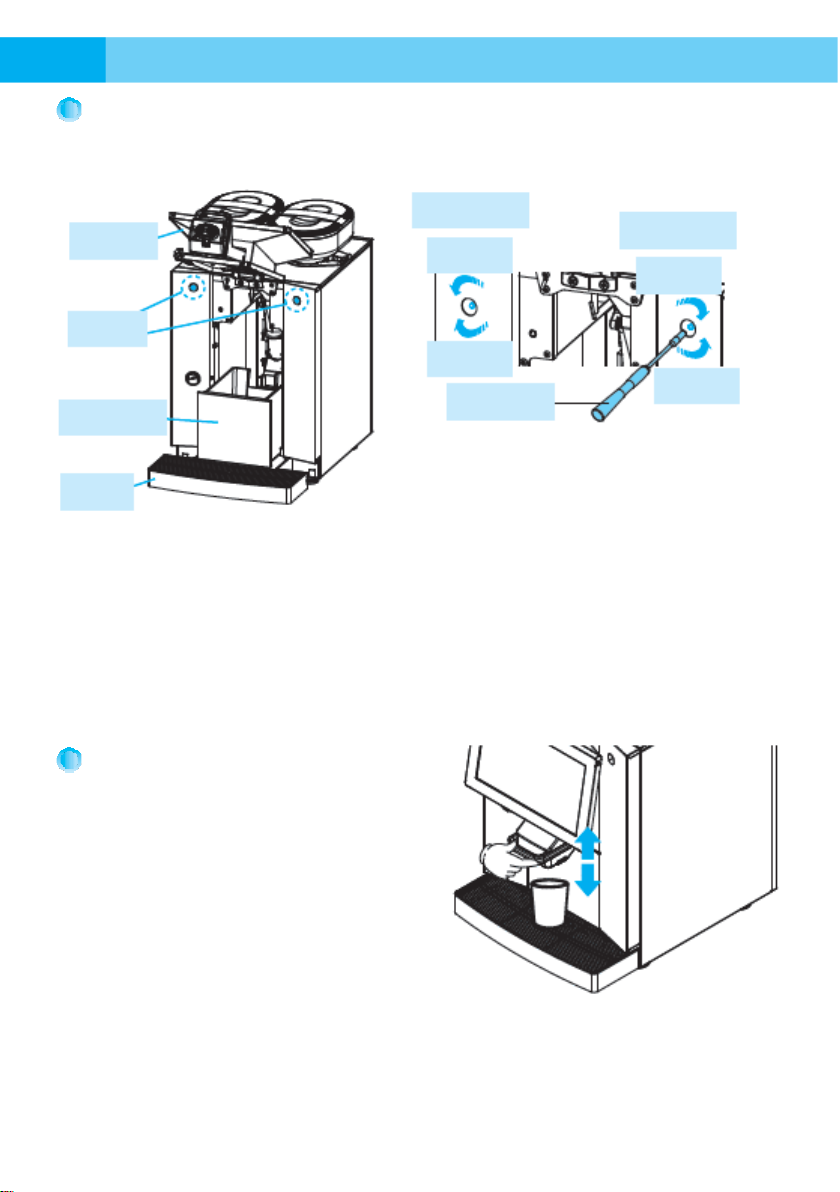
4-2. Installing/Removing the Bean .....................................................6
4-3. Filling the Bean .........................................................................6
4-4. Adjusting the Grind Level ..........................................................................7
4-5. Adjusting the Coffee Nozzle.......................................................................7
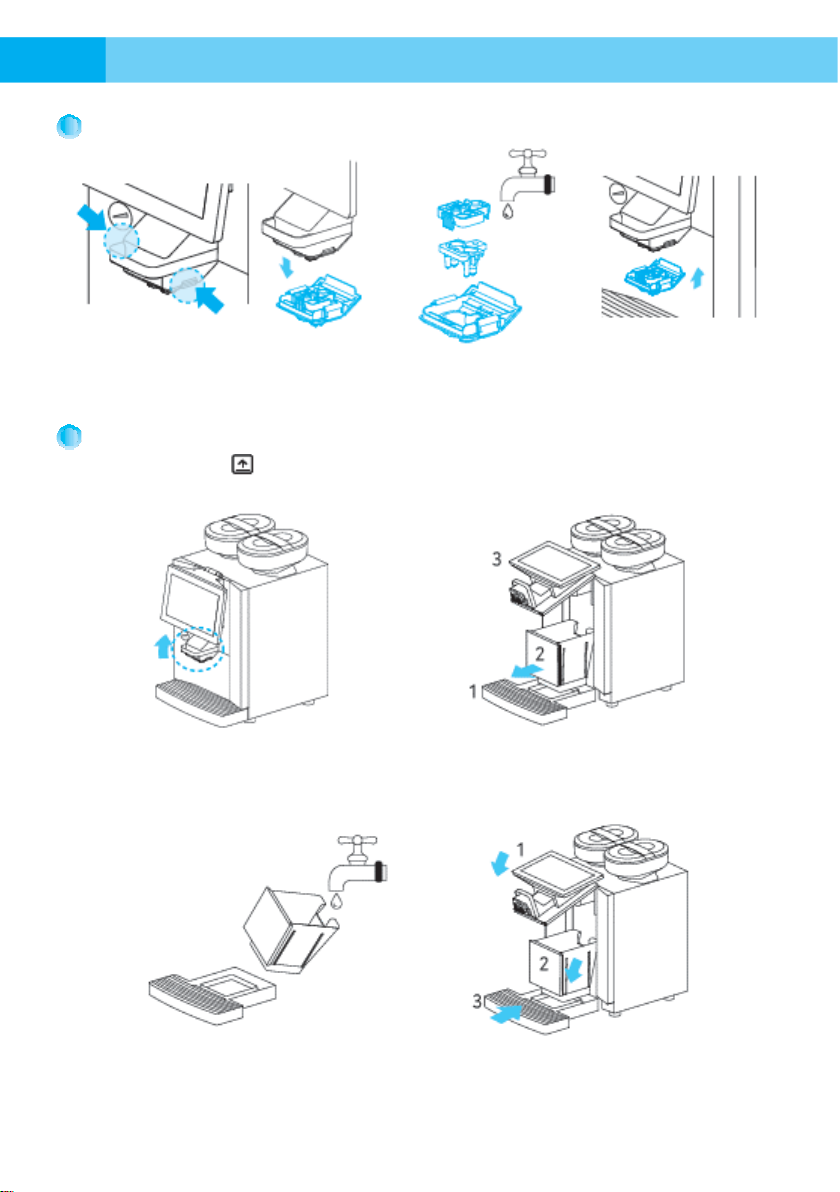
4-6. Lifting the Front Panel...............................................................................8
4-7. Rinsing the Brewer....................................................................................8
4-8. Cleaning the coffee nozzle.........................................................................9
4-9. Emptying the Bean Residue Box ................................................................9
4-10. Start screen..........................................................................................10
4-11. Single Sale ...........................................................................................11
4-12. Multi-Sale .............................................................................................12
5. Administrator Mode
5-1. Entering Administrator Mode ...................................................................13
5-2. Rinsing Mode..........................................................................................13
5-3. Administrator Mode Screen......................................................................14
5-4. Sales Configuration Settings ....................................................................14
5-5. Sales Management .................................................................................15
5-6. Menu Management ................................................................................16
5-7. System Setting ......................................................................................19
5-8. Error Information....................................................................................21
5-9. Load Test ...............................................................................................21
5-10. Machine Setting ....................................................................................23
5-11. Information ..........................................................................................25
6. Product Specification..................................................................................25
Canister
Canister

Components
2
Bean
Front panel
Pressure meter
Coffee nozzle
Bean residue box
Tray
Grill
Safety cap
Accessories
Spare fuse
Manual
Bean
(2 ea)
Bean Container
Fixing Lever
(2 ea)
Box driver
Drain hose
(1 ea)
Hose band
O-ring
(1 ea)
Cleaning brush
(1 ea)
Canister
Canister

Safety Precautions
3
This coffee machine is used for making espresso out of coffee beans.
Keep this manual close to the product and make it easily accessible to anyone who wants to
use it.
If you need information other than what this manual provides, or if there is a problem that
cannot be solved by the solution provided, please contact our service center.
[Symbols Used in This Manual]
Failure to follow these safety instructions may result in minor injuries in the event
of malfunction.
Failure to follow these safety instructions may result in major/minor injuries in the
event of malfunction.
Electric shock
Burn Hazard
Crush hazard
Hot surface
Hazard Slip
Product Damage Hazard
* Coffee machine
* Facilities in the installation site
* Always follow the instructions in the user manual correctly.
Note/Tips
* Tips for Safe Handling and Easy Operation
Caution
Personal Safety Instructions
Warning
Personal Safety Instructions
Note

4
The conditions described below will void the product warranty, and Donggu
Electronics assumes no liability for product defects caused by the following:
* Defects caused by improper use (caused by ignoring the instructions)
* Problems caused by repairs performed by parties other than our authorized service
centers
* Problems caused by unauthorized change of the power cord
* Problems caused by unauthorized modification or alternation of part of the product
* Problems caused by using or storing the product outside the proper temperature range
(10 to 40 °C)
* Problems caused by the use of parts and accessories not produced by Donggu
Electronics Co., Ltd.
* Installation, maintenance, or repair by a technician not authorized by Donggu
Electronics Co., Ltd. may cause danger to users.
* The installation, maintenance, and repair of the product must be carried out only by a
technician authorized by the manufacturer.
* The manufacturer is not responsible for any unauthorized installation, maintenance, and
repair.
Do not let water or other liquids get inside the machine as it may cause electric
shock. Please be careful as the hot water is very hot! Avoid direct contact with the
hot water. Watch out for burns!
* Make sure that the power outlet has a ground wire.
* Do not plug multiple products into one power outlet at the same time or into a
loose power outlet.
* Do not touch the power cord with wet hands.
* If the power cord or power outlet is damaged, please stop using the product
and request for repair.
Be sure to install this product indoors away from direct sunlight.
Children are usually not aware of the dangers of electrical appliances, so be careful
when children are nearby; do not let them play with this machine.
Caution
Warning
Warning
Caution
Caution

Installation and Operation
5
* This coffee machine must be installed and operated for the first time by a service
technician authorized by the manufacturer.
* Be sure to use a direct supply of water system with a water filter.
(Use the 1/4" water purifier hose to connect to the product.)
Installation Conditions
* Never install the product near flammable materials or heat sources.
* The device is not suitable for outdoor use. Never expose the coffee machine to weather
conditions such as rain, snow, or frost.
* The product should be installed on a flat, stable surface in a place where it can be
supported without any deformation.
* The ambient temperature of 10 to 40 °C is suitable for installation.
* The relative humidity should not exceed 70%; if the machine has been exposed to sub-
zero temperatures, contact our authorized service center.
* Be sure to use a direct supply of purified water.
* The temperature of the supply water should not exceed 30 °C, and the optimum water
pressure should be 1 to 3 bar, not more than 6 bar. If it exceeds 6 bar, please use the
pressure relief valve.
At least 25 cm
Direct water supply
* Please connect the power cord to a
dedicated power outlet.
Water filter

6
[Installing the Bean Container]
Failure to follow these safety instructions may result in minor injuries in the event
of malfunction.
*Always follow the instructions in the user manual correctly.
Caution
Personal Safety Instructions
Warning
BeanCanister
Fixing Lever
Installing/Removingthe Bean Canister
Bean
Canister
BeanCanister
Fixing Lever
Bean Canister
Fixing Lever
*Insert the ①beanCanister fixingleversin the leftandrightdirections as shown in the
pictureandpushthemin completely.②Makesurethe beanCanisters arein place.
*③Pullthe beanCanister fixingleverin the direction of the arrow to securethe
Canister
[Removing theBean Canister
*Pushthe beanCanister fixinglever
in the direction of the arrow.
*Removethe beanCanister by liftingit.
FillingtheBeanCanister
* Openthe lidof the beanCanister andfillit withbeans.
*Closethe lidof the beanCanister
*Large-capacitybean canister(1,200g)
* 2-containersystem
Please fill the beancanisterwithroasted
coffeebeansonly.Addingbeangrinds,beans
processedwithsugar,caramel,etc.,liquids
containing sugar,greenbeansor blendedbeans
withthem,etc.maycauseproductfailure.

Installation and Operation
7
Adjusting the Grind Level
* The default grind level of this product is set to fine grind.
* Lift the coffee nozzle and remove the
tray and the coffee bean residue box.
* Lift the front panel and remove the
safety cap (L/R).
[Left grinder]
- Turn it clockwise: Coarser grind
- Turn it counterclockwise: Finer grind
[Right grinder]
- Turn it clockwise: Finer grind
- Turn it counterclockwise: Coarser grind
Adjusting the Coffee Nozzle
Hold the coffee nozzle handle and move it up
and down to adjust the nozzle based on the
height of the cup.
If there is a large difference in height of the
coffee nozzle and cup, your coffee may splash
out of the cup.
※Refer to the images in the Cleaning item on the left side of the Administrator Mode screen.
* Adjust the size of the grind by using the
box screwdriver provided with the product.
Front panel
Safety cap
Bean residue
box
Tray
Left grinder
Right grinder
Finer
Finer
Coarser
Coarser
Box driver

8
Lifting the Front Panel
Lift the coffee nozzle
handle completely and
pull out the tray.
Press until the protruding door
snaps (L/R) inward.
Lift the front panel.
Rinsing the Brewer
※Refer to the image in the Cleaning item on
the left side of the Administrator Mode screen.
Pull out the tray and the bean residue box.
Lift the front panel.
Lower the lift lever and pull out the brewer
from the product.
Wash the brewer clean with water and
shake it off to remove excess water.
Wipe the inside of the suit and suit-S with
dry cloth to remove moisture.
※Failure to remove it may cause coffee bean powder
After placing the brewer, raise the lift lever. Push
down the front panel.
Push in the tray and the coffee residue box.
※If you cannot raise the lift lever smoothly, remove the
brewer, turn the slot slightly using the multi-tool, and
Door Snap
(L)
Door Snap
(R)
Lift Lever
Suit-S
Suit
Multi-tool

Installation and Operation
9
to form a lump that can cause clogging.
place it back to the product.
Cleaning the coffee nozzle
Press both sides of the coffee nozzle to
remove the lower part of the nozzle.
Remove the lower part of the nozzle as shown
in the figure, wash it clean, and assemble it back
to the coffee nozzle.
Emptying the bean residue box
※If the color of the icon changes to red on the screen, please empty the bean residue
box as shown below.
Lift the coffee nozzle handle completely.
1. Pull out the tray.
2. Pull out the bean residue box.
3. Lift the front panel.
Empty the residue in the bean residue
box and wash the bean residue box and
the tray with water.
1. Push down the front panel completely.
2. Push in the bean residue box.
3. Push in the tray.

10
Start screen
* When the coffee machine is connected to the power source, it turns on and starts the
initial booting process (Android).
* Click the power icon to switch to the
product initialization step.
* Reinforced glass is used for the
control panel. Note, however, that
it may still break if external shock
or excessive force is applied. Be
careful when tapping the panel.
* The product initialization process begins.
When each initialization step is complete,
the checkbox will be checked.
[Ready]
* When the coffee machine is ready to extract
coffee, such is indicated on the screen.
* Fill the bean container with coffee beans and
open the bean container fixing lever. (See the
Installing/Removing the Bean Container page.)
[Sales Operation]
* Place the cup under the drink nozzle, adjust
the nozzle height, and select the icon of the
drink you wish to sell to start the selling
process. When selecting a drink, tap the <
and > icons next to the drink icon to go to
the previous and next pages, respectively, on
the screen.
* If you do not have enough beans, replenish
the beans and tap the Re-run button to
resume sale. Please note that this does not
indicate failure.
Caution
System Initialization
Brew Initialization
Heating Coffee Boiler
Filling Coffee Boiler
Box Full Alarm
Current Time
Administrator Mode
Icon
Brewer Rinsing
Alarm
Current Boiler
Temperature
Fault/Error

Installation and Operation
11
Single Sale
* Single Sale is used to process single sale of the tapped drink menu only.
* Place the cup under the coffee nozzle
* and tap the icon of the desired drink to start extracting the selected drink.
* The name of the selected drink and extraction process are shown in order on the
screen.
* If extraction is complete, it will switch to the standby screen.
※If you tap CANCEL during extraction, the extraction process will be stopped.
[Use 2 cups (two-shot)]
* If "shotx2" is shown below the name of the
drink, you can make two cups of the drink as
shown in the left figure.
* Place two cups under the coffee nozzle and
select the drink to make them one by one.
Menu
Menu

12
Multi-Sale
* Multi-Sale is used to process continuous multiple sales of several drink menus, and up to 10 cups can be
selected.
* When selected, the selected
drink is added to the
column on the left side, and
the number of cups will be
shown on the screen.
* Tap START to start
extracting the first drink at
the top.
* The drink being extracted
will be removed from the
column, and the next
selected drink will be shown
at the top.
* Tapping the "-" icon next to
the drink icon in the column
will cancel the drink.
Be careful not to tap it by
mistake.
* In Auto mode,
When extraction is
complete, the extraction
process of the next drink
will start automatically.
Replace the cup before the
next one starts coming out
through the nozzle.
* In Pick-up mode,
the pick-up icon is displayed
as shown in the left figure.
After replacing the cup,
press the “→” icon to start
extracting the next drink.
Menu
Menu
Menu

Administrator Mode
13
Entering Administrator Mode
* Enter Administrator mode by tapping the icon on the upper right corner of the standby screen.
* The initial password is set to
"1111" when the product is
shipped.
* Enter the password and tap
OK to enter Administrator
mode.
* If a wrong password is
entered by mistake, tap DEL
to delete it from the last
entered character.
* Tap the icon to return
to the standby screen.
Rinsing Mode
* On the Administrator mode
screen, tap the
(Rinsing) icon to go to the
rinsing process screen.
* Tap the ▷icon to start
rinsing the brewer
automatically.
* During rinsing, tap the ×
icon to stop the rinsing
process.
* Tap the <icon on the upper left corner to return to Administrator mode.
Menu
Rinsing
Cleaning
MANAGER
Rinsing

14
Administrator Mode Screen
* The following screen appears if you enter Administrator mode:
* Tap the icon of the mode you wish to check or configure the settings for to enter the
mode.
* Tap the icon to return to the standby screen.
* If you tap the icon, the message appears. Tap OK to return to the Start
screen after rinsing the brewer. If you tap DEL, the menu disappears.
Sales Configuration Settings
[Singular Sales]
* For more details on
how to use Singular Sales,
see the Singular Sales
page.
* Tap the <icon on the upper left corner to return to Administrator mode.
* Free of charge: Runs a normal sales operation (No Beans state will be detected)
* Test Sales: Runs a test for sales operation (No Beans state will not be detected)
ADMINISTRATOR
SALES
CONFIGURATION
SALES
MANAGEMENT
MENU
MANAGEMENT
SYSTEM
SETTING
ERROR
INFORMATION
LOAD
TEST
MACHINE
SETTING
INFORMATION
SALES CONFIGURATION
Singular
Sales
Continuously
Sales
Free of charge
Test Sales

Administrator Mode
15
Sales Configuration Settings
[Multi-Sale]
* For more details on
how to use Multi-Sale,
see the Multi-Sale
page.
* Tap the <icon on the upper left corner to return to Administrator mode.
* Free of charge: Runs a normal sales operation (No Beans state will be detected)
* Test Sales: Runs a test for sales operation (No Beans state will not be detected)
* Auto mode : When the extraction of the selected drink is complete, the
extraction process of the next drink will start automatically. Replace
the cup before the next one starts coming out through the nozzle.
(The drink may splash out of the cup.)
* Pick-up mode : When the extraction of the selected drink is complete, the Pick-up
icon will be shown on the screen. It does not start extracting the next
drink until the →icon is tapped.
SALES MANAGEMENT
* Scroll down Turnover by
Beverage column as
shown in the figure to
check the number of
cups sold for other
drinks.
* Tapping the icon
will delete the total
number of cups. Please
be careful not to tap
the icon by mistake.
* Tap the <icon on the upper left corner to return to Administrator
mode.
* Set a period and tap OK to go to the number of cups sold in the
selected period. You can scroll up/down the numbers to set the
year/month/date and tap the OK button.
SALES CONFIGURATION
Singular
Sales
Continuously
Sales
Free of charge
Test Sales
SALES MANAGEMENT
Type Quantity
Total Sales 18
Free of Charge
18
Test Sales 0
Type Quantity
Espresso
Free of Charge 8
Test Sales 0
Americano
Free of Charge 6
Test Sales 0
Soft ice Americano
Free of Charge 2
Turnover By Beverage
Sales Turnover
Cancel OK

16
MENU MANAGEMENT
* You can manage menus by changing the order of drinks, set the recipe, register and set
a new menu, etc. in this mode.
* Scroll up/down the
screen in the drink
column on the
right to navigate
the screen.
* Tap the <icon on the upper left corner to return to Administrator mode.
* Tap the icon on the lower left corner to return to the default drink menu settings.
* Tap the icon to remove the drink and show the "+" mark instead.
* Tap the < > icon at the central pane to go to the previous/next page.
The drink screen can show 6 different drinks in one page. The list can have 13 basic
menus. By adding new menus, the list can have up to 18 drinks
* When the settings are complete, tap the icon to save the change. “Saved” will appear
on the screen.
[Add Drink]
* Tap the “ + ” in the central pane to change it to “ ”.
* Find and tap the drink you wish to add to complete the change.
※If the drink is already in the list, it cannot be added again.
[Move Drink]
* To relocate a drink in the list, tap the icon of the drink you wish to move or switch
places to remove it. Then use the Add Drink feature to place it back to the list.
[Recipe Settings]
* Tap the drink icon to
set a recipe for from
the central pane or
the column on the
right to go to the
Recipe Settings
screen.
* Be careful not to tap
the icon when
tapping a drink icon.
MENU MANAGEMENT
MENU MANAGEMENT

Administrator Mode
17
* You can scroll
up/down the screen
to move between the
recipe settings items.
* Tap the icon on the upper right corner to return to Administrator mode without
saving the changes.
* When the settings are complete, tap the icon to save the changes.
* Tapping the icon on the lower right corner will delete the selected drink and return to
the Manage Menu screen. You cannot delete the 13 basic menus. This feature only applies
to the new menus created by the operator.
[Settings Items]
1. PRODUCT TYPE: Used to select the type of drink. Choose between COFFEE, AMERICANO,
and ICE AMERICANO. Once selected, the settings items are updated according to the
type.
2. COUNTED PRODUCT: Used to set the amount:
shotx1 or shotx2. The selected item
will be highlighted with a circle outline.
3. SELECT GRINDER: Used to select the grinder: Left or Right. The selected
item will be
highlighted with a circle outline.
4. COFFEE QUANTITY: Used to set the grinding time for the selected grinder.
5. WATER QUANTITY: Used to set the extraction amount, i.e., espresso amount.
6. PRE-INFUSE: Used to set the amount forpre-infusion to run before extraction.
7. DELAY PRE-INFUSE: Used to set the resting time after pre-infusion.
8. INITIAL PRESSURE: Used to set the initial pressure in the brewer. Tap the < > icon to adjust
the level.
9. BYPASS SEQUENCE: Select from N, A, B, and W. The selected item will be highlighted with
a circle outline.
(1) ”N”: Do not run thebypass sequence (Espresso, Doppio, etc.)
(2) ”A”: Run the bypass sequence after extraction
(3) ”B”: Run the bypass sequence before extraction
(4) ”W”: Run the bypass sequence starting from the grinding process
10. BYPASS WATER: Used to set the amount of hot water to dilute the extraction.
[Adjustment]
* For items such as coffee quantity and water quantity with the scroll bar to the right, drag
the circle left/right to configure a rough setting and fine-tune the value using the < > icon.
MENU MANAGEMENT
PRODUCT TYPE
COUNTED PRODUCT
SELECT GRINDER
COFFEE QUANTITY
WATER QUANTITY
PRE-INFUSE
DELAY PRE-INFUSE
INITIAL PRESSURE
BYPASS SEQUENCE
BYPASS WATER
MicroSetting

18
[Change Drink Image/Name]
* Tap an image among the drink images in the column on the right to update the image of the
drink.
* Tap the name of the drink on the left to go to the keyboard screen. You can add numbers,
English letters, icons, etc. to the drink name. The keyboard screen will disappear if you tap
anywhere outside the keyboard area.
[Register New Menu]
* You can create up to 19 new menus.
* Tap an image among the drink images in the column on the right to add the image of the drink
on the left side.
* Tap Default on the left to go to the keyboard screen. You can add numbers, English letters,
icons, etc. to the drink name. The keyboard screen will disappear if you tap anywhere outside
the keyboard area.
* Refer to the Settings Items section. Set a recipe for the new menu and tap the icon to save
the recipe.
MENU MANAGEMENT
PRODUCTC TYPE
COUNTED PRODUCT
SELECT GRINDER
COFFEE QUANTITY
WATER QUANTITY
PRE-INFUSE
DELAY PRE-INFUSE
INITIAL PRESSURE
MicroSetting
Manage Menu
PRODUCT TYPE
COUNTED PRODUCT
SELECT GRINDER
BEAN QUANTITY
WATER QUANTITY
PRE-INFUSE
DELAY PRE-INFUSE
INITIAL PRESSURE
Adjust

Administrator Mode
19
SYSTEM SETTING
* Tap the <icon on the
upper right corner to
return to Administrator
mode without saving the
changes.
[Password]
* Tap four digits followed by OK to reset the password.
* If a wrong number is tapped by mistake, tap DEL to delete the last entered one.
[Time]
* Tap the Time item on the right to go to the settings screen.
* Tap the <icon on the
upper right corner to
return to Administrator
mode without saving the
changes.
[24 Time format]
* 24: 24-hour format. 00 to 24.
* 12: 12-hour format. AM/PM is indicated before the time.
* Tap to select 24 or 12.
[Date & Clock Setting]
* Tap the Year/Month/Date area to go to
the settings screen. Scroll up/down to set
the Year/Month/Date and tap OK.
* Tap the Time/Min/Sec area to go to the
settings screen. Scroll up/down to set the
Time/Min/Sec and tap OK.
SYSTEM SETTING
Password
Time
Language
Wallpaper
SYSTEM SETTING
Password
Time
Language
Wallpaper
24 Time format
Date & Clock Setting
Cancel OK Cancel OK
Table of contents
Other Dong Gu Co Coffee Maker manuals
Popular Coffee Maker manuals by other brands

Black & Decker
Black & Decker DLX851 use and care manual

Astoria
Astoria LOFT HOML Use and maintenance manual, Instructions for the user

Nespresso
Nespresso thermoplan AGUILA 220 user manual

Ignite Coffee
Ignite Coffee A400 Cleaning instructions

Cuisinart
Cuisinart DCC-500 Series user manual

Jura
Jura IMPRESSA X7-S Instructions for use