Dorena frontrow juno User manual

DAILY USE AND TROUBLESHOOTING GUIDE
ITR-02 Tower Receiver
ITM-02 Pendant Microphone
ISM-02 Pass-Around Microphone
IMC-01 Microphone Charger
by Dorena

1
Start of the Day
Step 1 Put the microphone around your neck and adjust the strap so it is comfortable and 14cm/5.5in from your mouth.
Step 2 Press the One-Touch Button on your Pendant Microphone. This will wake up both your Microphone and Tower.
Step 3 Speak in a normal conversational tone.
End of the Day
Step 1 Your Juno Tower and Microphones will automatically go into standby mode after a period of inactivity (10 minutes for
microphones; 30 minutes for Tower).
Step 2 Charge your microphones in the charging cradle (optional) or connect them with the USB cable to your Juno Tower or
your computer.
Teacher's Tips
Mute Indicator
OFF ......................Un-muted
SOLID RED ...........Muted
Power Indicator
SOLID GREEN.......Power On
OFF ......................Standby
One-Touch Button
PRESS MOMENTARILY .... Awaken/Mute/Unmute
PRESS AND HOLD .......... Issue Voice Command
Battery Indicator
In Use
OFF ......................Battery Charged
FLASHING RED.....Battery Low
When Charging
SOLID RED ...........Charging
SOLID GREEN.......Fully Charged
Auxiliary Audio Input
Input jack allows the microphone to transmit audio from any
secondary audio source such as a computer or MP3 player
Charging/Programming Jack
For configuration or charging
For your Juno user guide and more information, go to gofrontrow.com/juno
Power Indicator
SOLID GREEN.......Power On
OFF ......................Power Off
Battery Indicator
In Use
OFF ..............................Battery Charged
FLASHING RED.............Battery Low
When Charging
SOLID RED ...................Charging
SOLID GREEN...............Fully Charged
FLASHING RED/GREEN ...Charge Fault
Charging/Programming Jack
For configuration or charging
Power/Push-to-talk Switch
PRESS AND HOLD ..........Push-to-talk
PRESS AND SLIDE UP .....Power On
Portable Audio Interface
Comfortable
Hands-free Option
Lavaliere clip
Juno can be a powerful teaching tool in any classroom. Numerous studies report tremendous benefits from the
use of FrontRow audio systems, including doubled reading growth, greater student achievement, easier classroom
management, and heightened teacher energy. The clarity of sound with FrontRow systems also makes it easier for students
learning English to distinguish the different sounds of the language.

2
Your Juno Tower is equipped with a powerful Adapto™feedback suppression engine that helps avoid harsh squealing noise that would normally
occur when a microphone gets too close to a speaker. Nevertheless, try to use volume settings for daily use that give good audibility without
constantly activating the feedback suppression engine.
The chart below shows the volume settings for the Pendant and Pass-Around microphones that are adequate for a typical classroom environment
(600 - 900ft2/56 - 84m2). If more volume is required for a large or noisy room, you may notice the Adapto engine activating and at a high volume or short
distance, the engine may not be able to maintain a pleasant audio quality. If feedback occurs, move away from the Tower, remain behind it while talking,
or lower either the master volume or the volume for the microphone that is causing the feedback.
Volume Setting Guidance
Recommended:
Master Volume 18 - 20
Pendant Microphone Volume 5 - 6
Student Microphone Volume 4 - 5
Your Juno System lets you remotely control parameters of
your Juno Tower using a few simple voice commands.
Voice Command
Increase Increase the volume by 2 steps
Reduce Reduce the volume by 2 steps
LCD Toggle Juno Tower LCD lock on/off
Say: When you want to:
For best performance:
• Follow the sequence above precisely when issuing voice command.
• Avoid brushing the microphone against clothing, jewelry, etc. while
issuing voice command.
• Avoid holding the microphone close to the mouth with speaking a
command.
To issue a voice command:
1. Press and hold the One-Touch button on the Pendant Microphone.
2. Wait for Voice Command tone and Tower LCD background to turn green.
3. Keeping the button pressed, issue one of the commands below.
4. Wait for confirmation tone and Tower LCD background to return to white.
5. Release the button.
Power Switch
Auxiliary Output
Output with volume control. Connect personal
FM systems for listeners with hearing
impairment. The volume knob below the aux
output port will adjust the student's PFM. This
setting may change for each student, depending
on their hearing levels and needs. Please
customize accordingly with each student.
Stereo Inputs for External Audio
Connect other classroom AV equipment such
as a DVD player, television or VCR.
Serial Port
Integrated Serial Hub
Two serial ports for charging microphones, and for
programming microphones through a connected PC
using the FrontRow Microphone Settings application.
Stereo Quick Connect
Quickly and easily connect an MP3 player
or other audio device.
3
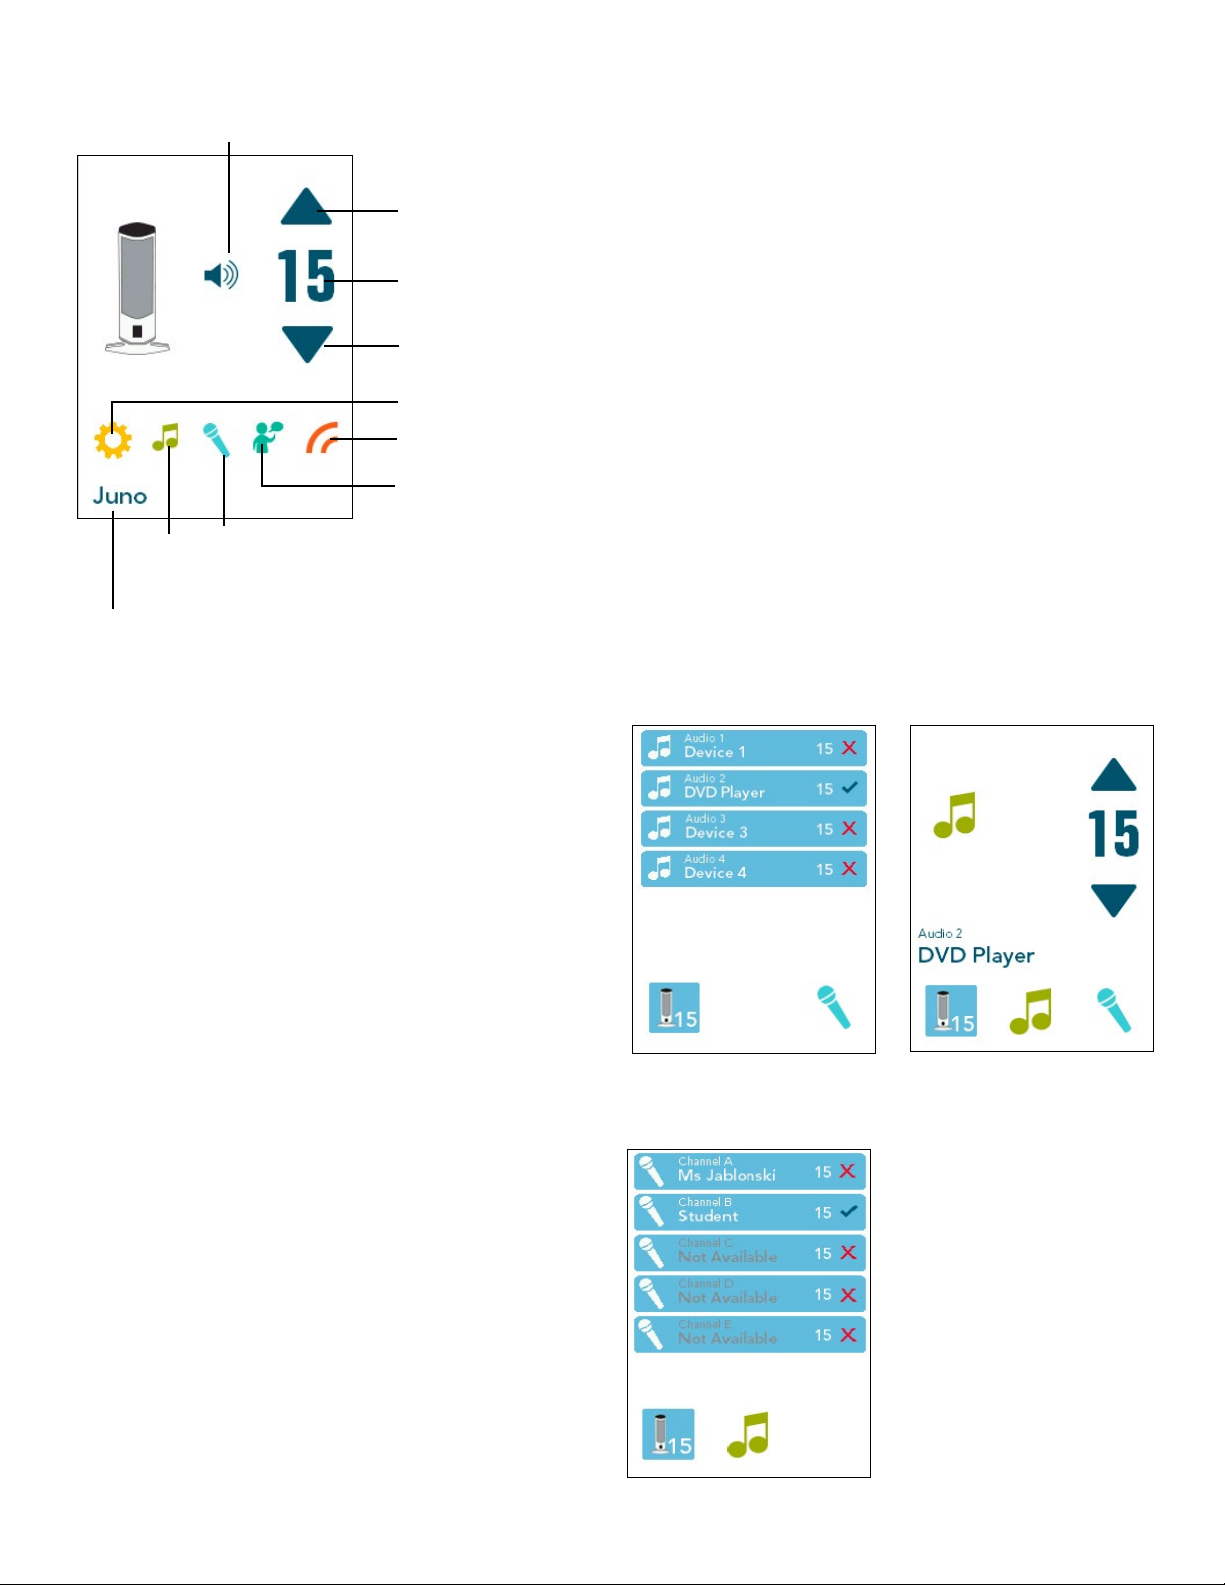
Microphone Volume
You can separately control the volume of each microphone used with
your Juno Tower.
1. Press the Microphone Volume Menu icon.
2. Select the microphone for which you want to change the volume
(microphones that are active – on and unmuted – will appear in
white text and will have a green check-mark in the far right of the
blue bar). See Image 3
3. Adjust the volume of the microphone.
Image 3
Home Screen
Tower Controls
Displays the current master volume
Settings Menu
Device
Volume
Menu
Microphone
Volume
Menu
Master Volume Up
(press and hold to increase volume quickly)
Master Mute
Master Volume Down
(press and hold to decrease volume quickly)
Name of Tower
(set via FrontRow Desktop or
Teacher Edition software)
Device Volume
You can control the individual volume of each device connected to your
Juno Tower. Devices that are currently playing audio will appear in white
text and have a green check mark in the far right on the blue bar.*
1. Press the Device Volume Menu icon.
2. Select the audio device for which you want to change the volume.
See Image 1
3. Adjust the volume of the connected device using the up or down
arrow. See Image 2
Image 1 Image 2
OptiVoice Menu
PrioriTeach Menu

Troubleshooting
The Battery Indicator on the Pendant or Pass-Around Microphone is
flashing green/red
•
Make sure the unit is not excessively hot or cold.
•
Remove microphone from charger for 5 minutes and then try again.
•
The battery needs to be replaced
The Push-to-Talk function is not working on the Pass-Around
Microphone
•
Verify you are pressing on the lower section of the switch.
•
Verify the battery is charged.
No signal reception (display indicates inactive channel)
• Check that the microphone is on.
• Check that the microphone is not muted (ITM-02 only).
• Verify that you are not blocking either the emitters on the microphone
or the sensor at the top of the Juno Tower.
• If reception is interrupted when facing a certain direction, install an
additional sensor in that area of the room (see Installer Guide) or
adjust VoiceChoice settings.
• If using more than one microphone, verify that they are not on the
same channel.
Tower will not 'wake up' from standby mode
• Volume level on auxiliary audio device is set too low.
• Make sure microphone is on and working correctly.
When I turn the Tower on, all I get is a white screen on the LCD
•
Turn the power off, wait 60 seconds and turn it back on.
Tower won’t turn on (LCD does not turn on)
• Verify that the power supply is plugged into both the receiver and a
working wall outlet.
• Verify the Tower power switch is on.
• Test with another power supply.
’Dead spots’ or
microphone crackling/noise
• Verify that you are not blocking either the emitters on the microphone
or the sensor at the top of the Juno Tower
.
• If reception is interrupted or noisy when facing a certain direction,
install an additional sensor in that area of the room (see Installer Guide)
or adjust VoiceChoice settings.
• If using more than one microphone, verify that they are not on the
same channel.
• There may be "noisy" electrical wiring. Install an AC line filter
(see Installer Guide).
Feedback (squealing)
•
Lower the Microphone Volume control(s) on the Tower.
• Position the microphone closer to mouth.
• Verify that the Music Audio In option is not checked in the Microphone
Volume screen.
Weak or no output from speaker(s)
•
Increase t
he Master, Device or Microphone Volume control(s) on
the Tower.
• Position the microphone closer to mouth.
• Verify that the microphone is on and not muted.
Charging light won't come on
•
Check that the charger is connected to a working power outlet.
When playing audio from an audio device such as an iPhone™or other
MP3 player, I can hear background noise through the speakers
•
Your device may be emitting a low level hum that is amplified by
the Juno Tower. Use a filtering cable such as a ground loop isolation
transformer cable to eliminate or reduce the noise.
My voice commands are not being recognized
•
Make sure there is not excessive background noise while issuing
command
•
Make sure the microphone is not being moved around, brushing
on clothing, buttons or jewelry.
•
Make sure you are following the correct sequence when issuing
command.
*Available at www.gofrontrow.com/juno
4Rev C 0518
Visit www.dorena.dk
Table of contents


