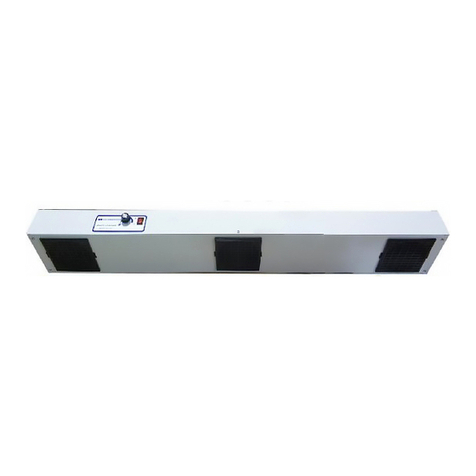
DR.SCHNEIDER PC SL-003 User manual

1
INSTRUCTION
SL-003
IONIZINGAIR BLOWER
DR.SCHNEIDER PC

2
Operation/Maintenance Instruction
1. IMPORTANT
Before installing SL-003, the compact fluorescent bulb must be
installed. The bulb is packed in cushioning material inside the blower’s
lamp compartment. Remove the front cover with a screw driver. Unpack
the bulb and install by screwing it into the lamp socket. Replace the
front panel.
SL-003 Overhead Ionizing Air Blower is a device of the ionizing air
blower series. The SL-003 blower is an overhead unit designed to
provide total coverage for electrostatic problems.
Please read the instruction manual completely before installing or
operating the device. This device is equipped with a 3-wires grounding
plug and must be plugged into a 3-terminal grounded socket. Do not
modifying plug or using an ungrounded power socket. If an extension
cord is required, it should be used only a 3-wire extension cord with
grounding.
Do not insert any object through intake or outlet grille.
Do not operate the unit under inflammable or explosive atmospheres.
Internal repairs or servicing should be done by SL-003 technician.
2. SPECIFICATION

3
Line Voltage 220VAC/ 50 Hz or 110VAC / 60Hz
Current Consumption Max.1.25 Amp (fan high, light on)
Min.0.62 Amp (fan low, light off)
Air Volume Output Fan speed Flow
Low 120 CFM
High 330 CFM
Air Flow Characteristics 40cm×120cmArea Coverage
Light Output 1650 Lumens Total.
Replacement Lamp 13-15 Watt Energy Saving Fluorescent
Operating Temperature 32ºF(0℃)~122ºF(50℃)
Enclosure Aluminum
Finish Powder Coat
Size
1100mm(L)×170mm(W)×125mm(H)
Optional Air Filter 30PPl Open Polyurethane Foam
Ion Balance(offset voltage) 0V+/-10V(It requires no calibration)
3. INSTALLATION
The SL-003 Ionizing blower should be located 600 to 900mm
above work surface with center fan directly above critical area. There
should be no cross flow of air between unit and work surface. Drafts
from air conditioning or heating air outlets can affect the performance of
this device.
3.1 Mounting
The SL-003 unit may be mounted using adjustable mounting
brackets. The mounting brackets are designed for use on a variety of
surfaces such as: perforated steel angle, uninstructed metal framing and
on Metro wire shelving. Place a lock washer and flat washer on the lock

4
knobs and secure the device using center holes on mounting tab. Be sure
to install fiber washer.
The S hooks provide for chain mounting or mounting on wire shelving.
Install overhead blower by using outer holes on mounting tabs. Chains
and mounting hardware (not supplied) must have a minimum safe
working load of 15kg.
3.2 Electrical
The SL-003 requires 220VAC/50Hz or 110VAC/60Hz for proper
operation. The device must be grounded for safe operation. The device
comes with line cord, without plug. A plug must be installed on the line
cord for operation. Installation of the plug must be performed by
qualified personnel. The color cord for wiring the plug is as follows:
Red-line; Blue-Neutral; Green/Yellow-Ground.
4. OPERATION
Activate the SL-003 Overhead Ionizing Air Blower by turning FAN
SPEED knob clockwise, out of the off position. The IONIZATION
INDICATOR will illuminate to indicate the presence of ionized air. Set
airflow as lights desired by adjusting FAN SPEED knob. If light is
desired, turn on task by setting LIGHTS switch to the on (1) position.
TO clean ion emitter points, rotate POINT CLEANER knob at each air
outlet clockwise to the stop slightly (approximately one turn) and
release.
The time required to neutralize a static charge on an item in the air
stream depends on fan speed. Setting a higher fan speed reduces time
required to neutralize a static charge.

5
When the SL-003 blower is used in an electronic assembly area, the
ionized air stream should cover as much of the working area as possible.
The constant flow of ionized air will prevent items such as work
surfaces, tools, materials and components from developing a static
charge. Charged items introduced into a work area will be neutralized
and will remain neutral while keeping in the ionized air stream.
The SL-003 overhead blower has been designed for minimal
maintenance. The only regular maintenance suggested consists of
emitter point cleaning, ion balance checking and ion output checking.
Emitter point cleaning takes only moments with the point cleaners. The
SL-003 also contains a balancing circuit that is inherently self balancing.
This circuit compensates for emitter point wear, line voltage fluctuations
and variations in air velocity.
Scheduled checking of ion output and balance should be considered to
assure quality audit requirements.
5. MAINTENANCE
5.1 Emitter Cleaning
To clean ion emitter points, simply rotate point cleaner knob located at
center of each outlet clockwise to the stop (approximately one turn) and
release. The spring-loaded point cleaning brush will return to its home
position. Recommended frequency of cleaning is once a week.
5.2 Air Inlet and Outlet Cleaning
The air inlet grilles on the top of the unit and ionized air outlets should
remain clean to prevent restriction of airflow. They can be cleaned with
a soft brush or vacuum.
5.3 Ion Output Check

6
Use a charged plate monitor to test the unit for ion output. Discharge
times should be measured and checked against the following Ion Output
tables.
ION OUTPUT (DISCHARGE TIME):
Testing condition
Temperature 22℃±5℃
RH: ≤60%
Distance: 300mm
Decay time
positive
1.1s
negative
1.2s
Offset voltage
-10V-+10V
1. Distance measured in mm, decay time measured in seconds.
2. Test data available using ME 268Acharge plate analyzer.
3. Test figures are subject to the variation in the atmospheric
conditions.
4. Discharge times are in seconds from 1000 volts to 100 volts.
If a charged plate monitor is not available, a hand held electrostatic
field meter can also be used. Ion output may be checked using the
following procedure.
1. Take a piece of plastic and rub it with cloth until a static charge can
be read with the static meter.
2. Turn on the SL-003 unit and set fan speed to high.
3. Hold the plastic one foot away from center ionized air outlet for five
seconds.
4. Remove plastic from ionized air stream and measure static charge.
The plastic should be neutralized.

7
If no instrumentation is available, ion output may be verified with
the following procedure.
1. Tear off about a 300mm length of Scotch brand (or equivalent) transparent
tape.
2. Approach non-adhesive side of tape with your free hand and note
the electrostatic attraction of tape to your hand.
3. Pass tape through the ionized air stream approximately 1 foot from
unit and again approach non-adhesive side of tape with your free
hand. If the tape has been neutralized, it will not attract.
CAUTION
ELECTRICAL SHOCK HAZARD
Do not insert objects through intake or outlet grille.
Do not try to verify operation of unit by drawing a spark from an ion
emitter point. The design of the balancing circuit makes the “park test”
inconclusive. Sustained grounding of ion emitters may damage the
balancing circuit.
5.4 Ion Balance Check
Use a charged plate monitor to test unit for ion balance of +/- 10V.
Do not try to determine ion balance by holding a static meter in the
ionized air stream. This will result in a meaningless reading.
5.5 Calibration
Ion output of the SL-003 unit is inherently balanced by design. As
a result, there are no calibration adjustment. After checking ion balance
as outlined in Section 5.4,if an unbalance or offset voltage exists in

8
excess of 0±10 volts, contact Dr. Schneider Customer Service Center.
5.6 Task Light Replacement
If either task light doesn’t turn on, dims appreciably or flickers, the
compact fluorescent lamp should be replaced as soon as possible.
Access to lamp is provided by removing the front panel of the device.
Disconnect the device by unplugging line cord. Remove appropriate
lamp access panel with a screwdriver and remove light bulb. Install a
new light bulb, replace lamp access panel and plug back in the device.
Table of contents
Other DR.SCHNEIDER PC Blower manuals
Popular Blower manuals by other brands

Eagle power
Eagle power TKS510ET Operation & maintenance manual

Tennant
Tennant SweepSmart S20 ELECTRIC Operator's manual

Homelite
Homelite VAC ATTACK II UT08544 Repair sheet

Ebmpapst
Ebmpapst W4E315-CS22-71 operating instructions

Nilfisk Egholm
Nilfisk Egholm City Ranger 2200 Operator's manual

Linea 2000
Linea 2000 DOMO DO206SW Instruction booklet