Draper CS18301 User manual


Read operating instructions before use!
Pay attention to the safety instructions!
1
3
AChain adjustment Bolt
BChain adjuster
CRunning direction
2
OIL
4 5
3

6
8
Z = Chain Interception Bolt
7
910
1Oil inspection window Fig. 2)
2Front handle
3Oil tank cap
4Front hand protection
5Blade
6Saw chain
7Securing nut
8Pinion lid
9Switch
10 Rear hand protection
11 Rear handle
12 Mains connection with plug
13 Blade protection
14 Fell handle
15 Stopping button Fig. 2)
4

5
Introduction to the Operating In truction
These Operating Instructions are intended to facilitate your becoming acquainted with the machine and using it in
accordance with the regulations. The Operating Instructions contain important information on how to use the
machine safely, correctly and economically. Observing this information will help increase the reliability and
working life of the machine. The Operating Instructions must always be at hand when the machine is being used.
They must be read and observed by every person dealing with the machine, whether operating, servicing or
transporting it.
In addition to the Operating Instructions and the applicable rules of the prevention of accidents valid in the country
of use and on site, the generally recognised rules on working safely and correctly must be observed as well as the
accident prevention rules of the relevant professional associations.
Important in truction for your per onal afety
A) General afety in truction
Attention: You are at ri k of injuring your elf if you
u e the chain aw incorrectly. It i imperative that
you read the e Operating In truction and follow the
in truction given.
Attention: Noise protection ! Please observe the local
regulations when operating your chainsaw.
1. Caution! : When electric tools are being used, the
following basic safety measures must be taken to
protect against electric shock, injury and risk of fire.
2. Protect yourself against electric shock. Avoid body
contact with grounded elements, e.g. pipes, radiators,
stoves, refrigerators.
3. Children and young persons not operate electrical
chainsaws.
4. The chain saw may only be used by persons who
have sufficient experience.
5. Always keep these Operating Instructions together
with the chain saw.
6. Only lend or give this chain saw to persons who are
familiar with its use. Also give them these Operating
Instructions.
7. You should always be in a good physical state when
working with the chain saw. Work steadily and with
concentration. Particular concentration is necessary
towards the end of your duty.
8. Never use the chain saw while under the influence of
alcohol, medication or drugs.
B) In truction on the u e of per onal protective
clothing
Working with a chain saw requires special measures
with regard to protective equipment and clothing suitable
for protecting your head, hands, feet, legs, eyes and ears.
9. Wear close fitting clothing which cannot get caught
10. Always wear an approved and tested safety helmet.
11. Always wear safety goggles or a face guard.
12. Always wear suitable protective gloves.
13. Wear ear protection to avoid damage to your hearing.
14. Wear safety boots.
15. We recommend that you wear leg guards.
C) In truction on u ing the chain aw afely
16. Attention! Read the Operating In truction care-
fully and have your elf in tructed in the u e of a
chain aw before you u e it for the fir t time.
17. Always store your electric tools in a safe place.
Electric tools not being used should be stored in a
dry, inaccessible or locked place, outside the reach
of children.
18. Use the cable only for the intended purpose. Never
carry or suspend electric devices by the cable. Do
not use the cable to pull the plug from the socket.
Protect the cable from heat, oil and sharp edges.
19. Check the extension cable regularly and replace it
if it gets worn or damaged. Keep the handle dry
and free of oil and grease.
20. Pull the plug from the socket when replacing the
saw chain or bar.
21. Do not leave the tool key in the ignition. Check
before switching on that the key and adjustment
tools are removed.
22. Avoid accidental starting. Do not hold your finger on
the switch when carrying an electric tool that is
connected to the power source. Ensure that the
switch is off when the plug is inserted in the socket.
23. Damaged switches have to be replaced by a
customer service workshop. Do not use an electric
tool if the switch cannot be switched on or off.
Illu tration and explanation of pictogram
1Wear eyes- and ear- protectors! 2Warning!
3Read operation instructions before use 4Do not subject this electric power tool to rain
5Remove plug immediately if the power 6Attention, kick-back!
flex is damaged or cut 7Hold tool with both hands!
12 3 4 5 6 7

6
24. Caution: Only use accessories or parts that are listed
in the operating instructions. Use of other tools and
other accessories mean safety risks for the operator.
25. Never subjekt the electrical chain saw to rain and
do not work in wet surroundings.
26. Check the chain saw for its proper operating state
before every use.Please pay special attention to the
sword and chain.
27. Check the power cable for damage or cracks every time
before you use it. Damaged cables must be replaced.
28. Always hold the chain saw with both hands while
working with it.
29. No other person may be within the working range of
the chainsaw.
30. The chain saw must be disconnected from the power
supply before you tighten the chain, exchange the
chain or carry out any other work on the saw. -
Remove the plug!
31. During work breaks put the machine down in such a
manner that nobody is at risk.
32. Always use the chain cover when transporting the
chain saw.
33. When switching on the chain saw, ensure that it is
supported well and hold it firmly. The chain and bar
must be free.
34. Before you start working ensure that you are stan-
ding firmly.
35. Remove the plug immediately if the power cable is
damaged or cut.
36. Never cut with the tip of the bar - the saw may recoil
“kick-back”).
37. Do not use the chain saw near combustible gases or
dust - danger of explosion.
38. The chain saw may only be connected to socket outlets
with earthing contact and tested electrical installations.
We recommend the use of a residual-current-operated
circuit-breaker. The fuse must have a value of 16 A and
mustn’t be used by other consumers while working
with the chain saw.
39. The cable must be unwound completely when using an
extension lead.
40. Ensure that the power cable has no kinks and is
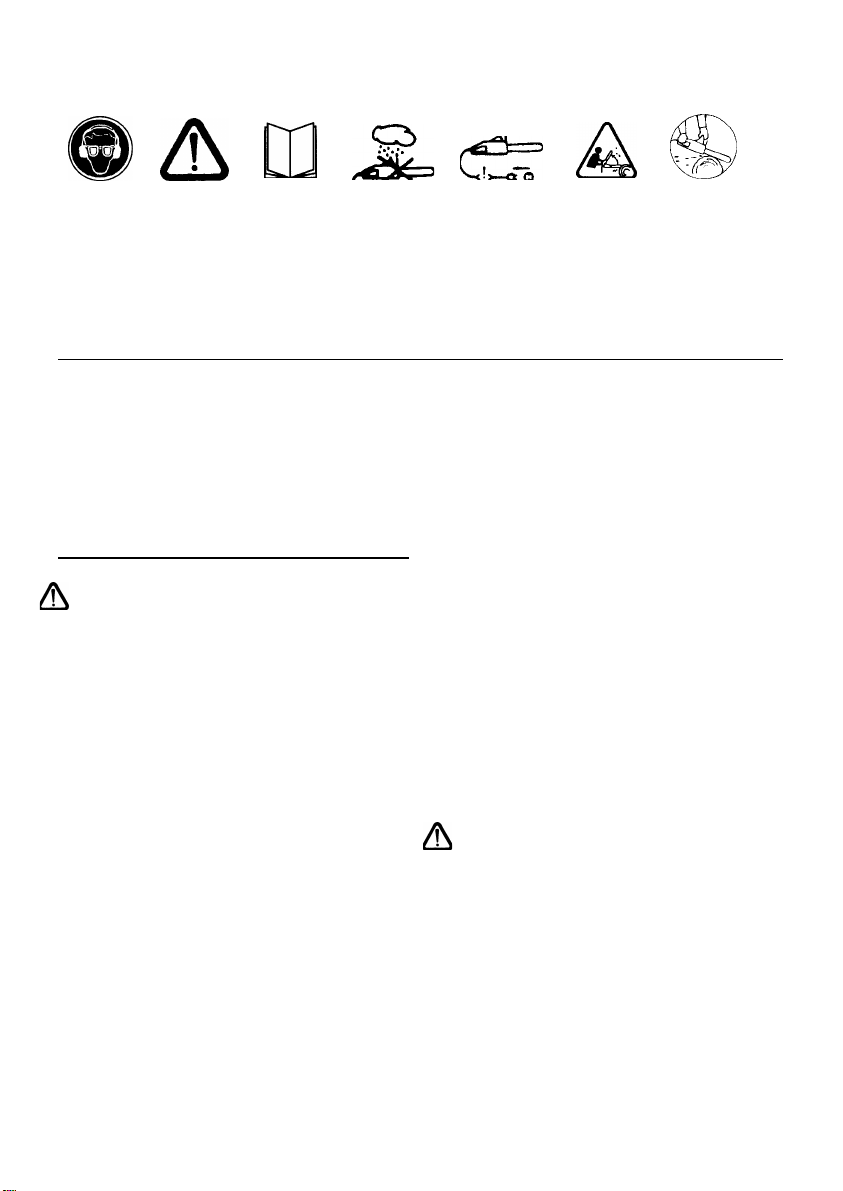
not damaged.
41. The chain saw may only be used in a completely
assembled state. No protective devices may be missing.
42. Switch the chain saw off immediately if you notice
any changes in the machine.
43. Always have a first-aid kit fulfilling DIN 13164 at
hand in case of accidents.
44. If the chain saw comes into contact with earth, stones,
nails or other foreign objects, remove the plug
immediately and check the chain as well as the bar.
45. Ensure that no chain oil penetrates into the earth or
sewage. Always place the chain saw on something
that will absorb any oil dripping from the bar or chain.
D) Warning to the danger of recoil (“kickback”)
46. Attention: If the tip of the bar contact a hard
object while the motor i running, the aw may
recoil dangerou ly. In recoiling, the chain aw i
flung upward at high peed toward the per on
holding the chain aw.
47. Do not touch wood or branches with the bar tip.
48. If possible, use a stand.
49. Always keep an eye on the bar tip.
50. Only place a running saw on the object to be cut. Never
start the machine while the chain rests on something.
51. So called piercing cuts with the bar tip may only be
carried out by trained personnel.
E) In truction on afe working technique
52. Before starting to work ensure that there is sufficient
light.
53. Always maintain a normal body posture when operating
the device. Always keep your balance.
54. Do not work with your body bent forwards.
55. Ensure that you are standing securely and do not work
on snow, ice or newly-barked wood. Danger of slipping!
56. Do not work while standing on a ladder.
57. Do not use the chain saw above shoulder height.
58. Use the chain saw only to cut wood. It is absolutely
forebidden to cut plastics or minerals gas concrete).
59. Ensure that the wood cannot twist while it is being cut.
60. Never climb on a tree to cut wood.
61. Watch out for splintering wood. While you are sawing
you may be injured by flying wood chips.
62. Do not use the chain saw to lever or move the wood.
63. Only cut with the lower section of the saw. The saw
will be propelled towards you if you try and cut with
the upper section of the saw.
64. Ensure that the wood is free of stones, nails or other
foreign objects.
Attention: The chain keep on running for a brief
moment after the chain aw ha been witched
off. Danger of injury.
Starting up
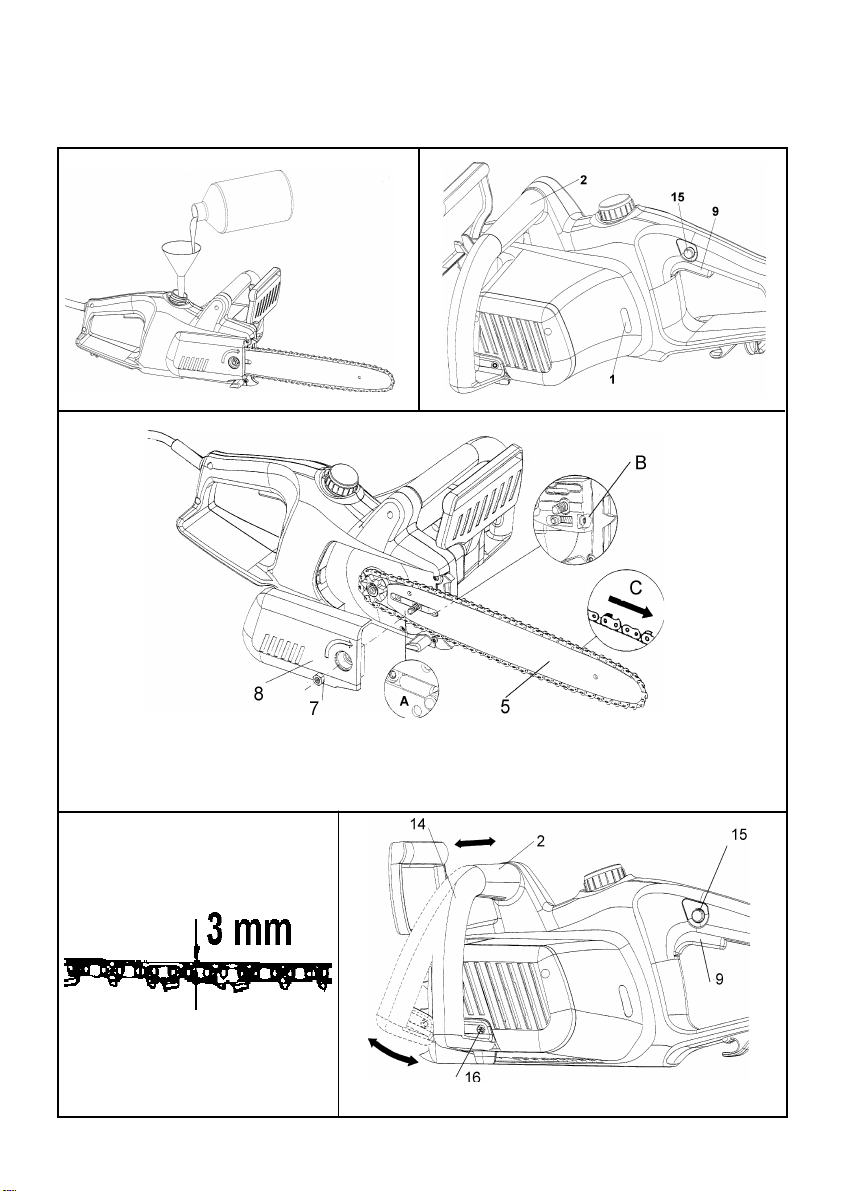
1. Filling the oil tank Fig. 1)
The chain saw must never be operated without sufficient
oil on the chain as this could cause damage to the chain,
blade or motor. No claims for guarantee can be accepted
if damage occurs when the device is being operated
without chain oil.
Plea e u e only biologically-ba ed chain aw oil, i.e.
oil which i 100% biologically decompo able.
Do not use old oil. This will damage the chainsaw and
will also lead to loss of the guarantee.
• Before filling the oil tank, pull out the mains plug
• Open the twist cap and place safely aside so that the
sealing ring in the tank cap does not get lost.
• Fill approx. 200 ml oil into the tank using a funnel and
screw on the tank cap tightly once more.
• The oil level can be seen in the inspection window Fig. 2).
If you plan not to use the machine for a long period,
you should remo ve the chain oil from the oil tank.
• The oil tank should also be emptied before the chainsaw
is transported or dispatched.
• Check correct functioning of the chainsaw before com-
mencing work. Switch on the saw with cutting fittings
assembled and hold over a bright background at a
safe distance Be careful not to come in contact with
the ground !). A track of oil will show you that the chain
is sufficiently lubricated.
• After use, lay the chainsaw horizontally on some absorbing
surface. The oil on the bar, chain and drive may lead

7
to some further dripping of oil.
2. A embling the blade and chain Fig. 3)
CAUTION ! Ri k of injury ! Alway u e afety glove
when a embling the chain !
• Lay the chainsaw on a stable base.
• Release and remove the securing nut 7
• Pull off the pinion lid 8
• Lay the saw chain onto the bar and observe the direction
of the chain. The cutting teeth mu t be pointing
forward on the top of the bar see fig.3, detail C).
• Lay the unattached end of the saw chain over the
chain drive wheel and the bar 5 with the elongated
hole over the blade guide and chain tensioning bolt
• Observe that the chain tensioning bolt is sitting exactly
in the small opening in the bar see fig.3,detail A). It
must be visible through the opening.
• Now push the bar together with the chain forwards.
Observe that all chain links are positioned exactly in
the bar grove and that the saw chain is running precisely
around the chain drive wheel.
• Replace the pinion lid 8 and press it tightly until secure.
• Replace the securing nut. The securing nut should
initially only be tightened by hand.
• Tighten the chain. To do this, turn the chain tensioning
screw see Fig.3,detail B) in a clockwise direction. The
chain should be tensioned so that it can still be raised
approx. 3 mm in the middle of the bar Fig. 4).
• Finally, tighten the securing nut 7 using a socket
spanner.
The tension in the chain has a major effect on the service
life of the cutting fittings, and must therefore be checked
regularly. When the chain warms up to operating
temperature it will expand and must be retightened. A new
saw chain will have to be tightened more frequently until it
has reached its full length.
CAUTION: During the running-in period, the chain
mu t be more frequently tightened. The chain
mu t be immediately retightened if it hake or
leave the grove !
To tighten the chain, loosen the nut 7. Then turn the
chain tensioning screw B on the front of the chainsaw
in a clockwise direction.Keep tightening the chain until
it can be raised in the middle of the bar by approx. 3
mm, as shown in Fig. 4.
3. In tall cutting grip Fig. 5)
To install the included cutting grip 14 lead both hooks
at the end of the grip into the openings of the front grip
2 and turn the cutting grip by 35° until it reaches its final
po-sition. Then, fasten the cutting grip 14 using the two
included screws 16 Pozidriv screws 4x25).
4. Connecting the chain aw Fig. 6)
This device is designed to be operated on a 230V/50Hz
mains supply in conjuction with a Risidual Current Device.
The chain aw mu t be tarted only with a
uitable connection H05RN 3 x 1.52.
This chainsaw is fitted with a strain-relief device to
provide extra safety for the cable. First form the cable
into a tight loop and push this through the safety web
on the lower side of the machine. Hang the loop into
the hook as shown in Fig. 6.
5. Switching on Fig. 2)
• Press with your thumb the safety button 15 on the left
side of the rear handle and then squeeze the operating
switch 9.
• The safety button 15 is used for unlocking the switch-
on mechanism and does not need to be pressed again
after the chainsaw is switched on.
• To switch off the chainsaw, release switch 9.
Caution: The chain aw will run immediately at full
peed and will continue running for a certain
period after it i witched off. You mu t wait until
the chain ha come to a full top before putting the
chain aw down.
Safety device on your chain brake
1. Chain brake Fig. 7)
The chain saw is equipped with a mechanical brake
for the chain. In the case of uncontrolled movements,
when the tip of the saw blade gets in contact with wood
or a solid object, the drive of the chain is immediately
stopped by activation of the hand guard 4, the motor
will not be stopped. This brake function is initiated by
the back of your hand on the front handle 2 pushing the
hand guard. The proper function of the saw chain
brake shall be checked before each use of the saw.
CAUTION: No button hould be pre ed when
the chain brake i relea ed (hand protection
pulled back in the direction of the handle and
locked).
Alway en ure before tarting the chain aw that the
hand protection 4 i locked in the operating po- ition.
To do thi , pull back the hand protection in the
direction of the handle.
2. Chain catch bolt Fig. 8)
This chainsaw is fitted with a chain catch bolt. If the
chain breaks when the saw is in operation, the chain
bolt will catch the loose chain end and thus prevent
injury to the operator's hand.
In truction on working properly with the
chain aw Fig. 9+10)
Removing branche Fig. 9)
• Ensure that you are standing firmly.
• Cut a deep notch from below into the branch about 15
cm from the trunk.
• Now cut the branch from above about 5 cm further out-
wards from the lower notch until the branch drops off.
• In order to remove the rest, cut from below about 1/3
into the remaining branch close to the trunk.
• Cut into the branch from above until the branch has
been removed completely.
• Do not remove free-hanging branches from below.
Felling a tree Fig. 10)
• Ensure that no one is within the felling area,
minimum distance: 2 tree lengths.
• Ensure that no one can be hit by falling branches or
the tree to be felled.

8
• Ensure that you have a possible escape route.
• Ensure that you are standing firmly.
• Keep the working area free of objects.
• Always stand at the side of the tree during felling.
• First determine in which direction the tree is to be
felled. The felling notch is cut on this side of the trunk.
• First cut 1/3 of the trunk diameter horizontally into the
tree at the intended felling notch.
• Now cut the second part of the felling notch from
above at an angle of 45° to the first cut.
• Now make the felling cut exactly opposite to the felling
notch. The felling cut must run horizontal and a bit
higher than the felling notch.
• Do not cut completely through the tree. Leave about 1/
10 of the trunk diameter.
• Put wedges into the felling cut to bring the tree to fall.
Cutting a felling tree
• First support the trunk so that the section to be cut off
always hangs freely and does not lie on anything so
that the bar cannot jam.
• If the chain saw does become jammed, switch it off
immediately and withdraw the plug. Use the wedges to
free the bar.
• Avoid letting the saw chain from coming into contact
with the earth.
General in truction on working with a chain aw
• Ensure that children and other spectators keep a safe
distance from the working area.
• Apply little pressure to the machine when sawing wood.
If the chain is keen, it will cut almost by itself through
the wood.
• If possible, always work with the chainsaw running
at high speed.
• Never try to continue sawing with a blunt chain. That
causes the motor to overheat and the loss of your right
to claim under guarantee. Always have a replacement
chain at hand.
• Allow the motor to cool off and make working breaks.
• After use always place the chain saw horizontally to
avoid oil dripping from the oil reservoir.
• Always use the chain cover when transporting the
chain saw.
Maintenance and Servicing
Alway withdraw the plug when carrying out
maintenance and ervicing.
• Always remove wood shavings and oil from your chain
saw after use. Ensure in particular that the motor
ventilation slits for cooling the motor in the housing of
the chain saw are clear danger of overheating).
• If the saw chain is particularly dirty, e.g. in case of
gumming with resin, remove the chain and clean it.
Place the chain for a few hours in a vessel containing
chainsaw cleaner. There-after clean the chain with clear
water. If the chain is not used again immediately, it must
be treated with anti-corrosion-spray.
• Only in case of use of biological oil: As some biological
oils may tend to incrustation after a time, the oiling
system should be rinsed thoroughly before storing
the chain saw for a longer period. Therefore, please
fillhalf of the oil reservoir about 50 ml) with
chainsaw cleaner and close it as usually. Then switch
on the chainsaw - without bar and chain being mounted
- and keep it running until the total rinsing liquid has
evapurated through the oil opening of the chain saw.
Before using the chain saw again, it is absolutely
necessary to refill the oil reservoir.
• Do not store the saw outdoors or in damp and moist areas.
• Check all the chain saw parts, in particular the chain,
bar and sprocket, of wear after every use.
• Ensure that the chain tension is correct. If the chain is
too loose, it may come off during use and lead to
injuries. The chain must be replaced immediately if it is
damaged. The cutting teeth must be at least 4 mm
long.
• Check the motor housing and power cable after every
use for damage. If there is any sign of damage, have
the chain saw repaired imediately.
• Check the oil level and lubrication of your chain saw
after every use. Insufficient lubrication leads to
damage to the chain, bar and motor.
• Check how sharp the chain is every time before you
use the chain saw. A blunt chain will cause
overheating of the motor.
• Sharpening a saw chain requires experience and
specialised knowledge. We therefore recommend to
have sharpening carried out by a specialised workshop.
In the ca e of technical problem
•The machine doe not tart up: Check whether the
power socket is live. Check whether the power cable
is undamaged. If neither case applies, take the chain
saw to a specialised workshop.
•Chain doe not run: Check position of handguard
ill. 7). Chain only runs if handguard brake is released.
•Spark fly at the motor: Motor or carbon brushes
damaged. Take the chain saw to a specialised work-
shop.
•Oil doe not flow: Check the oil level. Clean the oil
flow openings in the bar also see the corresponding
hints of “Maintenance and servicing). If this is not
successful, take the chain saw to a specialised work-
shop.
Attention: Any maintenance or repair work going
beyond that de cribed in the e Operating In truction
may only be carried out by authori ed per on .
Attention: If the power upply lead of thi device
how any defect , the lead mu t be replaced by
an authorized per on, a thi work require pecial
tool .
Repair Service
Repairs to electric power tools should only be carried
out by specialist electrical personnnel.

This manual suits for next models
3
Table of contents
Other Draper Chainsaw manuals

Draper
Draper 77941 User manual

Draper
Draper CSP4545 User manual

Draper
Draper CS1500 User manual

Draper
Draper CS18350A Firmware update

Draper
Draper CS1800A User manual

Draper
Draper CSP45450 User manual

Draper
Draper CSP2625 User manual

Draper
Draper CS16300 User manual

Draper
Draper CS1800A User manual

Draper
Draper CSP3940 User manual