Silverline 634009 User manual

Users Manual
52cc Petrol Chainsaw
508mm (20") Bar
Product Code 634009
© December 2007
•Thisguaranteebecomeseffectiveatthedateofretailpurchase.
PLEASE KEEP YOUR RECEIPT.
•Ifthisproductdevelopsafaultwithin30daysofpurchase,returnittothe
stockistwhereitwaspurchased,withyourreceipt,statingdetailsofthefault.
Youwillreceiveareplacementorrefund.
•Ifthisproductdevelopsafaultwithin3yearsofpurchasereturnitto;
Silverline Tools Service Centre
PO Box 2988
Yeovil
BA21 1WU
Includeyouroriginalreceipt,detailsofthefault,yournameandaddress,placeand
dateofpurchase.Wedonotrefundcarriage.Allproductsshouldbeinasuitably
cleanandsafestateforrepair,andshouldbepackagedcarefullytopreventdamage
orinjuryduringtransportation.Wemayrejectunsuitableorunsafedeliveries.
•Youmustprovideproofofpurchasebeforeanyworkcanbecarriedout.
•AllworkwillbecarriedoutbySilverlineToolsoritsauthorisedrepairagents.
•AnypartswhicharereplacedwillbecomethepropertyofSilverlineTools.
•Therepairorreplacementoftheproductwillnotextendtheperiodofguarantee.
•Therepairorreplacementofyourproductunderguaranteeprovidesbenetswhich
areadditionaltoanddonotaffectyourstatutoryrightsasaconsumer.
What is covered:
•Therepairoftheproduct,iffoundtobedefectiveduetofaultymaterialsorworkmanship
within3yearsofpurchase.Ifanypartisnotavailableoroutofmanufacture,
SilverlineToolswillreplaceitwithafunctionalreplacementpart.
•UseoftheproductintheUK.
What is not covered:
Silverline Tools does not guarantee repairs required as a result of:
•Normalwearandteare.gblades,brushes,belts,bulbs,batteriesetc.
•Accidentaldamage,faultscausedbynegligentuseorcare,
misuse,neglect,carelessoperationorhandlingoftheproduct.
•Useoftheproductforanythingotherthannormaldomesticpurposes.
•Changeormodicationoftheproductinanyway.
•UseofpartsandaccessorieswhicharenotSilverlineToolsgenuinecomponents.
•Faultyinstallation(exceptinstalledbySilverlineTools).
•Repairsoralterationscarriedoutbypartiesotherthan
SilverlineToolsoritsauthorisedrepairagents.
Silverline Tools 3 Year Guarantee
Thank you for choosing this product
634009_Instructions.indd 1 16/11/2010 12:32

Introduction
This manual is an integral part of the chainsaw and should be kept
with it at all times. If the chainsaw is re-sold this manual should be
included in the sale.
Safety Messages
A safety message is to alert you to potential dangers that could hurt
you or others. Each safety message is preceded by one of three
words DANGER, WARNING or CAUTION.
These words mean
DANGER: YOU WILL BE KILLED OR SERIOUSLY INJURED IF
YOU FAIL TO FOLLOW THE INSTRUCTIONS.
WARNING: YOU CAN BE KILLED OR SERIOUSLY INJURED IF
YOU FAIL TO FOLLOW THE INSTRUCTIONS.
CAUTION: YOU CAN BE SERIOUSLY INJURED IF YOU FAIL TO
FOLLOW INSTRUCTIONS.
Each safety message tells you what the hazard is, what can
happen and what you can do to avoid and reduce injury.
There are other important messages preceded with the word
NOTICE.
NOTICE: MEANS YOUR CHAINSAW OR OTHER PROPERTY
COULD BE DAMAGED IF YOU FAIL TO FOLLOW
INSTRUCTIONS.
The purpose of these messages is to help prevent damage to you,
your chainsaw, other property and the environment.
General Safety Instructions
Even when used as prescribed it is not possible to eliminate all
residual risk factors. Use with caution.
Keep guards in position
• Always keep guards in position, in good working order, correctly
adjusted and aligned. Never attempt to use a tool without any guard
supplied with it.
Remove adjusting keys
• Always check to see that keys and adjusting wrenches are removed
from tool before turning on.
Clean work area
• Accidents occur where benches and work areas are cluttered or
dirty, oors must be kept clear, avoid working where the oor
is slippery.
Dangerous environment
• Provide adequate surrounding work space and keep area well lit.
Do not use tools where there is a risk of explosion or re from
combustible material, ammable liquids, ammable gases
or dust of an explosive nature.
Children & Pets
• Children and pets should always be kept at a safe distance
from your work. Make your workshop child-proof. Lock tools
away where children can’t get access to them.
Use the correct tool
• Don’t force, or attempt to use a tool for a purpose it was not
designed for. Do not use a small tool to do the job of a heavy duty
tool.
Wear correct clothing and footwear
• Don’t wear loose clothing, neckties or jewellery or other items which
may get caught in moving parts. Wear non-slip footwear, cover or
tie back long hair. Use safety footwear if necessary.
Protect your head
• Wear safety goggles at all times, every day glasses are not
sufcient for eye protection, as lenses are not impact resistant and
could shatter. Use an approved face or dust mask when operation
creates dust. Ensure dust extraction equipment is functioning
and correctly used. Hearing protection should be used if the sound
intensity level for the operator could exceed 80dB(A). Use a hard
hat where there is a risk of falling objects or striking your head on
low level obstructions.
Protect yourself from vibration.
• Hand held tools may produce vibration. Vibration can cause
disease. Gloves to keep the operator warm and dry and therefore
maintain good blood circulation in the ngers may help. This tool
has not been designed for extended or industrial operation.
Secure work
• Always secure work. Where practical use a clamp or vice, it will
allow you to use both hands to operate your tool.
Keep your balance
• Don’t over reach, keep proper footing at all times to ensure
correct balance.
Maintain your tool
• Keep your tool in good working order, keep tools sharp and clean
for best and safest performance. Ensure ventilation holes are kept
clean and unrestricted at all times.
Accessories
• The use of any attachment or accessory other than those
mentioned in this manual could result in damage or injury. The use
of improper accessories could be dangerous.
Never stand on your power tool
• Standing on your tool could cause serious injury if the tool is tipped
or if the cutting tool is accidentally contacted. Do not store materials
above or near the tool so that it is necessary to stand on the tool or
its stand to reach them.
Check for damaged or missing parts.
• Before each use check if any part of the power tool is damaged or
missing, check carefully that it will operate properly and perform its
intended function. Check alignment of moving parts for binding. Any
guard or other part that is damaged should be correctly repaired or
replaced. Do not use if the power switch does not turn the power on
and off. Check any other condition that may affect the safety of the
power tool. DO NOT USE IF DEFECTIVE.
Direction of feed
• Feed work into a blade or cutter against the direction of rotation of
the blade or cutter only.
Don’t leave the tool running unattended
• Always wait until your power tool has come to a complete stop
before leaving it.
GENERAL WARNINGS
Wear close tting, durable work clothing that will provide
adequate protection. Long trousers, jacket, safety work shoes,
heavy duty work gloves, hard hat, safety face shield or safety glasses
for eye protection and a good grade of ear protection.
Turn unit off before, setting down, or checking ttings.
Hold unit rmly, hold with both hands, the thumb and ngers
encircling both handles.
Keep all screws and fastener tightened, never operate machinery
improperly adjusted or unsecurely assembled.
Keep handles dry, keep clean and free of fuel mixture.
Do not use any other fuel, always use recommended fuel.
Follow instructions in the fuel and lubrication section of the user
guide. Failure to do this will result in permanent engine damage
voiding manufacturer’s warranty.
Do not smoke while refuelling or operating unit.
Do not touch or let hands or body come into contact with the units
mufer. Hold unit with both hands, thumb and ngers encircling both
the handles.
NEVER allow children to operate unit.
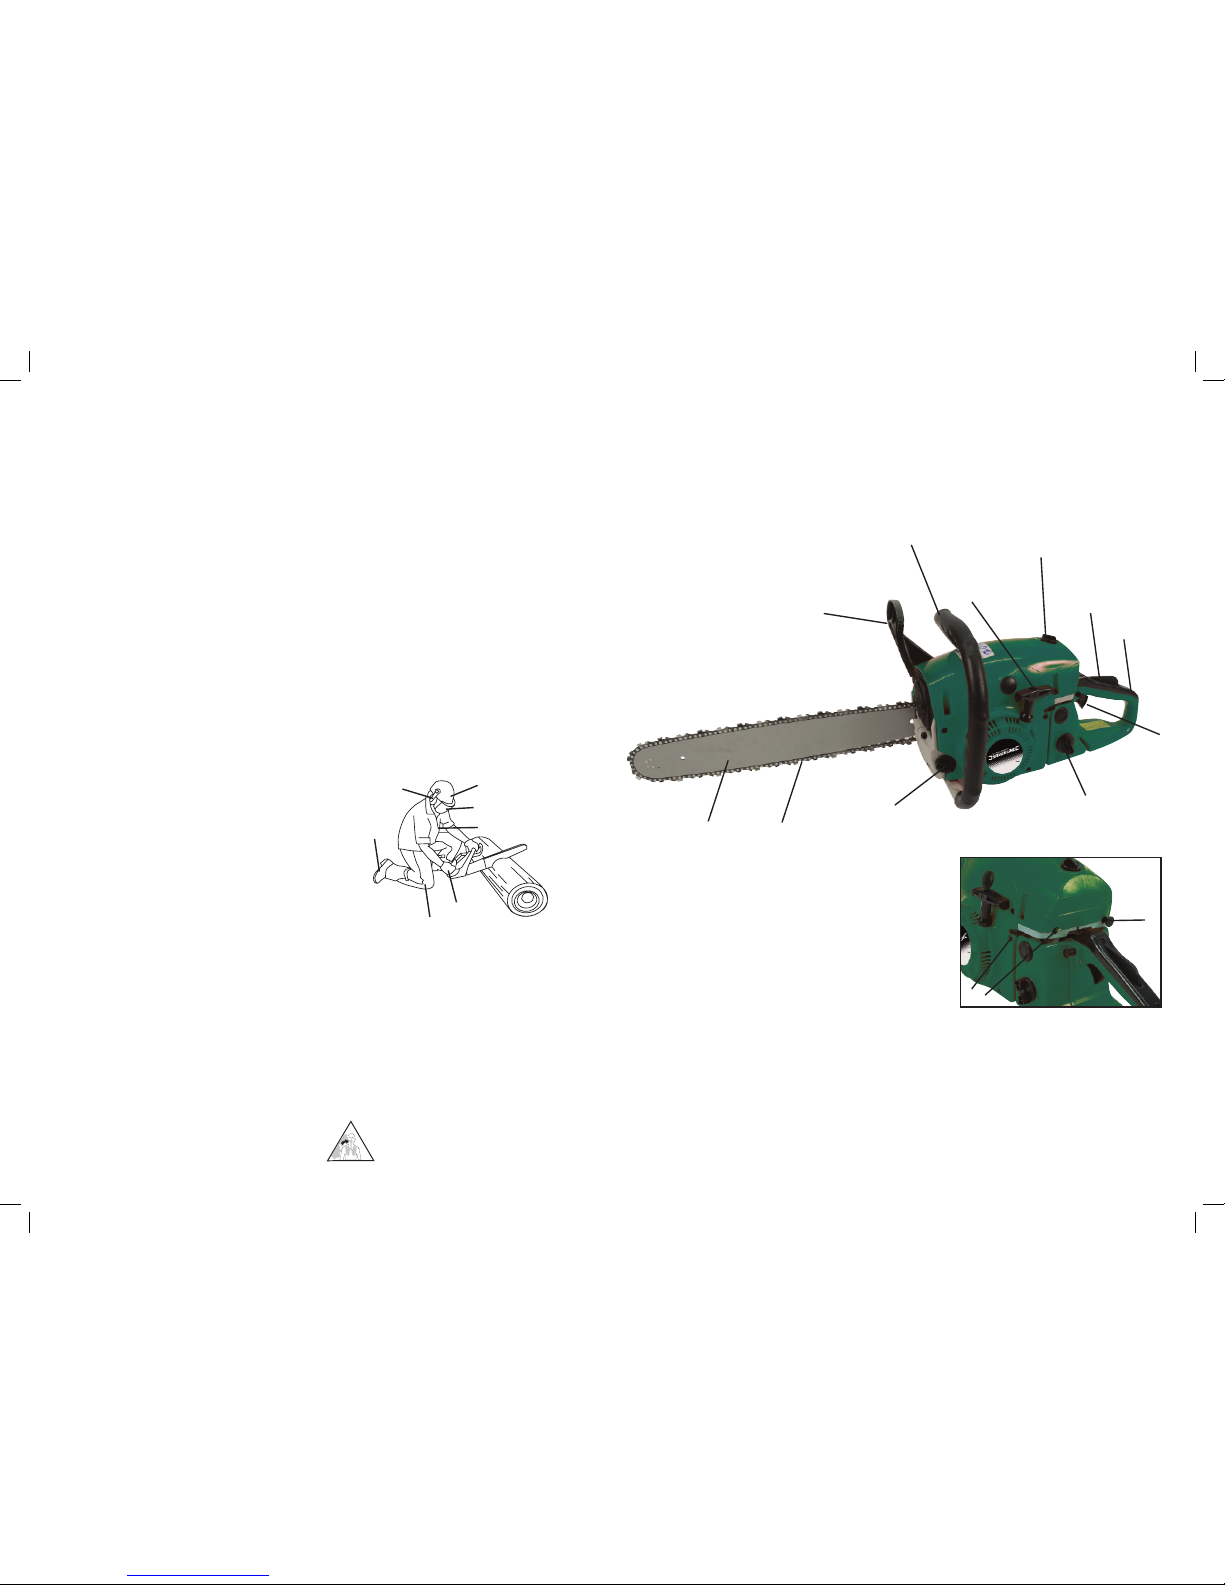
Product Familiarisation
52cc Petrol Chainsaw
508mm Bar
Hard hat
Face shield
Jacket
Leather gloves
Leg protection
Safety boots
Ear protectors
1. Front guard
2. Starter knob
3. Air cleaner cover
4. Choke knob
5. Throttle interlock
6. Rear handle
7. Throttle trigger
8. Carburetor adjustment screws
9. Ignition switch
10. Fuel tank ller
11. Oil tank ller
12. Front handle
13. Saw chain
14. Guide bar
This product produces poisonous exhaust fumes
as soon as the engine is running. These gases
may be colourless and odourless. To reduce the
risk of serious or fatal injury, never run the machine
indoors, or in poorly ventalilated areas. Ensure
proper ventilation when working in trenches or other
conned spaces.
SPECIFICATION
Fuel: Unleaded petrol / 2 stroke mix (25:1)
Fuel tank capacity: 520ml
Oil tank capacity: 260ml
Engine displacement: 51.2cc
Maximum engine power: 2.6kW
Maximum engine speed with
cutting attachment: 10000RPM
Maximum engine speed at idling: 3000RPM
Sprocket: 7 Tooth
Saw chain type: USA Semi-chisel
Saw chain pitch: 3/8"
Saw chain gauge: 1.27mm(0.058")
Guide bar type: Sprocket nose
Guide bar size: 508mm (20")
Max cutting length: 480mm
Oil feeding system: Automatic
Sound pressure: 104dB(A)
Sound power: 116dB(A)
Weighted vibration: Front: 7.07m/s2
Rear: 7.62m/s2
4
9
8
13
1
11
2
3
5
6
7
10
14
12
634009_Instructions.indd 2 16/11/2010 12:32

PRIOR TO USE
Installing guide bar and saw chain
Open the box and install the guide bar and the saw chain on the
power unit as follows:
WARNING!
The saw chain has very sharp edges. Use thick protective
gloves for safety.
1. Pull the guard (1) towards the front handle to check that the chain
brake is not on.
2. Loosen the nuts and remove the chain cover. (Fig.2).
3. Gear the chain to the sprocket and, while tting the saw chain
around the guide bar, mount the guide bar to the power unit.
Adjust the position of chain tensioner peg on the power unit to the
lower hole of guide bar.
4. Fit the chain cover to the power unit and fasten the nuts to nger
tightness.
5. While holding up the tip of the bar, adjust the chain tension by
turning the tensioner screw (located to the side of the guide bar)
until the tie straps just touch the bottom side of the bar rail.
6. Tighten the nuts securely with the bar tip held up (12~15N.m).
Then check the chain for smooth rotation and proper tension while
moving it by hand. If necessary, re-adjust with the chain cover
loose.
NOTE:
A new chain will stretch when rst used. Check and re-adjust the
tension frequently as a loose chain can easily de-rail or cause rapid
wear of itself and the guide bar.
Fuel and chain oil
Fuel
• The motor uses two stroke fuel, a mixture of petrol and a 2 stroke
lubricant at 25:1
• Use a branded 90 octane or higher unleaded petrol.
NOTE two stroke fuel may separate, Shake fuel container
thoroughly before each use. Do not mix more fuel than you
expect to use within one month.
WARNING!
• Keep open ames away from the area where fuel is handled
or stored.
• Mix and store fuel only in an approved petrol container.
NOTE:
Most engine troubles are caused, directly or indirectly, by the fuel
used on the machine. Take special care when mixing.
Chain oil
Use motor oil SAE# 10W ~ 30 all year round or SAE #30 ~ #40 in
summer and SAE#20 in winter.
NOTE:
Do not use waste or re-generated oil as this will cause damage
to the oil pump.
OPERATING INSTRUCTIONS
Starting engine
1. Fill fuel and chain oil tanks respectively and tighten the caps
securely.
(A) Ignition Switch
(B) Choke Knob
2. Put the ignition switch to “I” position. (Fig. 3).
3. Pull out the choke knob to the starting position.
NOTE:
When re-starting immediately after stopping the engine, leave
the choke knob at the RUN position.
4. While holding the saw unit securely on the ground, pull the starter
rope vigorously.
WARNING!
Do not attempt to start the chainsaw whilst holding in one hand
as this can cause injury.
5. When engine res, push in the choke knob and pull the
starter again to start the engine.
6. Allow the engine to warm up with the throttle lever pulled slightly.
WARNING!
Keep clear of the saw chain as it will start rotating once the
engine has started.
Check oil supply
After starting the engine, run the chain at medium speed and see if
chain oil is scattered off.
NOTE:
The oil tank should become nearly empty by the time fuel is
used up. Be sure to rell the oil tank every time when re-fuelling
the unit.
Adjusting carburettor (Fig. 4)
(A) L Needle
(B) H Needle
(C) Idle adjusting screw
The carburettor on your unit has been factory adjusted, but may
require ne tuning due to change in operating conditions. Before
adjusting the carburetor, make sure to renew the clean air/fuel lters
and use fresh, properly mixed fuel. When adjusting, take the
following steps:
NOTE:
Be sure to adjust the carburettor with the bar and chain
attached.
1. Stop engine and screw in both H and L needles until they stop.
Do not force or over tighten. Then set them back the intial number
of turns as shown below.
H Needle: ¾
L Needle: 1½
2. Start engine and allow it to warm up at half-throttle.
3. Turn L needle slowly clockwise to nd a position where idling
speed is maximum, then set the needle back a quarter (1/4) turn
counterclockwise.
4. Turn idle adjusting screw (C) counterclockwise so that the saw
chain does not turn. If idling speed is too slow, turn the screw
clockwise. (Fig. 4.)
5. Make a test cut and adjust the H needle for best cutting power, not
for maximum speed.
Stopping engine
1. Release the throttle lever to allow the engine to idle for a few
seconds.
2. Put the ignition switch to the “O” (STOP) position.
CAUTION
Ensure the brake is fully operational prior to use.
To do this:
(1) Turn off the engine.
(2) Holding the chainsaw horizontally, release your hand from
the front handle, hit the tip of the guide bar to a stump or a piece
of wood, and conrm brake operation. Operating level varies
by bar size. (Fig. 5). In case the brake is not effective. Refer to
the guarantee on the back of this manual about inspection and
repairing. The engine, if being kept rotated at high speed with the
brake engaged, will heat the clutch, causing a problem. When the
brake is operated while in operation, immediately release your
ngers from the throttle lever and keep the engine idling.
Fig.4
Fig.2
Fig.3
Fig.5
C
B
A
B
A
634009_Instructions.indd 3 16/11/2010 12:32

Sawing
WARNING!
• Before proceeding to your job, read the following sections. It is
recommended to rst practice sawing easy logs. This also
helps you get accustomed to your unit.
• Always follow the safety regulations. The chain saw must only
be used for cutting wood. It is forbidden to cut other types of
material. Vibrations and kickback vary with different materials
and the requirements of the safety regulations would not be
respected. Do not use the chainsaw as a lever for lifting,
moving or splitting objects. Do not lock it over xed stands.
• It is not necessary to force the saw into the cut. Apply only
light pressure while running the engine at full throttle.
• When the saw chain is caught in the cut, do not attempt to pull
it out by force, but use a wedge or a lever to open the way.
Guard against kickback (Fig. 6)
This saw is equipped with a chain brake that will stop the chain
in the event of kickback if operating properly. You must check the
chain brake operation before each usage by running the saw at full
throttle for 1-2 seconds and pushing the front hand guard forward.
The chain should stop immediately with the engine at full speed. If
the chain is slow to stop or does not stop, replace the brake band
and clutch drum before use.
It is extremely important that the chain brake be checked for proper
operation before each use and that the chain is sharp in order to
maintain the kickback safety level of this saw. Inadequate maintenance,
or incorrect replacement of the bar or chain may increase the risk of
serious personal injury due to kickback.
Felling a tree (Fig. 7)
WARNING!
When you fell a tree, be sure to warn your neighbouring workers
of the danger.
(1) Notch cut
(2) Felling cut
(3) Felling direction
1. Choose the felling direction considering the wind, lean of the tree,
location of heavy branches, ease of job after felling and other
factors.
2. While clearing the area around the tree, arrange a good foothold
and retreat path.
3. Make a notch cut one-third of the way into the tree on the felling side.
4. Make a felling cut from the opposite side of the notch and at a
level slightly higher than the bottom of the notch.
Bucking and limbing
WARNING!
• Always ensure your foothold. Do not stand on the log.
• Be alert to the rolling over of a cut log. Especially when
working on a slope, stand on the uphill side of the log.
• Follow the previous sections instructions “guard against kick
back” to avoid kickback of the saw.
Before starting work, check the direction of bending force inside the
log to be cut. Always nish cutting from the opposite side of bending
direction to prevent the guide bar from being caught in the cut.
A log lying on the ground (Fig. 8)
Saw down halfway, then roll the log over and cut from the opposite
side.
Fig.6
Fig.7
Fig.8
A log hanging off the ground (Fig. 9)
In area A, saw up from the bottom one-third and nish by sawing
down from the top. In area B, saw down from the top-third and
nish by sawing up from the bottom.
Cutting limb of fallen tree (Fig. 10)
First check to which side the limb is bent. Then make the initial cut
from the bent side and nish by sawing from the opposite side.
WARNING!
Be alert to the possibilities of spring back from a cut limb.
Pruning of standing tree (Fig. 11)
Cut up from the bottom, nish down from the top.
WARNING!
• Do not use an unstable foothold or ladder
• Do not overreach.
• Do not cut above shoulder height.
• Always use both hands to grip the saw.
MAINTENANCE & STORAGE
WARNING!
Before cleaning, inspecting or repairing your unit, make sure
the engine has stopped and is cool. Disconnect the spark plug
to prevent accidental starting.
Maintenance after each use
1. Air lter
To access the air lter, remove the air lter cover. To remove the lter,
unscrew the top lid and withdraw the lter element. The element can
be cleaned with a light brush or compressed air.
2. Oiling port
Dismount the guide bar and check the oiling port for clogging.
3. Guide bar
When the guide bar is dismounted, remove saw dust in the bar
groove and the oiling port.
Grease the nose sprocket from the feeding port on the tip of the bar.
(A) Grease port
(B) Sprocket
4. Other
Check for fuel leakage and loose fastenings and damage to major
parts. Especially handle joints and guide bar mounting. If any defects
are found, make sure to have them repaired before operating again.
Periodical service points
1. Cylinder ns
Dust clogging between the cylinder ns will cause overheating of the
engine. Periodically check and clean the cylinder ns after removing
the air cleaner and the cylinder cover.
When installing the cylinder cover, make sure that switch wires and
grommets are positioned correctly in place.
NOTE:
Be sure to block the air intake hole prior to cleaning
2. Spark plug (Fig.12)
Clean the electrodes with a wire brush and reset the gap to 0.65mm
as necessary.
3. Sprocket
Check for cracks and for excessive wear interfering with the chain
drive. If wear is found, replace it with a new one. Never t a new
chain on a worn sprocket, or a worn chain on a new sprocket.
4. Fuel lter
Using a wire hook, withdraw the lter through the fuel tank ller and
wash with petrol, or replace with new one if required.
Fig.9
Fig.11
Fig.12
Fig.10
634009_Instructions.indd 4 16/11/2010 12:32

Fuel and oil
• NEVER store the unit with fuel in the tank in an environment
where petrol fumes could come into contact with a ame, spark
or sources of extreme heat.
• Store the unit in a clean and dry environment.
• Allow the motor to cool before storing.
• If fuel tank needs to be drained, do so outdoors when the motor
is cold.
• Respect the environment and do not dispose of oil or petrol by
pouring into the drainage system or into the ground.
• Do not add, remove or modify any of the units components.
To do so could result in:
Injuries to the operator and other persons present.
Damage to the unit.
Moreover this will invalidate the warranty.
Extended storage
• Inspect, clean and repair if necessary.
• Remove all fuel from tank safely.
• Remove spark plug and pour one tea spoon of clean oil into spark
plug hole cylinder replace spark plug.
• Store in clean, dry area.
DANGER THIS UNIT PRODUCES CARBON MONOXIDE.
UNDER NO CIRCUMSTANCES USE THIS PRODUCT INDOORS.
Maintenance of saw chain and guide bar
Saw chain
WARNING!
It is very important for smooth and safe operation to keep the
cutters sharp.
Your cutters need to be sharpened when:
• Saw dust becomes powder-like
• You need extra force to saw
• The cut way does not go straight
• Vibration increases
• Fuel consumption increases
Cutter setting standards
WARNING!
Be sure to wear safety gloves
Before ling:
• Make sure the saw chain is held securely
• Make sure the engine is stopped
• Use a round le of proper size for your chain
File size: 5
/32 in (4.0mm)
Place your le on the cutter and push straight forward. Keep the le
position as illustrated. (Fig. 13)
After every cutter has been set, check the depth gauge and le it to
the proper level as illustrated. (Fig. 14).
WARNING!
Be sure to round off the front edge to reduce the chance of
kickback or tie-strap breakage.
Make sure every cutter has the same length and edge angles as
illustrated (Fig. 15).
Guide bar
• Reverse the bar occasionally to prevent partial wear.
• The bar rail should always be a square. Check for wear of the bar
rail. Apply a ruler to the bar and the outside of a cutter. If a gap is
observed between them the rail is normal. Otherwise, the rail
requires re-setting or replacement. (Fig. 16).
• The guide bar is provided with a sprocket at the tip, this must be
lubricated with grease at all times.
• Keep the bar groove and lubrication hole clean.
• Check the bar rails frequently for wear and if necessary remove
the burs and square up the rails using a at le.
WARNING!
NEVER mount a new chain on a worn sprocket
Fig.13
Fig.14
Fig.15
Fig.16
Failures such as difculty starting unit, poor performance can normally be prevented if careful attention is paid to all operating instructions and
maintenance procedures.
Checking the spark plug
Remove the spark plug cap and clean any dirt or debris from around the plug. Remove the spark plug and install it in the spark plug cap. Set
the plugs electrode on the cylinder head. Crank the engine and sparks should jump across the gap.
Spark gap 0.6 - 0.7mm (.23” .028”)
WARNING!: Be sure that there is no spilled fuel around the spark plug. Split fuel may ignite.
WARNING!: Petrol is extremely ammable and is potentially explosive under certain circumstances. Do not smoke or allow sparks or
ames in the area.
WARNING!: Never try to repair the unit, take to an authorised service centre.
Problem Possible cause Remedy
Engine does not start Is there fuel in the tank?
There is no spark from the spark
plug?
Is the compression correct?
Rell the fuel tank
Replace/check the spark plug
Check compression
Engine smokes or runs poorly Is the correct fuel being used? Check the mix is 25:1 Unleaded
petrol to oil
Motor stalls Water in fuel
Spark gap is wrong
Replace fuel
Adjust spark gap
Trouble Shooting Guide
634009_Instructions.indd 5 16/11/2010 12:32
Table of contents
Other Silverline Chainsaw manuals
Popular Chainsaw manuals by other brands

Powerplus
Powerplus POWEG1011 quick start guide

Einhell Royal
Einhell Royal REC 1840 Original operating instructions

Oregon Scientific
Oregon Scientific CS1418-091 Original instruction manual

Ross
Ross ROSSGARDEN RGCS45CC manual

Koma
Koma Pro Series 08337 instruction manual

Stihl
Stihl MS 261 C-MQ instruction manual