Dreamline Victoria User manual

© 2002-2006 DreamLine™. All Rights Reserved Victoria/DLG-65 1
Victoria / DLG-65
Shower Cabin Installation and User’s guide
I. Mounting Preparation
1. After opening the case, read this introduction carefully, check all the packed parts, and examine the shower cabin for
shipping damage. If the unit has been damaged or has a finishing defect, please contact your local distributor within 3
business days. Please note that DreamLine Guarantee will not cover shipping damage or such finishing defects once the unit
has been installed. Your distributor’s responsibility for damage in transit is limited after the shower package has been
transferred to the transportation company, so you may have to contact the transportation company directly to report damage.
Contact your distributor or DreamLine if you have any questions.
2. You should make sure that the floor is leveled and solid and will be able to support the total weight of the unit and its
occupant. You should also consult your local building codes on questions on installation compliance standards.
3. Install all of the required plumbing and drainage before securing the shower. Use a competent and licensed (if required by
local code) plumber for all plumbing installation.
4. Please insure that prior to the installation the floor is leveled and the walls are at right angles. While some adjustment in
leveling of the tray is possible, irregular floor level or improper angle of side walls will result in serious problems for your
installation. Please, note that there are some adjustments and drilling might be necessary during the installation process.
Please, note that there are some adjustments and drilling might be necessary during the installation process.
5. Necessary Tools: Screwdriver, Electric drill, Regular drill bits (1/8”, 7/64”), Phillips screwdriver, Level, Measuring tape,
Pencil and Stepladder. Bear in mind that you will need at least two people to assemble the unit.

© 2002-2006 DreamLine™. All Rights Reserved Victoria/DLG-65 2
II. Packing List
Roof cover (1 pc) ST4.2x25 Tapping Screw (16 Pcs)
Left and Right panels (2 pc – 1 set) Stationary Glass Door (2 Pcs)
Tray (1 pc) Sliding Glass Door (2 Pcs)
M6X20 bolts, Nuts, Washer (26 pcs) Side Glass Parts (1 Set)
Left and Right posts (2 pcs) Handle (1 Pair)
Connecting strips (2 pcs) Foot Massager (1pc)
Top and bottom guide rails (2 pcs) Handheld Showerhead (1pc)
ST4.2x16 Tapping Screw (24Pcs)
Tray pre-installation instructions
1. Choose the place where you will locate the tray.
2. Unwind the legs to level the tray in case the surface is uneven.

© 2002-2006 DreamLine™. All Rights Reserved Victoria/DLG-65 3
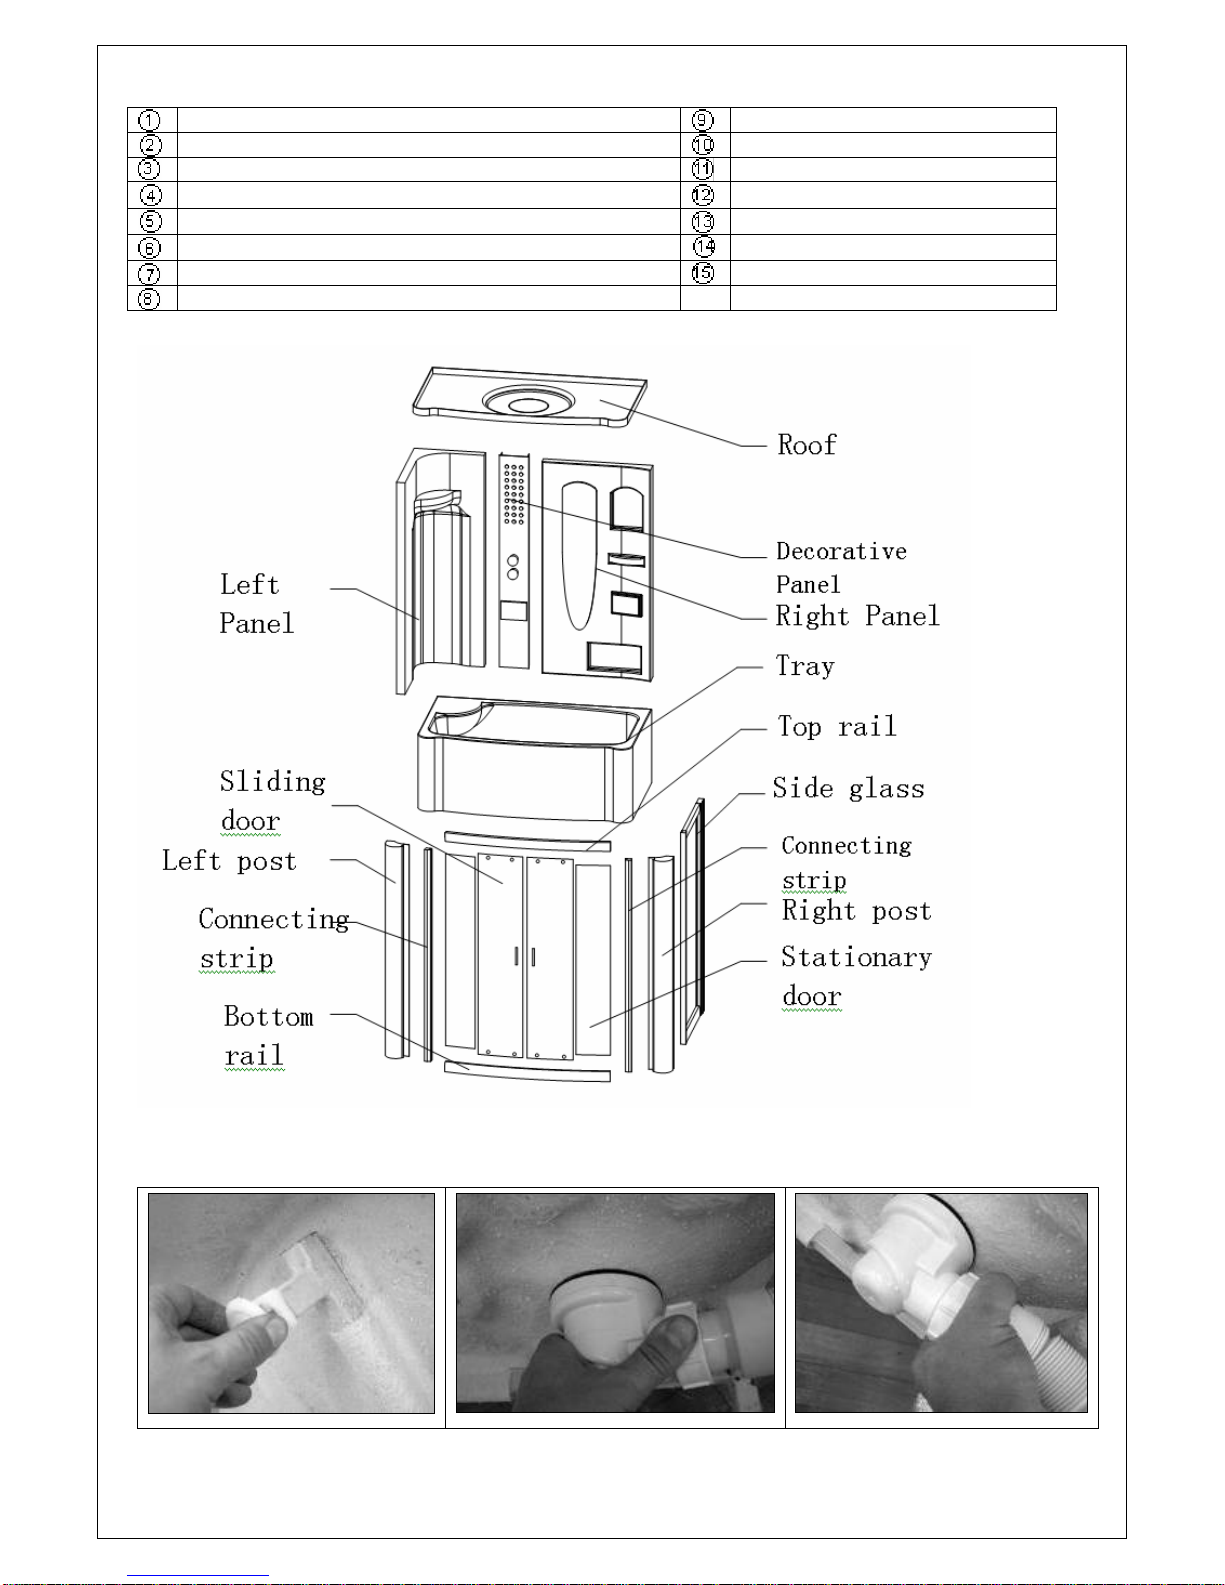
3. Check on the drain if it is fastened tight enough to make sure it won’t leak after complete tray installation.
4. Check all the hose connections to prevent leakage. Your plumber may want to replace the flex hose to hard
PVC pipes which is also possible.
One of the ways on how to change flex hose to
hard PVC pipes:
Disconnect the flex hose from the shower drain
unit. Fasten the 1 ½” hard PVC pipe to the drain.
Using the trap adaptor with washer and plastic nut
to fasten the PVC pipe to the adaptor from 1 ½” to
2”.
III. Installation Process
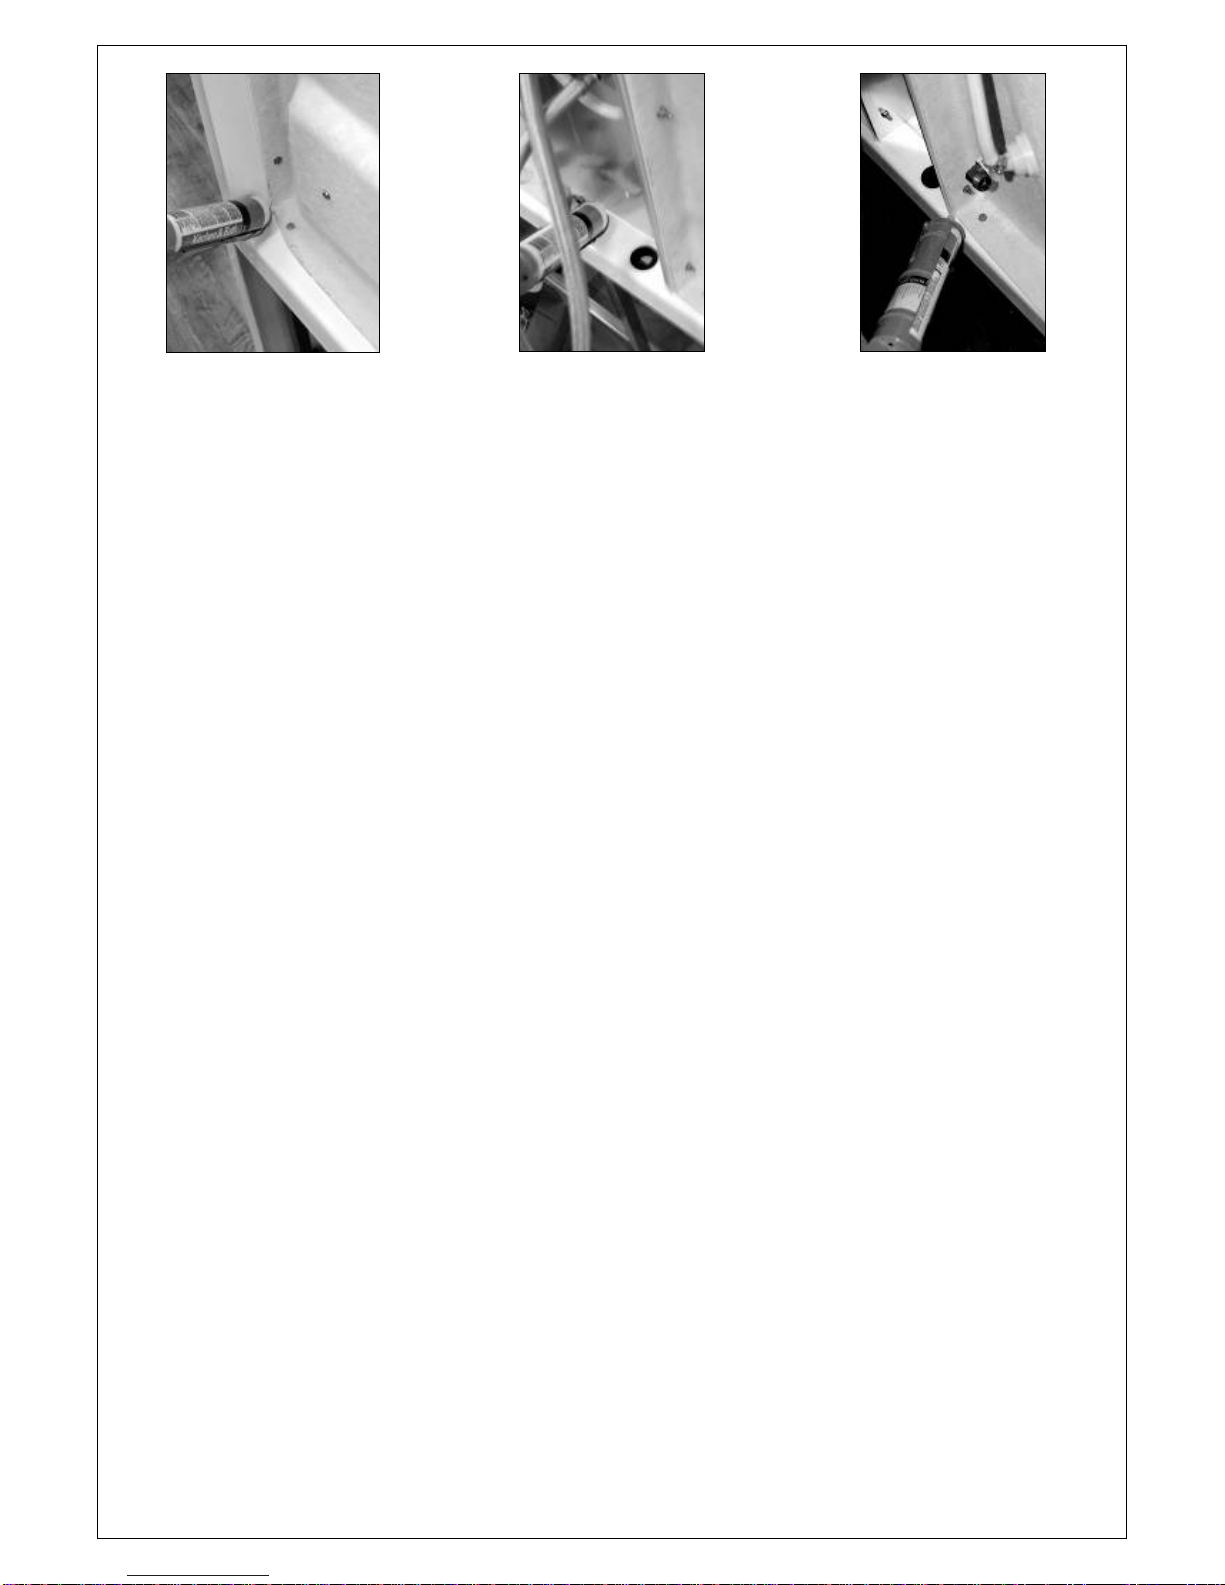
1. Level the tray by checking and winding in or out the leveling legs behind the front skirting panel. To reach
leveling legs, you should remove the front skirting panel. (Step 1, 2, 5).
2. Please, be careful not to break the inner supports for the tray – shown in Step 3, 4.
3. Clean the surface of the left back part of the tray and apply a layer of silicone (Step 6)
4. Place the left panel on the tray and fasten it with bolts (Step 7-10)
5. Next part to be attached is the decorative panel. Clean the side of the acrylic and apply a layer of silicone
(Step 11)
6. Set the decorative panel in place and secure it with bolts (Step 12, 13)
7. Next part to be attached is the right panel. Apply a layer of silicone to the edge of the middle decorative
panel and on the bottom of the tray where the acrylic part will be. (Step 14-16)
8. Fasten the acrylic wall using bolts (Step 17)
9. Next steps are the front glass assembly. Using screws fasten the bottom guide rail to the left metal profile
(left side when you see it from outside of the shower) (Step 18).
10. Insert stationary glass into the guide rail and the metal profile (Step 19).
11. With the help of a second person insert the second stationary glass in the guide rail and place the top guide
rail on two stationary glasses. Secure the top guide rail on the left side with the metal profile (Steps 20-21).
12. Slide the doors in the guide rail slots (Step 22)
13. Fix the metal profile to the top and bottom guide rails with screws. Make sure the stationary glass fits into
grooves in the metal profile (Step 23).
14. Insert white filler in the space between two stationary glasses on top and bottom guide rails (Step 24).
15. Fastening the posts. There are two posts which should be attached to the front glass assembly. The left
post has one groove only. Fit the post over the metal profile (Step 25).
16. Secure the left post with the front glass assembly (Step 26-27).
17. The right post has two grooves. Fit the post over the metal profile (Step 28).
18. When the front glass assembly is completed with the posts, clean the surface of the left side of the acrylic
wall, the front side of the tray, apply a layer of silicone and place the glass assembly (Step 29-32).
19. Fix the left post to the acrylic wall making sure there is silicone in between the wall and the post (Step 33).
20. Clean the surface of the acrylic wall and secure the side metal profile to the acrylic wall (Step 34-35).

© 2002-2006 DreamLine™. All Rights Reserved Victoria/DLG-65 4
21. The right stationary glass comes with left side framed in the profile. The metal profile fits over the post.
Clean the tray surface, apply a layer of silicone and insert the other side of the glass into the side metal
profile (Step 36).
22. Tighten the connection of the metal frame and the guide rails. Snatch the post and the frame of the
stationary glass together (Step 37).
23. Secure the top and bottom guide rails to the side metal profile making sure the screws go into the
designated threaded slots inside the guide rails. Apply some silicone into the connection between the guide
rail and the side metal profile (Step 38-40).
24. Fix the mirror with the screws and screw cover set (Step 41).
25. Secure the glass shampoo shelf on the acrylic back wall (Step 42).
26. Fasten the rubber door stoppers in places (Step 43-44).
27. Attach the handles.
28. Place the roof and fasten it with bolts, apply some silicone on the edges to seal the seams.
29. Check the door alignment and smooth operation by adjusting the door rollers (Step 45).
30. Seal the connecting joints and seams with silicone as shown ton the pictures (46-52).
NOTE: Allow 24 hours for the silicone to set before testing or using the shower.
NOTE: Improper application of silicone sealant may cause your shower to leak.
Notes: Our products are subject to modification without further notice.
Step 1 Step 2
Step 3
Step 4 Step 5 Step 6

© 2002-2006 DreamLine™. All Rights Reserved Victoria/DLG-65 5
Step 7
Step 8 Step 9
Step 10
Step 11
Step 12
Step 13
Step 14
Step 15
Step 16
Step 17
Step 18
Step 19
Step 20
Step 21

© 2002-2006 DreamLine™. All Rights Reserved Victoria/DLG-65 6
Step 22 Step 23
Step 24
Step 25
Step 26
Step 27
Step 28
Step 29
Step 30
Step 31
Step 32
Step 33
Step 34
Step 35
Step 36

© 2002-2006 DreamLine™. All Rights Reserved Victoria/DLG-65 7
Step 37
Step 38
Step 39
Step 40
Step 41
Step 42 Step 43
Step 44
Step 45
Step 46
Step 47
Step 48
Step 49

© 2002-2006 DreamLine™. All Rights Reserved Victoria/DLG-65 8
Step 50
Step 51
Step 52
This manual suits for next models
1
Table of contents
Other Dreamline Hot Tub manuals
Popular Hot Tub manuals by other brands

Aquatic
Aquatic Century 31 AI7048RC31 Specification sheet

Nordic
Nordic Impulse owner's manual

Moen
Moen ioDIGITAL Valve installation guide

Balboa
Balboa BP6013G1 Installation and Directions of Use

Wellis
Wellis Olympus user manual

Strong Pools and Spas
Strong Pools and Spas RIO Rotational Molded resin whirlpool spa owner's manual