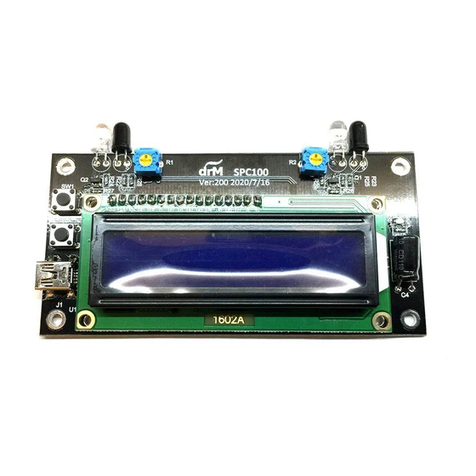
drM SPC100R User manual

drM
20
2
2/9
1
SPC100R(V211) Speedometer
Ver1.15

drM
20
2
2/9
2
SPC100R
Features
1. For Z/N/TT/S/HO/OO/O/1/G gauge
2. Power by Mini USB 5V
3. Large LCD display
4. Freely switch Z/N/TT/S/HO/OO/O/1/G gauge
5. Divided into four regions, the United States, the United Kingdom, Europe, and Japan.
6. Two detection modes, reflective and occlude.
7. Size 100mm x 50mm x 14mm
Panel description
SERSOR1 Sensor 1
SERSOR2 Sensor 2
Key1 Select key 1
Key2 Select key 2
MINI USB Power 5V input
LED Power display
VR1 Sensor 1 sensitivity adjustment
VR2 Sensor 2 sensitivity adjustment
External connector Connecting an External Detector
KEY1
KEY2
MINI
USB
LED
SENSOR1
SENSOR2 VR1
VR2
External
connector

drM
20
2
2/9
3
Instructions for use
1. Use a 5V adapter for the power supply.
2. The power 5V is plugged in by Mini USB.
3. After turning on the power, the LED lights up and the LCD display “drM SPC100R”.
4. After 3 seconds, it will directly enter the detection state.
5. After the train passes through the detection zone. The LCD will display speed for
3 seconds.
6. After the SPC100R enters the detection speed state.
Switch AREA
1. Press KEY1 or KEY2 in the detection state to enter the area selection.
2. Press KEY2 to enter the menu, press KEY1 to return to detection mode.
3. After entering, the area name will be displayed.
4. Press KEY1 to select the area, press KEY2 to confirm.
5. After confirmation, the scale menu will appear.

drM
20
2
2/9
4
6. Press KEY1 to select the scale, press KEY2 to confirm.
7. After confirmation, the area and scale will be stored, and the area and scale will
be used for detection after power-on.
Switch mode
1. The SPC100R has two detection modes (reflection and occlude).
2. The train body color is a bright color system using reflection mode.
3. The train body color is a dark color system using occlude mode.
4. Before powering on, press KEY1 and power on again until the menu appears.
5. KEY1 selects the detection mode, KEY2 confirms.
6. KEY1 mode selection, KEY2 confirm mode.
7. Use the reflection mode to detect that there can be no objects that reflect the
light source in front.
Use the Occlude mode to detect objects that reflect light sources on the opposite
side of the track, such as white acrylic or white paper to provide reflected light
sources.
8. When using the Reflection mode, make sure that there are no other objects in the
viewing path of the sensors that can interfere with the detection. When the screen
don’t reset, but stays in a loop, there is something permanent in its field. Move the
object or adjust the sensitivity of the sensors.
9. Use Reflection mode when the body color is light to reflect light.
10. When using the Occlude mode to detect objects that reflect light sources on the
opposite side of the track, place a white object or white sheet of plastic/paper to
provide reflection.
11. Use Occlude mode when the body color is dark and cannot reflect light.
Sensor sensitivity adjustment
1. Before powering on, press KEY1 and power on again until the menu
appears.
2. KEY1 selects the Sensor ADJ, KEY2 confirms.

drM
20
2
2/9
5
3. After confirmation, the following screen will appear.
4. Place the vehicle in front to measure the distance.
5. Clockwise rotation detection is weak. Counterclockwise rotation
detection is strong.
6. Adjust VR until the LCD shows OK!!

drM
20
2
2/9
6
Switch KM/H, MPH
1. Before powering on, press KEY1 and power on again until the menu
appears.
2. KEY1 selects the SPEED UNIT, KEY2 confirms.
3. KEY1 unit selection, KEY2 confirm unit.
4. After the unit is confirmed, it will be automatically saved.
Lap timing
1. Before powering on, press KEY1 and power on again until the menu
appears.
2. KEY1 selects the SPEED UNIT, KEY2 confirms.
3. Select set time

drM
20
2
2/9
7
4. KEY2 enter Lap timing.
5. When the vehicle passes through the detection area, it will start timing,
and it will stop when it passes again.
6. The end of the display time is about 3 seconds, after which it will enter
the detection state again.
7. To exit the lap time, press KEY1 or KEY2. The screen will then show the
detection speed state.
Toggle internal/external detector
1. Before powering on, press KEY1 and power on again until the menu
appears.
2. KEY1 selects the Sensor Mode, KEY2 confirms.

drM
20
2
2/9
8
3. Select internal or external.
4. KEY2 confirms.
5. When switching the internal detector, the external detector will be
disabled. When switching the external detector, the internal detector will
be disabled.
6. Select the external connector, please connect the SPC100RE detector. Do
not connect external connectors other than SPC100 series to avoid damage
to the host.
Precautions
Do not place any conductive materials (liquid, metal...) on the SPC100R.
Do not remove or replace any components under the speedometer.
Keep out of the reach of children under 14 years of age.
The occurrence of the above situations will cause the speedometer to be
damaged.
The speedometer will malfunction due to the presence of infrared rays in
the light. Please avoid using the speedometer in these lights. Such as
sunlight, mobile phone photography lights.
If the detection LED is used continuously for a long time, the brightness will
gradually decrease, which will eventually lead to poor detection. Please turn
off the power when the speedometer is not in use.
Table of contents
Other drM Measuring Instrument manuals