manuals.online logo
Brands
  1. Home
  2. •
  3. Brands
  4. •
  5. Radiasun
  6. •
  7. Measuring Instrument
  8. •
  9. Radiasun RA3211 User manual

Radiasun RA3211 User manual

1. Overview
RA3211 PON optical power meter is a tester designed for design, operation and maintenance of FTTX network. It is able
to concurrently measure the optical power values of voice, data and video signals. It is an ideal choice for the construction
and maintenance of FTTX network works.
RA3211 PON optical power meter
2 Packaging list
User Guide 1 copy
Meter bag 1 pc
Power adapter 1 pc
Warranty Card 1 pc
Pass Certificate 1 pc
Website: www.radiasunmeters.com, Email: sales@radiasunmeters.com, Phone: +86-22-83717689. Fax: +86-22-83717689
3. Specifications
Calibrating wave length 1310 upstream
measurement
1490 downstream
measurement
1550 downstream
measurement
Spectral passband (nm) 1260~1360 1470~1505 1535~1570
Measurement range (dBm) -40~+10 -40~+10 -40~+20
Isolation 1310nm (dB) - >40 >40
Isolation 1490nm (dB) >40 - >30
Isolation 1550nm (dB) >40 >40 -
Measurement accuracy
Connatural uncertainty (dB) ±0.5
PDL (dB) <±0.25
Linearity (dB) ±0.1
Pass through insertion loss (dB) <1.5
General Indicators
Display LCD:320×240
Unit dB dBm xW
Resolution 0.01dB
Input voltage DC 6.5V~8.5V
Rechargeable battery 7.4V
AC adapter 8.4V
Type of optical fibre Single mode optical fibre
Working temperature -10~60℃
Storage temperature -25~70℃
Dimensions (mm) 210 x 115 x 55
RA3211 PON optical power meter
Website: www.radiasunmeters.com, Email: sales@radiasunmeters.com, Phone: +86-22-83717689. Fax: +86-22-83717689
4.Operating Instructions
Website: www.radiasunmeters.com, Email: sales@radiasunmeters.com, Phone: +86-22-83717689. Fax: +86-22-83717689
RA3211 PON optical power meter
4.1Function description
Icons Functions
POWER ON/OFF or set AUTO POWER OFF
Access menu and select function
Enter menu or select current operation
Exit current operation without saving
Select functions, +
Select functions, -
5.Operation procedures
5.1 Power on
Press to power on the device, the following screen will appear:
There are the measurement results of three wavelength appearing on the screen, i.e.: 1310nm
upstream test and 1490nm/1550nm downstream test. The measurement value will appear
when there is light passing through the optical channel, otherwise “LOW” will appear.
5.2 Power Off
While the power meter is on, press and hold it for about 2 seconds to power off the device.
5.3 Set threshold value
The setting of threshold value will influence the status of the three indicators and the status of
measurement results. For example, if the option “1310nm” is set as: -15, -30, -40, it means that: when
the optical power measurement value of 1310nm is greater than -15dbm, the optical circuit will be
normal, the moment the 1310nm indicator turns in green; when the optical power measurement value
of 1310nm is within -15dBm~-30dBm, it means that problems may exist in optical channel but it is still
usable, the moment the 1310nm indicator turns in yellow; when the optical power measurement value of 1310nm is within
-30dBm~-40dBm, it means that there exists abnormal in optical channel, the moment the 1310nm indicator turns in red; if the optical
power measurement value s less than -40dBm, the moment the 1310nm indicator turns in dark, “LOW” appears in the LCD area
where the results are displayed. To conclude, “green” represents “Pass”, “yellow” represents “warning”, “red” and “dark” represent
"Error". So does 1490nm or 1550nm test.
RA3211 PON optical power meter
Website: www.radiasunmeters.com, Email: sales@radiasunmeters.com, Phone: +86-22-83717689. Fax: +86-22-83717689
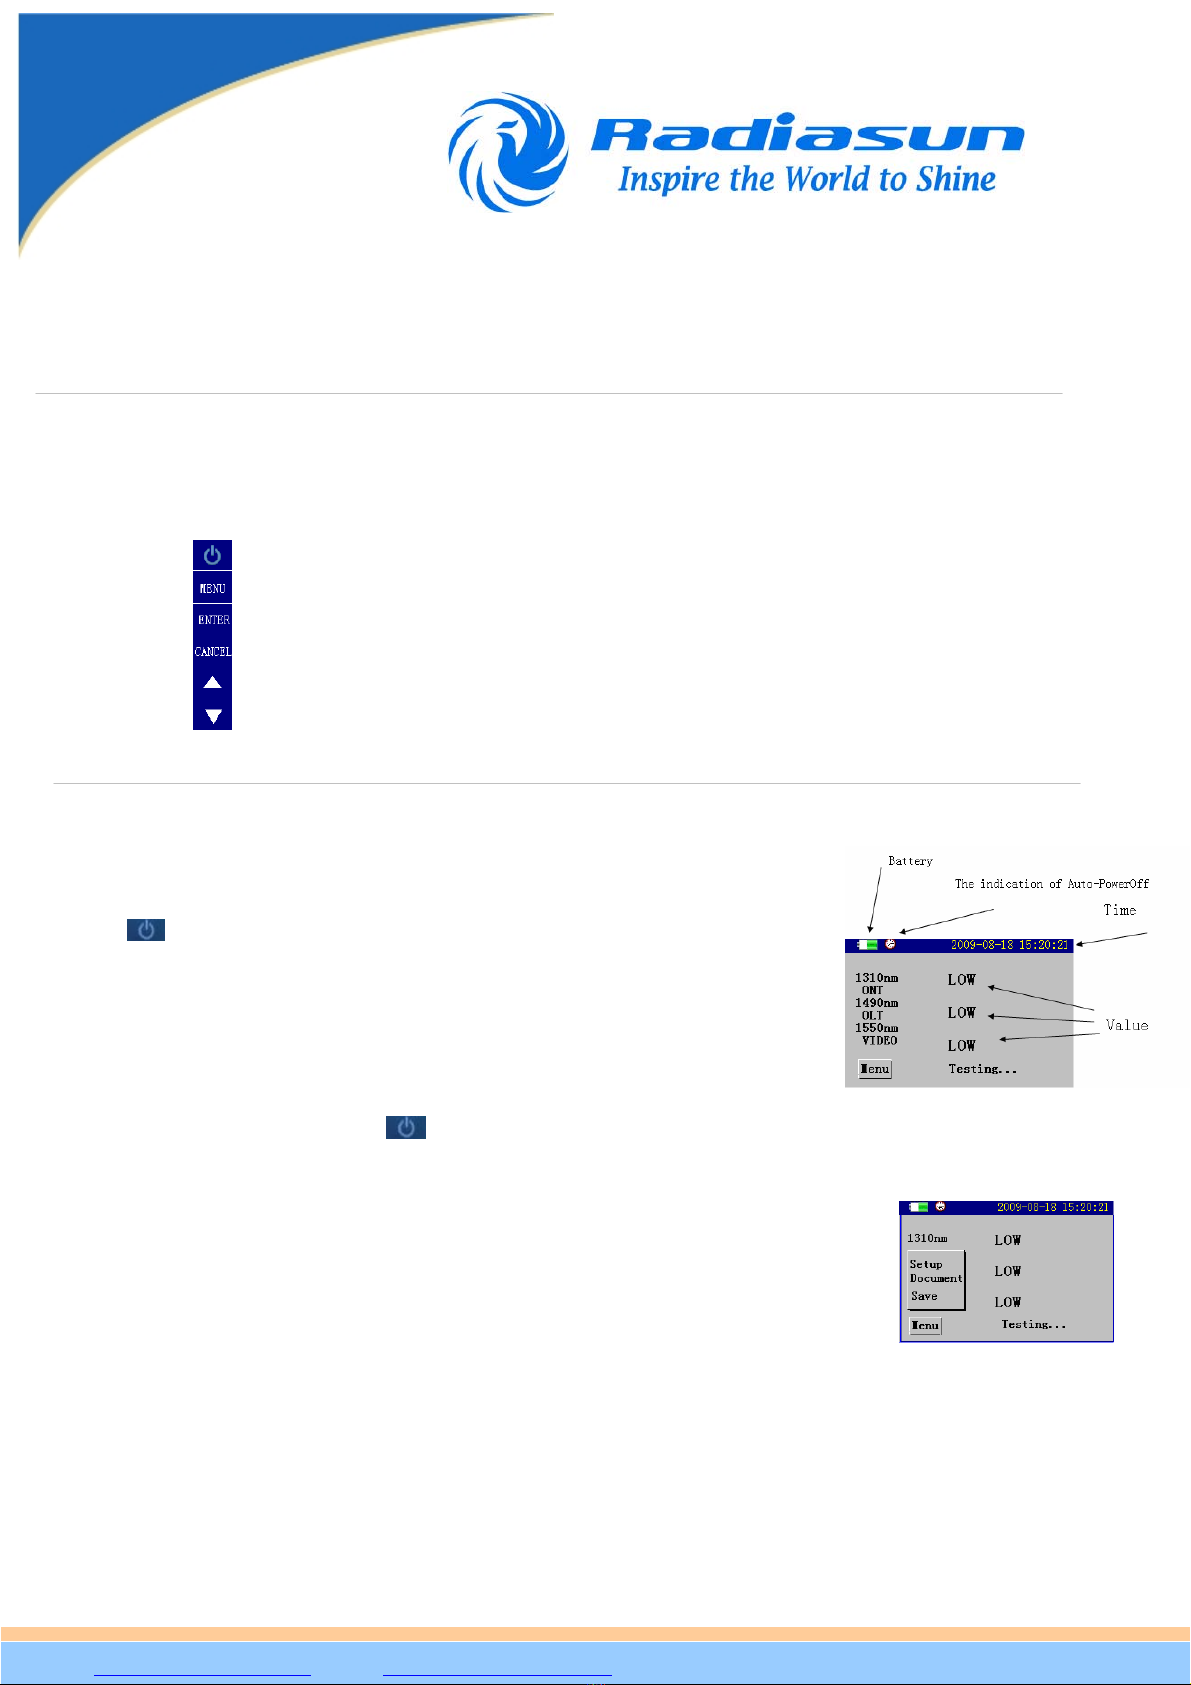
(1) While in main interface, press , a menu as below will pop up:
(2) Select the setting you desire by pressing and , press , to enter the setting interface as
shown below:
(3) Here user can set language, time, auto power off, incidental mode, threshold value, calibration. For
example, if you select “threshold value”, the setting interface will appear as below.
(4) Press to select option. Press or to increase or decrease the threshold by 1
respectively. If the option is Save, press , the change will take effect.
(5) If the operation is Default, press , the threshold value will be rest to be default value.
5.4 Calibration
This ability is designed to set tolerance, it will increase the power reading by 1.
(1) Enter setting interface, select Calibration, press , the calibration screen will appear as below:
(2) Press to select the option you desire. Press or to increase or decrease the
calibration value by 0.01 respectively. If the option is Save, press , the change will take effect.
(3) If the operation is Default, press , the threshold value will be rest to be default value.
5.5 Data upload
The measurement results can be saved in the device, or be uploaded to PC using upper computer software. Connect one end of
data cable to the port of PC Link in the device, the other end USB port of PC, run the upper computer software, and set the software
as per default configuration, and then you can directly click “Upload” on upper computer to transfer the data to PC.
5.6 Measurement procedures
(1) Press to power on the meter, enter threshold value setting interface to set threshold value.
(2) Connect in the optical fibre to be tested.
It supports measurement of three wavelength i.e.: 1310nm upstream, 1490nm and 1550nm downstream at the same time.
For example: threshold value is (+3dBm, -10dBm, -30dBm), the measurement readings of the meter are: the value for 1310nm
upstream test is +1dBm, which is within +3~-10dBm, it means that the optical circuit is normal, so in the testing screen, the power
value for 1310nm is displayed in green; if the power value falls within -10dBm~-30dBm, it means that the optical circuit may be
wrong but is still usable, so in the testing screen, the power value for 1310nm is displayed in yellow; if the power value falls outside
of threshold value, it means that there exists abnormal in optical circuit, the power value of the optical circuit is too strong or too
weak, so in the testing screen, the power value for 1310nm is displayed in red. So does 1490nm and 1550nm test.
RA3211 PON optical power meter
Website: www.radiasunmeters.com, Email: sales@radiasunmeters.com, Phone: +86-22-83717689. Fax: +86-22-83717689
6.Applications
FTTx/PON opening: it is used to measure all PON signals during opening stage, in order to verify and ensure network
standards are satisfied;
FTTx/PON maintenance: it is used to solve various transfer problems, e.g.: dirty connector ends, bending, broken optical fibre,
any of such problems may produce signal loss or decrease transfer performance.
7.Maintenance
1. Regularly clean the end of sensor, keep it free of grease, dirt. Don’t use dirty, non-standard connector, don’t insert in the end in
poor polishing conditions, otherwise the sensor's end may be damaged, otherwise the performance of entire system may degrade.
2. Use only one adapter if possible.
3. If you are not going to use the tester for the time, cover the dust-proof cap immediately to keep the end clean. Long-time
exposure in air may gather dust therefore influencing measurement accuracy.
4. Plug and unplug the adapter with care, don’t leave any scratches on the ports.
5. Regularly clean the surface of sensor, when cleaning the sensor, please gently wipe the surface using cotton swab by circling
the perimeter.
6. Handle the tester with care, protect it against fall or collision.
RA3211 PON optical power meter
W
ebsite: www.radiasunmeters.com, Email: sales@radiasunmeters.com, Phone: +86-22-83717689. Fax: +86-22-83717689
8. Warranty
No parts of the product can be repaired by user himself.
1. Warranty period: 18 months since the date of shipment. If any product defects within the above said period, we will repair or
replace the defective product, however, in no events we will bear responsibilities in excess of the product’s sales price.
2. If any fault occurs during usage, user can first solve them according to above trouble-shooting instructions, however, if such
efforts fail, the user shall not open the cabinet of the product by himself, he should contact our market department or local
dealers.
3. For any quality problem arising of production defect, the manufacturer will repair or replace the defective product free of charge,
however, any damage caused by improper-operation or good product will not be covered by the above warranty.
Notwithstanding the foregoing terms, any problem/fault caused for the following reasons are not included warranty.
1. The product has been repaired or modified without the authorization of the manufacturer
2. The problem or fault arising of improper use, negligence or incidence.
Warranty Registration
The product is accompanied by a Warranty Registration Card, please complete it and send it back to us together with a photocopy of
the invoice, they will be used as the voucher for any maintenance, technical update or calibration that we may make in the future.
RA3211 PON optical power meter
Website: www.radiasunmeters.com, Email: sales@radiasunmeters.com, Phone: +86-22-83717689. Fax: +86-22-83717689

Popular Measuring Instrument manuals by other brands

WIKA CTD4000 operating instructions

WIKA

WIKA CTD4000 operating instructions

ABB NGC8206 user manual

ABB

ABB NGC8206 user manual

PCB Piezotronics 350C23 Installation and operating manual

PCB Piezotronics

PCB Piezotronics 350C23 Installation and operating manual

Ametek 933S Operator's guide

Ametek

Ametek 933S Operator's guide

Bushnell Elite 1600 Rangefinder owner's manual

Bushnell

Bushnell Elite 1600 Rangefinder owner's manual

Rohde & Schwarz R&S SMBVB-K151 user manual

Rohde & Schwarz

Rohde & Schwarz R&S SMBVB-K151 user manual

socomec DIRIS A20 operating instructions

socomec

socomec DIRIS A20 operating instructions

IQAir AirVisual Outdoor manual

IQAir

IQAir AirVisual Outdoor manual

Stoneridge Optimo manual

Stoneridge

Stoneridge Optimo manual

AFRISO MAXILYZER NG Plus instruction manual

AFRISO

AFRISO MAXILYZER NG Plus instruction manual

Pixsys TCT101-1ABC user manual

Pixsys

Pixsys TCT101-1ABC user manual

Rinstrum M4202 quick start guide

Rinstrum

Rinstrum M4202 quick start guide

PCE Instruments PCE-PHD 1 manual

PCE Instruments

PCE Instruments PCE-PHD 1 manual

Seintek S2401 Service manual

Seintek

Seintek S2401 Service manual

WIKA PG23CP operating instructions

WIKA

WIKA PG23CP operating instructions

Precision Digital Corporation PROVU PD6402 instruction manual

Precision Digital Corporation

Precision Digital Corporation PROVU PD6402 instruction manual

Philips Joey Dosimeter Instructions for use

Philips

Philips Joey Dosimeter Instructions for use

Viavi G3-GSP-8P-8TSSD Hardware installation

Viavi

Viavi G3-GSP-8P-8TSSD Hardware installation

manuals.online logo
manuals.online logoBrands
  • About & Mission
  • Contact us
  • Privacy Policy
  • Terms and Conditions

Copyright 2025 Manuals.Online. All Rights Reserved.