Drop X User manual

INSTALLATION AND OPERATING INSTRUCTIONS
DROP POOLS


• Drop pool
• Winter insulation cover
• Pool chemical starter kit
CONTENTS OF THE
OUTDOOR SPA POOL
PACKAGE
The manufacturer retains the right to change the product’s assembly or structure
without separate notice and without any obligation arising from this.
These instructions contain important information on the installation,
operation, and servicing of the pool. Please read through the instructions
carefully before installing and starting up a new pool. Keep the
instructions for future reference. If you are uncertain, please contact
Drop’s customer service department.

SAFETY
Use of the pool requires compliance with the safety instructions set out in these user
instructions. Be vigilant, use your common sense and make sensible decisions in all
actions related to water.
• In order to prevent drowning and serious injury, the access of
children under the age of 5 to the pool must be restricted.
• Children may not use the pool without adult supervision.
• When using the pool with small children, check the suitability of
the water temperature.
• Diving is not allowed in the pool. Never jump into the pool. It
may lead to a serious injury or even death.
• Remove the pool’s cover fully before entering the pool.
• Do not heat up the water too much. The recommended water
temperature is 37 °C.
• It is recommended that people with heart problems keep the
water temperature below 37 °C.
• Donotusethepoolundertheinuenceofalcoholormedications
that may jeopardize safe use of the pool. Use of the pool under the
inuenceofthesubstancesmentionedaboveisattheuser’sown
risk.
• Do not bring electrical devices closer than 2.5 meters from the
pool. Neglecting to keep a safe distance increases the risk of
electric shock and may cause a serious injury or even death.
• We recommend that a continuous bathing session be no longer
than 30 minutes in length, after which you should cool down for
5–10 minutes.
• The surface of the pool may be very slippery. Be careful when
entering and exiting the pool.
• Do not remove or plug the suction drains or use the pool without
the drains or if the drains are broken.
• Keep the chemicals (e.g., water treatment or cleaning chemicals or
disinfectants) out of the reach of children.
• Keep the pool cover closed and locked when the pool is not in use.
• Do not stand, sit, lean, or place weight on the cover.

CONSIDERATIONS
BEFORE RECEIVING
THE POOL PACKAGE
Carefully familiarize yourself with the pool’s dimensions and, if necessary, ask
our customer service department for assistance with planning your pool site. The
pool’s placement must be planned well with regard to the comfort and safety of
use. The pool should be placed in an open spot if possible. Otherwise, leaves falling
from trees and other dirt may easily end up in the pool water during bathing ses-
sions. In densely populated areas, you should take your neighbors into account.
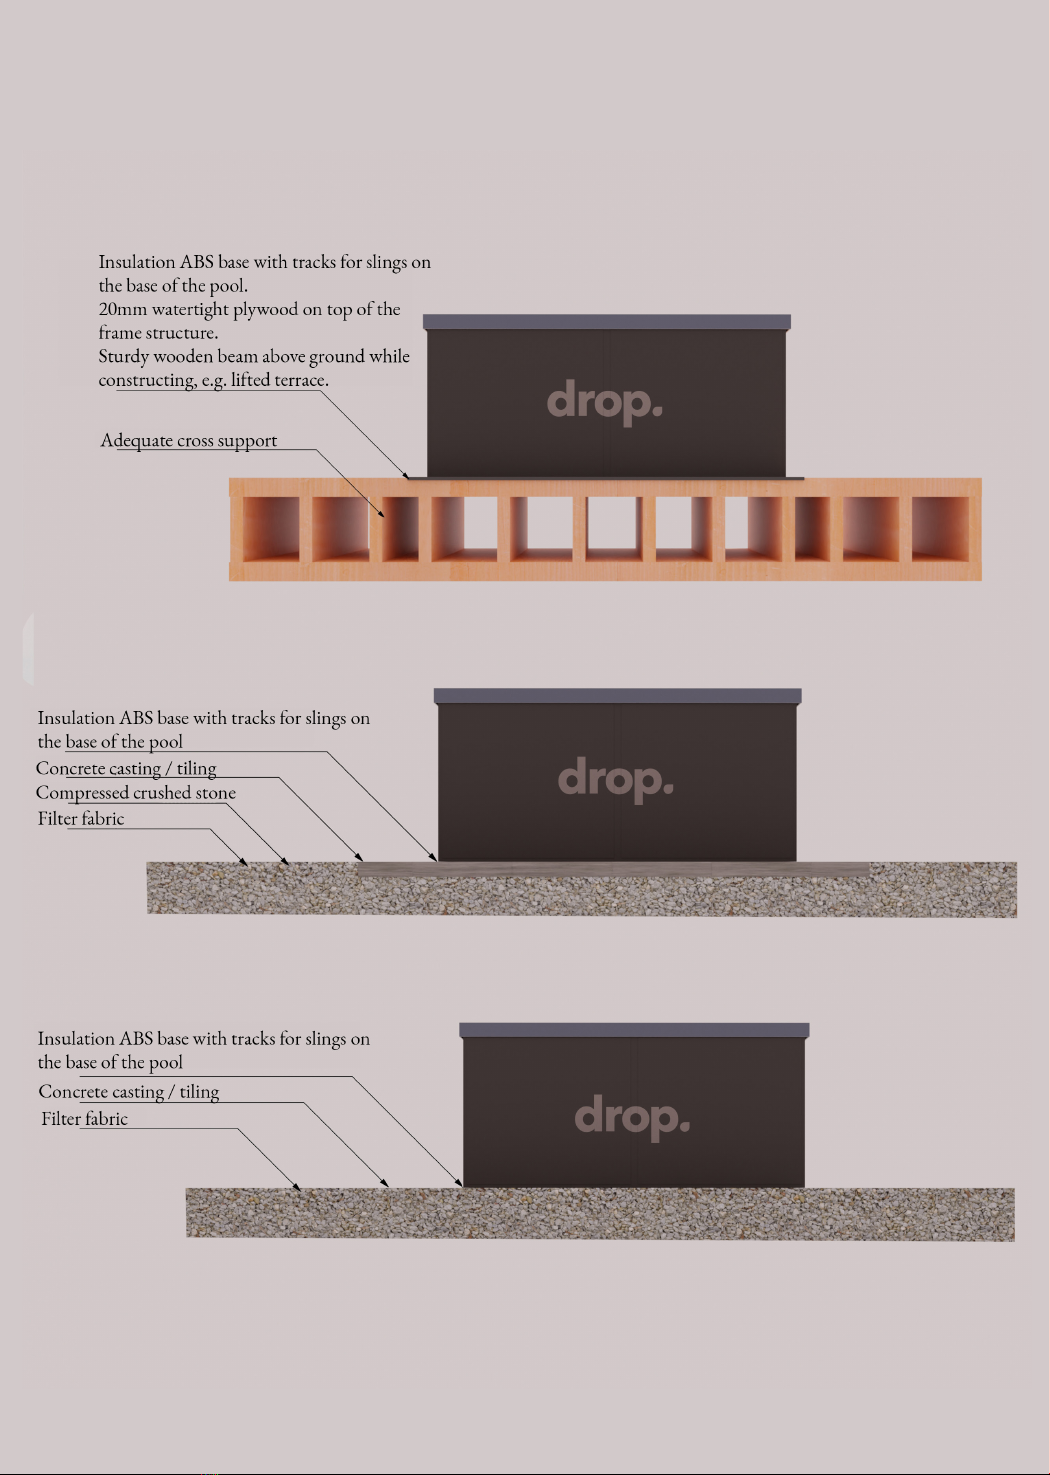
The pool must be installed and stored in such a way that it rests on its frame. Do
not lower the pool to rest on its top edge or have the pool resting against a terrace,
for example, in such a way that the top edge carries the pool’s weight. The plans are
indicative examples of installation.

Pool base and service hatch
Each site must be designed according to the situation and place. Special attention
must be paid to the realization of the pool base. The base must be level, load-bear-
ing and horizontal. The most suitable bases are made of concrete, gravel, wood
or some other hard base material. The base must be able to withstand a weight of
2,500kgwithoutsinkingordeforming.Pleasetakeintoconsiderationtheeectof
frost when designing the base.
There must be no less than 50 cm of space around the outdoor spa pool for any
required servicing measures. It must be possible to open the service hatches located
on each side of the pool without impediment. If you want to sink the pool into a
terrace, you will need to make separate service hatches in the terrace on each side of
the pool. The service hatches must allow the pool’s side panels to be opened and
provide enough room to work next to the pool if necessary. The manufacturer is
not liable for any damage caused by an incorrectly installed pool.
SERVICE HATCH
There must be no less than 50 cm of space around
the outdoor spa pool for any required maintenance measures.
Service hatches on each side of the pool should be possible to open in case of maintenance


RECEIPT OF
DELIVERY
Please check the package externally before acknowledging receipt. Any observed
external damage caused during transportation must be immediately reported
to the courier or our customer service department. All damage caused during
transportation must be reported within a maximum of seven days in writing to the
addressdrop@drop..
Iftherearefaultsordecienciesintheproductdelivered,thesellerwilleithermake
the required changes to the product or deliver a new replacement product to the
customer.Thesellermustbenotiedoftheproduct’sdeciencywithin14daysof
receipt of the product.
The pool is delivered in an upright position by a truck with a utility trailer. Remove
the plastic packaging, cardboard and any other equipment or parts delivered inside
the pool before turning the pool to its correct position. Roughly four people are
needed to turn the pool to its correct position.

INSTALLATION
AND STARTUP
Roughly four people are needed to move the pool. Special care must be taken when
moving the pool to prevent accidents. When the pool is lowered into a hole in a
terrace, for example, it is recommended that moving straps be used to ensure safe
installation. Grooves for moving straps can be found on the bottom of the pool.
Startup
PLEASE NOTE! Do not connect power to the pool until it is lled with water!
1. Turn the jets until they are open.
2. Before using the pool, check that all the threaded connections
ofthepumpsarermlysecured.Thethreadedconnectionsmay
come loose during transportation.
3. Fill the pool with water using a garden hose, for example (see page
8forhowtollthepool),insuchawaythatthewaterlevelis
approx. 10 cm below the edge of the pool.
4. Theelectricalinstallationmayonlybecarriedoutbyalicensed
electrician.Donotconnectpoweruntilthepoolislledwith
water. See Electrical installation.
5. After power is turned on, the pool display (located in the
equipment compartment) will show setup data, after which the
text RUN | PMPS | PURG | AIR | -- -- -- --
willblinkonthedisplay.Thisinitializationwilllast4–5minutes.
6. If the error message HTR | MAY | BE | DRY |
-- -- -- -- | WAIT | -- -- -- -- shows on the display within
therstfewminutes,itindicatesthatthereisairinthepump.In
this case, see the instructions for clearing an air lock.
7. Turn on the pumps and check that water is coming out of all jets.

Electrical installation
The electrical installation may only be carried out by a licensed electrician.
PLEASE NOTE! Donotturnonpowertothepooluntilitislledwithwater!
The outdoor spa pool must be connected to a 3 x 16 A, 400 V (current) or a 1 x 16 A,
230 V (3 kW Lähde & Lampi) electrical connection. The electrical connection must
be protected with a ground fault circuit interrupter. The electric supply can be drilled
through any corner of the pool’s siding or a moving strap groove in the pool base. The
side behind which the control panel is located is marked on the pool.
PLEASE NOTE! Models: Drop X, Drop Vuolle, Drop S and Lähde must be connected
toa3x16A,400V(current)electricalconnection)Models:LampiandDropLähde
3 kW must be connected to a 1 x 16 A, 230 V connection. Drop Lampi with a extra
heatermustbeconnectedtoa3x16A,400Velectricalconnection.
PLEASE NOTE! The wires must be stripped to a length of approx. 20 mm, and the
earth connection must be completed appropriately.
1. Checkthatthepoolislledwithwatertothelevelofthesurface
suction drains.
2. Open the service hatch to access the control panel.
3. Connect the power cable to the control panel.
4. Closetheservicehatch.
Electrical installation diagram
3 kW 1 x 16 A, 230 V
Electrical installation diagram
6kW3x16A,400V

Instructions for clearing an air lock
Connect the chimney pipes to each other and slide the stove’s protective grille to
the bottom of the chimney. Place the chimney on the collar on top of the stove.
Make sure that the chimney’s joint has been pushed all the way through. Make sure
thatthestove’sgrateisinitsownplaceintherebox.
Anairlockcausesthejetstomalfunction.Anairlockisoftencausedbyllingthe
pool too quickly, which results in air being trapped in the piping. This prevents the
pumpfromprellingandthewaterfromcirculatingproperly.
1. Open the service hatch and turn the threaded connection on top
of the pump slightly open.
2. When water starts coming out, tighten the connection and turn
on the pump. The pump will pump for a moment, after which
thewaterwillstarttoowproperly.
3. Dry any spilled water and close the service hatch. Your outdoor
spa pool is ready for use.

ControlMySpa™ remote control
You can use remote control to adjust the pool’s settings from anywhere and check
the status and functions of the pool. The new generation of CMS™ remote
controlalsosendsnoticationstoyourmobilephoneaboutanyissueswiththe
pool. The remote control requires a Wi-Fi connection near the pool to function.
The pool can also be controlled by using the control panel located in the pool’s
equipment compartment. Instructions for its use can be found on page 12.
1. Connect the CMS Gateway Ultra unit to a modem with a
2. network cable and connect the power cable to the unit.
Download the CONTROLMYSPA application via your
phone’s app store. Create a new account with your email.
3. Stand next to the pool and make sure that power to the pool
is turned on. PLEASE NOTE! CMS can be found 15 minutes
afterthepoolisturnedon.Ifnecessary,turnopowertothe
pool, wait for 20 seconds and then turn the power back on.
4. OpentheCONTROLMYSPAapplicationonyourphone,
press “SETUP” and follow the instructions on the screen.
5. The CMS code is PDS-26134
Troubleshooting
Red light in the CMS Gateway Ultra unit The unit and the pool are not connected
Blinking red light in the CMS Gateway
Ultra The unit and the pool are connected,
but there is no connection to the control
panel.
Blinking blue light in the CMS Gateway
Ultra unit Software update in progress. Do not turn
othepower.
Blinking green light in the CMS Gateway
Ultra The unit and the pool are connected,
but there is no Internet connection.
Green light in the CMS Gateway Ultra
unit The unit and the pool are connected and
an Internet connection has been estab-
lished. No errors.
PROBLEM CAUSE

ADroppoolcanbelledwithapprox.1,500litersofwater.Pleasenotethatthe
waterlevelrisesasthenumberofbathersincreases.Thepoolislledwithcleanwater
by using a garden hose, for example.
Never turn on the equipment or keep it running when the pool is empty of water.
Only turn on the equipment when:
1. the required amount of water has been reached (water
level approx. 10 cm below the pool’s edge)
2. thelterhandleisintheFILTERposition
3. the pool is in READY mode (control panel in the equipment
compartment).
Keep the pool’s insulation cover closed during heating and always when the pool
is not in use. Make sure that the pool always has enough water and that all jets are
below the water surface.
Using the pool
You can set the desired temperature using CMS™ remote control (Drop X, Vuolle
or option) or the control panel. These controls can also be used to adjust the timer
and otherwise control the equipment.
There are two switches on top of the pool that can be used while bathing.
1. Aeration/massage system (Drop X, Vuolle, S and Lähde) —press
thebuttontoturnthemassaging bubbleson/o.Thebubbles
run for 15 minutes.
2. Light switch—by pressing the button, you can change the color
of the pool’s LED lights to the color of your choice. The same
buttonturnsthelightson/o.
USE, CARE AND
SERVICING OF THE POOL
1 2

Insulation cover
The cover is made of polyvinyl chloride (PVC). Avoid vinyl conditioners that contain
silicon or oils or that are waxy, as they are very harmful to vinyl. To avoid damaging
the leather insulation cover, do not use sharp objects to remove extra weight.
Regular cleaning with mild household all-purpose cleaners lengthens the pool’s
service life and maintains the cover’s general appearance. When you add vinyl
conditioner, the cover must be clean. In the winter, it is important to remove any
snow that has piled up on the cover. Remember to keep the cover locked when the
pool is not in use.
PLEASE NOTE! The outdoor spa pool’s insulation cover is not made to withstand
human weight.
Cleaning the pool and water treatment
The pool requires care and servicing in order to stay fresh, attractive and hygienic.
TheltrationandUVsystemalonearenotsucienttokeepoutallbacteria,which
is why chemicals must also be used in the pool.
General
• Wash yourself carefully before entering the pool.
• If sand enters the pool, it may clog the equipment.
• Keepthewater’spHvaluebetween7.0and7.4.
• Follow the chemical dosing instructions.
• Thepool’swaterlevelshouldbecleanedwithamicrobercloth
regularly or after each use, for example.
• Emptyandcleanthepoolregularly.Alwaysllthepoolwith
clean water
• Replacethelterballsapproximatelyonceayear.

ADroppoolcanbelledwithapprox.1,500litersofwater.Theamountofwater
lldalsodependsonhowmanypeoplebatheatthesametime.Poolcareandcleaning
areeasyandeortless.Chlorineorsomeotherwatertreatmentchemicalmustalways
be added into the pool after bathing, or at least once per week, even when no one has
bathed in the pool.
The condition of the water largely depends on how frequently the pool is used,
what season it is (in the summer, the water must be disinfected more often), what
temperature the water is kept at and what the general water quality is (whether the
poolislocatedinacityoraruralareaorwhetheritislledwithlakewater).Itis
diculttoprovideinstructionsthatwouldbeapplicabletoallcases,aswaterquality
varies a great deal, depending on the examples provided above. Once you have used
the pool for some time, you become familiar with “your own” water.
See the chemical packaging for the correct dosage.
Important facts about chemicals and water treatment
Adhere to the dosages of chemicals closely. Excessive use of chemicals may
damage the equipment, whereas using too little causes algae and other bacterial
growth that may clog the piping, breaking the pool equipment as a result. The
warranty does not cover damage or breakdowns caused by erroneous use of
chemicals or neglect of other care instructions.

Cloudy water •Dirtylter
• The pH value is not within the
recommended range
•Insucientuseofcleaning
chemicals
• Excessive use of the same water
or the water is too old
•Cleanthelter
• Adjust the water pH level to the
recommended range
• Add a cleaning chemical to the
water
• Replace the water in the pool
Smell of water
• Bacterial or algae growth
• Adjust the water pH level to the
recommended range
• Add a cleaning chemical to the
water
Smell of water
• The water contains too much
organic matter
•Insucientuseofcleaning
chemicals
• Water pH level too low
• Wait for the chlorine level to
decrease
• Adjust the water pH level to the
recommended range
Musty smell
• Chlorine level too high
• Water pH level too low
• Add a cleaning chemical to the
water
•Empty,cleanandrellthepool
PROBLEM POSSIBLE
CAUSE SOLUTION
Organic layer • Accumulated oil and dirt • Wipe the dirt away with a clean
sponge
Algae growth
• Too much calcium in the
water
• Total alkalinity of water too
low
• Water pH level too low
• Adjust the water pH level to the
recommended range
• Add a cleaning chemical to the
water
Patches on the pool surface
• Water pH level too high
• Adjust the water pH level to the
recommended range
• Adjust the total alkalinity to the
correct value
Calcication
• Total alkalinity of water too
low
• Water pH level too low
• Adjust the water pH level to the
recommended range
•Empty,cleanandrellthepool
PROBLEM POSSIBLE
CAUSE SOLUTION
Emptying the pool
Replace the water in the pool 2–3 times per year, depending on use. If you wish to
empty the pool for the winter, see the winter instructions on page 11.
Turn o power to the pool before emptying it. The pool is emptied into the
wastewater drain with a submersible pump. PLEASE NOTE! Do not use a metal
submersible pump.
After the pool has been emptied, clean the inner surface thoroughly with a mild
disinfectant. Use a soft and lint-free cloth or sponge.

Replacing a lter
1. Close the seals pictured below (2 pcs).
2.Screwtheventingscrewontheltertankslightlyopeninordertodepressurise
the tank.

3. Pull the grey locking clip upwards and screw the large nut on the cover open.
4.Openthetankcoverbypullingthehandle.
5.Removethelterforcleaning/replacement.
6.Putthecleanlterbackinitsplaceandclosethetankcover.Screwthenutback
in place.
7.Opentheseals(2pcs)andkeeptheventingscrewopenuntilthetankislledwith
water and there is no longer air in the tank.
8. Screw the venting screw back in place.
NB: The tank will release a little bit of water. It is recommended to place a
bucket or a towel beneath the tank.

Youcancleanandreusethelter.Toachievethebestresult,replacethelter
wheneveryoureplacethewater.Youcanusetwoltersinturns.Whenoneisbeing
cleaned, the other is ready for use.
Thefabriclterrecoverssmalldebrisfromthewater.Thefabriclterofanoutdoor
hottubmightgetblockedbylimeparticlesfromhardwater,whichmakestheow
ofwaterweaker.Inordertoprolongtheusefullifeofthefabriclterandimprove
itsperformance,rinsethelterunderrunningwater2–4timesamonth.The
lteringsystemofanoutdoorhottubisfullyautomated.
Cleaning a lter
1.Removethefabriclterfromthetub.
2.Fillabucketwithwaterandlettheltertosoakforatleastthreehours.
3.Rinsethelterwithcleanwater.
4.Letthelterdry.
5.Thisensuresthelterisalwayscleanandreadyforuse.

Using the pool in winter
The Drop pool is intended for year-round use, which is why we recommend that
pools equipped with maintenance heating be used in summer and winter alike. If
the pool is emptied for the winter, the warranty does not cover any damage caused
by the freezing of the pool.
The pool cover should be cleared of snow at regular intervals. At worst, a thick layer
of snow may even cause the cover to break. Additionally, the pool’s surroundings
and the access route to the pool should be kept clear of snow to allow you to make
it ready for use quickly and to ensure safe access to the pool. In the winter, the area
around the pool may be particularly slippery when water that has spilled from the
pool freezes over.
The Drop pool can be kept always ready for use in the winter, in which case the
equipment is kept warm inside the frame and there is no risk of the pool freezing.
Please secure the supply of power to the pool, as long-term power outages may cause
the pool to freeze and damage to the equipment. In the event of a power outage,
DO NOT OPEN THE INSULATON COVER! The pool will turn back on
automatically when power is restored. After a power outage, check the functions
and water temperature of the pool. Short power outages ranging from a few minutes
toafewhoursdonotaectthefunctionalityofthepool.Thepooliswell-insulated,
which prevents it from freezing in this amount of time, even in freezing temperatures.
It takes a power outage of longer than a few days for the pool to freeze. In the event of
a longer power outage, please contact the seller or your service agent.
Before the weather drops well below freezing point, you should service the pool
(replacethewater,cleanthepoolandreplacethelterballs).
If you want to empty the pool for the winter, we recommend that you contact our
customer service department. When emptying the pool, you must make sure that
there is no water left in the piping. The piping cannot be fully emptied with the
drainagepumpalone–thepipingmustbevacuumed.Additionally,thelterballs
mustberemovedfromtheltertanktoallowtheballstodryandpreventthemfrom
mildewing or freezing.
The warranty does not cover damage caused by freezing.
This manual suits for next models
2
Table of contents
Popular Swimming Pool manuals by other brands

Sport-thieme
Sport-thieme 1145700 Assembly manual

Procopi
Procopi ProSwell TROPIC JUNIOR installation instructions

DURAplas
DURAplas Aussie 1005 installation instructions

Piscine Solide
Piscine Solide V35046 installation manual

Endless Pools
Endless Pools FASTLANE PRO owner's manual

Waterman
Waterman Waterfun 3000005CH Assembly and operating instructions