manuals.online logo
Brands
  1. Home
  2. •
  3. Brands
  4. •
  5. DRUM FIRE
  6. •
  7. Drum
  8. •
  9. DRUM FIRE DK7500 User manual

DRUM FIRE DK7500 User manual

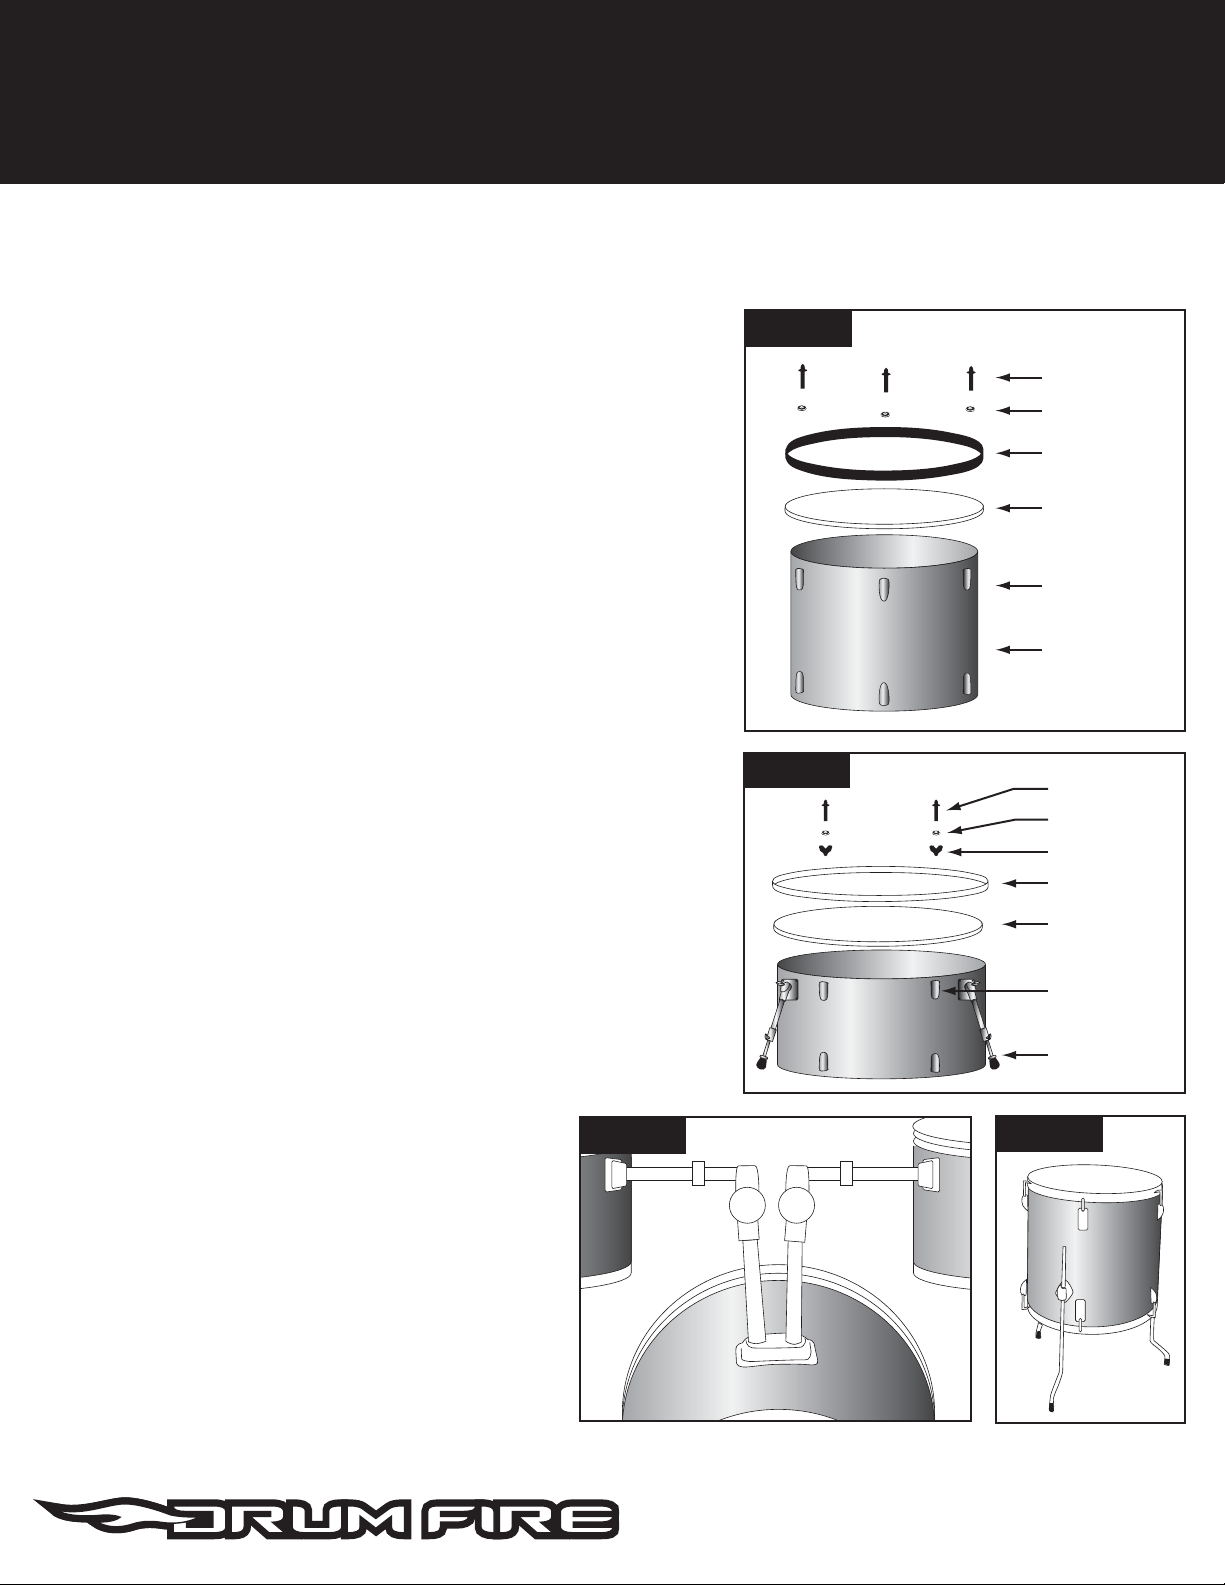
ASSEMBLING THE TOM (Figure A)
1. Take the drum head and place it on the drum shell with the logo on the drum shell facing up.
2. Take the rim and t it on top of the drum head, so it is evenly seated around all sides.
Line up the holes in the rim with the mounting lugs on the drum shell.
3. Take the washers and insert them on the tension rods. Insert the tension rods
through the holes in the rim. Screw the tension rods into the lugs. Tighten the
tension rods with your hands making sure the rim is even around all sides.
4. Take the drum key and tune the drum head. Always keep the head evenly
seated on the drum shell. Press down in the center of the drum to stretch the
head while tuning. This is to ensure the drum will not go out of tune as easily.
5. Repeat steps 1 through 4 for the bottom of the drum.
ASSEMBLING THE BASS DRUM (Figure B)
6. Take the clear batter drum head and place it on the side
that is opposite the legs.
7. Take the hoop and place it on top of the drum head while making sure
it is evenly seated around all sides.
8. Take the tension rods and place them through the washers and claw hooks.
Line up the tension rods with the lugs and rest the claw hooks on the hoop.
Hand tighten the tension rod.
9. Repeat step 8 for the remaining tension rods.
10. Take the drum key and tune the drum head. Always keep the head evenly
seated on the drum shell. Press down in the center of the drum to stretch the
head while tuning. This is to ensure the drum will not go out of tune as easily.
11. Turn the drum over.
12. Take the batter drum head with the logo and put it on the drum.
13. Repeat steps 7 through 10.
MOUNTING THE TOMS (Figure C)
14. Insert the long tube into the tom mount of the bass drum.
Tighten the screw. Adjust the height of each tom.
15. Tighten the screw on the tom mount of the drum
16. With the joint of the tom arm, adjust the angle of the tom.
17. Tighten the locks and repeat steps 14 through 16 for
the other tom.
FLOOR TOM (Figure D)
18. Place the heads and rims on the oor tom
repeating steps 1 through 5.
19. Insert the long oor tom rods to raise it o the oor.
ASSEMBLY INSTRUCTIONS
For Standard Drum set DK7500 and Junior Drum set DKJ5500
Continued on back.
Figure A
Figure B
Figure C Figure D
Tension Rod
Washer
Mounting Lug
Drum Head
Drum Shell
Rim
Drum Shell
Tension Rod
Washer
Claw Hook
Leg
Mounting Lug
Drum Head
Hoop
Figure F
Figure H
Figure I
ASSEMBLY INSTRUCTIONS
For Standard Drum set DK7500 and Junior Drum set DKJ5500
©2009 TMP, Inc. Drumre™ and the Drumre™ logo are trademarks of
The Music People, Inc., the innovators of On-Stage Stands® and other premium
brands. Printed and manufactured in China.
www.musicpeople.com • www.onstagestands.com
Continued from front.
Figure G
Snare Drum
Snare Basket
Angle Adjustment
Basket Adjustment
Height Adjustment
Junior Drum Set
Snare Drum
Snare Basket
Angle Adjustment
Height Adjustment
Standard Drum Set
Basket Adjustment
Felt
Washers
Memory
Lock
Long Nut
Screw
Plate Strip
Bottom
Cymbal
Top
Cymbal
Hi-Hat
Seat
Pull Rod
Clutch
Nut Plastic
Washer
Plastic
Washer
Felt
Washer
Figure E
Wing Nut Cymbal
Cymbal
DK7500
Cymbal Stand
DKJ5500
Cymbal Stand
Plastic
Washer
Cymbal Seat
Felt
Washers
ASSEMBLING THE CYMBAL
(Figure E)
20. Remove the wing nut and rst
felt washer from the top of the
cymbal stand.
21. Take the cymbal and place
it on the stand.
23. Replace the felt washer
and wing nut. Tighten.
HI HAT STAND (Figure F)
24. Remove clutch from pull rod.
25. Place a cymbal upside down
on hi-hat seat and felt washer.
26. Unscrew the nut from the bottom
of the clutch. Take o the bottom
washer and felt and place the top cymbal on the
clutch. Replace the felt and washer and screw the
bolt back onto the clutch.
27. Replace clutch, with cymbal attached,
onto the pull rod.
ASSEMBLING THE SNARE
Junior Drum Set (Figure G)
28. Unfold the snare stand
29. Place the snare drum in the snare basket.
30. Adjust one of the snare arms
to t the snare drum snugly.
ASSEMBLING THE SNARE
Standard Drum Set (Figure H)
31. Unfold the snare stand
32. Place the snare drum in the snare basket
33. Adjust the knob below the snare basket to t
the snare drum snugly.
ATTACHING THE DRUM PEDAL
TO THE BASS DRUM (Figure I)
34. Place the base of the pedal under the bass
drum hoop and make sure the clamp is over the
hoop. Tighten the screw until the clamp ts
securely on the hoop.

This manual suits for next models

1

Popular Drum manuals by other brands

ATV EXS-5SK artist Assembly guide

ATV

ATV EXS-5SK artist Assembly guide

HXM HDP-1 user manual

HXM

HXM HDP-1 user manual

Roland CR-5000 owner's manual

Roland

Roland CR-5000 owner's manual

Gear4music CHILDREN’S DRUM KIT Setup guide

Gear4music

Gear4music CHILDREN’S DRUM KIT Setup guide

Simmons Electronics SDX manual

Simmons Electronics

Simmons Electronics SDX manual

Roland CR-1000 owner's manual

Roland

Roland CR-1000 owner's manual

Medeli DD610S owner's manual

Medeli

Medeli DD610S owner's manual

Assist Technology Easy-Pad instructions

Assist Technology

Assist Technology Easy-Pad instructions

Yamaha RX-11 owner's manual

Yamaha

Yamaha RX-11 owner's manual

Roland V-Drums TD-3KV owner's manual

Roland

Roland V-Drums TD-3KV owner's manual

Sven HC-01 user manual

Sven

Sven HC-01 user manual

Roland BT-1 user manual

Roland

Roland BT-1 user manual

NSI Solutions Rapid Z-DRUM instructions

NSI Solutions

NSI Solutions Rapid Z-DRUM instructions

XDrum DD-200DG user manual

XDrum

XDrum DD-200DG user manual

Millenium DT-600 user manual

Millenium

Millenium DT-600 user manual

Yamaha PCY65 owner's manual

Yamaha

Yamaha PCY65 owner's manual

First Act Drum Set instruction manual

First Act

First Act Drum Set instruction manual

Roland V-Drums TD-27 manual

Roland

Roland V-Drums TD-27 manual

manuals.online logo
manuals.online logoBrands
  • About & Mission
  • Contact us
  • Privacy Policy
  • Terms and Conditions

Copyright 2025 Manuals.Online. All Rights Reserved.