Dualsky Hornet 460 User manual

Instruction Manual · 使用说明
Hornet460
EN CN
Hornet 460 ARF
Vol.2 · 21001-2

- 2 -
Thank you Thank you for selecting the Hornet 460 from Dualsky! This kit is designed to be fun to fly and uses top
quality parts for durability and performance. This instruction manual you are reading was designed to be
easy to follow, yet thorough in its explanations. Dualsky wants you to enjoy the performance and experience
of using our products. If you have come across any problems or require further assistance, contact us or
one of our international distributors and we will do our very best to help you.You can also contact us on the
internet at www.dualsky.com
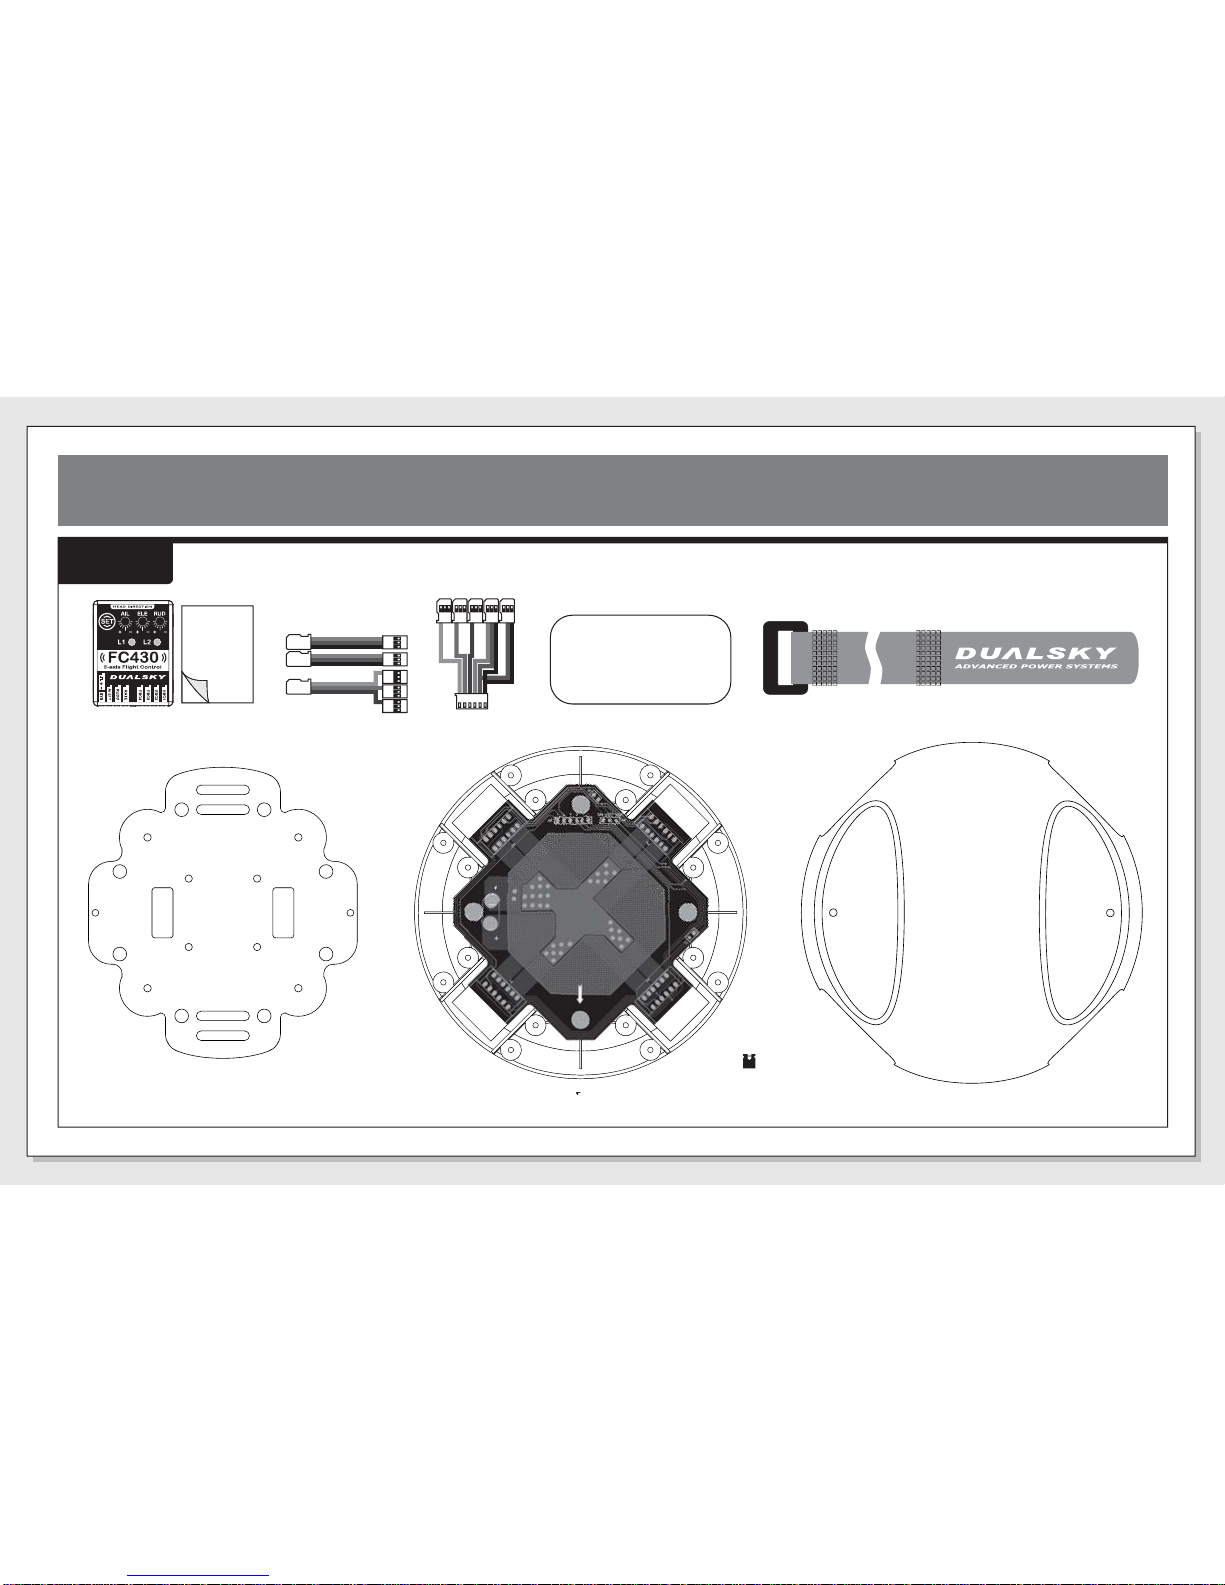
· This is a high performance R/C kit, and it requires regular maintenance for best performance. If you don't do regular maintenance the
performance will suffer. Dualsky has all the necessary parts and accessories available to keep your aircraft performing at its best.
The caution or attention symbols will warn you about steps that can be very dangerous.
Please read and understand the instructions carefully before proceeding.
!Caution
警告
Failure to follow these instructions
can damage your kit, and cause
serious bodily injury or death. !Attention
注意
Failure to follow these instructions
can cause injury to yourself or
others. You might also cause
property damage or damage your kit.
!Caution
警告
Before Flying
·Please read manual with parent or guardian (responsible adult).
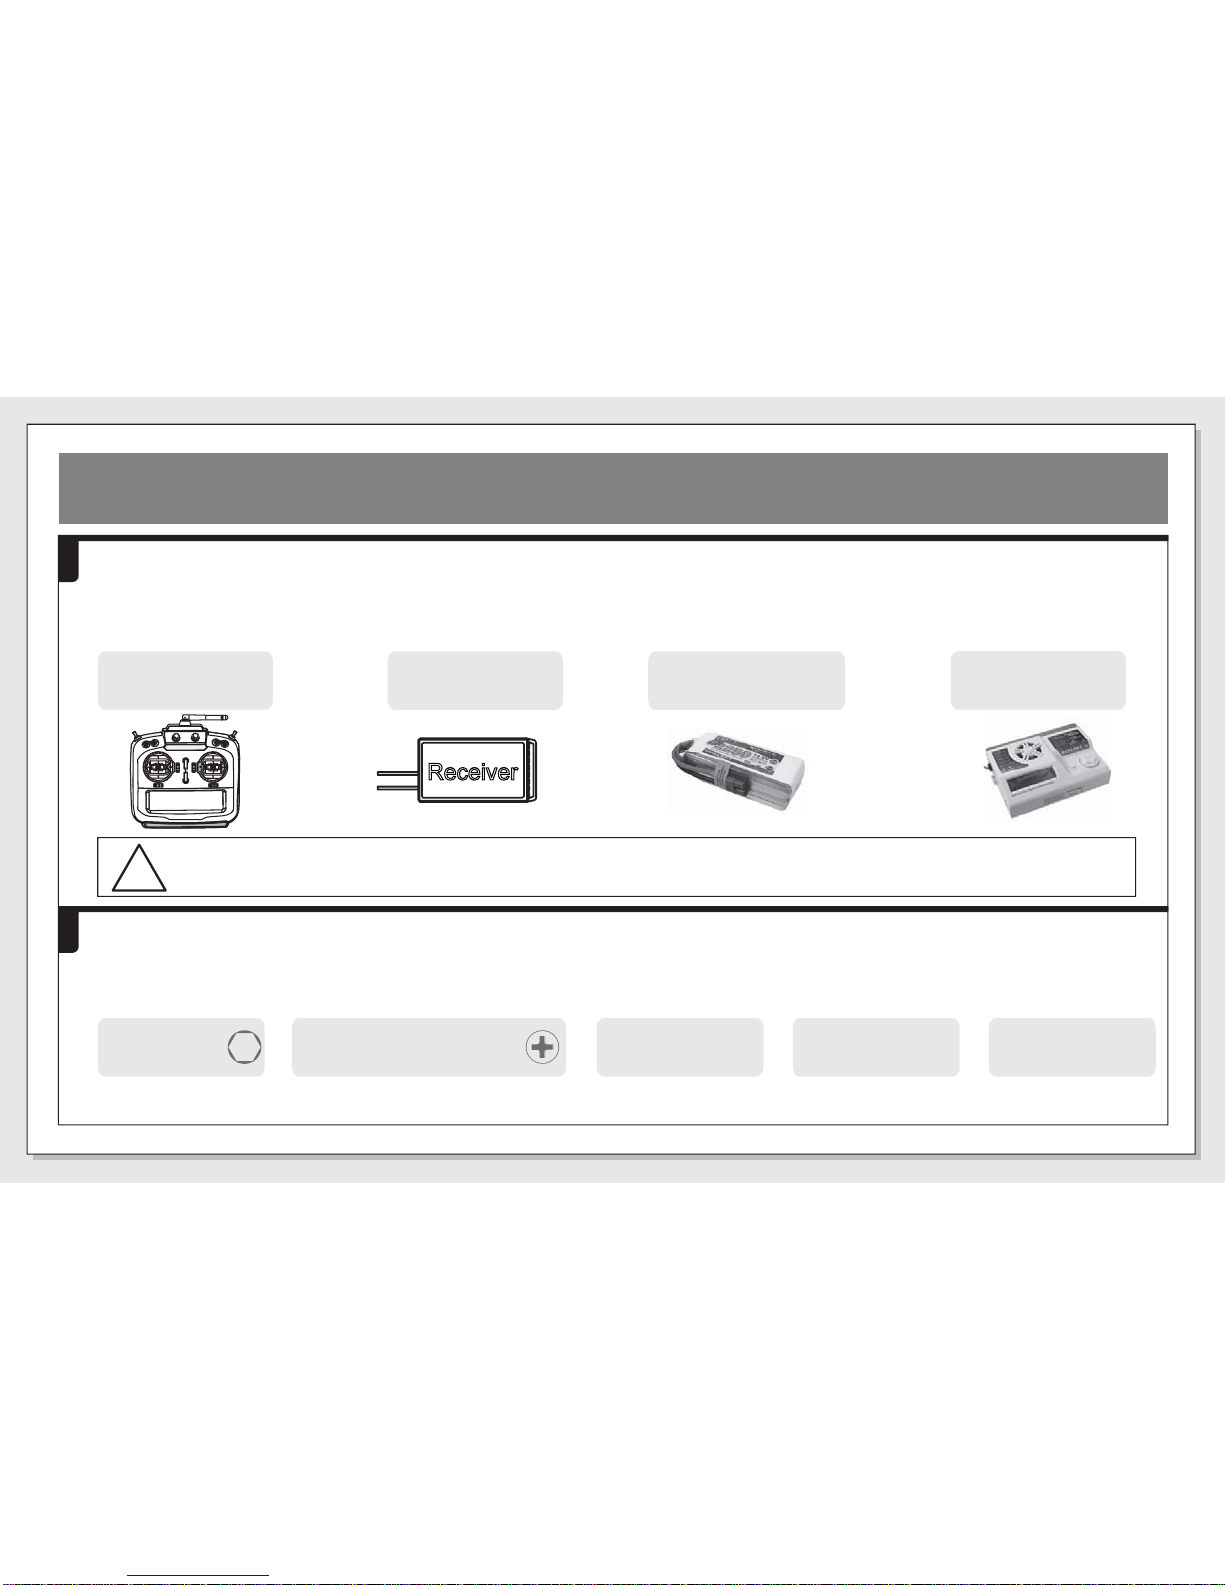
·Turn ON transmitter first, and then turn ON the receiver. This will prevent the aircraft from losing control.
Before Operating
·Make sure that all screws and nuts are properly tightened.
·Always use fully charged batteries in your transmitter and receiver to avoid losing control of the model.
·Make sure no one else is using the same radio frequency that you are using.
·Please confirm the range of the radio operation.
During Flying
·Please do not fly in a public area, this could cause serious accidents, personal injuries and/or property damage.
·Please do not fly near pedestrians or small children.
·Please do not fly in small and confined areas.
After Flying
·Turn OFF receiver first, then turn OFF transmitter. This will prevent the aircraft from losing control.
Battery Safety
·Please be careful when handling the battery. It could be hot after running. As part of a regular maintenance
routine, be sure to check all wiring including battery wire and terminals.

- 3 -
感谢您 感谢您选择双天的Hornet 460!这款套件力求让您体验到飞行的乐趣,在设计时我们选用顶级材料与配件以保证
最佳的可靠性和飞行表现。您正在阅读的这份使用说明力求通过简单易懂的描述让您对本产品有一个全面细致的了解。
我们希望您能够喜欢我们的产品。如果您在使用过程中遇到问题,或者需要一些帮助来完成某一步骤,请您致电我们
公司,我们会竭诚为您服务。您也可以通过我们公司的网站(www.dualsky.com)来联系我们。
·这是一款高性能的遥控模型套件,它需要一定的常规维护来使其保持在最佳状态。如果您不进行常规维护,那么产品的性能将会受到影响。双天
公司提供完备的产品配件及附属装备来保证您的飞行器始终工作在最佳状态下。
警告及注意事项符号将会提醒您哪些安装或使用步骤会变得十分危险。
请在操作前仔细阅读并完全理解这些说明。
!Caution
警告
未能按照说明操作将会损坏您的套件,
并会造成严重的身体伤害甚至死亡。 !Attention
注意
未能按照说明操作将会伤害到您或他人。
您也有可能会造成财产损失或损坏到您
的套件。
!
Caution
警告
在飞行前
· 请与父母或监护人(能够负责任的成年人)一起阅读本“使用说明”。
· 先打开遥控器的开关,再打开接收机的开关。这可以防止飞行器失控。
在操作前
· 确保所有螺丝和螺帽都已经正确锁紧。
· 总是在遥控器和接收机中使用全新的或完全充电的电池以防止模型失控。
· 确保没有人和您使用相同的遥控频率。
· 请确认遥控距离在遥控器的可操作范围之内。
在飞行中
· 请不要在公共场合飞行,这可能会引起严重的意外事故、人身伤害及财产损失。
· 请不要在行人或儿童附近飞行。
· 请不要在狭小受限的环境中飞行。
在飞行后
· 先关闭接收机的开关,再关闭遥控器的开关。这可以防止飞行器失控。
电池安全
· 请小心使用电池。它在飞行之后会变得很热。如果电池组的接线受到磨损,有可能会短路,
进而引发火灾。作为日常维护工作的一部分,请确保检查电池接线和插头。

- 4 -
Table of Contents
* Visit our website at Dualsky.com to view our updated instruction manual.
Section Contents Page
Thank you
1
2
Equipment Needed
2
3
4
5
6
Packing List
Assembly Instruction
7
8
Configuration
Test Flight
Exploded View
Parts List
Optional Parts List
5
6
8
16
18
20
21
22
目录
* 请访问我们的网站 www.dualsky.com 以获取最新说明书
章节 内容 页码
感谢您
1
2
所需设备
2
3
4
5
6
包装清单
安装指南
7
8
设定与调试
试飞
产品爆炸图
配件清单
选装配件清单
5
6
8
16
18
20
21
22

- 5 -
1Equipment Needed
所需设备
Electronics 电子设备
The Hornet 460 requires the following items to complete: at minimum a 4-channel radio system (we recommend a 6-channel or higher
radio system), Lithium Polymer (LiPo) battery pack (recommend Dualsky 1700-5000mAh 11.1V) and battery charger.
您需要准备一套4通道(或以上的)遥控设备、锂电池组和电池充电器。
Battery Charger
电池充电器
!Caution
警告 If you do not use a charger designed to charge Nickel Metal Hydride / LiPo batteries, the batteries will be damaged.
如果您使用的电池充电器不是专为镍氢和锂电池所设计的,那电池将会被损坏。
Tools
Tools needed for assembly. Sold Separately.
组装所需的工具。需要单独购买。
工具
Allen Wrench
内六角螺丝刀 1.5
mm
M6 Wrench
M6扳手
M3 Wrench
M3扳手
Lipo Battery Pack (11.1V)
锂电池组(11.1V)
*Dualsky 1700-5000mAh Recommended
Transmitter
发射机
Receiver
接收机
Thread Lock
螺丝胶十字螺丝刀(2号)
#2 Philips Head Screwdriver

- 6 -
2Packing List
包装清单
Box A Bottom Case, Canopy and Parts 底壳、头罩和零部件
21007
H460-Upper Deck
H460 二楼板 Assembled Lower Case w/Battery Mount
er
C
安装完成的底壳(带电池安装架) Canopy
头罩
FC430飞控
21021
FC430 Flight Control Unit
21021-1
Double
Sided
Tape
双面胶
21010
H460-Wire Set Battery Patch Battery Fastener
电池魔术贴片
电池紧固带
H460接线套件
FC430接线套件
21022
FC430-Wire Set
Jumper
跳线
2 x

- 7 -
Box C Landing Gear, Propeller and Parts 起落架、螺旋桨与零部件
Box B Arm Set 机臂组件
41016
PM32S - Propeller Mount Set
21017
H460-Propeller (9" black, 1 pair) 21018
H460-Propeller (9" white, 1 pair)
H460螺旋桨(9" 黑色,一对) H460螺旋桨(9" 白色,一对)
4 x
21005
H-Landing Gear
起落架
Assembled Arm Set
安装完成的机臂组件
2 x #1,#2
安装前请撕去保护膜
Please peel off the protective
film before assembly
!Attention
注意
Box D also has two assembled Arm Sets inside (#3, #4) D盒中也有两支安装完成的机臂组件(#3,#4)
Each pair of propellers includes one Normal and one Reverse propeller
每对桨都包括一支正桨和一支反桨
Nut M3 x 2pcs
M3螺母 x 2颗 Washer M3 x 2pcs
M3垫片 x 2片 Plastic Washer M3 x 2pcs
M3塑料垫片 x 2片 Spring Washer M3 x 2pcs
M3弹簧垫片 x 2片 M3x12 Post x 2pcs
M3x12螺丝立柱 x 2个 M3x5 Washer Screw x 2pcs
M3x5带垫片螺丝 x 2颗
Accessories of #21009 H460-Canopy
#21009 H460头罩的安装附件
Nut M6 x 4pcs
M6螺母 x 4颗 Set Screw x 4pcs
顶丝 x 4颗
Propeller Mount x 4pcs
桨座 x 4个
PM32S 桨座组件
21014
H-Screw 3x10
3x10自攻螺丝
32 x

- 8 -
3Assembly Instruction
安装指南
1Install Landing Gear 安装起落架
Repeat
Steps
重复
步骤
Repeat this step
to install Landing
Gear to Arm Sets
in Box B and D
重复此步骤,将起落
架安装到B盒和D盒中
的机臂上
21014
21014
请留意机臂此处的编号,在下一步中请留意
机臂此处的编号,在下一步中需要与底壳插
口的编号一一对应,依次安装。
Please note the number
marker here, you will need
to match this number with
the slot number on the Lower Case in
the next assembly step.
!Attention
注意

- 9 -
2Install Arm Set to Bottom Case 将机臂安装到底壳上
Repeat
Steps
重复
步骤
Repeat this step
to install Arm Sets
to four directions
of the Lower Case
重复此步骤,将机臂
安装到底壳的四个方
向上
1
23
4
底壳插口编号
Bottom Case Slot Number
口
Notice the direction 注意方向
·
将机臂编号与底壳插口编号一一对应
·
将机臂插入底板上的金手指插座
·
用#21014螺丝(3x10)将机臂固定在底壳上
· Match the Arm Set Number with the Bottom
Case Slot Number
· Plug the Arm Set into the Slot on the Lower Case
· Use the #21014 Screw (3x10) to fix the Arm Set
21014 21014

- 10 -
3Connect Cables 连接线缆
Port
APort
BPort
C
端口 端口 端口
Port
D
端口
Plug
A
插头
Plug
C
插头 Jumper
B
跳线 Jumper
D
跳线
ESC 1 ESC 2 ESC 3
(Orange) (Red) (Brown)
· Connect cables and jumpers according
to the Letter
· Jumper B is the switch for the LEDs on
Arm 1 and 4
· Jumper D is the switch for the LEDs on
Arm 2 and 3
·
按照字母表示连接对应的线缆和跳线帽
·
跳线帽B是机臂1和4上的LED的控制开关
·
跳线帽D是机臂2和3上的LED的控制开关
(White)
(Red)
(Black)

4Radio Connections 遥控设备连接
!Attention
注意
The AIL, ELE, THR
and RUD port
sequence on the
receiver may vary
between brands
(refer: Page 16).
Please refer to
your radio
manufacturer's
instruction manual
for correct
installation.
不同厂商的接收机上,
AIL,ELE,THR和RUD
接口的排列顺序可能
会不同。请参考遥控
设备厂商的说明书以
保证正确地连接各部
件。
RATE
RUDD
A/ E/ T
21010
H460-Wire set
H460接线套件
ESC 1 ESC 2 ESC 3 ESC 4
Goes to Mainboard
Port A
Goes to Mainboard
Port C
RATE
A/ E/ T
RUDD
CH5/GEAR
CH5/GEAR
Rudder
Rudder
Aileron
Elevator
Throttle
Aileron
Elevator
Throttle
连接到底板上的端口A
连接到底板上的端口C
(Orange)
(Orange)
(Red)
(Red)
(Brown)
(Brown)
To FC430
连接至FC430
To Receiver
连接至接收机
21022 FC430-Wire set FC430接线套件
Reserved
AIL
ELE
THR
RUD
CH5
(White)
(Red)
(Black)
- 11 -

- 12 -
5Install Radio Equipment 安装遥控设备
Multiple
solutions
多种
可选方案
There are three
different layouts
you can choose
此步骤有三种可选
的安装布局
Layout 1
21014 21014
21021
布局1
21021-1
!Attention
注意
Please use the double sided tape
included with the flight control unit
请务必使用随飞控附赠的双面胶
Easier to adjust Flight Control Unit
便于调节飞控
!Attention
注意
Please notice the direction of
the flight control unit
请留意飞控的安装方向

- 13 -
Layout 2
布局2
Upper Deck can be used to mount other devices
二楼板可以用于安装其他设备
Layout 3
布局3
Easier to change/adjust receiver and flight control unit
便于拆装和调整接收机与飞控
21014
21014
21021
21021-1
Please use the
double sided tape
included with the
flight control unit
请务必使用随飞控
附赠的双面胶
Please notice the
direction of the
flight control unit
请留意飞控的安装
方向
!Attention
注意
!Attention
注意 21014
21014
21021
21021-1

- 14 -
6Install Propeller
安装螺旋桨
Repeat
Steps
重复
步骤
Repeat this step
to install Propellers
重复此步骤,安装
四支螺旋桨
41016
41016 21017 / 21018
Thread
Lock
Please use Thread Lock
(not included) on the Set
Screw and the Propeller Mount
请在顶丝螺丝和桨座上使用
螺丝胶(产品中不包括螺丝胶)
!Attention
注意
Please notice the color and direction
of rotation is different for each propeller
请留意每只螺旋桨的不同的颜色和旋转方向
Install all four propellers
as shown in the picture
如图所示,安装四支螺旋桨
White, NOR White, REV
Black, NOR
Black, REV
白色,正桨
黑色,反桨
黑色,正桨
白色,反桨

- 15 -
7Install Battery Pack and Canopy 安装电池组和头罩
If you choose Layout 2
when you install the
radio equipment, you
can mount the battery
(Dualsky XP17003EX)
inside of the Canopy.
You also need to
change the direction
of the Power Wire on
the Mainboard.
如果您在安装电子设备时选择了“布局2”,那么您可以将电池
(双天 XP17003EX)安装在头罩内。 但您也需要重新焊接底板
上的电源线以改变其方向,使其可以在头罩内连接电池。
21009
21009
21009
21009
21009
21009
Battery
Stick the Battery Patch to the Lower Case and the Battery.
Use the Battery Fastener to fix the battery as shown in the
above picture.
把电池魔术贴片分别贴在底壳和电池上。按照上图所示,用
电池紧固带把电池扎牢。
Nut M
M3螺母
Washer M3
M3垫片
Plastic Washer M3
M3塑料垫片
Spring Washer M3
M3弹簧垫片
M3x12 Post
M3x12螺丝立柱
M3x5 Washer Screw
M3x5 带垫片螺丝
Canopy
头罩
Upper Deck
二楼板

- 16 -
4Configuration
设定与调试
Transmitter Setting 遥控器设置
·
双天H460四旋翼需要一台四通道或以上的遥控设备;
·
设定遥控器为固定翼模式,如果遥控器有混控功能,请关闭所有混控,将各通道行程
都设为100%;
·
各通道的电子微调(TRIM或SUBTRIM菜单)和摇杆的机械微调都归“0”;
·如下图所示,
根据品牌设定遥控器各通道正反向;
·
如果使用四通道遥控器,操纵杆灵敏度可在飞控中设定。如果您使用五通道或以上的
遥控器,请将 RATE 连接至CH5/GEAR通道,并在遥控器上与三段或两段开关关联,开
关拨至最小。该通道用来调节飞行过程中操纵杆灵敏度。开关通道对应数值,请参考
下图:
· The Hornet 460 needs a 4-channel or higher radio controller to operate;
· Set the radio to “Airplane Mode”, turn off all the mixing functions,set all
channel’s D/R to 100%;
· Set all channel’s trim, sub-trim and mechanical trim to “0”;
· Set all channel’s direction according to the below chart;
· If you are using a 4-channel radio controller, the sensitivity of sticks can
be set in Flight Control Unit. If you are using a 5-channel or higher radio
controller, please connect the RATE to CH5/GEAR channel on the receiver,
then sign a 3-position or 2-position switch on the radio to CH5/GEAR
channel, set this switch to Low. This channel is used to adjust the sensitivity
of the sticks. Please check the diagram on the right for corresponding value
of this channel.
ESC Initial Setting 电调行程设定
· Turn on the radio controller, push the throttle stick to the top, turn
on power to the Hornet 460, when L1 shows blue in color, it means
the ESC is in initial setting mode;
· Wait until the ESC's long beep (it means the top point of throttle has
been confirmed), then pull the throttle stick to lowest point;
· Wait about 1 second for a short beep (it means the lowest point of
throttle has also been confirmed), the ESC initial setting is finished;
· Don't move the throttle stick after initial setting, turn the power off to
the Hornet 460, then reconnect the power after 5 seconds, the new
setting will be applied.
·
开启遥控器,将油门推至最高,接通四旋翼飞行器的电源,L1蓝灯亮时,即进入电调
行程设定模式;
·
等待电调发出“滴”声(长声),表明油门最高点已经确认,此时应立即将油门收至
最低;
·
等待约1秒,电调再次发出“滴”声(短声,约0.2秒),表明油门最低点确认,即完
成电调行程设定。电调设定完成后请勿推高油门(为确保安全,建议断开电源后重新
接通)。
Futaba JR Spektrum
AILERON
ELEVATOR
THROTTLE
RUDDER
NOR
REV
NOR
NOR
NOR NOR
NORREV
REV
REV
REV
REV
CH5/GEAR NOR REV NOR
HOTT
NOR
NOR
REV
REV
REV
L-100%
1300μs
900μs
1700μs
2100μs
10%
+100%
M
H
0% 10%
10%
Default, hovering and slow flight
Fast and sport flight
Flips and extreme flight

- 17 -
·
按键操作说明:
1.锁定状态下长按(大于两秒):进入设定模式
2.设定状态下单击:改变设定项
3.设定状态下双击(双击有效间隔小于0.5秒):改变该项设定值
4.设定状态下长按:保存并退出
·
具体设定项如下表所示
· “SET” Button usage:
1) Long Press (more than 2 sec) under Lock Mode: enter Setting Mode
2) Single Click under Setting Mode: switch between SETTING ITEM
3) Double Click (finish within 0.5 sec) under Setting Mode: change SETTING VALUE
4) Long Press (more than 2 sec) under Setting Mode: Save and Quit to Lock Mode
· Please check the below chart for all settings.
· Some settings will take effect after the Hornet 460 is restarted. Cut the power to
the Hornet 460 and reconnect after 5 seconds to apply the new settings.
·
部分设定需重启飞控后才能生效,因此在飞控设定完成后,请断开
四旋翼飞行器的电源,稍等5秒钟再重新接通电源以应用新的设定值。
Flight Control Setting 飞控设置
· How to enter Setting Mode: Turn on radio controller, move the throttle to lowest
position; turn on power to the Hornet 460, wait until the L1 LED finishes flashing
Green and then changes to RED (Now the flight control is in Lock Mode); press
the “SET” button on the flight control to enter Setting Mode. After you enter Setting
Mode, L1 displays the corresponding SETTING ITEM menu attributes (color),
and L2 displays the corresponding SETTING VALUE menu attribute (color).
·
如何进入设定模式:打开遥控器,油门收至最低,接通四旋翼飞行
器的电源,等待飞控L1绿灯闪烁结束红灯常亮(此时为锁定状态)
后,长按飞控上的“SET”按钮进入设定模式。此时,L1的颜色指示
设定项目,L2的颜色指示该设定项当前设定值。
ALL SETTINGS ARE OPTIMIZED TO FIT HORNET 460, DON’T CHANGE THEM UNLESS IT’S NECESSARY.
设定项目根据双天H460已做最优化处理,如非特殊情况无需设定。
!Attention
注意
L1
Setting Item
设定选项
D/R
杆量
ESC PWM Freq.
电调PWM频率
Gyro Direction
陀螺仪方向
Potentiometer Lock
电位器锁定
Blue
蓝色
Green
绿色
Red
红色
Yellow
黄色
Purple
紫色
Low
小杆量
400Hz
Front face upward
正面向上
Not Lock
未锁定
X Type
X型
Middle
中杆量
200Hz
Back face upward
背面向上
Lock
锁定
High
大杆量
266Hz
Front face to left
正面向左
333Hz
Front face to right
正面向右
Blue 蓝色
Green 绿色 Red 红色 Yellow 黄色
Reset
恢复设置
* Blue color setting indicates default values
* 蓝色设定值是默认值
L2
Setting Value 设定值
Factory Reset
恢复出厂设置
White
白色
Cross Type
十字型
飞行器模式
Flying Mode

- 18 -
5Test Flight
试飞
Unlock & Propeller Direction Check 解锁与螺旋桨方向检查
· Make sure the Hornet 460's battery is fully charged, and you are in a wide, flat area;
· Turn on the radio, pull the throttle stick to lowest position, plug in the power to the
Hornet 460. L1 LED on FC430 Flight Control will flash Green (initial startup process),
don't move sticks on the radio controller, keep the Hornet 460 still. When the L1 LED
changes to Red, it means the initial startup process has finished and the Hornet 460
is now in Lock Mode (throttle will not operate). Move the sticks as shown in the
diagram (below) and hold for about 0.5 sec to unlock the Hornet 460. After unlock,
motors will reach idle speed for about 1 sec. If you don't do any stick movements
during this period after "unlock" (5-seconds) the Hornet 460 will return to Lock Mode
again.
·
确保Hornet 460的动力电池电量充足,飞行器四周没有障碍物;
·
打开遥控器,油门收至最低,接通Hornet 460的电源。飞控上的L1绿灯闪烁时为飞
控初始化过程,此过程中请勿拨动操纵杆,并保持飞行器静止。L1绿灯闪烁结束红
灯常亮后即进入锁定状态,此时推油门无效。执行下图中的拨杆动作并保持约0.5秒
即可解锁,解锁后电机保持怠速约一秒。解锁后五秒内如不将油门推高或执行拨杆
动作,飞控将会重新进入锁定状态。
* This movement is the same for both Mode I and Mode II transmitters to “unlock” the Hornet 460
*模式1和模式2的用户都可以使用这个动作来解锁
After unlock, push the throttle a fraction above idle speed, check if the
propellers run in correct direction like shown in below diagram.
解锁后,将油门推至略高于怠速,查看螺旋桨旋转方向是否与下图所示一致。
Head Direction
头部方向
Head Direction
头部方向
Cross Type
十字型
X Type(default)
X型(默认模式)

- 19 -
· The weight on the Hornet 460 can differ depending on the choice of
battery. This will impact center of gravity, and the flight characteristics.
To improve flight performance you can address the below.
· Normally, if the sensitivity is set too high on the “pitch” (elevator) axis,
the opposing axis (i.e., aileron) will vibrate; if the sensitivity is set too low
on the “pitch” (elevator) axis, the opposing axis (i.e., aileron) will respond
with delay to stick movement.
· If the sensitivity is set too high on the rudder axis it will cause the motors
to over react, which will make the Hornet 460 unstable in pitch and yaw
direction; if the sensitivity is set too low on the rudder axis, the Hornet
460 will have difficulty on tail lock.
Adjust the sensitivity 调节感度
Ground Test 地面测试
· Put the 3-position switch on the radio to low , Put the remote control
CH5/GEAR switch to low. After initialization or toggle this switch, L2 LED
indicates the state of the current switch position : blue indicates low stick
input, green indicates middle stick input, red indicates high stick input.
set all sensitivity potentiometers on FC430 Flight Control Unit to neutral;
· Direction check: Controlling the throttle, make sure the Hornet 460 doesn't
leave the ground. Slightly move each stick to observe if the Hornet 460
moves with your stick input direction. If the direction is opposite, please
change the channel direction on the radio. If the stick returns to neutral
point and the Hornet 460 remains in a “tilted” position, it means the flight
control is working properly.
·
将遥控器上的三段开关拨至最小,将遥控器CH5/GEAR对应的开关拨至低位。初始化结束
或拨动此开关,L2会指示当前开关位置对应的杆量:蓝色表示低杆量,绿色表示中杆量,
红色表示高杆量。飞控上的感度电位器都旋至中间。
·
控制油门,保证飞行器不要离开地面,依次轻微拨动各通道操纵杆,观察飞行器在地
面的倾斜状态与操纵杆的方向是否一致,如不一致,请在遥控器上更改相应通道的正
反;在操纵杆回中后飞行器如果能保持倾斜状态,表明飞控工作正常。
L2
Green (0.5S)Middle
All ESCs on the Hornet 460 have low voltage protection function, but if one
of the ESCs starts low voltage protection, the quadcopter will lose balance
immediately. To prevent accident during flying, flight times should be kept to
a conservative time in relation to the operating batteries capacity. You can
check the sheet at right side as a reference of your flight time.
Hornet 460的四颗电子调速器都具备低电压保护功能,但是任意一颗调速器
的保护功能启动,都将会立即导致Hornet 460的飞行状态失调。为了防止在
飞行中发生意外,请根据您所使用的电池容量将飞行时间控制在一个保守的
范围之内。请将右侧的表格中的数据作为您预估飞行时间的参考。
· When adjusting the sensitivity don’t change the setting too much, 5-10
degrees is enough. When you find a stable range, then tweak it for
optimum performance.
·
不同的四旋翼飞行器因为重量、重心、马达和螺旋浆的不同会导致感度也不同。
·
一般俯仰轴和横滚轴的感度过大会导致在该轴上的震荡;感度过低会导致在该轴上
的动作偏软,突然打杆时飞行器停止不干脆、难以控制。
·
航向轴的感度过大会导致电机的加减速过于激烈,导致其他方向上的不稳定;过低
则对航向的锁定有影响,打杆时飞行器停止不干脆;
·
每次感度调节请勿过大,每次旋转电位器5-10度即可,基本稳定后可继续进行细微调节。
Caution of the Low Voltage Protection 低电压保护的注意事项
L2
Blue (0.5S)
Low
L2
Red (0.5S)High
* Suggested Flight Time is tested with new and fully charged Dualsky battery, under zero payload weight.
Please estimate a safety flight time according to battery condition, payload weight and flight condition.
建议飞行时间为使用全新充满电的Dualsky电池,在空载状态下测得。请根据电池状况、负载重量及场地环境
来预估合理安全的飞行时间。
Suggested Flight Time
建议飞行时间
Dualsky XP17003EX
(1700mAh 11.1V)
Dualsky XP22503GT-S
(2250mAh 11.1V)
Dualsky XP46003HED
(4600mAh 11.1V)
6 min. 8 min. 15 min.

- 20 -
6Exploded View
产品爆炸图
21022
21002
21003
21004
21005
21006
21007
21008
21009
51015
41016
41016
41029
21017 / 21018
21021
21009
21011
21012
21013
21014
21014
21012
21009
21014
21014
21011
21011
21011 21010
21014
21014
21009
21009
21009
Other manuals for Hornet 460
1
Table of contents
Other Dualsky Quadcopter manuals