Dyegoo GT02D User manual

Vehicle GPS Tracker
(GPS+GSM+SMS/GPRS)
GT02D User Manual
(Version 9.9)
Thank you for purchasing the tracker. This manual shows how to operate the
device smoothly and correctly. Make sure to read this manual carefully before
using this product. Please note that specification and information are
subject to changes without prior notice in this manual. Any change will be
integrated in the latest release. The manufacturer assumes no responsibility
for any errors or omissions in this document.

1. Summary
Working Based on existing GSM/GPRS network and GPS satellites,
this product can locate and monitor any remote targets by SMS
or internet.
Overview of the characteristics:
1.GPS position.
2.GSM 850/900/1800/1900MHZ.
3. Wide voltage range:9-40V.
4. Oil-cut function.
5. GEO-Fence alarm.
6. ACC alarm.
7. Vibration alarm.
8. Power-Cut alarm.
9. Overspeed alarm.
2.Accessories:
Power line:

Relay:
Manual:
Screws:

3. Spec:
1).GSM:850/900/1800/1900MHZ
2).GPRS: Class12, TCP/IP
3).Working Voltage:9-40V DC
4).Working current:≈22mA (12VDC)
5).Working current:≈12mA (24VDC)
6).GPS locating time:Cold start≈38s(Open sky)
Warm start≈32s
Hot start≈2s(Open sky)
7).GPS Precision:10m(2D RM)
8).Working temperature:-20℃~+70℃
9).Working humidity:20%~80%RH
10).Measurement:90(L) x 45(W) x 13.5(H) mm

4.Device status indicators
Power Status (Red LED)
Continuously Bright
External Power
Connected
Continuously Dark
External Power Cut-off
GPS Indicator (Blue LED)
Continuously Bright
GPS Unfixed
Flashing
GPS Fixed
GSM Indicator (Green LED)
Continuously Bright
No GSM Signal
Flashing
GSM Signal OK
5.Installation
5.1 Preparation before installation
5.1.1 Open the packing box to check whether the type of device is correct
and whether the accessories are included.

5.1.2 This product is a high-tech electronic device, installation should be
undertaken by a professional.
5.1.3 Please follow the following procedures to install your GT02D.During
installation, there should be no power to the device.
5.1.4 Installing SIM card:
The device need to insert a SIM card which support GSM 2G network. The SIM
card used should be enabled for GPRS.
1) Testing SIM card: to test SIM card, please install it into a normal
GSM mobile and ensure it can send and receive SMS, and enables for
GPRS.
2) Installing SIM card: Remove the upper cover of device, insert SIM card
as shown then replace cover, lock the shell with 4 bolts
.
.
5.2 Installation

The GPS tracker must be installed under professional personnel.
Note:
1) Please install the device in the hidden place as followings:
Under Front windshield;
In the front instrument panel;
Under back windshield;
2) Avoid being placed with signal radiators like reverse sensor ;
3) The device has GSM antenna and GPS antenna inside. Please ensure the
receiving side of the device is face up and without metal cover.
Note: The metal cover will lessen the receiving of GPS signals.
5.3 Selecting installation place and fixing it.
There are two kinds of installation: covert and non covert.
5.3.1 If you need the covert installation, please refer installation to an
auto electrical contractor.
Note:
1) To prevent theft of the GT02D, the device should be installed as
covertly as possible.
2) Avoid placing the GT02D close to higher power electrical devices, such
as reversing radar, anti-theft device or other vehicle communication
equipment.

3) The GT02D should be fixed into position with cable ties or wide
double-side tape.
4) Your device has built-in GSM antenna and GPS antenna. During
installation, please make sure the receiving side face is up, with
no metal object above the device to interfere with GPS reception. The
following places are suggested for installation:
Under the dash board below the front windshield;
- In the parcel shelf in the rear;
- In the front bumper( non-material face), please ensure the device cannot
get wet;
- Under the wiper version (non-metal), please ensure the device cannot get
wet;

Notice: If the windshield is pasted with metal thermal-protective coating,
it may affect the performance of the device. In this case, please change the
installation place after consulting the professional.
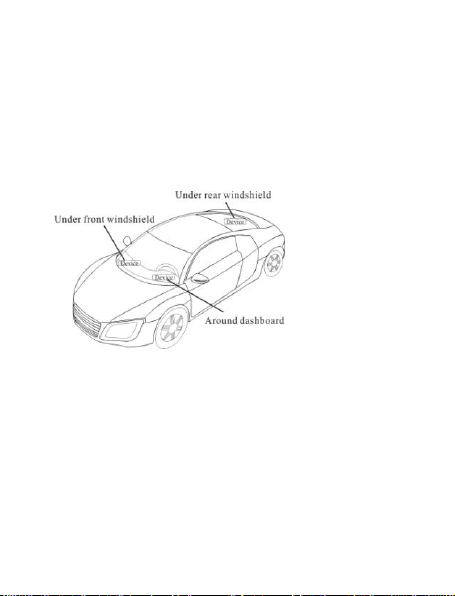
5.3.2 Non Covert Installation,
Firstly fix the device on the dash board below windshield.
- In the parcel shelf in the rear;
- In the front bumper( non-material face), please ensure the device cannot
get wet;
- Under the wiper version (non-metal), please ensure the device cannot get
wet;
Notice: If the windshield is pasted with metal thermal-protective coating,
it may affect the performance of the device. In this case, please change the
installation place after consulting the professional.
6. Device wiring requirements
6.1 The device power supply is DC 9-40V. The red line is positive pole while

the black line is negative pole.
6.2 The negative pole of power supply connects with ground or the metals.
Please do not connect with other ground lines.
6.3 When finishing the power supply wire connection, please make the plug
of power supply to the device.
7.The Device Working
7.1 Power on:
Connecting to the power, then switch on the device (in the board of the tracker, there
a switch). The 3 LED will light. The device will upload the data to the online platform
by Sim card, the default data-upload time interval is 15seconds. When the car is in
static state for 5 minutes, the device will come in energy saving mode.
7.2 Power off:Pull off the power wires plug then switch off the device.

8.User Settings
8.1 SMS Commands Instruction
1)Center Number
Text command
Parameter
Sample
CENTER Add
710#number#
711#number#
710#008613500135000#
711#008613800138000#
CENTER Del
D01#
D02#
D01#
D02#
Command
Description
1)Center numbers can control the oil and power and
resume factory setting
2) Center numbers can receive the call and text of
Alarms from tracker
3) Only 2 numbers can be center numbers.
4) The number should be your mobile phone number, should
not be the sim card number in the tracker.
5) Please add country code, for example, send SMS as:

710#008613800138000#,0086 is China code.
2) View Administrator Number
Text command
Parameter
Sample
View
901#
901#
Command
Description
This SMS command is used to view Device center number.
Command
Feedback
Successful reply:Admin1:
Admin2:
3)Authorized Number Set
Text command
Parameter
Sample
Authorized
Add
101#number#
102#number#
103#number#
1:101#008613800138000#
2:102#008612345678912#
3:103#008612345678912#

Authorized
Del
D11#
D12#
D13#
D11#
D12#
D13#
Command
Description
1) Authorization number for SMS control oil.
2) only three numbers to set the authorization number
3) The number should not be sim card number in the
tracker.
4) Please add country code, for example, send sms as:
710#008613800138000#
Command
Feedback
Successful Setting:Add Authorization account 1
OK!
4) View Authorized Number
Text command
Parameter
Sample
View
C10#
C10#

authorized
Command
Description
This directive is used to view the equipment
authorization numbers
Command
Feedback
Successful Setting:
Authorization 1:
Authorization 2:
Authorization 3:
5)APN Setting
Text command
Parameter
Sample
APN Setting
802#username#pass
word#
1:802#intenet#123#123#
2: 802#internet#
Command
Description
APN differs according to the local telecom operators.
For example:APN request password ,please refer to
Sample 1,and Sample 2 for no password.
Command
Successful Setting:SET APN OK!

Feedback
6) Set / View Server
Text command
Parameter
Sample
SERVER
Parameter
803#SERVER#port#
803#47.90.39.27#6100#
803#gps.dyegoo.net#6100#
View SERVER
804#
CIP#
804#
CIP#
Command
Description
Change the IP and port when move to a new server
port:10~65535
Command
Feedback
Successful Setting:set IP OK!
7)Moving Time Interval
Text command
Parameter
Sample
TIMEER
730#uploading interval#
730#20#

Parameter
setting
Command
Description
Time scope:0,10~60 seconds;0,no data uploading;
10~60,means time interval ;the default value is 15
seconds.
Command
Feedback
Successful Setting:SET TIMER OK!
8)Static Time Interval
Text command
Parameter
Sample
STATIC
731#time interval#
SUP#time interval#
731#5#
SUP#5#
Command
Description
Range:1~60 minutes;The device has
3D transmission and the default time interval are 5
minutes.
Command
Successful Setting:SET STATIC TIME OK!

Feedback
9) Cancel the continuous upload
Text command
Parameter
Sample
NUP
740#
NUP#
740#
NUP#
Command
Description
This command is used to cancel sending data to the
platform
If need to restore the uploading, please set upload
interval time setting.
Command
Feedback
SET OK!
10)Power-Cut
Text command
Parameter
Sample
RELAY
222#
222# cut off oil and power

Parameter1
RELAY
Parameter2
333#
333# recover oil and power
Command
Description
The device only cut off the oil circuit on the condition
of the driving speed below 20KM/H or in static state.
Command
Feedback
Cut Oil OK
The speed is high Cut Oil fail
Recovery Oil OK
11)GMT
Text command
Parameter
Sample
GMT
801#TIME ZONE#
801#E8#
801#W5#
Command
Description
The default time zone is 0.

12)Vibration Alarm (Default: Closed)
Text command
Parameter
Sample
VIBRATION Parameter
123#2#alarming way#
1) 123#2#3#
Set come into
vibration alarm
time
V123#2#
1) V123#2#
2) V123#1#
Enable vibration
Alarm
911#
911#
Disable vibration
Alarm
456#
456#
Command Description
the sensitivity value of the vibration is from
1 to 5,1 is the most sensitive and 0 is close.
Alarming ways: 1, calling 2, texting, 3 calling
and texting.

Command Feedback
set vibration alarm level,OK!
13)ACC Alarm (Default: Closed)
Text command
Parameter
Sample
Enable
840#Alarming Way#
840#1#
840#2#
840#3#
Disable
840#0#
840#0#
Command
Description
It can not be set when ACC on. Reply: ACC(set up fail!
pls turn off ACC)
Alarming ways: 1, calling 2, texting, 3 calling and
texting.
Command
Feedback
open ACC alarm OK
close ACC alarm OK
14)ACC Alarm & Vibration Alarm Open/Close
Text command
Parameter
Sample
Table of contents
Other Dyegoo GPS manuals
Popular GPS manuals by other brands

Bulldog Security
Bulldog Security TR25 quick start guide

DeLorme
DeLorme Earthmate GPS PN-60 user manual

Yield Technology
Yield Technology SuperGuard EZT-VT07B Operation manual

Sony
Sony NV-U44/R - 3.5" Portable Navigation System Limited warranty

Raymarine
Raymarine Raystar 590 user guide

Garmin
Garmin FUSION MS-RA70NSX installation instructions