Dynalink S 8864 User manual

Operating Instructions
S 8864
14” Portable HD Monitor
• Sturdy adjustable back stand
• 1280x800 resolution
• USB PVR recording support
• HDMI input
• AV input
• HD tuner
• Headphone output
• SD card slot
• IR Remote control
Side View

Side View
Overview
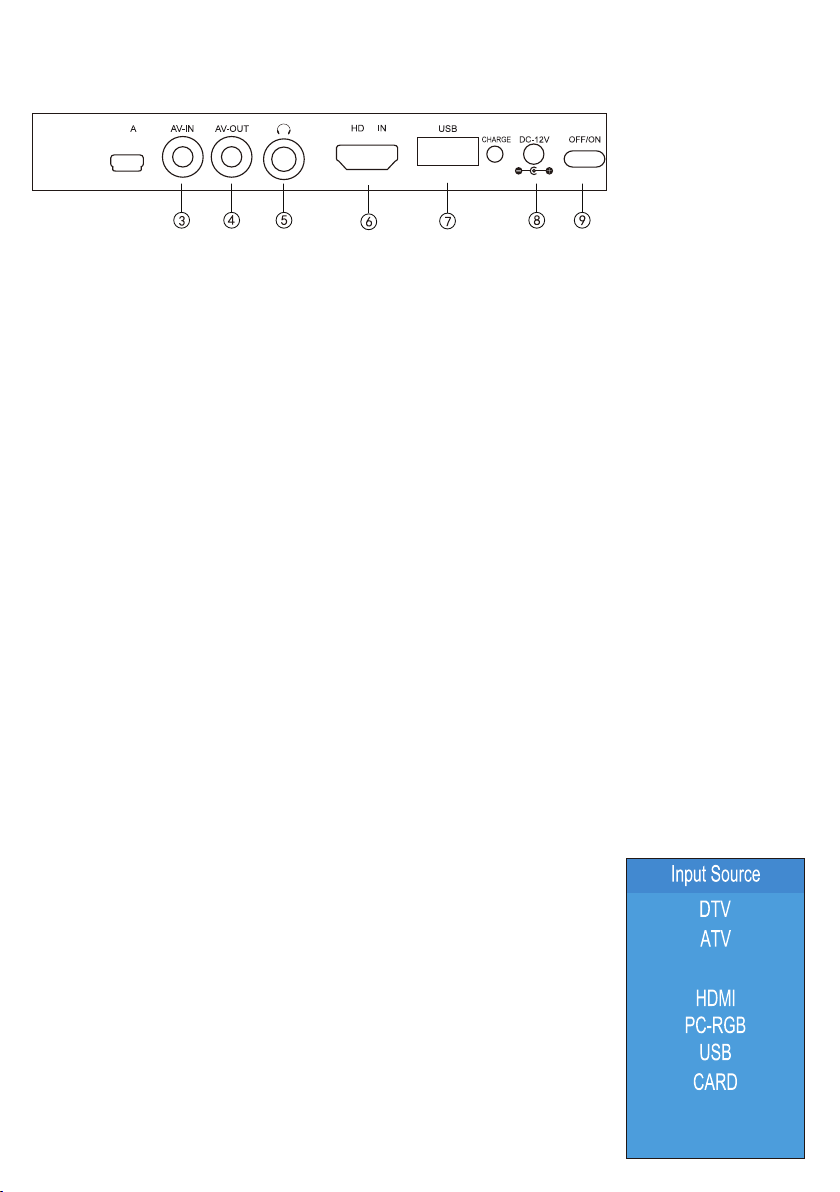
A must have for your next caravan, boating or camping trip. This portable TV allows
you to enjoy high denition entertainment on the go thanks to its in-built lithium
battery. It can also be used in xed installations in 4WDs, caravans, campers and
boats. Catch local digital TV channels or connect to a HDMI AV source to playback
from media centres, DVD players or streaming dongles. USB connection allows PVR
recording of your favourite shows. Includes high gain magnetic base antenna and
remote control.
Caution
1. Please read the user manual carefully before using this product.
2. If problems arise, do not try and repair this product yourself, see the last page
for details.
3. Please check the rating label on back of screen to ensure you’re using the correct
power.
4. Do not place the unit directly in sunlight, also avoid dropping or hitting the unit.
5. Instead of using chemical detergents, use a soft cloth to clean the unit.
6. Avoid using the unit during thunderstorms.
Display:............................................................................................ 14" Color Screen
Screen dimension ratio: ....................................................................................... 16:9
Peak brightness:........................................................................................... 500cd/㎡
Contrast ratio:.................................................................................................... 300:1
Left and right viewing angle:...............................................................................165°
Response time:..................................................................................................... 8MS
Power consumption: ......................................................................................... <20W
Media formats support: ...................................... rmvb, avi, mov, mkv, 3gp, mp4 etc
Audio:................................................................................................................. 2x1W
Power supply:........................................................................................... 12V DC 2A
Battery:...............................................................................................Li-Polymer 7.4V
Screen Dimensions:............................320x190mm (Diagonal Screen Width 355mm)
External Dimensions (WxHxD):......................................................... 330x228x31mm
Built-in Battery Life: .................................................... Up to 2 hours on a full charge
Specications
1

Product Overview
1. Antenna Jack
2. Mini VGA
3. AV In
4. AV Out
5. Earphone
6. HD In
7. USB port
8. Power Input
9. Power Switch
10. SD card slot
11. Audio Input
Power Supply Options
• AC Adapter: Use the included 100V-240V adapter with this unit to supply power.
• Car Charger: Use a car adapter with 12V DC power output.
External Signal Input/Output Functions
• DTV: Connect an external antenna cable to the unit. Press the input button, the
signal is connected when the unit displays TV channels. If you use the unit for the
rst time to watch tv, search the channels in the menu.
• AV In & Out: Connect a AV line with a AV output jack or AV input, the press the
“INPUT” Button and select “AV” mode.
• USB/SD Card: Put the USB or card into the machine and select the USB/Card
mode to play the contents on them.
• ATV: Connect the antenna,it will search local TV programs automatically
• VGA: Video Graphics Array is a graphics standard for personal computers and
associated connectors
• HDMI In: HDMI input such as bluray DVD or game console.
• FM Radio: Connect the antenna and turn to “FM Radio” mode to receive radio.
Selecting Input Source
1. Press “INPUT” to show input source list.
2. Press the up and down arrows to select the input source
you want and press ENTER to conrm
3. The TV will go into the source you have selected in step 2
2
FM Radio
MI-

Button Overview
Instructions
Volume increasing
Volume decreasing
Next Channel
Last Channel
MENU setup/Return button
Switch Mode
Up/Previous
Down/Next
Left/Rewind
Right/Fast Forward
To return to USB menu/Quit set up
Conrm
Power ON/OFF
Buttons
VOL+
VOL-
CH+
CH-
MENU
INPUT
ENTER
POWER
NOTE:
1. When using the remote, aim the remote control at the receiver IR
2. Avoid dropping, disassembling or getting the remote control wet.
3. Avoid pressing the buttons continously and quickly. Wait at least 2 seconds between two operations.
Press this button to mute the sound,
press again or press volume increase/
decrease to resume the sound
Press to start recording program
onto a USB device
Press to display/hide subtitles
Shows the EPG guide
Photo and Text TV
Favourite Channel
Change audio channel
Function keys according to MENU
SUB
EPG
TXT/CC
FAV
AUDIO
RED/GREEN/
YELLOW/BLUE
3
KR-62
Remote Control

System menu setup
1. Press MENU to enter System Setup
2. Press the direction keys to select each section
3. Press ENTER to go into the sub menu and select items from the menu
4. Choose the item you want and press ENTER to conrm
5. Press MENU to return to the upper menu
6. Press RETURN to exit the system setup
Channel Menu
Scanning Channels
1. Select to DTV/ATV mode
2. Press the MENU button, select “Auto
Search” or “DTV Manual Search” or “ATV
Manual Search” to search through the
programs
3. Select auto search, then select search
type and choose between DTV+ATV/DT-
V/ATV. Then select the country you live in,
press OK and start auto search.
4. After Auto Scanning, press the CH+/CH-
to choose the program you want
- Channel Edit: Set DTV/ATV channel info
- Signal Information: Check TV signal info
Attention: If any words appear in grey
(shown in image on the right) this means it
cannot be adjusted in the current menu.
Picture Menu
Press MENU to display the main menu and
press the up and down arrows to select the
picture menu
• Picture Mode: Personal/Dynamic/
Standard/Mild
• Colour Temperature: Personal/Cold/
Normal/Warm
• Noise Reduction: Low/Middle/High/Off
4
Main Menu Operation

5
Sound Menu
Press MENU to display the main menu and
press the up and down arrows to select the
sound menu
• Sound Mode: Standard/Music/
Movie/Sports/Personal
• Balance: Adjust the level of sound coming
from the left and right speakers
• Auto Volume: When set on, quick volume
change will be smoothed
• Surround Sound: Surround/Off/SRS
Trusound
Time Menu
Press MENU to display the main menu and
press the up and down arrows to select the
time menu
• Clock: (Adjust time in clock section)
Date/Month/Year/Hour/Minute
• On time: Set the Day(s), Hours, Minutes,
Input, Channel and Volume
• Off time: Set the Day(s), Hours and
Minutes
• Sleep timer: If user has selected a time for
the TV to sleep it will start to count down
from 60 seconds once it has reached that
time at which point the user can press any
button on the remote to cancel the TV
going to sleep. The following are the Sleep
timer options:
Off/10/20/30/60/90/120/180/240 minutes
• Auto Sleep: Never/4hrs/6hrs/8hrs

1. Press “INPUT” to show input source list.
2. Press the up and down arrows to select the input source
you want and press ENTER to conrm
3. The TV will go into the source you have selected in step 2
6
Option Menu
Press MENU to display the main menu and
press the up and down arrows to select the
option menu
• OSD Language: Set the OSD display
language
• Audio Language: Set the audio language
• Subtitle Language: Set subtitle language
• PVR File system: Set the recording of DTV
program, check the USB device’s free
record limit hours, recording speed, set
time shift size
• Restore Default: Restore all settings to
default
• OSD Timer
Lock Menu
Press MENU to display the main menu and
press the up and down arrows to select the
lock menu
• Press the default password (0000) to enter
set up
• Lock System: By entering the password,
users can lock important set ups of the
system including program search and
setting default
• Cancel LOCK by setting it at OFF
• Set Password
• Block Channel: Set Channels that you wish
to be blocked
• Parental control: Set the age level (4 to 18
years old) of the TV program

7
USB/CARD
Enter the Input source list
Press the “INPUT” button to show input
source list. Press up and down arrows to
select.
• The colour of the icon indicates whether
your TV has detected a USB/Card or not.
Yellow: YES and Grey: NO.
• Choose C, then Press “ENTER” to enter
the sub menu
Photo Play
1. Insert the USB device into the USB jack
2. Press the left and right arrows, choose
PHOTO, and press ENTER to get to the
sub-menu
3. Choose C, then press ENTER to
sub-menu
4. Choose the photo you want and press
the play/pause button. Use the rewind
button to play the last photo. Press the fast
forward button to play the next photo.
5. Press RETURN to quit.
Music Play
1. Insert the USB device into the USB jack
2. Press the left and right arrows, choose
MUSIC, and press ENTER to get to the
sub-menu
3. Choose C, then press ENTER to
sub-menu
4. Choose the music you want to play and
press the play/pause button. Use the
rewind button to play the last track. Press
the fast forward button to play the next
track.
5. Press RETURN to quit.

8
Movie Play
1. Insert the USB device into the USB jack
2. Press the left and right arrows, choose
MOVIE, and press ENTER to get to the
sub-menu
3. Choose C, then press ENTER to
sub-menu
4. Choose the movie you want to play and
press the play/pause button. Use the
rewind button to play the last chapter. Press
the fast forward button to play the next
chapter.
5. Press RETURN to quit.
Text Play
1. Insert the USB device into the USB jack
2. Press the left and right arrows, choose
TEXT, and press ENTER to get to the
sub-menu
3. Choose C, then press ENTER to
sub-menu
4. Choose the txt you want to write and
press the play/pause button. Press the
reverse button to play the last page and
press the forward button to play the next
page.
5. Use the rewind button to play the last
text and the fast forward button to play the
next text.
6. Press RETURN to quit.
FM Radio
1. Press the INPUT button
2. Press ENTER button or the SEARCH
button to look for FM channels
automatically. (Press the RETURN button for
a long time to stop searching through FM
channels.)
3. Press CH- or CH+ to select a FM channel

Solution/Reason
Incorrect power is being used. Power switch is
off or the display has been turned off by the
remote control
Problem
Check channel has been selected correctly. If
in multimedia state, change to TV state.
No picture
and sound
No picture
No sound
Vague picture or
unstable picture
Duplicated
Pictures
Static
interference
No Colour
USB won’t
play
Audio volume is off or the audio system has
been improperly set
Ensure the antenna is correctly adjusted.
The grounding signal is too weak.
Reective signals from nearby buildings or
high reective signals are being picked up
Affected by electric wave interference from
vehicle motors, trains, high-voltage power
wires or neon lights.
Check colour is adjusted correctly.
Poor signal.
Check if the colour elimination function is on.
Ensure the USB has been put in the right
way. Ensure the memory format is right.
Before you take the television into your place of purchase, please see the table
below to ensure the problem you are having cannot be solved by one of the
solutions listed below.
9
Troubleshooting

Altronic Distributors warrants this product for one year from date of purchase from Altronics or its resellers to
the consumer. If this item is part of an installation or another product, please contact the installer or supplier for
your warranty.
During the warranty period, we undertake to repair or replace your product at no charge if found to be
defective due to a manufacturing fault. The warranty excludes damage by misuse or incorrect installation (i.e.
failure to install and operate device according to specications in the supplied instruction manual), neglect,
shipping accident, or no fault found, nor by use in a way or manner not intended by the supplier.
For repair or service please contact your PLACE OF PURCHASE.
If this item was purchased directly from Altronics please make a warranty claim by:
1. FOR MAIL ORDER CUSTOMERS (includes school and trade orders),
a) Calling your nearest store location and quoting your tax invoice number.
b) Upon contacting Altronics, we will issue an R.A. (Return Authorisation). As Altronics have a number of service
agents throughout Australia, a copy of the R.A. will be emailed, faxed or mailed to you with full instructions of
how and where to send the goods. The freight for shipping goods back to
Altronics for all repairs is at the customers expense.
c) A copy of the R.A. form, (or at the very minimum, the R.A. number) must accompany the
goods to eect the repair.
d) Altronics will pay the return freight to the customer where the warranty claim has been accepted.
e) Please quote the R.A. number in any correspondence to us.
2. FOR OVER THE COUNTER PURCHASES to make a warranty claim, please return the goods to us in any of our
stores, with a copy of your proof of purchase (tax invoice).
a) Upon leaving the goods at one of our stores, an R.A. number will be issued to you.
b) Once repaired, you will be contacted, advising that the goods are ready to be collected from the store.
It is at Altronics discretion as to whether the goods will be repaired or replaced (whilst under warranty); and as
to whether identical goods will be used to replace the item due to changes of models / products.
Note: Under no circumstances should you attempt to repair the device yourself or via a non-authorised
Altronics service centre, as this will invalidate the warranty!
Our goods come with guarantees that cannot be excluded under the Australian Consumer Law. You are entitled
to a replacement or refund for a major failure and for compensation for any other reasonably foreseeable loss
or damage. You are also entitled to have the goods repaired or replaced if the goods fail to be of acceptable
quality and the failure does not amount to a major failure.
Distributed by Altronic Distributors Pty. Ltd.
Phone: (08) 9428 2199
altronics.com.au
Revision 16/10/2020
This manual suits for next models
1
Table of contents
Other Dynalink Portable TV manuals