DynaQuip WaterCopPRO Troubleshooting guide

Owner’s Manual / Installation Guide
MODE
OPEN
CLOSE
Monitoring Station
DynaQuip Controls, Inc. St. Clair, MO
www.watercop.com Made in U.S.A.
WS 1
WS 2
WS 3
WS 4
WS 5
WS 6
WS 7
WS 8
Water Sensor
& Transmitter
DynaQuip Controls, Inc. St. Clair, MO
www.watercop.com
TRANSMIT
RECEIVE
Range Enhancing
Repeater
DynaQuip Controls, Inc. St. Clair, MO
www.watercop.com
DynaQuip Controls, Inc. St. Clair, MO www.watercop.com Made in U.S.A.
OPEN
CLOSE
MODE
WaterCopPRO
Actuator
Brass Valve
Flood Sensor Range Enhancing Repeater
Monitoring Station –Hardwired
www.watercop.com • 800-545-3636
System Description
The WaterCopPRO System is designed to detect leaks in
your plumbing system at predetermined locations, and
automatically shut off the water supply to help effectively
reduce the chances of major water damage associated
with a leak.
System Components
Brass Valve: Full port, ANSI NSF 372 approved, lead-free,
brass, 125 psi cold water, designed for placement on
incoming water main.
WaterCopPRO Actuator: Polycarbonate housing containing
motor to drive valve, AC/DC power converter with 20’ cord,
liquid crystal display with back light for sensor/trouble
status, ambient temperature 35°F to 105°F, manual override,
local open/close water control.
Flood Sensor: Wireless sensors are addressable and
supervised for conditions such as water detection, actuator
power loss, sensor short/open and low battery. Ten foot
sensor cord allows optimal sensor placement. Flood sensors
can support one or two sensor probes. Each WaterCopPRO
actuator can support up to 45 wireless sensors.
Range Enhancing Repeater: Enhances transmission range
of wireless sensors. Plugs into any standard wall outlet.
Receives and re-transmits sensor signals from outlying
sensors to the WaterCopPRO actuator.
Monitoring Station – Standard: LCD display with back light
provides instant feedback of sensor alarm and trouble
conditions as well as open/close status of water supply. On/
Off push button for local control of water supply. Audible
alarm sounds when any sensor detects flooding. Internal
mounting bracket mounts to standard wall boxes for
aesthetics and cord management. AC/DC power converter
with 20’ cord included.
Monitoring Station – Hardwired: Accommodates up to 8
zones for WPSC hardwired flood sensors (sold separately).
The flood sensors are a battery powered device enabling
it to be located anywhere a leak is likely to occur, or
where water might cause damage. The WaterCop requires
household electrical power (common 115 VAC, grounded
outlet) and will not operate during a power outage.

Do not use an extension cord.
The shut-off valve must be
installed;
• In the main water line;
• In place of or just downstream
from the main water shut-off
valve;
• Where it is accessible;
• Where the case is protected
from use as a step or from other
excessive loads.
Local electrical and plumbing
codes should be consulted to
ensure that the installation is in complete compliance.
(See Installation section for details.)
Placement of Flood Sensors
Each WaterCopPRO can support up to 45 wireless flood
sensors. Additional sensors may be added at any time.
A sensor consists of a transmitter and a sensor probe
(a small disc at the end of the wire, with two short gold
prongs protruding from one side). Flood sensors should be
placed in locations where leaks are most likely to occur.
Suggested Locations
• Washing Machines • Toilets
• Dishwashers • Icemakers/Refrigerators
• Kitchen Sinks • Automatic Humidifiers
• Bathroom Sinks • Water Heaters
• Pipes that are prone to freezing (freeze sensors are
also available)
The transmitter in the flood sensors and the receiver in
the WaterCopPRO communicate by radio frequency. The
smaller the distance between them, the stronger the signal
will be. Transmission distance is somewhat dependent
upon the building layout and type of construction. The
transmitter (attached to the sensor) must be kept dry.
It is NOT splash proof. Sensors should never be placed
outdoors. The sensor probe detects the water from a leak
and is completely waterproof. Sensor probes should be
placed on the floor or in areas where water would tend to
accumulate rapidly in common leak or overflow situations.
Make sure that any water from a leak will drain toward
the sensor probe, not away from it. Avoid high traffic areas
where the cord or sensor could be stepped on or kicked
and where children or pets may disturb it. The sensor
probe should be placed FLAT on the floor so water can be
detected as soon as it begins to accumulate. The sensor
probe may be secured to the floor with screws. To avoid
damage to transmitters and to provide for the strongest
signal possible, the transmitter portion of the flood sensor
should be mounted in a convenient location (on the wall,
in a cabinet, closet, etc.) 2’ to 3’ above the floor (see
illustration). (See Installation section for details on
sensor installation.)
Hardwired Sensors: Ten foot white cord with single sensor.
PRO sensors are easily secured to floor using mounting
holes. Sensors provide the same feedback to monitoring
station as the wireless WaterCopPRO sensors. Use
hardwired sensors for convenience or if conditions prevent
wireless communication. Sensors sold individually and can
be wired with up to 200’ of 22/24 AWG 2-conductor cord
(not included).
General Safety Information
Warning
Do not apply electrical power to the unit unless the unit is
fully assembled. Failure to do so could result in personal
injury and/or damage to the unit.
Warning
Disconnect power source before working on or servicing
the unit. Failure to do so could result in personal injury.
Caution
It is strongly recommended that eye
protection be worn while servicing the
system. Failure to do so could result in
personal injury.
How the System Works
Flood sensors constantly monitor their selected areas for
accumulating moisture. When a leak is detected, a sensor
will send a radio frequency signal to the WaterCopPRO
actuator instructing it to shut
off the water supply to the
home. The WaterCopPRO
valve will remain closed until
it is manually reset. The flood
sensors are battery powered
devices enabling them to
be located anywhere a leak
is likely to occur, or where
water might cause damage.
The WaterCopPRO actuator
requires household electrical
power (common 115 VAC, grounded outlet) and will not
operate during a power outage unless receiving auxiliary
power from a backup device such as an uninterruptible
power supply unit (UPS). Additionally, the use of a certified
surge protection device is highly recommended.
Selection of WaterCopPRO Installation Sites
The WaterCopPRO valve should be installed in the main
water line just downstream from the main shut-off valve in
your home. The front control panel of the WaterCopPRO
should be easily visible in order to see the valve position
(open/closed). It should also be easily accessible for
resetting the valve after it has closed due to the detection
of a leak and the leak has been repaired. The installed
WaterCopPRO is completely supported by the piping in your
plumbing system. The WaterCopPRO should NOT be used
as a step or to support heavy loads. The WaterCopPRO
requires household electrical power, and the provided
power cord must be plugged into a properly grounded
power source (115 VAC).
2
127,&(
,QVWDOODWLRQPXVWEHDPLQLPXPRILQFKHVGRZQVWUHDP
RIDZDWHUPHWHULIZDWHUPHWHULVLQVLGHWKHSUHPLVHV

Flood Sensor Battery Life
WaterCopPRO wireless sensors require power to operate.
Use either fresh AA alkaline batteries (not included) and/
or a WaterCopPRO Sensor AC Adaptor (sold separately)
to power. If both are used, batteries will provide back-up
power in the event AC is lost. Rechargeable batteries are
not recommended.
Operating the WaterCopPRO System
The normal position of the valve is open to allow full flow
throughout the plumbing system. WaterCopPRO is a full
port ball valve which does not restrict the flow capacity of
your plumbing system. The indicator lights on the face of
the WaterCopPRO will show the position of the valve.
If the valve is in the CLOSED position (the red light will be
lit), press OPEN and the valve will move to the open position
(green indicator will light).
When leaking water comes into direct contact with a flood
sensor, an RF (radio frequency) signal is transmitted to
the WaterCopPRO and the valve closes, turning off the
water source to protect the building from additional water
damage.
The red indicator light will signal that the valve is now in
the CLOSED position. The valve will remain closed until the
unit is manually reset. After the plumbing problem is fixed,
reset the WaterCopPRO by pressing OPEN VALVE (green
circle) on the face of the WaterCopPRO actuator. Valve will
open and green indicator will be lit.
Note: If major repairs are needed to correct the plumbing
system, it is recommended that the manual shut-off valve
upstream of the WaterCopPRO also be closed during the
repairs. Close the main water shut-off valve and unplug
the WaterCopPRO before making repairs on the plumbing
system.
Note: In case of a power failure, use the manual shut-off
valve to turn the water off in case of an emergency. When
power is restored, the WaterCopPRO will remain in its last
known position indicated by the red or green lights on the
face of the unit.
WaterCopPRO Specifications
Max. working pressure.... 125 PSIG
Ambient temperature ....... 35° to 105°F
Enclosure............................ Polycarbonate NEMA 4
Voltage................................ 12 VDC includes 120 VAC adaptor
Current................................ 1.3 Amps
Valve.................................... Full-Port, ANSI NSF 372
approved, Lead-Free Brass, NPT
Valve seals......................... RTFE (Reinforced Teflon)
FCC Information
This equipment has been tested and found to comply with
the limits for a class B digital device, pursuant to part 15
of the FCC Rules. These limits are designed to provide
reasonable protection against harmful interference in a
residential installation. This equipment generates, uses
and can radiate radio frequency energy and if not installed
and used in accordance with the instructions, may cause
harmful interference to radio communications. However,
there is no guarantee that interference will not occur in a
particular installation. If this equipment does cause harmful
interference to radio or television reception, which can be
determined by turning the equipment off and on, the user
is encouraged to try to correct the interference by one or
more of the following measures:
• Reorient or relocate the receiver.
• Increase the separation between the equipment and
receiver.
• Connect the equipment into an outlet on a circuit different
from that to which the receiver is connected.
• Consult the dealer for help.
Operation is subject to the following two conditions: (1) this
device may not cause interference, and (2) this device must
accept any interference, including interference that may
cause undesired operation of the device.
The user is cautioned that changes and modification made
to the equipment without the approval of the manufacturer
could void the user’s authority to operate this equipment.
LIMITED WARRANTY
DynaQuip Controls Corporation warrants the electrical
components of the WaterCopPRO System to be free from
defects in material and workmanship under normal use and
if properly installed for a period of two years from the date
of purchase.
3
Sensor can be placed
under dishwasher or
near the water lines
underneath the
kitchen sink

4
If found to be defective as mentioned above, it will be
replaced or repaired if returned prepaid along with
proof of date of purchase. This shall constitute the sole
remedy of the purchaser and the sole liability of DynaQuip
Controls Corporation. To the extent permitted by law, the
foregoing is exclusive and in lieu of all other warranties or
System Quick Reference Setting and Status
Common Displays on WaterCopPRO Integrated
WATERCOP
NORMAL
WATERCOP
WATER IS OFF
!ALARM!
SENSOR #1 WET 1
!ALARM!
WIREPANEL WET 2
***ALERT***
SENSOR #3 SHT 2
***ALERT***
SENSOR #2 OPN 1
***ALERT***
WIREPANEL LOST?
***ALERT***
SENSOR #2 BAT
Valve is open and all components
functioning.
Water was turned off via local controls.
Flood sensor #1 (Probe 1) detected
water and turned valve off.
#2 hardwired sensor from monitoring
station detected water and turned valve
off.
Probe on Sensor #3 (probe 2) is shorted.
Water is still on. Probe needs to be
checked and repaired to allow proper
function.
Probe on Sensor #2 is cut or
disconnected. Water is still on. Probe
needs to be repaired or replaced to
allow proper function.
Monitoring Station has lost power or is
out of range.
Battery in Sensor #2 is low and needs to
be replaced.
RESET ACTUATOR TO FACTORY SETTINGS
Hold MODE, press and release OPEN– Release MODE
TO ADD DEVICES:
SENSORS:
Press MODE twice (DEVICE ADD) on WaterCopPRO
Actuator
Press CLOSE (DEVICE #1 ID)
Short probe on Sensor (SENSOR #1 SHT)
Remove Short (SENSOR #1 OK)
Press MODE
Press CLOSE (SENSOR #2 ID)
Repeat for all Sensors. When finished, Press MODE 2X
to return to NORMAL
MONITORING STATION:
Press MODE twice (DEVICE ADD) on WaterCopPRO
Actuator
Press CLOSE (DEVICE #1 ID [next device number ID]) on
WaterCop Actuator
Press CLOSE on Monitoring Station (this adds station
and also closes valve)
Press OPEN on WaterCopPRO Actuator to reopen valve
and return to NORMAL mode
REMOTE:
Press MODE twice (Device Add)
Press CLOSE (Device #1 ID)
Press CLOSE ON REMOTE (Remote #1)
TO REMOVE WIRELESS SENSORS:
Press MODE 3X (DEVICE REMOVE)
Press CLOSE to scroll to device to be removed
Press OPEN to remove that device
Press MODE to return to NORMAL
TO CHECK STATUS:
Press MODE
Scroll using CLOSE
Press MODE 3X to return to NORMAL
TO TEST SIGNAL:
HOLD MODE, press and release CLOSE
Press OPEN (TX ACTIVE SIGNAL)
Place sensor probe in water and read signal strength
When finished, Hold OPEN, press and release MODE to
return to NORMAL
representations whether expressed or implied, including any
implied warranty of merchantability or fitness. In no event
shall DynaQuip Controls Corporation be liable for special or
consequential damages. The WaterCopPRO brass ball valve
has a lifetime warranty.
These are the text display codes on both the WaterCopPRO
valve and monitoring station (optional).

Installation Guide
IMPORTANT!
Adherence to all local and municipal building, plumbing
and electrical codes as they pertain to the installation of
the WaterCopPRO System is of utmost importance. Codes
in some areas may require that a licensed plumber be
employed to do the installation, or that the proper permits
be obtained prior to any installation. Even if local codes
do not require a licensed plumber to do the installation,
it is necessary that the installer has a professional level
of competence in both plumbing and electrical skills to
perform the installation. These instructions assume this
level of knowledge and skill. If in doubt, use a licensed
professional.
TO POWER AND PROGRAM WIRELESS SENSORS
WaterCopPRO wireless sensors are addressable. This
means that the WaterCopPRO valve can tell you the
operational status of each flood sensor. If you have
many wireless sensors, this feature will quickly tell you
which sensor is wet or requires service (low batteries,
lost connection). It is important that you introduce each
wireless sensor to the WaterCopPRO shut-off valve and
document the sensor number on the sensor. Once placed
in location you will also note this information on the Sensor
Location Log (included). Once the wireless sensors are
programmed you will be able to place them in desired
locations to monitor your home or business for water
intrusion.
Powering Sensors
WaterCopPRO wireless sensors require power to operate.
Use either fresh AA alkaline batteries (not included) and/
or a WaterCopPRO Sensor AC Adaptor (sold separately)
to power. If both are used, batteries will provide back-
up power in the event AC is lost. Rechargeable batteries
are not recommended. To install batteries, remove the
battery cover located on the back of the sensor, and install
batteries in accordance with the (+ and –) placement guide.
Reinstall back plate. Instructions on how to connect AC
adaptors are included in this manual.
It is important that you number each sensor withthe
included numbering stickers (shipped with the
WaterCopPRO motor) for easy identification while
programming. If you do not have stickers, you may simply
write numbers on the outside back cover of each sensor
in permanent ink. The WaterCopPRO system is capable
of supporting as many as 45 wireless sensors. Additional
wireless sensors (up to 45) can be added in the future by
repeating the steps taken in this section. Please contact
your local dealer or DynaQuip Controls to inquire about
additional sensors.
Once each sensor is powered and numbered, you are
ready to begin addressing the sensors to the WaterCopPRO
actuator.
Programming Wireless Sensors
Plug the WaterCopPRO actuator power supply into a nearby
115 VAC outlet. As with all sensitive electric equipment, the
use of surge protection is highly recommended. Depending
upon the position of the valve, the motor may initially turn
the valve when first powered. BE EXTREMELY CAREFUL TO
KEEP FINGERS AND OTHER ITEMS OUT OF THE VALVE. The
display will read WaterCop NORMAL.
To add sensor #1: Press MODE twice (DEVICE ADD will
display on LCD)
Press CLOSE once (DEVICE #1 ID= will display on LCD)
Short probe on sensor by touching leads with metal.
Do not wet sensor—it must be shorted with conductive
metal such as a key or ring. Sensor will beep and LCD
will display SERVICE STATUS SENSOR #1 OK!
To add sensors #2 through #45: If time has passed, the
WaterCopPRO LCD will revert to ready mode displaying
WaterCopPRO NORMAL. To add more sensors you will
need to return to program mode and repeat steps used to
add sensor #1.
If you are adding sensors in quick succession, your
WaterCop will remain in program mode and the display
will read DEVICE ADD, press NEXT. Press CLOSE once
(DEVICE #2 ID= will display on LCD).
Short probe on sensor by touching leads with metal. Do
not wet sensor—it must be shorted. Sensor will beep and
LCD will display SERVICE STATUS SENSOR #2 OK!
Repeat above steps for all of your wireless sensors taking
care to program them in the same order as labeled. Repeat
for all sensors. When finished Press MODE twice to return
to NORMAL mode. If you need to remove a device for any
reason, please see the instructions TO REMOVE WIRELESS
SENSORS.
TO POWER AND PROGRAM
MONITORING STATION
The WaterCopPRO Monitoring Station (part number WPMS)
provides instant feedback of sensor alarm and trouble
conditions as well as open/close status and control of
water supply. An audible alarm will sound when any sensor
detects flooding. The Hardwired Sensor Monitoring Station
(part number WPMSH) includes eight zones to attach
WaterCopPRO hardwired flood sensors (part number WPSC).
Plug the WaterCopPRO Monitoring Station power
supply into a nearby 115 VAC outlet. As with all sensitive
electric equipment, the use of surge protection is
highly recommended. The LCD display will beep once
and read WaterCopPRO Valve Lost? ***ALERT***
?COMMUNICATIONS? until the Monitoring Station has
been programmed to the WaterCopPRO actuator.
To Program Monitoring Station
Similar to flood sensors, the Monitoring Station is
programmed using the keys on the WaterCopPRO
actuator.
5

On the WaterCopPRO actuator press MODE twice (LCD will
display DEVICE ADD, press NEXT). Press CLOSE (LCD will
display DEVICE ADD, DEVICE # (next number).
On the Monitoring Station press CLOSE to add the
monitoring station. The WaterCopPRO actuator will turn to
a closed position (LCD will display WATERCOP NORMAL
WATERCOP WATER IS OFF).
Press OPEN on the WaterCopPRO actuator to complete
programming and reopen the valve. The LCD will display
WATERCOP NORMAL.
Pre-Installation Testing of WaterCopPRO
Although each unit is pre-tested at the factory, it is highly
recommended that the unit be tested prior to installation to
ensure proper operation in your home. Operating the valve
before connecting to the water line will not damage it.
Use caution!
• The valve closes with enough force to cut off a finger.
• Be extremely careful to keep fingers and other items out
of the valve.
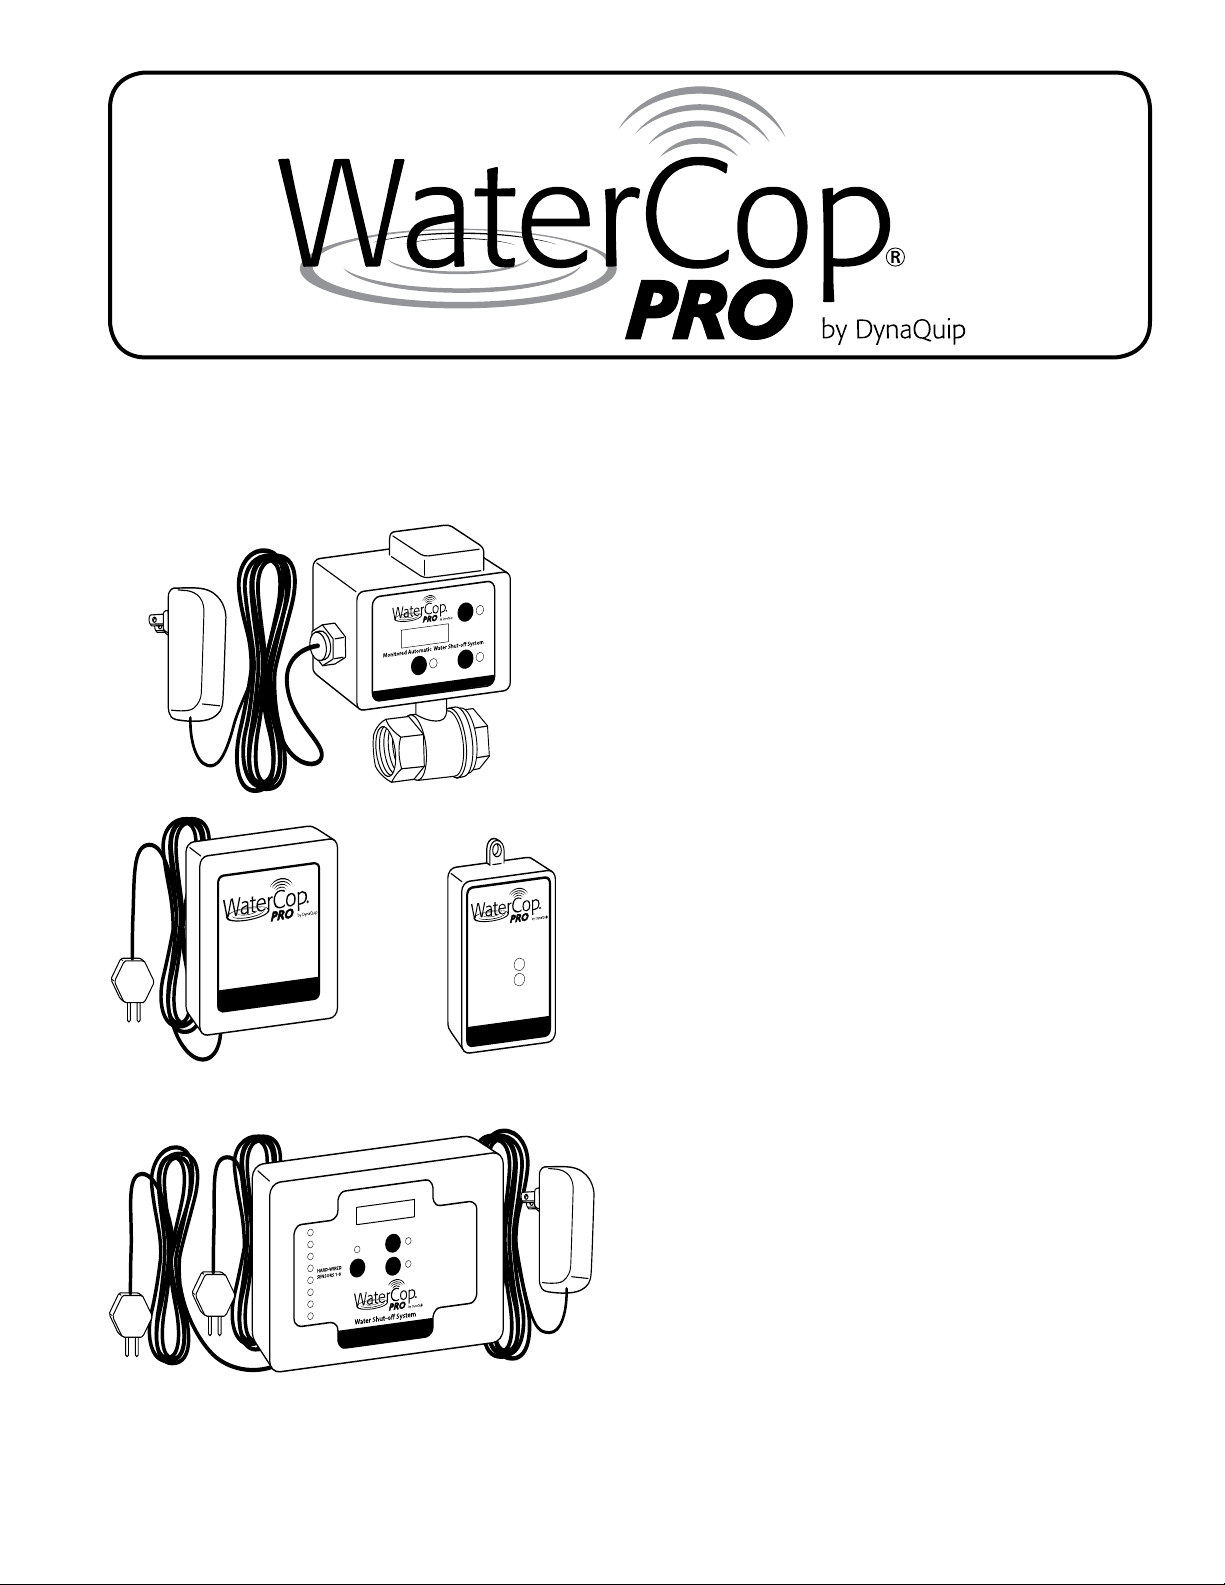
Manually Test the Valve
To test your WaterCopPRO system, gently pull the safety
plugs out from each end of the valve. Check the position
of the valve by looking in either threaded end. In the open
position, you will be able to see through the valve; in the
closed position only the shiny surface of the ball will be
visible. Place the base of the housing on a sturdy surface,
as close as feasibly possible to the location where it will
be permanently installed. Plug the WaterCopPRO power
supply into a nearby 115 VAC outlet. As with all sensitive
electric equipment, the use of surge protection is highly
recommended. The valve position indicator lights should
now correspond to the actual position you noticed. Green
= Open. Red = Closed. Grasp both sides of the housing
(not the valve) with the valve pointing away from you for
safety. Being very careful not to have your fingers or other
objects near the valve openings, press the colored circle
just below the unlit indicator light. You will hear the motor
change the valve position. Again, look into the threaded end
of the valve to verify that the valve has changed position. If
it appears that the valve has not turned from one position
to the other, DO NOT try to reposition the valve yourself
by inserting any tool or fingers into the valve. Operate the
valve several more times from open to close, checking each
time for proper positioning. If you are experiencing trouble
getting the valve to open and shut, call the installation help
line listed on the back cover.
Manually Test the Flood Sensors
WaterCopPRO wireless sensors require power to operate.
Use either fresh AA batteries (not included) and/or a
WaterCopPRO Sensor AC Adaptor (sold separately) to
power. If both are used, batteries will provide back-up
power in the event AC is lost. Rechargeable batteries
are not recommended. To install batteries, remove the
battery cover located on the back of the sensor, and install
batteries in accordance with the (+ and –) placement guide.
Reinstall back plate.
Follow suggestions found in the section titled “Placement
of Flood Sensors” for recommendations where sensors
should be placed. Locate a wall near the area you choose
to monitor. Avoid high traffic areas where cord or sensor
could be stepped on or kicked. Mount transmitter at a
convenient location on the wall, 2’ to 3’ above the floor. This
will help avoid damage to the sensor and provide a strong
signal. Use fasteners included with the unit.
1. Following all safety precautions, make sure that the
WaterCopPRO is plugged in and the valve is in the open
position. Leave the WaterCopPRO near your main water
line, on a sturdy surface. It is important that anyone who
will be near the valve is aware of the safety precautions,
and does not insert any object into the valve, or handle
the valve during the test.
2. At one of the locations you have chosen to monitor, drop
the sensor probe (not the mounted transmitter) into a
cup of water. Hold until you hear the sensor transmit a
signal to the WaterCopPRO (about 5 seconds). This test
simulates a leak, and lets you check for interference
between the sensor and the WaterCopPRO.
3. Take the sensor out of the water and carefully dry off the
sensor and prongs.
4. Go back to your WaterCopPRO and verify that the valve
has closed (the red indicator light will be lit). The display
will indicate which sensor activated the valve.
5. Keep all objects away from the valve, reset the
WaterCopPRO by pushing the OPEN button.
6. Repeat steps 2 through 5 until you have tested each
sensor in the locations you wish to monitor.
Troubleshooting
• If the flood sensor does not close the valve, check that
the sensor is powered with correctly installed batteries
and/or AC adaptor. Repeat test.
• If the batteries have power and the wireless sensor
still does not make the valve close, physically remove it
from its installed location and place it next to the Water
Control Panel. Repeat test. If the sensor operates
properly when it is closer to the Water Control Panel,
but not when it is installed at its remote location,
try moving the sensor to a different position or try a
different wireless sensor. Some possible causes of
signal reduction are steel construction, foil backed
insulation or other large metallic barriers. You may
also use a range enhancing repeater (WPR – sold
separately) to extend the effective range of the
wireless signals.
Installation of Flood Sensor
Once testing is complete, finish installation of the flood
sensors by unwinding the cord and placing the sensor
probe on the floor at the lowest point (where water would
naturally collect) in the area to be monitored. Be sure that
the sensor probe is placed FLAT on the floor so water can
be detected as soon as it begins to accumulate. The sensor
probe may be secured to the floor with screws or adhesive
tape, taking care that the metal probes are not covered.
6

taken to prevent damage from heat when installing the unit.
Remove plastic housing before soldering valve in place.
Additional Part Requirements
Installation of the WaterCopPRO will require additional
parts. When the main supply line is cut to accommodate the
WaterCopPRO, new fittings will be needed to connect the
ends of the piping to the WaterCopPRO valve.
The type of connecting fittings to use will be determined
by the type of existing piping, local plumbing codes, and
“industry standard practices.”
Compression Fittings
The unit can be installed with compression fittings using
common household tools and basic mechanical ability. You
will need:
a) 2 fittings (male pipe thread x compression) available at
most local hardware or plumbing supply stores
b) Teflon tape or other thread sealant
c) Tubing cutter
d) Ruler
e) Pencil or marker
f) 2 large adjustable wrenches
Measure the outside diameter of the copper tube and note
the valve size to be sure you purchase the proper size
fittings for the job.
1. Remove nuts and sleeves from compression fittings
and install the fittings into each end of the valve
using Teflon tape or other thread sealant to ensure a
watertight seal. Hold one wrench on flats of valve body
and use the other to tighten fittings.
2. Measure the distance from end to end of valve
assembly once fittings are secure. For 1/2” tube
(5/8” outside diameter) subtract 1/2”, for 3/4” tube
(7/8” outside diameter) subtract 3/4” from your valve
assembly measurement. This is the length of the
section of tubing to be cut out of the existing line. The
piece of existing tubing to be cut out is shorter than
the measured length so that tube ends extend into the
compression fittings.
3. Select the location for the WaterCopPRO. Be sure to
consider that you will need access to the front panel
of the control unit. After cutting the section of tube out
of the line, you will need to shift the tube ends to be
able to fit the unit into place. Make sure you will have
access and room to adjust before you cut the tube.
4. Mark the tube in the location you have selected.
Double check the length and location you marked.
5. Turn water off and drain the system.
6. Use tube cutter to cut copper tube at the locations you
marked. Careful, there will probably still be some water
in the line.
7. Remove any burrs from the tube ends and clean ends.
8. Install compression nuts and sleeves to each tube end.
9. Shift tube ends to install WaterCopPRO valve in line.
Verify that the transmitter and wire are clear of doors,
drawers, sharp edges, or other hazards that may cause
damage.
Unplug the WaterCopPRO after the testing is complete.
The WaterCopPRO can now be installed into the plumbing
system.
Prior to installation, read all warnings and precautions
carefully.
Installation Procedure
Check the contents of the carton with the products listed on
the carton label. The shipping package should contain the
following:
1 ea. WaterCopPRO actuator with power adaptor
1 ea. Owner’s Manual/Installation Guide
You will also need the correct size WaterCopPRO—ready
ball valve (may be sold separately).
Note: The package may contain sensors if purchased as
part of kit.
Read Operating Instructions before any installation is
attempted. All sections of this Installation Guide and
accompanying Owner’s Manual should be read and
completely understood.
Review Location and Type of Main Supply Line
The main supply line should enter the house in either the
basement or a crawl space beneath the first floor. The
water main shut-off valve is usually located near where
the line comes through the basement wall or just after the
water line enters the living area from the crawl space.
In apartments, townhouses, and manufactured housing
constructions the water main shut-off valve can usually be
found in close proximity to the water heater installation.
The WaterCopPRO valve should be installed in the main
water line just downstream from the main shut-off valve
in your home. The water supply must be shut off prior to
installation of the WaterCopPRO.
Choose a dry location to install the WaterCopPRO. The
front control panel should be easily visible in order to
see the valve position (open/closed) and accessible for
resetting after a leak has been detected and corrected.
Place the valve where the housing is protected from use
as a step or to support excessive loads. The shut-off valve
must be installed:
• In the main water line.
• In place of or just downstream from the main water shut-
off valve.
• Where it is accessible for checking status, resetting the
valve and adding or removing sensors from the network.
• Where the case is protected from use as a step or to
support excessive loads.
Caution: Never use the housing for leverage when
mounting this unit or tightening fittings. Use a wrench on
the valve flats that are provided.
Caution: High heat from soldering or brazing can damage
valve seats or motor housing. Proper precautions should be
7

10. Position the unit and tighten compression nuts. Hold the
fitting with one wrench while tightening the nut with the
other. Tighten both nuts.
11. Plug unit into a proper power source and turn valve to
open position (open button / green light).
12. Unplug unit, turn water back on and carefully check for
leaks.
13. Tighten fittings if needed to stop any leaks.
14. Plug unit back into power source. Installation is
complete.
Solder Fittings
An alternative method is to solder the unit into the water
line. This method requires a considerably higher skill level
to accomplish the installation properly and safely. If you
are not skilled in this area, it is strongly recommended
that you contact a professional plumber to do this type of
installation.
Electrical Connection
The WaterCopPRO is supplied with a power adaptor.
Consult local electrical codes as to the necessity of
ground fault protection. It is recommended that the
WaterCopPRO not be plugged into an extension cord.
Review “Specification” current and power requirements
as not to overload the circuit supplying power. As with all
sensitive electric equipment, the use of surge protection is
highly recommended.
DynaQuip Controls
10 Harris Ind. Pk., St. Clair, MO 63077 • 800-545-3636 • www.watercop.com
8
192261 rev C
Warnings and Precautions
WARNING
The motorized drive unit case is not capable of supporting
any loads. Do not attempt to use the unit as a step. This will
cause damage to the unit and could cause personal injury.
Do not store highly flammable items such as oily rags or
other combustibles near your WaterCopPRO.
CAUTION
It is recommended that eye protection be worn while
installing or servicing the system. Failure to do so could
result in personal injury.
CAUTION
Do not use the case as leverage when mounting this unit or
tightening fittings. Apply wrench to flats on the valve body
to tighten fittings.
Emergency Procedures
In the unlikely event that the WaterCopPRO System should
shut off the main water supply and then become inoperable
due to a power outage or damage, it is possible to manually
operate the WaterCopPRO to return water service. Unplug
the WaterCopPRO from its power source. The valve may be
manually opened by turning the manual override handle in
the direction indicated on the actuator.
Table of contents
Other DynaQuip Plumbing Product manuals
Popular Plumbing Product manuals by other brands

Moen
Moen SHOW HOUSE S658 Series manual

Helvex
Helvex MAGNA DX UE-914 installation guide

Rohl
Rohl EDWARDIAN U.3720L installation instructions

Sanela
Sanela SLZA 20PH Instructions for use

MEPA
MEPA EasyLift 150 193 installation instructions

MAPA Products
MAPA Products MPH-24-FP:24/9 Installation instructions & parts list

Kraus
Kraus Indy KVF-1400-2PK installation manual

Helo
Helo Piccolo Trend Installation and user manual

Hans Grohe
Hans Grohe M7120-H320 ST Instructions for use/assembly instructions

Karibu
Karibu 80391 Building instructions

Spectrum
Spectrum Pfister Brea LF-042-BR Maintenance & Care Guide

Symmons
Symmons Origins 9600-PLR Operation & maintenance manual