dynarex Overbed Table 10450 User manual
SYMBOL GLOSSARY
For an explanation of symbols
used in Dynarex packaging, visit
dynarex.com/symbols.php
R201230
User’s manual
Please read the user’s manual closely before using!
Usage Overbed Table
Reorder No. 10450
Reorder No. 10456
Limited Lifetime Warranty
Your Dynarex product is warrantied to be free of defects in materials and
workmanship for the lifetime of the product for the original consumer
purchaser. This item was built to exacting standards and carefully inspected
prior to shipment. This Limited Lifetime Warranty is an expression of our
confidence in the materials and workmanship of our products and our
assurance to the consumer of years of dependable service.
The Warranty shall not apply under the following conditions: problems
arising from normal wear; problems arising from failure to adhere to the
product instructions; problems arising from misuse, negligence, accident or
improper operation, maintenance or storage; problems arising from
modifications or unauthorized repairs, parts or attachments; products where
the serial number has been removed or defaced; problems with
non-durable components, such as rubber accessories, casters, and grips,
which are subject to normal wear and need periodic replacement. Dynarex
shall not be liable for any consequential or incidental damages whatsoever.
Dynarex shall repair or replace defective products at its option. The
foregoing warranty is exclusive and in lieu of other express warranties, if
any, including the implied warranties of merchantability and fitness of a
particular purpose. The remedy for any violation of the implied warranty
shall be limited to repair or replacement of the defective product pursuant to
the terms contained herein.
6. Install two Bolt Sleeves (10) into upside down Base (7) and
then position two Bolts (12) through Bolt Plate (11) and into
Bolt Sleeves (10). Position Base (7) over Mast (2) and thread
bolts into bottom of Mast (2) and tighten using wrench.(Fig. 6.)
12
11
2
FIG. 6
10
1
7
7. Turn the table upright onto the casters.
CAUTION: Step 8 must be completed last to prevent damage
to the spring loaded mechanism.
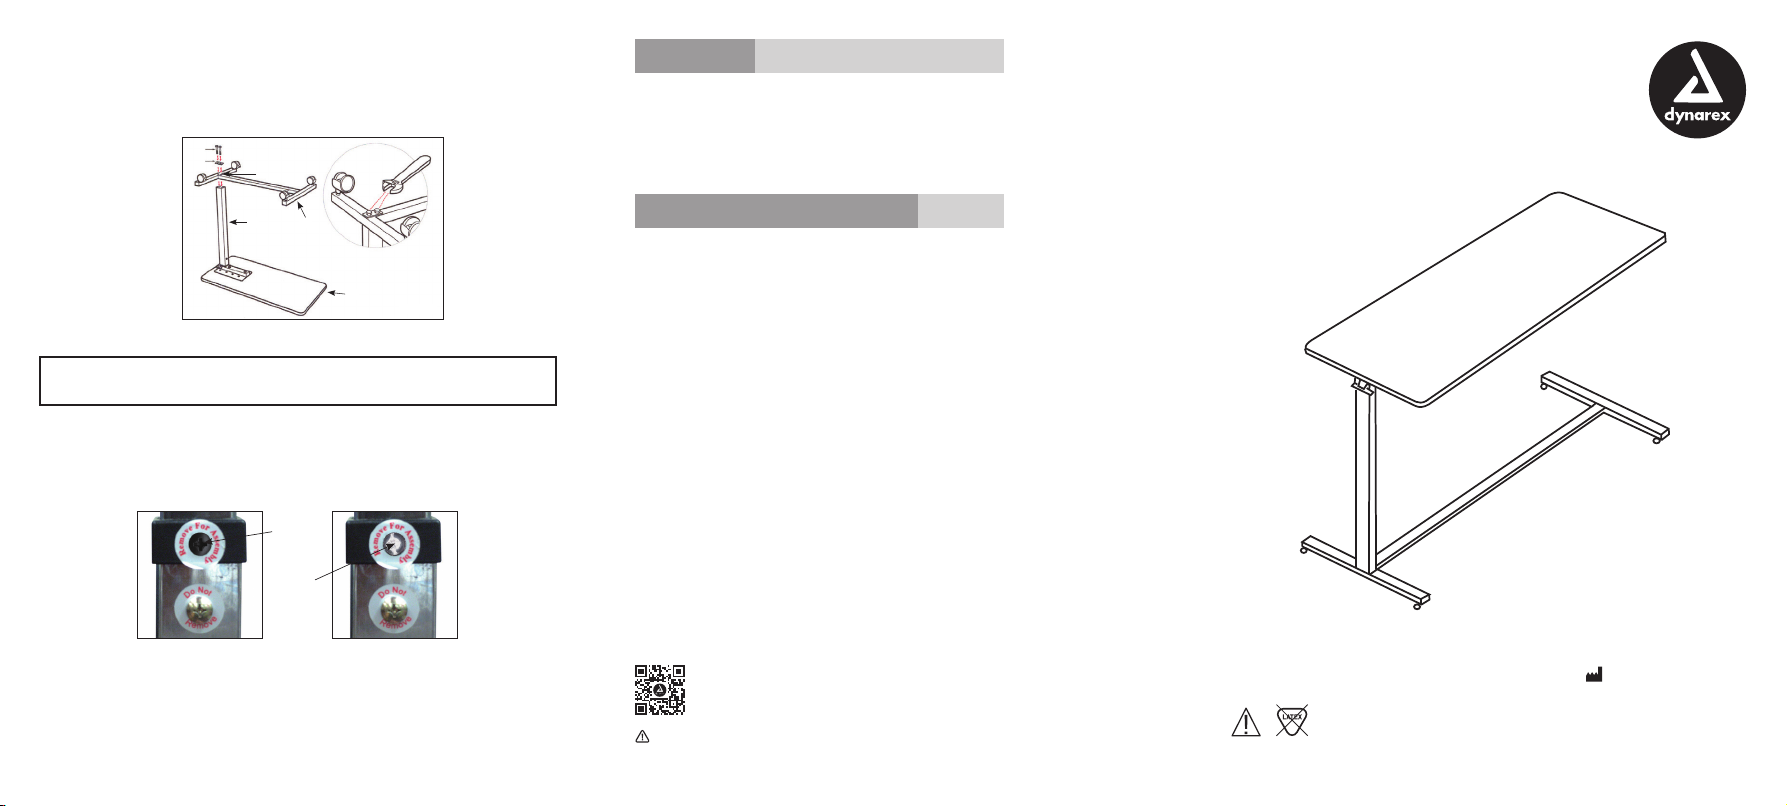
8.
Remove the Black Screw (13) in the Mast (2) collar
labeled
“Remove for Assembly” and replace it with the Chrome
Screw
(14) contained in hardware package. Do not remove
Chrome
Screw labeled “Do Not Remove”. See (Fig. 7 and Fig. 8.)
FIG. 7
Remove 13
FIG. 8
Insert 14
WARNING
FOR SAFETY – DO NOT REMOVE BLACK SCREW (13) ON MAST (2) UNTIL THE TABLE IS FULLY
ASSEMBLED AND STANDING IN UPRIGHT POSITION AFTER REMOVING BLACK SCREW,
REPLACE WITH CHROME SCREW (14) INCLUDED IN HARDWARE PACKAGE.
CAUTION
THE BOTTOM CHROME SCREW WITH THE “DO NOT REMOVE” LABEL SHOULD NEVER BE
REMOVED AS IT WILL DAMAGE THE UNIT AND VOID YOUR WARRANTY.
Adjusting Table Height:
1. Gently squeeze the Trip Lever up towards the table top.
Adjust table top to desired height.
2. Check that Trip Lever is properly engaged prior to use.
WARNING:
Cancer and Reproductive Harm
www.P65Warnings.ca.gov
Manufactured for:
Dynarex Corporation
10 Glenshaw Street
Orangeburg, NY 10962
USA • www.dynarex.com
Made in China

InstallationParts List
1. Table Top
7. Base
8. Casters with Lock (2 each)
9. Casters without Lock
(2 each)
10. Bolt Sleeves (2 each)
11. Bolt Plate
13. Black Screw
14. Chrome Screw (to
replace #13 black screw)
15. Trip Rod ¼″ × 20 ½″
(inside Mast)
12. ⅜″-15 × 2″ Bolts
(2 each)
3. Trip Lever
4. ¼″-20 × 2⅛″ Bolt & Nut
(1 each)
5. Mounting Bracket
6. ¼″-12 × ¼″ Domed
Phillips Head Bolt &
Locking Washer (2 each)
2. Mast
1. Turn the Mast (2) right side up. Ensure Trip Rod (15) is visible
inside the rectangular tube, and not protruding out of the tube.
If necessary, shake the Mast (2) until the Trip Rod (15) drops into
place inside the Mast (2). Next, insert the Trip Lever (3), with
flat side facing down into the Mast (2) (Fig. 1).
2. Lay Table Top (1) upside down on flat surface with Mounting
Bracket (5) facing upward. While holding the Trip Lever (3)
securely inside the Mast (2), turn the Mast (2) upside down and
insert it into the Mounting Bracket (5) (Fig. 2.)
FIG. 1
(15)
(3)
2
TRIP LEVER
FIG. 21
25
3.
Align hole in Mounting Bracket (5) with hole in Mast
(2) and hole
through Trip Lever (3). Insert
¼″-20 × 2⅛″ Bolt
(4) through all
the aligned holes and secure with Nut (4).
Tighten with
wrench. (Fig. 3.)
FIG. 3
4
32
3
4. Install two Domed Phillips Head bolts and Locking Washers (6)
through the vertical holes in the Mounting Bracket (5) and into
the threaded holes in Mast (2) (Fig. 4.)
6
6
FIG. 4
2
5
5.
Install two Casters with Lock (8) into Base (7), on the side with
2 holes
. Install two Non-Locking Casters (9) into base (7) on
the side opposite the 2 holes (Fig. 5.)
8
9
FIG. 5
Column end of base
with 2 holes 7
11
10
6124
14
4
3
6
HARDWARE
This manual suits for next models
1
Other dynarex Indoor Furnishing manuals


Popular Indoor Furnishing manuals by other brands

Baxton Studio
Baxton Studio ANN-2012 Assembly instruction

deVRIES
deVRIES Trendy Milage Set Sessel Assembly instructions

OVE
OVE VENICE SP 32 installation manual

SEI
SEI BC304400TX-COUNTRY OAK Assembly instruction

Manhattan Comfort
Manhattan Comfort BOWERY 55.12 Assembly instructions

EXPEDO
EXPEDO KOLOREDO 210926 Assembly instruction


