Dynasty ProAudio WSA-5RP-PLUS User manual

1. Transmitter
2. Receiver (built-inamplifier)
3. 9V AC Adapter (for transmitter)
Features:
Package Contents:
5. 6-foot Speaker Wires (2)
6. Owner’s Manual
*Lossless Audio-5.2&5.8GHzselectabledigital wireless withan advanced channelselection for nearlossless
audio, provides excellenttransmission stability
*WideRange -Up to 100 ft (30M)operationaldistance betweentransmitter andreceiver (line of sight)
*HighPerformance -24-bit48KHzfull CD qualityhighresolution/uncompressedaudio
*Works withany AV receiver or power amplifier -Speaker Line Level Input &Stereo RCAInput
*Highefficiency2x100W RMS class Damplifier built-into connects directlyto any passive bookshelf or the
rearsurroundsoundloudspeakers
*An additionalsubwoofer monoinput andoutput for connecting betweenAV Receiver andPower/Active
Subwoofer Speaker or Subwoofer Amplifier
4. Power Cord (for receiver)
Tired of running cables around doors orhiding under carpetto connect your rear surround speakers and
subwoofer to the receiver? Or having limited optionson rear surround speakers and subwoofer placement
due to cable length and componentlocation? The WSA-5RP-PLUS providing premium-quality audio for stereo
audio applicationsoperating in the 5.2G/5.8GHz bandswith 2 x 100 W low-hear class D amplifier built-in.
Simplyconnect the transmitter module to you're A/V processor and the receiver to your passive bookshelf /
rear surround sound speakersand powered/active subwoofer
5.2G/5.8GWIRELESS SURROUND SOUND REAR SPEAKERKIT /2x100WAMPLIFIER BUILT-IN
WSA-5RP-PLUS /WSA-5RP-PLUS-RX

-2-
WSA-5RP-PLUS Wireless Transmitter (Front View)
WSA-5RP-PLUS Wireless Transmitter (Back View)
WSA-5RP-PLUS Wireless Receiver (Back View)
Power/Status Indicator LEDPower Switch
1. Left Speaker Level Audio Input Terminals
2. Right Speaker Level Audio Input Terminals
3. Line-In Level Audio Input
4. Subwoofer Signal Audio Input
1. Volume Control Knob
2. Left Speaker Output Terminal
3. Right Speaker Output Terminal
4. Subwoofer Signal Output
5. M Paring Button
6. IEC Power Receptacle & AC Fuse/Holder
7. Stereo / Bridge Mode Selection
8. Wireless Antenna
9. Multi Voltage Selector Switch 115V ( or 230V)
5. DC-IN Jack (9V)
6. M Paring Button
7. Output Gain Switches
8. Wireless Antenna

1. Using the included 6-foot speaker wire, connect the right rear speaker terminals of
your home theater receiver to the right speaker terminals of the wireless transmitter
by connecting the red wire to the red (+) terminals, and the black wire to the black (-)
terminals.
2. Connect the left rear speaker terminals of the home theater receiver the same way.
3. Connect the supplied AC adaptor (9V, 200MA) to DC IN 9V jack, then plug it into a
standard household outlet (Caution: To avoid risk of fire, and to prevent damage, only
use the supplied power adapters)
Application A. Connect the transmitter via SPEAKER LEVEL IN:
-3-
Install the WSA-5RP-PLUS Wireless Transmitter
4. (Optional Connection) connect the Subwoofer Output (or LFE) from your AV receiver
/amplifier to the WSA-5RP-PLUS transmitter Subwoofer Input
(The WSA-5RP-PLUS wireless transmitter can be connected via SPEAKER-LEVEL-IN
or LINE-IN Audio with your AV Receiver /Amplifier, when the RCA cables are
connected, audio input from the speaker terminal will be mixed, make sure your
home theater AV receiver /ampli er is power on while connecting the speaker kit.

Application 2. Connect the transmitter via LINE IN:
-4-
3. (Optional Connection) connect the Subwoofer Output (or LFE) from your AV receiver
/ amplifier to the WSA-5RP-PLUS wireless transmitter Subwoofer Input
DC9V
2. Connect the supplied power cord, then plug it into astandard household outlet
(Caution: To avoid risk of fire, and to prevent damage, only use the supplied power
adapters)
Install the WSA-5RP-PLUS Wireless Transmitter (Option 2)
1. Connect your WSA-5RP-PLUS wireless transmitter to the amplifier’s RCA output ports
with RCA cables

-5-
Install the WSA-5RP-PLUS Wireless Receiver
1. Connect the right speaker to the right speaker terminals of the WSA-5RP-PLUS wireless
receiver, and the left speaker to the left speaker terminals.
2. If the speaker wires are attached to the speakers already, connect the positive (+) wire
from the right speaker to the red (+) terminal for the right speaker on the
WSA-5RP-PLUS wireless receiver and the negative (-) wire from the right speaker to
the black (-) terminal for the right speaker on the WSA-5RP-PLUS wireless receiver
3. Connect the left speaker the same way *Make sure the exposed tips of the speaker
wires don’t touch each other, and make sure they are fully inserted into the terminals
4. (Option) Place the active/powered subwoofer speaker at its intended location (refer to
your subwoofer owner’s manual), and using the mono RCA cable to connect the
WSA-5RP-PLUS wireless receiver’s subwoofer output to your subwoofer audio input.
5. Connect the AC power input of the WSA-5RP-PLUS wireless receiver with the supplied
power cord then plug it into a standard household outlet
(ATTENTION:Connect the amplifier receiver to the power cord BEFORE connecting the
power cord to the power outlet to avoid sparks due to rush-in current)

-6-
For best reception performance, we recommend that the WSA-5RP-PLUS wireless transmitter
and receiver must be placed within 100 feet line of sight for proper operation. If no line of
sight is possible, place the transmitter and receiver such that there is the minimum possible
number of walls and obstacles between the transmitter and receiver.
We suggest that you place the WSA-5RP-PLUS wireless transmitter on top (or beside) of
your audio source (AV receiver / amplifier), If no line of sight is possible, place the
WSA-5RP-PLUS wireless transmitter and receiver such that there is the minimum possible
number of walls and obstacles between the transmitter and receiver.
You can mount the WSA-5RP-PLUS wireless receiver vertically by using the 2 screw
openings at the bottom. If the receiver is mounted vertically, the operating range is
reduced compared to mounting the receiver right side up.
We suggest that you experiment with placement in order to find the best location for
the WSA-5RP-PLUS wireless transmitter and receiver
Note: This product will not work properly from within an enclosed metal cabinet.

-7-
Operating the WSA-5RP-PLUS wireless speaker kit system
* Set the WSA-5RP-PLUS wireless receiver s volume control to a low level to prevent clipping inside
the amplier
* Set your audio source to output the maximum audio level that you will encounter during normal
operation such that both the left and right channel are balanced.
* If you are using the 5.1/7.1 AV receiver with WSA-5RP-PLUS wireless speaker kit, please make
sure to set “MULTI ST ”mode on your AV receiver to turn on the rear surround speaker output
(there will be no sound if you select the 2CH STEREO or DIRECT mode)
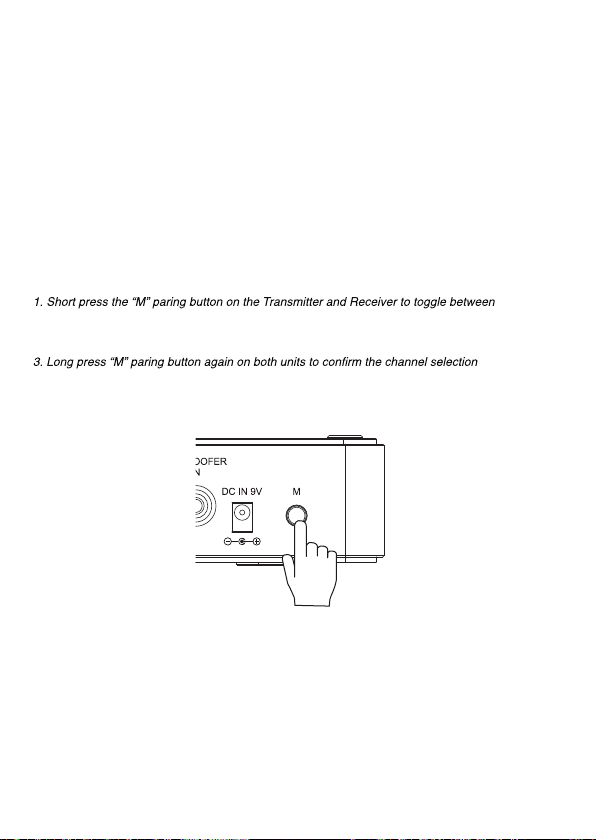
1. Once the wire connection has been done on both WSA-5RP-PLUS wireless transmitter &
receiver as page 3~5 , and the AC adapters are connected. Turn on the power switch on the
front panel, the LEDs light BLUE (as 5.8GHz mode with factory default setting) on both
transmitter and receiver are paired and enters standby mode.
2. Turn on your AV receiver / amplifier and then play the audio or video source through your
amplifier
3. The volume control on the WSA-5RP-PLUS wireless receiver is only used to adjust the
balance of the volume between the front and rear surround speakers. After the system is set
up, we recommend that you adjust the best volume to match the balance with your center
and front left/right speakers in the first time installation (after balance setup, simply use the
volume control on your AV receiver / amplifier to adjust the master speaker volume during
the playback)
4. Adjusting Transmitter Gain The gain switched can be adjusted that depends on which audio
input connection you selected (Speaker Level In or RCA Line In), audio sources (movie,
music, gaming), or if you would like to do the easy adjust the sound output balance between
the front speakers and rear surround speakers.
Even the WSA-5RP-PLUS wireless receiver has the output level control, but this control only
adjustment in the transmitter. If distortion or poor signal-to-noise is occurring in the
transmitter from the original sound signal thru the AV receiver, then the audio output level
can be easy adjusted via the Gain Switches on the WSA-5RP-PLUS wireless transmitter from
0dB, -6dB and -12dB, without re-programe the sound level controls thru the AV receiver.
For example, when the volume controls and playback loudness for your surround sound
speakers has been set on the AV Receiver menu and the Gain switches is at “-6dB" position
on the WSA-5RP-PLUS wireless transmitter. Once you switch to 0dB position, the rear
surround sound speaker playback volume will be slightly louder. On the contrary, the rear
surround sound speaker’s volume will be decreased once it set to “-12dB” position.

In order for the transmitter to transmit to receiver, they need to be paired. If the front
panel LEDs are blinking on one or both units, do the following:
Flashing Slowly: No paired wireless device detected
Flashing Quickly: Pairing Mode
Solid Blue: 5.8G mode (as at factory default)
Solid Green: 5.2G mode (optional setup)
Description of the network status LED light
-8-
We use the latest 5.8G wireless technology connection with 62 channels auto selection
from RF channel 5727~5848, which are not easily disturbed by 2.4G (the frequency
band of bluetooth and WIFI) and have excellent transmission stability, also avoids and
decrease possibility of interference from the wireless networks routers, cell phone,
garage doors, R/Cs, and other 2.4G/5.8GHz frequency devices. However, if you
experience any interference in the 5.8G mode, you could try to use the 5.2G mode with
44 RF channel 5157~ 5243 (option)
2. Ensure both the Transmitter and Receiver show the same LED colour.
the 5.8GHz (blinking Blue LED) channels, and the 5.2GHz (blinking Green LED)
4. Successful pairing is indicated by asolid Blue (or Green) LED on both the Transmitter
and Receiver.
Pairing the WSA-5RP-PLUS transmitter and wireless amplifier receiver
The WSA-5RP-PLUS wireless Transmitter and Receiver are automatically paired and
synced at the factory, both LEDs should be solid Blue in 5.8G mode as default when
powered on.

TroubleShoot
-9-

The wireless transimtter and receiver must be placed within 100 feet for proper
operation.
To avoid risk of electric shock and fire, and to prevent damage, locate the wireless
transmitter and receiver units with no obstructions in front.
distance, and don't want to run wires from one receiver to two speakers.
You can PAIR the second wireless receiver to the existing transmitter for the “1 to 2”
wireless audio transmission.
For pair those 3 devices are very easy.
1. Set the original wireless receiver to “Bridge” position, and follow the bridge speaker
wiring connection.
2. Set the additional wireless receiver (model WSA-5RP-PLUS-RX) to the Bridge “Mono R”
position, and follow the bridge speaker wiring connection.
3. Short press the “M” paring button on the 1 x Transmitter and 2 x Receiver to restart the
new pairing process, and toggle between the 5.8GHz (blinking Blue LED) channels, or press
again to select the 5.2GHz (blinking Green LED)
4. Ensure those 1 x Transmitter and 2 x Receivers show the same LED colour.
5. Long press “M” paring button again on 3 units to confirm the channel selection
6. Successful pairing is indicated by a solid Blue (or Green) LED on those 1 x Transmitter
and 2 x Receivers.
Please keep in mind that when you do the multi receivers pairing might takes few times to
get it done, but once you got the tip, you will find the whole process is very easy.
WSA-5RP-PLUS (Original Set)
TX
RXRX
Set “Bridge Mono”
Add the extra wireless receiver (model WSA-5RP-PLUS-RX)
-10-
Placing the wireless transimtter and wireless receiver
WSA-5RP-PLUS-RX (Additional Wireless Receiver)
Set “MONO-R”

This equipment has been tested and found to comply with the limits for a Class B digital
device, pursuant to Part 15 of the FCC Rules. Operation is subject to the following two
conditions: (1) this device may not cause harmful interference, and (2) this device must
accept any interference received, including interference that may cause undesired
operation. These limits are designed to provide reasonable protection against harmful
interference in a residential installation. This equipment generates, uses and can radiate
radio frequency energy and, if not installed and used in accordance with the
instructions, may cause harmful interference to radio communications. However, there is
no guarantee that interference will not occur in a particular installation. If this
equipment does cause harmful interference to radio or television reception, which can
correct the interference by one or more of the following measures.
If you cannot eliminate the interference, the FCC requires that you stop using your
product. Changes or modifications not expressly by the party responsible for
compliance could void the user’s authority to operate the equipment.
This device complies with Part 15 of the FCC Rules. Operation is subject to the following
two conditions: (1) This device may not cause harmful interference, and (2) this device
must accept any interference received, including interference that may cause undesired
operation.
For service and support, please contact support@dynastyaudio.com
FCC
- Reorient or relocate the receiving antenna.
- Increase the separation between the equipment and receiver.
- Connect the device into an experienced radio/TV technician for help.
receiver is connected.
- Consult the dealer or an experienced radio/TV technician for help.
Contact:
-11-

This manual suits for next models
1
Other Dynasty ProAudio Speakers manuals