Dynaudio Evidence User manual

Evidence
Owners manual/Bedienungsanleitung
Home Systems I Professional I Automotive I Multimedia
Dynaudio A/S, 8660 Skanderborg, Denmark
Sales & Marketing
Dynaudio International GmbH, Ohepark 2, 21224 Rosengarten, Germany, Phone +49 4108 - 41 80 - 0
www.dynaudio.com
© Dynaudio International GmbH, Evidence Manual 0109, Item-No. 455550. All text and image copyrights reserved. Subject to change without notice.

Dynaudio Evidence
Content
Introduction ....................................................................................... 3
Safety Instructions ............................................................................ 4
About this guide ................................................................................ 4
Used expressions and symbols .................................................... 4
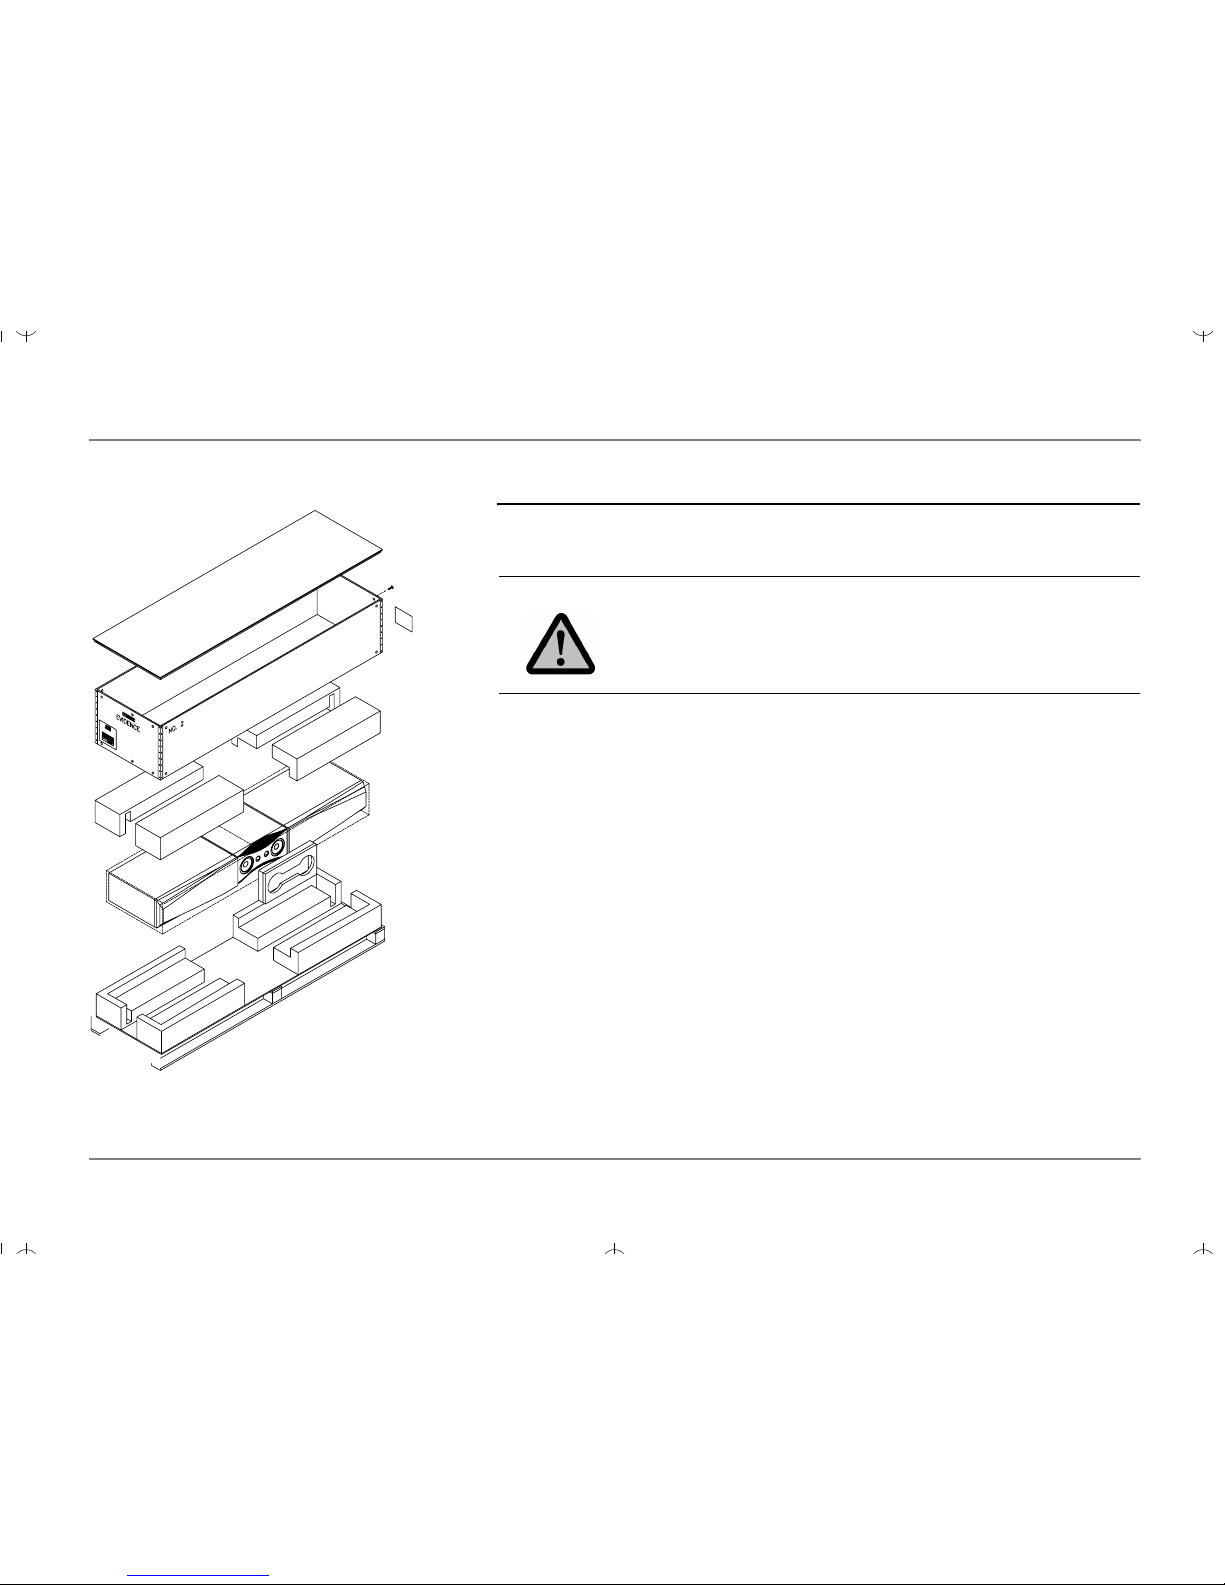
Unpacking the Loudspeakers .......................................................... 5
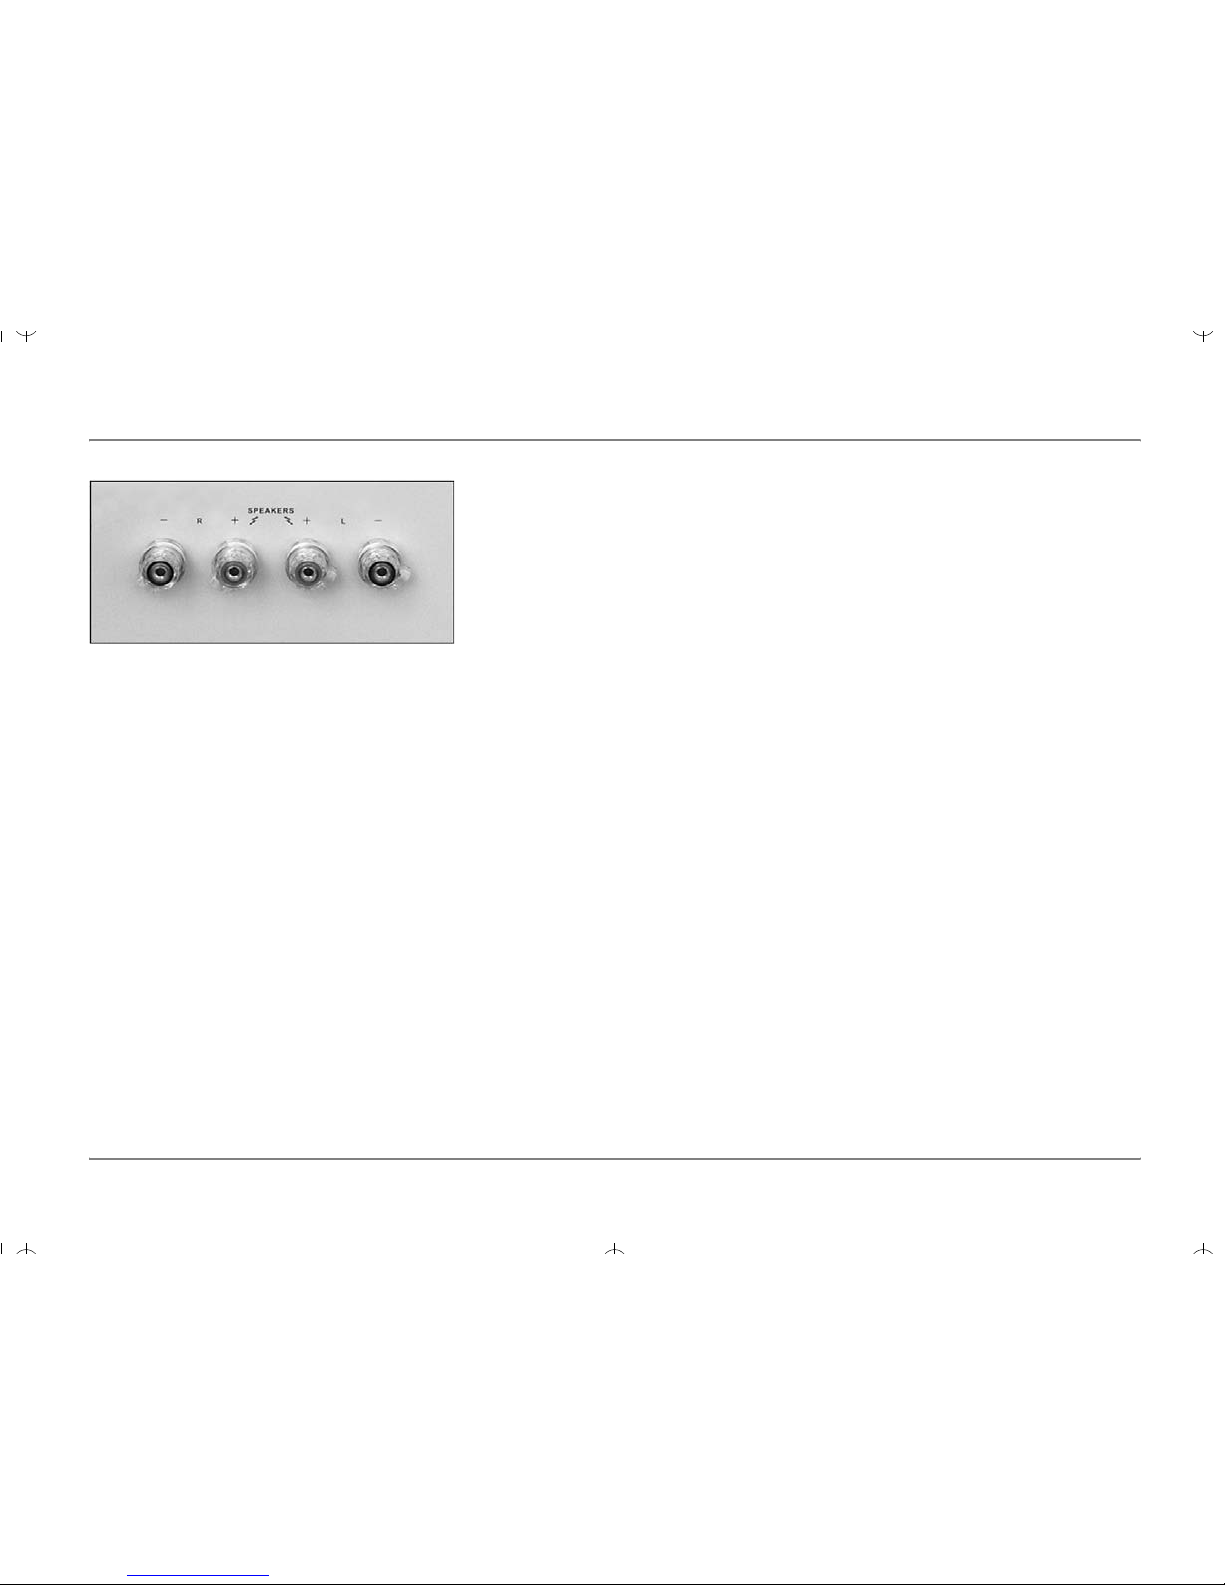
Connecting......................................................................................... 6
Connecting the loudspeakers ....................................................... 6
Connecting surround speakers ..................................................... 7
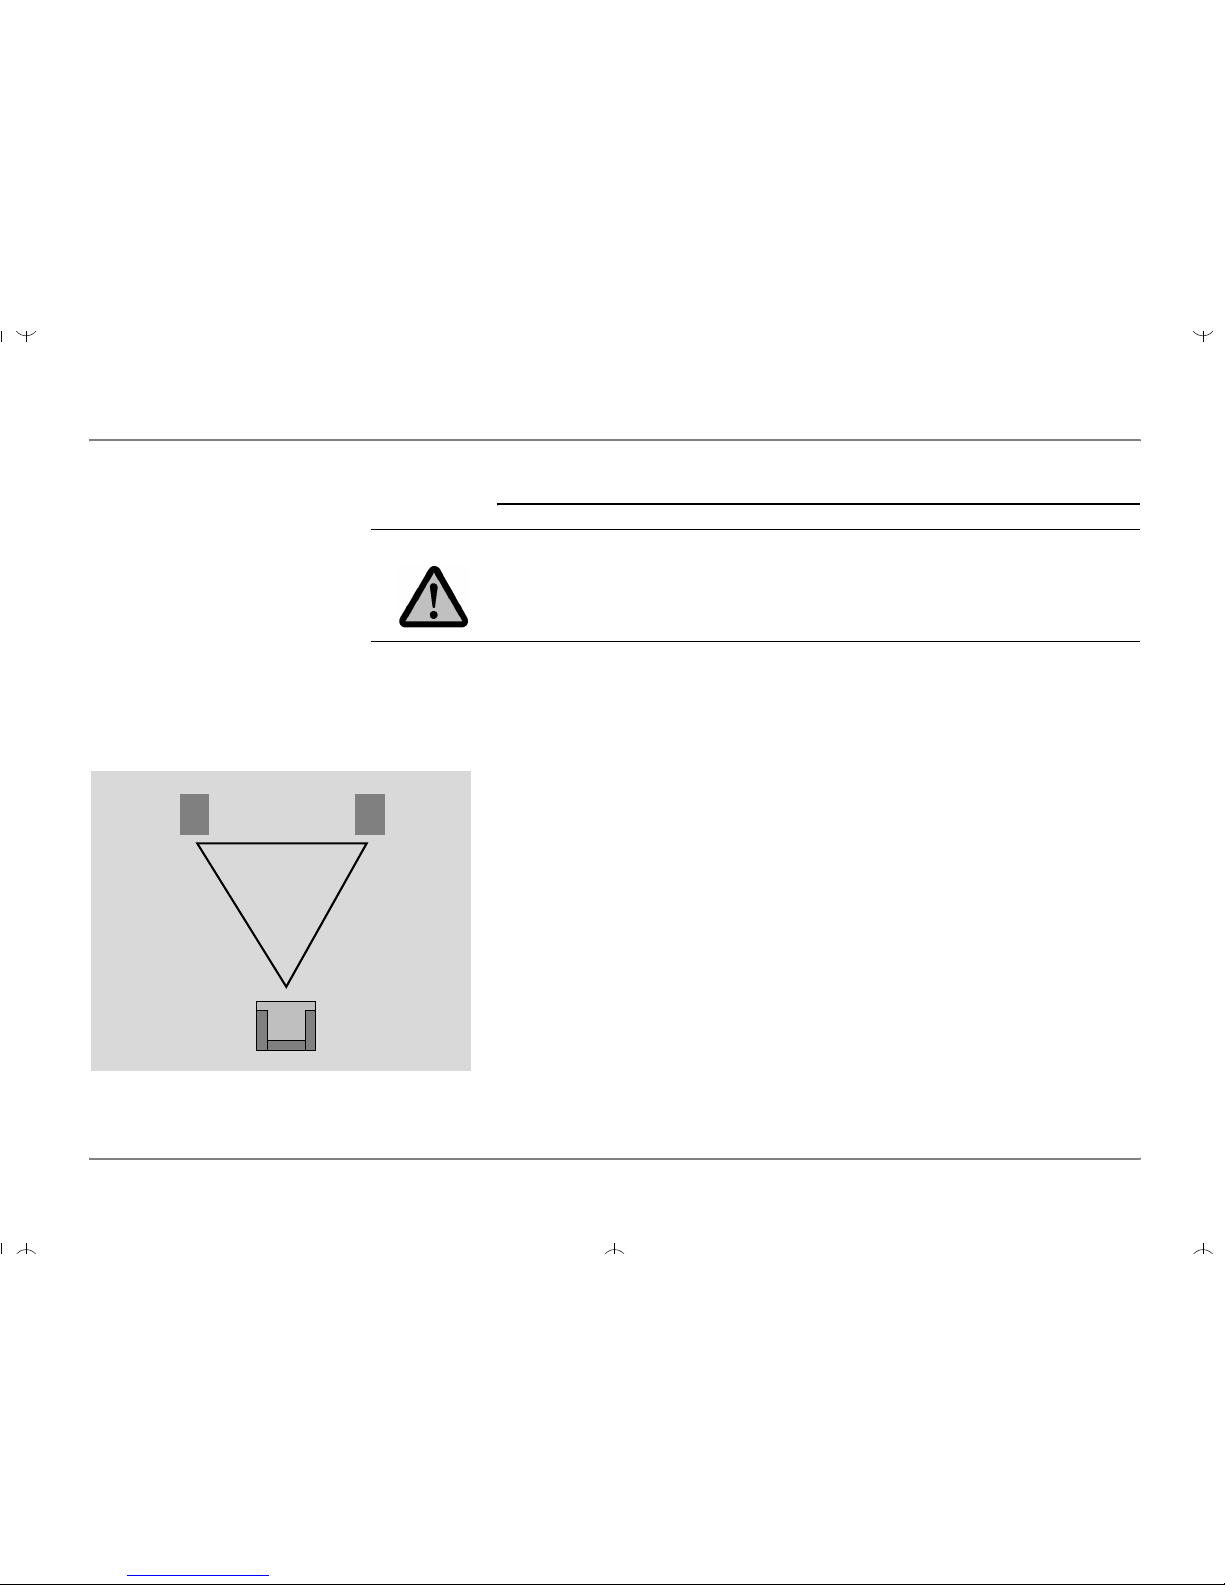
Positioning......................................................................................... 8
General recommendations............................................................ 8
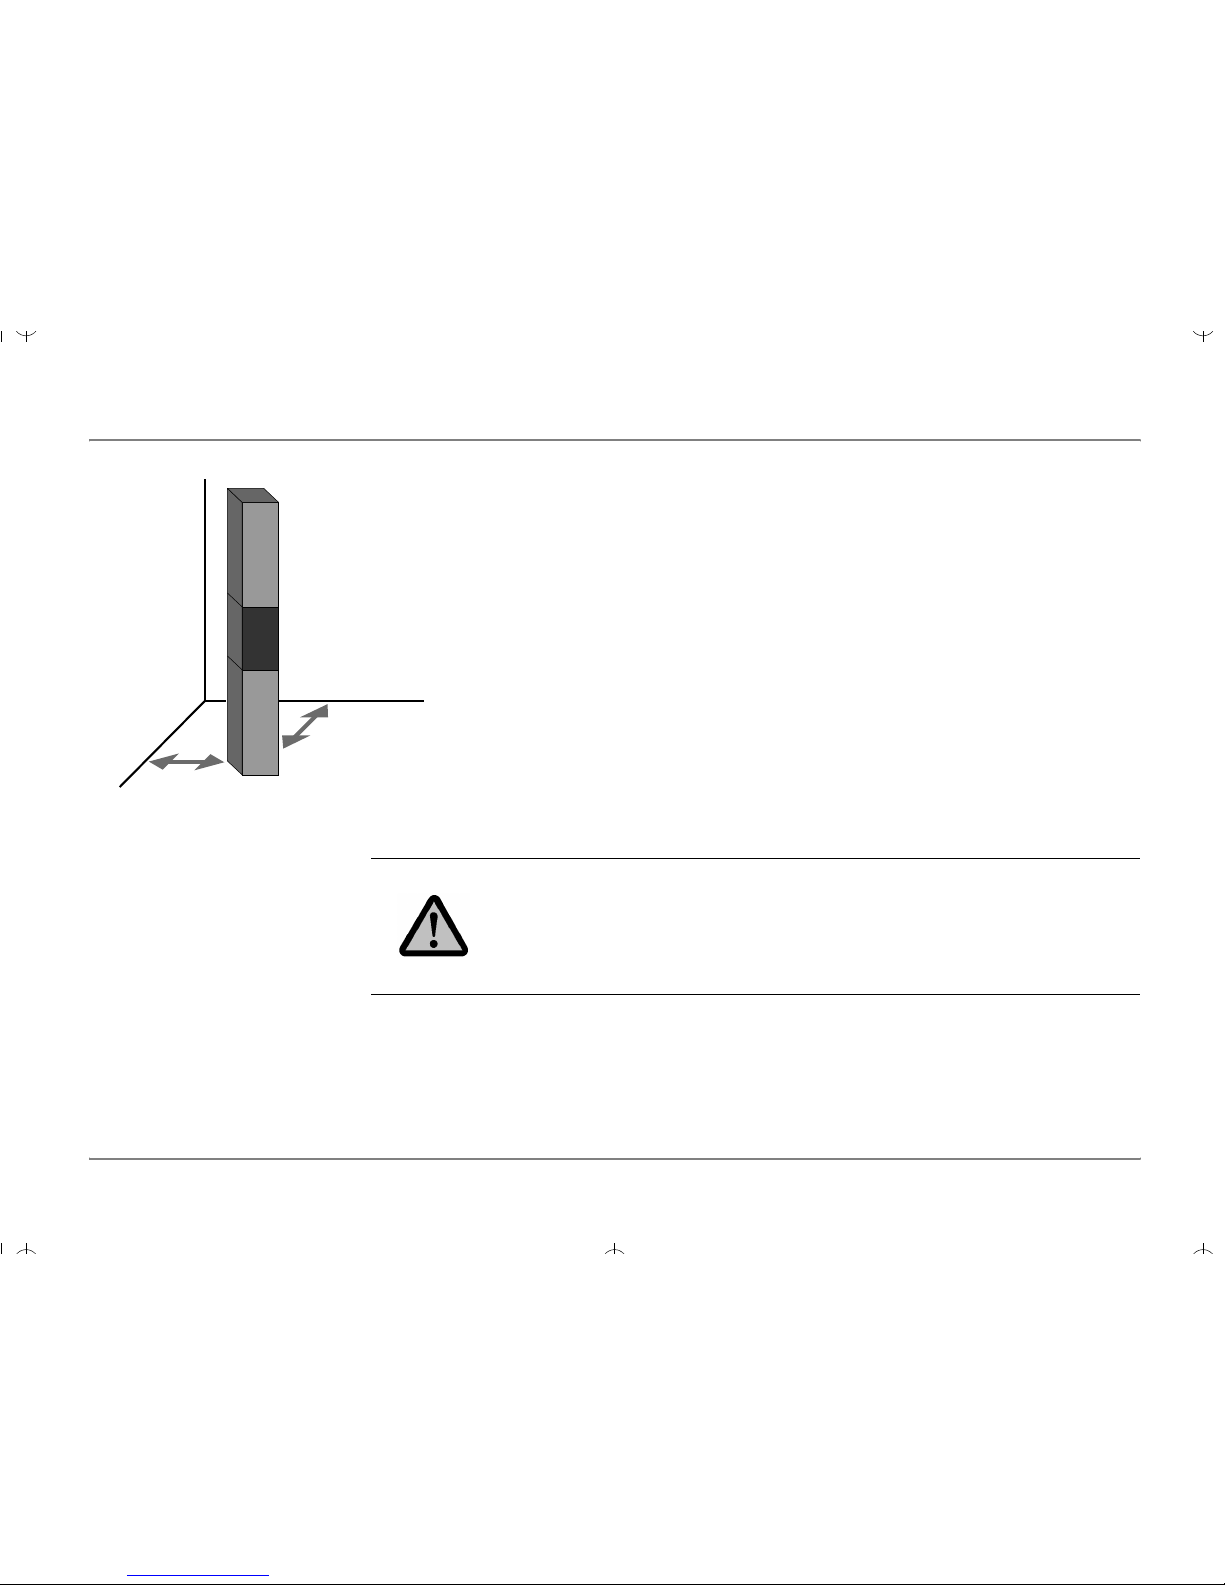
Distance to back and side walls.................................................... 9
Floor-standing loudspeaker set-up ............................................... 9
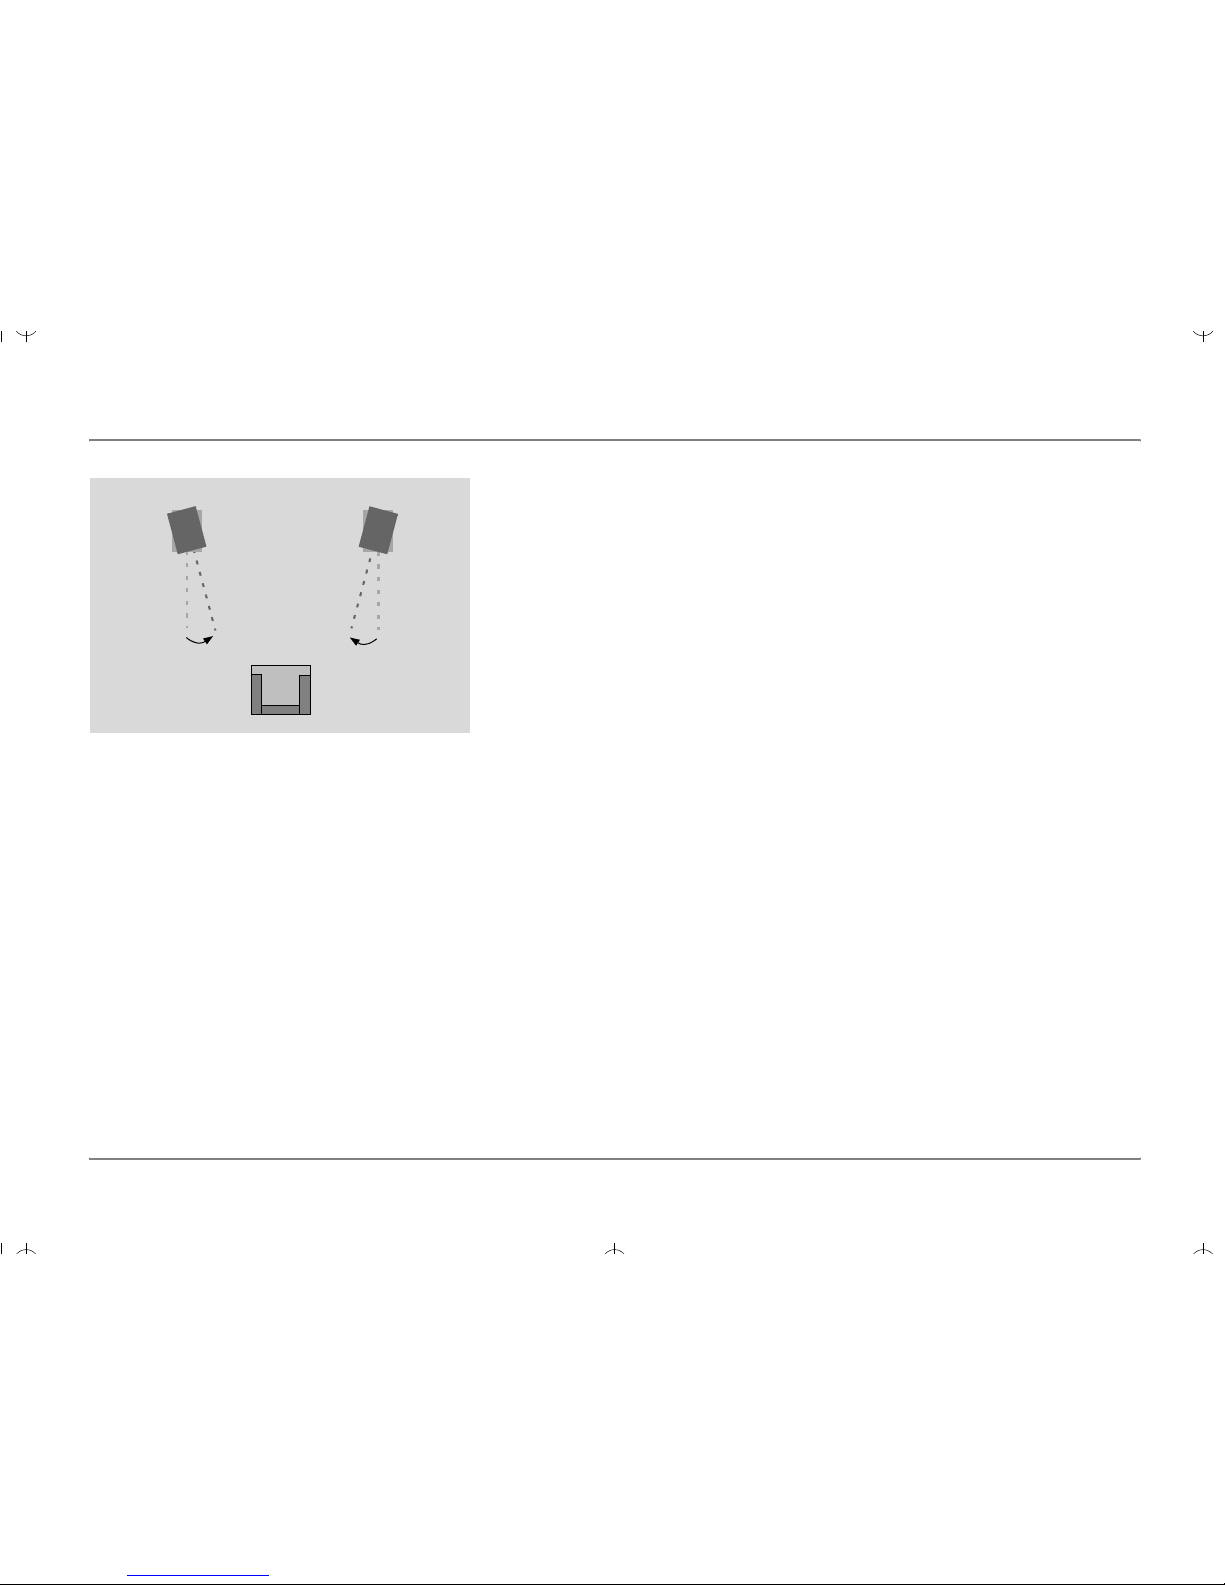
Loudspeaker Toe-In.................................................................... 10
Room and furniture influence...................................................... 10
Grille............................................................................................ 10
Multi-Channel Setup........................................................................ 11
Loudspeakers for multi-channel setups ...................................... 11
Multi-channel loudspeaker setup ................................................ 12
Running-in / Care & Maintenance .................................................. 13
Warranty........................................................................................... 14
Technical Specifications ................................................................ 27
Inhalt
Einleitung ......................................................................................... 15
Sicherheitshinweise........................................................................ 16
Zu dieser Anleitung......................................................................... 16
Verwendete Begriffe und Symbole ............................................. 16
Auspacken der Lautsprecher......................................................... 17
Anschließen ..................................................................................... 18
Lautsprecher anschließen........................................................... 18
Surround-Lautsprecher anschließen........................................... 19
Aufstellen ......................................................................................... 20
Allgemeine Empfehlungen .......................................................... 20
Abstand zu Rückwand und Seitenwänden ................................. 21
Standlautsprecher aufstellen ...................................................... 21
Auf den Hörplatz ausrichten ....................................................... 22
Wohnraumeinrichtung................................................................. 22
Frontabdeckung .......................................................................... 22
Mehrkanal-Anlage ........................................................................... 23
Lautsprecher für eine Mehrkanal-Anlage.................................... 23
Aufstellen der Mehrkanal-Lautsprecher ...................................... 24
Inbetriebnahme / Pflegehinweise................................................... 25
Garantie............................................................................................ 26
Technische Daten............................................................................ 27
Evidence
.
book
Seite
2
Montag
,
12
.
Januar
2009
2:04
14

Dynaudio Evidence 3
Introduction
English Introduction
Dear Music Lover,
Thank you for your decision to acquire these very special Dynaudio Evidence
loudspeakers.
They feature advanced Dynaudio loudspeaker technology, resulting in music
reproduction at a very high level, making many familiar recordings a new listening
experience altogether. This advanced technology results from many years of intense
research and development, the highest quality standards in production, and Dynaudio's
enduring passion for musical truth.
Dynaudio is one of very few companies who can realize such loudspeaker concepts
through it's own in-house development and production facilities. These facilities are so
advanced and the quality control is so strict that Dynaudio is likely the only specialty audio
company to have exceeded ISO 9000 and earned QS 9000 certification.
Your new Dynaudio loudspeaker is constructed by Dynaudio's master craftsmen in
Denmark to these high standards of quality. To realize the highest sound, some areas
should be addressed, as will be explored on the following pages. By considering the tips
and suggestions, you will achieve the maximum performance and enjoyment of the
Dynaudio loudspeakers and it's advanced musical capabilities for a long time to come.
Please also visit our web site www.dynaudio.com.
You will find additional information:
• Dynaudio dealers in your area
• Questions and answers about Dynaudio products and technical information
• Dynaudio events and news
We wish you many years of enjoyment experiencing music,
Dynaudio
Evidence
.
book
Seite
3
Montag
,
12
.
Januar
2009
2:04
14

4Dynaudio Evidence
Safety Instructions
Safety Instructions
About this guide
Used expressions and symbols
In this operating manual following signs and symbols are used:
CAUTION HIGH SOUND PRESSURE LEVELS
Listening to high sound pressure levels over a longer period of time
may harm your hearing.
XTo avoid auditory effect do not listen to very high sound levels
over a longer period of time.
The exclamation point within an equilateral triangle is intended to alert the user to the
presence of important operating and maintenance (servicing) instructions in the
literature accompanying the product.
CAUTION Indicates (in combination with a safety sign) a potentially hazardous situation which, if
not avoided, could result in minor or moderate injury or damage to equipment.
Note: Additional information is provided, which is important to fully understand the
loudspeakers and how to operate it.
XThe arrow will identify steps to be performed. Please follow the instructions carefully.
1.
2.
Multiple steps that should be performed consecutively are numbered.
Please follow these instructions carefully.
Evidence
.
book
Seite
4
Montag
,
12
.
Januar
2009
2:04
14

Dynaudio Evidence 5
Unpacking the Loudspeakers
Dynaudio Evidence models are protected during transit by stable and secure packaging.
Due to their weight and dimensions, they are shipped in a special wooden crate.
To unpack the Evidence Master loudspeakers:
XPlease consult your Dynaudio dealer.
To unpack the Temptation and Center models:
1. Lay the transport box flat on the floor.
2. Remove the screws along the top plate, the top plate and the five safety pads.
3. Remove the screws along the bottom plate.
4. Carefully lift the sidewall frame.
5. Carefully remove the loudspeaker by lifting it up horizontally.
6. Turn the loudspeaker and slowly place it on its plinth.
7. Remove the wrapping foil by lifting it on one end and unwrap it in a clock-wise motion.
Do not use blades, cutters or any other sharp objects that will destroy the foil.
8. Fix the sidewall frame on the bottom plate again.
9. Place the wrapping and the safety pads back into the box and close the plate.
The wooden transport crates and custom cartons are intended for long-term use and
should be used whenever the loudspeakers are to be transported, and as such they
should be stored for future use.
CAUTION HEAVY PARTS
Unpacking the Evidence loudspeakers without help may cause
personal injuries or product damage.
XConsult your trained Dynaudio dealer for assistance.
XTwo people are recommended to unpack the loudspeakers.
Fig. 1 Packaging (Temptation and Center models only,
figure shows Temptation).
Evidence
.
book
Seite
5
Montag
,
12
.
Januar
2009
2:04
14

6Dynaudio Evidence
Connecting
Connecting
Connecting the loudspeakers
1. Connect a two-pole (+/-) loudspeaker cable to the binding posts, located at rear of the
cabinet (see Fig. 2). The high quality, gold plated binding posts can accommodate
different connection systems:
–4-mm-plugs (“banana plugs”): The pins can be put directly into the binding post
without any tightening necessary.
–Cable spades: Un-tighten the binding posts, insert the spade into the opening, and
secure the spade by tightening the posts.
–Bare wires: Un-tighten the binding posts and place the cable into the binding
posts. Tighten the posts.
Note:
• With every connection system, ensure that the contact is tight and has a proper
contact area.
• Connectors with similar gold plating as the loudspeakers binding posts will typically
offer the best results and remain corrosion-free.
• Please ensure that the positive and negative cables do not make contact with each
other.
• Tighten the posts, and check the contact after a few days to make sure that it hasn’t
loosened.
Fig. 2 Binding posts at rear of cabinet.
Evidence
.
book
Seite
6
Montag
,
12
.
Januar
2009
2:04
14

Dynaudio Evidence 7
Connecting
2. Connect the other cable ends to the loudspeaker outputs of your switched off power
amp (see Fig. 3).
Note:
XPlease make sure that both loudspeakers are connected properly. For a better
distinction one of the two veins of most loudspeaker cables are marked.
– Connect the red marked post of the speaker to the red marked output of the amp.
– Connect the white or black marked post to the white or black marked output
accordingly.
Bi-wiring/bi-amping
Dynaudio loudspeakers feature a carefully fine-tuned cross-over, optimized using
selected parts and an advanced circuitry to achieve a truly balanced and smooth
frequency response. Therefore, dividing the frequency sections through bi-wiring or
bi-amping is not recommended.
Choice of loudspeaker cable
The impact a loudspeaker cable can have on sound quality may be dramatic, though in
general quality cable products will yield a quality result. Dynaudio loudspeakers are
designed to be very neutral and thus are not extremely suited to any particular type of
cable. The choice of cable is as much a factor of matching the cable to the entire audio
system. Please consult your Dynaudio dealer for information about compatible
loudspeaker cables that will suit both your electronics and the Dynaudio loudspeakers.
Connecting surround speakers
When connecting a two-channel stereo system, only the right and left channels are
connected to the amplifier.
In a surround set-up, center, side or rear loudspeakers as well as a subwoofer are
typically connected to provide for a multi-channel listening experience. Please refer to the
amplifier’s owner manual for particular connection instructions and see chapter “Multi-
channel loudspeaker setup” on page 12 for further help.
Fig. 3 Amplifier loudspeaker outputs (example).
Evidence
.
book
Seite
7
Montag
,
12
.
Januar
2009
2:04
14

8Dynaudio Evidence
Positioning
Positioning
Every room will have its own particular sound characteristics. Any room is also shaped
and decorated uniquely, and therefore remains independent regarding options for
positioning loudspeakers. The following steps are general suggestions that will make the
correct positioning easier to achieve.
General recommendations
Following explanations refer to Fig. 4:
• The distance between each loudspeaker and your listening position should be the
same (B). Try to achieve an isosceles triangle.
• The distance between the loudspeakers should be the same or better slightly less
than the distance between each loudspeakers and your listening position (A, B).
• The closer the listening position is in relation to the loudspeakers, the closer the
speakers can be positioned to each other.
(As a starting point, it is recommended that the speakers be about 2 meters apart
from each other for the best results (A).)
• If the speakers are positioned too close to each other, the stereo image will not seem
realistic; if that distance is too wide, the image may leave an acoustic hole in the
middle.
• Paying attention to the image during listening tests will help dictate optimum
placement during experimentation and set-up.
CAUTION EXCESSIVE BRIGHTNESS
Direct sunlight or excessive brightness can affect the color of any natural wood veneer
(the structural integrity of the cabinet will not be affected).
XTo maintain the aesthetic quality of the loudspeakers for the long term, placing such in
very warm, very cold, or very humid environments should be avoided.
Fig. 4 Positioning the loudspeakers.
A
BB
A≤B
Evidence
.
book
Seite
8
Montag
,
12
.
Januar
2009
2:04
14

Dynaudio Evidence 9
Positioning
Distance to back and side walls
Every loudspeaker not only disperses sound energy directly into the room, but also to the
side and even backwards. As a result, time-delayed reflections occur and add to the
original music signal. Thus, when loudspeakers are positioned too close to walls, the
sound quality can be restricted.
The Dynaudio loudspeaker models were developed to be placed free-standing, and
therefore they reach their optimum performance when positioned as clear of any walls as
possible.
XTo reduce possible influences from the back and sidewalls, the distance to these
boundaries should ideally not be less than 0.5 meter.
Floor-standing loudspeaker set-up
Dynaudio feature a special base construction, which offers both an ideal performance and
mechanical basis. Integrated into the base plinth are four individual spike assemblies.
These stabilize the cabinet on an extremely small contact area, and therefore prevent any
wobbling while offering optimal resonance control.The individually adjustable spikes allow
leveling of the cabinet on uneven floors.
Fig. 5 Distance to walls.
D≥0.5 m
DD
CAUTION SPIKES WITH SHARP PEAKS
The sharp peaks of the spikes may cause injuries and damage sensitive surfaces like
hardwood flooring or tile.
XBe careful when handling the loudspeakers.
XPlace plates between the spikes and the surface to protect the underlying surface.
(Note: The spike will not destroy a carpet surface.)
Evidence
.
book
Seite
9
Montag
,
12
.
Januar
2009
2:04
14

10 Dynaudio Evidence
Positioning
Loudspeaker Toe-In
Depending on your personal listening environment and room dimensions, loudspeakers
may be angled in towards the listening area to focus the sound radiation. This positioning
will typically improve imaging and is especially recommended by Dynaudio (see Fig. 6).
Room and furniture influence
The sound quality of any loudspeaker is influenced by the furniture, wall materials and
other objects in the listening room. For example, large rooms without much furniture and
many clean, hard wall surfaces can give a bright and diffuse sound with diverse echoing
frequencies. A room with thick carpet, curtains and soft furniture surfaces will give a
slightly warmer, darker and less lively sound.
Grille
A cloth grille is included and can be affixed to the cabinet to help protect the drivers from
dust and any other influences. The grille is acoustically optimized, but the highest sound
quality levels will be attained without any grille covers in place during listening.
XTo remove the grille, gently pull the grille at all corners straight away from the front.
XTo fit the grille, line up the studs with the corresponding front baffle holes and gently
push the grille in at all corners.
Fig. 6 Angle inwards loudspeakers to improve imaging.
Evidence
.
book
Seite
10
Montag
,
12
.
Januar
2009
2:04
14

Dynaudio Evidence 11
Multi-Channel Setup
Multi-Channel Setup
Dynaudio loudspeaker models are designed to offer the most advanced performance in
both stereo and multi-channel applications. When connecting a loudspeaker to a multi-
channel setup, in general the same guidelines as mentioned in the text above will apply.
Note:
When setting up a home theatre system, the loudspeakers should create a realistic
soundstage with similar sound characteristics on each channel. It is therefore important
that any speaker used in a multi-channel setup should match the same high quality level.
This is especially important with regards to the center channel loudspeaker, as this is
critical aspect of any multi-channel soundstage.
Loudspeakers for multi-channel setups
For a multi-channel setup, in addition to the two main (stereo) loudspeakers, additional
channels (speakers) may be added to reproduce dialogue and surround effects.
Center speaker
The center is responsible for the information directed from the middle of the screen and
should be positioned between the right and left main loudspeakers.
In a home theater/surround setup, the center supports the images and should be placed
as close as possible to the screen. With various surround formats, such as Dolby Digital
EX or DTS ES, a Center can also be utilized as a rear center channel.
1
Evidence
.
book
Seite
11
Montag
,
12
.
Januar
2009
2:04
14

12 Dynaudio Evidence
Multi-Channel Setup
Rear speakers
The rear speakers are responsible for the rear sound effects behind the listening position.
Corresponding to the surround format 5.1, 6.1 or 7.1, you need to install additional
speakers:
Subwoofer
Most often a subwoofer will be utilized for the LFE-signal in such setups, especially in
larger listening rooms. The position of the subwoofer will be dependent upon the size of
the room and its acoustics. Dynaudio recommends placing the subwoofer close to the
front speakers, but not too close to any walls, corners or furniture. This helps to sonically
integrate the subwoofer in the existing surround channel setup.
Multi-channel loudspeaker setup
Thus, a complete multi-channel setup consists of following speakers:
Because there are many different setup options – from 5.1 to 10.2 channel applications –
and the fact that loudspeaker positioning will also depend upon the room’s shape, please
consult your Dynaudio dealer for special applications and for placement options.
15.1: The standard multi-channel setup with two rear speakers.
26.1: An additional rear center speaker is placed between the two rear speakers.
37.1: Two speakers are added on both sides between the front and rear speakers.
1, 2, 3 Rear speakers (as explained above).
4Front (stereo) speakers.
5Center speaker.
6Subwoofer, possible positions (e.g. Dynaudio Sub).
Fig. 7 Rear speakers in multi-channel setups.
11
2
33
Fig. 8 5.1, 6.1 and 7.1 multi-channel speaker setup.
11
3
44
2
3
5
6
6
Evidence
.
book
Seite
12
Montag
,
12
.
Januar
2009
2:04
14

Dynaudio Evidence 13
Running-in / Care & Maintenance
Running-in the loudspeakers The moving parts of a newly manufactured loudspeaker have been acoustically checked
after production, but nevertheless are not as flexible as they need to be for optimum
results to be realized. The higher the quality of any driver system, the more demanding
the loudspeaker will be regarding time for running-in the system.
A newly unpacked Dynaudio loudspeaker therefore requires several weeks running/
playing to reach its optimum performance capability. After that period, a couple of minutes
before every listening session will be helpful to “warm up” the loudspeakers.
Power rating Due to the construction and the driver technology the Dynaudio loudspeakers can be
driven with very high power levels. With a high quality amplifier, delivering undistorted
signals, the speaker can achieve high volumes without any compromises in sound quality.
Attention must be given to amplifiers with very low power and adjustable tone controls or
switches. These types may soon overreach their own performance limits and may send
distorted output signals to the speakers, compromising even high quality technology.
Any damage caused under such circumstances is not covered by the Dynaudio warranty
and is easily avoided in the first place by consulting your Dynaudio dealer for advice
regarding the choice of amplifier.
CAUTION DISTORTED OUTPUT SIGNALS
Distorted output signals from too weak, defective or overloaded amplifiers may damage
the loudspeakers.
XUse high quality amplifiers only and run loudspeakers and amplifiers within specified
power ratings.
Evidence
.
book
Seite
13
Montag
,
12
.
Januar
2009
2:04
14

14 Dynaudio Evidence
Warranty
Care & maintenance Dynaudio loudspeakers require no special treatment apart from the kind of careful
handling you would normally apply to any high tech product in your home.
Cleaning the loudspeakers:
XSwitch off all components of your system when cleaning any of these components.
XAvoid touching the tweeter domes as any change of their shape may have an impact
on sound quality.
XClean the cabinet and other plain parts with a soft dry or slightly damp cloth only.
XRemove dust on the woofer diaphragms with a fine furniture brush.
All materials used by Dynaudio are integrated with exceptional care. By taking care of your
loudspeakers, you will preserve the finish and build quality for a very long time.
Warranty
Dynaudio provides a transferable limited 5 year manufacturer’s warranty. This warranty only
covers faults or defects in material and production. Damage caused as a result of abuse,
misuse or defective electronics is not covered by the warranty. All warranty claims must be
accompanied by a copy of the original purchase invoice and warranties are only valid in the
country or market of original origin or distribution. Should warranty service be required, it
must be arranged for in the country of purchase by an authorized Dynaudio dealer.
All performance criteria are strictly controlled. In the whole production procedure – from
raw materials to the final assembly – Dynaudio thoroughly inspects all parameters along
every step of way.
CAUTION AGGRESSIVE CLEANING FLUIDS
All-in-one cleaning materials, aggressive cleaning fluids or special furniture polishes may
damage the cabinet surface or other speaker parts.
XUse a soft dry or slightly damp cloth when cleaning the cabinet and other plain parts.
Evidence
.
book
Seite
14
Montag
,
12
.
Januar
2009
2:04
14

Dynaudio Evidence 15
Einleitung
Deutsch Einleitung
Sehr geehrter Musikliebhaber,
vielen Dank, dass Sie sich für diesen besonderen Dynaudio Evidence Lautsprecher
entschieden haben.
Dieses Modell beinhaltet hochwertige Dynaudio Lautsprechertechnologie, die aus jeder
Musikwiedergabe ein beeindruckendes Erlebnis macht. Diese Technologie ist das
Resultat langjähriger Forschung und Entwicklung, höchster Qualitätsansprüche und der
für Dynaudio typischen Liebe zur wahrheitsgetreuen Musikwiedergabe.
Dynaudio ist einer der wenigen Hersteller, der anspruchsvolle Lautsprecherkonzepte
nicht nur in eigener Entwicklung, sondern auch in aufwändiger eigener Fertigung
realisieren kann. Aufgrund dieser Qualitätsorientierung ist Dynaudio nach der strengen,
die ISO 9000 übertreffenden Qualitätsnorm QS 9000 zertifiziert. Jedes Dynaudio
Lautsprecher Modell wird in Dänemark nach diesen höchsten Qualitätsanforderungen
gefertigt. Um die bestmögliche Klangqualität zu erzielen, sollten einige Anforderungen
beachtet werden, die wir auf den folgenden Seiten beschreiben. Sie werden so die
Freude an Ihrem Dynaudio Lautsprecher und an seinen musikalischen Fähigkeiten für
viele Jahre erhalten.
Besuchen Sie auch unsere Internetseiten unter www.dynaudio.com.
Sie finden dort zusätzliche Informationen:
• Dynaudio Fachhändler in Ihrer Nähe
• Fragen und Antworten zu Dynaudio Produkten sowie technische Informationen
• Dynaudio Veranstaltungen und Neuigkeiten
Wir wünschen Ihnen viel Spaß beim Musik hören,
Dynaudio
Evidence
.
book
Seite
15
Montag
,
12
.
Januar
2009
2:04
14

16 Dynaudio Evidence
Sicherheitshinweise
Sicherheitshinweise
Zu dieser Anleitung
Verwendete Begriffe und Symbole
In dieser Bedienungsanleitung werden folgende Begriffe und Symbole verwendet:
VORSICHT HOHE SCHALLPEGEL
Musikhören mit zu hoher Lautstärke über eine längere Zeit kann das Gehör schädigen.
XVermeiden Sie es, über eine längere Zeit mit sehr großer Lautstärke Musik zu hören.
Allgemeines Warnzeichen
Das Ausrufezeichen in einem Dreieck macht den Benutzer auf eine Gefahr aufmerksam,
die zur Beschädigung des Gerätes oder zu Verletzungen führen kann.
VORSICHT Das Warnwort VORSICHT in Verbindung mit einem Warnsymbol kennzeichnet eine
Gefahr, die zur Beschädigung des Gerätes und leichten Verletzungen führen kann.
Beachten Sie bitte unbedingt die an diesen Stellen gegebenen Anweisungen.
Hinweis: Diese Textstellen geben Ihnen zusätzliche Informationen, die zum Verständnis des
Lautsprechers und seiner Bedienung wichtig sind.
XStellen, die mit einem Pfeil markiert sind, kennzeichnen einen Handlungsschritt. Lesen
Sie bitte sorgfältig die dort gegebenen Anleitungen.
1.
2.
Mehrere Tätigkeiten, die nacheinander ausgeführt werden müssen, sind entsprechend
nummeriert. Bitte befolgen Sie die angegebene Reihenfolge.
Evidence
.
book
Seite
16
Montag
,
12
.
Januar
2009
2:04
14

Dynaudio Evidence 17
Auspacken der Lautsprecher
Die Dynaudio Evidence Modelle werden durch eine stabile und sichere Verpackung
geschützt. Aufgrund ihres hohen Gewichts und ihrer Größe werden sie in einer speziellen
Transportverpackung aus Holz versendet.
Auspacken der Evidence Master Lautsprecher:
XBitten Sie Ihren Dynaudio Fachhändler um Unterstützung.
Auspacken der Temptation und Center Modelle:
1. Legen Sie die Transportverpackung flach auf den Boden.
2. Lösen Sie die oberen Verschraubungen entlang der Deckelkante, nehmen Sie den
Deckel ab und entfernen Sie die fünf oberen Sicherheitspolster.
3. Lösen Sie die seitlichen Verschraubungen entlang der Unterkante.
4. Heben Sie den Seitenwand-Rahmen vorsichtig nach oben hoch.
5. Entnehmen Sie den nun frei liegenden Lautsprecher aus den Verpackungs-Elemen-
ten, indem Sie ihn waagerecht langsam aus der Verpackung heben.
6. Stellen Sie den Lautsprecher vorsichtig auf seine untere Standfläche.
7. Entfernen Sie die Schutzfolie, indem Sie sie vom offenen Ende her abwickeln. Benut-
zen Sie keine scharfen Werkzeuge, um die Folie zu zertrennen.
8. Befestigen Sie den Seitenwand-Rahmen wieder auf der Bodenplatte.
9. Legen Sie die Folie und die oberen Sicherheitspolster zurück in die Transportverpa-
ckung, schließen Sie den Deckel und befestigen Sie alle Schrauben.
VORSICHT SCHWERE LAUTSPRECHERELEMENTE
Das Auspacken und Aufstellen der Lautsprecher ohne Hilfe kann zu
Verletzungen oder Beschädigungen führen.
XNehmen Sie den Service Ihres Dynaudio Fachhändlers in Anspruch.
XLassen Sie sich von einer Person beim Auspacken helfen.
A
bb. 1 Verpackung (nur Temptation und Center
Modelle, die Abbildung zeigt Temptation).
Evidence
.
book
Seite
17
Montag
,
12
.
Januar
2009
2:04
14

18 Dynaudio Evidence
Anschließen
Die Transportverpackung ist für eine lange Verwendungsdauer ausgelegt und sollte zu
jedem Transport der Lautsprecher wieder genutzt werden, um Beschädigungen sicher
auszuschließen. Auch die individuell angepassten Transportverpackungen sollten für die
weitere Verwendung aufbewahrt werden.
Anschließen
Lautsprecher anschließen
1.
Verbinden Sie zunächst das Lautsprecherkabel mit den Anschlüssen des Lautsprechers
(siehe Abb. 2). Dynaudio Lautsprecher sind mit hochwertigen, kontaktsicher vergoldeten
Schraubklemmen für verschiedene Anschlusssysteme ausgestattet.
–4-mm-Stecker („Bananenstecker“): werden direkt in die offenen
Anschlussbuchsen eingesteckt. Ein Verschrauben ist nicht notwendig.
–Kabelschuhe: werden befestigt, indem Sie die Anschlüsse lösen und die
Kabelschuhe durch die Verschraubung fest auf die vergoldeten Kontaktflächen
pressen.
–Abisolierte Kabelenden: Diese können nach Herausdrehen der Verschraubung in
die mittlere Öffnung des Gewindebolzens geschoben und festgeschraubt werden.
Hinweise:
• Achten Sie bei jedem Anschlusssystem auf möglichst große, fest verbundene
Kontaktflächen, um die Klangqualität nicht durch Übergangswiderstände zu
beeinträchtigen.
• Für eine dauerhaft kontaktsichere, korrosionsfreie Verbindung sollten die
Kontaktflächen des Anschlusssystems möglichst ebenfalls vergoldet sein.
• Achten Sie darauf, dass sich an den Lautsprecher- und Verstärkeranschlüssen die
beiden Adern nicht an den blanken Kabelenden berühren.
• Ziehen Sie die Verschraubung nach einigen Tagen nochmals fest, da jede
Befestigung noch etwas nachgeben kann.
Abb. 2 Anschlussfeld am Lautsprecher.
Evidence
.
book
Seite
18
Montag
,
12
.
Januar
2009
2:04
14

Dynaudio Evidence 19
Anschließen
2. Verbinden Sie nun die Kabelenden mit den Lautsprecher-Ausgängen des
ausgeschalteten Verstärkers (siehe Abb. 3).
Hinweis:
XAchten Sie auf die richtige Polung beider Lautsprecher. Bei den meisten
Lautsprecherkabeln ist zur besseren Unterscheidung eine der beiden Adern
gekennzeichnet.
– Verbinden Sie den rot markierten Anschluss des Lautsprechers mit dem rot
markierten Ausgang des Verstärkers (+).
– Verbinden Sie den weiß oder schwarz markierten Anschluss mit dem weiß oder
schwarz markierten Ausgang des Verstärkers (–).
Bi-Wiring/Bi-Amping
Dynaudio Lautsprecher bilden durch eine aufwändige Frequenzweichenkonstruktion eine
klanglich genau abgestimmte Einheit. Eine Auftrennung der Frequenzbereiche durch
Bi-Wiring oder Bi-Amping ist nicht zu empfehlen, da hierbei die Frequenzbereiche einzeln
betrachtet werden. Dies würde zu einer unvorhersehbaren klanglichen Abstimmung führen.
Wahl des Lautsprecherkabels
Der Einfluss der Kabelqualität ist sehr bedeutend für den Klang der gesamten Anlage.
Das Kabel sollte daher mit großer Sorgfalt ausgewählt werden. Dynaudio Lautsprecher
wurden mit hochwertigen Verbindungskabeln entwickelt und sollten daher auch bei Ihnen
zu Hause mit entsprechenden Lautsprecherkabeln betrieben werden. Bitte diskutieren
Sie mit Ihrem Dynaudio Fachhändler, welche Kabel am besten mit Ihrer Anlage
harmonieren und der hohen Klangqualität Ihrer Dynaudio Lautsprecher entsprechen.
Surround-Lautsprecher anschließen
Bei Stereo-Verstärkern werden nur der linke und der rechte Lautsprecher angeschlossen.
Bei Mehrkanal-Verstärkern zusätzlich Center-Lautsprecher, Rear-Lautsprecher sowie
eventuell Subwoofer. Bitte beachten Sie hierzu die Hinweise in der Bedienungsanleitung
Ihres Verstärkers sowie das Kapitel „Aufstellen der Mehrkanal-Lautsprecher“ auf Seite 24.
Abb. 3 Lautsprecherklemmen am Verstärker
(Beispiel).
Evidence
.
book
Seite
19
Montag
,
12
.
Januar
2009
2:04
14

20 Dynaudio Evidence
Aufstellen
Aufstellen
Jeder Raum ist vollkommen individuell gestaltet und eingerichtet und verhält sich daher
völlig unterschiedlich bei der Positionierung der Lautsprecher. Die folgenden Hinweise
sind lediglich Richtlinien, die eine richtige Aufstellung erleichtern.
Allgemeine Empfehlungen
Die folgenden Hinweise beziehen sich auf Abb. 4:
• Der Abstand beider Lautsprecher zu Ihrem Hörplatz sollte gleich groß sein (B). Bilden
Sie mit den Lautsprechern ein gleichschenkliges Dreieck.
• Der Abstand zwischen den beiden Lautsprechern sollte etwas geringer sein als die
Entfernung zum Hörplatz (A, B).
• Je näher Sie an den Lautsprechern sitzen, desto geringer kann auch der Abstand
zwischen den Lautsprechern sein.
(Zur Optimierung kann ein Abstand von 2 m als Ausgangsbasis dienen, der dann
individuell dem Raum entsprechend variiert werden muss (A).)
• Bei zu geringem Abstand zwischen den Lautsprechern entsteht keine korrekte
Stereo-Abbildung; bei zu großem Abstand ist die Wiedergabe rechts-/linkslastig mit
einem deutlich hörbaren Loch in der Mitte.
• Hilfreich bei dieser Aufstellung ist eine Ihnen vertraute Aufnahme, bei der Sie die
Bühnenabbildung nachempfinden können. (Tipp: Stellen Sie den Verstärker auf
„Mono“. So können Sie die Mittenabbildung leicht optimieren.)
VORSICHT INTENSIVE LICHTEINWIRKUNG
Direktes Sonnenlicht oder intensive Helligkeit können die Farbe der Echtholzfurniere Ihrer
Lautsprecher beeinflussen. Dies hat jedoch keine Auswirkungen auf die klangliche
Qualität des Gehäuses.
XUm die optische Qualität Ihrer Lautsprecher auf lange Sicht zu gewährleisten, sollten
Sie die Aufstellung an sehr warmen, kalten oder feuchten Orten vermeiden.
Abb. 4 Die Lausprecher aufstellen.
A
BB
A≤B
Evidence
.
book
Seite
20
Montag
,
12
.
Januar
2009
2:04
14
Other manuals for Evidence
1
This manual suits for next models
1
Table of contents
Languages: