Dyne Telecom DN464 User manual

Digital Voice Recorder
User Manual
DN464 / DN4128
DYNE TELECOM CO., LTD.

THIS DEVICE COMPLIES WITH PART 15 OF THE FCC RULES. OPERATION IS
SUBJECT TO THE FOLLOWING TWO CONDITIONS: (1) THIS DEVICES MAY NOT
CAUSE HARMFUL INTERFERENCE, AND (2) THIS DEVICE MUST ACCEPT ANY
INTERFERENCE, RECEIVED, INCLUDING INTERFERENCE THAT MAY CAUSE
UNDERSIRED OPERATION.
Note : This equipment has been tested and found to comply with the
limits for a Class B digital device, pursuant to part 15 of the FCC Rules.
These limits are designed to provide reasonable protection against
harmful interference in a residential installation. This equipment
generates, uses and can radiate radio frequency energy and, if not
installed and used in accordance with the instructions, may cause
harmful interference to radio communications. However, there is no
guarantee that interference will not occur in a particular installation. If
this equipment does cause harmful interference to radio or television
reception, which can be determined by turning the equipment off and
on, the user is encouraged to try to correct the interference by one or
more of the following measures :
-Reorient or relocate the receiving antenna.
-Increase the separation between the equipment and receiver.
-Connect the equipment into an outlet on a circuit different from that
to which the receiver is connected.
-Consult the dealer or an experienced radio/TV technician for help.
NOTE: THE MANUFACTURER IS NOT RESPONSIBLE FOR ANY RADIO OR TV
INTERFERENCE CAUSED BY UNAUTHORIZED MODIFICATIONS TO THIS EQUIPMENT.
SUCH MODIFICATIONS COULD VOID THE USER'S AUTHORITY TO OPERATE THE
EQUIPMENT.

Features
●Long Time Recording
Maximum 1100 minutes recording. (64MB)
●MP3 Playback
Record and playback the digital music.
●Digital Interface
Edit, store and E-mail the recorded contents through PC.
●Repeating
You can repeatedly listen to the sections as you want.
●VOR (Voice Operated Recording)
Recording only when sounds exists. So you can treat recording time sufficiently.
●Recording Sensibility
You can adjust recording sensibility according to the noise around and distance from sound
source.
●Message Scanning
You can rapidly search the desired part of the message during playback.
●Time Display
Present time is shown on display.
●Alarm
You can set the alarm as you want.
●Recording the Phone Conversation
You can record important phone conversation.
Precautions
Please read the following precautions before using the unit.
●Do not disassemble & assemble the unit for yourself.
●Do not drop the unit, or give it a mechanical shock. When the unit is not used, safekeeping
is needed to avoid its damage.
●Do not use or place the unit in hot or humid condition. Be careful that the unit is not wet.
Wetting can cause a critical damage that can make it impossible to repair the unit.
●Do not use the unit in the place which is exposed to the explosive or inflammable
substances.
●Do not clean the unit with the inflammable solvents like alcohol, benzine and thinner, etc.
●Avoid using the unit while driving or walking. It might cause some unexpected accidents.
●When you are not going to use the unit for a long time, remove the batteries to prevent
damage from battery leakage and corrosion.
●Avoid being put near by magnetic cards such as credit cards. Otherwise the cards may no
longer be used.
●Note that our company does not reimburse you for any loss from the use of the unit or any
demand of indemnity from the third person.
●Be understood that our company does not take responsibility for any memory loss by the
reasons of breakdown, repair, and others.
●It could be illegal to use or duplicate the recordings beyond a private purpose.

- 1 -
Contents
Preparing
Description of the unit
Insert battery
Connect DC adaptor
Basic Functions
Selecting Voice Recorder / MP3(Music) mode
Adjusting the Volume
How to set the Menu
1. Voice Recorder
Recording
Playback
Erasing the Message
2. MP3 Player
Playback
Erasing the MP3(Music) file
How to use the MENU
How to set the menu and menu order
1. Voice Recorder
Menu of the Voice Recorder
2. MP3 Player
Menu of the MP3 Player
Connecting to the External Device
Connecting to the External Microphone
Connecting to the telephone
Connecting to the Audio system
Connecting to PC
Others
Troubleshooting
Specification
Warranty

- 2 -
Preparing
Description of the Unit
Front Window Display
ORDER
Left Right Top
BottomRear
Accessories:
Battery (AAAx1EA), Earphone, External MIC, Hand Strap, USB Cable, Audio Cable,
Telephone Adaptor, Telephone Cable, CD-ROM, User's Manual.
Window Display
Jog Button
(Volume/Repeat/
REW/FF)
MENU/PAUSE
ERASE
Voice Recorder
mode
MP3 mode
Section Repeat
ROCK mode
JAZZ mode
CLASSIC mode
Date/Time
Folder No.
File Number
Repea
tBattery Life
Voice / MP3 mode
Setting Alarm
Recording LED
Playing LED
Messages
VOR
Recording mode
Lock mode
HOLD Switch
USB Port
MP3/VOICE
MIC. Output
EAR. Output
Battery
Cover
PLAY/STOP
REC/STOP
Built-in
Speaker
Built-in MIC
AC Adaptor port
Battery Cover

- 3 -
Insert Battery
1. Open the battery cover.
●Pushing cover, and slide it off as following arrow direction.
2. Insert the battery noting the correct polarity and close the cover.
●The current time is shown. To set the current time, refer to page __.
3.Checking the battery condition
full normal weak exhausted
Connect DC Adaptor
You can use this unit without batteries by DC adaptor.
Specification of DC Adaptor
You have to purchase the DC adaptor suitable for following requirements, and then connect it.
If a adaptor is not suitable for following requirements, it may cause a fatal defect.
ㆍExternal diameter : 2.35ø
ㆍInternal diameter : 0.7ø
ㆍRegular output : Voltage - 4.5 ~ 5V, Current - 300mA and over.
♠NOTE
Please use it after checking the polarity of DC adaptor because it may cause the trouble of
the unit if the polarity is changed.
Basic Functions
Selecting Voice Recorder / MP3(Music) Mode
You can record the messages at the Voice Recorder mode and listen to the digital music at
the MP3 mode with this unit. First select the mode you want.
To select the Voice Recorder Mode
Slide the MP3/VOICE switch to VOICE mode.
2
●The recording folder, message No. and time are displayed.
Voice recording and playing the message are available .
To select the MP3(Music) mode
Slide the MP3/VOICE switch to MP3 mode.
2
●MP3 file No. and playing time are shown. You can listen to the music.
♠NOTE
2.35ø(-)
0.7ø(+)

- 4 -
If you do not press any button over a minute, this unit will be automatically
off and show present time. We call it "stand-by" mode.
Adjusting the Volume
You can adjust the volume level from 0 to 30.
Increasing the volume
Press
+
(up-side) of Jog button.
●The sound becomes louder by pressing the button.
Decreasing the volume
Press ━(down-side) of Jog button.
●The sound becomes smaller by pressing the button
♠NOTE
.You cannot adjust the volume at stand-by mode.
To escape from stand-by mode, press MENU/PAUSE button.
Listening to the Music/Message through earphone
You can listen to the Music and Messages more clearly with the earphone.
Connect the earphone to output Ear. jack.
●You can listen to the music through earphone.
Setting the Holding Function
Slide the Hold button to down side.
●All buttons are not operated.
Voice Recorder
Recording
1. Select the file to record message at File mode in Menu.
●Each time you press
+
, ━of Jog button, each 4 file indicator
A →B →C →D
comes on in order.
1. Move MIC toward the sound source and then push
REC/STOP button. Recording is started.
●The red lamp turns on and recording is started
The recording number and time are displayed.
2. To stop the recording, press REC/STOP button again.
●The lamp turns off and recorded contents are saved.
♠NOTE
In the case that memory is full or the number of message in a file is over,
then 'FULL' is shown on LCD and you cannot record any more.
☞Please erase unnecessary messages to record.

- 5 -
Playback
1. Press or of jog button, and select recording No. to play.
2. Press PLAY/STOP button.
●Playing time is displayed and playing is started.
3. To stop playing, press PLAY/STOP button again.
To pause Recording / Playback
To pause recording or playing, press MENU/PAUSE button during recording
or playback.
To restart recording press MENU/PAUSE again.
●After 10 minutes at 'Pause' status, recording stops automatically.
To monitor during recording
Connect earphone to the unit, you can monitor the contents during recording.
To add Index
Press of jog button during recording, the new recording No. is made and the message
is recorded in new file.
Scan Playback
Keep pressing PLAY/STOP button at least 3 seconds.
●The first part of each message in the current file will be scanned for 5
seconds.
REW and FF during playback
If you press or of jog button during playback, it plays as jumping forward or
backward fast.
Section Repeating
1. Press the center of jog button at the start of the section you want to repeat during
playing.
●- is shown.
2. Press the center of jog button again at the end of the section you want to repeat.
●is shown, then it repeats playback from to (-).
●To cancel this function, press any button.
2

- 6 -
Start of the section End of the section
Erasing the Message
【
Erasing one recorded message
】
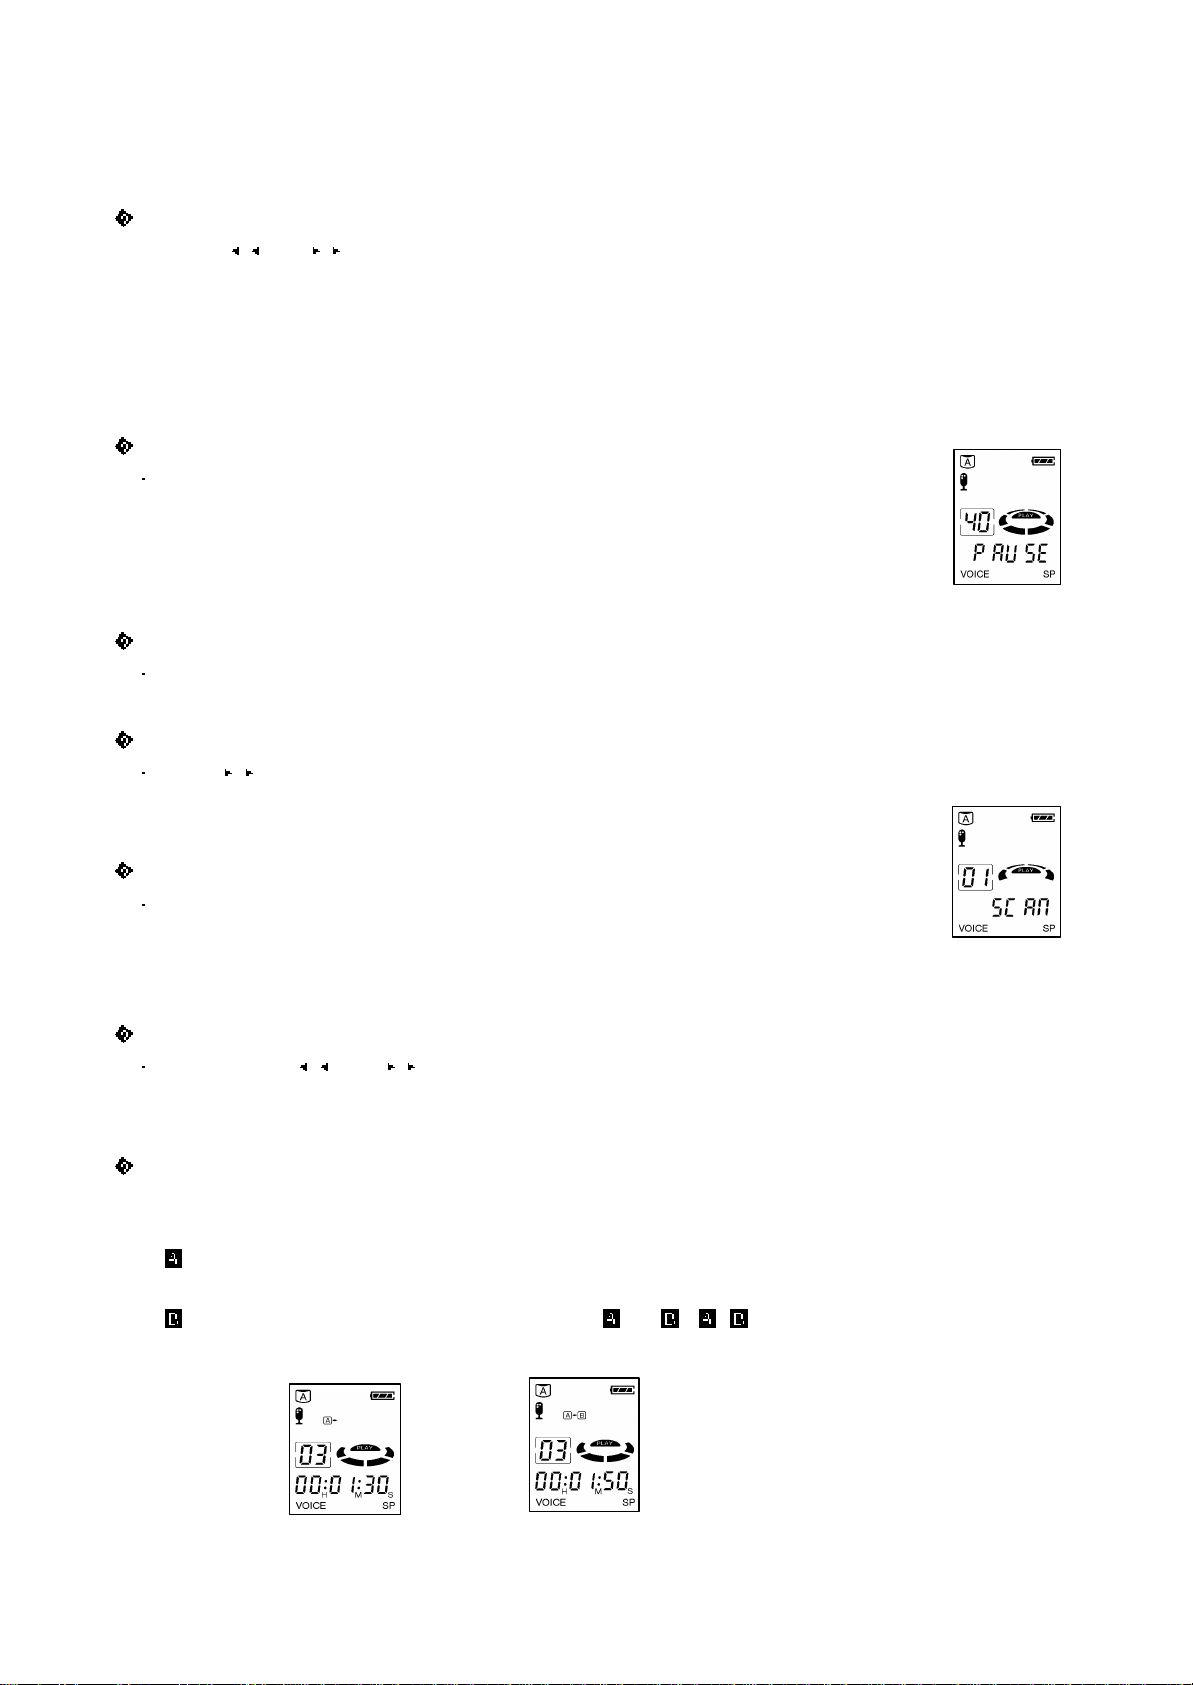
1. Select the message to erase by pressing or of jog button.
2. Select 'On' by pressing ERASE button at least 3 seconds.
●"dEL : On" is shown and the message No. blinks on display.
●Each time you press
+
, ━of jog button,
On →FI →AL
comes on in order.
-
On
(ONE) : Erasing the message
-
FI
(FOLD) : Erasing all messages in one file
-
AL
(ALL) : Erasing all messages
3. Press ERASE button again.
●"Ok"display and selected message is erased.
●When you erase one message, the number of messages are arranged
automatically.
※Caution
Once erased messages never be restored. Check before erasing.
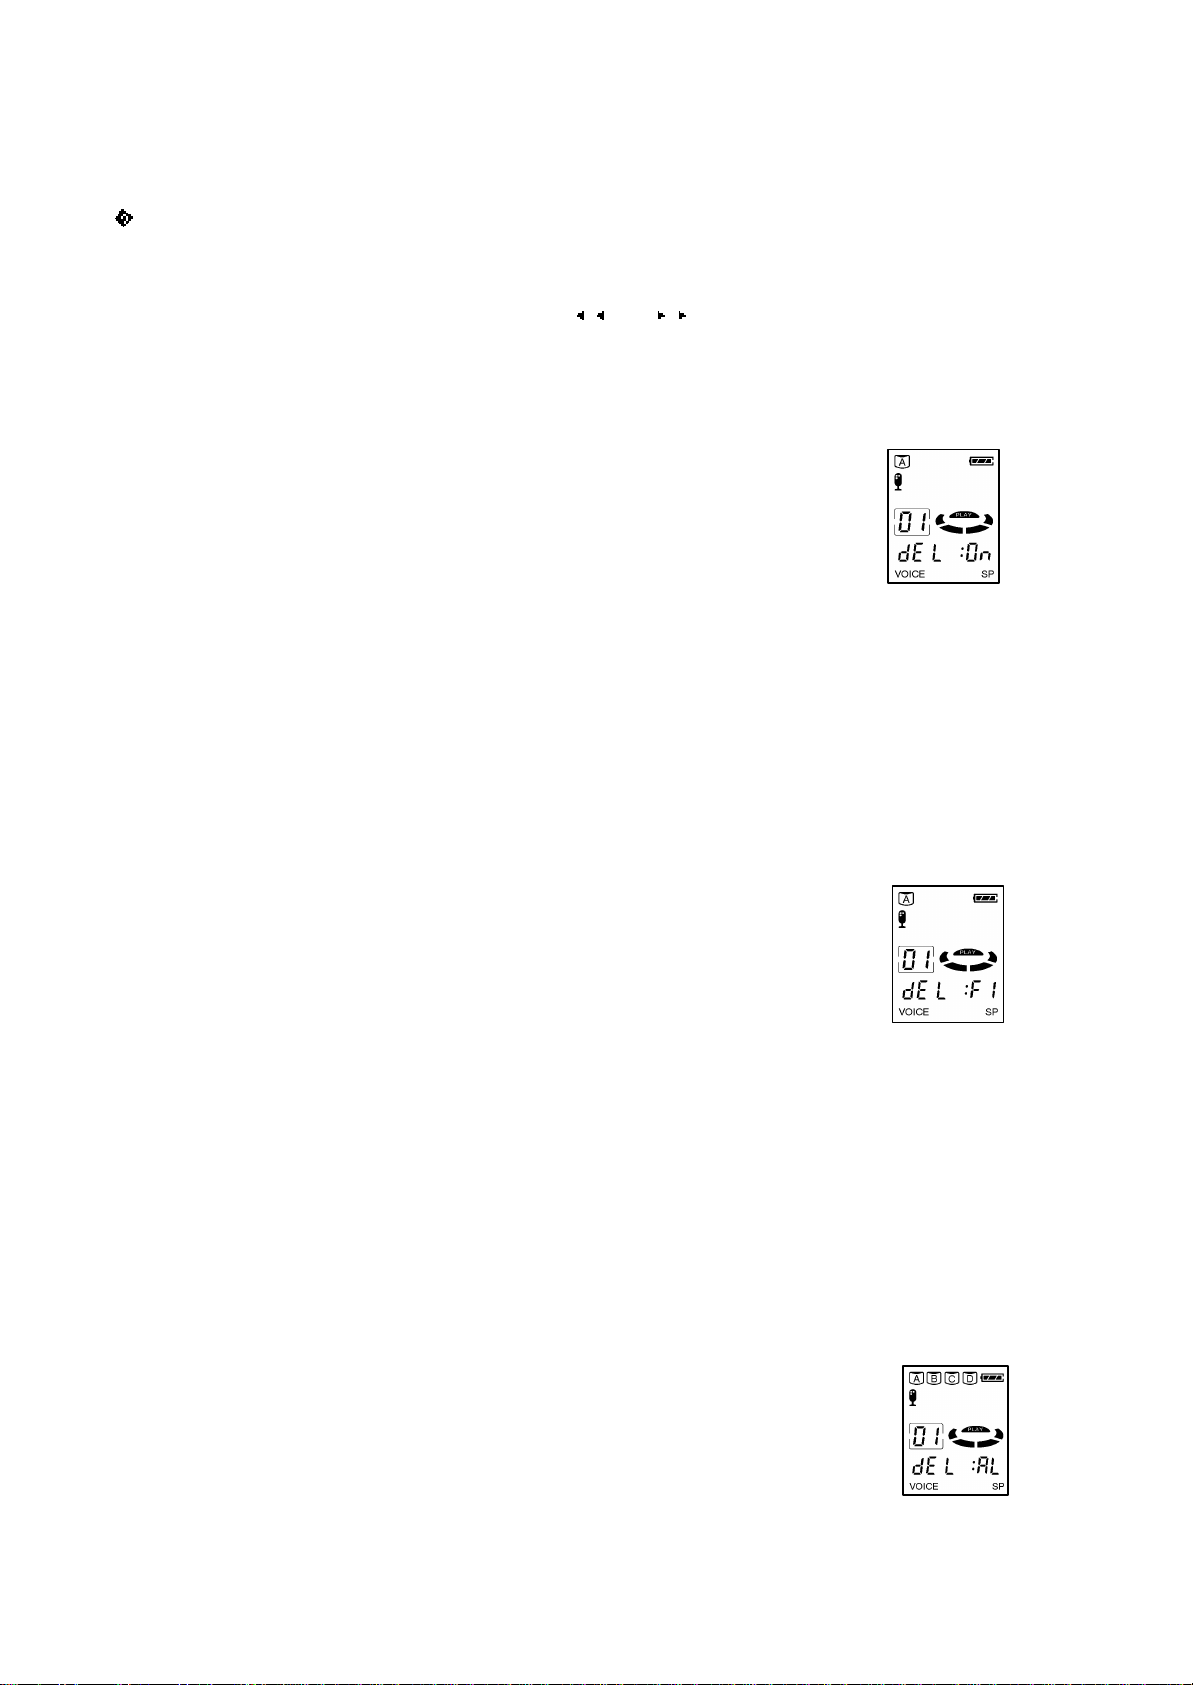
[Erasing all messages in a file
】
1. Select the folder to erase by pressing
+
, ━of jog button at FILE mode in MENU.
●Each time you press jog button, file indicator
A →B →C →D
comes on in order.
2. Press ERASE button, and select F1 by pressing
+
, ━of jog button.
●‘dEL : FI’is shown and message No. blinks on display.
●Each time you press
+
, ━of jog button,
On →FI →AL
comes on
in order.
-
On
(ONE) : Erasing the message
-
FI
(FOLD) : Erasing all messages in one file
-
AL
(ALL) : Erasing all messages
3. Press ERASE button again.
●"Ok"display and all messages in the selected folder will be erased.
※Caution
Once erased messages never be restored. Check before erasing.
[Erase all messages in the unit
】
1. Press ERASE button at least 2 seconds, and select 'AL' by pressing
+
, ━of jog button.
●‘dEL : AL’is shown and 'A, B, C, D' blinks.
●Each time you press
+
, ━of jog button,
oN
→
FI
→
AL
comes on
in turn.
-
On
(ONE) : Erasing one message
-
FI
(FOLD) : Erasing all messages in one file
-
AL
(ALL) : Erasing all messages
2. Press ERASE button again.
●"Ok"display and all recorded messages will be erased.

- 7 -
※Caution
Once erased messages never be restored. Check before erasing.
MP3 Player
Playback
1. Select the MP3 file number pressing or of jog button.
2. Press PLAY/STOP button.
●Playing is started and the playing time is displayed.
3. To stop playing, press PLAY/STOP button again.
Section Repeat
1. Press the center of jog button at the start of the section you want to repeat during
playing.
●- is shown.
2. Press the center of jog button again at the end of the section you want to repeat.
●-is shown, then it repeats playback from to (-).
●To cancel this function, press any button.
2
Start of the section End of the section
To play the desired section in MP3 (Music)file
Press or of jog button during playing.
●The message is played at the moment you release the button.
Scan Playback
Keep pressing PLAY/STOP button at least 3 seconds.
●The first part of each message in the current file will be scanned for 5 seconds.
To pause Playback
To pause playing, press MENU/PAUSE button during playing.
To restart recording press MENU/PAUSE again.
●After 10 minutes at 'Pause' status, recording stops automatically.
Erasing MP3 (Music) File
[Erasing one MP3 (Music)file]
1. Select the MP3 (Music) file that you would erase by controlling or of jog button.
2. Keep pressing ERASE button for at least 2 seconds to select on.
●"dEL : On" is shown and "MP3 file" blinks.
●Each time you push
+
, ━of jog button,
On
→
AL
comes on in turn.
-
On
(ONE) : Erasing one MP3 File.

- 8 -
-
AL
(ALL) : Erasing all MP3 files.
3. Press ERASE button again.
●“Ok”is shown and selected file is erased.
●After erasing, the number of MP3 file is arranged automatically.
[To erase all MP3 files]
1. Keep pressing ERASE button at least 2 seconds and select '
AL
' by controlling
+
, ━of jog
button.
●"dEL : AL" is shown and "MP3" blinks.
●Each time you push
+
, ━of jog button,
On
→
AL
comes on in turn.
-
On
(ONE) : Erasing the selected MP3 File.
-
AL
(ALL) : Erasing all MP3 files in the unit.
2. Press ERASE button again.
●“Ok”is shown and selected all MP3 files are erased.
♠NOTE
The erased MP3 file cannot be restored. Check before erasing.
How to use the MENU
To use the unit more efficiently, it will be very helpful if you know well how to set the menu.
Basic method for setting menu is as below.
1. Keep pressing MENU/PAUSE button at least 3 seconds at stand-by mode or during playing.
●Menu setting mode is shown.
MENU EquipmentSetting ContentsSettings
MOd (MODE)VOICE Record mode : SP/ HQ/ SHQSP
MICVOICEMIC. sensitivity : LOW/ HILo
LOCKVOICEPrevent messages harmed : ON/
OFF OFF
FILEVOICESelect message file : A/ B/ C/ DA
EQMP3Select music genre:
EQ:OFF/ ROCK/ JAZZ/ CLASSICEQ: OFF
BASS MP3Select mid-low tone : OFF/ON OFF
REP (REPEAT)VOICE/MP3Setting repeat:
OFF/ FI/ ALL/ CONTINUOUSLYOFF
HEARVOICE/MP3Hear. Aid facility : ON (Using EAR.)OFF
ARM (ALARM)VOICE/MP3Setting alarmOFF
dATE (DATE)VOICE/MP3Setting time and date02, 01. 01.
12:00:00

- 9 -
●Each time you press MENU/PAUSE button, the 'Menu' will be changed as bellow.
- VOICE mode (stand-by mode)
In order of
MOd →REP →VOR →MIC →LOCK →FILE →HEAR →ARM →dATE
- VOICE mode (playback)
In order of
REP
- MP3 mode (stand-by mode)
In order of
EQ →BASS →REP →HEAR →ARM →dATE
- MP3 mode (playback)
In order of
REP →EQ →BASS
●To revere the Menu, press of jog button.
2. Select the desired menu by pressing MENU/PAUSE button.
3. Select the desired function by pressing
+
, ━of jog button.
●Each time you push
+
, ━of jog button, the function is changed.
4. To finish, press PLAY, ERASE or REC button.
●It will be run as you select.
Voice Recorder
Changing Recording Mode
1. Select MOD mode in menu.
●'MOD : SP' is shown.
2. Select MOD by pressing
+
, ━of jog button.
●Each time you press the jog button,
SP →H →SH
comes on in order.
3. After selecting MOd, push PLAY, ERASE or REC button.
SP mode HQ mode SHQ mode
Repeating the Playback
1. Select REP mode in menu.
●REP: oF is shown.
2. Select repeat function by pressing
+
, ━of jog button.
●Each time you press the jog button,
oF
→
FI
→
AL
→
Co
comes onin order.
3. Press PLAY, ERASE, REC button after setting up.
1
1
Repeat Playback Mode Repeat one Repeat all messages Repeat all messages
(Not repeat yet) Message in current folder one time in current folder

- 10 -
continuously
Setting the VOR Recording
VOR(Voice Operating Record) function is that the unit records only when the sound exists.
1. Select VOR mode in menu.
●'VOR: oF' is shown.
2. Select ON or OF by pressing
+
, ━of jog button.
●Each time you press the jog button,
oF →On
comes on in order.
3. After selecting, push PLAY, ERASE or REC button.
3
VOR ON VOR OFF
Adjusting the Recording Sensitivity
1. Select MIC mode in menu.
●'MIC Hi' is shown.
2. Select recording sensitivity by controlling
+
, ━of jog button.
●Each time you press the jog button,
Hi →Lo
comes on in order.
3. After selecting, press PLAY, ERASE or REC button.
MIC HI(High Sensitivity) MIC LO(Standard Sensitivity)
Sound source is far or Sound source is near or
there is little noise. there is much noise.
Setting the Lock Function
1. Select LOCK mode in menu.
●‘LOCKoF’is shown.
2. Press
+
, ━of jog button to select ON or OF.
●Each time you press the jog button,
oF →On
comes on in order.
3. To finish, press PLAY, ERASE or REC button.
LOCK OFF LOCK ON
♠NOTE

- 11 -
The locked messages is NOT erased.
Setting the FILE
1. Select FILE mode in menu.
●‘FILE: A’is shown.
2. Press
+
, ━of jog button to select the FILE to record.
●Each time you press the jog button,
A →B
→C →D
comes on in order.
3. To finish, press PLAY, ERASE or REC button.
Setting the Hear Aid Function
1. Connect the earphone to the earphone terminal.
2. Select HEAR mode in menu.
●‘HEAR: On’is shown and this function works.
●Adjust the volume by pressing
+
, ━of jog button.
●‘HEAR: oF’will be shown if unplug the earphone from the unit.
3. To finish this function, press PLAY, ERASE or REC button.
Setting Alarm
1. Select the ARM mode in menu.
●'ARM: oF' is shown.
2. Select Alarm ON or OF by pressing
+
, ━of jog button to.
●Each time you press the jog button,
oF →On
comes on in order.
3. Setting 'hour' and 'minute' by pressing of jog button at ARM ON mode.
●'Hour' blinks and then 'minute' blinks when you press of jog button
after time setting.
At the same way, set the 'minute'.
4. After setting, press PLAY, ERASE or REC button.
♠NOTE
To finish the ARM setting, change Alarm
On →oF
at ARM mode
.
Setting the current time
1. Select DATA mode in menu.
●'dATE' is shown, and year blinks.
2. Set year, month, date & hour, minute, second by controlling jog button.
●
+
, ━of jog button : Changing set contents
3.
●or of jog button : Shifting to left or right.
3. To finish, press PLAY, ERASE or REC button.

- 12 -
MP3 Player
Selecting the Sound Mode
1. Select EQ mode in menu.
●"EQ: oF" or "ROCK, JAZZ, CLASS1" is shown.
2. Select the desired sound mode by controlling
+
. ━of jog button.
●Each time you press the jog button,
oF →ROCK →JAZZ →CLASS1
comes on in order.
3. After setting, press PLAY, ERASE or REC button.
EQ OF (Standard Mode) ROCK (Rock Mode) JAZZ (Jazz Mode) CLASS (Classic
Mode)
Setting the Bass Mode
1. Select BASS mode in menu.
●"BASS: oF" is shown.
2. Select the desired sound mode by controlling
+
, ━of jog button.
3. After setting, press PLAY, ERASE or REC button.
Bass Mode ON Bass Mode OFF
Repeating the Playback
Setting method is same as the Voice Recorder.
Setting the Hear Aid Function
Setting method is same as the Voice Recorder.
Setting Alarm
Setting method is same as the Voice Recorder.
Setting the current time
Setting method is same as the Voice Recorder.

- 13 -
Connecting to the External Device
Connecting to the External Microphone
You can easily record the message by using the external microphone.
1. Connect the external microphone to the MIC terminal of the voice recorder.
2. Press REC/STOP button.
●It starts recording.
3. To stop the recording, press REC/STOP button again.
Connecting to the Telephone
You can record telephone conversation.
1. Connect the Voice Recorder to the telephone using telephone adaptor.
2. Press REC/STOP button during conversation.
●The conversation will be recorded.
3. To stop recording, press REC/STOP button again.
♠NOTE
However, you cannot record the conversation through the digital telephone.
Connecting to Audio System
»
To record the contents of the Audio in the Voice Recorder
1. Connect the Voice Recorder to the audio system.
2. Press REC/STOP button of the Voice Recorder and the playing button of audio at the same
time.
3. To stop recording, press REC/STOP button again.
»
To record the contents of Voice Recorder into Audio
1. Connect the Voice Recorder to the audio system.
2. Select the message which you would record into audio.
●Refer to No. 1 of Playback.
3. Press PLAY/STOP button of the Voice Recorder and the recording button of audio at the
same time.
4. To stop recording, press PLAY/STOP button of the Voice Recorder and stop button of Audio
at the same time.
Connecting to PC
●You can copy the message in the Voice Recorder to PC. Also, you can play and edit the
sound files on PC.
●Refer to 'Help' of the 'Express Media Player' for the details.
보이스 매니저 프로 설치하기

- 14 -
System Requirements:
●Computer: Pentium or higher, IBM compatible, USB port support
●Memory: Above 64M
●Operating System: Windows 98 / Me / 2000 / XP
●Hard Disk: 100M or bigger empty space
●For playing: Sound Card, Speaker
●For recording: Sound Card, Microphone
Connecting to PC(cont.)
To manage the recorded messages with 'Express Manager', connect the Voice Recorder to PC
with USB cable.
♠NOTE
Before connect the USB Cable, set the ‘Express Manager' in PC first.
●
Express Manager Installation
●
Express Media Player Installation
●
Express Manager User Manual
●
Express Media Player User Manual
Others
Troubleshooting
Check for the following points first if any problem happens.
LCD window
does not work.
Isn't the battery exhausted? →Replace with new battery.
Is the battery installed correctly? →Insert the battery with the correc
t
polarity.
Recording
does not work
Isn't the Hold switch set? →Release the Hold switch.
Is there no space for recording? →Erase the unnecessary messages.
Isn't the battery exhausted? →Replace with new battery.
Playing
does not work
Isn't the Hold switch set? →Release the Hold switch.
Is there any messages recorded? →Check for the message number.
Isn't the battery exhausted? →Replace with new battery.
No sound
output from
the speaker
Isn't the volume is set to '0'? →Adjust the volume.
Is the earphone plugged in the unit? →Unplug the earphone.
No sound
output from
the earphone
Isn't the volume is set to '0'? →Adjust the volume.
Isn't the earphone unplugged in the unit? →Plug the earphone.

- 15 -
Specifications
Warranty
In occurring of trouble, please contact to sales agency.
ModelDN-432 DN-464 DN-4128
Built-in Flash Memory32MB64MB128MB
Recording Time(SP/HQ/SHQ)265Min/130Min/65Min550Min/265Min/135Min1100Min/530Min/265Min
Max. number of recording396 Messages (4 folders)
Dimensions (L x W x D)78 x 28 x 14mm
Weight33g (excluding battery)
Power RequirementsDC 1.5V (AAA battery 1EA)
Battery LifeRecording: about 5 hours,
MP3 playing : about 6 hours (Earphone, Volume 20)
Recording DeviceBuilt-in Flash Memory
Frequency RangeVoice : 300Hz ~3.3KHz
MP3 : 20Hz ~20KHz
Effective Max. Output50mW (16 ohm, THD 10%)
InputMono Jack(φ3.5mm) and Built-in MIC
OutputStereo Jack(φ3.5mm, Output: Stereo) and Built-in speaker
Speakerφ23mm
MicrophoneBuilt-in nondirectional electric capacitor Microphone (Mono)
Operating Temperature0℃~40℃
AccessoriesManual, Stereo Earphone, Ext. Microphone, Audio Cable, Telephone Adapto
r
& Cable, USB Cable, Hand Strap, Battery, CD-ROM.
ProductDigital Voice
RecorderModelDN-432/ DN-464/ DN-4128
Assurance
period1 YearSales dateyy mm dd
CustomerAddress
Name
Tel
sincerely
Sales agencyAddress
Name
Tel
sign
This manual suits for next models
1
Table of contents