e-Flame USA Hamilton EL-BLT01 User manual

Page 1
HAMILTON ELECTRIC STOVE HEATER MODEL
EF-BLT01 / EF-BLT04 / EF-BLT07 / EF-BLT08
OPERATION MANUAL
NO VENTALATION REQUIRED
PRODUCES SAFE AND EFFICIENT HEAT
PLEASE READ THIS ENTIRE INSTRUCTION MANUAL BEFORE USING
110/120-VOLT / 1500-WATT
SAVE THESE INSTRUCTIONS FOR FUTURE USE

Page 2
Quick Reference Guide:
1. Prior to plugging your heater into a convenient outlet, first verify that the circuit breaker for
the outlet is on.
2. The heater may emit a slight harmless odor when firstused. This odor is normal and is caused
by the initial heating of the internal heater parts, but will not occur again.
3. If the heater does not emit any heat, please consult the manual for further instructions.
CAUTION:
- RISK OF ELECTRIC SHOCK
- DO NOT OPEN
- THERE ARE NO SERVICEABLE PARTS INSIDE (EXCEPT FOR THE LIGHT BULBS)
- HIGH TEMPERATURE WHEN IN USE
- KEEP ELECTRICAL CORDS, DRAPERY, AND ALL FURNISHINGS, AT LEAST
THREE INCHES FROM THE FRONT, AND SIDES, OF THE HEATER AT ALL TIMES
WARNING:
- RISK OF FIRE
- KEEP COMBUSTIBLE MATERIAL AWAY FROM THE FRONT OF HEATER
- SERVICING SHOULD ONLY BE DONE WHEN THE HEATER IS UNPLUGGED
FROM THE POWER SUPPLY
CAUTION WHEN CHANGING LIGHTBULBS
REPLACE ONLY WITH E12 CLEAR, SCREW FITTING, WITH A RATING OF 110-120 /
40-WATT MAXIMUM
Lightbulbs are not covered under this warranty

Page 3
IMPORTANT SAFETY INSTRUCTIONS:
When using electrical appliances, to reduce the risk of fire, electric shock, and injury, basic
precautions should always be followed, including the following:
1.
Read all the instructions before use.
2.
This heater will get hot when in use. To avoid burns, do not let bare skin touch any of the hot
surfaces.
3.
Keep combustible materials such as furniture, pillows, bedding, papers, clothes, and curtains,
at least 3-inches away from the front of heater, and keep them away from the sides of heater.
4.
Extreme caution is necessary when the heater is used near children, elderly and pets. Never
leave the heater unattended.
5.
Always unplug the heater when not in use.
6.
Do not operate any heater that has a damaged cord or plug. Do not operate if the heater has
malfunctioned, or has been dropped, or is damaged. Return the heater to an authorized service
facility for repair if damage has occurred.
7.
Do not use outdoors.
8.
This heater is not intended for use in bathrooms, laundry areas, or any similar indoor location.
Never place heaters where it may fall into a bathtub or another water source.
9.
Do not run cord under carpeting. Do not cover cord with throw rugs, runners, or any kind of
textile. Keep the cord away from traffic areas where it could be tripped over.
10.
To disconnect the heater, turn the control to off, then remove the plug from the outlet.
11.
Connect to a properly grounded outlet only.
12.
Do not insert or allow foreign objects to enter any ventilation or exhaust opening as this may
cause an electric shock or fire, as well as damage the heater.
13.
To prevent a possible fire, do not block the air intake or exhaust in any manner.
14.
Do not use on soft surfaces, such as a bed, where openings may become blocked.
15.
This heater has hot and sparking parts inside. Do not use it in any areas where gasoline, paint,
or flammable liquids are used or stored.
16.
Use this heater only as described in this manual. Any other use not recommended by the
manufacturer may cause fire, electric shock, or injury.
17.
Avoid the use of an extension cord because the extension cord may overheatand cause a fire.
18.
Do not strike the heater glass.
19.
Always use properly grounded, fused, and polarized outlets.
20.
Always disconnect the power before cleaning, performing maintenance, or relocating the
heater.
21.
When transporting or storing the heater, keep in a dry place that is free from excessive
movement or vibration.

Page 4
22.
A motor powers the flame effect, and it is normal for the motor to make some noise as it slowly
rotates and creates the beautiful 3D flame effect.
23.
Every effort is made to ensure packing materials are kept outside of the plastic bag, which
covers your heater in the box. There is a chance that some packing may lodge itself into the
heater part of the unit. If you notice this upon close inspection, please remove it before turning
the heater on. When turning your heater on for the first time it is normal for the heater to emit
a little ‘new heater’ smell, which will quickly pass.
24.
You may notice some light coming from underneath, or from the sides, of the unit. This is
normal and the holes allow the unit to ‘breathe’. Do not block these holes.
25.
This heater is only to be used on a 110-120-volt, 15-amp, grounded circuit. Do not use in an
outlet controlled by a switch or dimmer switch. The cord supplied with the heater has a 3-prong
plug. The round pin on the plug is for grounding purposes. If a 3-prong outlet is not available,
an adapter must be used, and the adapter must be properly grounded to an outlet box. Do not
plug any appliances into the same circuit as the heater.
-Save These Instructions-
Page 5
When the heat function is used for the first time, a slight odor may be present. This is
normal and should not occur again unless heater has not been used for an extended
period of time.
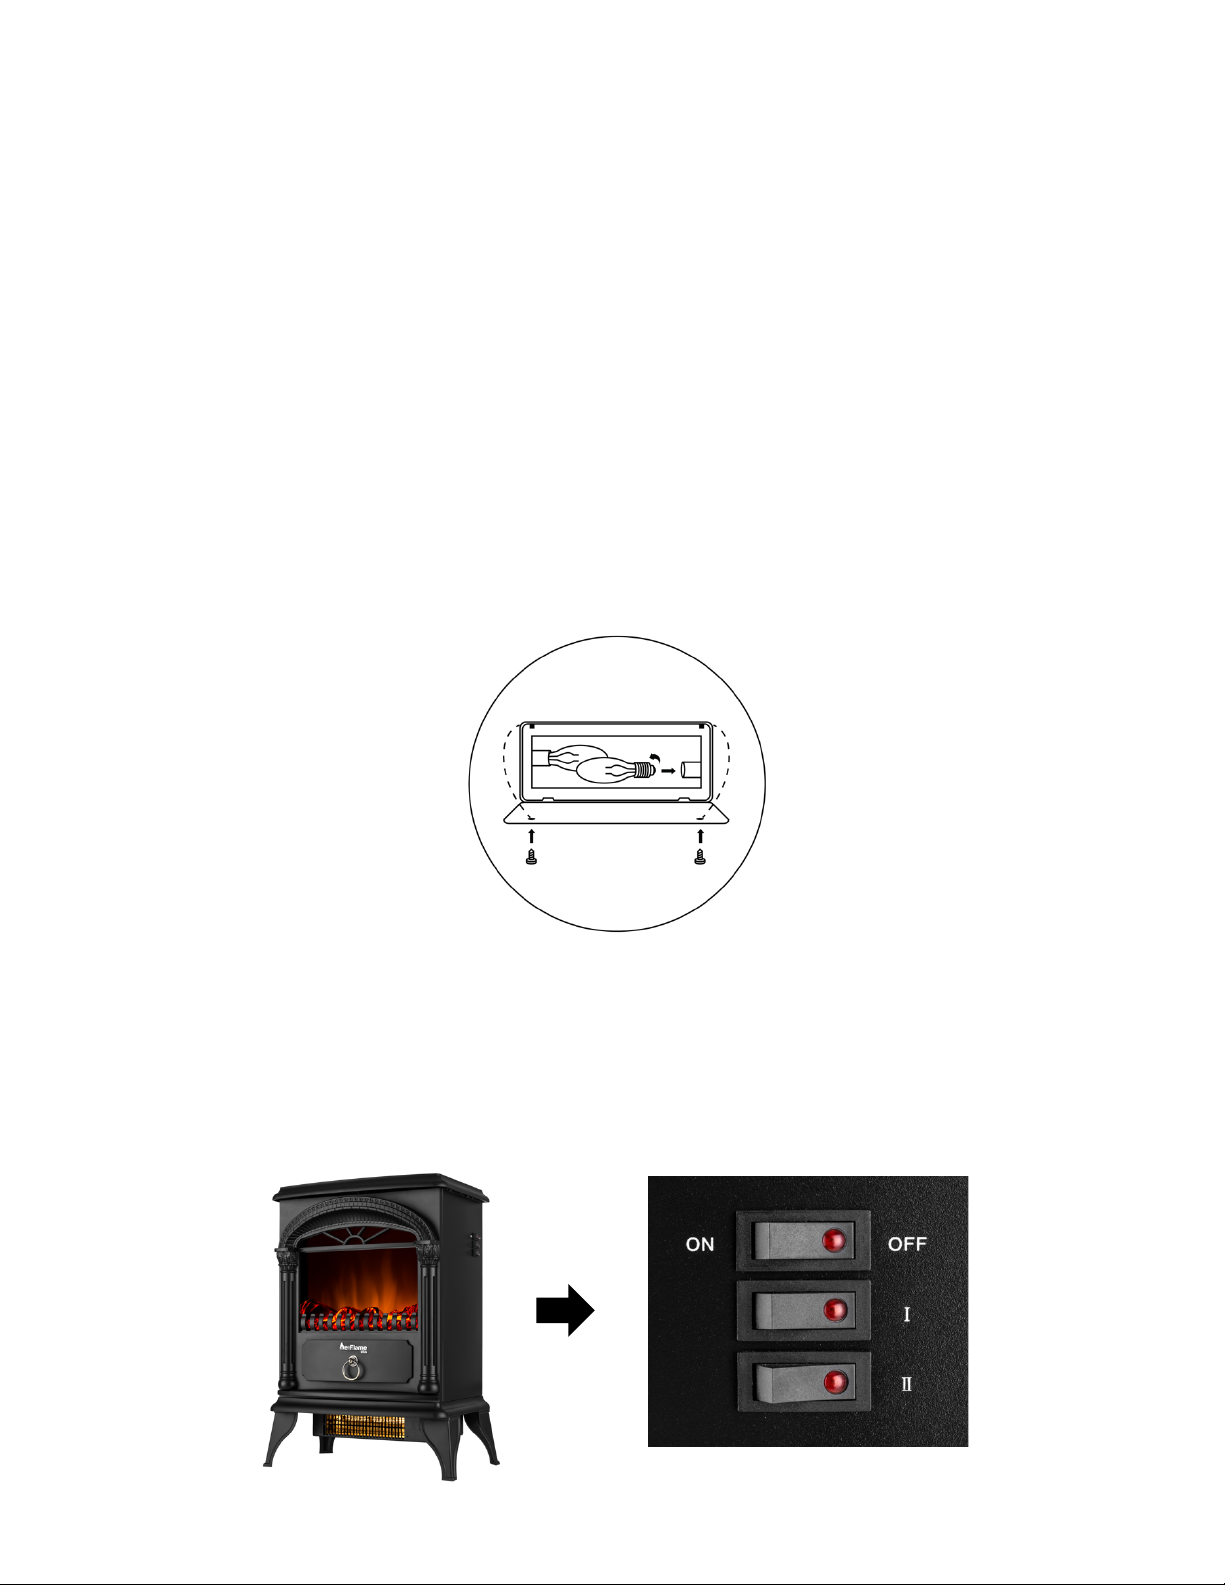
Flame Effect / Lightbulb Replacement
Caution: Lightbulbs will become very hot when they are in use. Allow at least ten
minutes for lightbulbs to be cool before touching.
The flame effect on this electric stove heater is created by two 40-watt lightbulbs with an E-12
(small) socket base. Only use 40-watt lightbulbs in this unit. To service lightbulbs, unplug the
power cord from the outlet, and locate the access panel on the back of the stove. Remove the
screws and the panel. Lightbulbs may have come loose, or may have become damaged, during
shipping. If the flame effect does not work properly, check to be certain that both bulbs are
screwed in tightly, and are in working order. Replace the lightbulbs as needed. Replace the
access panel. Do not operate without the access panel in place. Do not remove the back cover
of the heater. There are no serviceable parts inside the heater.
Controls / Operation
After reading the safety instructions, and this entire manual, be certain that the controls are in
the OFF position. The heat and flame affect controls are located on the right side of heater. Your
heater stove is now ready for operation. Plug the unit into a grounded 15-amp with a 110 / 120-
volt outlet. For the flame affect only, slide the ON / OFF switch to the ON position. For low heat,
slide the ON / OFF switch and the I switch. For high heat, slide the ON / OFF switch, and the I
and II switch.

Page 6
Leg Assembly
Lay stove on a flat surface. Attach 4 legs with screws provided as shown:
Temperature Control
This heater is equipped with Temperature Limiting Control. Should the heater reach an
unsafe temperature (115 degrees) the heater will automatically turn off. To reset unplug
the unit from the wall and wait for five minutes. Plug unit back in and continue to use.
Cleaning
Turn the heater OFF and unplug from the outlet. Use a vacuum or duster to keep heat
and vent area clean from dust and dirt. The exterior of the stove should be cleaned with
a damp cloth or duster. Do not use abrasive cleaners, liquid sprays, or any other cleaner.
Thank you for purchasing and enjoy this e-Flame Electric Stove Heater!

Page 7
LIMITED WARRANTY
This warrants to the original purchaser that this product is free from defects in material and
workmanship as of the date of purchase and that it will, under normal use and proper care,
remain so for 1 year from the date of purchase. Missing or initially defective parts will be
replaced free of charge during the period of this limited warranty. If parts are unavailable,
comparable replacement or refund will be given. The original dated sales receipt is required for
all warranty claims. This warranty does not cover damage which has occurred during transport
from the point of purchase to the consumer’s home. This warranty does not cover glass,
lightbulbs, or batteries.
This product is for residential use only. Any and all commercial use of this product voids all
warranties, and frees the manufacturer from all liability. Read and fully understand all assembly
and operating instructions, and all safety information and warnings, before use. The following
will void this warranty: damage caused by tampering with, modifying, or altering the electric
fireplace in any manner; damage due to incorrect assembly, improper care, misuse, or abuse;
damage from being used with the wrong power source; water damage; damage caused from
the electric fireplace being used outdoors; damage caused from the electric fireplace being used
for excessive periods of time; damage caused by the electric fireplace being used in any
commercial application; damage from use as a primary heat source; other misuse and abuse
not specifically listed herein.
This product is not intended to be used as a primary heat source. e-Flame USA, it’s
directors, officers, or agents, will not be liable to the purchaser or any third party, whether in
contract, in tort, or on any other basis, for any indirect, special, punitive, exemplary,
consequential, or incidental loss, cost, or damage arising out of or in connection with this sale,
maintenance, use, or inability to use this product, even if e-Flame USA, or its directors, or
agents have been advised of the possibility of such losses, costs, or damages that exceed the
purchase price of the product. Some states do not allow the exclusion or limitation of incidental
or consequential damages, so the above limitation or exclusion may not apply to the purchaser.
This limited warranty gives you specific legal rights, and you may also have other rights, which
vary from state-to-state.
Thank you for purchasing this product! If you have any questions about the assembly or
operation of this product, are missing any parts, or have defective parts, please email us at
info@eflameusa.com.

Page 8
This manual suits for next models
4
Table of contents
Popular Stove manuals by other brands

Charnwood
Charnwood Cove 2sr Operating & installation instructions

Esse
Esse 500 Series Installation & servicing instructions

Woodstock Soapstone
Woodstock Soapstone Cottage Franklin 207 owner's manual

ROBENS
ROBENS FIREFLY instruction manual

Stansport
Stansport 205 instructions

Heta
Heta SCAN-LINE 40 Operating and installation instructions


