E-matic ED929D User manual
ED929D
Ematic 9” Dual Portable DVD Player
1
Table Of Contents
Safety Precaution 1
Package 3
Main Features 3
4
System Connection 5
The Remote Control 8
Basic operation 11
System Setup 19
Specification 23
Troubleshooting 24
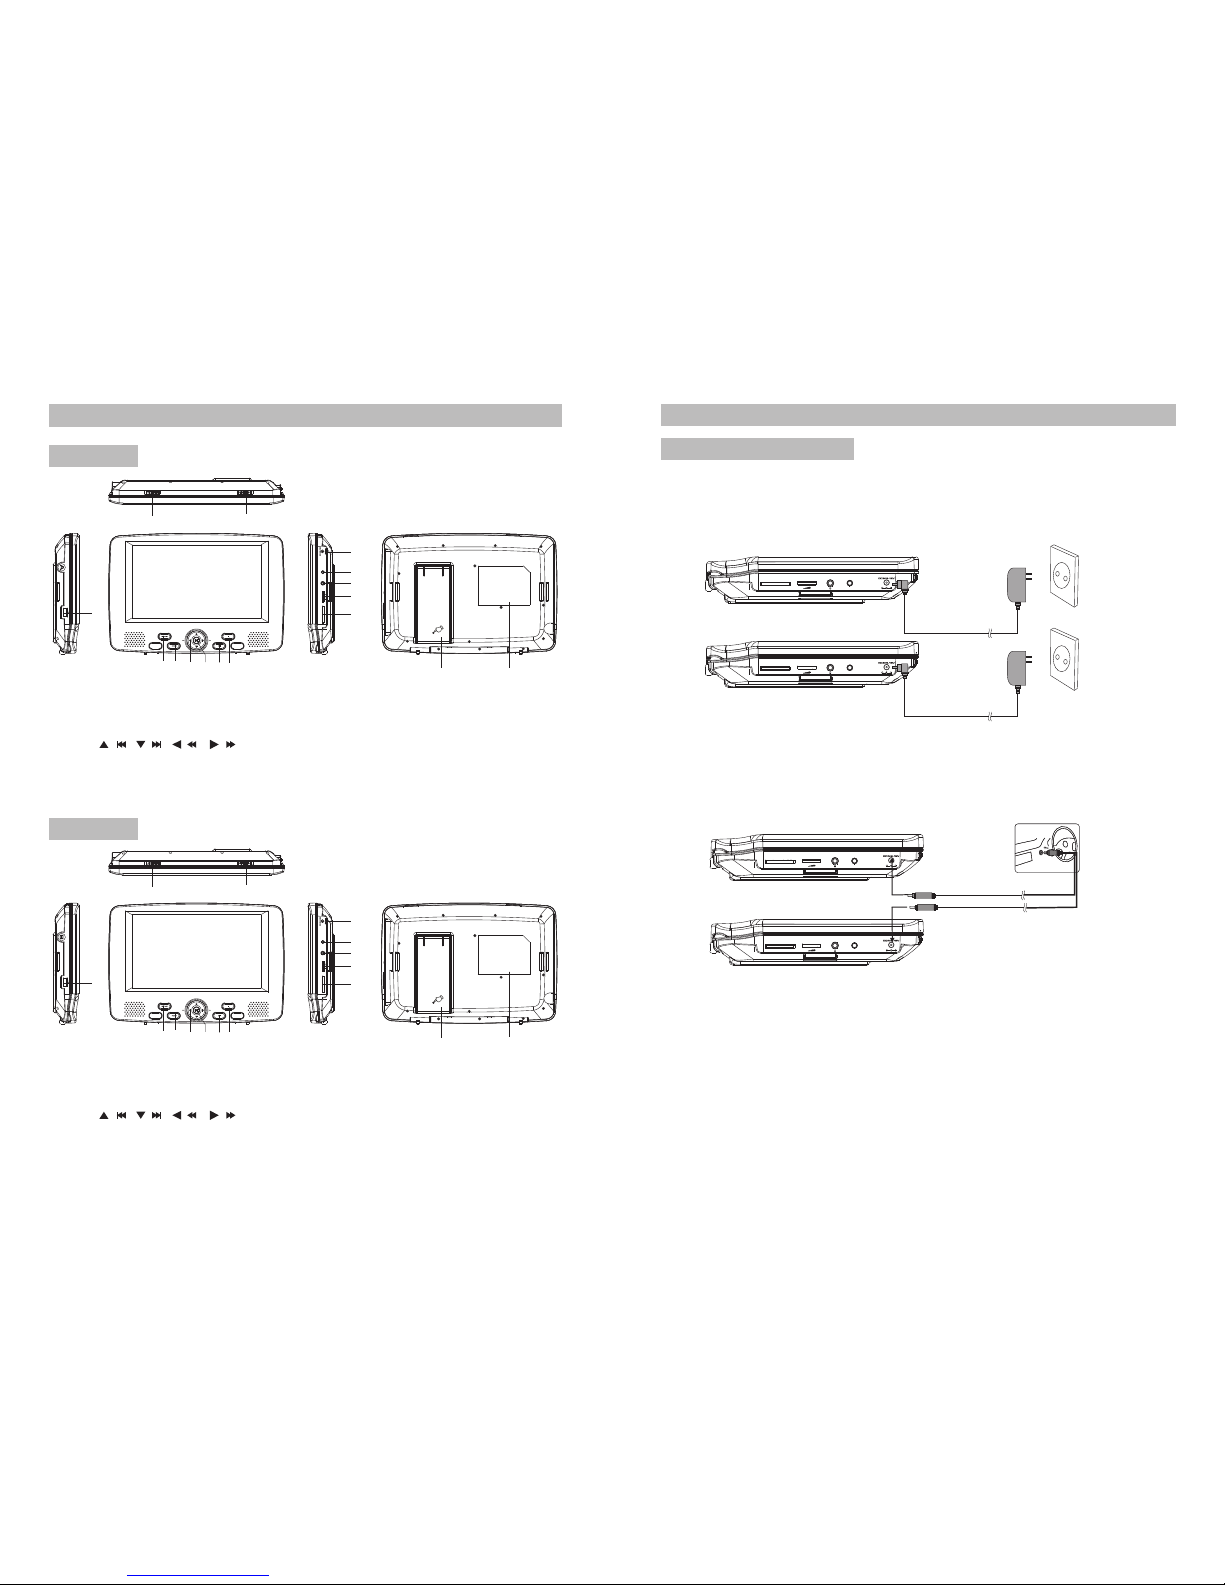
Overview of Unit A/B Controls
Warning:To reduce therisk of fireor electric shock,do not exposethis device torain
or moisture.
1) Please readthe instruction manualcarefully and followall the requirementsof safe
operation.
2) Do notuse this unitnear water.Donot place theunit over anycontainer with liquid
inside.
3) Do notinstall near anyheat sources suchas radiators,heat registers,stoves,or other
apparatus(including amplifiers)that produceheat.
4) Unplug thisunit during lightningstorms or whenunused for long time.
5) AboutCleaning:Unplug the system,useonly a moistcloth to clean.Do not use liquid
detergent or aerosol.
6) Only useaccessories specified bythe manufacturer.
7) Refer allservicing to qualifiedservice personnel,servicing isrequired when the unit
has been damaged in any way.Such as if the power supply cord or plugis damaged,
liquid spilled orobjects having falleninto the unit,hasbeen exposed to moisture,or
is not operatingnormally. Don'ttry to repairthe machine byyourself because ofthe
danger of highvoltage and electricshock.
8) Do notuse irregular shapeddiscs such asheart or star-shaped discs as they may
cause the unitto malfunction.
Hi-voltage, Do NotOpen
Use care toavoid electric
shock
Thank you forchoosing our portableDVD player. Please read the manual carefully prior
to use andkeep it forfuture reference.
Safety Precaution

32
This device complieswith Part 15of the FCCRules. Operation issubject to the
following two conditions: (1) This devicemay not causeharmful interference, and
(2) This devicemust accept any interference received, includinginterference that
may cause undesiredoperation.
Warning: Changes or modifications to this unit notexpressly approved bythe party
responsible for compliancecould void theuser's authority to operate the equipment.
NOTE: This equipmenthas been testedand found tocomply with thelimits for a
Class B digitaldevice, pursuant toPart 15 ofthe FCC Rules. These limits are
designed to providereasonable protection againstharmful interference ina
residential installation. Thisequipment generates, usesand can radiateradio
frequency energy and,if not installedand used inaccordance with the instructions,
may cause harmfulinterference to radiocommunications.
However, thereis no guaranteethat interference willnot occur in a particular
installation. If this equipment does cause harmful interference toradio or television
reception, which canbe determined byturning the equipmentoff and on, the user is
encouraged to tryto correct theinterference by oneor more of the following
measures:
Reorient or relocatethe receiving antenna.
Increase the separationbetween the equipment and receiver.
Connect the equipmentinto an outlet on a circuit different from thatto which
the receiver isconnected.
Consult the dealeror an experienced radio/TV technician for help.
High brightness color 9" LCD screen
Compatible with discof DVD,VCD,MP3,MPEG4,CD,JPEG,etc
Built-in stereo speaker
Support PALor NTSC system
Support Multi-language OSD,speedforward/backward,repeat function
Zoom in/out function
Package
Main Features
2
2
2
1
1
2
Remote Control withbattery
AVCable(DVD to DVD)
AC/DC Power Adapter
Cigarette LighterAdapter
User Manual
Car Straps
9 '' DVDPlayers
1
5
4
AVO UT
SD
AVO UT
SD
AVI N/OUT
SD
Note:
1.Car cigarette lighter adaptor is not recommended to recharge the battery.
2.Car cigarette light adaptor can only be used when the carpower supply is9-12V.
3.The mains plugis used as the disconnect device, the disconnect deviceshould remain
readily operable.
Powering and installation
Plug one endof the AC/DC power adaptor into the DC IN 9-12V jackon the rightof the
unit, then plugthe other endinto theAC power receptacle. Please refer to the following
illustration.
If using carcigarette lighter adaptor to connect tothe power:
Plug one endof the cigarette lighter adaptor into the DC IN9-12V jack onthe unit, plug
the other endinto the car cigarette lighter socket.Seeillustration below.
System Connection
Car cigar ette lighter
AVI N/OUT
SD
Main Unit Controls
Overview of Unit A/B Controls
1. Open knob
2. Power ON/OFFswitch
3. SETUP button
4. MODE button
5.
6. OK button
7. PLAY/PAUSE button
8. STOP button
1. Open knob
2. Power ON/OFF switch
3. SETUP button
4. MODE button
5.
6. OK button
7. PLAY/PAUSE button
8. STOP button
9. DC IN 9-12V
10. AV OUT
11. Earphone jack
12. Volume knob
13. SD card slot
14. USB Port
15. Bracket
16. Rating label position
9. DC IN 9-12V
10. AVIN/OUT
11. Earphone jack
12. Volume knob
13. SD card slot
14. USB Port
15. Bracket
16. Rating label position
16
16
( )/
( )/
( )/
( )/
( )/
( )/
( )
( )
CLOSE
CLOSE
1
1
2
2
15
15
3
3
4
4
5
5
6
6
7
7
8
8
9
9
10
10
11
11
12
12
13
13
15
15
AVOUTAVIN/OU T
ON OFF
ON OFF
SDSD
SD
Unit A
Unit B

Connecting with externalSpeaker
Both unitA andunit B canbe connected withexternal speaker.Pleasesee the following
illustration.
AMPLIFIER
TV
SUBWOOFER
Left front speaker Right front speaker
Center speaker
Left rear speaker Right rear speaker
Note:
There is no5.1 channel inthe unit, however,after connecting to APM itis available to output
audio in 5.1channel.
AUDIO INVIDEO IN
AV CABLE
Not supplied
AVO UT
SD
AVO UT
SD
AVO UT
SD
Connecting to UnitA/B
1.Connect unitA andunit B withAVcable.
2.Connect the unitto power byAC/DC adapteror cigarette lightadapter
3.Turn on these two units,insert a discinto the disccompartment of the main unitA,
press the IN/OUTkey on remote control B tochange Unit Bto AV IN mode,then you
can see the same image on both units.
Please refer tothe illustration below.
Connecting to TV
You can connect unitA or unit Bwith TV toenjoy high quality picture and stereo sound.
Please refer tothe following illustration:
Please useAV cableto connect the machine and the TV.Make sure it is connected
correctly.
TV
AUDIO IN VIDEO IN
AV CABLE
Not supplied
AVI N/OUT
SD
76

ED929D AED929D B
98
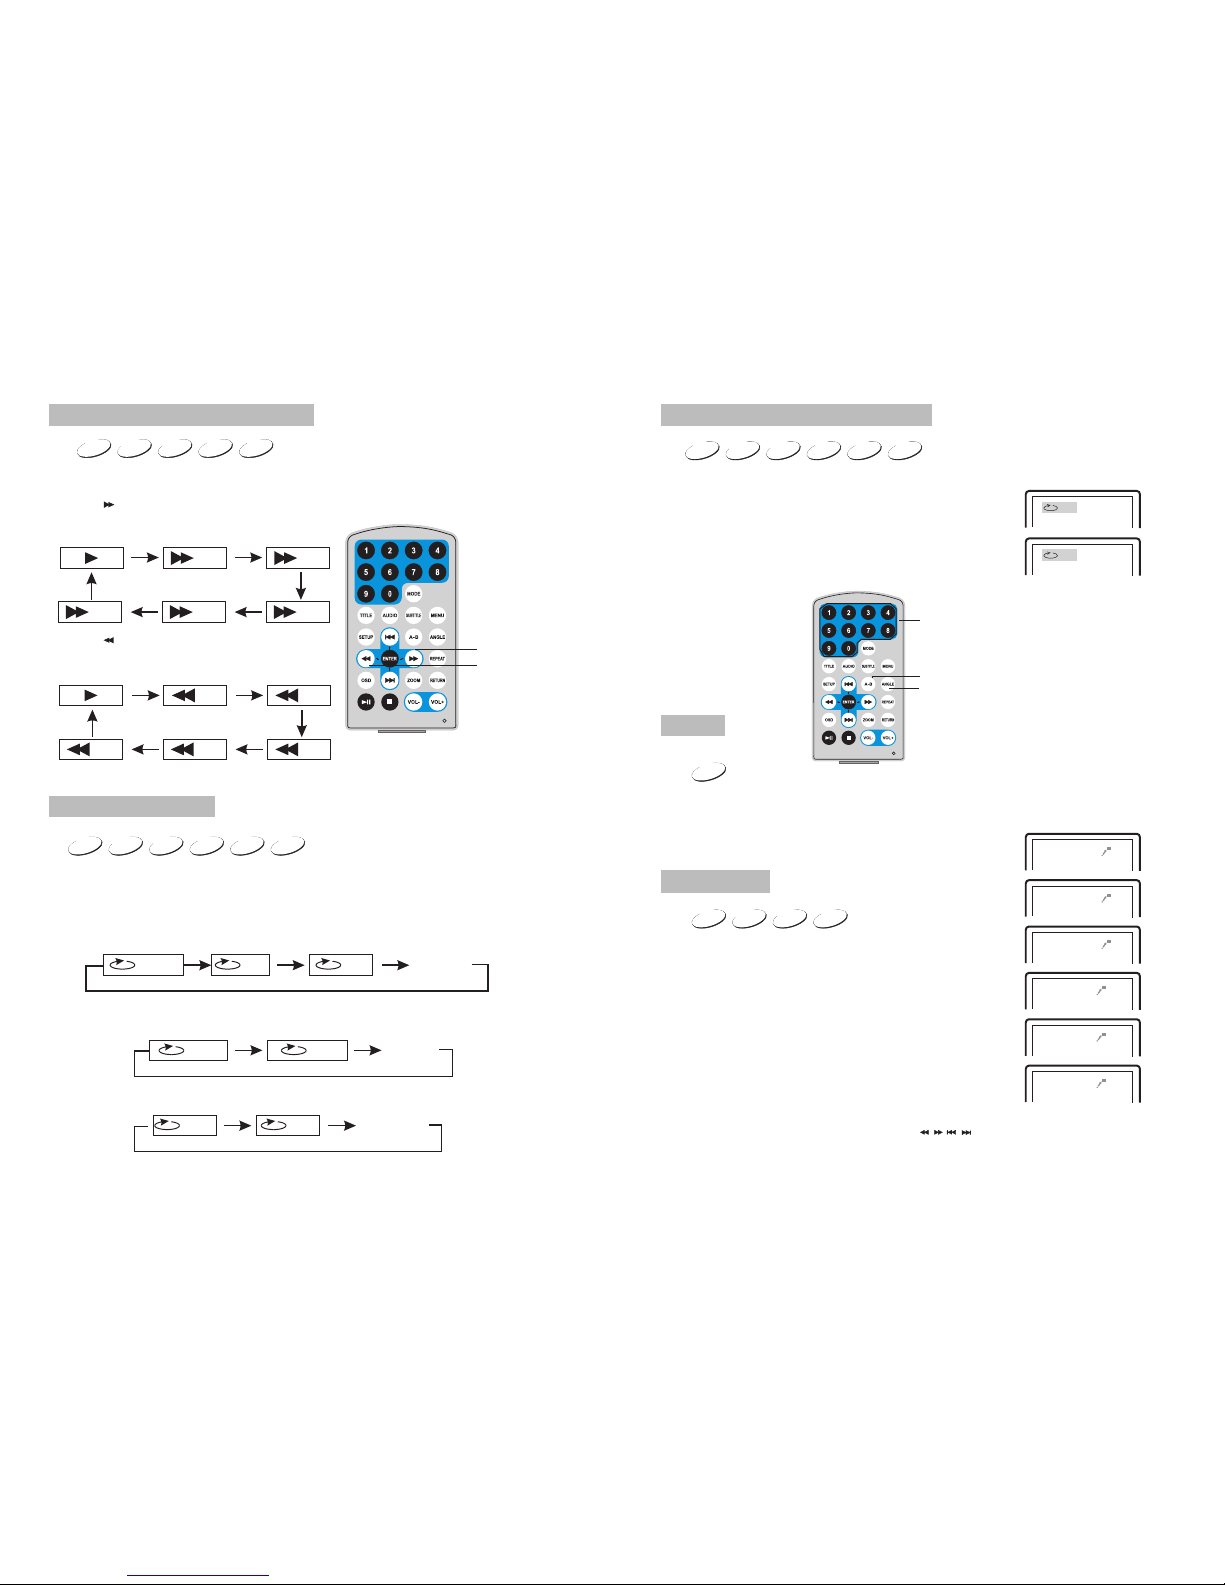
1. Number button
2. TITLE(To display titleinformation)
3. AUDIO(To select audiolanguage)
4. SETUP(To go to or exit setup menu)
5. Previous/Next button(To go
to previous/next chapteror scene
during playing)
6. Fast forward/backward
button(To scan forward/backward
at 2,4,8,16,or 32times)
7. OSD(To display disc information
during playing suchas elapsed and
remaining time)
8. PLAY/PAUSE
9. STOP (press once to stop playback,
then press to resume playback
from the pointwhere you stopped;
press stop buttontwice to stop
playback completely)
1. Number button
2. TITLE(To display title information)
3. AUDIO(To select audiolanguage)
4. SETUP(To go to or exit setup menu)
5. Previous/Next button(To go
to previous/next chapteror scene
during playing)
6. Fast forward/backward
button(To scan forward/backward
at 2,4,8,16,or 32times)
7. OSD(To display disc information
during playing suchas elapsed and
remaining time)
8. PLAY/PAUSE
9. STOP (press once to stop playback,
then press to resume playback
from the pointwhere you stopped;
press stop buttontwice to stop
playback completely)
The Remote Control of Unit A The Remote Control of Unit B
1 1
2 2
3 3
4 4
5 5
6 6
7 7
8 8
9 9
10 10
11
11 12
12 13
13 14
14 15
15 16
16 17
17 18
18 19
10.MODE
11.
12.
13.
14.
15.
16.
17.
18.VOL+/-(Toadjust the volume)
19.ENTER(Toconfirm)
MENU(Toenter or exitroot menu)
SUBTITLE(Toselect subtitle language
when playing DVD disc)
ANGLE(To change viewing angle
when playing disc with multi-angle)
A-B(Repeat a specificportion from
point Ato B, press it again to cancel
repeat playing)
REPEAT(To repeat playingtitle,
chapter or track)
RETURN(Toreturn to themain menu)
ZOOM(Tozoom in/out theimage
during the playback)
10.IN/OUT(Toinput or outputsignal)
11.MODE
12.
13.
14.
15.
16.
17.
18.
19.VOL+/-(Toadjust the volume)
20.ENTER(Toconfirm)
MENU(Toenter or exitroot menu)
SUBTITLE(Toselect subtitle language
when playing DVD disc)
ANGLE(To change viewing angle
when playing disc with multi-angle)
A-B(Repeat a specificportion from
point Ato B, press it again to cancel
repeat playing)
REPEAT(To repeat playingtitle,
chapter or track)
RETURN(Toreturn to themain menu)
ZOOM(Tozoom in/out theimage
during the playback)
19 20

ED9 29D A
ED9 29D A
1
2
CR2025 CR2025
Please put thebattery into theremote control asper illustration below .
When using remotecontrol, make surethe infrared windowis pointed to infrared
receiving window ofthe unit. Thedistance between the unit and remote control must be
within 3 metres.Please refer tothe following illustration.
The Use ofRemote Control
0
30
0
30
Note:
1. To avoid falling off or placenear damp environment.
2. To avoid infraredreceiving window ofthe unit beingunder direct sunlight.
3. Please usea new batteryto replace old one if the remote control doesn'twork.
4. Remote controlA can only operate unit A,Remote control B can only operateunit B.
0
30
0
30
Unit BUnit A
Remote Control A Remote Control B
10 11
Basic Operation
Playing disc ofDVD, MPEG4, SVCD,VCD, CD, MP3.
1.
2. Open thedisc door andinsert a discinto the door with the labelside facing up.
3. Close thedisc door.Theunit will load the disc andstart playing.
4. Press“ ”once to stop playback; press“ ”to resume playback from the point
where you stopped;press“ ”twice to stop playback completely.
5. During playback,press“ ”to pause; press it again to resume playback.
6. When the playingis finished, pleaseturn off thepower by slidingON/OFF switch toOFF.
7. For someDVD disc withTitle orChapter menu, press“MENU”button to enter menu
page, and use“ ”to select. Press ENTER to confirm.
DVD MPEG4 SVCD V CD C D MP3
Note:
Please do notdisconnect USB devicesor plug outSD/MMC cards while they are working
with the unit.Functionalfailure may occurin case ofwrong operations.
In the SourceMode,you can press to select and ENTER key to enter the
source you want.
“ ” “ ”
DVD SD USB
Play/pause
Cursor button
ENTER
Title Menu
ED929D AED 929D B
ED9 29D A
12 13
ED92 9D A
When playing discof DVD,MPEG4,SVCD,VCD,CD,MP3,user canrepeatedly play a
specific section.
During playback,press“A-B”button at apoint A,thenpress
this button againin point B,the unit will automaticallyrepeat
playing the partbetween“A-B”
Press it thethird time,the unit will return tonormal playback.
AB
A
During playing DVDdisc with multi-angle, press“Angle”button to change the display angle.
Repeat playing offavorite scene
Angle
A-B
Angle
Number
Note:
The function isavailable only fordiscs with multi-angle.
2X
3X
4X
1 /2X
1 /3X
1 /4X
During playback,press“Zoom”button,the image will be
enlarged;press it againthe image willbe enlarged again;
press it fourthtime,the image willzoom out,press it
repeatedly and theimage will returnto normal status.
When the imageis enlarged,user canpress“ / / / ”to move the image.
Zoom in/ out
When playing discof DVD,MPEG4,SVCD,VCD,user can
zoom in orzoom out theimage.
MP3
VCD
SVCD
MPEG4
DVD CD
DVD
SVCD
DVD MPEG4 VCD
DVD MPEG4 SVCD V CD C D MP3
DVD MPEG4 SVCD VCD CD
2X 4X
8X16X32X
2X 4X
8X
16X32X
Search forward
When playing discof DVD,MPEG4,SVCD,VCD,CD, themachine can search forward or
backward.
1. Press“ ”,the unit will search forward.
Press it repeatedly,the machine will play at
2, 4,8, 16, 32 times of speed.
2. Press“ ”, the unit will search backward.
Press it repeatedly,the machine willplay at
2,4,8,16,32 times ofspeed.
When playing discof DVD,MPEG4,SVCD,VCD,CD,MP3,user canrepeat playing one
chapter, titleor the wholedisc.
For DVD disc,press“repeat”button,user can repeat playing one Chapter;press it
again to repeatplaying Title;pressit the third time to repeatplaying the wholedisc.
For MP3 disc,press“repeat”button to repeat playing present file;press it again to repeat
playing the folder;pressit the thirdtime to cancelrepeat function.
Search backward
Chapter Title All
Repeat off
one folder
Repeat off
Fast forward andfast backward
Repeat playing
Track All Repeat off
For CD/VCD disc,press repeatedly to repeat the track andthe whole disc.“repeat”button
14 15
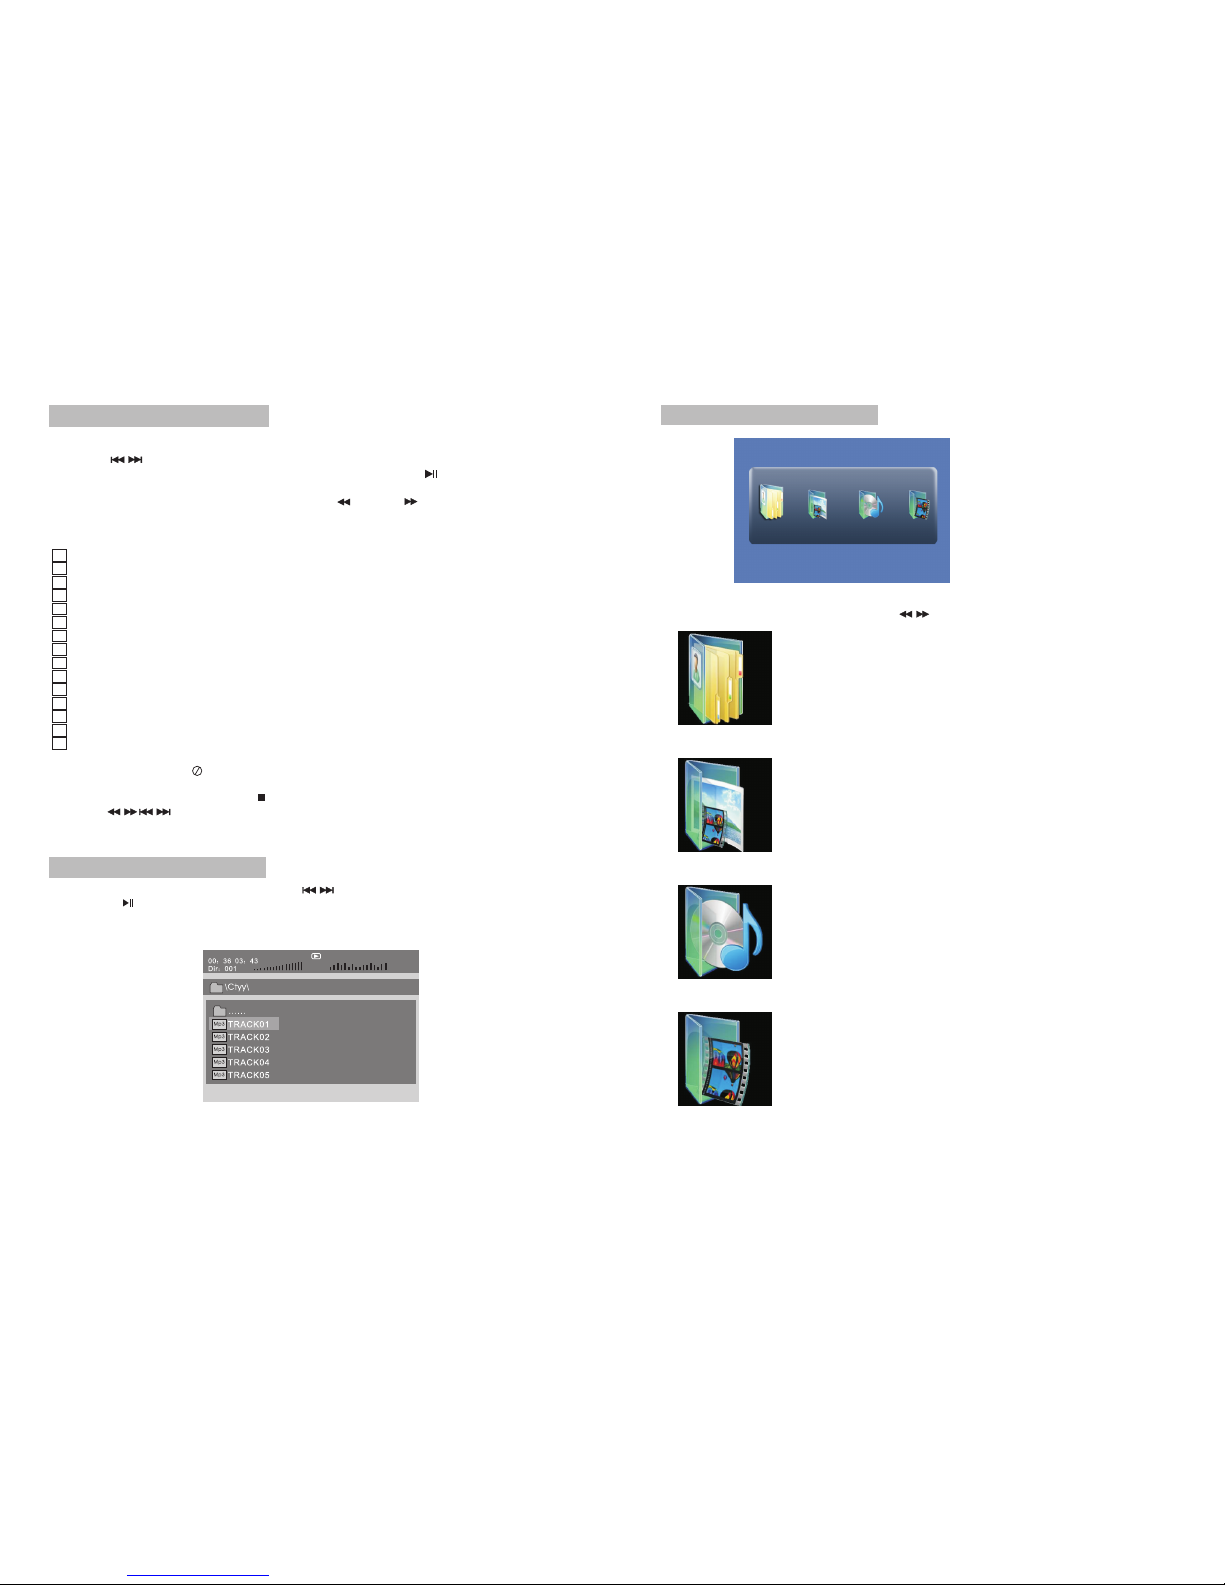
SD/MMC/USB main menu
After entering theSD/MMC or USB,thesystem will showMain Menu which includes 4
Function ICONS.You can selectthem by and press key to confirm.“ ” “ENTER”
Photo Mode
Please refer toP16 -17 fordetail explanation
Browser Mode
Please refer toP16 for detailexplanation
Music Mode
Please refer toP17 for detailexplanation
Movie Mode
Please refer toP18 for detailexplanation
Note:Media cards formattedin exFAT file systemare not supported.
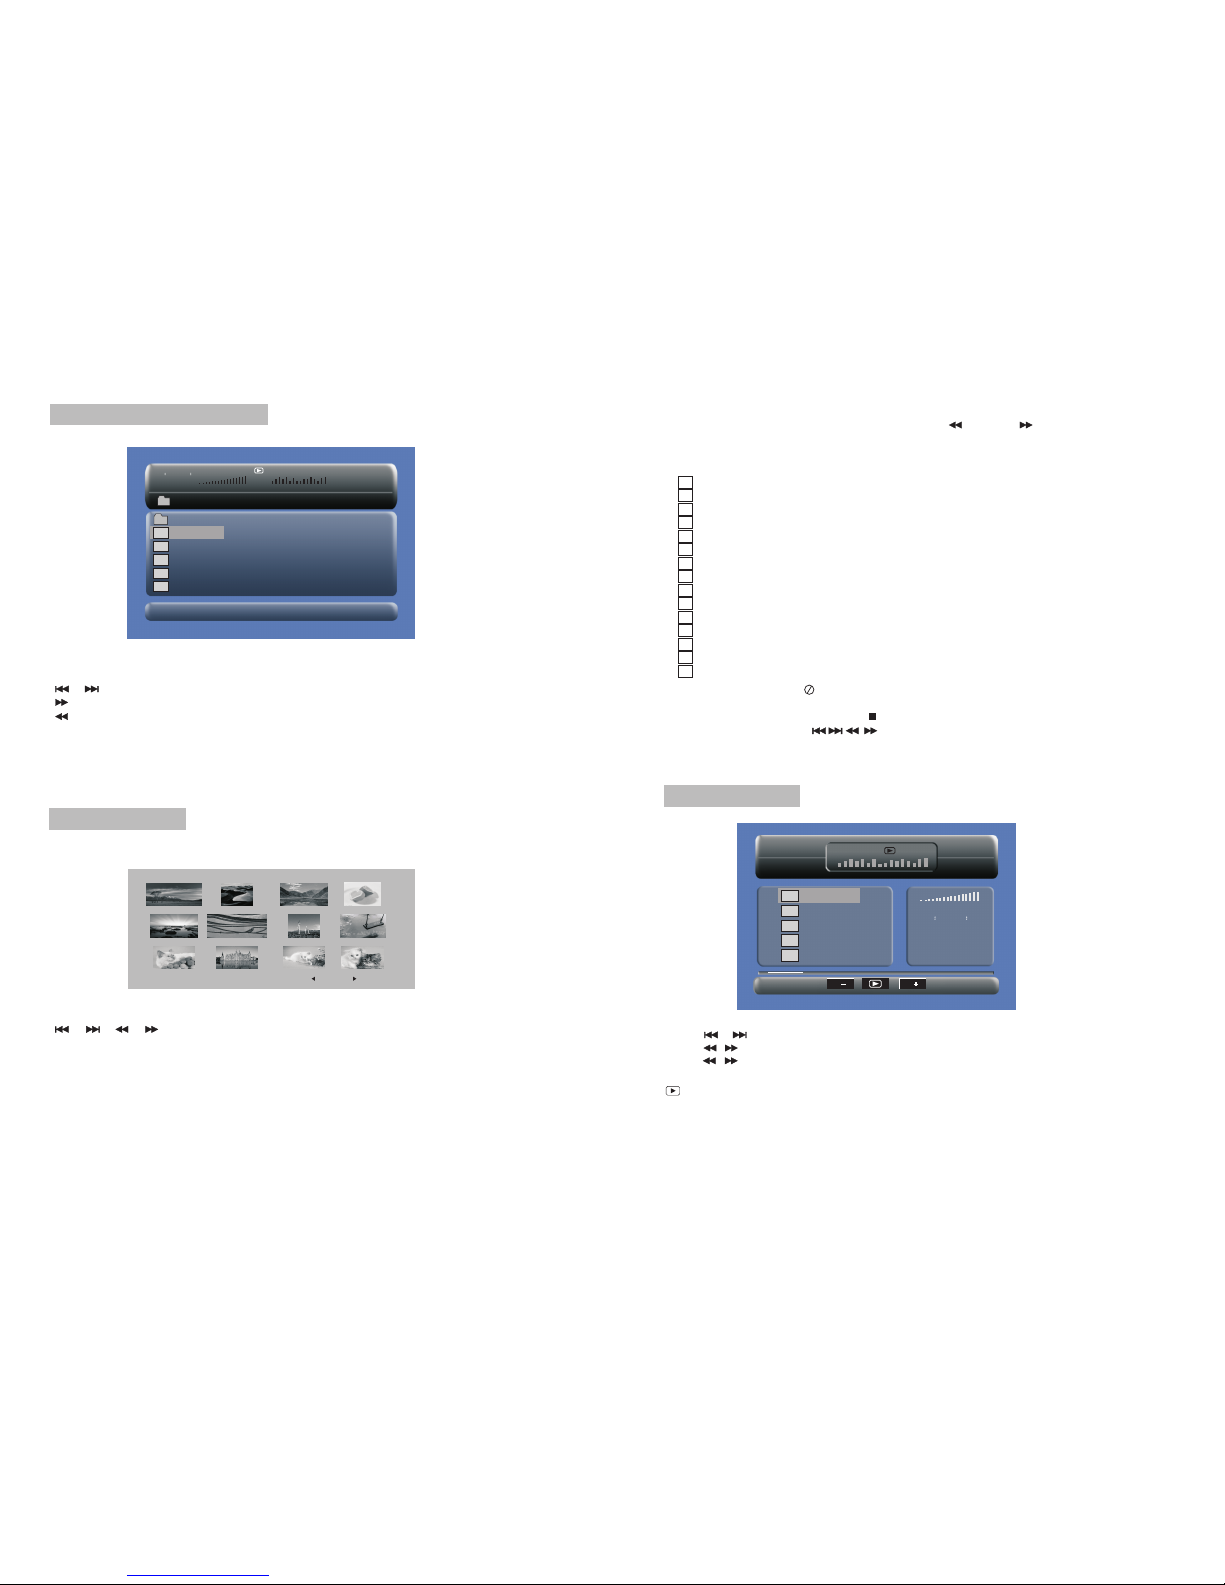
Mp3
......
\Ctyy\
00 36 03 43
Dir 001
Mp3
TRACK02
TRACK01
Mp3
Mp3
TRACK03
Playing JPEG filein data disc
Playing MP3 filesin data disc
1.Place MP3disc into thedisc door.Press “ ”or “ENTER”button tochoose an MP3
file;Press “ ”or“ENTER”button to playthe file selected.
TRACK05
Mp3
TRACK04
1. Place aJPEG disc intothe tray, the unit will start reading andplay.
2. Press“ ”to select a JPEG file and press“ENTER”button to confirm.
Note:you can press“MENU” to return to the folder list.Press “ ”or “ENTER” to
preview the fileselected.
3. To rotate the picture counter-clockwise,press “ ”;Press “ ” to rotate thepicture
clockwise.
4. Press OSDbutton when viewingpictures,you can selectdifferent refresh modeas
follows:
1. from top to bottom
2. from bottomto top
3. from leftside to rightside
4. from rightside to leftside
5. from lefttop to rightbottom
6. from righttop to leftbottom
7. from leftbottom to righttop
8. from rightbottom to lefttop
9. from horizontalcenter to bothsides
10.from vertical centerto both sides
11.from topand bottom to center
12.from right andleft to center
13.from four window'stop side tobottom side
14.from four window'sleft side toright side
15.from 4 edgesto center
5. During viewingfiles,“ ”may appear when pressing“Angle”or“Subtitle”or “Audio”
or“A-B”or“Title”etc; inthis situation these options are unavailable to operate.
6. When viewingJPEG files,press“ ”,pictureswill be displayedin thumbnail mode,
press “ ” or “ENTER” buttonto select onepicture to view.
16 17
1. from top to bottom
2. from bottomto top
3. from leftside to rightside
4. from rightside to leftside
5. from lefttop to rightbottom
6. from righttop to leftbottom
7. from leftbottom to righttop
8. from rightbottom to lefttop
9. from horizontalcenter to bothsides
10.from vertical centerto both sides
11.from topand bottom to center
12.from right andleft to center
13.from four window'stop side tobottom side
14.from four window'sleft side toright side
15.from 4 edgesto center
When playing JPEG:
1.Torotate the picturecounter-clockwise,press “ ”;Press“ ” to rotate the picture
clockwise
2. Press OSD buttonwhen viewing pictures,youcan select differentrefresh mode as
follows:
In the MusicMode,the system willshow the listof music file,like Mp3 and so on.
Press , , ,select and play.
Press to fast forward/backward MP3 duringplaying.
Press to select thefunction button whenin stop status.
Page-:Page Up.
:play
Page+:Page Down
Note:Press Return Key to Returnto the Main Menu.
“ ” “ ” “ENTER”
“ ”
“ ” “ ”
“”
Music mode
00 00 03 43
001/008
Repeat Off
Mp3 TRACK01
Mp3 TRACK02
Mp3 TRACK03
Mp3 TRACK04
Mp3 TRACK05
128Kbps
P P
3. During viewingfiles,“ ”may appearwhen pressing“Angle”or“Subtitle”or“Audio”
or“A-B”or“Title”etc;in thissituation these options are unavailable to operate.
4. When viewingJPEG files,press“ ”and“RETURN”key,pictures will be displayed in
thumbnail mode,press“ ”or“ENTER”button to select one picture to view.
Note :
If you wantto return theMain Menu, pleasepress“RETURN”key in the thumbnail mode.
00 00 03 43
001/008
\Ctyy\
......
Mp3 TRACK01
Mp3 TRACK02
Mp3 TRACK03
Mp3 TRACK04
Mp3 TRACK05
Browser mode
Photo mode
Slide Show Menu Prev Next
In the PhotoMode,the System willshow the thumbnailMode first.
,,,, :select and play.
Slide Show:play theJPEG.
Menu:Enter the HelpMenu.
Prev:Page Up.
Next:Page Down.
“ ” “ ” “ ” “ ” “ENTER”
In the BrowserMode,the system willshow the listof file and folder.
, , key:select and play
:Enter the folder
:Quit the folder
“ ” “ ” “ENTER”
“ ”
“ ”
Note:
If you wantto return tothe Main Menu,pleasemake sure the system is in list of fileor
folder status,then press RETURN KEY.“”

18 19
CD RIP
Ripping Selected track
Track Progress
Total Progress
Track 01 9%
Cancel
SUMMARY
Now ripping
Track 01/01
During the converting,youcan select “CANCEL”to stop it.
Speed: In this item,you can set the rip speed: Normal or Fast.
Bitrate: In this item,you can setthe bitrate. Ithas 6 choices,128Kbps,192Kbps,256Kbps,
320Kbps,96Kbps and 112Kbps.
Create ID3:In this item, you can create ID3 when playing CD text.
Device: This item indicateswhether USB orSD CARD isconnected with DVD player.
Exit: Exit to theprevious menu.
All: Select all thefiles in thedisc for convertionand storage.
None: Cancel the selection.
Start: Move the cursorto the itemand press “ENTER”button, the convertion begins.
System Setup
Press the "Setup"button, the mainmenu will
be displayed onthe screen
In the main Page,Press " button to
highlight the item.
Press the "ENTER" buttonto access.
Press the "Setup" buttonto exit.
"
General Setup
Video Setup
Preference Setup
Setup Menu -- MainPage
In the MovieMode,the system willshow the listof Movie file,like AVIand so on.
, , Key:Select and Play.
When playing movieyou can press MENU and Return Key to backto the list of movie
file status.And ifyou want toReturn to theMain Menu,Please Press Return key in list
of Movie filestatus.
“ ” “ ” “ENTER”
“”“ ”
“”
Movie mode
001/006
AVI TRACK01
TRACK02
TRACK03
TRACK04
TRACK05
TRACK06
AVI
AVI
AVI
AVI
AVI
During playing theCD/HDCD disc,you canenter CD Rippingfunction.By pressing
subtitle button,DVD playerwill be ableto change theCD format into MP3 format,
and then storeit in the USB or SD card.
CD RIPPING
CD RIP
Options Track
Track 01 03:36
SUMMARY
Selected Track 0
Selected Time 00:00
Track 02 03:36
Track 03 03:36
Track 04 03:36
Track 05 03:36
Track 06 03:36
Track 07 03:36
Speed Normal
Bitrate 128kbps
Create Id3 Yes
Device USB 1
Start Exit All None
20 21
Video Setup Page
Video Setup
:Move :Return :Entry
TV TypeNTSC
Set the VideoQuality ofAV OUT
TV Type:
Enter this optionto select TVtype
(PAL, NTSC)
The default isNTSC.
Video Setup
:Move :Return :Entry
TV TypeNTSC
Set the VideoQuality of PANEL
Video Setup
:Move :Return :Entry
Quality
Panel Quality
Quality
Panel Quality
Quality
Panel Quality
TV TypeNTSCNTSC
PAL
Preference Page
Audio:
Enter this option,user canselect preferred
audio language for DVDs.
The default isEnglish.
Note
The audio languagedepends on the
material on each disc.
User can also change the audio language
durin g playback by pressing theAudiobutton.
Preference Setup
:Move :Return :Entry
Audio ENG
SubtitleOff
DiscMenuENG
Parental
Default
English
French
Spanish
Portuguese
General Setup
TV Display Wide
AngleMarkON
OSD LangENG
Screen Saver ON
Normal/PS
Normal/LB
Wide
:Move :Return :Entry
General Setup Page
TV display:
Enter this option,usercan set screendisplay
format(Nomal/PS,Nomal/LB,Wide)
The default is Wide
Note
The function dependson the displayratio
with which the DVD disc is recorded.
Please choose Wide(16:9) when using
a 16:9 wide screenTV set.
“”
“”
General Setup
TV Display Wide
Angle MarkON
OSD LangENG
ScreenSaver ON
On
Off
:Move :Return :Entry
Angle Mark:
Enter this optionto set theangle during
playback.
Optional setting:ON,OFF
The default is:ON
General Setup
TV Display Wide
Angle MarkON
OSD LangENG
ScreenSaver ON
English
French
Spanish
Portuguese
:Move :Return :Entry
OSD Language:
In the optionuser can setOSD menu
language ( English,French, Spanish,
Portuguese).
The default isEnglish.
TV Display Wide
Angle MarkON
OSD LangENG
ScreenSaver ON
On
Off
:Move :Return :Entry
General Setup
Screen Saver
Enter this option toset whether to activate
the screen saverfunction.
The default isON.
22 23
Specification
Compatible disc: DVD/VCD/CD/MP3/MPEG4
Signal system: PAL/NTSC
Panel size: 9inch
Frequency response: 20Hz to 20 kHz
Video output: 1Vp-p/75Ohm, unbalanced
Audio output: 1.4Vrms/10kOhm
Audio S/N: Betterthan 80dB
Dynamic range: Betterthan 85dB
Laser: Semiconductor Laser, Wave Length: 650nm/795nm
Power source: DC9-12V
Power consumption: 10W
Operating temperature: 0~40°C
Weight(2 ): 0.93/ 0.93kg
Dimensions (2 (W x Dx H): 270x186x40/270x186x40mm
DVD Player
DVD Player)
Note:
1.The quality andspeed for readingJPEG photos dependson the resolutionand
compression of thephotos. Some JPEG photo may not be played due to the disc
quality and theformats.
2.Some DVD+R/RW,DVD-R/RW,CD-R/RW discsmay not beplayed due tothe quality of
burning.
Default:
Select this item andpress “ button to
reset.
ENTER”
Preference Setup
:Move :Return :Entry
Audio ENG
SubtitleOff
DiscMenuENG
Parental
Default Reset
Preference Setup
:Move :Return :Entry
Audio ENG
SubtitleOff
DiscMenuENG
Parental
Default
English
French
Spanish
Portuguese
Off
Disc Menu
This function allowsyou to choosethe menu
language stored on thedisc.
The default isEnglish.
Note:the disc menulanguages depend onthe
information available on thedisc.
Parental:
Enter this optionto set theparental control
level to blockunsuitable scenes forchildren.
Optional parental control levels:KID SAFE,
G, PG, PG13, PGR, R,Nc17, ADULT.
The default isADULT.
The default passwordis 8888.
:Move :Return :Entry
Audio ENG
SubtitleOff
DiscMenuENG
Parental
Default
English
French
Spanish
Portuguese
Preference Setup
1KID SAFE
2 G
3 PG
4 PG13
5PGR
6 R
7 NC17
8ADULT
:Move :Return :Entry
Audio ENG
SubtitleOff
DiscMenuENG
Parental
Default
Preference Setup
Subtitle
Select your preferredlanguage to show the
subtitles on thescreen.
The default is OFF
The subtitle languagesdepend on the
information available on each disc,Youcan
also change thesubtitle language during
playback by pressingthe SUBTITLE button.

Troubleshooting
PROBLEM SOLUTION
Picture is distorted
If at any time in the future you should need to dispose of this product please
note that waste electrical products should not be disposed of with household
waste.Please recycle where facilities exist.Check with your Local Authority
or retailer for recycling advice.(Waste Electrical and Electronic equipment
Directive)
Due continuous improvement,no prior noticewill be givenregarding changes on
above feature andspec.
Some discs havesections that prohibitrapid
scanning or chapterskip;If you tryto skip
through the warninginformation and credits
at the beginningof a movie,youwon't be able
to.This part ofthe movie isoften programmed
to prohibit skippingthrough it.
No forward or
reverse scan
The disc mightbe damaged.Tryanother disc;
it is normalfor some distortionto appear during
forward or reversescan.
The feature oraction cannot becompleted at
this time because:
1.The disc's softwarerestricts it.
2.The disc's softwaredoesn't support the
feature (e.g.,angles)
3.The feature isnot available atthe moment.
4.You've requested a titleor chapter number
that is out of range.
The icon
appears on
screen
You can't advance throughthe opening credits
and warning informationthat appears atthe
beginning of moviesbecause the discis
programmed to prohibitthat action.
Can't advance
through a movie
Make sure themachine is connectedproperly.
Make sure allcables are securelyinserted into
the appropriate jacks.
No sound or
distorted sound
24
Table of contents
Other E-matic DVD Player manuals


 Operation manual")


