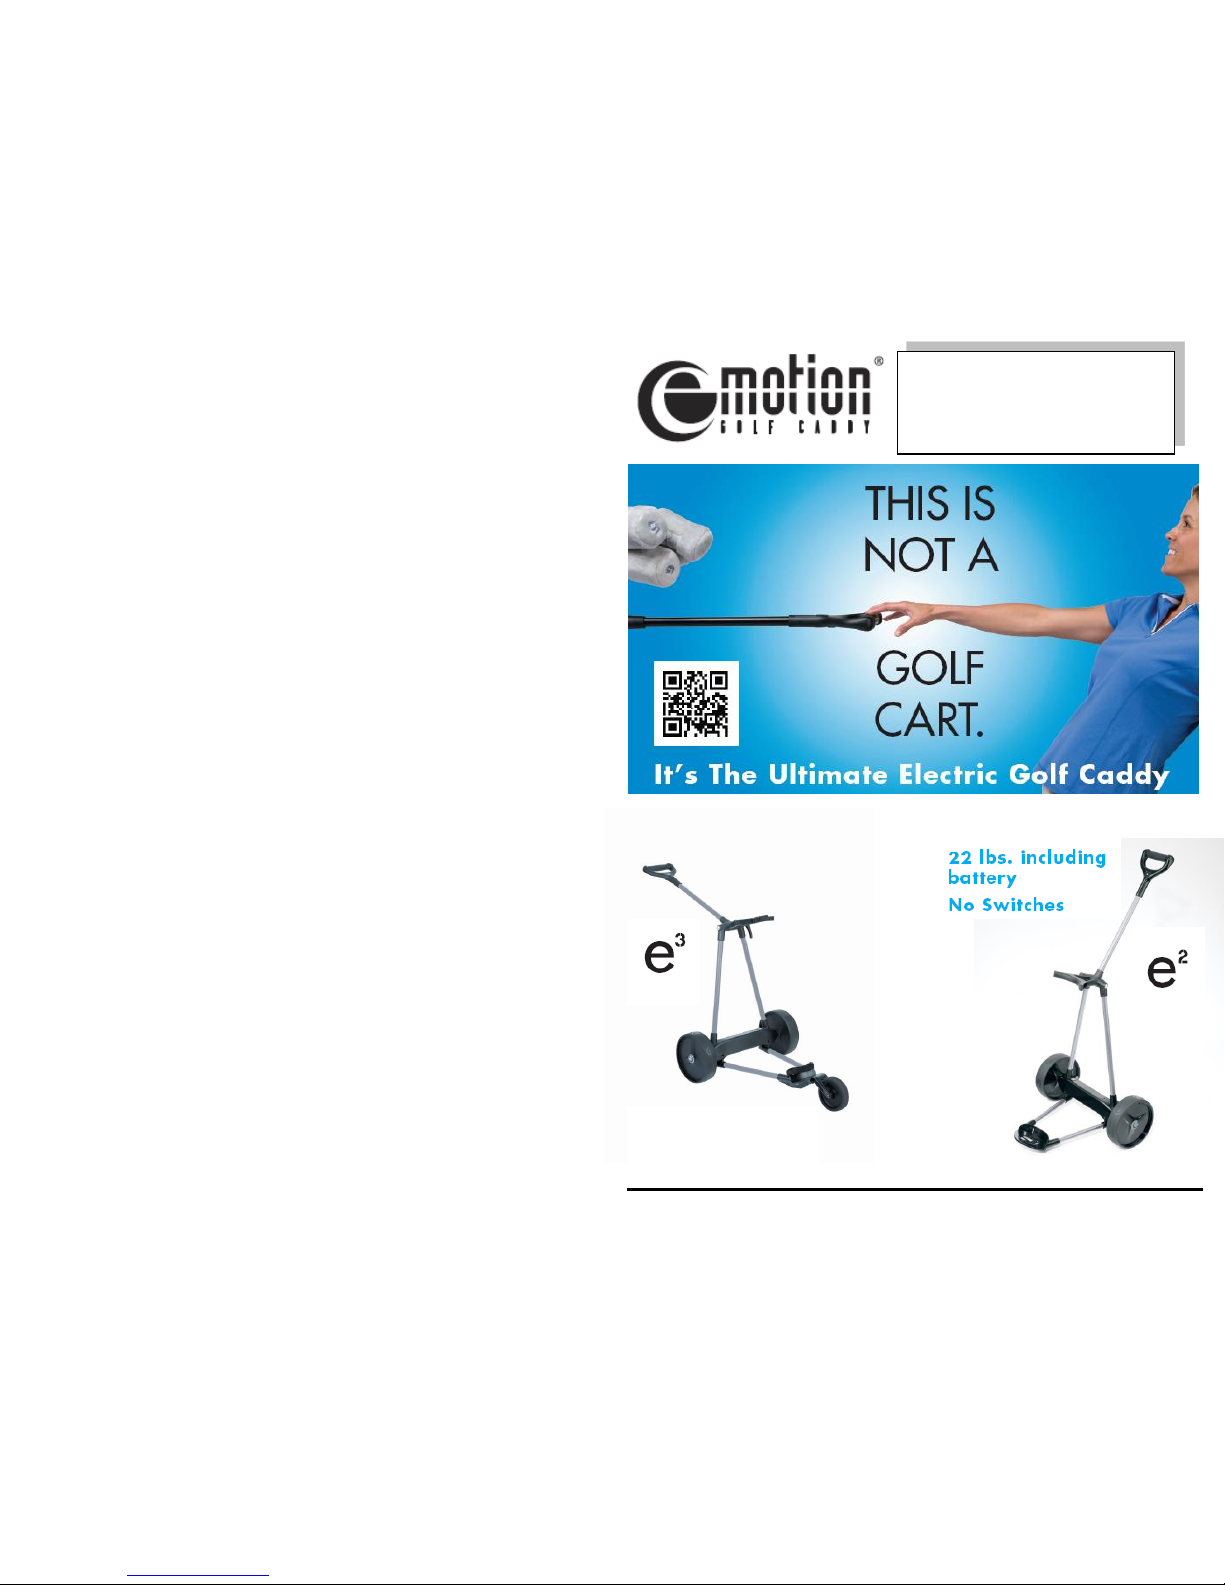
e-motion E3 User manual
Toll Free (855) 816-7501 • 4010 Valley Blvd., #105, Walnut, CA 91789 • www.eMotiongolfcaddy.com
Owner’s Manual
USER SHOULD READ THIS USER
GUIDE CAREFULLY BEFORE USING
3 Year Warranty

Your eMotion Caddy has been inspected and tested and is guaranteed for a period
of twenty four months from the date of purchase against defects in workmanship
and materials. During this warranty period, our sole obligation shall be to either
repair or replace the defective products, at our option. All replaced products or
parts shall become our property.
Normal wear and tear is expressly excluded.
IMPORTANT: PLEASE RETAIN A COPY OF WARRANTY CARD.
To obtain a replacement product under this warranty, you will need to produce
satisfactory evidence of the date of purchase. Normally the completed warranty
card and purchase receipt must be presented with the product. The warranty card
should be filled out at the time of purchase –it is in your interest to make sure
this is done.
When a product is replaced, that replacement will be the same model as the
faulty product or accessory excluding packaging, instruction card etc. Where a
replacement product is supplied will be covered under this warranty only for the
balance of the original warranty period.
Any model that is no longer available will be replaced by a model of value and
with such features as we consider appropriate in the circumstances.
Emotiongolfcaddy.com is not responsible for freight charges, loss or damage in
transit.
If service is required after the warranty period has expired, the product should be
returned to a recommended service agent. Service outside the warranty period
will be at your cost.
If any of the provisions of the foregoing are contrary to any relevant legislation,
then that provision shall be deemed to be excluded from the warranty and the
rest of the provision(s) will continue to apply.
In no event shall we be liable for any damages, whether in contract or tort
(including negligence) including but not limited to direct, consequential, special,
exemplary, incidental and indirect damages arising out of, or in connection with,
the use of (or inability to use) the product
Please fill out the Warranty Card before using the Emotion Caddy and send to
www.eMotiongolfcaddy.com
36 MONTH LIMITED WARRANTY
THE eMOTION CADDY DOES NOT TURN ON?
1. THE BATTERY IS NOT INSERTED PROPERLY
2. THE BATTERY CONTACTS ARE BENT AND NEED TO BE REPAIRED
THE EMOTION CADDY DOES NOT OPERATE?
1. CHECK THE LIGHTS FOR CODES A FAST BLINKING RED LIGHT MEANS THE
BATTERY IS FULLY DISCHARGED AND NEEDS TO BE RECHARGED, FURTHER
USAGE WILL PERMANENTLY DAMAGE THE BATTERY. IN THIS CASE THE CADDY
MUST BE TURNED OFF BY PRESSING THE eLOGO BUTTON. IT IS POSSIBLE TO
USE THE CADDY AS A MANUAL CADDY WITHOUT DAMAGE.
2. A CONSTANT RED LIGHT MEANS THE CADDY IS IN NEED OF SERVICE, PLEASE
CALL eMotiongolfcaddy. (Toll Free : 855-816-7501)
3. RED AND GREEN ALTERNATING LIGHTS MEAN THE CADDY IS LOCKED AND
NEEDS TO BE UN-LOCKED WITH THE SECURITY KEY (IT IS NOT NECESSARY TO
LEAVE THE SECURITY KEY IN THE CADDY ONCE IT IS UNLOCKED)
4. MAKE SURE THE BATTERY IS INSERTED PROPERLY AND FULLY CHARGED
I LOST MY SECURITY KEY?
1. PLEASE CONTACT eMotiongolfcaddy DIRECTLY, PLEASE BE READY WITH YOUR
SERIAL NUMBER AND PERSONAL INFORMATION TO VERIFY OWNERSHIP. (IT IS
IMPORTANT TO RETURN THE WARRANTY CARD TO INSURE PROPER
IDENTIFICATION)
READ ALL INSTRUCTIONS
BEFORE USING
THIS PRODUCT
WARNING!
Please check for all the
parts when opening the
carton box
Congratulations on your purchase of the eMotion Caddy. It is the lightest, easiest
to use, most technologically advanced caddy on the market. To insure that you
are using the eMotion Caddy properly, please take a few minutes to review this
Owner’s Manual.
Before you get started please take a few minutes to fill out the WARRANTY CARD.
Each eMotion Caddy has a unique serial number. By registering this number to
you, we will be able to provide you with the quickest service should there be any
problems in the future.
To get started, take the Emotion Caddy out of its shipping box,
This box will contain the following parts:
1. Frame / Handle with 2 wheels attached
2. Battery
3. Battery Charger
4. Security Key
5. Carrying Case
6. Score Card Holder
7. Umbrella Holder (option –see page “using the eMotion Caddy”)
8. Drink Holder (option –see page “using the eMotion Caddy’)
All option products can be purchase from www.eMotiongolfcaddy.com
IMPORTANT SAFEGUARDS
TROUBLESHOOTING

The eMotion Caddy has the most advanced battery on the market. It is a Lithium
Manganese technology that has no memory effect and can be recharged over
1,000 times for many years of usages.
The battery should be fully charged before using
1. Simply plug the cable from the battery charger into the battery. (Fig. 1)
<CAUTION> : THE PLUG IS DESIGNED TO FIT INTO
THE BATTERY ONE WAY, MISUSE
MAY DAMAGE THE CHARGER PLUG OR
BATTERY PLUG.
2. There is a small light on the charger that will light up Red when battery is being
charged and will turn to Green when the battery is fully charged.
(6 to 8 hours to fully charge)
<CAUTION> : ALTHOUGH THE BATTERY CHARGER IS AUTOMATIC, TO BE SAFE, DO
NOT LEAVE THE CHARGER PLUGGED INTO THE BATTERY FOR MORE
THAN 8 HOURS. THE BATTERY MUST BE STORED ABOVE 32⁰F TO
AVOID PERMANENT DAMAGE.
To store the caddy when you are finished with the round simply follow the
assembly procedure in reverse.
1. Loosen the [handle/bag holder] lever and lower the handle down into the
storage position.
2. Loosen the straps and remove the bag.
3. Loosen the [handle/bag holder] lever, fold down the upper bag holder and
retighten the lever.
4. Remove the battery by pressing the grey button
on the base of the caddy (Fig. 15)
5. Fold the bottom of the caddy completely –The caddy can be stored with the
[wheel/motors] attached to the frame
Removing the [Wheel/Motors]
1. Turn the caddy on its side (Fig. 16)
2. Place your foot on the wheel and pull up gently until a slight click is felt (Fig. 17)
3. Release the [wheel/motor] from the frame by pulling the release lever on the
bottom of the frame (Fig. 18). Remove the wheel (Fig. 19)
4. Repeat the process with the other [wheel/motor]. (Fig. 20)
CHARGE THE BATTERY
Fig. 1
The battery can also be charged while the
battery is in the eMotion Caddy by simply
plugging the charger directly into the plug
in the handle of the eMotion Caddy. (Fig. 2)
Fig. 2
STORING THE eMOTION CADDY
Fig. 15
It is not necessary to remove the battery for
storage. When the caddy is off. It does not
draw any charge and will not drain the battery.
Fig. 16
Fig. 17
Fig. 18
Fig. 19
Fig. 20
In order to maximize the life of the eMotion Caddy,
store in a dry moderate temperature Place. Store the
battery above 32⁰F to avoid damage.

The eMotion Caddy can be used in all conditions including rain and on all parts of
the course.
<CAUTION> : 1. DO NOT USE THE CADDY ON THE GREEN
2. DO NOT USE THE CADDY IN MORE THAN 2 INCHES OF WATER OR
SUBMERGE THE CADDY UNDER WATER
3. THE CADDY IS NOT MADE TO GO UP AND DOWN STAIRS,
BANGING THE CADDY UP AND DOWN STAIRS WITH A HEAVY BAG
COULD CAUSE DAMAGE TO THE [MOTOR/WHEEL] ASSEMBLY.
There are two lights on the handle that can turn on during use. In most cases the
cart will be operating normally and the GREEN light will be on at times during the
round (the e2 caddy will go into standby mode when left standing and the GREEN
light will go out).
If during the round, the RED light comes on and stays on, the caddy needs service.
In this case, the caddy should be turned off by pressing the elogo button. –
PLEASE CALL EMOTIONGOLFCADDY AS SOON AS POSSIBLE
If during the round, the RED lights blinks, the battery is low or discharged and
needs to be re-charged.
The caddy should be turned off immediately by pressing the elogo button. Then
re-charge the battery completely.
<CAUTION> : IN CASE OF A FLASHING RED LIGHT, THE CADDY MUST BE TURNED
OFF TO PREVENT POTENTIAL DAMAGE TO THE BATTERY.
If it becomes necessary to turn off the caddy during the round, it can be used as a
manual caddy during the remainder of the round without any damage to the
caddy. In normal conditions, once you are finished with the round simply push the
e logo button to turn the caddy off.
If you are testing the eMotion Caddy indoors on a carpeted surface, there can be a
static electricity charge buildup that will give a normal shock, this will not hurt
eMotion Caddy.
Once the battery is fully charged, the eMotion Caddy is ready to use. To begin
using the caddy some assembly and setup is necessary.
(The eMotion Caddy is shipped fully assembled with the [wheel/motors]
attached.)
1. Stand the frame upright and unfold the lower [frame/bag holder]. (Fig. 4)
>>> For the e3 model, make sure the 3rd wheel is unfolded in the proper position
(Fig. 5)
2. Insert the battery in caddy. The battery inserts into the opening at the base of
the caddy (Fig. 6). Press the battery into the base until it clicks into place.
<CAUTION> : THE BATTERY CAN ONLY FIT PROPERLY ONE WAY INTO THE BASE.
ATTEMPTING TO FORCE IT INTO THE BASE MAY DAMAGE THE
CADDY OR THE BATTERY (Fig. 7)
<CAUTION> : Wrap battery compartment with Velcro strap for secured battery.
3. Loosen the [handle/upper Bag Holder] lever (approx. 4 turns) and raise the
upper bag holder 90 degrees, then lightly tighten the lever (approx. 2 turns).
(Fig. 8)
4. Set your golf bag onto the bottom platform. (Fig. 9)
5. Then center the bag in the upper bag holder. (Fig. 10)
6. Attach and tightly secure the lower and upper bag straps.(Fig. 11)
7. Once the handle is in the proper position, securely tighten the handle lever.
GENERAL USE
e3 caddy –when the on/off button is pressed the GREEN light flashes for 3
seconds, if during this 3 seconds, the button is pressed again the caddy will
move forward for 50 feet. If the button is not pressed, the caddy will turn
off.
The eMotion Caddy has powerful electric motors and
is not a toy, please keep the caddy secure from
children to prevent potential accidents.
eMOTION CADDY SETUP
Fig. 4
Fig. 5
Fig. 6
Fig. 7
e 2 caddy –the handle must be set to slightly below waist height.
e 3 caddy –the handle should be set at a comfortable height to make
pushing or pulling the caddy easy.
Fig. 8
Fig. 9
Fig. 10
Fig. 11
To begin using the eMotion Caddy simply press the elogo on the handle and the
GREEN light will light up and the caddy is ready to use. (Fig. 12)
THAT’S IT!
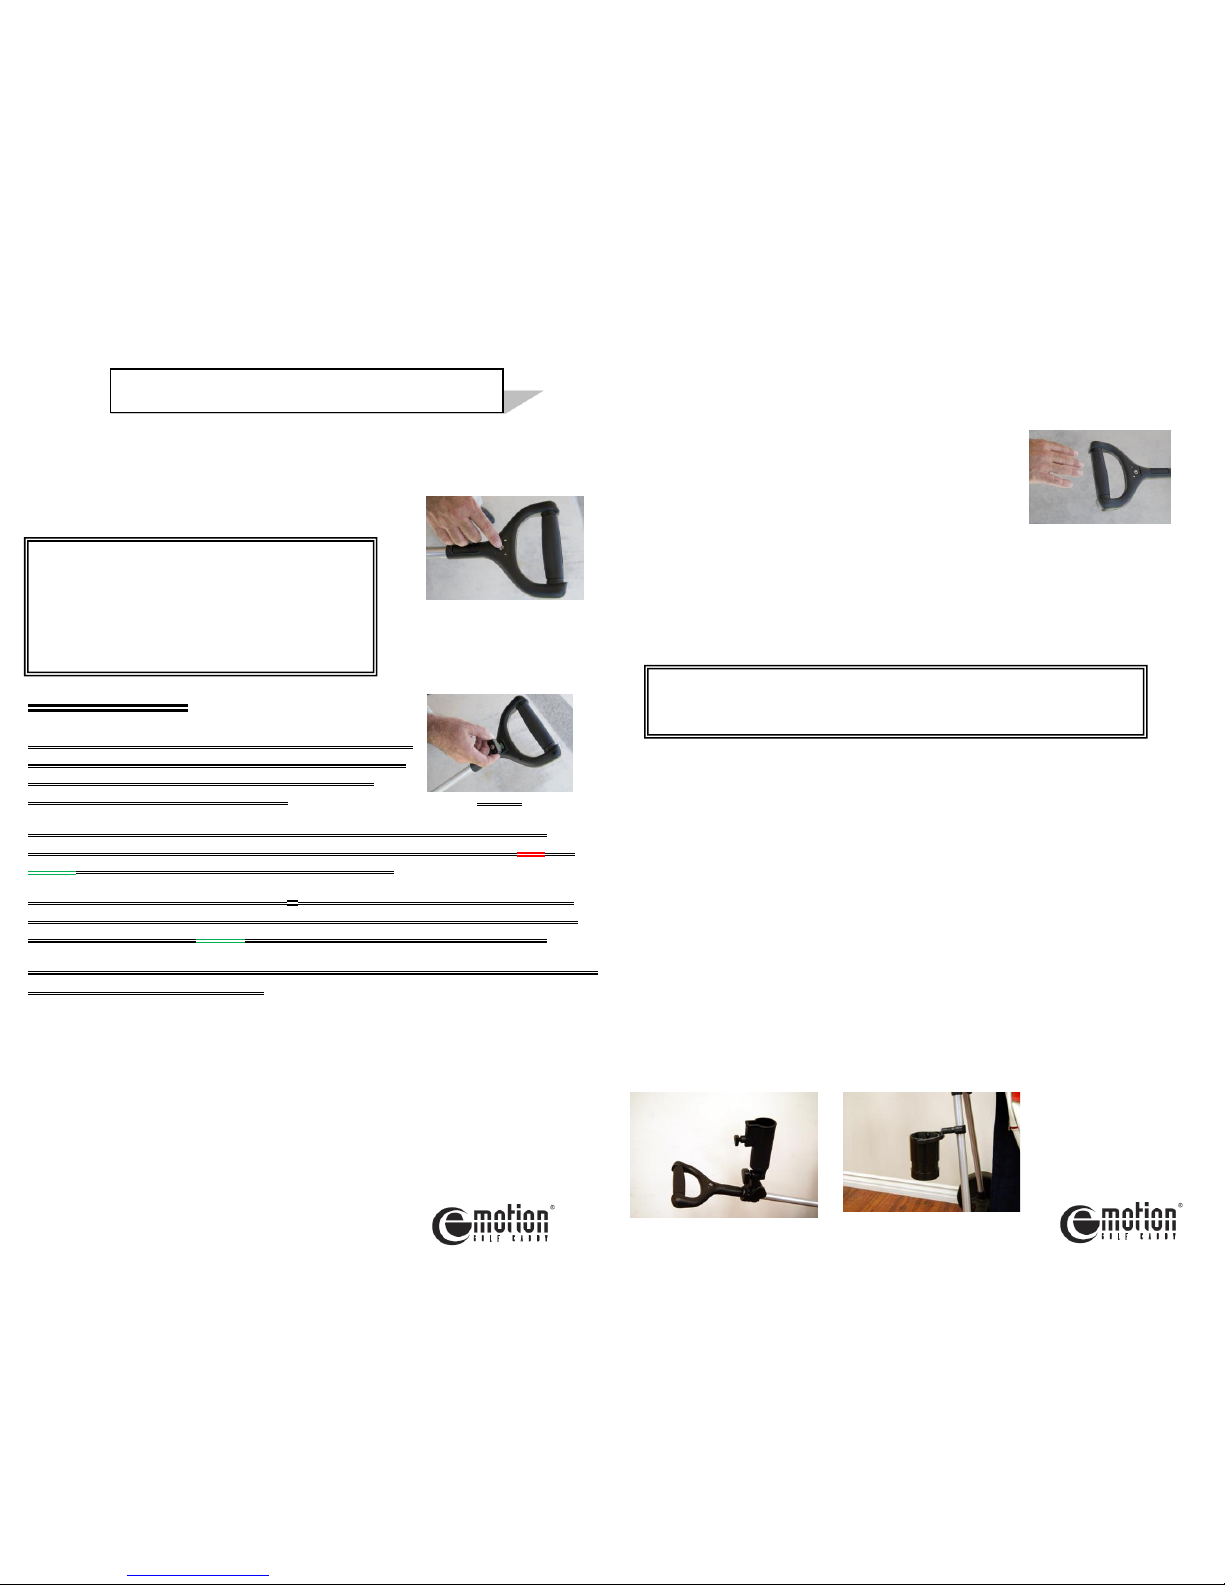
SECURITY KEY
Each eMotion Caddy comes with a Security Key (Fig. 13)
to prevent usage by unauthorized people. The Security
Key is similar to a car door key, each one is unique
and cannot be used in another caddy.
To lock the eMotion caddy, simply plug the security key into the plug in the
underside of the handle (Fig. 13) and remove it, the light will alternate RED and
GREEN, this means the caddy is in the lock condition.
To unlock the caddy, simply push the ebutton on the handle and the lights will
flash GREEN and RED, then plug the security key in the plug on the underside of
the handle (Fig, 13), the GREEN light will stay on and the caddy is unlocked.
<CAUTION> : IT IS NOT MECESSARY TO LEAVE THE SECURITY KEY PLUGGED IN AND
IT COULD BE LOST IF IT IS LEFT IN.
e 3 CADDY
For the e3 model, there are 2 features that are not on the e2 model.
e3 Features eMotion Caddy’s Patented Pace Technology
>>> Simply place your hand on the handle, it is not necessary to grip the handle.
>>> The eMotion Caddy has a very sophisticated sensor in the grip and will move
forward at your pace.
>>> After a few steps, the e3 caddy will perfectly match
your speed and you can release the handle. (Fig. 14)
>>> The caddy will maintain this pace until you touch
the handle to speed it up or slow it down or stop it.
<CAUTION> : YOU MUST KEEP TRACK OF THE CADDY WHEN IT IS IN THE MODE
BECAUSE IT CAN MOVE ON ITS OWN AND POTENTIALLY CRASH.
>>> Another feature for the e3 model is the automatic forward setting.
>>> This setting can be used to send the caddy ahead to the next tee or away from
the green.
<CAUTION> : MAKE SURE THE DIRECTION THAT YOU ARE SENDING THE CADDY IS
CLEAR. THE CADDY WILL BE MOVING ON ITS OWN AND CAN
POTENTIALLY CRASH.
OPTIONS
1. Umbrella Holder : This golf cart umbrella holder clamps to the cart to hold an
umbrella, It fits most golf carts and its holder’s clamps easily attach
to the cart frame tube and require two screws to be tightened.
(Opt. 1)
2. Cub Holder : Fully adjustable. Just twist the bottom and it increases in length
and automatically adjusts its inner diameter. (Opt. 2)
USING THE eMOTION CADDY
This is only when the caddy is unlocked, each
caddy is shipped from the factory unlocked.
On the e2 caddy, the light will blink GREEN
when the caddy is in standby mode waiting
for your next shot.
Fig. 12
Fig. 13
Fig. 14
By pressing the elogo button 2 times quickly, the caddy will move
forward for 50 feet.
Opt. 1
Opt. 2
This manual suits for next models
1
Table of contents


