Eagle 335376 Product guide
ART #335376
EG9809 Revised 08/10
Eagle Foodservice Equipment, Eagle MHC, SpecFAB®, and Retail Display are divisions of Eagle Group. ©2010 by the Eagle Group
• 100 Industrial Boulevard, Clayton, Delaware 19938-8903 U.S.A. • www.ea le rp.com
• Phone: 302/653-3000 • (Foodservice) 800/441-8440 • (MHC/Retail) 800/637-5100
• Fax: 302/653-2065
(continued on Page 2)
OPERA ING/INS ALLA ION INS RUC IONS
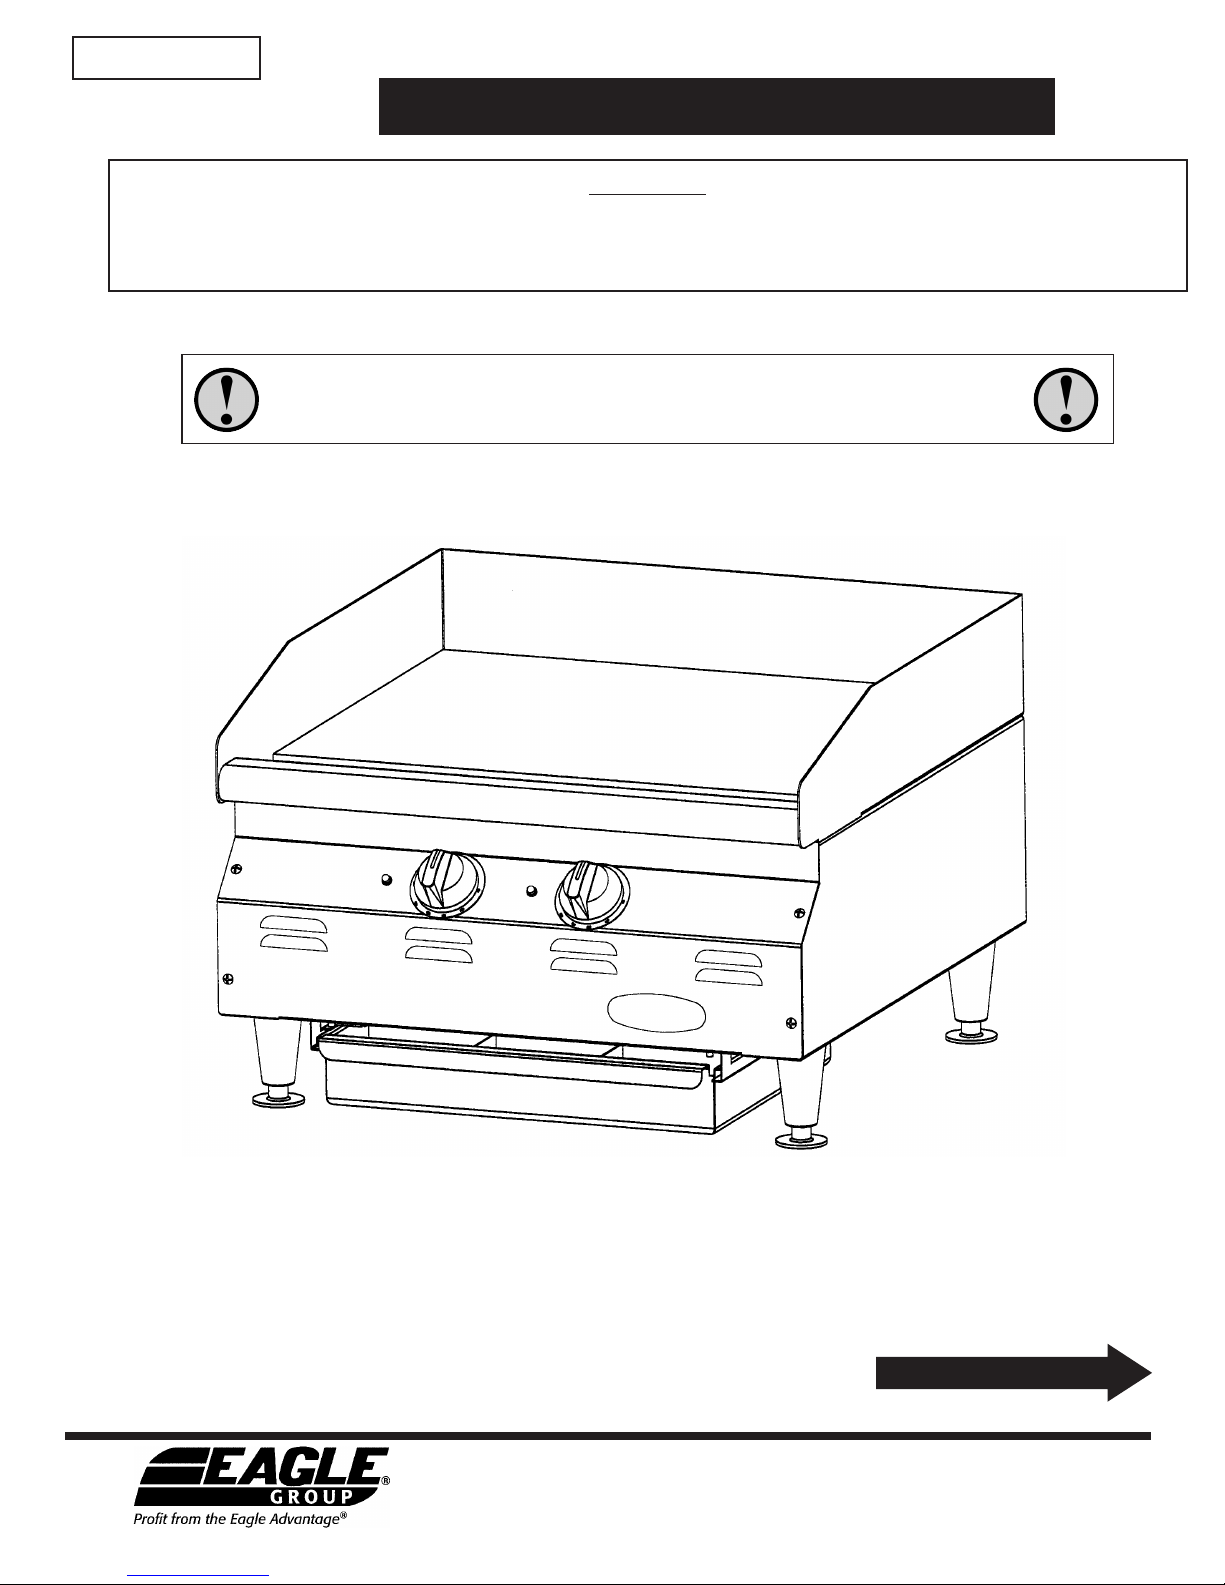
Electric Griddles
This Eagle Electric Griddle is equipped for the voltage indicated on the nameplate mounted on the rear of the
unit. This griddle is designed for use on alternating current (AC) only.
CAU ION
INS ECT CONTENTS IMMEDIATELY AND FILE CLAIM WITH DELIVERING CARRIER FOR ANY DAMAGE.
SAVE YOUR BOX AND ALL PACKING MA ERIALS.
YOU ARE RES ONSIBLE FOR DAMAGE TO YOUR UNIT IF RETURNED IM RO ERLY ACKED.
NOTE: INTENDED FOR OTHER THAN HOUSEHOLD USE. THIS COMMERCIAL
APPLIANCE MUST BE INSTALLED WITHIN SURROUNDINGS AND VENTILATION
REQUIREMENTS AS DICTATED BY NATIONAL AND/OR LOCAL CODE.

2
(continued on Page 3)
The installation of the electric griddle must conform to the
NATIONAL ELECTRIC CODE AND ALL
LOCAL ELECTRIC CODES AND ORDINANCES AND THE
LOCAL ELECTRIC COM ANY RULES AND REGULATIONS
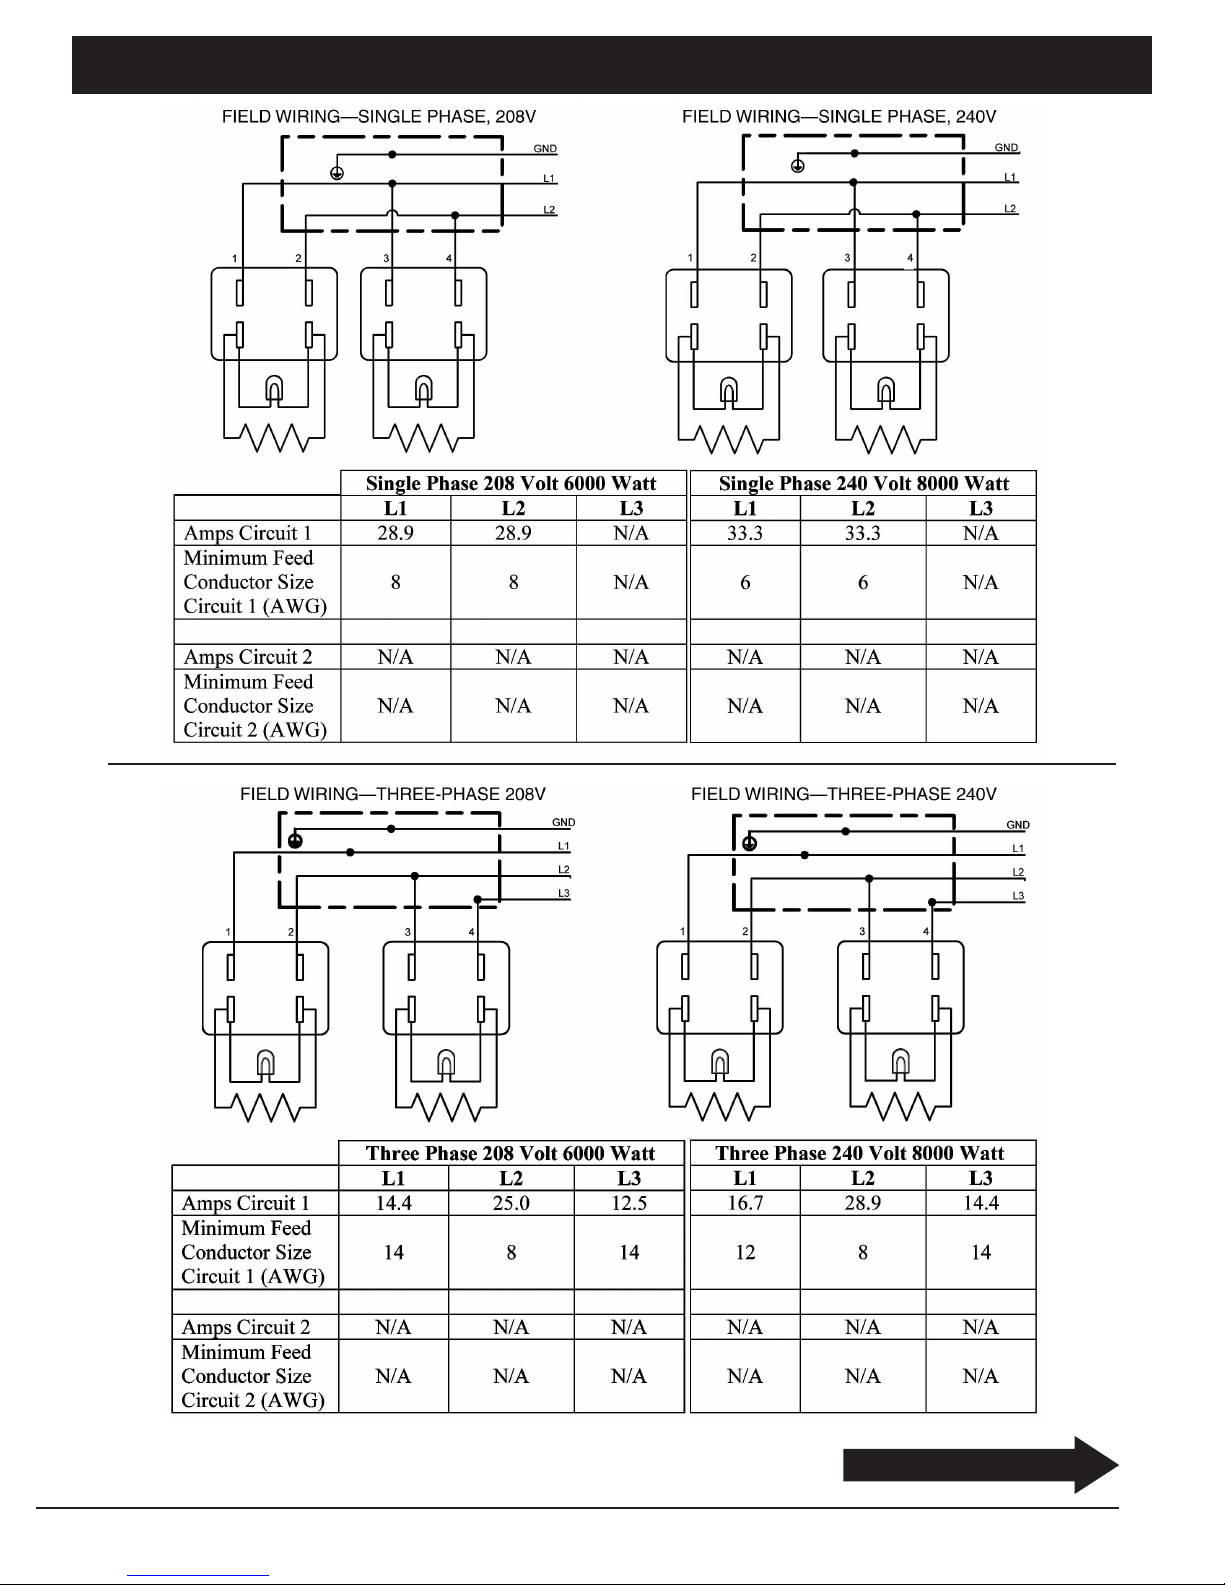
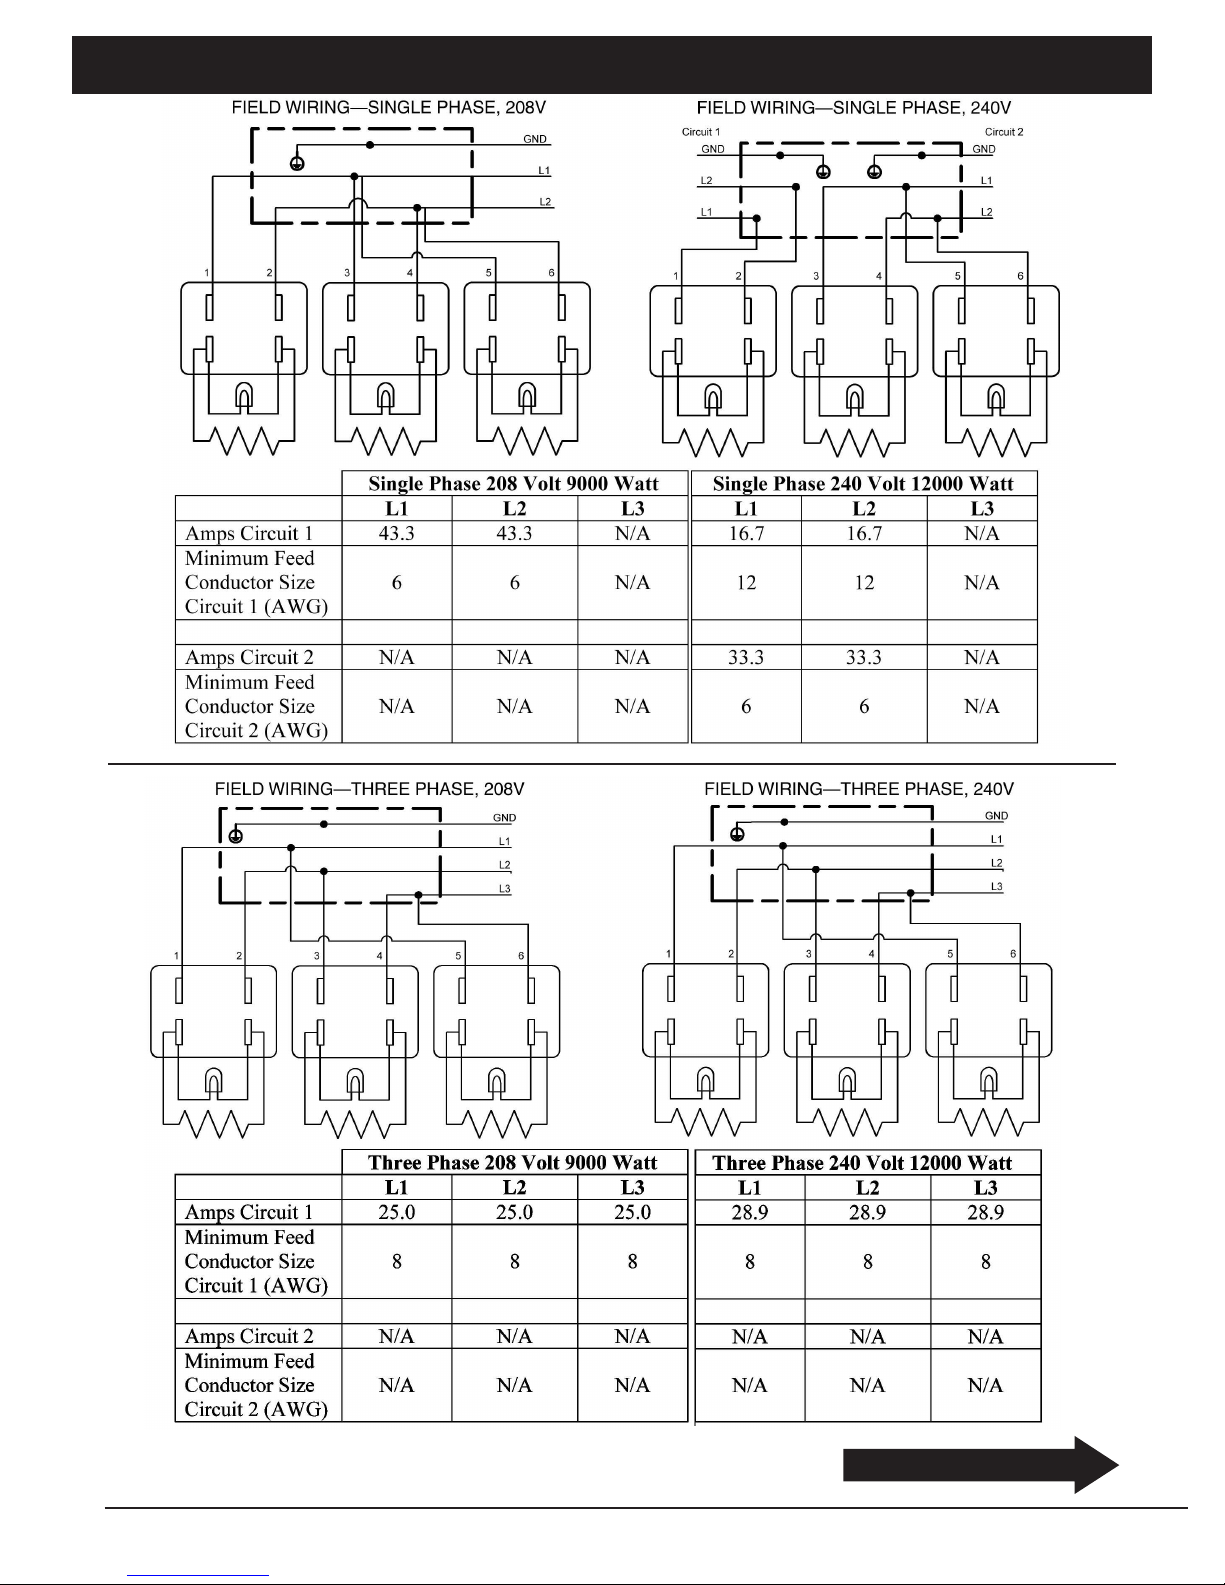
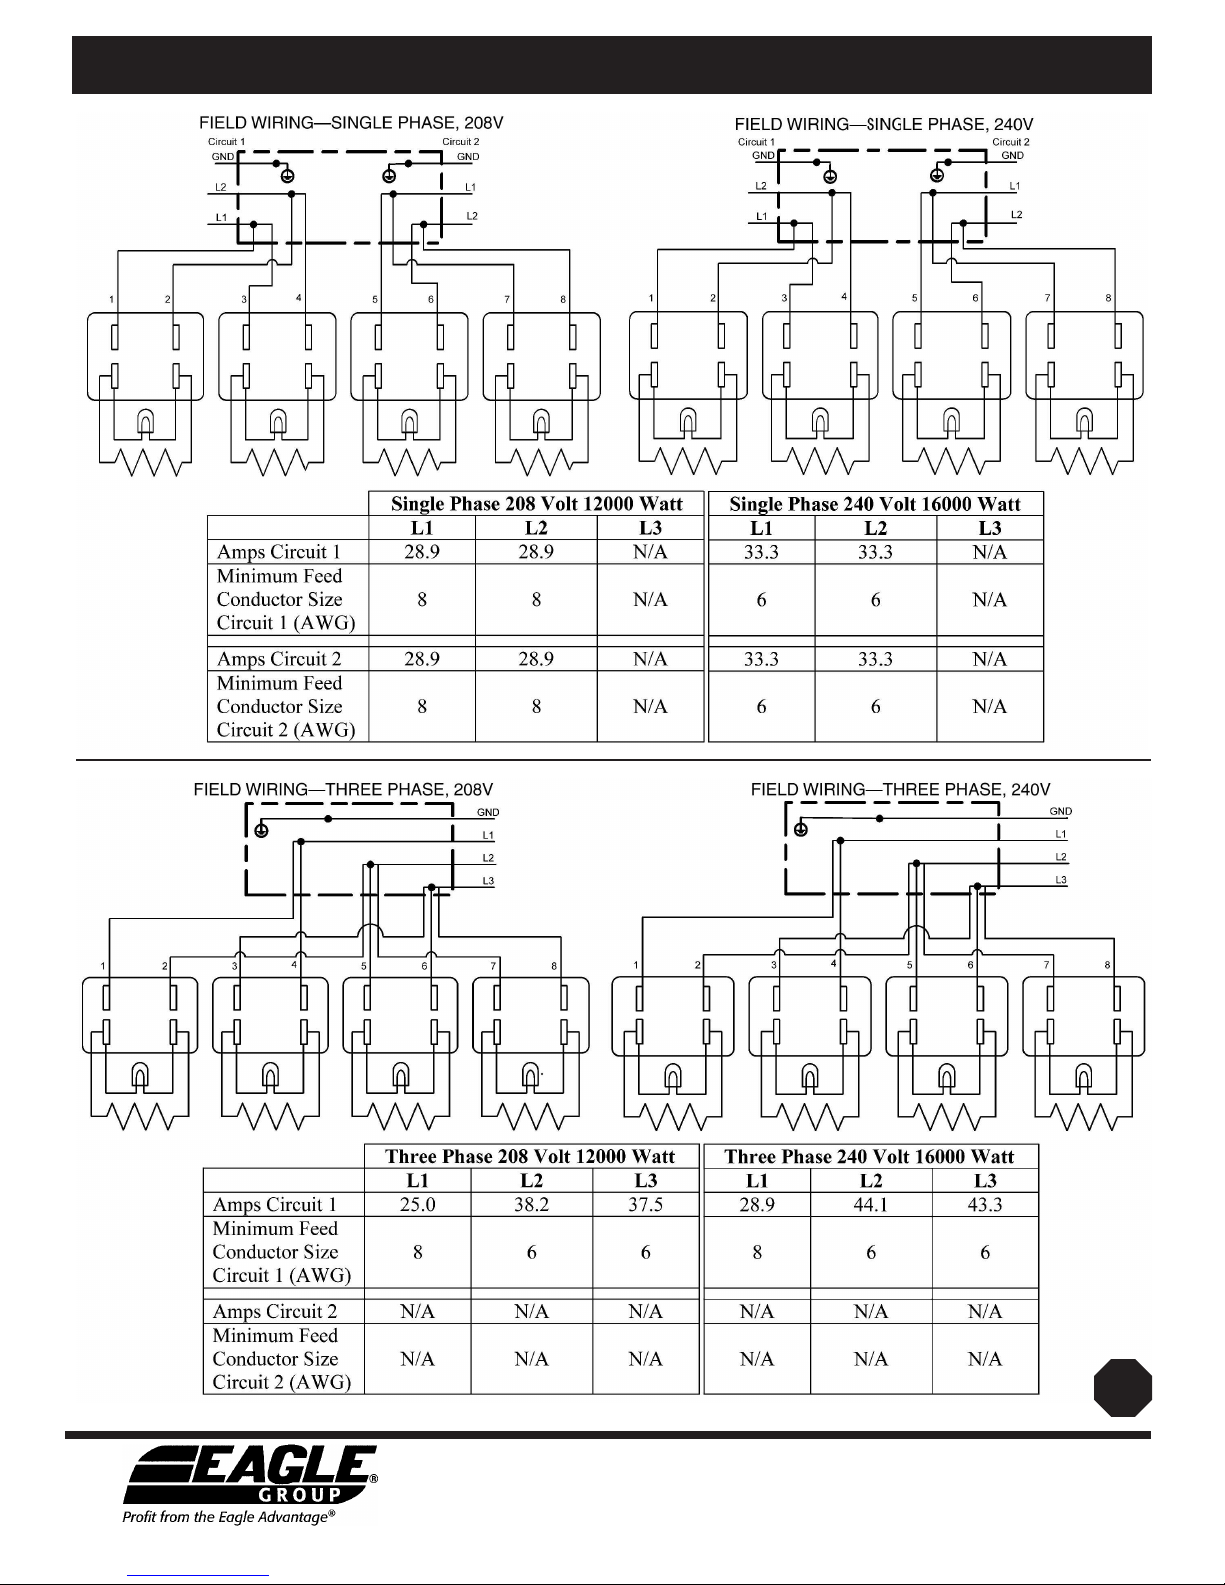
See “Wiring Diagrams…” (pages 6 through 8) for wire sizes.
• For your protection, we recommend that a qualified electrician install this griddle. They should be familiar with electrical
installations and all electrical codes.
• roper connections and power supply are essential for efficient performance.
• The external wiring should be in conduit or an approved type of flexible cable suitable for operation at temperature
indicated at the conduit hole, and a proper size to carry the load.
• The supply circuit should be properly fused and equipped with a means of disconnecting, as required by local
electrical code.
• THE BODY OF THE GRIDDLE SHOULD BE GROUNDED. (DO NOT GROUND TO A GAS SUPPLY LINE)
1) Power Supply
Remove the junction box cover on rear of riddle to expose the wire connections. Use one of the holes furnished for attachin
the conduit with proper size clamp.
All wires must be spliced or joined as to be electrically or mechanically secure and be covered with insulation equal to that of the
wire. Loose or improper connections may result in arcin , which in turn can cause a fire.
2) Feet
Install feet by screwin each foot into the threaded openin s on the bottom of the riddle. Failure to use feet will void warranty and
could cause unsafe conditions.
3) Leveling
Level unit by adjustin the four feet and ti hten securely. The adjustable feet have an adjustment of one inch for line-up with other
Ea le counter top lines. Check the feet every 60 days to assure that they are ti ht.
INS ALLA ION
CAU ION - O REDUCE HE RISK OF FIRE:
• Do not operate without the legs provided.
• Do not install unit closer than 3˝ to a vertical surface.

3
MAIN ENANCE
It takes very little time and effort to keep the griddle attractive and performing at top efficiency. If grease is permitted to
accumulate, it will form a gummy cake and then carbonize into a hard substance which is extremely difficult to remove.
To prevent this condition please follow the cleaning steps below.
1) Scraping
After each use, scrape the riddle with a scraper or a flexible spatula to remove excess fat and food. A rease drawer is provided for
the scrapin s. If there is an accumulation of burned fat and food, the riddle should be thorou hly scoured and re-seasoned. Use
pumice or riddle stone, while the riddle is warm, to remove excess fat and food. Do not use steel wool because of the dan er of
steel slivers ettin into the food.
2) Body
Daily, use a clean cloth and a non-abrasive cleaner to clean the body of the riddle. Wipe the polished front with a soft cloth.
3) Grease Drawer wit Removable Baffle
At least once a day, remove the rease drawer and wash. If the rease drawer is permitted to fill too hi h, t e excess grease will
run out of overflow ole at t e front of t e drawer. The drawer is removed by pullin forward.
CAUTION: HANDLE GREASE DRAWER WITH EXTREME CARE WHEN FILLED WITH HOT GREASE!
4) Controls
Unit should be turned off when not in use. It is recommended that the unit be disconnected from power supply by shuttin off
power disconnect switch.
(continued on Page 4)
Before operating griddle, it should be checked to see that it is sitting level. Adjust the feet if necessary to level the griddle.
1) Season t e surface.
Clean the riddle surface thorou hly. After the riddle has been thorou hly cleaned, it should be seasoned to prevent food from
stickin . Before usin and after each thorou h scourin , season the riddle by heatin surface in the followin manner:
1. Turn the temperature control dials to 350˚F.
2. Usin a clean cloth, not a spatula, spread a thin film of cookin oil or fat over the riddle cookin surface. This film should remain
on the hot riddle for half an hour.
3. Remove the excess fat and wipe clean.
(CAUTION: GRIDDLE SURFACE WILL BE HOT.)
4. Apply another film of cookin oil over the hot cookin area for another half hour and a ain remove the excess fat and
wipe clean. The riddle surface will be ready for use.
Even with careful seasoning, food may stick to the griddle cooking surface until griddle plate is “broken in”.
2) Temperature control
The temperature controls are combination “on/off” switches and thermostats. The set point of each control knob is the indicator
li ht. Your riddle is equipped with one thermostat per foot of cookin surface len th. They operate independently of one another,
allowin different foot sections of the riddle to be operated at different temperatures. Each thermostat controls the section of the
riddle above it.
3) Cooking
Set the thermostat dial knob at the desired temperature. After a short pre-heatin period, the thermostat will automatically maintain
the selected temperature. When the set temperature is reached, the si nal li ht will o off.
OPERA ING INS RUC IONS

4
(continued on Page 5)
ROUBLE SHOO ING
Griddle will not eat.
CAUSE REMEDY
a. Fuse or breaker blown . . . . . . . . . . . . . . . . . . . . . . . . . Replace fuse or reset breaker.
b. Power line disconnected . . . . . . . . . . . . . . . . . . . . . . . Reset disconnect switch.
One section will not eat.
CAUSE REMEDY
a. Thermostat not turned on . . . . . . . . . . . . . . . . . . . . . . Adjust to temperature.
b. Possible defective thermostat . . . . . . . . . . . . . . . . . . . Call authorized service center.
c. Possible defective heatin element . . . . . . . . . . . . . . . Call authorized service center.
d. Fuse or breaker blown . . . . . . . . . . . . . . . . . . . . . . . . . Replace fuse or reset breaker.
Griddle surface too ot.
CAUSE REMEDY
a. Cookin unevenly on riddle . . . . . . . . . . . . . . . . . . . . Space out food uniformly on riddle.
b. Possible defective thermostat . . . . . . . . . . . . . . . . . . . Call authorized service center.
Food sticking.
CAUSE REMEDY
a. Grease or food particles accumulated on surface . . . . See “Maintenance” section (pa e 3).
b. Not seasoned . . . . . . . . . . . . . . . . . . . . . . . . . . . . . . . . See “Maintenance” section (pa e 3).
Center is cold.
CAUSE REMEDY
a. Possible defective center element . . . . . . . . . . . . . . . . Call authorized service center.
Food runs to one side.
CAUSE REMEDY
a. Not level . . . . . . . . . . . . . . . . . . . . . . . . . . . . . . . . . . . . See Levelin instructions
(under “Installation” section, pa e 2).
5
(continued on Page 6)
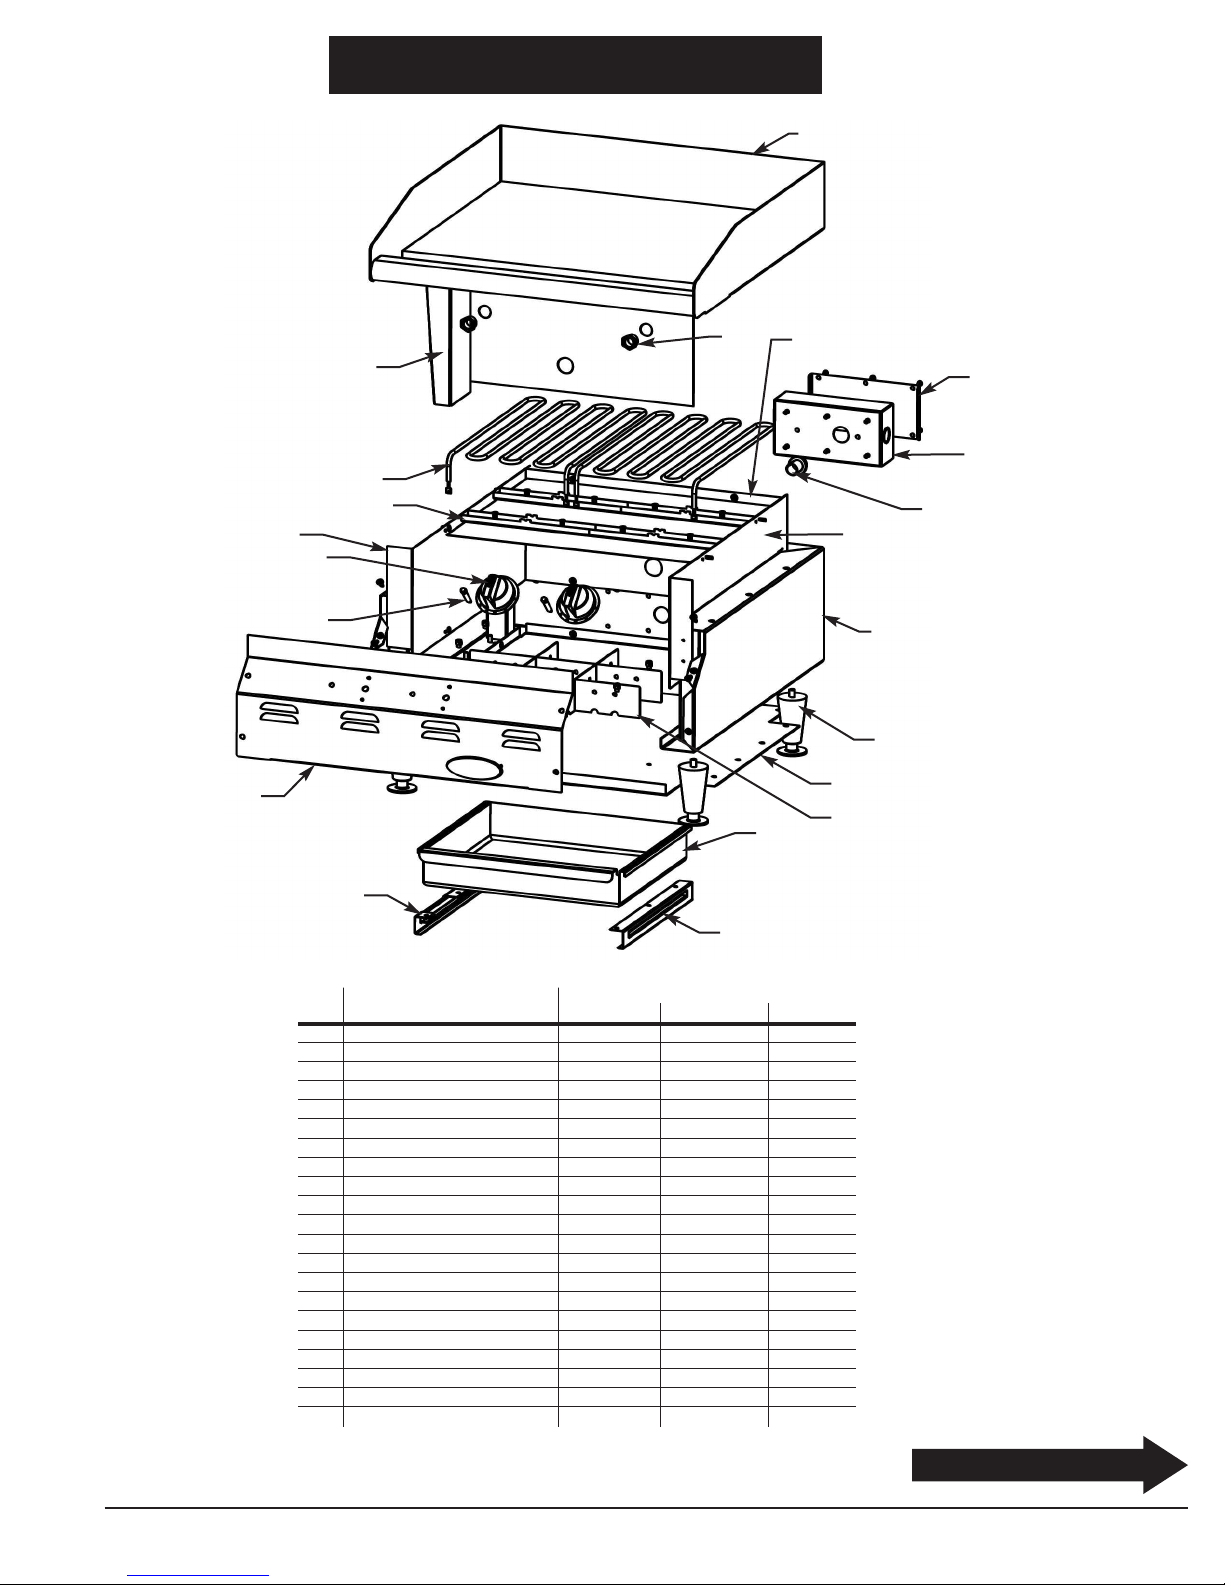
ref PART NUMBERS
# descr pt on 24˝ un t 36˝ un t 48˝ un t
1 grease chute 354646 354646 354646
2 knob 349397 349397 349397
3 heating element 322149 322149 322149
4 j-box 369507 369507 369507
5 j-box cover 332257 332257 332257
6 indicator light 302353 302353 302353
7 4˝ leg 354609 354609 354609
8 grease drawer 354642 354642 354642
9 element support 355476 355476 355476
10 inner panel - RH 354632 354632 354632
11 inner panel - LH 354631 354631 354631
12 rear panel 355458 355459 355460
13 bottom panel 355470 355471 355472
14 control/front panel 355467 355468 355469
15 chase nipple 330569 330569 330569
16 right-hand slide 354661 354661 354661
17 left-hand slide 354660 354660 354660
18 conduit connector 369508 369508 369508
19 grease drawer baffle 410283 410283 410283
20 top assembly 355452 355453 355454
21 wrapper/base 355464 355465 355466
PAR S LIS S—“CLEGH” Models
1
3
5
12
15
20
16
13
19
18
6
14
17
7
8
4
10
21
2
9
11
6
WIRING DIAGRAMS—24˝ MODELS
(continued on Page 7)
7
WIRING DIAGRAMS—36˝ MODELS
(continued on back page)
Eagle Foodservice Equipment, Eagle MHC, SpecFAB®, and Retail Display are divisions of Eagle Group. ©2010 by the Eagle Group
• 100 Industrial Boulevard, Clayton, Delaware 19938-8903 U.S.A. • www.ea le rp.com
• Phone: 302/653-3000 • (Foodservice) 800/441-8440 • (MHC/Retail) 800/637-5100
• Fax: 302/653-2065
(End)
WIRING DIAGRAMS—48˝ MODELS
Table of contents
Other Eagle Griddle manuals

Popular Griddle manuals by other brands


Keating Of Chicago
Keating Of Chicago MIRACLEAN PRE-2000 manual

Nexgrill
Nexgrill 720-0786A owner's guide

Outwell
Outwell FH-3047C instruction manual

Rankam
Rankam Member's Mark GR2298901-MM-02 Assembly & operating instructions

Black Stone
Black Stone 1972 owner's manual

Star
Star Ultra Max 760TA Installation and operation instructions