Eagle EHR-10 User manual

EHR-10
Operation Instructions
www.eaglesonar.com
Pub. 988-0158-081

Copyright © 2007 Navico
All rights reserved.
Eagle® is a registered trademark of Navico
No part of this manual may be copied, reproduced, republished, transmitted or
distributed for any purpose, without prior written consent of Eagle Electronics.
Any unauthorized commercial distribution of this manual is strictly
prohibited.
Eagle Electronics may find it necessary to change or end our policies,
regulations, and special offers at any time. We reserve the right to do so without
notice. All features and specifications subject to change without notice. All
screens in this manual are simulated. On the cover: EHR-10 shown. Other
models covered in the manual are similar.
For free owner’s manuals and the most current information on this product, its
operation and accessories, visit our web site: www.eaglesonar.com
Eagle Electronics
P.O. Box 669
Catoosa, OK USA 74015
Printed in China.
IMPORTANT SAFETY INFORMATION
Please read carefully before installation and use.
CAUTION
!
!
CAUTION
DANGER
WARNING
This is the safety alert symbol. It is used to alert you to potential personal
injury hazards, Obey all safety messages that follow this symbol to
avoidpossible injury or death.
CAUTION
!
!
CAUTION
DANGER
WARNING
WARNING indicates a potentially hazardous situation which, if not avoided,
could result in death or serious injury
CAUTION
!
!
CAUTION
DANGER
WARNING
CAUTION indicates a potentially hazardous situation which, if not avoided,
could result in minor or moderate injury.
CAUTION
!
!
CAUTION
DANGER
WARNING
CAUTION used without the safety alert symbol indicates a potentially
hazardous situation which, if not avoided, may result in property
damage.

EAGLE EHR-10 Operation Instructions 3
Contents
Introduction ...........................................................................................................................................4
Your radio has the following features: ................................................ 4
Safety and Operational Information ........................................................................................................5
Display .....................................................................................................................................................5
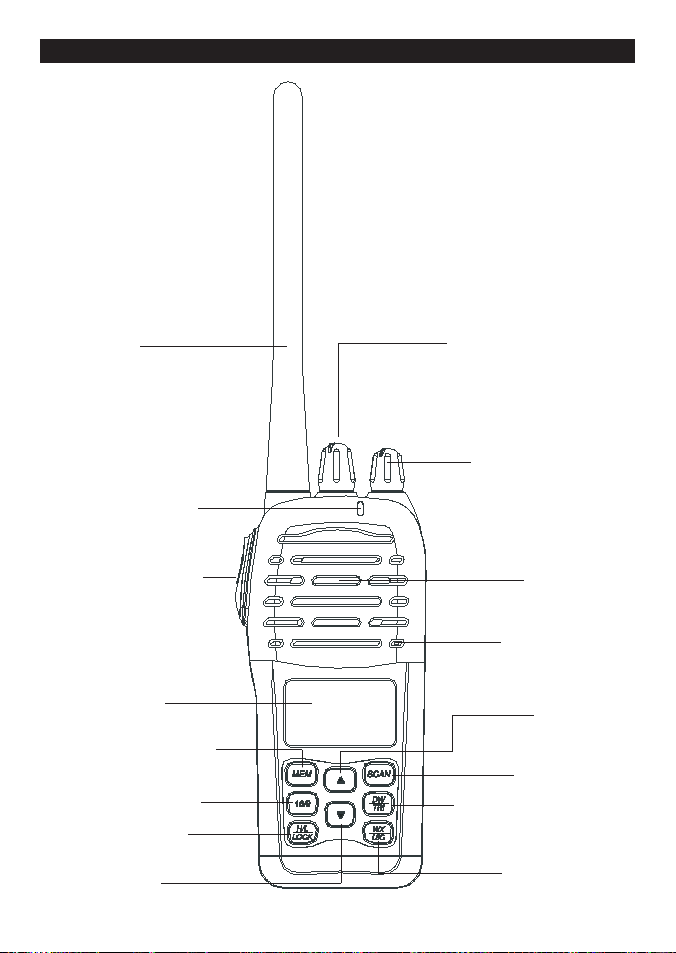
Function and Location of the Controls .......................................................................................................6
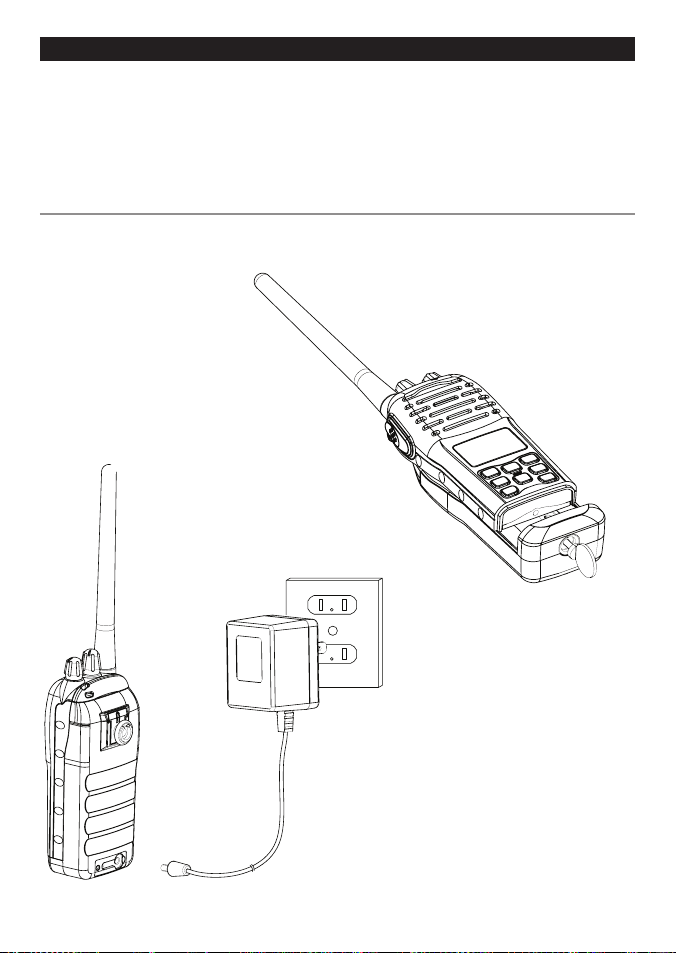
Before Using your Radio............................................................................................................................7
1. Charging and Installing the Ni-MH Battery Pack ................................... 7
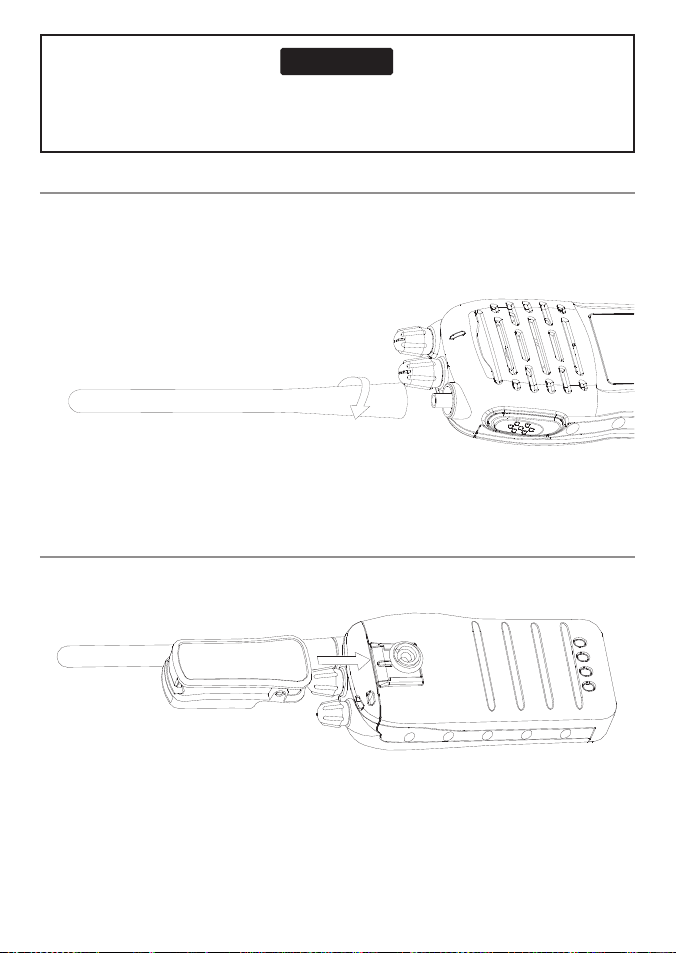
2. Installing the Antenna ............................................................ 8
3. Installing the Belt Clip ............................................................. 8
Using Your Radio ......................................................................................................................................9
1. Turning the Power On/Off ......................................................... 9
2. Adjusting Squelch . . . . . . . . . . . . . . . . . . . . . . . . . . . . . . . . . . . . . . . . . . . . . . . . . . . . . . . . . . . . . . . . . 9
3. Transmitting and Receiving ......................................................10
4. Accessing the 16/9 Priority Channels..............................................10
5. Selecting Channels ...............................................................10
6. Selecting High/Low Power .......................................................10
7. Locking the Keypad ..............................................................11
8. Adding/Deleting Channels to/from Memory .....................................11
9. Accessing Channels Saved to Memory ...........................................11
10. Scanning .......................................................................12
11. Using the WATCH Modes ........................................................12
12. Selecting a WX (weather) channel ...............................................13
13. Weather Alert Operation ........................................................13
14. Selecting U.S./International/Canadian Band .....................................13
15. Resetting the Radio .............................................................14
Maintenance .......................................................................................................................................... 14
Technical Specifications.......................................................................................................................... 15
Frequency Charts.................................................................................................................................... 16
International Marine Channels. . . . . . . . . . . . . . . . . . . . . . . . . . . . . . . . . . . . . . . . . . . . . . . . . . . . . . . 16
USA Marine Channels ...............................................................18
Canadian Marine Channels ..........................................................20
FCC Compliance.....................................................................23
How to Obtain Service . . ........................................................................................................................ 25

EAGLE EHR-10 Operation Instructions4
Introduction
Congratulations on your purchase of an Eagle EHR-10 handheld marine band VHF radio. Designed
for international operation, allows you to transmit and receive on all international channels in
the VHF marine band, as assigned by the International Union (ITU). The EHR-10 is approved with
commercial-grade standards to give you clear, reliable communication.
NOTE: According to WEEE regulations, the user should not dispose the product when damaged,
but rather send it back to Eagle for disposal. Refer to How to Obtain Service section for
instructions to contact Eagle.
Your radio has the following features:
Channel 16/9 Priority Key
Provide quick access to emergency channel 16, the universal and most frequently-used marine
channel, which is used for distress or safety communications. Pressing and holding the 16/9
channel key for 3 seconds allows quick and easy access to Channel 9. Channel 9 is an alternate
frequency for distress or safety in some areas in the event Channel 16 is congested.
PLL (Phase Lock Loop) Controlled Circuitry
Provides accurate and stable channel selection.
Squelch Adjustment
Help eliminate noise between transmissions.
Key Lock
Let’s you lock the keypad in order to prevent the controls from accidental pressing.
High/Low Power Selection
Let’s you save power by selecting a suitable transmitting power for long or short distances.
Battery Level Indicator
Indicates the battery pack condition.
Signal Strength indicator
Displays the relative strength of the RX and TX signals.
Supplied Battery Charger
Allows you to conveniently recharge your radio battery pack.
Backlight LCD Display
Allows you to operate the radio in a darkened environment.
Memory Channels
Let’s you store channels as memory channels.
WX/UIC Key
Allows you to select Weather Band, U.S. Channel Band, International Channel Band or Canadian
Channel Band. This key is also used to select Weather Alert ON/OFF.
DW/TRI key
Allows you to Dual Watch your current working channel and CH16 or Tri Watch adding CH9 to the
scan.

EAGLE EHR-10 Operation Instructions 5
Safety and Operational Information
Display
Your radio comes with a multifunctional display.
CAUTION
!
!
CAUTION
DANGER
WARNING
Your hand-held marine VHF radio contains a low power transmitter. When the Push-To-Talk
(PTT) button is pushed, the radio will transmit a Radio Frequency (RF) signal.
Memory Mode indicator
Receiving indicator
Transmiting indicator
Low power transmit indicator
High power transmit indicator
Priority channel indicator
Scan mode indicator
Signal level indicator
ATIS indicator (EU version)
Key lock indicator
International channel indicator
Canada channel indicator (USA version)
Weather station indicator (USA version)
Weather station alarm (USA version)
Memory Channel indicator
Dual watch mode indicator
Tri-watch mode indicator
Battery level indicator
This channel can only receive
not transmit indicator
Channel number
This channel can only receive
and transmit by same frequency
USA channel indicator
!
WARNING
Never leave your radio in a closed car or trunk; the extremely high temperatures generated in
hot weather can damage the electronics.
Signal Strength indicator
Displays the relative strength of the RX and TX signals.
When TX is set to HI (High)
When TX is set to LO (Low)
Fully charged - Normal operation
Normal operation
Normal operation
Low battery - needs charging
Battery Level indicator
(Note: Test only when transmitting in HI Power Mode)
Table of contents
Other Eagle Marine Radio manuals