E&J EJ777-1 User manual
GF0500090RevB07
© GF Health Products, Inc.
October 2007
EJ777-1 Transport Chair user and attendant:
Read this manual before operating the transport chair.
Save this manual for future reference.
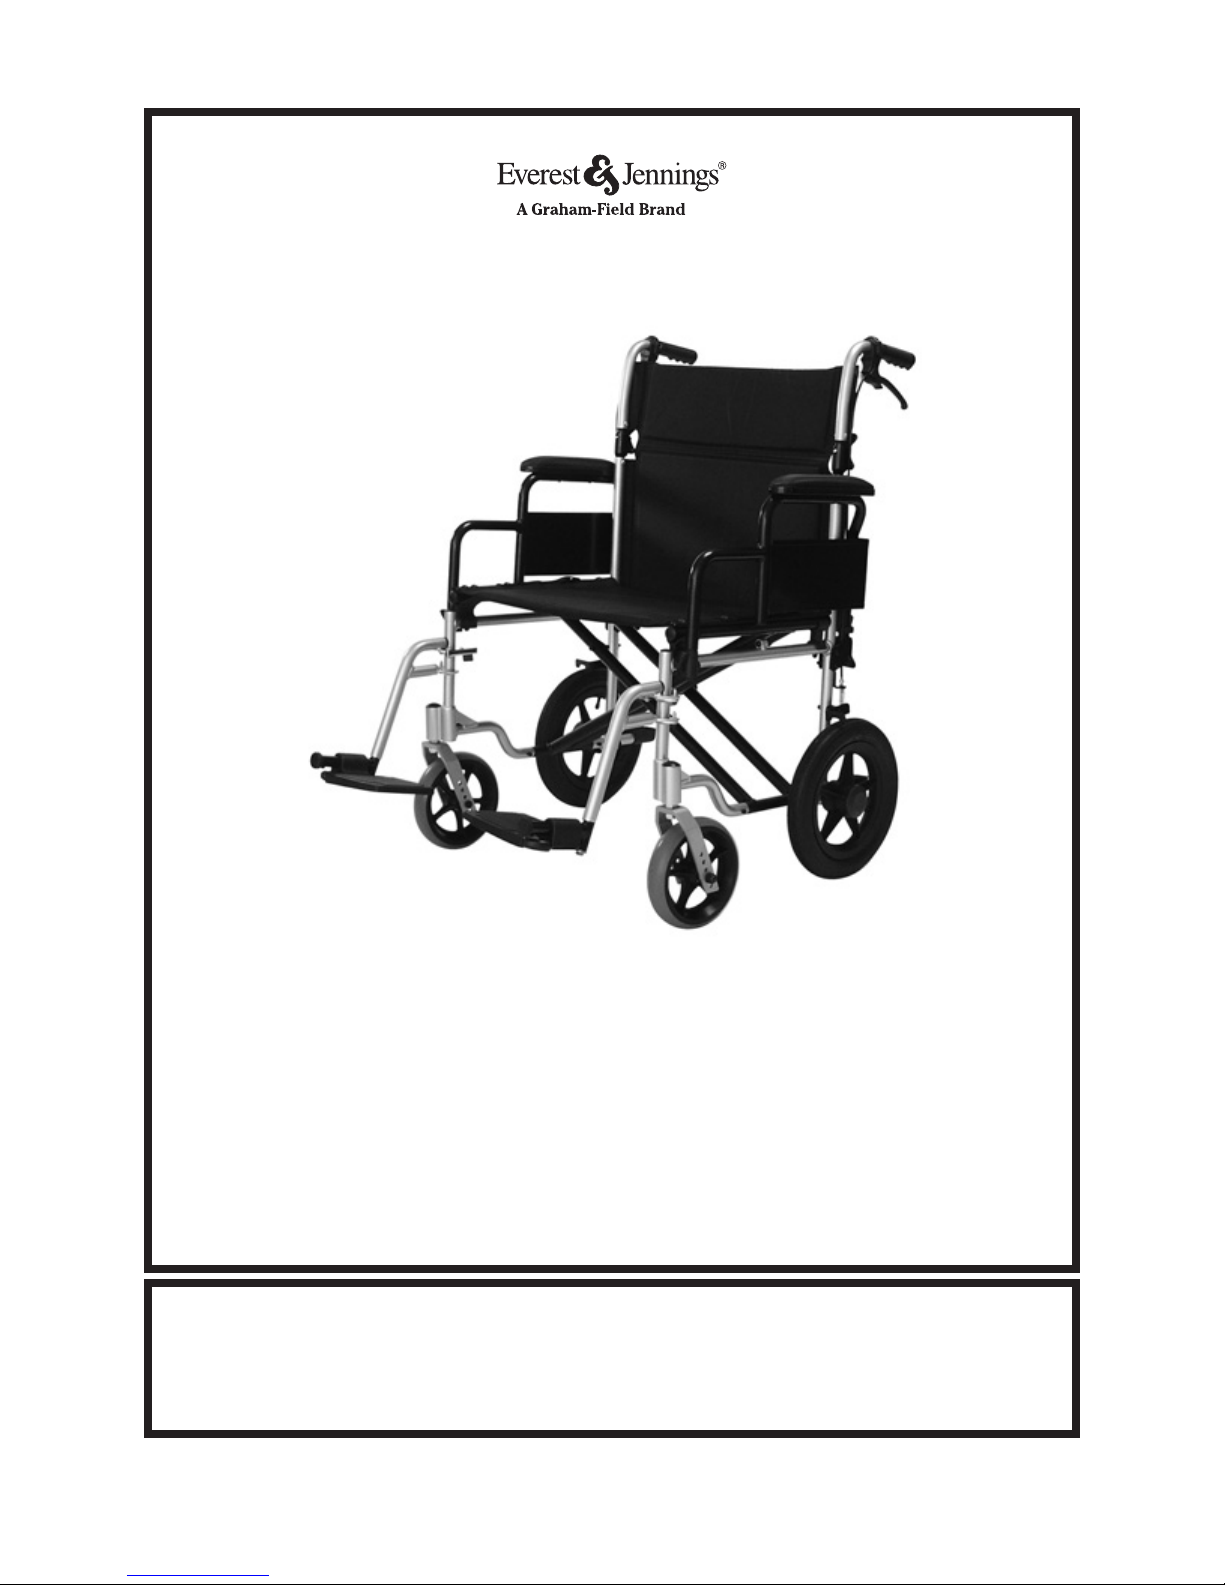
EJ777-1 Bariatric Transport Chair
Operation Manual

2 GF0500090RevB07 • EJ777-1 Transport Chair
CONTENTS
1 INTRODUCTION ........................................................................................................3
INTENDED USE....................................................................................................3
STATEMENTS OF SIGNIFICANCE ......................................................................4
2 IMPORTANT SAFETY PRECAUTIONS.....................................................................5
EJ777-1 TRANSPORT CHAIR LABELS ..............................................................5
WARNINGS...........................................................................................................5
3 GETTING STARTED...................................................................................................7
4 HANDLING TIPS ........................................................................................................8
TO ATTENDANT ...................................................................................................8
BALANCE .............................................................................................................8
TRANSFER ACTIVITIES.......................................................................................9
FOR ATTENDANT: TILTING .................................................................................9
RAMPS AND INCLINES .....................................................................................10
CURBS AND STEPS...........................................................................................10
5 ADJUSTMENTS .......................................................................................................13
REAR WHEEL & CASTER..................................................................................13
CROSS BRACE ..................................................................................................13
ARM ....................................................................................................................14
FOOTREST—DETACHABLE, SWINGAWAY .....................................................15
ATTENDANT WHEEL LOCKS............................................................................16
6 TRANSPORTING THE EJ777-1 TRANSPORT CHAIR...........................................17
PREPARING THE EJ777-1 FOR TRANSPORT .................................................17
7 MAINTENANCE .......................................................................................................19
8 TROUBLESHOOTING..............................................................................................23
9 SPECIFICATIONS ....................................................................................................24
10 LIMITED WARRANTY..............................................................................................25
11 INDEX ......................................................................................................................27
WARNING: EJ777-1 Transport Chair user and attendant: Do not operate the transport
chair without first reading and understanding this manual. If you do not
understand the warnings, cautions, and instructions provided herein, con-
tact your healthcare professional, Graham-Field Health Products dealer, or
technical representative before proceeding with the use of this product;
otherwise personal injury or damage to your transport chair could result.

GF0500090RevB07 • EJ777-1 Transport Chair 3
1 INTRODUCTION
Thank you for choosing an Everest & Jennings® product. We at Graham-Field Health
Products wish to assure you of our continuing commitment to provide innovation
and quality in our products. Important safety, operating, and maintenance instruc-
tions that warrant the attention of both user and attendant are included in this op-
eration manual. Read the entire manual carefully before operating your new EJ777-1
Transport Chair, keep it handy for future reference, and refer to it as often as neces-
sary to help maintain good performance standards.
Consult your healthcare professional and Graham-Field Health Products dealer for as-
sistance in developing and learning safe and effective techniques for performing your
daily activities according to your individual physical abilities and needs, and to make
certain that your transport chair is properly prescribed and adjusted for your use.
The safety precautions in this manual are general warnings intended to be used only
as basic guidelines. You may nd it necessary to develop your own methods for
safely solving frequently encountered challenges. Again, consult your professional
medical advisors for their recommendations about safety methods, and never hesi-
tate to ask for their assistance.
Your transport chair should receive frequent, regularly scheduled maintenance,
including an inspection of the mechanical parts, to ensure proper operation. Some
suggested inspection procedures, troubleshooting procedures, and adjustment pro-
cedures are included in this manual. When it comes to service and repair, remember
that your Graham-Field Health Products dealer knows your transport chair best.
The person performing adjustments on the EJ777-1 Transport Chair has the responsi-
bility of making certain that the user can safely operate the transport chair with the
adjustments selected. This person must evaluate the user's ability, weight, physical
condition, the environment in which the transport chair will be used, and the terrain
over which the transport chair will travel.
All information and specications in this manual are current at the time of printing.
Packaging, labeling, warranties and products are subject to change without notice.
Graham-Field Health Products is not responsible for typographical errors.
INTENDED USE
The EJ777-1 Transport Chair is a manual, folding, lightweight transport chair, suitable
for frequent users with a maximum weight capacity of 400 lb (182 kg) who require
a lightweight, portable transport chair, tted to their anatomy, without the need of
customization or alteration to the center of gravity. The EJ777-1 Transport Chair is
intended for indoor and/or outdoor use. The EJ777-1 transport chair is intended to be
propelled by an attendant at all times, who should remain behind the transport chair
when the user is being positioned or the transport chair is in use.

4 GF0500090RevB07 • EJ777-1 Transport Chair
STATEMENTS OF SIGNIFICANCE
Please note the following special statements, used throughout this manual, and their
signicance:
Note: Provides application recommendations or other useful information to ensure that
you get the most from your product.
▲Caution:Indicates a potential hazard or unsafe practice that, if not avoided,
could result in minor personal injury or product/property damage.
WARNING: Indicates a potential hazard situation or unsafe practice that, if not avoid-
ed, could result in death or serious injury.

GF0500090RevB07 • EJ777-1 Transport Chair 5
2 IMPORTANT SAFETY PRECAUTIONS
IMPORTANT SAFETY PRECAUTIONS: ALWAYS FOLLOW THESE SAFETY PRE-
CAUTIONS WHEN USING YOUR EJ777-1 TRANSPORT CHAIR. FAILURE TO DO
SO COULD RESULT IN PERSONAL INJURY TO YOU OR OTHERS OR DAMAGE TO
YOUR TRANSPORT CHAIR.
Safety requires the constant attention of the transport chair user and the attendant.
It is extremely important to learn and always use safe methods of performing basic
daily activities. Always consult your healthcare professional to determine those
methods most suitable for your individual abilities.
Protect yourself and your transport chair by having your transport chair serviced
regularly. Whenever any part of your transport chair is not functioning properly,
contact your Graham-Field Health Products dealer immediately, as a hazardous situ-
ation could result, causing personal injury or damage to your transport chair. ONLY
EXCELLENT CONDITION IS ACCEPTABLE WHERE SAFETY IS CONCERNED. Peri-
odic inspection, adjustment, and replacement of worn parts will provide many years
of superb performance.
EJ777-1 TRANSPORT CHAIR LABELS
Read all labels on your EJ777-1 Transport Chair before operating it. Do not remove
any of the labels.
WARNING: To avoid possible tilt hazard, do not leave user unattended. Attendant
must always be behind and in control of transport chair when user is being
positioned or transport chair is in use.
WARNINGS
WARNING: The EJ777-1 Transport Chair maximum weight capacity is 400 lb (182 kg).
WARNING: Do not operate the transport chair on streets or roadways.
WARNING: Do not operate the transport chair on hilly or rough terrain, sand, wet or
icy surfaces, or surfaces with impaired traction. Ensure that pathway is
clear of all obstacles.
WARNING: Do not leave the transport chair on an incline.
WARNING: Do not turn the transport chair while going downhill, as the transport chair
could tip over.
WARNING: Do not attempt any incline or decline greater than six degrees (10% grade,
or one foot of rise or fall per ten feet of ramp length).
WARNING: This transport chair does not offer seating or occupant restraint equiva-
lent to the seat provided in a motor vehicle! To increase your safety while
traveling in a motor vehicle, always transfer to the vehicle seat and use
the restraint provided by the vehicle manufacturer.

6 GF0500090RevB07 • EJ777-1 Transport Chair
WARNING: Do not tie down or attach anything to the wheels. This could cause tipping
and possibly result in injury or damage to the transport chair.
WARNING: The footplates' lowest point should clear the ground by at least 2 1/2
inches, to permit proper clearance of potential obstruction.
WARNING: Doing a "wheelie" (tilting the transport chair backward until it reaches its
balance point) is dangerous and could result in personal injury to the user.
WARNING: Do not stand or step on the footplates while transferring to or from your
transport chair. This could cause the transport chair to tip, or could cause
personal injury or damage to your transport chair.
WARNING: Always engage wheel locks before transferring, using a wheelchair lift or
using an elevator.
WARNING: Ensure that transport chair is on a stable, level surface and engage wheel
locks before and during transfer.
WARNING: Do not lean over the top of the transport chair back. This could cause the
transport chair to tip over.
WARNING: To reduce the risk of tipping before leaning or reaching forward, sit back
in the seat and rotate casters fully toward front of transport chair.
WARNING: Unauthorized modification or the use of non-Everest & Jennings replace-
ment parts could change the structure of the transport chair, void the
warranty, and create a hazardous condition resulting in serious personal
injury.
WARNING: We recommend the use of anti-tippers at all times to prevent the trans-
port chair from tipping backward and causing injury. To purchase anti-tip-
pers, please contact your Graham-Field dealer.
WARNING: Do not lean on the transport chair or use it as a walker—these are prac-
tices which could result in loss of balance and personal injury.
WARNING: Do not use your transport chair on stairs or escalators.
WARNING: Use the transport chair's positioning belt at all times to maintain proper
weight distribution, and ensure that it is properly adjusted.
WARNING: Wheel locks are not brakes. Do not use the wheel locks to slow down the
transport chair, or while the transport chair is moving. Wheel locks are
only intended to keep the transport chair in place when it is at a complete
stop.
WARNING: GF Health Products, Inc. specifically disclaims responsibility for any per-
sonal injury or property damage which may occur during any use which
does not comply with federal, state, or local laws or ordinances.

GF0500090RevB07 • EJ777-1 Transport Chair 7
3 GETTING STARTED
Please familiarize yourself with main components, identied in EJ777-1 Transport
Chair illustration below.
carrying strap
positioning belt
armpad
arm
seat
upholstery
footrest
cross brace
(with serial
number label)
caster socket
footplate
caster fork
caster wheel
frame
rear wheel
tipping lever
back upholstery
hand grip
push handle /
upper back post
lower grip,
attendant
wheel lock

8 GF0500090RevB07 • EJ777-1 Transport Chair
4 HANDLING TIPS
The Everest & Jennings EJ777-1 Transport Chair has been designed and engineered
to perform as a stable and well balanced unit when used for its intended purpose.
However, it is possible to tip the transport chair over if it is used improperly. We urge
both user and attendant to learn the characteristics of your transport chair. It is most
important to learn safe methods to perform the daily activities basic to your lifestyle.
Use this manual as a guide for developing techniques that you are comfortable with,
and consult your medical professionals for assistance in developing the skills and
proper techniques to perform all activities safely. We recommend the use of anti-tip-
pers at all times. To purchase anti-tippers, please contact your Graham-Field dealer.
TO ATTENDANT
WARNING: To avoid possible tilt hazard, do not leave user unattended. Attendant
must always be behind and in control of transport chair when user is being
positioned or transport chair is in use.
1. Work with the transport chair user's medical professionals to learn the best meth-
ods of assistance.
2. Always tell the transport chair user what you are about to do and what you ex-
pect them to do, especially when changing balance or tipping backward. Remind
the transport chair user to lean back when tipping backward, to maintain proper
weight distribution.
3. When assisting a transport chair user, always perform operations carefully and
use good body mechanics (bend your knees slightly and keep your back as up-
right as possible) to prevent personal injury.
WARNING: Ensure that hand grips are firmly attached to push handles before assist-
ing user with transport chair. Slippage of hand grips could cause personal
injury or transport chair damage. If hand grips are loose or in unstable
condition, contact your Graham-Field dealer for repair before assisting
user with transport chair.
WARNING: Do not lift the transport chair by any detachable parts; this could cause
personal injury to attendant or user, and damage to the transport chair.
Use the carrying straps to lift the unoccupied transport chair.
BALANCE
Proper balance is the key to maintaining the stability of your EJ777-1 Transport Chair.
Reaching, bending, and transferring to or from a transport chair will change your
weight distribution and center of gravity. Have an attendant with you at all times,
especially when reaching, bending, or transferring. Use the transport chair's position-
ing belt at all times to maintain proper weight distribution, and ensure that it is prop-
erly adjusted.

GF0500090RevB07 • EJ777-1 Transport Chair 9
TRANSFER ACTIVITIES
WARNING: Always ensure that the transport chair is on a stable, level surface and
engage the wheel locks before transfer.
WARNING: Do not step on the footplates; this could cause the transport chair to tip.
Fold them up, and either detach them, or swing them aside.
WARNING: There is a critical moment when there is little or no seat platform beneath
you. Take every precaution to reduce this unsupported distance before
you attempt transfer.
Transferring into or out of a transport chair is a very difcult maneuver; exercise
extreme care when transferring, and never transfer without the aid of an attendant.
Consult your physician, nurse, or physical therapist for assistance in developing your
individual technique. Make sure that the transport chair is stabilized, and will not
move or slide during the transfer. Take extra precaution to prevent tipping. Use good
body mechanics to prevent personal injury.
FOR ATTENDANT: TILTING
Tilting the transport chair backward is generally required to negotiate such obstacles
as ramps, inclines, curbs, stairs and door sills. Tilting should only be performed by
an attendant. To tilt the transport chair backward:
1. If equipped with anti-tippers, remove them temporarily.
2. Grasp the push handles securely and ensure that the hand grips are rmly at-
tached.
3. Ensure that the user's feet are situated at on the footplates and that arms, hands
and ngers are clear of the wheels and any other components.
4. Advise the user, before tilting the transport chair backward, what you intend to do
and remind the user to lean back.
5. Place one foot on the tipping lever and apply downward force until the transport
chair is tilted back enough to overcome the obstacle.
6. Lower the front end slowly.
7. If you have removed anti-tippers, replace them now.

10 GF0500090RevB07 • EJ777-1 Transport Chair
RAMPS AND INCLINES
WARNING: During descent, the footplates' lowest point should be no closer to the
ground than 2 1/2 inches to permit proper clearance.
WARNING: Do not attempt any incline or decline of more than 6 degrees (10% grade,
or one foot of rise or fall per ten feet of ramp length).
WARNING: Do not use wheel locks to slow your descent. Attempting to use wheel
locks is likely to result in accidental locking that could cause the trans-
port chair to stop abruptly, suddenly pitch forward, or tip sideways.
WARNING: Avoid changing direction while descending a ramp or incline, as this could
cause instability.
Ramps and inclines should only be negotiated with the assistance of an attendant. To
attendant: Practice with a healthcare professional rst before attempting ramps or
inclines. Always inspect the ramp for hazards such as holes, slippery or uneven sur-
faces, etc. before starting up or down. If you can not see the entire ramp, ask some-
one to inspect it for you.
CURBS AND STEPS
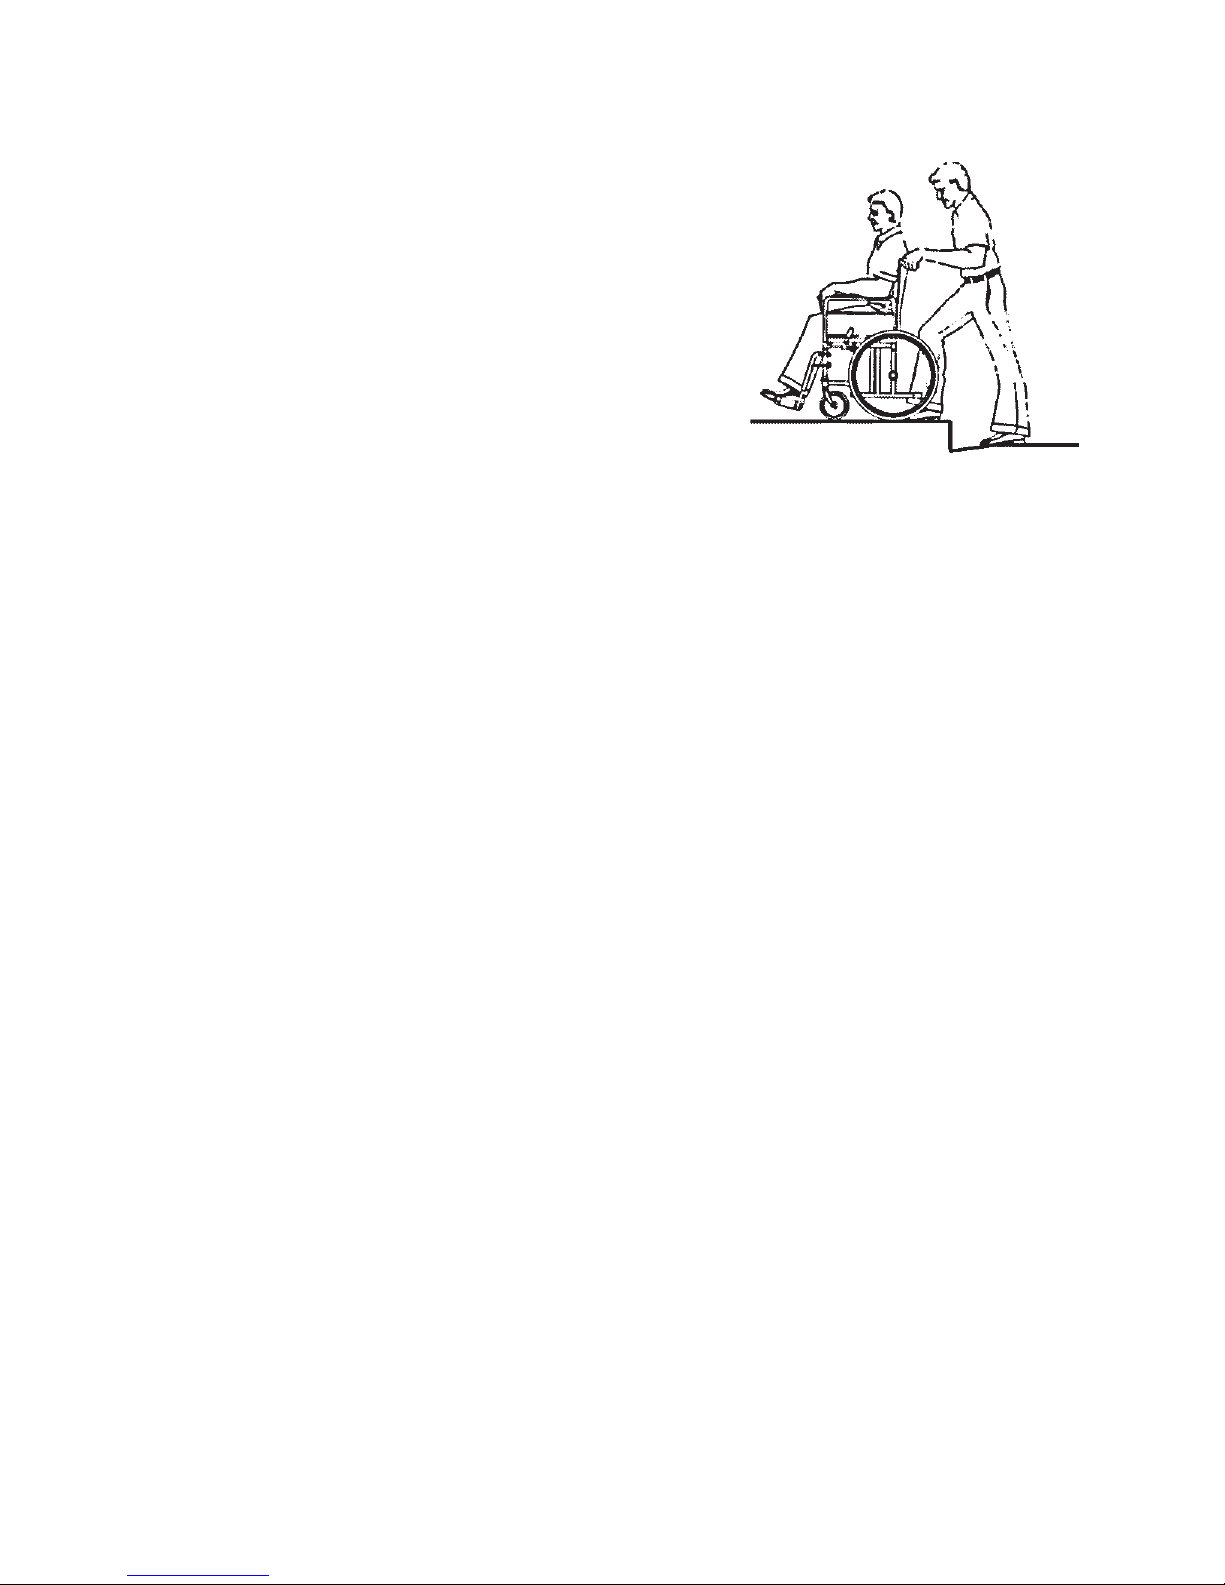
WARNING: Never attempt to negotiate curbs or steps in your transport chair without
the assistance of an attendant.
WARNING: Never attempt to negotiate stairs or escalators in your transport chair
under any circumstances.
Curbs, steps and stairways are dangerous obstacles that confront the transport chair
user. When you encounter curbs, nd a way around, or use the ramps now available
in most locations. If you encounter stairs or escalators and there is no ramp avail-
able, avoid the stairs or escalators by utilizing the disabled designated elevators now
required in most locations.
Curbs and steps should only be negotiated with the assistance of an attendant. The
following are suggestions only for curb negotiation. It is important for you to develop
your own safe technique that is best suited to your abilities.

GF0500090RevB07 • EJ777-1 Transport Chair 11
For attendant: curb ascent facing forward
1. If equipped with anti-tippers, remove them tempo-
rarily.
2. Ensure that the hand grips are securely fastened
and do not turn or slip.
3. Stand behind the transport chair, holding the hand
grips, facing the curb.
4. Advise the user that you will be tilting backward
and remind the user to lean back.
5. Tilt the transport chair backward to its balance
point and move forward until the front casters pass
over the top of the curb.
6. Lower the front casters SLOWLY to the curb while
you rotate the transport chair forward by the push
handles until the rear wheels roll up and over the
curb.
7. Ensure that the transport chair has completely cleared the curb and can not roll
backward.
8. If you have removed anti-tippers, replace them now.
For attendant: curb ascent facing backward
1. If equipped with anti-tippers, remove them tempo-
rarily.
2. Ensure that the hand grips are securely fastened
and do not turn or slip.
3. Stand behind the transport chair, holding the hand
grips, facing away from the curb, with the rear
wheels against the curb.
4. Advise the user that you will be tilting backward
and remind the user to lean back.
5. Tilt the transport chair back to its balance point
and lift up by the push handles while pulling the
transport chair up and over the curb. DO NOT
lower the front casters down until the transport
chair is back far enough to clear the curb.
6. If you have removed anti-tippers, replace them now.
12 GF0500090RevB07 • EJ777-1 Transport Chair
For attendant: curb descent
1. If equipped with anti-tippers, remove them tem-
porarily.
2. Ensure that the hand grips are securely fastened
and do not turn or slip.
3. Stand behind the transport chair, holding the
hand grips, with your back to the curb.
4. Look over your shoulder and step down carefully.
5. Hold the hand grips tightly and pull the transport
chair until the rear wheels reach the curb edge.
6. Slowly roll the rear wheels down onto the lower
level.
7. After the wheels are safely on the lower level, ad-
vise the user that you will be tilting backward and
remind the user to lean back.
8. Tilt the transport chair back to its balance point;
this will lift the front casters off the curb. Take
several small steps backward until the front cast-
ers have cleared the curb.
9. Turn the transport chair around, place one foot on the tipping lever, and gradually
lower the front casters to the ground.
10. If you have removed anti-tippers, replace them now.

GF0500090RevB07 • EJ777-1 Transport Chair 13
5 ADJUSTMENTS
The EJ777-1 Transport Chair offers several adjustments to make it easier and more
comfortable to operate. Section 7, MAINTENANCE, offers preventive maintenance
suggestions for keeping your transport chair in excellent condition; ensure that all
components are in excellent condition before adjusting. The following are recom-
mended methods; after a few adjustments, you may develop your own. Always con-
sult your Graham-Field Health Products dealer for assistance.
The person performing adjustments on the transport chair has the responsibility of
making certain that the user and attendant can safely operate the transport chair
with the adjustments selected. This person must evaluate the user's ability, weight,
physical condition, the environment in which the transport chair will be used, and
the terrain over which the transport chair will travel.
All adjustments and their page locations are referenced in the index at the end of
this manual. Specic tools needed to perform each adjustment are identied in ad-
justment directions. Most of the following adjustments can be performed with the
wrench included with your EJ777-1 transport chair. The only other tool necessary to
perform all adjustments in this section is one M6 hex key.
REAR WHEEL & CASTER
We recommend that you do not replace or adjust rear wheel or caster components
yourself, since special tools and training are required. Please contact your Graham-
Field Health Products dealer when your rear wheels or casters need adjustment.
CROSS BRACE
Tighten cross braces
Tools required: included wrench, M6 hex key
Check the cross braces to ensure that the bolts and nuts that fasten the cross braces
in the center of the transport chair are secure (cross braces should be loose enough
to fold easily, yet snug enough to take up excess play). Use the included wrench and
an M6 hex key to tighten the cross braces.

14 GF0500090RevB07 • EJ777-1 Transport Chair
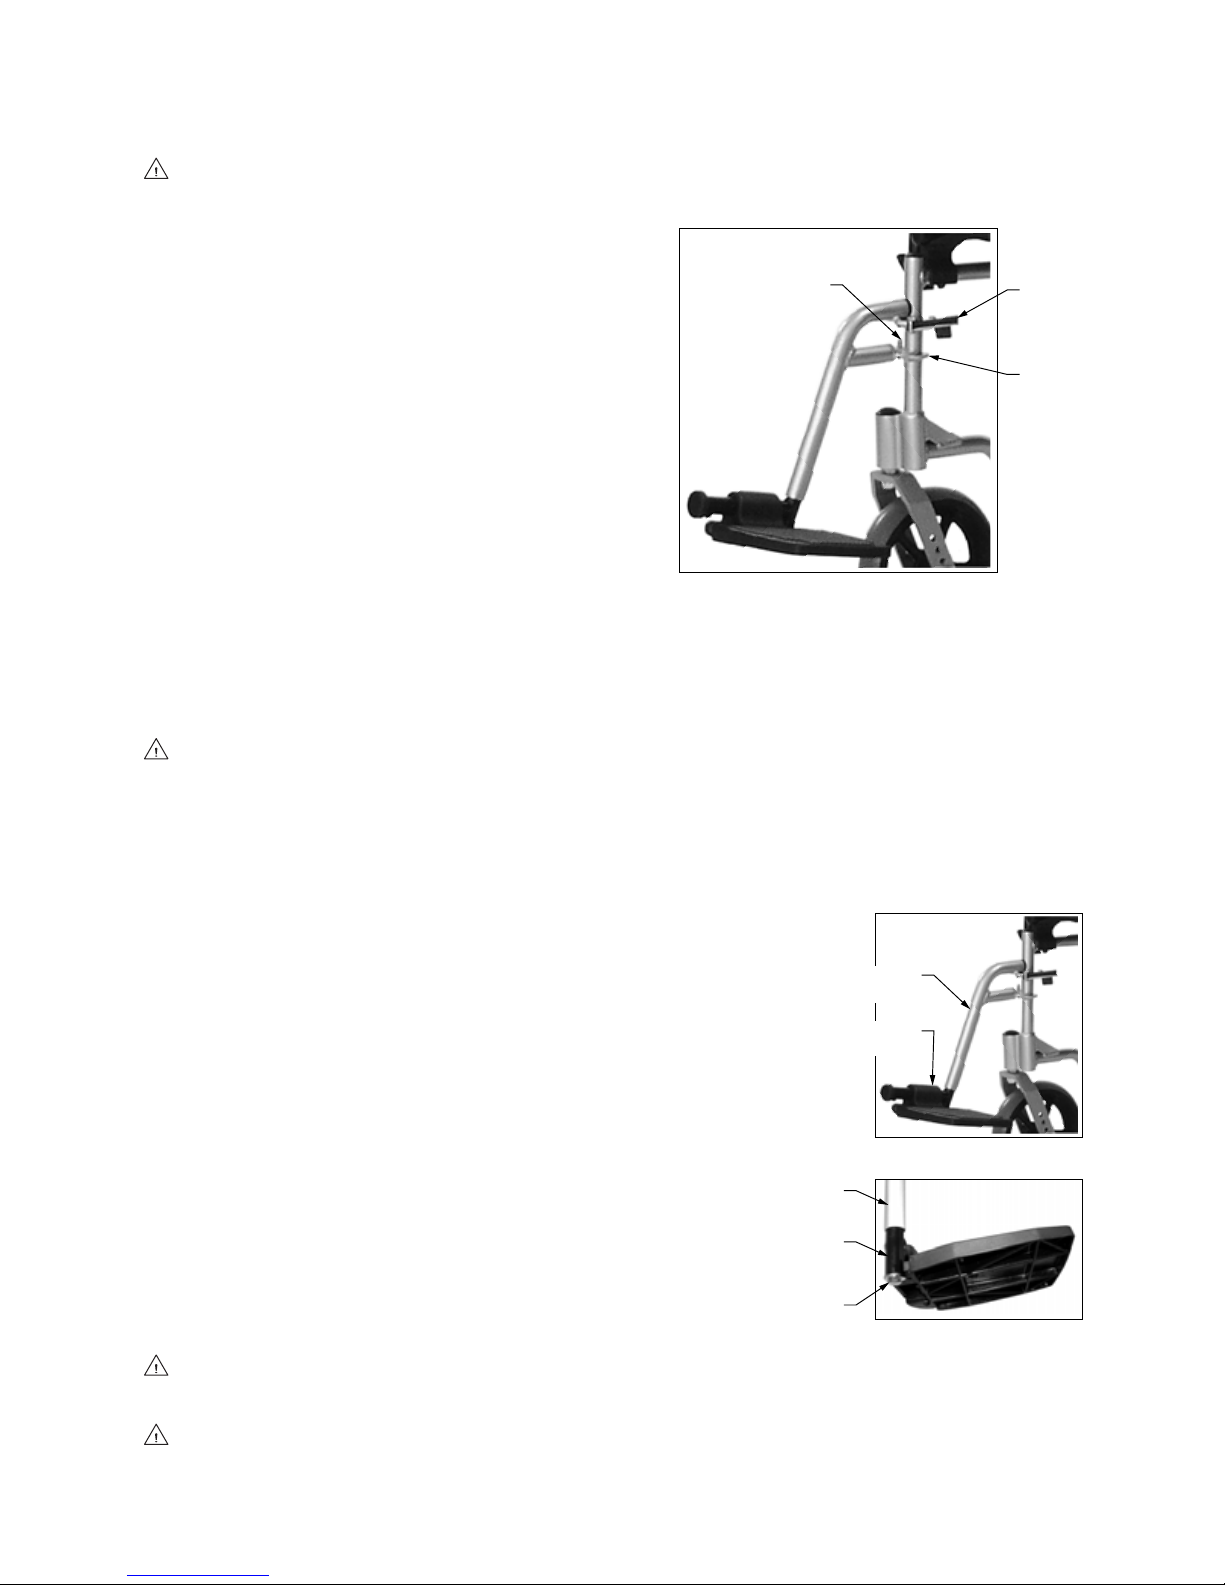
ARM
Rotate arm backward for transfer (see pictures below)
To rotate the arm backward for transfer:
1. Rotate the release lever down.
2. Hold arm by the front post and rotate it backward.
arm, locked arm, unlocked arm, rotated
release
lever
front
post front
post
release
lever
arm
receptacle
Rotate arm forward to reinstall (see pictures above)
To return the arm to operation position:
1. Rotate the arm forward and down into the arm receptacle.
2. Rotate the release lever up to lock front of arm into place.
Note: Front of arm must be fully down and engaged in the arm receptacle or the release
lever will not lock into place.
WARNING: Ensure that arms are locked into place before occupying or operating
transport chair.
GF0500090RevB07 • EJ777-1 Transport Chair 15
FOOTREST—DETACHABLE, SWINGAWAY
WARNING: Do not stand on the footplates; this could cause the transport chair to tip.
Remove footrest for transfer
(see picture at right)
1. Pull swingaway release lever toward front
of transport chair and swing footrest out-
ward.
2. Lift footrest straight up off transport chair
hinge pins.
Attach footrest
(see picture at right)
1. Set footrest on outside of transport chair
so that footrest hinge plates engage trans-
port chair hinge pins.
2. Swing footrest inward until release lever locks into place. Ensure that swingaway
release lever is locked in place.
WARNING: Ensure that footrests are locked in place before occupying or operating
transport chair.
Adjust footplate extension length
Tools required: included wrench
There is a draw bolt in the bottom of the footplate
extension tube that allows the footplate extension to
be repositioned upward or downward in the footrest
hanger. To lengthen or shorten footplate extension:
1. Loosen, but do not remove, the draw bolt using
the included wrench.
2. Reposition the footplate extension at the desired
position.
3. Resecure the draw bolt using the included wrench.
4. Follow steps 1-3 to adjust other footplate exten-
sion length. Ensure that footrest bolts are securely
fastened, and that minimum ground clearance is
21/2inches.
WARNING: The footplates' lowest point should be no closer to the ground than 2 1/2
inches, to permit proper clearance.
WARNING: Ensure that footplates are securely clamped before occupying or operat-
ing transport chair.
release
lever
swingaway footrest
lower
hinge
plate
lower hinge pin
footrest
footplate
footrest
hanger
footplate
extension
footplate
extension
tube
footrest
hanger
draw bolt

16 GF0500090RevB07 • EJ777-1 Transport Chair
attendant wheel lock,
unlocked
attendant wheel lock,
temporarily locked
lower grip
push handle
attendant wheel lock,
unlocked
attendant wheel lock,
indefinitely locked
lower grip
push handle
ATTENDANT WHEEL LOCKS
WARNING: Wheel locks are not brakes. Do not use the wheel locks to slow down the
transport chair, or while the transport chair is moving. Wheel locks are
only intended to keep the transport chair in place when it is at a complete
stop.
For attendant: Attendant wheel locks, temporary lock
The attendant wheel locks can be
engaged temporarily:
1. To engage attendant wheel
locks, squeeze the lower grip
upward toward the push han-
dle as shown at far right; the
rear wheels will be locked in
place as long as you hold the
lower grip as shown.
2. To release attendant wheel
locks, let go of the lower grip;
the rear wheels will be free to
move.
For attendant: Attendant wheel locks, indenite lock (for transfer or
stationary periods)
1. To engage attendant wheel
locks indenitely, push the
lower grip down, away from the
push handle, until it locks into
place. The rear wheels will be
locked in place.
2. To release attendant wheel
locks, pull the lower grip up-
ward toward the push handle
until the rear wheels move
freely.
WARNING: Ensure that wheel locks lock in place appropriately before occupying or
operating transport chair. If your wheel locks are not operating correctly,
please see your Graham-Field dealer for repair.

GF0500090RevB07 • EJ777-1 Transport Chair 17
6 TRANSPORTING THE EJ777-1 TRANSPORT CHAIR
PREPARING THE EJ777-1 FOR TRANSPORT
WARNING: This transport chair does not offer seating or occupant restraint equiva-
lent to the seat provided in a motor vehicle! To increase your safety while
traveling in a motor vehicle, always transfer to the vehicle seat and use
the restraint provided by the vehicle manufacturer.
When transporting the transport chair in a motor vehicle, do not place the transport
chair where it will interfere with the safe operation of the vehicle or endanger the
driver or passengers. The front seat is not a good location to store a transport chair
during transport, as the transport chair can be dislodged and become a serious haz-
ard to the vehicle driver. Always take precautions to avoid personal injury when load-
ing or lifting a transport chair into or out of a vehicle. The transport chair can easily
be transported in the rear seat or the trunk.
Fold the transport chair (see picture below)
seat upholstery
center front
footrest
upper back
hand grip
push handle /
upper back post
upper back
release lever
upper back
release pin
1. Detach footrests from transport chair.
2. Fold down upper back: Press the upper back release levers toward the upper back
posts. This will free the upper back release pins. Rotate the push handles down-
ward.
3. Fold the transport chair: pull up sharply on the seat upholstery at front and rear
center at the same time. Tip the transport chair sideways so the opposite wheel
won't drag and press sides together.

18 GF0500090RevB07 • EJ777-1 Transport Chair
Store in the back seat
1. Move the front seat as far forward as possible.
2. Hold the folded transport chair by the push handles, facing toward the open car
door.
3. Tilt the transport chair backward and roll it forward on the rear wheels.
4. Push the transport chair forward so the casters enter the car.
5. Tilt the transport chair away from the back of the front seat, then lower the cast-
ers to the oorboard.
6. Slowly lift-roll the transport chair into the car. Stow the footrests alongside.
Ensure that the transport chair is stable, will not shift while the car is in motion, and
does not block the driver's eld of vision.
Store in the trunk
1. Grasp the front of the frame and rear of the wheels and lift the transport chair
carefully, using good body mechanics to avoid injury, and place it carefully in the
trunk. Stow the footrests alongside.
2. DO NOT put any articles on top of the transport chair. Close the trunk lid slowly.
Unfold the transport chair (see picture on previous page)
1. Push down on the seat rails to open.
WARNING: DO NOT place your hand or fingers between seat rails and side panels.
2. Push down again on the seat rails to lock seat rails into place in cradles.
3. Raise upper back: Rotate the push handles upward until the upper back release
pins lock in place. Ensure that upper back is locked into place before proceeding.
4. Install footrests.
WARNING: Ensure that transport chair is unfolded as instructed and that upper back
is locked into place, seat rails are locked into place on cradles, and foot-
rests are locked in place before occupying or operating transport chair.

GF0500090RevB07 • EJ777-1 Transport Chair 19
7 MAINTENANCE
Protect your E&J EJ777-1 Transport Chair by having it serviced regularly. Proper care
and maintenance are essential to keep your transport chair in safe working condi-
tion. Periodic inspection, adjustment, and replacement of worn parts will provide
many years of superb performance. When you believe that a component or part of
your transport chair is not functioning properly, contact your Graham-Field Health
Products dealer immediately, as a potentially hazardous condition could result. Only
excellent condition is acceptable where safety is concerned.
Service manual
There is no service manual for the transport chair. Please contact your Graham-Field
Health Products dealer with service questions not answered by this manual.
Note: We recommend that you have a Graham-Field Health Products dealer perform
a six month maintenance check, as the dealer may find and correct a problem
which might otherwise go undetected and eventually cause more serious problems
and/or personal injury.
Do-it-yourself maintenance
You can do many of the scheduled maintenance tasks yourself, if you have mechani-
cal ability and a few basic tools. Refer to the maintenance schedule on the next page
for the recommended regularity of each procedure. If any maintenance procedure is
not clear to you, ask your Graham-Field Health Products dealer for assistance.
▲Caution: Improper maintenance can cause operating problem and may affect
your warranty.
WARNING: Unauthorized modification or the use of non-Everest & Jennings replace-
ment parts could change the structure of the transport chair, void the
warranty, and create a hazardous condition resulting in serious personal
injury.

20 GF0500090RevB07 • EJ777-1 Transport Chair
MAINTENANCE SCHEDULE
Procedure Perform at least every
Week month 3 months 6 months
Check tire wear ✔
Check wheel lock engagement ✔
Check anti-tippers (optional) ✔
Wipe off frame with soft cloth ✔
Check handgrips ✔
Check upholstery ✔
Check rear wheel adjustment ✔
Check arms ✔
Check backposts / push handles ✔
Check footrests ✔
Clean frame with soap and water ✔
Check caster stem rotation ✔
GF dealer maintenance check ✔
Check rear wheel bearings (dealer) ✔
Check caster bearings (dealer) ✔
List of tools
The tools and cleaning supplies listed will assist in the procedures outlined in this
section.
30 weight oil (available at most auto parts stores)
Phillips screwdriver
soft cloth
mild soap and water solution
General care
Always evaluate the overall operation of your transport chair. It should function with
ease and should travel straight without excessive drag or pull to one side.
Remember, your Graham-Field Health Products dealer knows your transport chair
best when it comes to service and repairs. Contact your dealer with any questions
or concerns regarding the safe operation and maintenance of your transport chair.
Regular maintenance is essential for your safety and continued operation of your
transport chair.
Check tire wear
Examine tires at least once a week for surface wear and cracks and replace them as
needed. Always replace tires when they become loose on the rims or cracks appear.
Table of contents
Other E&J Wheelchair manuals


