Easy Touch MODIG ET-8102 User manual

Page 1

User’a manual for Easy Touch ET-8102 MODIG heart rate monitor
1.0 Introduction
General Guide
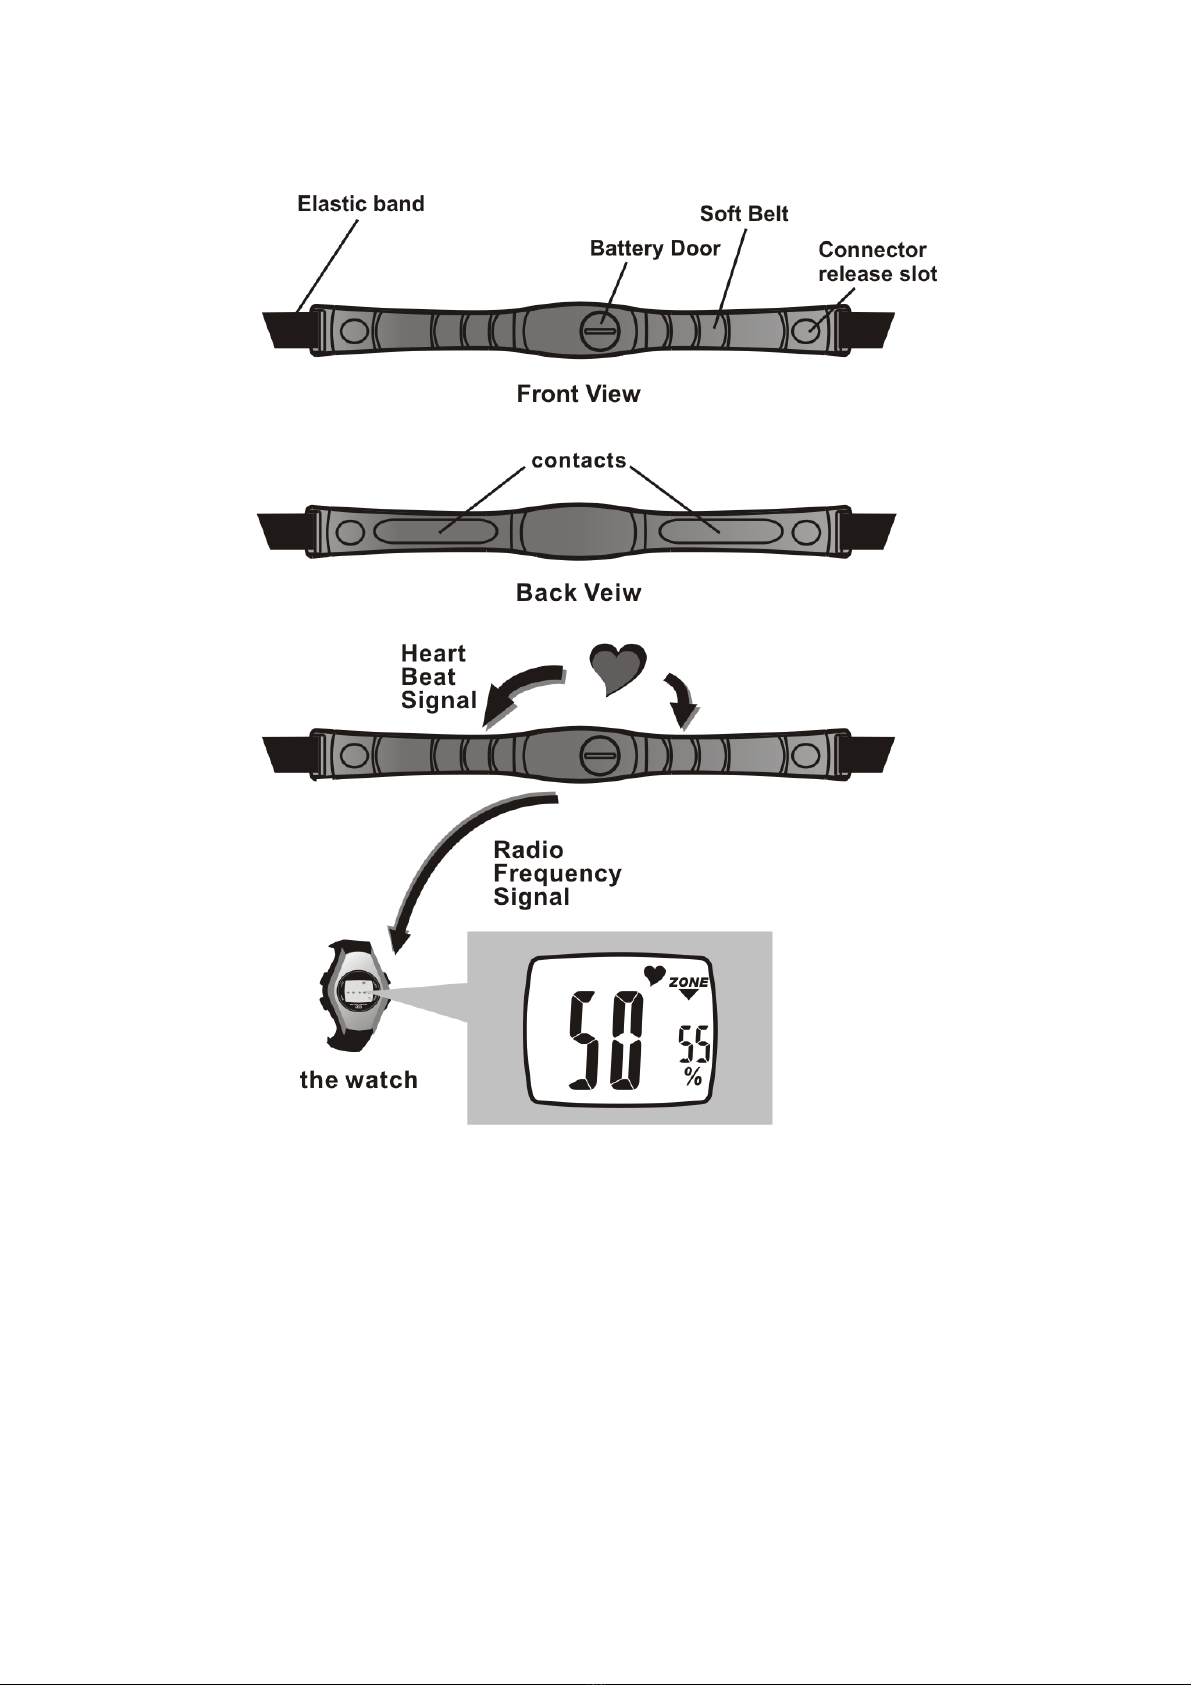
Thank you for purchasing Easy Touch ET-8102 set which contains a Watch and a Chest Strap. To see our
other products please visit www.easy-touch.com.
With this product set, you can get ECG accurate heart rate readings! In addition to the absolute heart rate
reading, the Watch also includes relative heart rate as a percentage of one's estimated maximum heart rate.
Simply put the Watch on your wrist and the Chest Strap on your body, your heart rate will display on the
Watch within seconds!
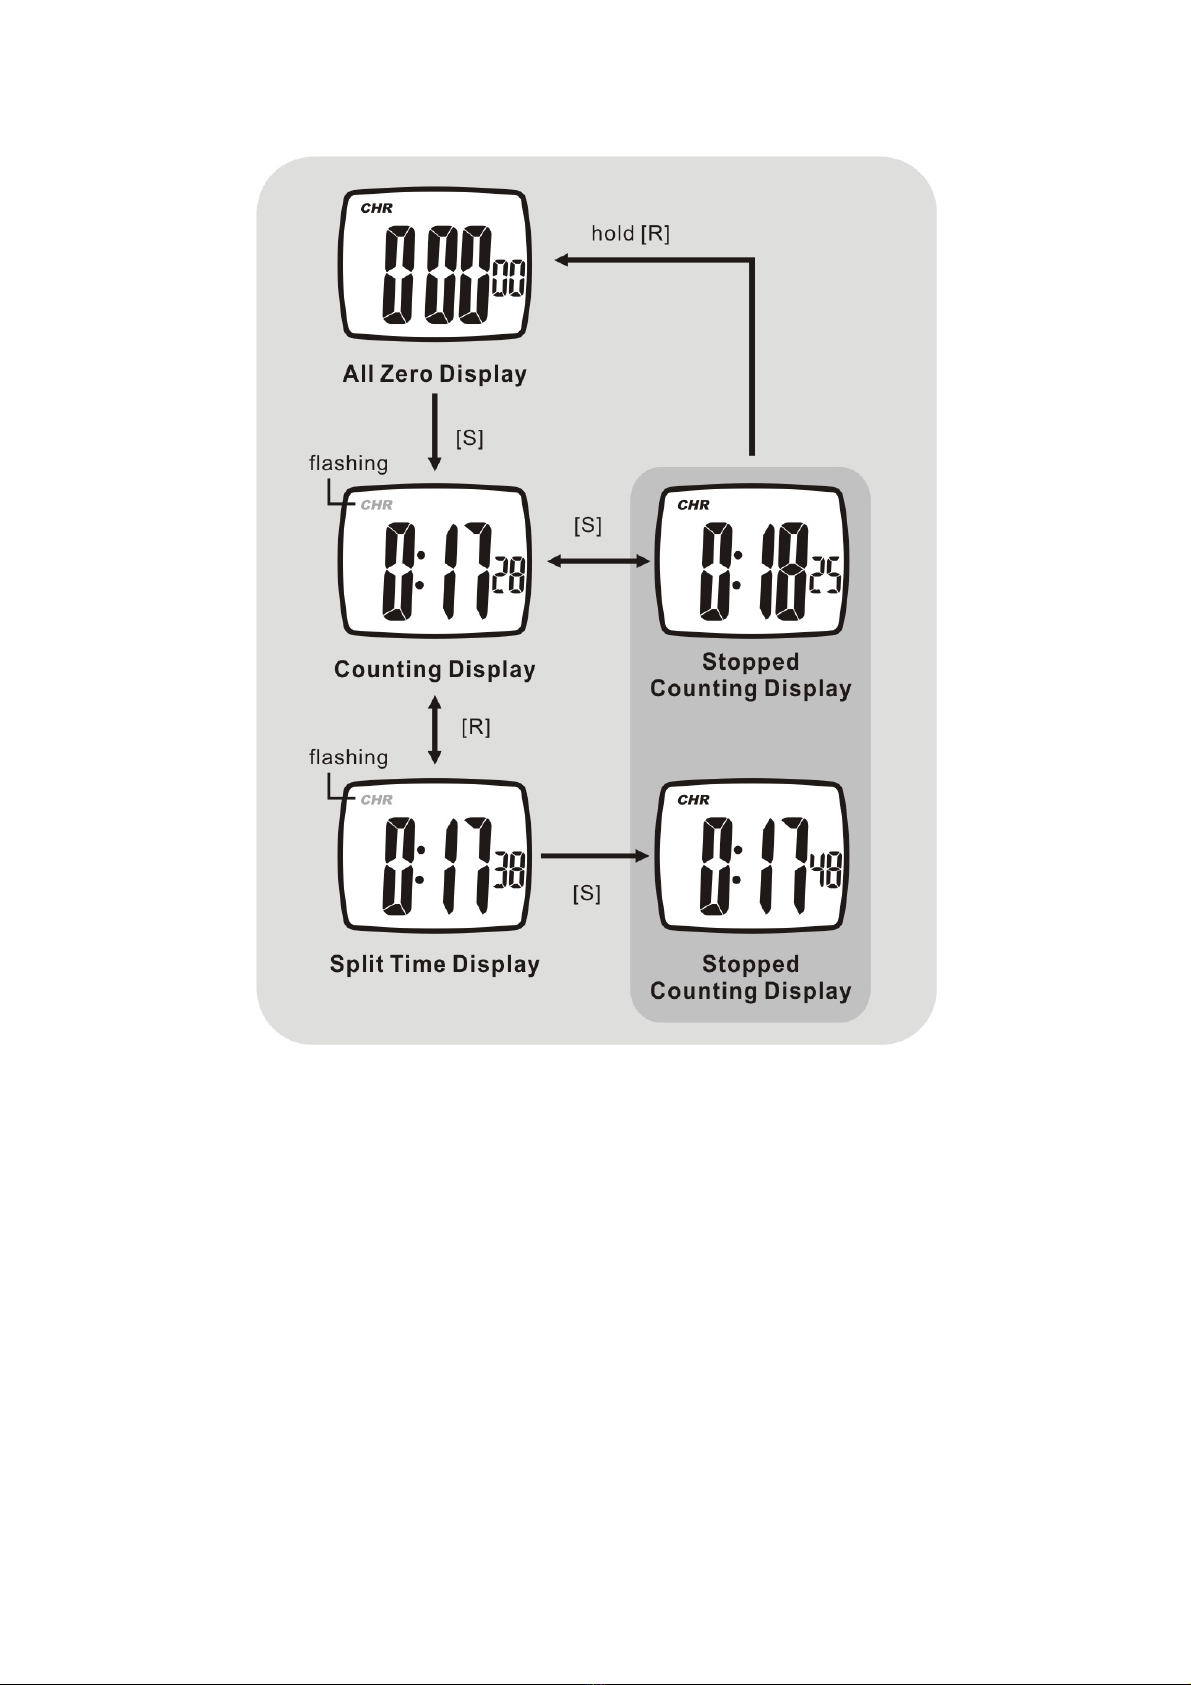
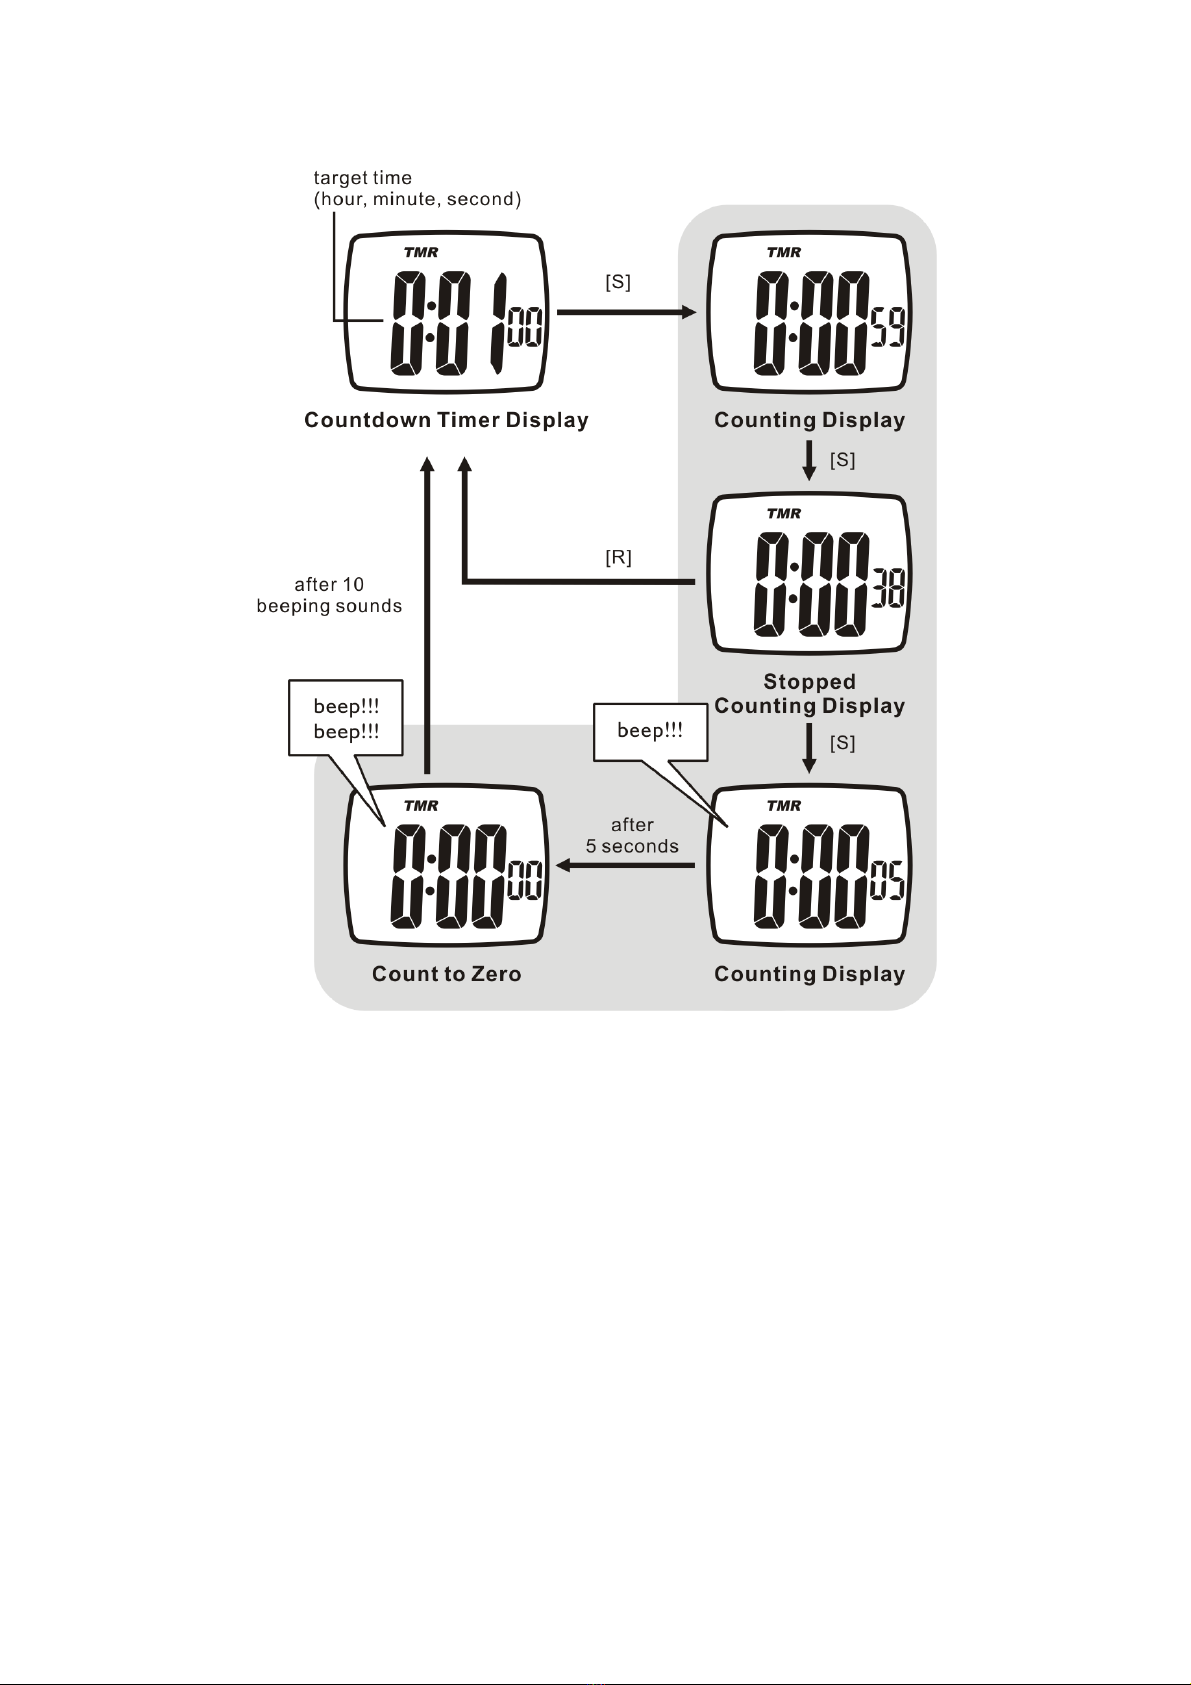
This Watch also includes 7 functional modes, they are Current Time Mode, Daily Alarm Mode, Chronograph
Mode, Countdown Timer Mode, Date Mode, Heart Rate Mode and Exercise Timer Mode.
WARNING !
DO NOT use this product set for commercial or professional purposes.
This product set, like most electronic or magnetic devices that may interfere with pacemaker. While it is safe
for patients with pacemakers to check with their doctor before using this product set.
Make sure that you fully understand the functions and limitations of this product set before using it.
This product set is a supplementary device for measuring heart rate; it is NOT a substitute for medical
devices. You should periodically compare the heart rate reading acquired by this product set with the reading
from a doctor.
Consult a doctor or trainer before setting your Upper and Lower heart rate limits.
2.0 Care and Maintenance
Read this manual thoroughly before using this product set.
Avoid rough usage or severe impacts to this product set.
Store this product set in a dry place when it is not in use.
When the battery runs out, it is recommended to have a professional replace the battery.
Clean your product set occasionally with a soft moistened cloth.
DO NOT expose this product set to chemicals such as gasoline and alcohol; these chemicals will damage
this product set.
3.0 Button and its Function
Mode Button [M]
To select among the Current Time, Alarm, Chronograph and Countdown Timer Mode.
To select setting display.
Up/Start/Stop Button [S]
To show the date.
To switch alarm on/off.
Page 2

To switch between 12 or 24 hour format during the current time setting display.
To switch Month-Day or Day-Month format during the current time setting display.
To switch beep tone on/off during the current time setting display.
To activate the 'start' or 'stop' function during Heart Rate Mode, Chronograph Mode and Countdown Timer
Mode.
To increase the set value during setting display.
Down/Reset Button [R]
To select the Heart Rate Mode.
To switch the hourly chime on/off.
To switch between 12 or 24 hour format during the current time setting display.
To switch Month-Day or Day-Month format during the current time setting display.
To clear the value for the Exercise Timer, Chronograph and Countdown Timer.
To decrease the set value during setting display.
EL Button [L]
To turn on the EL back light for about 3 seconds.
NOTE: The major key operations are summarized on the above paragraphs, however please read the
coming chapters for the detail operations.
4.0 Major Function Modes
5.0 Current Time Mode - Current Time Display
Current Time Display
When the Current Time Mode is selected, the Watch will show the following items on the display:
The current time (hour, minute, second) is exhibited on the display.
Page 3

5.1 Current Time Mode - Setting the Current Time
ow to Set the Current Time
hold the [M] button for 2 seconds in the Current Time Mode, and then the
utton to move the flashing following the adjacent diagram to select among
settings (second, minute, hour, year, month, day, birthday year, birthday month and
ing, press the [S] or [R] button to reset them to zero.
play. The Watch
H
To select the setting display,
'Second' digits will start flashing.
In setting display, press the [M] b
different settings.
During one of the
birthday day) is flashing, press the [S] or [R] button to change the set value (hold down the button to change
the set value at a higher speed).
When the second digits start flash
When the setting is completed, hold the [M] button for about 2 seconds to exit the setting dis
will also exit the setting display if NO key-stoke has been activated for 1 minute.
Page 4

6.0 Daily Alarm Mode - Setting the Daily Alarm and Hourly Chime
ow to Set the Daily Alarm and Hourly Chime ON/OFF
set the daily alarm between ON and OFF, press the [S] button in the Daily Alarm Mode.
N.
[M ode, and then the 'Minute'
H
To
When the daily alarm indicator ' ' is appeared, the daily alarm is O
To set the hourly chime between ON and OFF, press the [R] button in the Daily Alarm Mode.
When the 'chime' is turned ON ( ), the Watch will beep once per hour.
How to Set the Daily Alarm
To select the setting display, hold the ] button for 2 seconds in the Daily Alarm M
digits will start flashing.
In setting display, press the [M] button to move the flashing following the adjacent diagram to select among
different settings.
During one of the settings (minute, hour) is flashing, press the [S] or [R] button to change the set value (hold
down the button to change the set value at a higher speed).
When the setting is completed, hold the [M] button for 2 seconds to exit the setting display. The Watch will
also exit the setting display if NO key-stoke has been activated for 1 minute.
Page 5

7.0 Chronograph Mode - Chronograph Mode
Chronograph Mode
This Watch includes a stopwatch function which measures elapsed time and current split time.
The measuring capacity of the chronograph:
Measuring unit: 1/100 second,
Measuring range: 99 hours, 59 minutes and 59.99 seconds.
Chronograph Display
When the Chronograph Display is selected, the Watch will show the following items on the display:
At the first counting hour, the counting time minute, second and 1/100 second will be exhibited on the
display.
After the first counting hour, the counting time hour, minute and second will be exhibited on the display.
Page 6

7.1 Chronograph Mode - Using the Chronograph
How to Measure Elapsed Time
During the 'All Zero' Display, press the [S] button once will start the counting, and press the [S] button again
will stop the counting.
How to Get a Split Time
When the chronograph is counting, press the [R] button to select Split Time Display. When the counting
display is frozen, press [R] button will return to the counting display.
How to Reset the Chronograph
Hold the [R] button for about 2 seconds to reset the display to 'All Zero' display when the chronograph is
stopped counting.
Page 7

8.0 Countdown Timer Mode - Countdown Timer Display
Countdown Timer Mode
The measurement unit of the timer is 1 second, and the preset value of the timer can be set up to a
maximum of 99 hours and 59 minutes 59 seconds.
The initial setting of the timer is 1 minute.
During the counting, the Watch will beep once per second for the last 5 seconds, and 10 seconds when
counts to zero.
When the timer counts to zero, it will reload the preset value of target time automatically after the sound
sequence is finished.
How to Reload the Timer
Press the [R] button once to reload the preset value, when the timer is stopped counting.
Page 8

8.1 Countdown Timer Mode - Setting the Countdown Timer
ow to Set the Countdown Timer
he following paragraphs will illustrate the procedure for setting the Timer.
wn Timer Display, and then the
button to move the flashing following the adjacent diagram to select among
settings (hour, minute, second) is flashing, press the [S] or [R] button to change the set
The Watch will
H
T
To select the setting display, hold the [M] button for 2 seconds in the Countdo
'Second' digit will start flashing.
In setting display, press the [M]
different settings.
When one of the
value (hold down the button for about 2 seconds to change the set value at a higher speed).
When the setting is completed, hold the [M] button for 2 seconds to exit the setting display.
also exit the setting display if NO key-stoke has been activated for 1 minute.
Page 9

9.0 Heart Rate Mode – Precautions
recautions / Tips
wo contacts located on the back of the Chest Strap. These two contacts must make firm contact with the
ent when diving or under water.
and wipe it dry with a paper towel to
ill insulate the signal between the skin and the contacts.
ld on your chest firmly to avoid loosen it
ard motion during measurement, it will create an inaccuracy heart rate reading.
P
T
user's skin during measurement.
DO NOT take heart rate measurem
Clean the contacts occasionally by applying a few drops of water,
remove any residual grease.
DO NOT use hand cream; it w
Clean your skin with soap and water for better signal transmission.
For those with extremely dry skin, apply a conductive gel or water.
Adjust the Chest Strap with the supplied elastic band until it is ho
when doing exercise.
Avoid doing any awkw
Page 10

9.1 Heart Rate Mode - Heart Rate Function Overview
eart Rate Function Overview
heart naturally speeds up in pumping blood to the body in accordance with
llowing heart rate functions:
aximum heart rate (%EMHR).
OTE: Check the coming chapter 9.3 for more detail of Heart Rate Alert Zone function. Check the coming
H
During exercise or sports, your
your increased energy level.
This product set includes the fo
Heart rate reading express in beats per minute (bpm).
Heart rate reading express in percentage of estimated m
Heart Rate Alert Zone Function.
N
chapter 9.5 for more detail of percentage of Estimated Maximum Heart Rate.
Page 11

9.2 Heart Rate Mode - Getting a Heart Rate Reading
How to Get Ready to Receive Heart Rate
Wear the Watch on your wrist.
Place the Chest Strap on your chest, and make sure that the contacts of the Chest Strap are in firm contact
with your chest.
How to Get a Heart Rate Reading
When entering the Heart Rate Mode, the icon ' ' and ' - - - - - ' is exhibited on the display.
Press the [S] button to activate the heart rate measurement, the ' - - - - - ' start flashing.
When a heart rate is acquired, the heart rate and the percentage of estimated maximum heart rate will be
exhibited on the display.
NOTE: The Watch will beep once per 10 second if NO heart rate signal is received. The Watch will go to idle
mode (the ' - - - - - ' stop flashing) if NO heart rate signal is received for over 1 minute.
NOTE: If NO heart rate reading or long response time, check the possible causes and solutions at chapter
11.0, and then repeat the above steps to get your heart rate.
Page 12

9.3 Heart Rate Mode - What is Heart Rate Alert Zone Function
What is Heart Rate Alert Zone Function
This Watch includes a supplementary Heart Rate function - The Heart Rate Alert Zone Function. This feature
can be function by setting an objective heart rate zone into the Watch, and hence, the Watch will alert the
user when his /her heart rate is out of the objective heart rate zone.
Example 1: Some training require the trainee maintaining his/her heart rate within a objective zone. If the
user has set the watch according to that zone, the Watch will alert the user when his /her heart rate is out of
the objective heart rate zone. Hence, the user can render appropriate remedy actions such as slow-down or
speed up his/her exercise.
Example 2: Some people may need to maintain his/her heart rate within an objective zone for health
reasons. If the user has set the watch according to that zone, the Watch will alert the user when he/she gets
a heart rate measurement which is out of the objective heart rate zone. Hence, the user may render
appropriate remedy actions if the condition is dominating.
How to Acquire your Objective Heart Rate Zone
The objective heart rate zone is the region that bounding by the upper and lower heart rate limits.
These limits can be obtained by the following:
1) Get these two limits by consulting a doctor or trainer.
2) Get these two limits by using user's age.
NOTE: Check the coming chapter 9.7.1 for more detail on how to set the Heart Rate Alert Zone.
WARNING!: These limits must be set according to applications and on one's own health conditions, and
check your doctor or trainer before using this alert function.
Page 13

9.4 Heart Rate Mode - Using the Heart Rate Alert Zone Function
Heart Rate Alert Zone
If the heart rate alert zone is ON, the 'ZONE' icon will be ON. If the acquired heart rate is out of zone, either it
is exceed or below the zone limit, it will be flashing at the upper right hand corner.
Within the Objective Range (Alert Zone)
When your heart rate results fall within the set range: The digits of the Watch will remain still.
Exceed the Objective Range (Alert Zone)
If your heart rate is exceed the set range: The ' ' indicator will appear and start flashing, and the Watch
will beep twice every 10 seconds.
Below the Objective Range (Alert Zone)
If your heart rate is below the set range: The ' ' indicator will appear and start flashing, and the Watch
will beep twice every 10 seconds.
NOTE: To use the heart rate alert function, the Heart Rate Alert Function must be turned ON.
NOTE: Check the coming chapter 9.7.1 for more detail on how to turn on the Heart Rate Alert Zone.
Page 14

9.5 Heart Rate Mode - What is Percentage of Estimated Maximum Heart Rate
stimated Maximum Heart Rate (EMHR) is calculated by using the below formula.
Maximum Heart Rate is calculated by using the below formula.
ercentage of Estimated Maximum Heart Rate
addition to absolute heart rate reading, the Watch also includes the percentage of estimated maximum
objective range by using his/her age, the Watch will use that data to
aximum heart rate by using the adjacent formula
.6 Heart Rate Mode - An Example on Percentage of Estimated Maximum Heart Rate
n Example of Percentage of Estimated Maximum Heart Rate
n Percentage of Estimated Maximum Heart
le: A male exerciser at his 30th. has set the heart rate objective range by using age, then he takes a
131 / 190 X 100% = 69%
E
EMHR = 220 - user age
Percentage of Estimated
%EMHR= acquired heart rate4EMHR X100%
P
In
heart rate (%EMHR) reading to user.
Once the user has set his/her heart rate
calculate his/her estimated maximum heart rate (EMHR).
The Watch will further show the percentage of estimated m
when the user acquired a heart rate reading.
9
A
The following is an example which illustrates the operations o
Rate.
Examp
heart rate measurement during the exercise, and the acquired heart rate is 131 beats per minute.
Estimated Maximum heart rate = 220 - 30 = 190 bpm. Then,
The acquire heart rate = 131 bpm (by measurement)
The percentage of estimated maximum heart rate =
Page 15

9.7 Heart Rate Mode - Heart Rate with Exercise Timer
Exercise Timer Mode
Exercise Mode works together with the heart rate measurement.
In Exercise Time Mode, press the [S] button to start the heart rate measurement, the 'hour', 'minute' and
'second' digits start flashing.
Once a valid Heart Rate is gotten, exercise timer will count up automatically.
If NO heart rate is acquired for 10 seconds, the Exercise Timer will stop counting automatically, the 'hour',
'minute' and 'second' digits start flashing.
If the Exercise Timer has been stopped for 50 seconds, the heart rate measurement will turn off
automatically.
NOTE: If heart rate is acquired again during the Exercise Timer is stopped, the Exercise Timer will count up
automatically from the last reading.
How to Reset the Exercise Timer
Hold the [R] button for about 2 seconds to reset the time to zero when the timer is stopped counting.
Page 16

9.7.1 Heart Rate Mode - Setting the Heart Rate Alert Zone
etting Principles
he Heart Rate Alert Zone can be set by one of the following principles:
f Estimated Maximum Heart Rate.
escribed in chapter 5.1, or
estimated maximum heart rate
ow to Set the Heart Rate Alert Zone
o select the setting display, hold the [M] button in the Heart Rate or Exercise Timer Mode.
to select among
HR) or zone upper limit (HR or %EMHR) is flashing, press the [S] or [R]
setting is completed, hold the [M] button for 2 seconds to exit the setting display. The Watch will
0.0 Specifications
urrent Time Mode
ond
nd year
le
99
S
T
User's age.
Heart Rate.
Percentage o
User can set the Alert Zone by age in the setting d
User can set the zone deliberately by entering the heart rate or percentage of
by the following setting.
H
T
In setting display, press the [M] button to move the flashing following the adjacent diagram
different settings [ON or OFF the alert zone function, setting principle, zone lower limit (HR or %EMHR) and
zone upper limit (HR or %EMHR)].
When zone lower limit (HR or %EM
button to change the set value (hold down the button for about 2 seconds to change the set value at a higher
speed).
When the
also exit the setting display if NO key-stoke has been activated for 1 minute.
1
C
Hour, minute and sec
Month, day, day of week a
12 / 24 hour format selectable
Month-day/Day-month selectab
Auto calendar from year 2000 to 20
Birthday range from year 1900 to 2099
Page 17

Automatic age calculation from birthday for estimated maximum heart rate calculation
40 to 240 bpm
6 / 165 bpm for lower/higher limit respectively
alar
econds
cond
9 minutes, 59.99 seconds
9 minutes, 59 seconds
nds and beep for 10 seconds when count to zero
rs, 59 minutes, 59 seconds
luminescent backlight
1.0 Potential Causes for: NO Heart Rate Reading or Long Response Time
) Cause: Dry Skin.
nductive gel or saliva thoroughly to chest area. (Even water will help if conductive
t Strap are not placed firmly over the chest.
e Watch is placed securely on wrist.
nt. This will
ctive gel to chest area.
Hourly Chime on the hours
Key tone ON/OFF
Heart Rate Mode
Measuring range:
Default Heart Rate Zone Value: 12
Default Heart Rate % in Zone Value: 65% / 85% for lower/higher limit respectively
Daily Alarm Mode
Daily Alarm: 1 daily m
Alarm Duration: about 30 s
Chronograph Mode
Resolution: 1/100 se
Counting range: 99 hours, 5
Countdown Timer Mode
Resolution: 1 second
Setting limit: 99 hours, 5
Timer sound: beep every 1 second at last 5 seco
Heart Rate Exercise Timer
Resolution: 1 second
Counting range: 9 hou
Others
Electro-
1
1
Solution: Apply co
gel is not available).
2) Cause: Ches
Solution: Make sure the Chest Strap is firmly over the chest and th
3) Cause: Muscle tremors caused by holding the Chest Strap too hard on your chest.
Solution: The contacts must make firm contact with the user's skin during measureme
ensure good and consistent readings even while walking or jogging with arms swung naturally.
4) Cause: Hairy chest.
Solution: Apply condu
Page 18

Page 19
2.0 Chest Strap Batteries
hest Strap Battery Low
your Chest Strap stops transmitting the heart rate signal to your watch (NO heart rate reading show on the
rvice agency only.
ow to Replace the Battery for the Chest Strap
owever, you can change the battery of the Chest Strap by the following instructions:
s from Dot to Arrow.
ry.
attery with the (-) side of the battery against the metal contact.
ttery
7. over back with the arrow on the cover points to Arrow, and then press the cover
8. n the cover turns from Arrow to Dot.
1
C
If
Watch), it might be due to the battery of the Chest Strap running out.
We recommend that you have the battery replaced by an authorized se
H
H
1. Turn the cover with a coin counterclockwise so that the arrow on the cover turn
2. Turn the cover further gently to pops it out.
3. Put aside the battery cover.
4. Remove the exhausted batte
4. Replace the battery with a new b
6. Important: Make sure that the sealing rubber o-ring is placed correctly in its slot before the ba
cover is closed.
Put the battery c
down gently until it is on the same level with the surface.
Turn the cover with the coin clockwise so that the arrow o