Eborn G-01 User manual
EBORN TECH
HD GPS DVR G-01
Owner’
s Manual

2 / 20
Thank you for purchasing the EBORN GPS
Da
sh
Cam
!
We
are
always
here
to
help ,please
do
not
hesitate
to
let
us
know if
any
questions or concerns you may have! Your 100% satisfaction is our priority!
You can download firmware/user manual, view set up videos at our website! www.Eborn.net.cn
Customer Service : [email protected]
WARNING:
Please
note the
operating temperature
of the
camera is
-20
℃
to 65
℃
- 4F to
149F,
Failure to comply may lead to
malfunction
and unit failure. Do not
leave
the
camera powered on
while
mounted
on the
windshield under
direct sunlight in
a parked car.
Note:
If the camera is crash, please use a card pin to click the reset hole, it will reboot.
The GPS mode is build in bracket,if you plug the power cable with the usb port on
camera, it can also start recording,but GPS will not work.
WARRANTY POLICY:
12 month FREE replacement for the camera, 6 month FREE replacement for the parts.
The free replacement does not cover:
• Damage caused by accident or tampering firmware .
• Damage or scratches on the shell, lens, or LCD display.
• Memory card.

3 / 20
Table of Contents
About
EBORN G-01
Dashboard Camera ....................................................................................................................................................... 2
Setting Up for First Time Use
...................................................................................................................................................................... 2
EBORN Dash Cam G-01
Layout
..................................................................................................................................................................... 3
Main Interface Instruction
.......................................................................................................................................................................... 4
Recording mode
......................................................................................................................................................................................... 5
Preview mode.
............................................................................................................................................................................................. 5
Menu mode .........................................................................................................................................................................................................
6
Playback mode ............................................................................................................................................................................................. 9
Photo mode
............................................................................................................................................................................................... 10
Parking Monitor
. ........................................................................................................................................................................................ 11
WDR
.......................................................................................................................................................................................................... 12
Locked Video .......................................................................................................................................................................................................
12
LDWS
......................................................................................................................................................................................................... 13
Video Resolution ....................................................................................................................................................................................... 14
Metering Setting ......................................................................................................................................................................................... 14
Frequency .............................................................................................................................................................................................................
14
Date Stamp ...........................................................................................................................................................................................................
14
Time Zone ...........................................................................................................................................................................................................
14
Low Light Warning
.......................................................................................................................................................................................
15
Fatigue Warning ...
.........................................................................................................................................................................................
15
Safety Driving Distance Warning
................................................................................................................................................................. 15
Record Time / Loop Setting
............................................................................................................................................................................ 15
G-Sensor
....................................................................................................................................................................................................... 15
Firmware upgrade
......................................................................................................................................................................................... 16
Indicator Instruction
...................................................................................................................................................................................... 16
Connecting to PC ............................................................................................................................................................................................ 16
Install GPS Video Player .................................................................................................................................................................................. 16
2 / 20
About EBORN GPS Dashboard Camera G-01
The G-01 is designed to automatically turn ON when it receives power to the DC IN port. It
a
l
so
automatically shuts down and records for a few extra seconds using the internal battery when
the
power is shut off (to avoid any sudden power cuts and possibly corrupting data). Under default
sett
i
ngs
the camera always cycles or “loops” the memory card so you will always be recording and never run
out
of
space
.
Certain camera functions such as Motion Sensor and
G
---
sensor
should
remain
OFF under normal operating conditions. They are intended to be used
ONLY
when the vehicle is stationary and would interfere with normal
camera
operation while driving. Please only change the settings as
required!
If you have any questions, please contact
us!
Set Up Steps for First Time Use
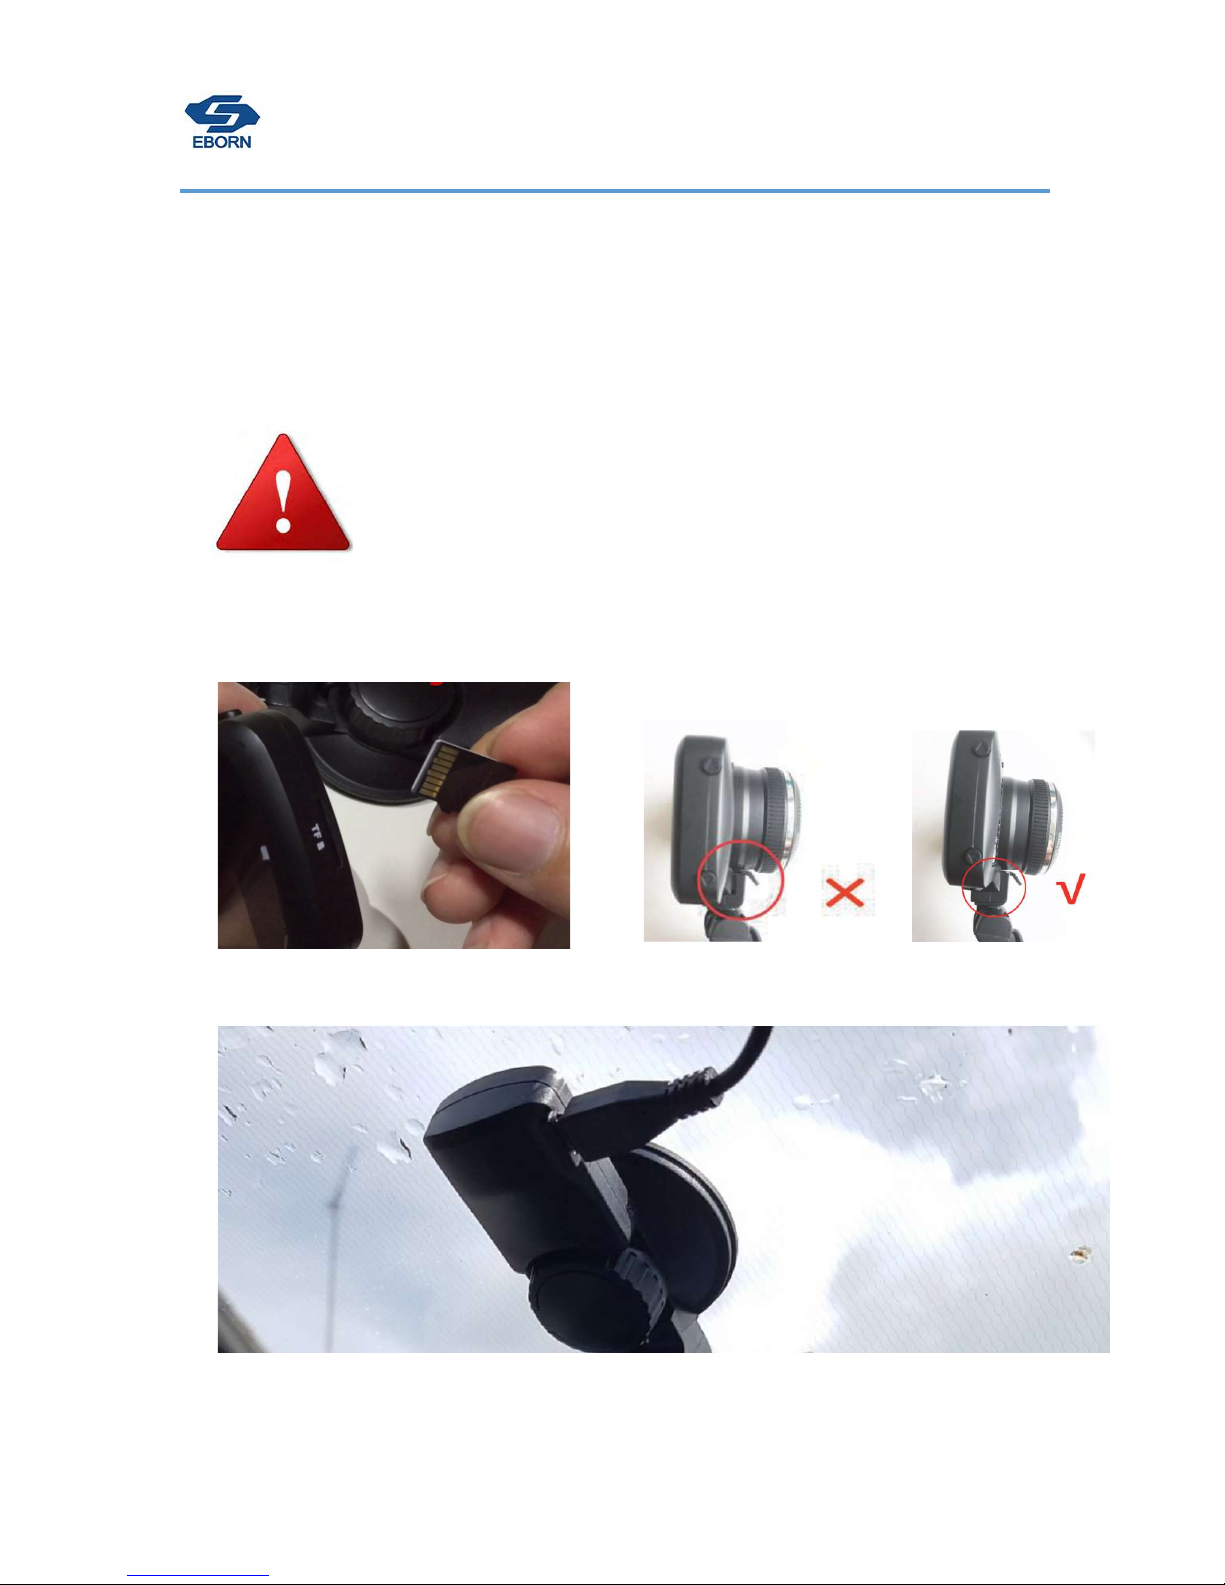
1. Insert memory Card into the card slot.
(If
you have trouble use a penny to push it
i
n
.
)
2. Mount the bracket with camera ,should without
any gap.
.
2.
Connect the power cord to the DC
IN
bracket power
socket
.

3 / 20
4. Connect the power cord into the
c
i
garette
lighter socket in your
car
.
5. Format the memory card,then set up the
correct Greenwich Mean Time (find setting
menu-Time Zone),the GPS will locate in 1~
3mins.
We have set up video steps on www.eborn.net.cn
EBORN G-01
Layout Structure
1. Power
2. MENU
3. UP button
4. Down button
5. MODE
6. Rec/OK
7. Holder
8. Display
9. Power port
10. TF card port
11. Camera
12. USB port
13. HDMI
14. MIC
15.Reset
16.Video light
4 / 20
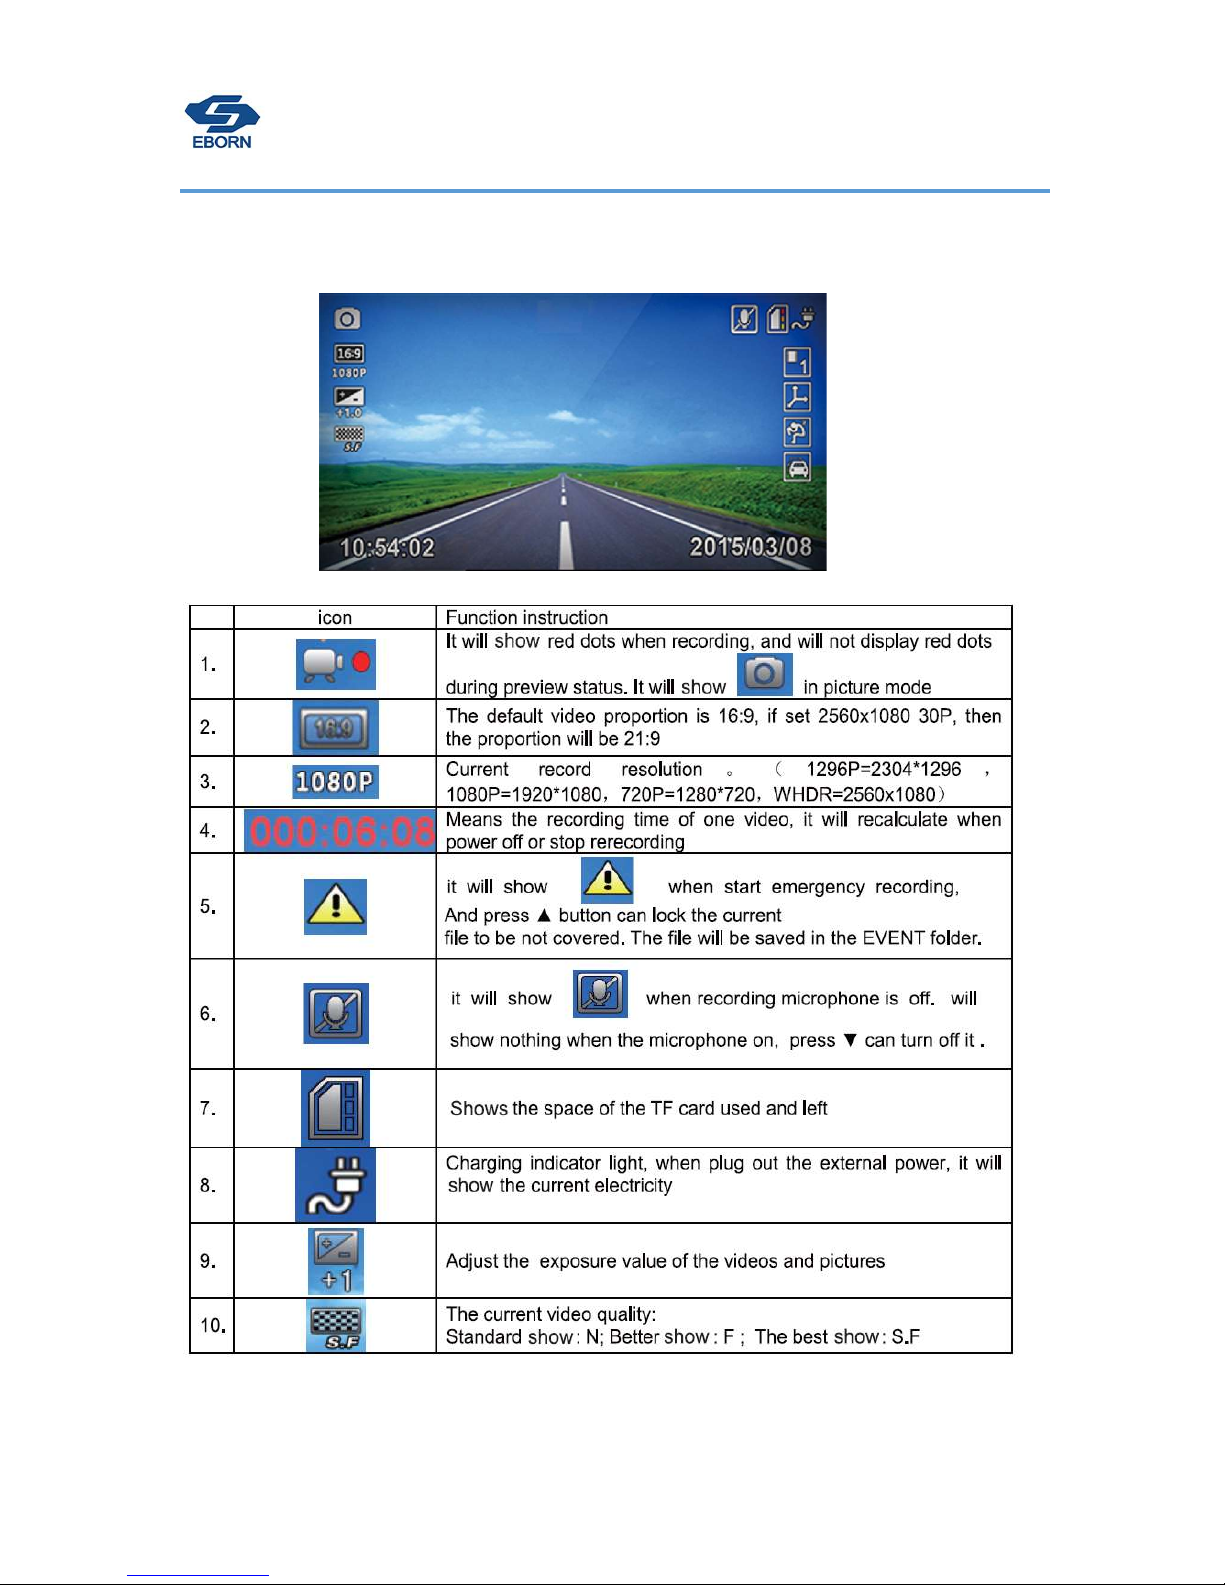
Main Interface Instruction:

5 / 20
Button functions:

6 / 20
Recording mode
The camera will check if there has a memory card when boot up.
When first time use it will ask you format the memory card, please choose YES and format it.
.A
fter formatting ,EBORN dash cam will start recording.
Button functions in recording mode:
Preview mode
Press OK button to stop recording and switch to preview mode.
Button functions in preview mode:

7 / 20
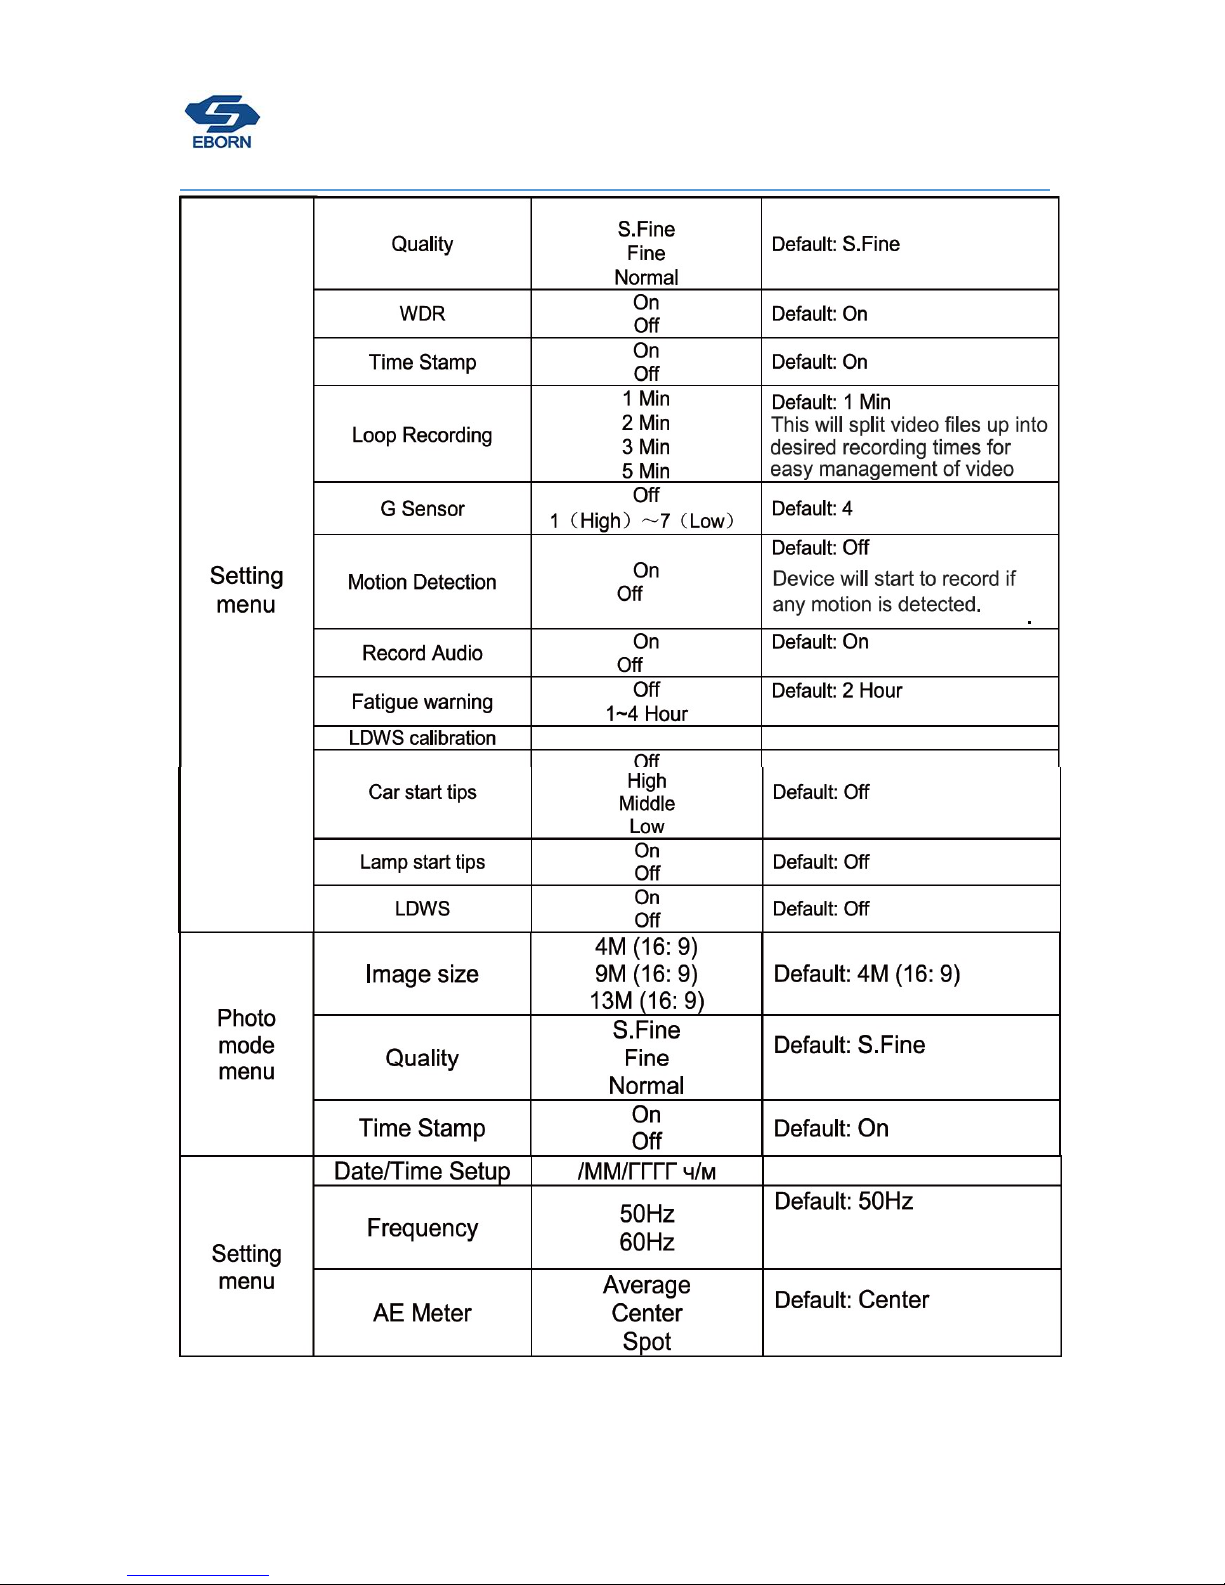
Menu mode
Press OK button to stop recording then press the menu button.
Button functions in menu mode:
Tips: If you press the menu button during preview mode,it will
direct you to the recording menu, and if you press it during photo mode,it will direct you to the photo menu.
8 / 20

9 / 20
Playback mode
Long press M button at preview mode, it will direct you to playback mode, you can see a video list:
.

10 / 20
Choose a file to play, you can use the button to delete or move to another file:
Photo mode
Short Press M button at preview mode:

11 / 20
Parking Monitor
Please mount the hardwire kit first before using the parking mode,
Using a hardwire kit requires some
basic technical skills. Depending on your vehicle, you can route the wires to the back of your cigarette
lighter or fuse panel. If wiring to a fuse panel, please use a multi--meter or a test light to find a fuse
that is ON when vehicle is in Accessory/Ignition and is off when vehicle is off.
After you install the car hardwire successfully, then car charger will always have power supply even
engine is off, please use parking mode as below steps:
1.Stop recording, press MENU ---- enter the menu, select "start parking monitoring", will appear a
dialog box and then select "
Yes ", it will automatically enter the parking monitoring mode after 9 seconds countdown, and the
icon of parking will be displayed at the top, 5 seconds after the screen will turns off. You can also
enter the parking monitoring mode during recording or preview by long press MENU button..
12 / 20
2.find "way of monitor", choose the monitor way
way of monitor Description
time lapse
Can be set to 1 second / frame, 2 seconds / frame, 5 seconds / frame, 30
seconds / frame. The default is 1 second per frame. When choose time lapse,
it will continue recording, the playback speed is 30 frames per second.
Park G-sensor
when the camera sensor any vibration it will start recording, and stop
recording after 20sec if the vibration stop.you can set the sensitivity from level
1 to level 7.
Motion detect when camera lens sensor any moving object it will start recording ,and stop
recording after 20sec.
The screen will sleep in parking mode, you can press any key to awake the screen, if no continue operate in 5
seconds, screen will sleep again.
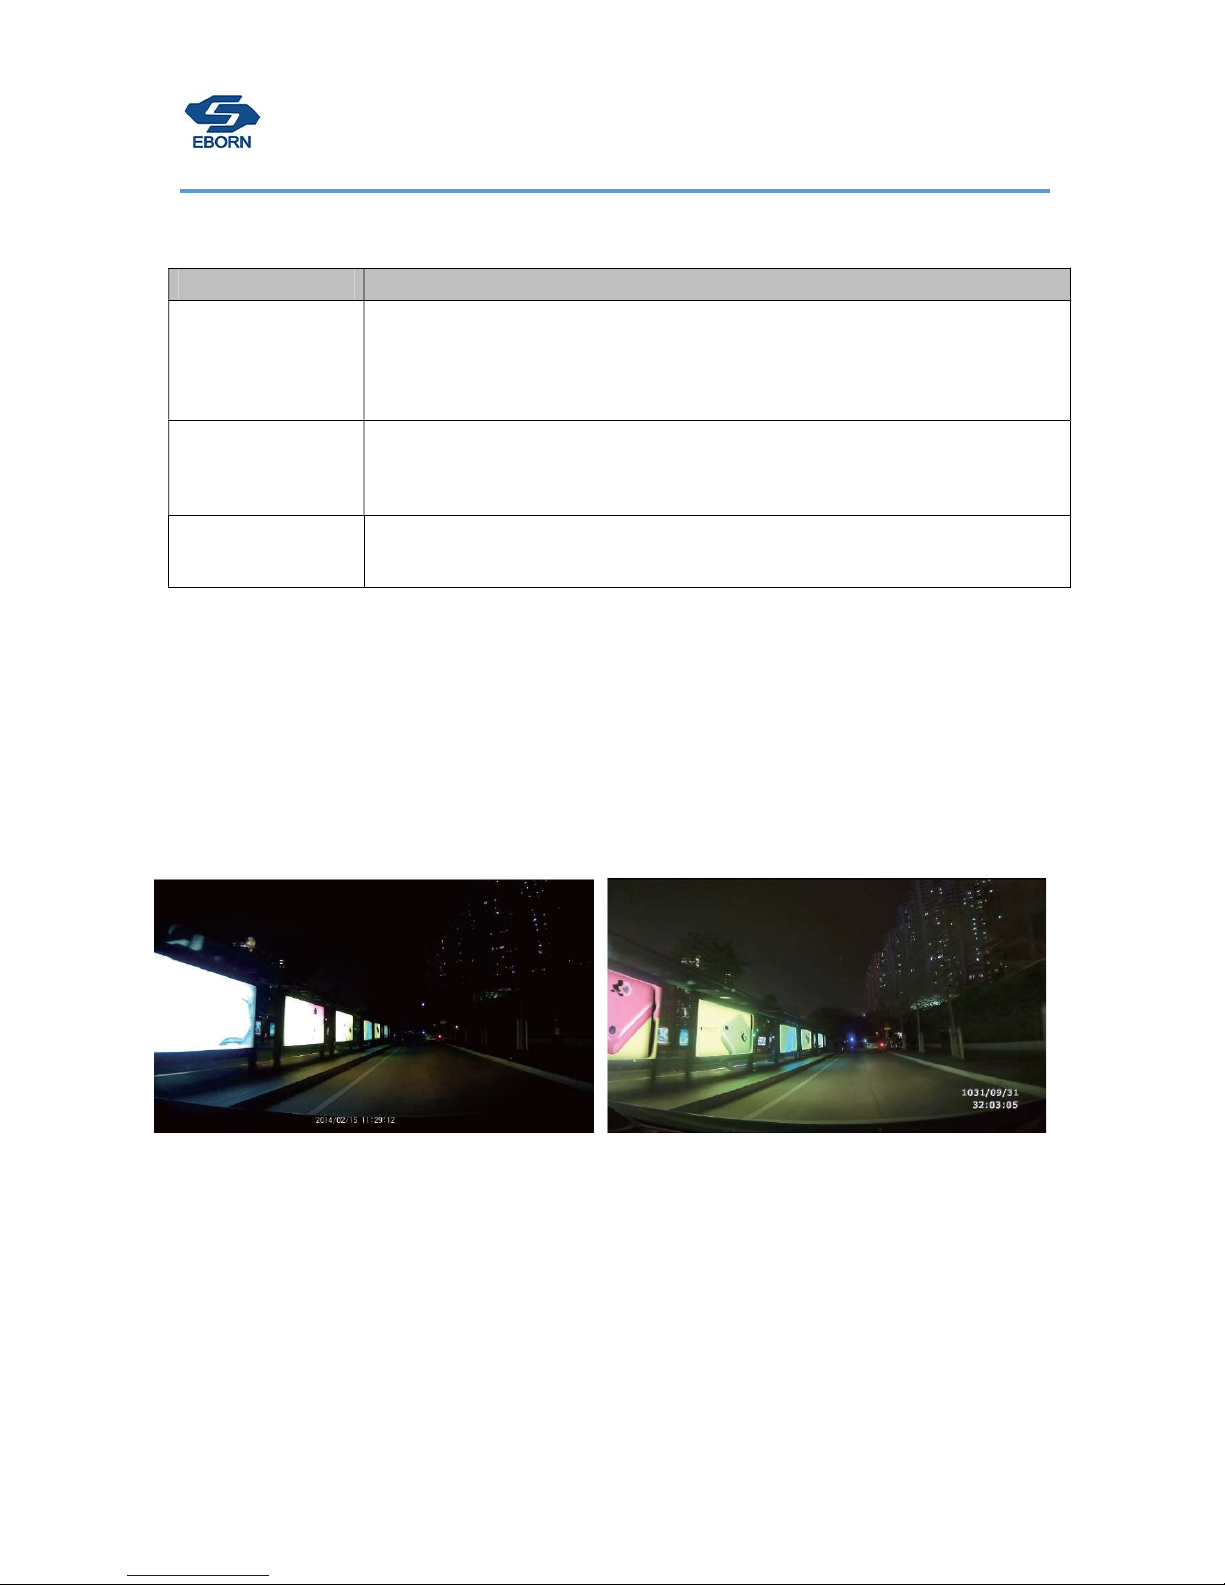
WDR
Video processed by WDR (wide dynamic range) will be clear even recorded in a strong contrast of light and
shade environment. The image will not be overexposed or dark.
Without WDR with WDR
Locked video
Locked videos will be saved in EVENT file.A maximum of 50 videos can be locked.If you continue to lock
videos,new locked videos will overwrite the oldest one. ( when G-sensor’s sensitivity too high, it will lock many
video even by slightly shake,we suggest set it with level 4 or 5.)
13 / 20
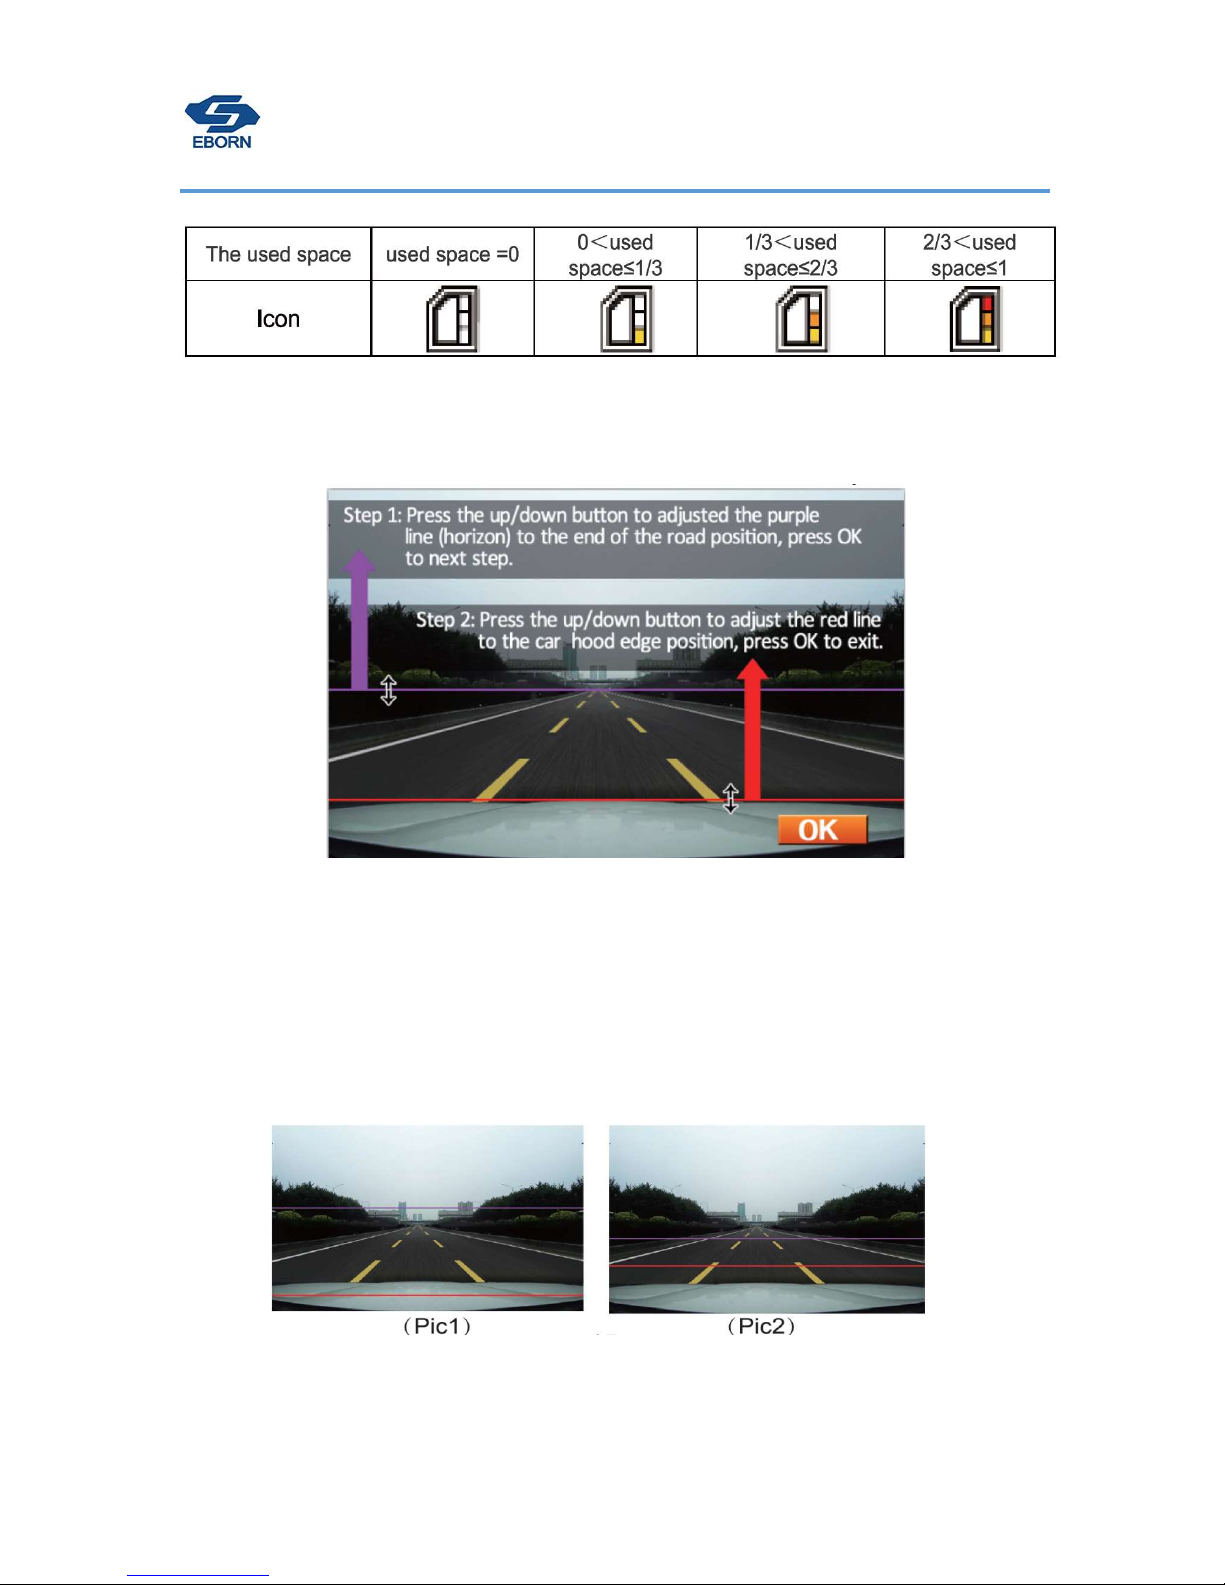
SD card space status
LDWS (Lane Departure Warning System)
start “LDWS calibration” at menu:
press OK button to start
First step: Press “Up” and “Down” button to adjust purple line to end of road(horizontal).
Second step: press “Up” and “Down” button to adjust red line to the edge of engine cover(liking picture),after
adjusting,press OK to exit LDWS calibration.
Remark:
you need adjust the purple and red lines according to requirement, if the distance between purple line and red
line is too big ( pic 1), it will make more failing alarm.And if the distance is too closer (pic 2), it will not work.
14 / 20
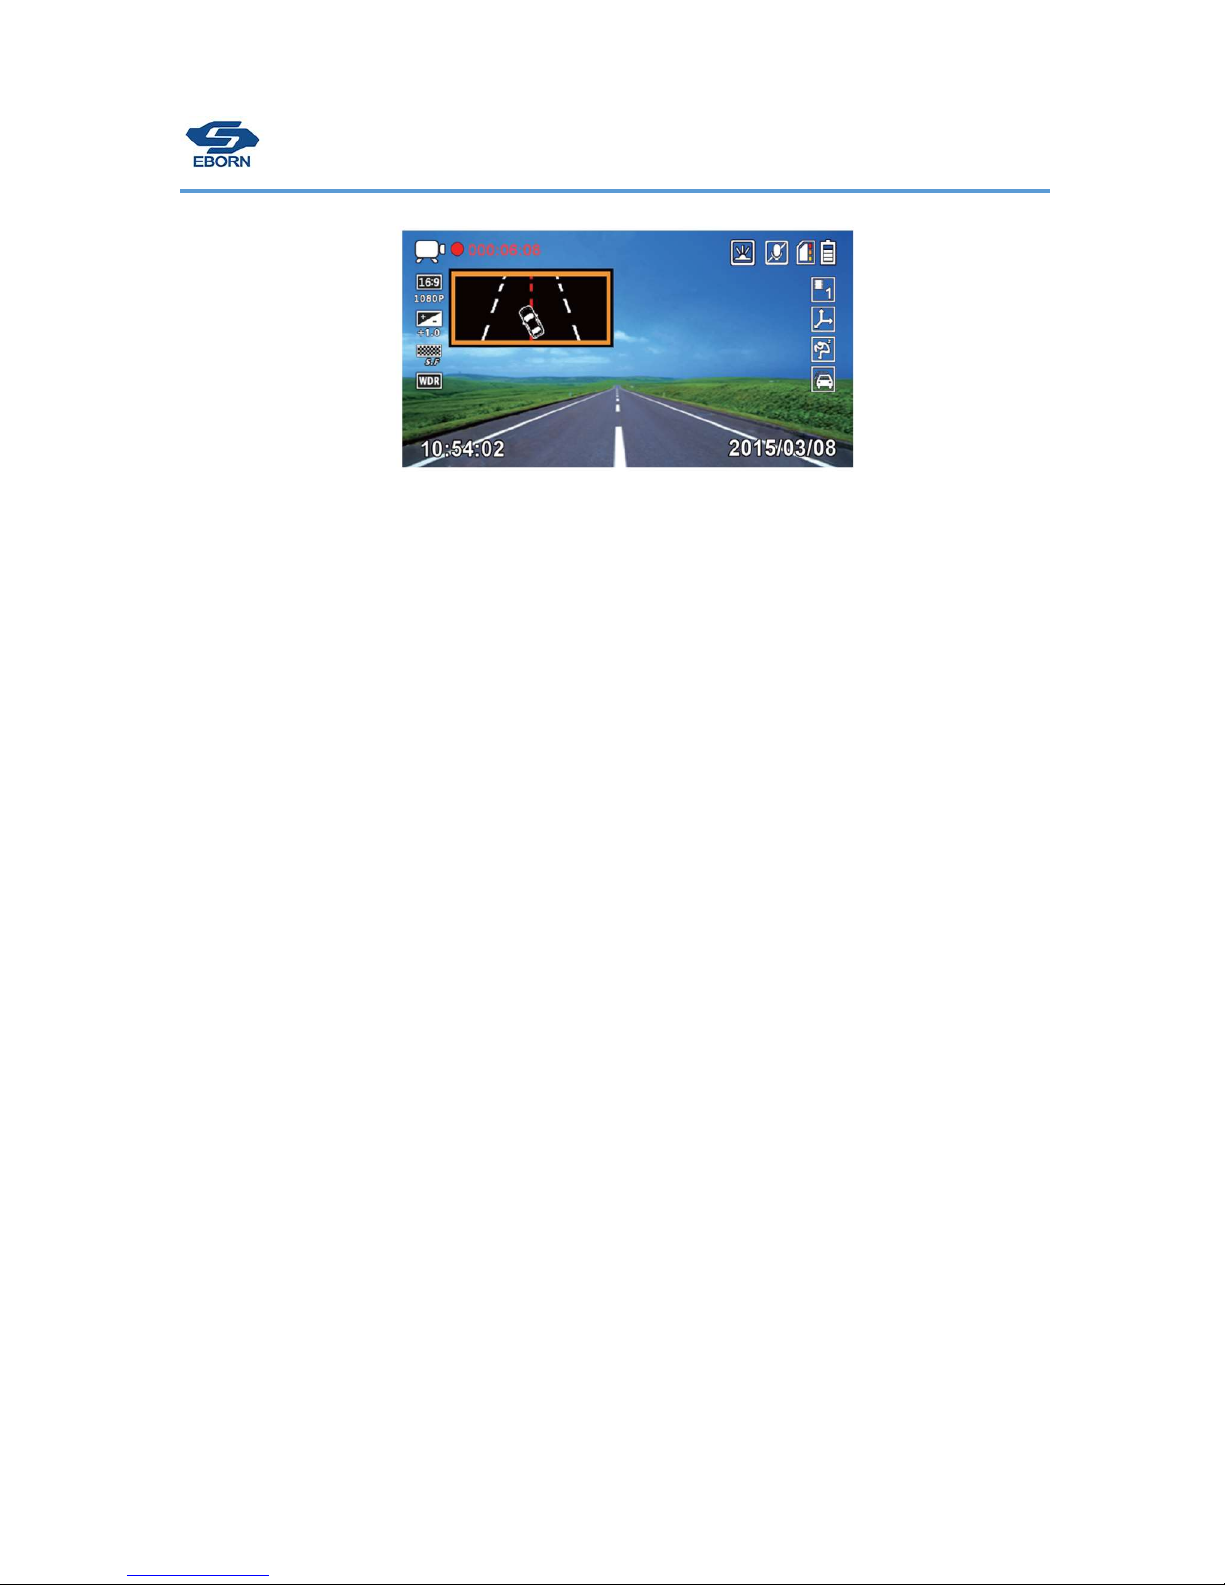
When car deviate the road,the camera will beep warning and shows below:
Resolution
Video resolution can be selected up to 2304 x 1296P. Higher resolution produces
a
higher
quality image. The higher the resolution, the higher the file
s
i
ze.
A standard 32GB microSD card will hold approximately 8 hours at the highest
resolut
i
on
mode
ava
il
ab
l
e
.
[Video
Reso
l
ut
i
on]
[2560x1080 30P 21:9] / [2304 x 1296 30P] / [HDR 1920 x 1080 30P] / [1920
x
1080 30P] / [1280 x 720 60P] /
[1280 x 720
30P]
Metering Mode Setting.
Metering Mode refers to the way in which camera determines the
exposure
.
Frequency
Light Frequency (anti
f
li
cker
i
ng)
[Auto] / [60Hz] – USA Standard / [50Hz] – European
Standard
Date Stamp
You can select to have the Date & Time “stamped” into the
v
i
deo
.
Current speed is stamped in [ON] mode when optional GPS Module is
present
.
Time Zone
Press OK button to enter time zone setting, use the “up” “down” button to set the correct GMT, then
GPS will get the real time automatically. Please “Time Zone” is different from “Date/Time set up”, the
date time set up is working for non-GPS device or when you don’t want use GPS feather for EB-G01.

15 / 20
Low Light Warning System (Lamp Start Tips)
Under
l
ow
---
light
conditions the camera will remind you to turn on your
headl
i
ghts
.
Fatigue Warning System
The camera dev
i
ce w
ill
d
i
sp
l
ay a warn
i
ng p
i
cture and warn
i
ng tone when you have been
cont
i
nuously dr
i
v
i
ng for more than safety driving time you set
.
Car Start tips ( Safety Driving Distance Warning)
Including the front car start reminder and saftety driving distance warning two features.
1.
Car start tips
: when you are waiting for the green light, the car in front of you has already gone
but you don’t move yet, it will remind you.
2.
Safety driving distance warning
: when your car is too close with another one it will warn you.
Record Time / Loop Setting
Us
i
ng
the
Record
T
i
me
funct
i
on
you
can
have
the
camera
sp
li
t
the
v
i
deo f
il
es
i
nto either 1,2, 3 or
5
minute
f
il
es
.
The
record
i
ng
i
s
cont
i
nuous,
but
the
f
il
es
are
sp
li
t
i
nto
sma
ll
er
chunks
so
they are eas
i
er to
work w
i
th
.
G
---
Sensor
(Gravity Sensor) (Set to OFF under normal operation)
The
G
---
Sensor
is used when the vehicle is stationary or under special application options.
When
there is a
collision or a sudden change in XYZ axis, the
G
---
Sensor
determines the direction of
the
collision and
16 / 20
records the event. It creates a separate EVENT folder and stores the files
there
.
These files are saved
and are not overwritten when the camera files
l
oop
.
Adjust the sensitivity parameter of the sensor so that the camera does not automatically lock
a
ll
the
recorded
v
i
deos
.
Firmware upgrade
Please download the newest firmware from www.eborn.net.cn to get the newest function for fix bug.
Tips: You can check the current firmware in “version” from setting menu.
Indicator Instruction
When boot up, it will comes blue light first, it means "successfully connect with power",
then it will countdown 3 seconds then blinking red, means "recording".
Connecting to
PC
Plug the USB cable to the micro USB port on the side of dash cam, the screen will shows “mass storage”
and your computer will recognize a u-disk. You can check file from “EVENT” or “NORMAL” folder.
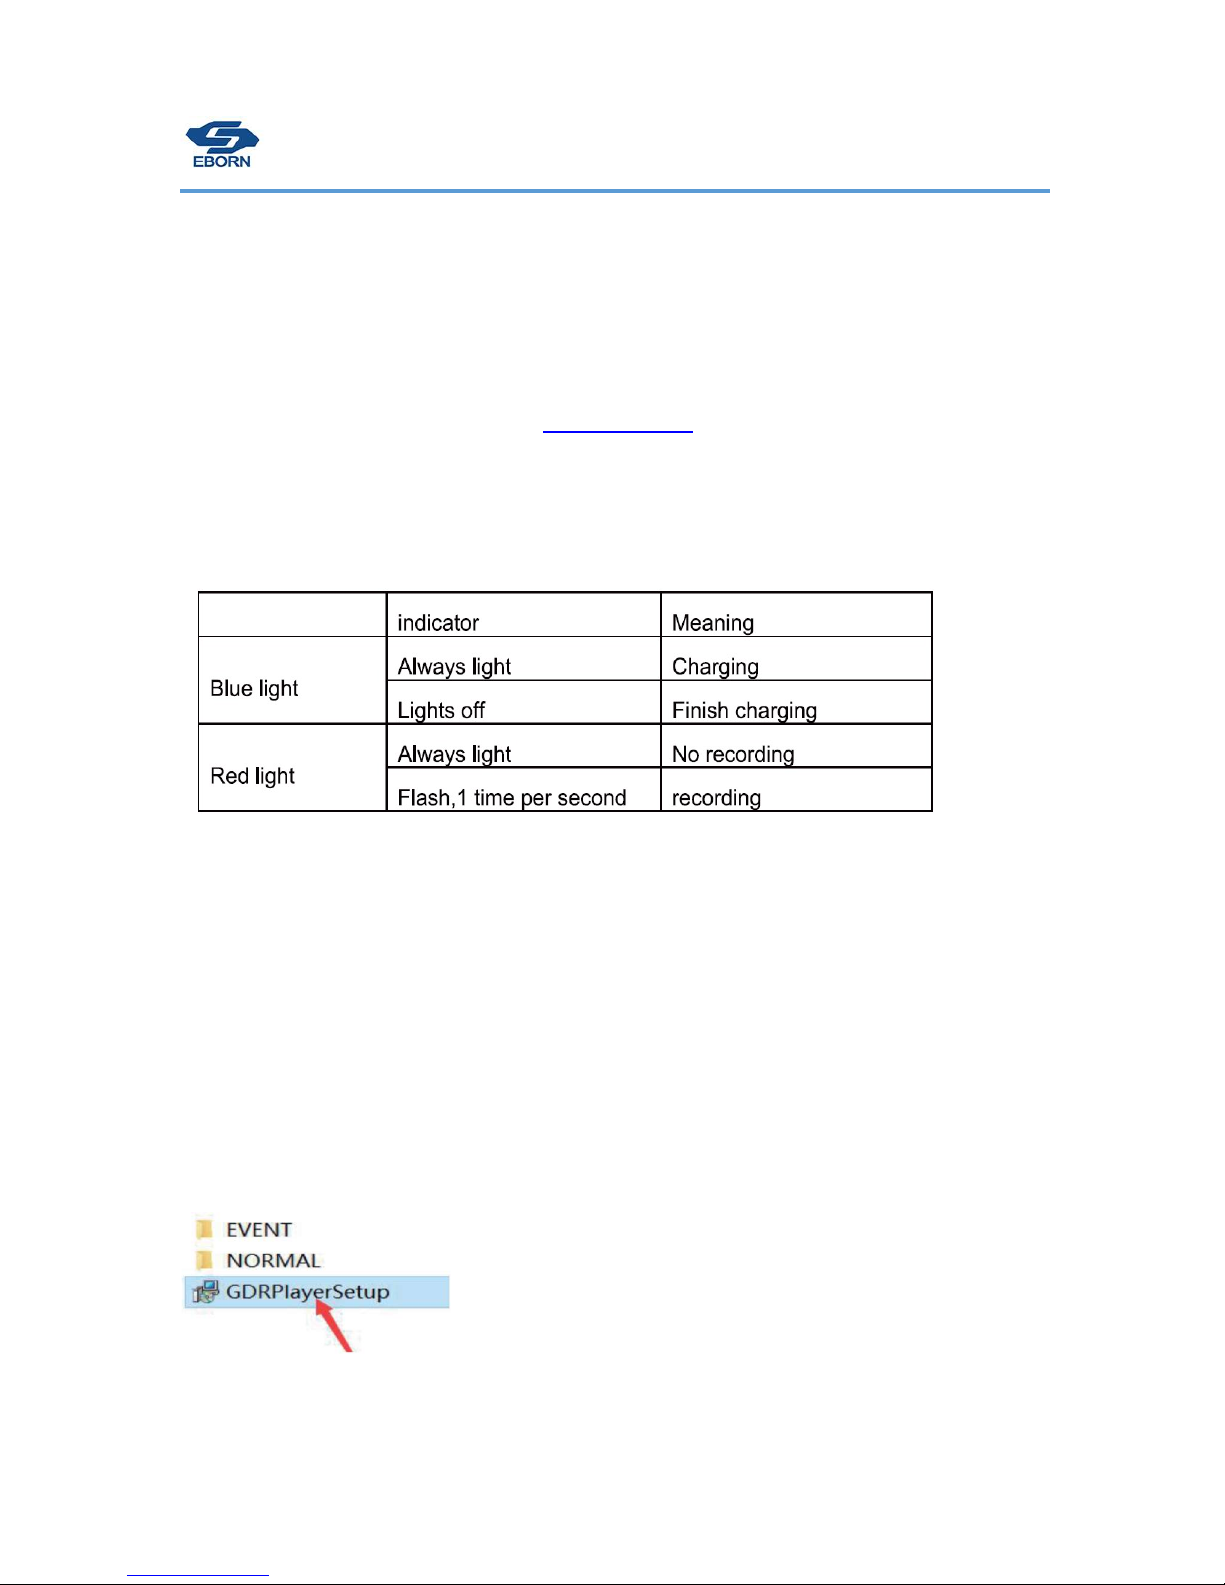
Install GPS Video Player
Find the exe file named “GDRPlayerSetup” in memory card then install it (please use a windows computer).
If the install file was damaged, please format the memory card in camera again, it will create a new exe file.

17 / 20
We have install steps video sample on www.eborn.net.cn
After installation, click on the top of left, choose the language/map/speed you want.
The setting will be saved in your computer when the first time you set ,there is no need to set every-time,
unless you change another computer.
If the G-sensor picks up a high amount of lateral G in any direction, the camera will automatically lock the
video files associated with this moment. Data is stored as locked in EVENT file.
If you have problem in using the software, please contact tech@eborn.net.cn

18 / 20
EBORN Electronic Technology Inc
WWW.EBORN.NET.CN
Other manuals for G-01
1
This manual suits for next models
1
Table of contents
Other Eborn Dashcam manuals


